Nowadays, it is difficult to find an apartment without plastic windows. Yes, plastic windows have firmly entered our life, but their installation includes not only the correct installation directly, but also the treatment of slopes. For those who don't know, the slopes are the part between the wall and the window itself.
They are of two types:
1. Internal, which are located inside;
2. External, which are located on the outside of the window.
Why do you need to do them, because the distance between the window and the wall is completely foamed, for beauty or what? The fact that they need to be done for beauty is a correct assumption, but not the main reason.
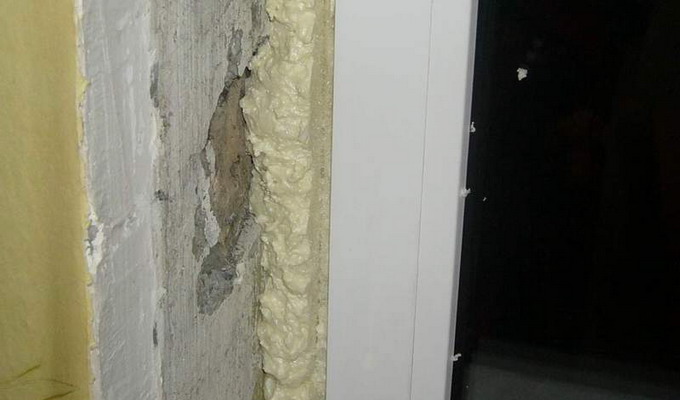
- Firstly, the foam absorbs moisture and, accordingly, swells, thereby it can deform, in addition, when temperature drops, the foam begins to collapse. They can prevent all this.
- In addition, they are useful in that they provide non-penetration, and also do not start the cold and do not let heat through, and they reliably hide the traces of the installation of plastic windows. Hopefully you now understand how important they are in your installation.
Plaster slopes
It will take a long time to make the slopes, while they will not have the necessary properties, that is, they will not protect against noise and cold. In addition, any structure tends to settle over time, and this can lead to the fact that they can move away from the wall. They also lose their properties under the influence of the sun and with temperature changes.
They are made in several layers, while each layer must be given time to completely dry out, after which they need further refinement, because they will need to be primed, putty and painted.
The slopes of their drywall
They can also be made from drywall. It's over the best optionthan plastering.
Why are they better?
- First, they will last longer.
- Secondly, if you insulate them, then the apartment will be warm.
Minuses
But with all these pluses, there is a big minus.
This disadvantage is that it is exposed to moisture. That is, it is destroyed under this influence. Therefore, your room should always be dry and with a low level of humidity. In terms of installation, the plasterboard slopes do not go far from the plaster ones. Not only do you need to be able to install them exactly, they will also need to be primed, putty and painted.
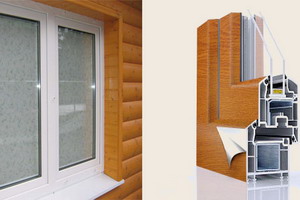
Plastic slopes
But now the time has come for plastic. They are fairly easy to install, although they require some skill. But this is not difficult to learn.
Plastic slopes will not take much time during installation. They will last you much longer than plaster or drywall, while they are not affected by moisture, sun and temperature changes. And what can I say, they will also look better with plastic windows. Can be used to provide additional thermal insulation. It will also prevent. Now you understand why we advise you to install plastic.
What we need to install
Let's start our lessons by giving you a list of the tools and things you need. First, you will need to purchase plastic 8 mm thick, 6 meters long; U-shaped plastic, it is also called the starting strip; And finally, F-shaped plastic.
If you do not have, then buy or ask friends for a drill or hammer drill, metal scissors and a knife. You can also buy mineral wool along the way.

Well, the last thing you need for installation is 9.5 centimeters self-tapping screws, about 15 pieces, bugs, the so-called small self-tapping screws No. 4.5, and silicone, but it should not be transparent, but white.
Installation process
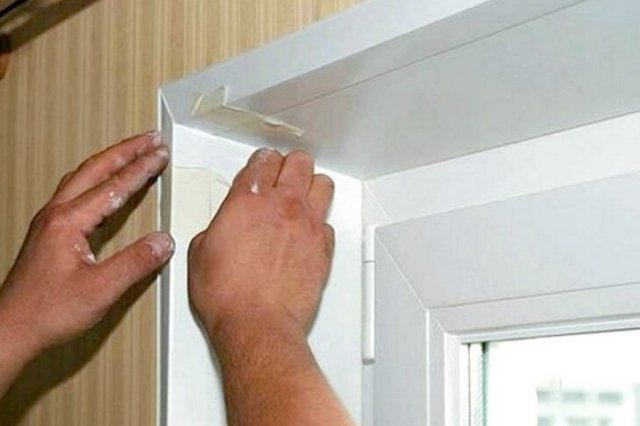
Before proceeding directly to the installation, I would like to remind you that until you finish everything assembly work, it is not necessary to remove the protective film from plastic windows, as you can scratch them if you carelessly.
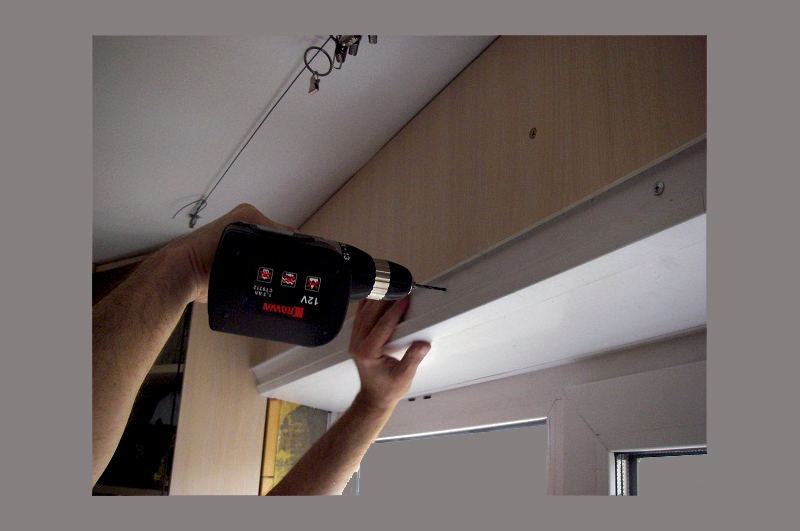
In order for there to be plastic to which to attach, it is necessary over the entire surface, where we will attach wooden slats to the wall. They should be fastened with self-tapping screws 9.5 centimeters. Here you will need a punch to drill holes in the wall so that there is something to attach the slats to. In this case, the slats must be installed evenly so that the plastic holds more rigidly. You can align the slats using bars, placing them between the rail and the wall. And in order to find out whether the rake is exactly worth it or not, the level will help you. See the pictures below.
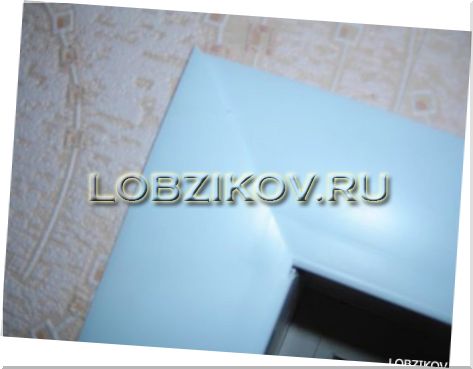
1. Left slope.
2.Upper slope.
3. How to level with bars. 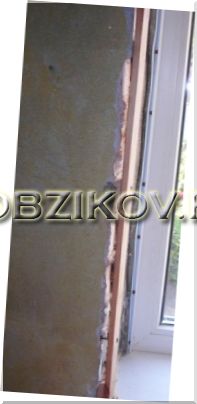
4. How to check the level of the evenness of the rail. ![]()
This completes the first part of the work, and you can see the result in the picture below. 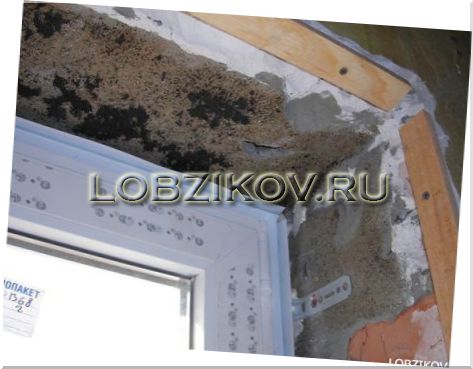

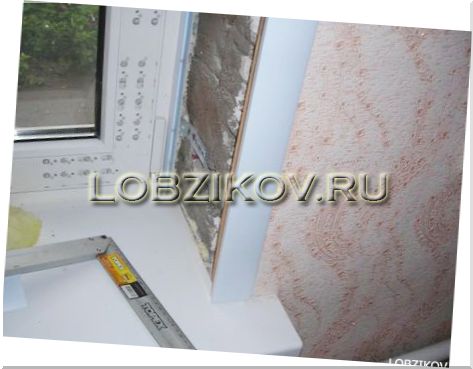
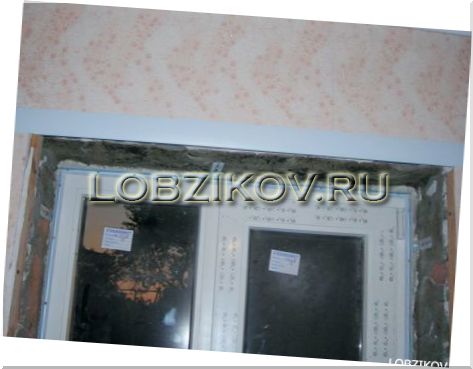
Now it's time for the starting strip. It must be attached to the slats. First, using a spirit level, draw a vertical on the side rails, and a horizontal on the top rail. Using these marks, you attach the starter strip using self-tapping bedbugs. At the same time, make sure that the starting strip is tightly pressed against the slats. Unlike rails, you should pay more attention to the joints of the starting strips. (see fig)
![]()
Now look at what you should get after setting up the starting strips. 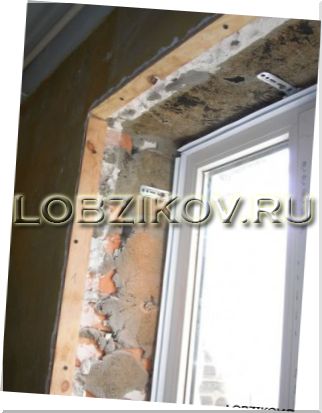
If you are already tired of fiddling with slopes, you can temporarily distract yourself from them by tearing off the protective film from the windows, and also in passing and wallpaper the room. We all say this, because in the further stages of installing plastic, you will no longer litter much.
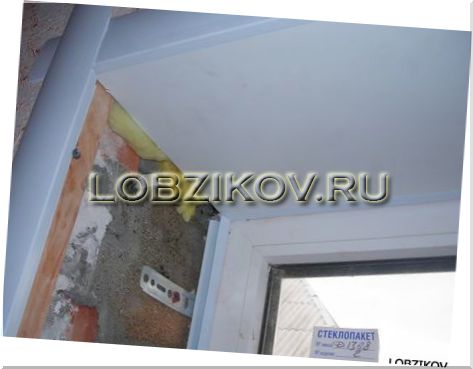
Now the turn of the F-shaped plastic has come. Measure exactly the height of the slope, and cut the same size of the F-profile. The remaining piece of the profile must be cut as follows. (see fig)
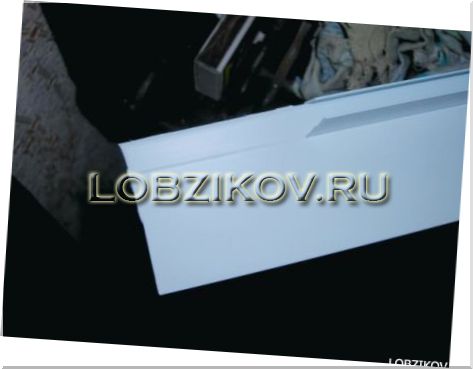
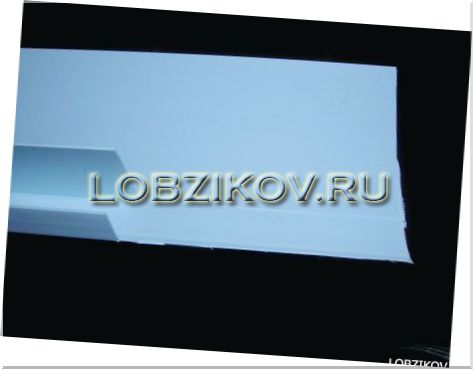
After that, the F-shaped profile should be stuffed so that in the end you get such an overlap. (see fig)

Looking at the picture above, we can conclude that when cutting the F-shaped profile, you need to leave the start, and the resulting overlap can be removed using metal scissors. (see fig)
How do you attach the F-profile? To do this, you need a steeler with brackets, and the profile should be attached to the rail. (see fig)

We do all this for a reason, because thanks to this you do not need to glue wallpaper around the window, since the profile hides all the flaws.
And now the climax comes, we begin to fix the plastic itself, but do not forget about the insulation. Take the plastic and place it with one end in the starting strip, which is located on the far edge of the slope. After that, insert cotton wool inside, and attach the plastic to the F-shaped profile. (see fig)
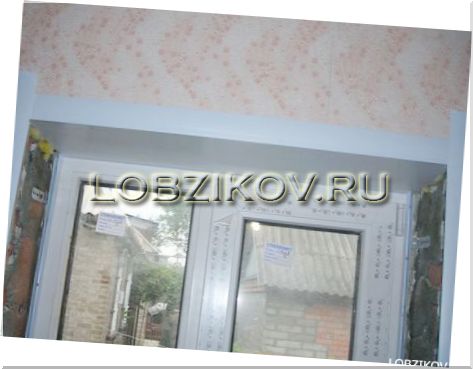

You can get it like this (especially if you do plastic slopes in the first) that the plastic will not dock so well with each other. It doesn't matter, because white silicone will come to your aid, which needs to wipe out all the errors.
Foreword
Slopes are the surface of the walls that are near the windows. Correctly executed, the slopes give an already completed look to the entire opening
Required tools and materials
RollerPrimerPencilBrushGlueCuvetteJigsawA hammerPolyurethane foamPuncherRouletteSelf-tapping screwsGonLevelInsulation
Content
After the installation of plastic windows, the next stage in order to conclude work on the window opening is finishing the slopes of plastic windows. Slopes are the surface of the walls that are near the windows. Done correctly, the slopes give an already completed look to the entire opening.
In the provided material, we will tell you how to make the slopes of plastic windows with your own hands, starting from general practice.
How to make slopes on windows?
Accordingly, there are slopes on the inside and on the outside. In addition to how to make slopes on windows is necessary from an aesthetic point of view, their implementation is necessary for reasons of thermal insulation, sound insulation and resistance to moisture. Among other things, in the process of glazing, window installers fill the empty cavities of the window and door plastic frames with construction foam. If the polyurethane foam remains unprotected from the external environment, then it will pick up moisture, and under the influence of external factors, it will elementarily collapse, thus losing its qualities. Thus, the installation of slopes is also necessary for the durability of the assembly of windows.
Despite the fact that the construction of slopes is a rather responsible process, they can be done independently, without resorting to the help of masters. Next, consider the plaster, plastic and plasterboard methods for finishing window slopes.
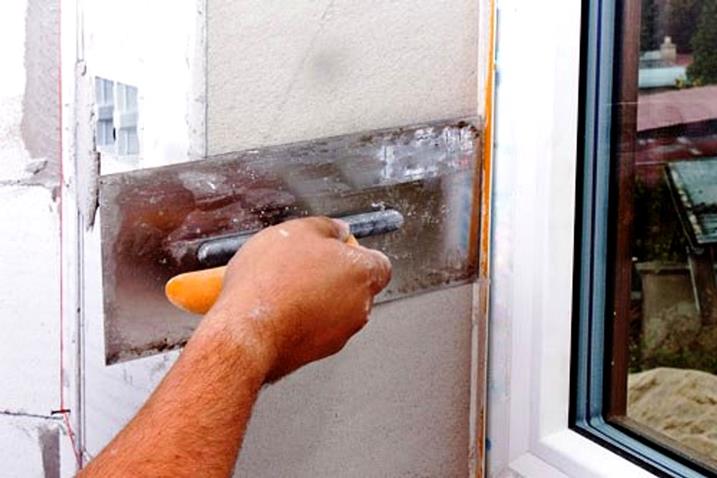
How to plaster window slopes?
Despite the fact that this method, in comparison with others, is rather troublesome and requires elementary skills, finishing the slopes with mortar is the most desirable, from the point of view of insulating properties from the external and internal environment.
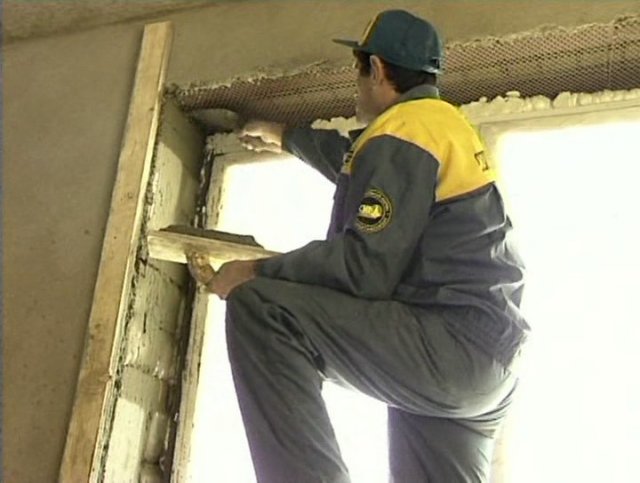
How to plaster window slopes? First of all, you should prepare the surface of the slopes. To do this, first of all, you should cut off the excess foam protruding from the slots of the openings, and prepare the surface for work. Cut off the foam with a knife with replaceable blades, carefully along the edges of the adjacent window frames. Next, we prepare the surface for plastering. We go with a spatula along the surface of the slopes, removing easily peeling particles. We need a plumb line and planks for even application of the solution. We fasten the strips along the edge of the slope, having previously aligned on a plumb line.
For the interior, we also need to install beacons. The most suitable material for this we will serve a metal profile. To do this, apply a gypsum plaster solution every 20-25 cm. After that, we will attach the metal profile to the applied solution and fix it with a plumb line, after which we will let our lighthouse dry for several hours.
Finishing window slopes in the video:
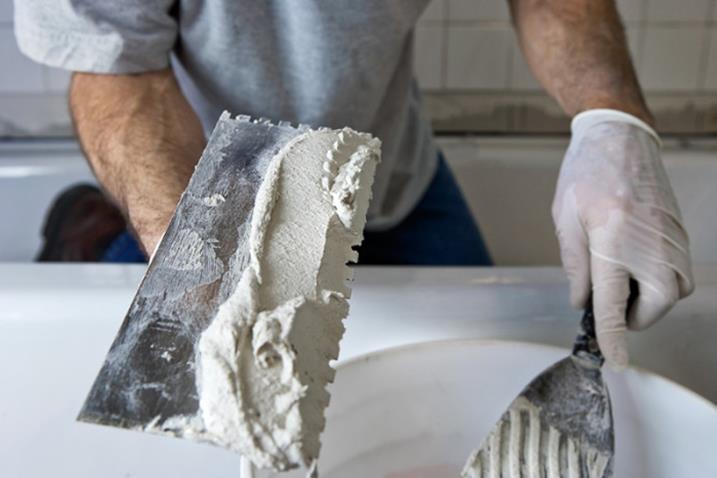
After the slats are installed, we begin to prepare the solution. To do this, we take river sand, sift it through a mesh, separating it from unnecessary particles. It is advisable to use cement for plaster of 300 brands. It should also be borne in mind that with a thick layer, only river sand and cement in the solution will crack. Therefore, if the applied layer is on the slope in places of more than 2-3 cm, a little building gypsum plaster should be added to the solution and a little washing powder for greater elasticity. You can also use glue-cement for this purpose, which will provide reliable adhesion without cracking. If the layer is not very large, then you can use whole gypsum or other plaster, although, according to experts, for greater moisture resistance, it is still desirable to apply a cement base with the first layer.
Finishing window slopes in the video:
Consider for our case a cement mortar. We knead the cement at the rate of one part of cement and three parts of sand. So, we have the planks installed, the solution is prepared, now we begin to apply the solution to the surface. Apply the solution in small portions with a spatula, covering the entire surface as much as possible. Let the solution harden for some time and go over the surface with a plaster float, sliding in circular movements, guided by our beacons, and thus removing the excess part of the solution. Similarly, we do the same procedures with the rest of the vertical slopes. Also, do not ignore the places under the windowsills, gently apply the plaster solution to them. The thickness of the plaster layer should be at least 3-5 mm from the polyurethane foam in order to exclude the effect of moisture on it. Now for the ceiling slopes. Everything is the same here, only in this case we use the level to establish our lighthouses.
Plastering window slopes in the video:
We also install the bar along the edge of the plumb line and from its inside. Gypsum should be used as a solution for lighthouses, spreading it slightly with plaster. It is advisable to use glue-cement, which is used in tiling, as a solution for the ceiling plumb line, in order to avoid the attached solution falling off. We also apply the solution with a spatula, let it dry slightly and rub it with a grater in a circular motion, sliding along the beacons. Most of the profiles are covered with a layer of nickel, so there is no need to worry about the appearance of rust stains on the wall. After the slope dries out, you should walk along it with a layer of gypsum plaster. Thus, our slope is already ready for painting.
All the same procedures should be done from the outside. Naturally, for the outside, a solution is needed on cement base, and the final layer should be applied from plaster for external cladding.
Installation of slopes of plastic windows
Slopes made of plastic have a rather attractive appearance. In terms of aesthetics, they are even similar to the plastic windows themselves, so when choosing them, pay attention to their homogeneity with the windows. Also, plastic slopes can be insulated, which gives good performance in terms of thermal insulation. They are not afraid of moisture, do not lose their color when exposed to direct sunlight, the possibility of their fading is excluded. Immediately it should be noted that the installation of the slopes of plastic windows made of plastic, as such, is more associated with accuracy than with laboriousness, since subsequently no layer of plaster or other putty is applied to the slopes, with the exception of plastic, but more on that later.
Compared to plaster slopes, plastic finishing of window slopes is much faster, literally, within a few hours, depending on our skills and theoretical knowledge.
Installation of slopes of plastic windows in the video:
How to make plastic window slopes with your own hands?
First of all, if we already decided to assemble the plastic window slopes with our own hands, we need to prepare the surface. We remove all unnecessary from the surface of the slopes with a spatula. After that, in order to avoid shedding, we prime the surface of the slopes. If desired, you can first plaster the slopes with rough plaster. For the installation of the lathing - wooden slats on the edges of the slope opposite from the windows, the edges should be as even as possible. To do this, we use a plumb line, and knock or scrape off irregularities on the surface. Especially you can not be zealous, the main thing is that there is no strong roll on the surface. Otherwise, everything can be adjusted.
After that, we proceed to the installation of the U-shaped starting profile on the base of the plastic windows along their entire perimeter. The starting profile is required to insert a plastic slope plate into it. It is advisable to start the installation of the starting profile from the upper part of the slope above the plastic frames, since it will be easier to fit the side profiles to it later.

The profiles are fastened with self-tapping screws - bugs 1.5–2 cm. We carefully measure the required profile length. We fasten the self-tapping screw to start at the edge. After that we level it with a level. In order to minimize the error, when leveling the profile with a level, a line should be drawn under it. To exclude deformations during sagging, which will inevitably give an error during alignment, the profile should be fixed with self-tapping screws sequentially, after the first fastener, at a distance of 35-45 cm from each other.
After we have installed the top profile, we proceed to laying the side profiles in the same way, using a plumb line or a double-sided level. As mentioned above, it is easier to fit the lateral plumb lines to the upper one. We cut off a piece of the required length from the upper end on the inside, forming a kind of groove, and insert it into the gap between the wall and the upper profile. After that, we align the vertical side profile with a plumb line and fasten with self-tapping screws. We do the same on the other side.
Now it's time to install the lathing. We fasten the slats along the edges of the slope openings. This is done in order to level the roughness of the wall, giving the structure an aesthetic look. The edges of the strips should not protrude beyond the plastered level of the walls. Otherwise, when applying a plastic F-shaped casing, it will be very difficult to achieve proper adherence to the wall. In any case, whether it is concrete or other surface, the slats should be fastened to the wall with self-tapping screws using dowels, "drowning" the heads of the screws in the rail so that they do not interfere with the subsequent installation of plastic plates. The slats, depending on the thickness, should be fixed at a distance of 60-80 cm. Avoid twisting the boots. Since this is not a massive material, excessive tension can cause cracks, and subsequently lead to breakage.
After the lathing is installed, we proceed to the installation of plastic slope plates. Show all your care and scrupulousness when measuring and cutting plastic slope tiles. The slightest error will lead to impressive gaps, which will be extremely difficult to cover up later.
As before, it is advisable to install the top plate first. It is cut to the full size of the upper ceiling slope, from wall to wall. We insert one edge of the plastic strip into the U-shaped starting profile, and the second we must attach with self-tapping screws to the crate. The plastic slope should be fixed to the crate with self-tapping screws at the edge at an angle, in order to later easily put the F-shaped casing on it. It should be fixed at a distance of 45-50cm.
In addition, it is advisable to insulate the slopes with polyurethane foam. This will not only give the effect of insulation, but also give additional strength to your slopes.
How to foam window slopes?
First of all, the surface to be applied should be moistened with water, which will contribute to better adhesion of the polyurethane foam. To do this, we use a simple home water spray. After we insert the slope into the starter profile, we should apply foam over the slope in a circular motion in small portions at a reasonable distance from each other so that when the foam swells, the slope would not be squeezed out. After that, we attach the slope to the crate. Excess foam will come out of the gaps near the wall and the crate, where it should be removed. Remember, do not overdo it with foam, which is fraught with deformations of plastic slopes and unnecessary work.
Slopes for plastic windows in the photo with a description
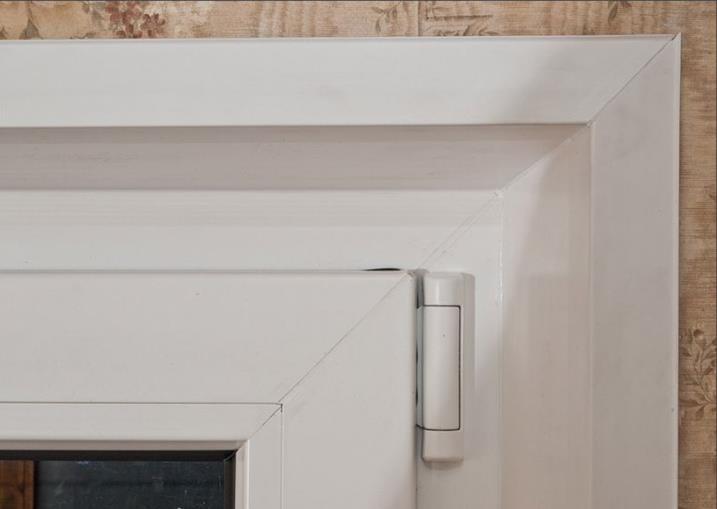
After we have installed the plastic slope plates, we proceed to the installation of the platband. The F-shaped profile of the platband hides the place where the slope is attached to the lathing, giving our structure a complete and aesthetic look. Again, be extremely careful about sizing. The vertical and horizontal battens must adhere to each other at a 45 degree angle. To do this, cut off the separator at the edges from the base to the distance of the casing width, and along the inner edge of the profile edge, which is threaded between the crate with a sheet of plastic tiles, cut off the places where the sheet of plastic itself is fixed on the rail.
If the unevenness of the edge of the slope does not give you the opportunity to install the lathing, then in this case, you should completely rely on the mounting foam as fasteners.
In the same way as indicated above, we put the starting U-shaped profile and cut the plastic slopes to size. Before foaming the slopes of the windows, we should moisten the surfaces with water, after that we install our plastic plates with a level and fix them with rails. After the foam has hardened, we proceed to the installation of the F-shaped trim profiles. For greater adhesion strength of the casing, you should use silicone, applying it to the inner opening between the two walls of the casing.
At the final stage, we process the seams with silicone, well, that's all, our plastic slope is ready.
Plasterboard slopes
Plasterboard slopes are absolutely identical to the method for installing plastic slopes, with the only difference that instead of plastic sheets, drywall sheets are used. Just as in the case of plastic plates, you should start with fasteners to the windows of the starting profile. After that, as above, we install the crate. As additional strength, a plaster solution can be applied in portions under the drywall, which, after installation, will completely grab the sheet. You can also use polyurethane foam as insulation. When handling drywall, do not forget about its fragility. Therefore, in places where this is not required, you should not "drown" the screws in the stove in excess of the norm. A careless movement can ruin the entire sheet of the plate. You should also carefully cut the sheets using a knife with replaceable blades.
After installation and fastening to the lathing, the F-shaped profile of the casing is installed. Drywall is easy to use and handle, one of its most significant disadvantages is that, as such, it is very afraid of moisture. Therefore, plasterboard slopes should be installed in rooms with low humidity.
Installation of slopes on windows in the video:
Gradually, old slopes are replaced with new ones - plastic ones. The slope is the area that surrounds the window. It serves to mask the seams in the place where the frame is connected to the window opening. Plastic windows are gaining increasing popularity among the people at a very active pace. And there is nothing strange and surprising in this, because such windows are an ideal ratio of price and quality. They look very neat and tidy, they are not difficult to care for, they are very easy to wash. This is guaranteed protection against street noise and absolute tightness. During installation, all calculations and measurements are made by competent specialists.
Plastic slopes and a window sill are an irreplaceable addition to modern plastic windows, which gives them a complete and familiar look for us.
But you can make plastic slopes with your own hands. This is the last step in installing the window. The last stage on the list, but not in meaning. With plastic slopes, the window will take on a harmonious and finished look.If you take up this business yourself, then you can save about three to four thousand rubles, and reasonable savings will only benefit. Do not underestimate your strengths and capabilities, relying on specialists in all matters.
Why choose plastic slopes?
The slope is a very important element of the window structure. Therefore, the choice of the material from which it will be made must be approached with all seriousness and responsibility. At first glance, plastic is a fragile and fragile material. In fact, it is very strong and durable. A properly installed plastic slope will protect your home from moisture, cold and drafts, and will not fade in the sun. And it will last for many, many years. Modern man wants to make his home warm, comfortable and cozy. And the window plays one of the main roles in this matter.
Plastic has practically no drawbacks. The only negative is that this work requires absolutely precise execution, there should be no errors. Then plastic slopes will serve you faithfully for a long time, protecting your house from blowing.

Basic tools needed for.
Required materials for self-assembly of plastic slopes:
- plastic panel (U-shaped plastic strip, F-shaped plastic strip, plastic strip 6 m long and 8 mm thick);
- drill with attachments;
- hammer drill with a drill;
- wooden slats (1.5 cm);
- building level;
- stapler and staples;
- self-tapping screws, dowels;
- saw on wood, saw on plastic;
- hammer, screwdriver, pencil, tape measure, knife;
- polyurethane foam;
- mineral wool (insulation);
- decorative corners;
- silicone sealant white;
- scissors for metal;
- vapor barrier tape.
So, preparing everything necessary materials, you can learn how to make slopes and get to work.
Dismantling old slopes is the first and important step in installing new plastic slopes. Unscrupulous and poor-quality dismantling of old slopes will nullify all the outstanding and wonderful properties of new plastic ones. Excess polyurethane foam and all that is left of the previous slopes are removed.
The window opening is carefully and thoroughly cleaned from plaster. If anchors interfere with installation, they are also removed. The mounting foam is pasted over with vapor barrier tape.
How to make plastic slopes with your own hands?
For professionals, it takes an average of two to two and a half hours to install window slopes, so if you try, you can do it yourself in three to four hours. To do this work yourself, you need to familiarize yourself with the plastic rules. Without slopes, the window will have an unfinished and unattractive appearance. With the naked eye, the mounting plates and sticking out pieces of polyurethane foam are visible. Remember that you can start working only a day after installing the window. Everything should dry well.
The window should be tightly tightened with foil to avoid damage when installing the slopes.
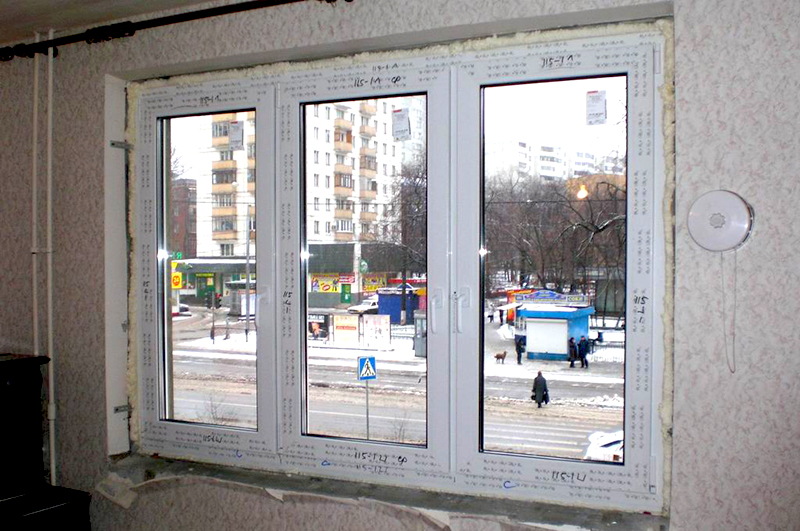
A day after the installation of the plastic window, you can proceed to the installation of the slopes, which will subsequently hide the mounting plates and foam and give the window a neat look.
The first step in installation is to carefully align the entire opening. You need to align horizontally and vertically. To do this, you need polyurethane foam. Frost-resistant is best. The resulting voids are filled with mineral wool. This preparation will protect the plastic from destruction. Protects from dampness. This is waterproofing and soundproofing with your own hands. Excess foam is removed after 20 minutes
The second step is to fix the wooden blocks along the full perimeter of the opening, the bars of the required length are measured and cut. Then you need to drill holes in them for self-tapping screws. Self-tapping screws with a length of 95 mm are used for fasteners. The slats should be placed so that they do not protrude beyond the level of the walls. Use a level to get the perfect vertical. The rail is attached directly to the wall with a drill or perforator.
The third step is attaching a U-shaped element to the bar (seamless plastic profile). The starting profile is stuffed along the outer edge of the window. Self-tapping screws are used to fasten it. It is better to take self-tapping screws 15-20 mm and fasten them at a distance of 35-40 cm from each other. When installing the profile, the joint of the inner walls must be made without a gap. Measure the width of the window from the right to the left slope. Next, a U-shaped profile is cut to size with a hacksaw or grinder. The starting profile is screwed to the plastic frame with five self-tapping screws. The starting strip should fit as tightly as possible to the window.
The U-shaped plastic profile, called the starting profile, is fastened with self-tapping screws to the previously screwed wooden bars.
All dusty work is done. At this stage, you can free the window from the protective film and proceed to the next step.
The fourth step is the F-shaped strip (the strip of plastic used for). The groove of this strip is placed opposite the already installed U-shaped profile. But before that, it must be properly trimmed. For this, markings are applied along the height of the plastic slope, and the excess part is removed. After the F strip is filled, an overlap is formed everywhere. Given this overlap, a small margin should be left when trimming. At the end of all work, the overlap is cut off. The strip is attached to a wooden strip using a construction stapler. Fastening is done on the part of the F-end closest to the tree. Everything is ready. The F-shaped strip of plastic will cover the defective area, hide the entire internal unsightly picture from the eyes.
The fifth step is insulation. Install the plastic in the grooves and simultaneously lay the layers of cotton wool. The plastic panel is placed in the starter strip, laid with cotton wool and fixed in the F-strip. If you nevertheless notice that in some place the plastic joints do not fit perfectly, ordinary silicone will help you white... Cover the gaps with it.
This is a detailed, step-by-step program of your actions. As you can see, there is nothing daunting in this work. But there are still a number of difficulties that can be encountered when doing this work.
What difficulties can arise when installing plastic slopes?
If you do not want to change the plastic after a few years, then pay attention to the gross mistakes that can be made when installing plastic slopes:
- The window opening must be well prepared. Otherwise, fungus and blowing may occur.
- An incorrect measurement will lead to the same negative consequences.
- Polyurethane foam is ineffective at temperatures from -12 ° C.
- Voids and irregularities are foamed incorrectly.
In order for the foam to perform its functions well, remember that it is afraid of the sun, fire, moisture. Excess foam should be trimmed, but this can only be done after 48 hours. This is how much time is needed for complete drying. If you can't wait that long, a foam canister with a dispenser can help you. He leaves no surplus.
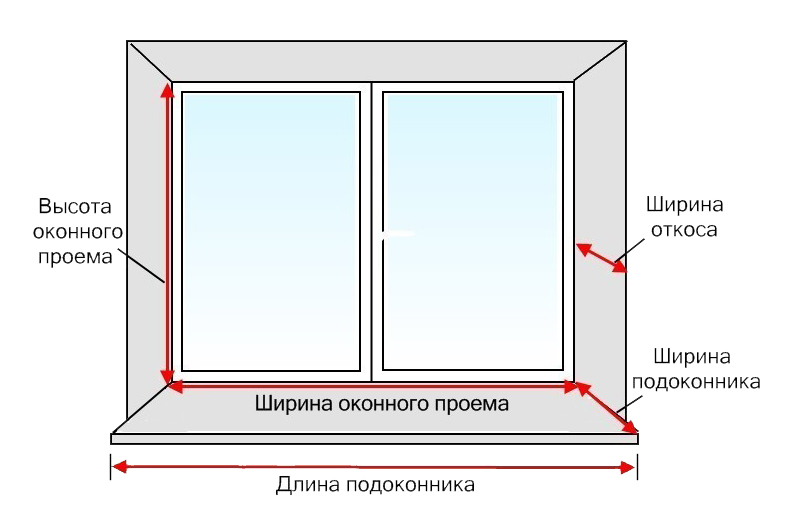
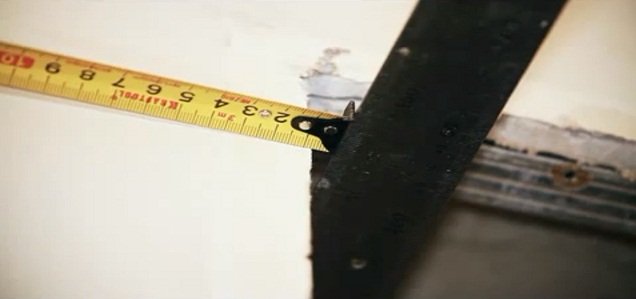
Schematic representation of measurements of a window plastic slope, which must be performed with an accuracy of millimeters.
Consequences of improperly installed slopes:
- All measurements must be made with an accuracy of one millimeter. An error in this matter can lead to the destruction of the layer of polyurethane foam, and in the future, the entire wall. Moisture will begin to penetrate into the room, and all the work will have to be redone.
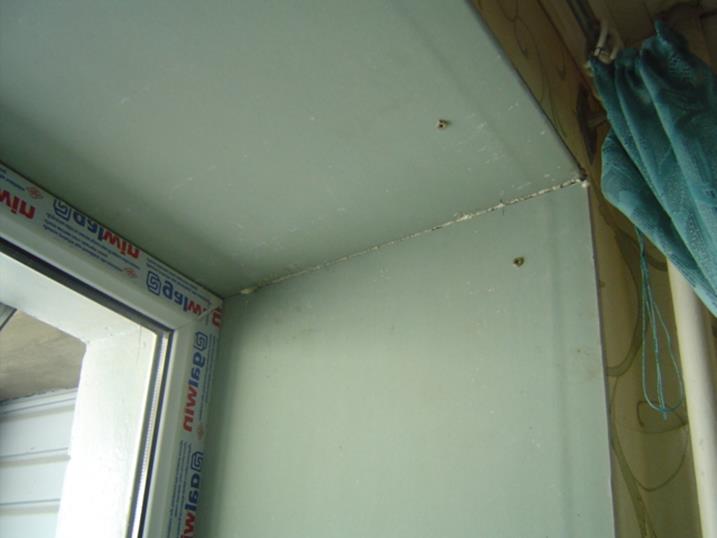
- If the slopes are installed incorrectly, then moisture will begin to accumulate in the corner of the windowsill. This will lead to fogging of the window, ice will appear in winter, and a characteristic howling of the wind will be heard.
- When wrong installed slopes the window will have an unaesthetic and unattractive appearance.
If you notice at least one of these signs, you need to redo the entire structure to avoid complete destruction of the window.
What is the price of self-installation of plastic slopes:
- A strip of plastic 6 m long - RUB 700- 4200
- U-shaped strip - 50 rubles per meter.
- F-shaped strip - 60 rubles per meter.
- Wooden slats - 35 per meter.
- Self-tapping screws and dowels - about 200 rubles.
- Polyurethane foam - 300 rubles (two cylinders - 600 rubles).
- Mineral wool - 500 rubles.
- Decorative corners - from 100 rubles.
- Silicone white sealant - 150 rubles.
- Vapor barrier tape - 400 rubles.
Thus, you can calculate the approximate cost of plastic slopes per standard window. Prices are average for 2014. But the cost will come out quite acceptable if you do without specialists in this matter, on your own.
It's not difficult to do. But this work requires a competent, responsible and thorough approach. If you decide to save money on paying professionals, then take into account all the small nuances of this work. It requires filigree precision of execution, and at the slightest deviation from the established norms, everything will have to be redone.
When cladding a house internally or externally, it is sometimes necessary to remove old slopes and replace them with new ones. You can clad window openings with plaster, drywall, wood and even ceramic tiles... But most often plastic is used as cladding: a material with high resistance to ultraviolet radiation and good decorative properties. You will learn how to make slopes on windows with your own hands after reading this article.
Preliminary work
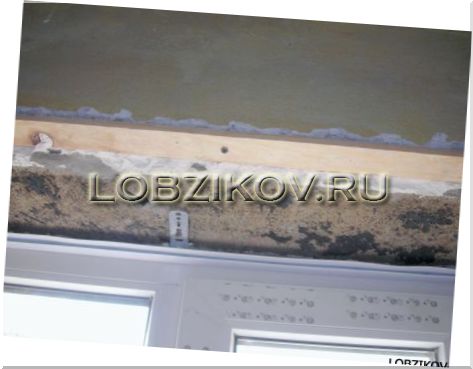
1. Leaving window openings without cladding for a long time is not worth it, since the foam, laid between the window and the wall for insulation, very quickly collapses under the influence of ultraviolet radiation. If she already changed color and began to crumble, it should be carefully removed.Important! When working in cold seasons, use only "winter" foam that can harden even at low temperatures.
3. In order for the foam to harden more evenly, too large gaps (from 6 cm) are foamed in several steps... You should wait about 10 minutes between each entry. Excess foam cut off.
Foaming the joint between the wall and the window frame
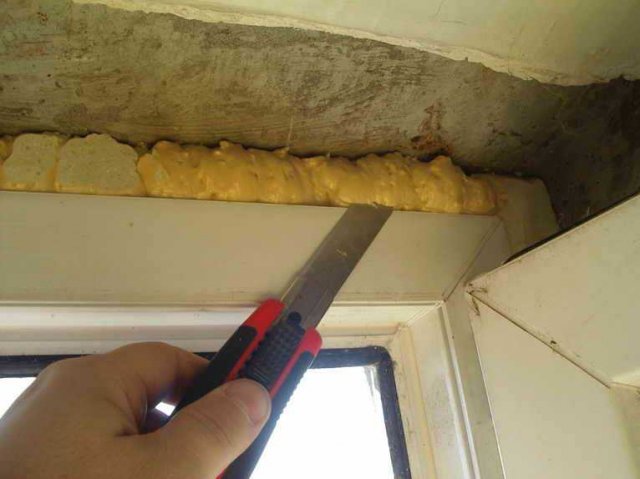
Excess foam is cut with a sharp knife
4. If at the joints of the window frame with the wall appears fungus, plaster with damaged spots is removed completely. Then the slope is carefully processed with any antifungal drug... An antiseptic should also be added to the solution when applying a new layer of plaster.
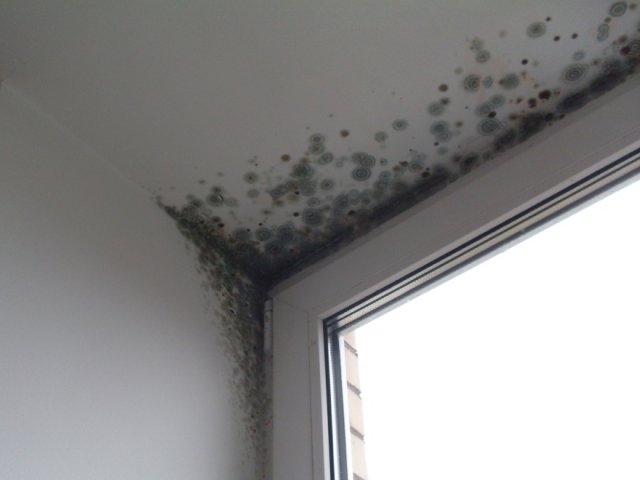
Fungus-covered window
5. Avoid the reappearance of the fungus will help thorough warming places of joints of a window and a frame with polyurethane foam.
Cladding of internal slopes
1. If the windows are covered protective film, it should not be removed before completion of work. It will not only help to avoid contamination of the frame, but also protect it from mechanical damage. If the protective film is no longer there, the window frame can be glued with construction tape. To protect against dirt, a plastic film is attached to the glass.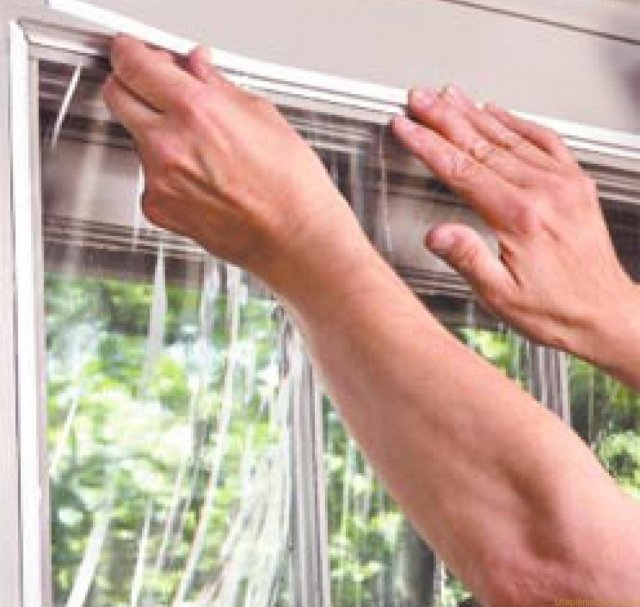
To protect the glass from dirt, it is better to cover it with a film
2. First, the frame of the slope is formed. For this, along the perimeter of the window opening, wooden lath 10-20 mm. It is fastened with 51mm self-tapping screws.
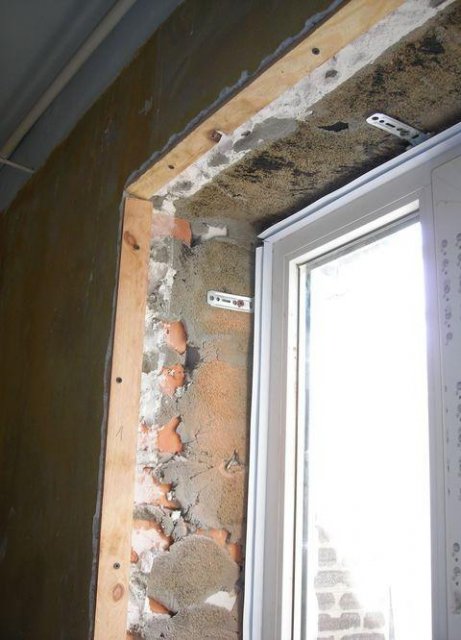
Wooden batten along the perimeter of the window
3. Very often, to prevent the accumulation of condensate, the windows are installed by installers with a slight slope, so the alignment of the battens should be done not with a level, but visually... Otherwise, they will only emphasize the curvature of the window. You can align the slats using wooden linings.
Checking the horizontal slopes
4. If the design of the opening allows this, a 10 mm deep groove is prepared in the mounting foam on the sides of the frame and in its upper part (its location is checked with a level), into which it will be inserted U-shaped plastic starting profileon which the slopes are attached. If this is not possible, it is allowed to fasten it with screws directly to the window frame.
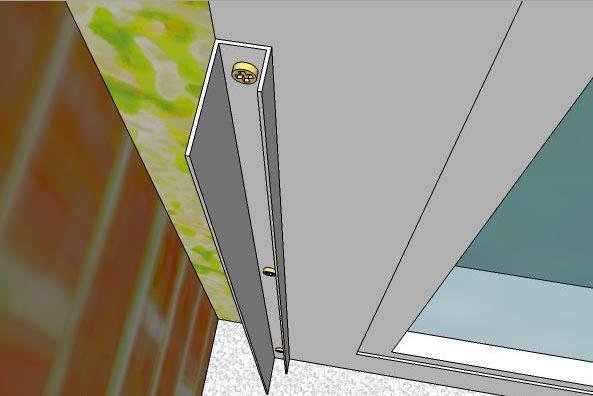
Fastening the starter profile to the frame
5. Further, into the grooves of the starting profile are inserted side slope elements... They are used as pVC sheet plastic... It is cut to the size of the window opening and attached to polyurethane foam or liquid nails.
Measuring side slope elements before cutting
6. If necessary, lay between the side elements of the slopes and the window opening mineral wool layer.
7. The last to be installed C-profiles with a snap... To form an angle of 45 °, both profiles are cut out with a hacksaw at their intersection. Instead of C-profiles for finishing, you can use conventional plastic corners or metal corners.
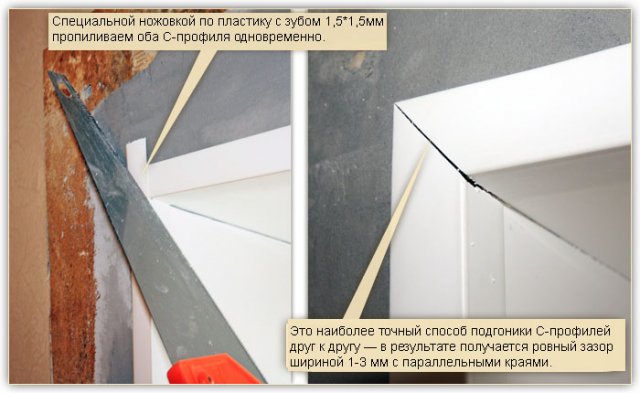
Sawing the corner of C-profiles
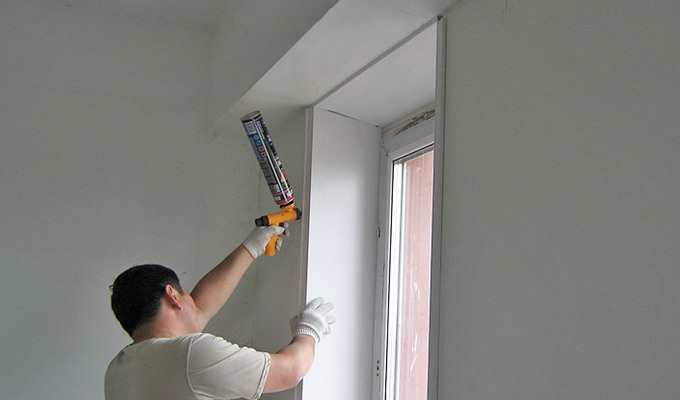
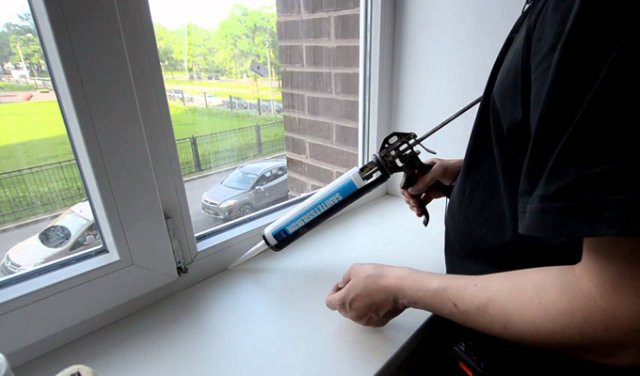
8. All joints between the parts are coated silicone sealant... Since it absorbs the finest dust quickly enough, you should work with it only after thoroughly cleaning the room and washing the windows.
Sealing joints
9. For reliable fixing of the slopes during the drying of the polyurethane foam, they are attached to the jamb masking tape... They take it off in a day.
Fixation with masking tape
10. Finishing slopes drywall similar to plastic trim. Instead of polyurethane foam, you can use gypsum glue or wooden lathing to fix the side parts of the slope.
Plasterboard slopes
11. Facing street slopes no different from theirs interior decoration... They can be finished not only with plastic, but also with cement mortar, followed by painting with acrylic paint.
How to plaster the slopes?
1. For finishing street slopes it is better to use cement mortar or facade plaster... For facing the slopes inside the house, you can use a gypsum or lime-gypsum solution.2. For the formation of the frame of the slope from its outer side are fastened with self-tapping screws wooden slats.
3. Plastering is done by lighthouses... To do this, a straight line is drawn parallel to the window frame, along which a solution is applied every 25-30 cm with slaps ("marks"). Pressed into it lighthouse - a small strip of metal. As it, you can use blanks from drywall 20 mm wide. The force of pressing into the solution is controlled using a level.

Beacon alignment
Council. Finishing should start from the uppermost slope - in this case, the side ones will press it.
4. After the lighthouses have dried, a solution is applied between them, which is leveled with a wide spatula.
5. Along the perimeter of the windows are glued with mortar or screwed on painting corners made of plastic or metal.

Installation of painting corners
Council. When applying too much layer of mortar to prevent it from cracking, it is better to use painting net... It is pressed into the solution, and then the excess is removed with a spatula.
Plastering on a paint grid
Video: How to make slopes on windows with your own hands
If in the apartment not a cosmetic repair, but a full-fledged one is started - with the replacement of windows, interior doors, the purchase of expensive wallpaper, the issue of saving the family budget becomes very relevant. You can save money by doing some of the work yourself. Such a simple, even for a beginner, nevertheless very costly when performing work hired by specialists, is the installation of window slopes. Try to make slopes on plastic windows with your own hands - it's easy and fun.
Materials for the design of window slopes
The materials used for finishing window openings are as follows:
- Plaster;
- Drywall;
- Plastic.
Each of them has its pros and cons, before choosing a material, it is better to familiarize yourself with them in advance.
| Material | pros | Minuses |
| Plaster | Cheap consumables Minimum tools required (but maximum patience) |
Manufacturing time - from 10 to 14 days At the next repair, part of the plaster may crumble - restoration of the slope will be required After drying, small cracks always form in the joints with the window due to the different expansion of the materials of the window and the slope when the temperature changes. Subsequently, they can expand and the window will lose its neat appearance. |
| Drywall | The top layer of drywall is easily repairable - the surface is re-putty, primed and painted | Duration of installation The instability of drywall to moisture - cannot be installed in rooms with excessively humid air, such as a kitchen |
| Plastic | Durable Easy to clean Does not require painting Easy to assemble Resistant to moisture |
Over time, the surface of the plastic can become scratched and lose its original whiteness. |
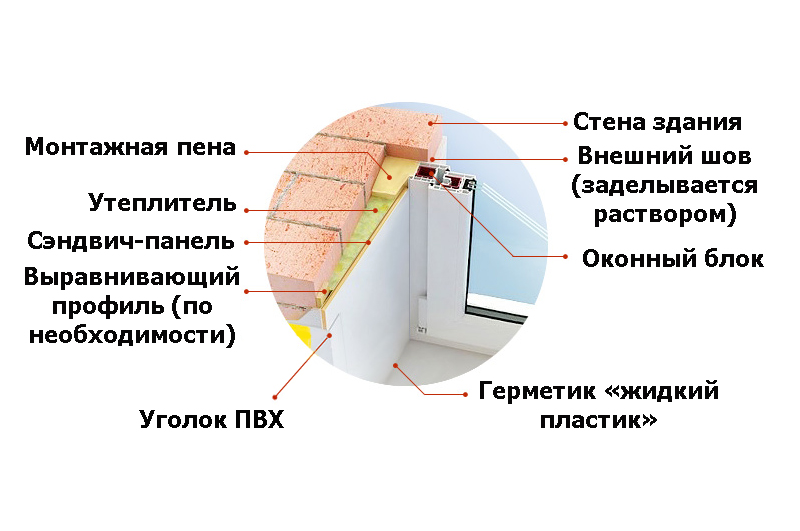
When choosing a plastic, you should pay attention to the fact that the panel must be resistant to mechanical damage and ultraviolet light (otherwise it will quickly lose color, turning into something yellowish!). Sandwich panels with a stable outer layer, internal, consisting of insulation (as a rule, it is expanded polystyrene), and a moisture-resistant PVC sheet.
 plastic panels for slopes on PVC windows
 We plaster ourselves
If the openings on the windows have a sufficiently flat and strong base, you can stop at this type of finish. For work you will need:
- building level;
- dry gypsum plaster (or cement and sand, when plastering slopes with a sand-cement mixture);
- sealant;
- a spatula (many use two - small and large, the first in order to collect the solution from the container and apply to the second - wider - along the entire length);
- putty;
- primer;
- sander or fine sandpaper;
- paint of the desired color (you can use both solvent-based enamels and acrylic paints).
Attention! Important! When plastering window openings, a part of the wall around the window is affected, so if it is a pity to damage the existing wallpaper, it is better to choose another material for decoration!
 plastering slopes after installing plastic windows
 The first stage consists of preparing the surface for plastering. The rule here is one and simple - the surface must be clean, strong (all crumbling and falling out parts must be removed). Before starting work, it must be washed with a paint brush and primed.
Preparation of mortar and plastering itself
Dry gypsum plaster is diluted in accordance with the manufacturer's recommendations on the packaging. You should not experiment so that after a while you do not have to do all the work again, and perhaps after finishing the premises, this will hardly be possible.
If cement mortar is used it is best to adhere to classic recipe: The ratio of water, cement and sand should be 1: 2: 1. In this case, the layer thickness should not exceed 3 cm. It is better to sift the sand before work.
 preparation of mortar for plastering slopes
 Advice:You should not prepare a lot of mortar at once - they prepared from a gypsum mixture dry quickly, which makes it difficult to use them further.
After applying the first layer of plaster, it is necessary to insulate the window opening around the entire perimeter. Otherwise, due to the temperature difference, PVC windows may fog up. As a heater, you can use expanded polystyrene, which is glued with a layer about 5 mm thick. Then, it is also covered with plaster.
Outside the window, walls are affected - about 5-10 cm are also plastered. The corners are leveled with a spatula.
Little trick:if the corners of the opening are severely damaged during the dismantling / installation of the window, it can be leveled using a perforated aluminum corner. A piece of the required size is simply pressed into the still damp plaster, and then allowed to dry and putty. The angle is like new!
The evenness of the resulting surface is periodically checked by the building level.
After application, each layer is thoroughly dried, after which it is primed 1 or 2 times.
After applying the plaster, the entire surface is sanded sandpaper (work is performed only after complete drying).
The final step is simple:
- The resulting surface is primed
- Then putty (the layer should not exceed 3 mm, if it is necessary to make more than one - each is dried and primed separately)
- Grind with fine sandpaper
- The joints are coated with sealant
- Paint the resulting slopes in the desired color
Plasterboard wisdom
The main thing is not to forget when working with drywall: measure seven times, then cut! Therefore, in advance, remove all the necessary dimensions for the workpieces of future slopes - height and width. It is better to double-check everything at this stage ten times than to buy the missing sheet later. Drywall is a beneficial material for cutting - you can redraw the layouts of the blanks several times, making the most of the surface.
 finishing of slopes of windows with plasterboard sheets
 Recommendation: you need to cut drywall in three stages - first, cut the first layer of cardboard with a sharp knife along the markings, then break the gypsum core with a slight blow from the other side, and lastly cut the second layer of cardboard.
Quite often, the blanks are cut out a little with a margin, so that it is possible to adjust the dimensions during the work. However, if the wall is uneven, the most accurate dimensions are cut out - all the irregularities can subsequently be plastered.
Do-it-yourself installation of plasterboard slopes is possible in two ways - with and without the construction of a frame.
The frame is not used when a sufficiently strong base is available. In this case, drywall is attached to it with self-tapping screws; for additional fixation, construction adhesives (special for drywall) are used. Drying time with this method is about 3 days.
Attention!Construction adhesives dry very quickly, so prepare all the necessary materials before starting work!
All voids between the sheets and the wall must either be foamed or insulated with any other material.
When installing with a frameless method, it is imperative to use spacers so that the resulting structure does not lead in different directions during the drying process.
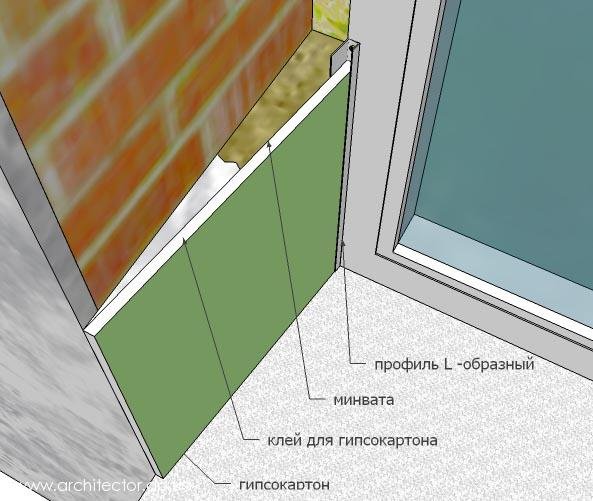
For the manufacture of the frame, a guide profile is used. You can ask a window manufacturer - very often they sell the necessary materials, or buy an L-profile at any hardware store.
The attachment points of the guide profile are the perimeter of the window and the joints of the drywall. Before fixing the slopes, it is necessary to carry out thermal insulation - the best option in this case is mineral wool. Then you can start fixing the cut blanks to the profile with self-tapping screws.
After collecting the main structure, all the cracks, joints are carefully putty, then the surface is sanded. The joints of window blocks and slopes are pasted over with masking tape, on which a special acrylic putty is applied.
The painting of the manufactured slopes can be carried out after the putty and putty have completely dried - not earlier than after 12-14 hours.
To make the finished window look neat, glue the junction of the slope and the wall with a plastic corner.
Plastic perfection
The most logical thing for plastic windows is to trim the slopes with plastic. You can use both thin plastic and sandwich panels. The only difference during installation is that thin plastic is attached directly to the base, otherwise it will bend easily and spoil the appearance of the window.
To work you will need:
- PVC panels ( optimal size - length 6 meters, thickness 7 mm)
- U-shaped starting bar
- F-shaped bar
- Wooden lath 1-1.5 cm thick and 3-6 cm wide
- Special construction stapler (staple size 6-8 mm)
- Construction adhesive, sealant
- Self-tapping screws, fleas, small dowels
The advantage of installing from PVC cloth is that there is no need to somehow additionally prepare the surface for work. Except, perhaps, to make additional steam and heat insulation. The materials are the same - mineral wool, any insulation, polyurethane foam.
You can additionally treat the wall with a special antiseptic solution, then, even in the most favorable conditions, mold will not develop. It is under the plastic slopes that it settles the fastest, especially if during the installation the cracks, into which moisture enters, were not sealed.
The work plan will be as follows:
Installation of the initial profile - U-shaped bar. It is fixed along the perimeter of the window opening with self-tapping screws.
Then, over the entire surface, a crate is made of wooden slats, fixed with dowels.
The gap between the top rail and the side ones should be 8-10 mm. This is where the panel will be inserted.
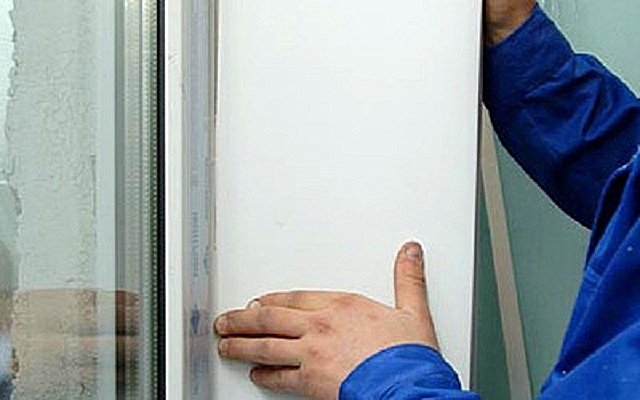
Work starts from the top panel. A piece of the required length and width is cut from the PVC panel. One end of the cut out workpiece is inserted into the profile, and the other is screwed to the wooden lath with self-tapping screws or a construction stapler. All work is carried out according to the level, if necessary, wooden dies are placed.
After that, proceed to the side slopes, the PVC panels on which are attached according to the same principle.
The edges are closed with an F-shaped strap, which forms the casing. It is attached to construction glue. So that the bar does not fall off while the glue dries, it is fixed for 2-3 hours with construction tape.
In order for the casing to look beautiful, the F-shaped bar is cut as follows: the height of the window is measured (for the side casing), and then the narrow part of the bar is cut off by a few centimeters. From the place where they began to cut off, the corner 45 is cut off (this place will stick to the wall. The same is done with the upper casing (for it, the width of the window is measured and the cuts are made in two directions).
After assembling all the slopes, the joints are sealed. To do this, use a sealant, which is carefully leveled with a small rubber spatula.
The last secret
The disadvantages of the above method of installing plastic slopes with your own hands is that the P-profile is very noticeable. It is rarely possible to perfectly match the panel and profile by color.
However, there is a mounting option without using the initial profile.
For the most painstaking, you can offer the following sequence of work:
- A gap is made in the foam around the window frame. A sharp knife is fine for this. The slot should be about 1 mm wide and about 10 mm deep.
- As in the previous version, the crate is made
- But the slope blank is inserted with a thorn into the nest you cut out. Its opposite end is also fixed with screws.
Further, everything is carried out according to the previously proposed plan. After all the work on improving the window opening has been completed, you can remove the protective film from the windows (you don’t forget - it is still on them). It is quite simple to install the slopes of plastic windows with your own hands, you just have to want and everything will work out!


