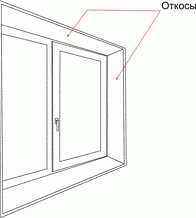
After replacement and installation of double-glazed windows, window openings need finishing. And if only a specialist is required to install the window, then perform finishing work everyone can. This process has a simple technology, so it is not at all difficult to install plastic slopes with your own hands. Practical, inexpensive, easy-to-use plastic panels are mounted in just 3-4 hours, completely changing the appearance of the window opening.

In order to qualitatively install the slopes, you should thoroughly clean the surfaces of the opening and prepare everything necessary tools and materials. Plastic panels must have a thickness of at least 8 mm, and correspond in length and width to the parameters of the opening. Too thin plastic will not last long, moreover, it can be easily damaged during installation.
In addition to panels for work you will need:
It is possible to start finishing no earlier than 36 hours after the installation of the glass unit. During this time, the mounting foam, on which the frame is installed, has time to completely freeze, and even accidentally touching the structure, it will not work to move it.
Now you need to clean and prepare the walls of the opening by performing the following operations:
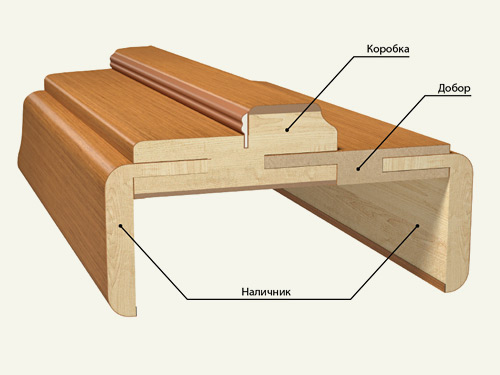
Manufacturing and installation of plastic slopes
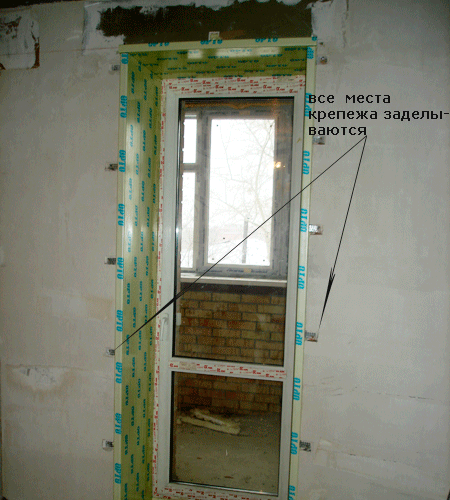
When the walls of the opening are dry, a vapor barrier film is glued around the perimeter. At the joints, the film segments are laid with an overlap of 5-7 cm and glued along the seam. The edges of the film must not protrude beyond the window frame. After that, they begin to make slopes.
Step 1. Installation of the starter profile
Along the outer edge of the window frame, the starting profile is screwed with short self-tapping screws. At the corners, when connecting the horizontal strip with the vertical ones, the profile is fixed so that its inner walls fit snugly against each other, without gaps and cracks.
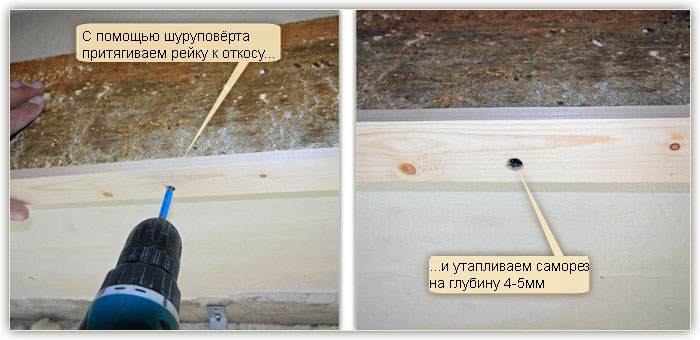
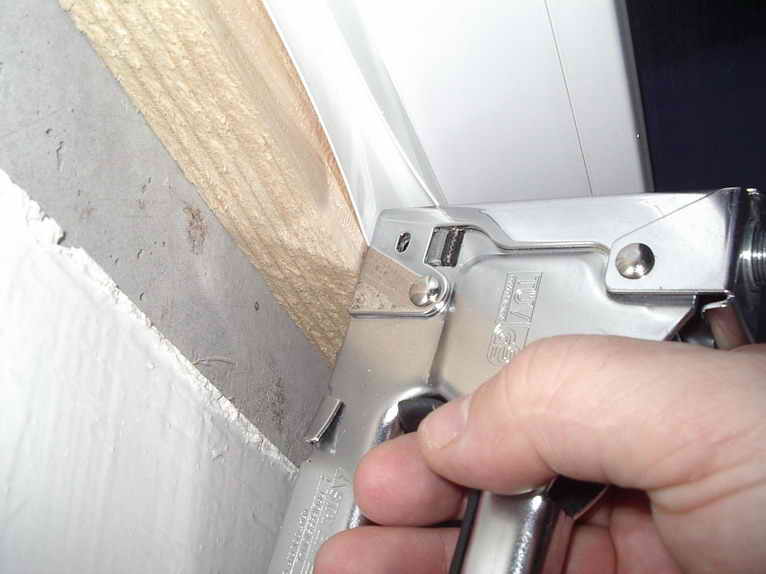
Step 2. Fastening wooden battens
Fastening wooden slats
Take slats 15 mm thick and 40 mm wide, cut them to the width and height of the outer edge of the opening. With the help of hammer-in dowels, the strips are fixed along the perimeter with the flat side to the surface so that their edges do not go beyond the plane of the wall. Both the top and side rails must be set horizontally and vertically using a level. If the walls of the opening are not even enough, thin wedges are placed under the slats.
Step 3. Cut the slopes

The length and width of the walls of the opening, as well as the bevel angle on each side, are very accurately measured. Cut lines are marked on the panel and blanks of slopes are cut using a jigsaw or a sharp knife.
By the way, about plastering slopes with your own hands - you can read on our website.
The resulting parts are applied to the walls and to the upper part of the opening, check their location and tightness in the corners.
Step 4. Installation of slopes

The F-shaped profile is cut to the size of the outer perimeter of the opening and the ends are cut at an angle of 45 degrees. A section of the profile is applied to the rail so that it is completely covered with plastic, but does not overlap the groove for fastening the slope. Fix the profile on the rail with staple brackets. The rest of the segments are mounted in the same way.

The blank of the upper slope is laid in the upper starting profile, having previously covered it with a sealant. Keeping the slope alive, fill the gap between the panel and the wall with insulation. The insulation layer should not be too thick or have voids. Outer edge the slope is inserted into the groove of the profile and pressed lightly to level the panel.
Next, the side slopes are installed, carefully distributing the thermal insulation material. If the outer walls are insulated, there is no need to additionally insulate the slopes. In this case, the voids between the panels and the base base of the slopes are filled with polyurethane foam. It is very important not to overdo it here, as excess foam can squeeze out the panels or arch them. It is desirable to use foam with a low coefficient of expansion, apply it in small portions, evenly distributing it over the height of the gap.


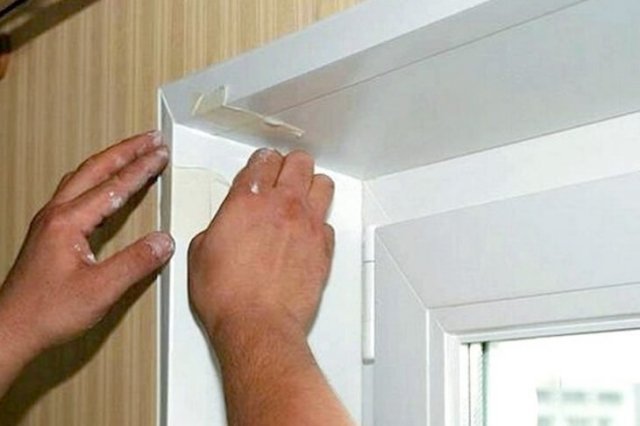
Step 5. Final finishing
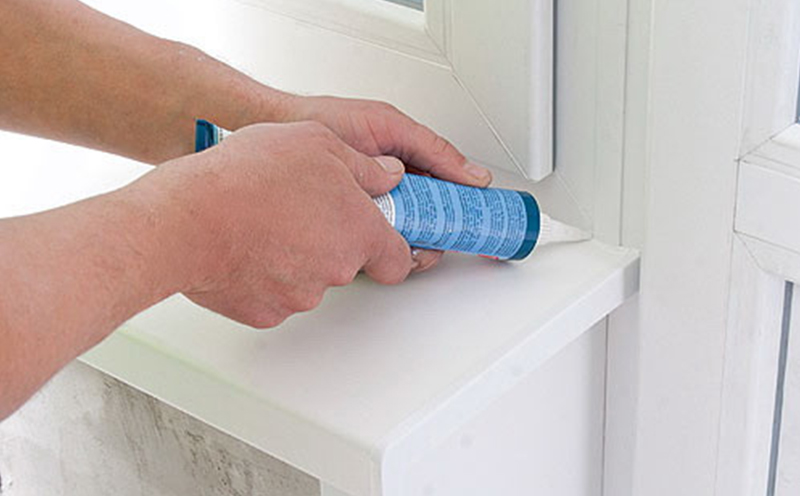
The places where the panels fit to each other and to the window sill must be well degreased. Next, the seams and cracks are filled with acrylic sealant. With a clean rag soaked in acetone, wipe off traces of glue and sealant on the panels and profile, plaster the section of the opening under the windowsill.


Plastic slopes are also used to decorate the doorway. The installation process is slightly different from the installation of window slopes. The preparation of the surface of the opening is carried out in the same way: the frozen foam around the door frame is cut off with a knife, the walls are cleaned of wallpaper, paint or plaster, and all cracks are carefully sealed with a solution. If you plan to fix the slopes on the surface itself, it should be leveled with cement-sandy mortar. If used frame technology, it is enough to close cracks and deep recesses.

For work you will need:
Step 1. Installation of the frame
Measure the width of the walls of the opening from the door frame to the corner line. The slats are sawn into pieces according to measurements. On the side walls, horizontal lines are marked with a pencil at a distance of 50-60 cm. Holes for dowels are drilled according to the marking and the slats are fixed. If the surface is uneven, use wedges or thin bars that are placed under the slats. 3 transverse bars are attached to the lintel - 2 in the corners and one in the middle.
Step 2. Cutting the panels
On the panel, cut lines are marked with a pencil, forming a slope. Especially carefully measure the angle of inclination, because the mismatch of the joints is not always possible to imperceptibly close up. All fragments should be 10-12 cm wider than the surface to be trimmed to cover the edges of the corners. It is necessary to cut three blanks - 2 side and one for the lintel. After that, the blanks are placed against the walls of the opening and the correct cutting is checked.
Step 3. Installation of slopes
Take the first slope and apply it to the wall of the doorway. Having aligned the joints in the corners, mark the fold line with a pencil on the back of the workpiece. With a sharp knife, a vertical cut is made in the cavity of the panel, leaving the entire front side. Again, the slope is applied to the surface, leveled and screwed to the frame with small screws.
When the main part of the slope is fixed, the protruding edge is screwed on. To do this, determine the border of the panel, retreat 2 cm from it to the opening and draw a vertical line. According to this marking, 6-7 holes are drilled, wooden wedges are hammered into them, and then the edge of the slope is pressed against the wall and screwed, exposing the screws to the level of the wedges. Heavy wood plugs can be used instead of wedges.
A second side slope is installed, after which the lintel is sheathed with a panel. The top edge of this blank should overlap the ends of the side tabs; after the installation is completed, the material is carefully cut at an angle and the joints are glued. The inner seams are coated with a sealant, the excess is removed with a clean rag, if desired, the caps of the self-tapping screws are covered to match the color of the slopes.

Video - Installation of a slope on the door
Frameless finishing method
If the walls of the opening are perfectly smooth and even, you can simply glue the slopes:
- to increase adhesion, the surface is coated with a deep penetration primer and dried;
- plastic panels are cut according to measurements so that the edge of the slope falls exactly on the corner of the wall;
- after that, glue is applied around the perimeter of the workpiece and several strokes in the center, and then pressed to the surface;
- until the glue has frozen, align the corners and edges;
- glue the side slopes, then close the lintel. The side cuts of the top panel should overlap the edges of the slopes by 2-3 mm.
In the end, the vertical seams are sealed, and decorative platbands are attached to the outer perimeter of the opening to match the color of the door and slopes.
Video - DIY plastic slopes
Video - How to make slopes on plastic windows
In this note I want to tell you how you can independently install internal slopes on plastic windows... It is no secret that companies ask for a lot of money for the installation of internal slopes, and the quality often does not correspond to this money. Therefore, if you have your hands, as they say, on the spot, after reading this article, you can install internal slopes quite professionally without any problems, paying only for the material itself and for the rental of the tool (if there is no one at home).
So, first you need to decide what material we will work with. I advise you to install windowsill slopes. Such slopes will "sit" like a glove. They are very durable, they are difficult to scratch, and the folded edge will save you from peeling wallpaper at the joints with the slope. The slope installers always offer the customer to supply the slopes from sandwich panels - this material is thin and during the installation process, the slope often does not have an ideal plane, but with bulges or concave sections. At the joints with the wall, installers always recommend installing plastic corners in order to avoid the inevitable peeling of wallpaper in these places. But such corners are often peeled off afterwards and are not always perfectly docked together.
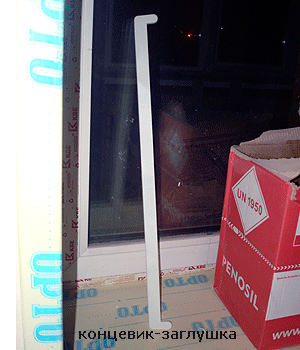
To begin with, we need the necessary tool - a saw with a sharp tooth, an e / jigsaw, an assembly gun for foam, an impact drill or perforator, a screwdriver. If there is no such tool, then it can be rented, in your city such services are probably available. It remains only to go to the construction market or to the construction hypermarket to purchase window sills. I think it will not be difficult to calculate how much material is needed. Measure the length of the slopes and window sills on each window, balcony door and already on the spot together with the seller you will be able to accurately determine the number of window sills you need for installation. You should also count the plugs for the cut ends - one end cap for two ends.


You will also need professional mounting foam, dowel-nails 6x40 pieces 50-100, depending on the number of windows, straight hangers for profiles - also depending on the number of slopes - for each slope 2-4 hangers. Self-tapping screws with a press washer (bugs) 16 mm - 50-100 pcs.
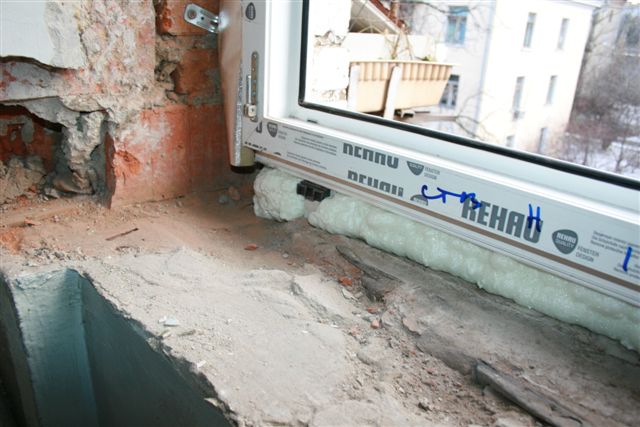
Now that everything you need is at your fingertips, you can start installation. First you need to prepare the windows - trim excess foam so that you can get the slope and the window sill behind the window frame. The window sill is installed first. We measure the width of the window sill - naturally, it should be with an overlap - the length of the overlap is arbitrary, as they say, to your taste. When the window sill is marked and sawn off, we take a mounting gun, moisten the entire area that will be closed by the window sill and carefully apply foam with longitudinal strips, the distance between which should be no more than 5 cm.
Then we take the window sill and put it under the window frame and press it tightly against the foam. In order for the foam to adhere well, it is necessary to put a load on the windowsill and leave it for 3-4 hours.
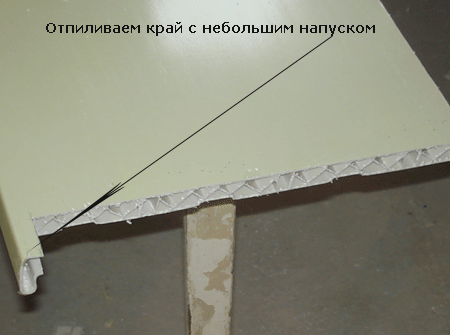
Then comes the turn of the upper slope. We carefully measure the distance from the frame to the wall and add 4 cm to get the slope behind the frame. We cut it out with a jigsaw, leaving a small margin of overlap on the wall.


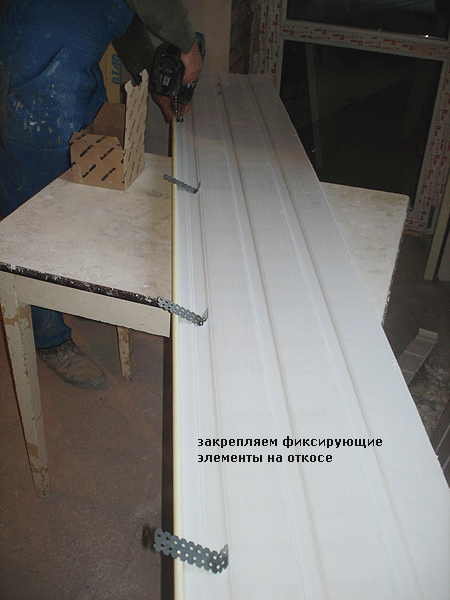
After the slope has been cut, we proceed to fastening the fixing elements to it. For this we need straight hangers that were purchased in advance.


From each suspension, two corners are obtained that attach the slope to the wall. We fix the corners at a distance of 30-40 cm from each other using self-tapping screws with a press washer. For the upper slope, if it is small, one bracket is sufficient.


When all the corners are fixed, it is necessary to try on the slope in place and mark the location of the fastening angle on the wall. This is necessary in order to hammer this place and drown the corner, which subsequently needs to be plastered


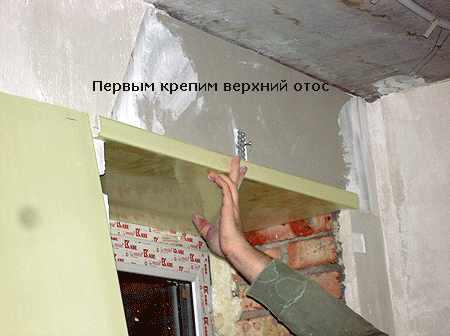
Now it is necessary to apply foam to the frame with the help of an assembly gun, not forgetting to wet the treated surfaces first.

After the foam has been applied, we carefully start the slope behind the frame and fix the corner with a hammer drill or puncher on the dowel-nail.
Then we proceed to the side slopes. If you want to "open up" the slopes a little, you need to draw a perpendicular along the upper slope and the window sill using a large square, and from this straight line the side slopes at the same distance. When the slopes are "open" they look better than at right angles to the window frame. We carry out the fastening of the slopes in the same way as described above. I want to note that due to their rigidity, these slopes do not need spacers and other devices, which must be used in the case of using slopes from sandwich panels.

When cladding a house internally or externally, it is sometimes necessary to remove old slopes and replace them with new ones. You can clad window openings with plaster, drywall, wood and even ceramic tiles... But most often plastic is used as a cladding: a material with high resistance to ultraviolet radiation and good decorative properties. You will learn how to make slopes on windows with your own hands after reading this article.
Preliminary work
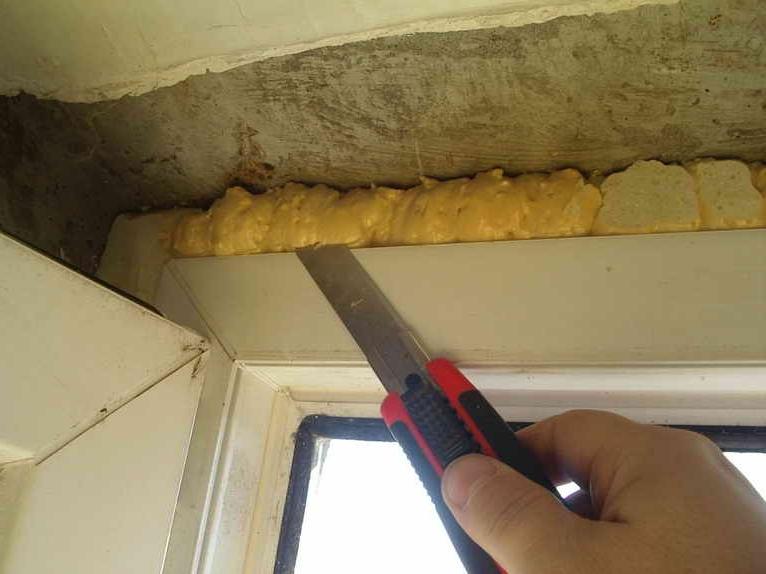
1. Leaving window openings without cladding for a long time is not worth it, since the foam, laid between the window and the wall for insulation, very quickly collapses under the influence of ultraviolet radiation. If she already changed color and began to crumble, it should be carefully removed.Important! When working in cold seasons, use only "winter" foam, which can harden even at low temperatures.
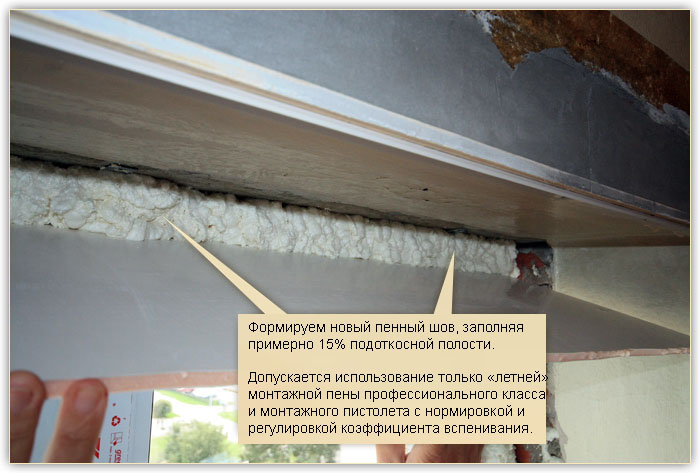
3. In order for the foam to harden more evenly, too large gaps (from 6 cm) are foamed in several steps... You should wait about 10 minutes between each entry. Excess foam cut off.
Foaming the joint between the wall and the window frame
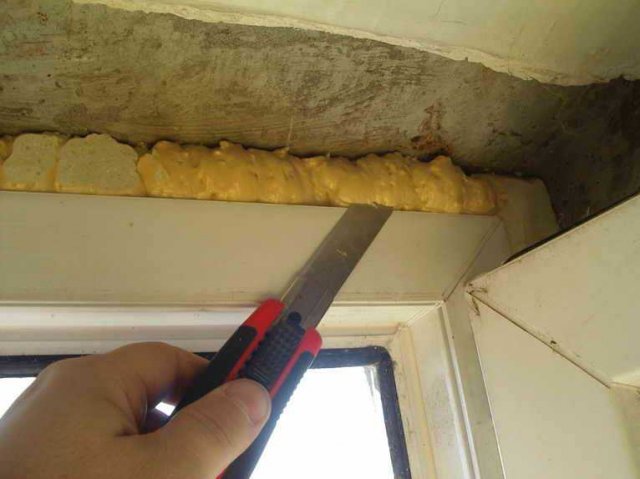
Excess foam is cut with a sharp knife
4. If at the joints of the window frame with the wall appears fungus, plaster with places of damage is removed completely. Then the slope is carefully processed with any antifungal drug... An antiseptic should also be added to the solution when applying a new layer of plaster.
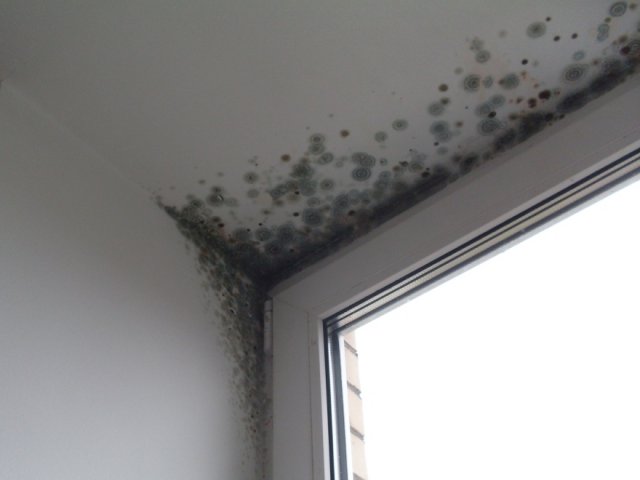
Fungus-covered window
5. Avoid the reappearance of the fungus will help thorough warming joints of the window and frame with polyurethane foam.
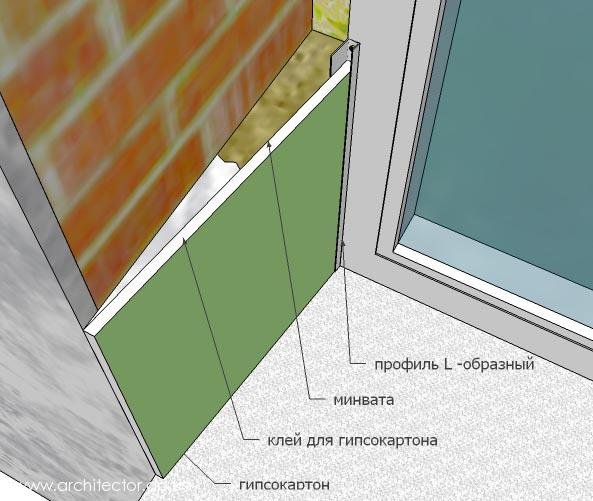
Cladding of internal slopes
1. If the windows are covered protective film, it should not be removed before completion of work. It will not only help to avoid contamination of the frame, but also protect it from mechanical damage. If the protective film is no longer there, the window frame can be glued with construction tape. To protect against contamination, a plastic film is attached to the glass.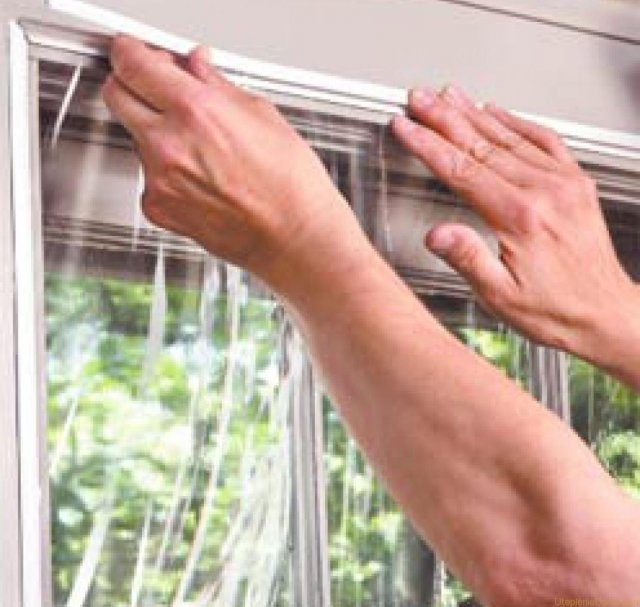
To protect the glass from dirt, it is better to cover it with a film
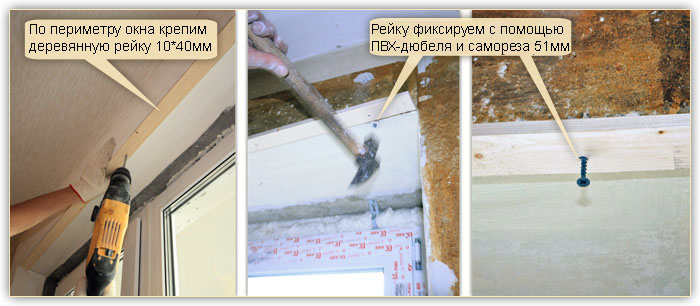
2. First, the frame of the slope is formed. For this, along the perimeter of the window opening, wooden lath 10-20 mm. It is secured with 51mm self-tapping screws.

Wooden batten along the perimeter of the window
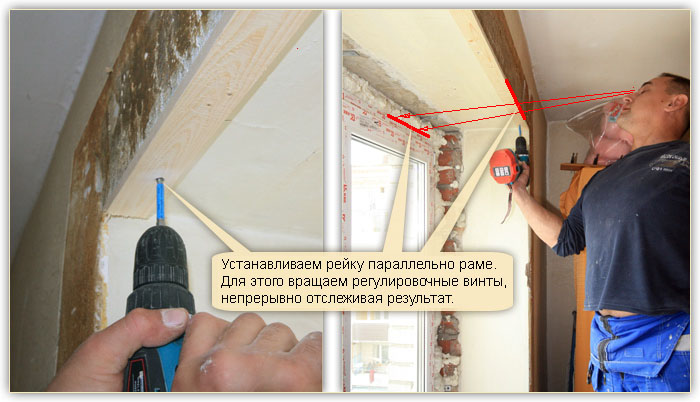
3. Very often, to protect against the accumulation of condensate, the windows are installed by installers with a slight slope, so the alignment of the battens should not be done visually... Otherwise, they will only emphasize the curvature of the window. You can align the slats using wooden linings.

Checking the horizontal slopes
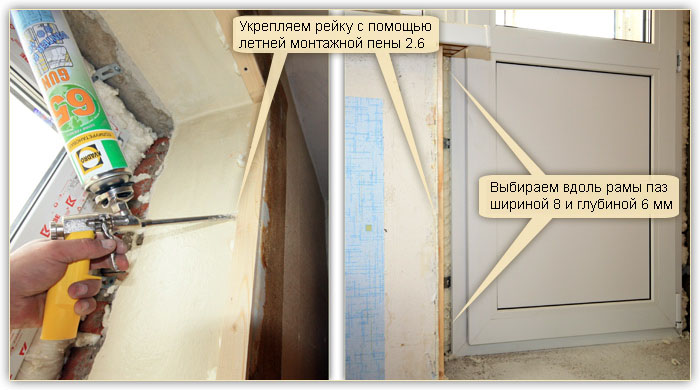
4. If the design of the opening allows this, a 10 mm deep groove is prepared in the mounting foam on the sides of the frame and in its upper part (its location is checked with a level), into which it will be inserted U-shaped plastic starting profileon which the slopes are attached. If this is not possible, it is allowed to fasten it with screws directly to the window frame.
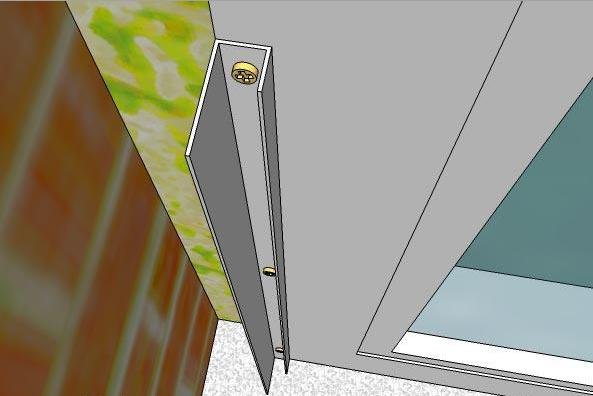
Fastening the starter profile to the frame
5. Further, into the grooves of the starting profile are inserted side slope elements... They are used pVC sheet plastic... It is cut to the size of the window opening and attached to polyurethane foam or liquid nails.
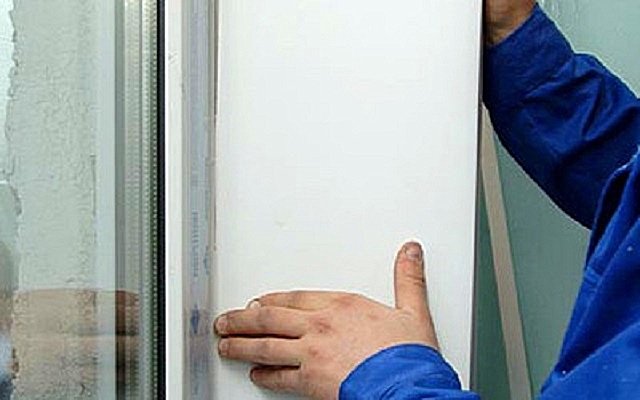
Measuring side slope elements before cutting
6. If necessary, lay between the side elements of the slopes and the window opening mineral wool layer.
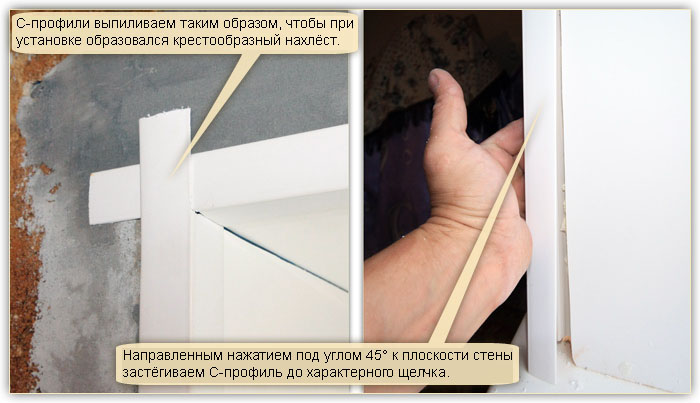
7. The last to be installed C-profiles with snap... To form an angle of 45 °, both profiles are cut out with a hacksaw at their intersection. Instead of C-profiles for finishing, you can use conventional plastic corners or metal corners.
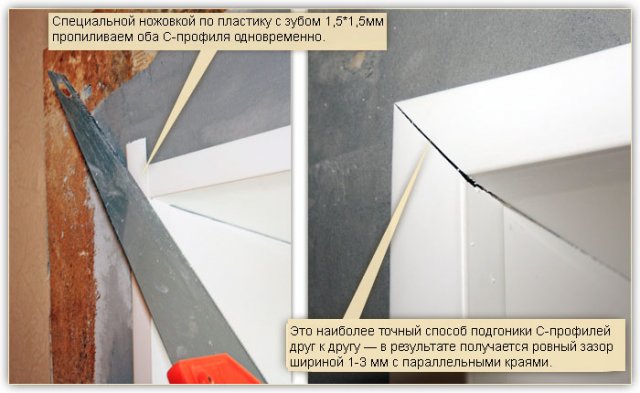
Sawing the corner of C-profiles
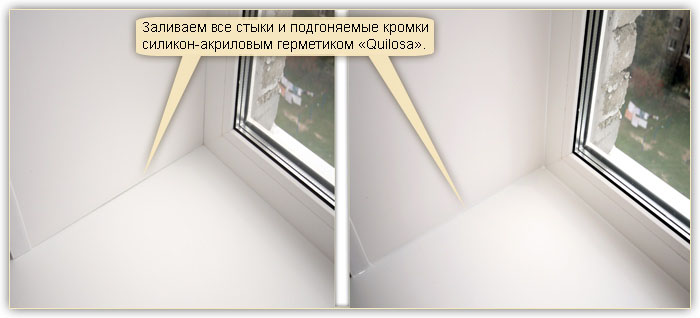
8. All joints between the parts are coated silicone sealant... Since it absorbs the finest dust quickly enough, you should work with it only after thoroughly cleaning the room and washing the windows.

Sealing joints
9. For reliable fixing of the slopes during the drying of the polyurethane foam, they are attached to the jamb masking tape... They take it off in a day.
Fixation with masking tape
10. Finishing slopes drywall similar to plastic trim. Instead of polyurethane foam, you can use plaster glue or wooden lathing to fix the side parts of the slope.
Plasterboard slopes
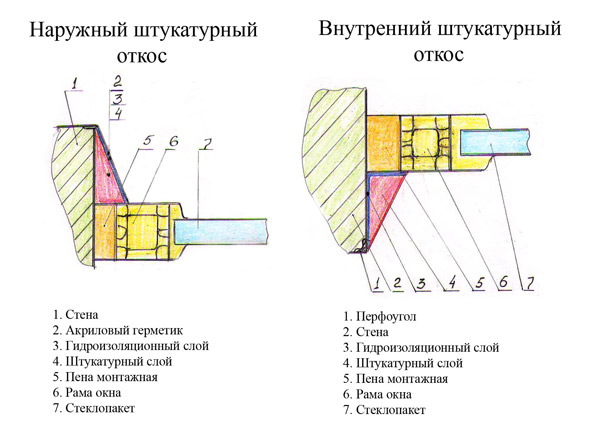
11. Facing street slopes no different from theirs interior decoration... They can be finished not only with plastic, but also with cement mortar, followed by painting with acrylic paint.
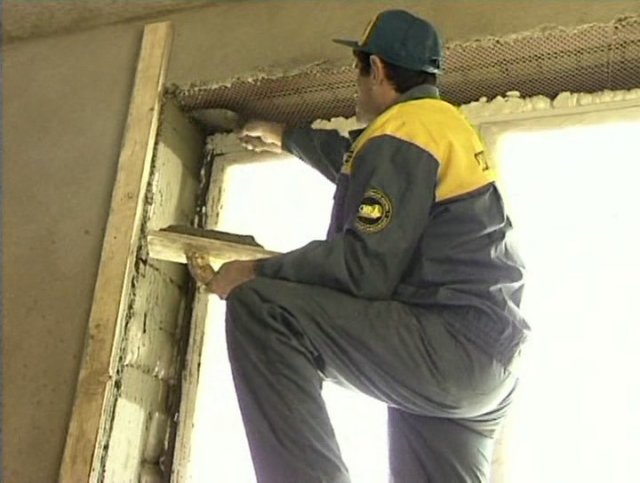
How to plaster the slopes?
1. For finishing street slopes it is better to use cement mortar or facade plaster... For facing the slopes inside the house, you can use a gypsum or lime-gypsum solution.2. For the formation of the frame of the slope from its outer side are fastened with self-tapping screws wooden slats.
3. Plastering is done by lighthouses... To do this, a straight line is drawn parallel to the window frame, along which a solution is applied every 25-30 cm with slaps ("marks"). It is pressed into lighthouse - a small strip of metal. As it, you can use blanks from drywall 20 mm wide. The force of pressing into the solution is controlled using a level.

Beacon alignment
Council. Finishing should start from the uppermost slope - in this case, the side ones will press it.
4. After the beacons have dried, a solution is applied between them, which is leveled with a wide spatula.
5. Along the perimeter of the windows are glued with mortar or screwed on painting corners made of plastic or metal.
Installation of painting corners
Council. When applying too much layer of mortar to prevent it from cracking, it is better to use painting net... It is pressed into the solution, and then the excess is removed with a spatula.
Plastering on a paint grid
Video: How to make slopes on windows with your own hands
Plastic windows have become part of our everyday life. Increasingly, they are installed not only in city apartments, but also in wooden houses, in cottages. Such windows are practical, easy to open and close. With their use, there is no need for constant updating of the coating, painting of frames. Among the advantages of such windows, in the first place is the absence of drafts and, conversely, the possibility of micro-ventilation of the room. But many apartments and houses still have old wooden windows.
When installing new frames, a great material for greenhouses is formed, as we talked about.
With the replacement of old windows with new double-glazed windows, it becomes necessary to update the slopes. Plastic is ideal for this purpose - it looks neat, easy to clean, optimal in terms of price and quality. All work can be ordered from a company that installs windows, but if you want to save money, making plastic slopes with your own hands is also quite realistic. Consider the key points of manufacturing and installation plastic slopes at home, as well as their benefits and features.
Why plastic?
Plastic is easy to care forIn addition to plastic, drywall and plaster are also used. These three materials divide the "prize" places for possible use for the purpose of finishing slopes. Plastic has a number of advantages over plasterboard and plaster slopes, which make it more suitable material for the design of metal-plastic windows:
- Easy to care for. Plastic slopes can be cleaned with detergents, although a damp cloth is often sufficient to maintain cleanliness due to the smooth surface.
- Moisture resistance. It is known that modern double-glazed windows are prone to the formation of condensation, which can quickly ruin drywall and plaster. Plastic, on the other hand, is not susceptible to the formation of mold and mildew, therefore, even in conditions of high humidity, it retains its presentable appearance longer.
- Fast repair. If necessary, the plastic panels are easy to replace, and you immediately get a decorative coating that does not need to be cleaned and painted.
Another undoubted plus is simple installation, which even a person without special skills can handle. The main thing is not to violate the technology and to properly prepare the surface of the opening for the installation of slopes, their service life and ease of use will depend on this.
And it's superfluous to talk about the choice of colors: in modern hardware stores there is a choice of panels for every taste, and there is an option for rooms of any style.
Preparatory work
Before installing the slopes, you must complete the complex preparatory work, namely:
- cement the holes between the window and the opening (if any);
- cut off excess polyurethane foam and remove the remnants of old slopes;
- make sure the integrity brickwork around the perimeter of the window;
- cover the foam with a vapor barrier material;
- clean the surface of the window opening from dust;
- apply an antifungal composition;
- remove the shipping tape from the plastic window.
Important! Before installing the slopes, you need to drill a hole for the window sill and install it, if this has not been done before.
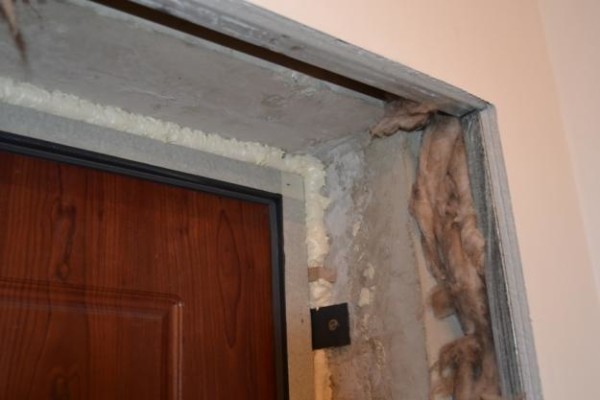
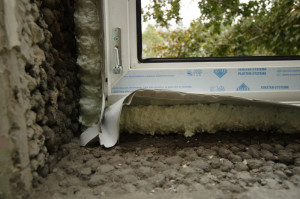
 Carefully remove excess polyurethane foam
 Choosing materials
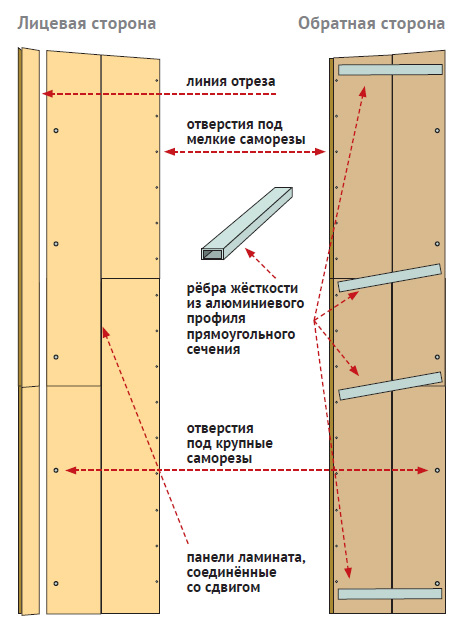
To make slopes with your own hands, you need high-quality plastic with a thickness of at least 8-10 mm. The length and width of the panels are selected depending on the size of the window opening. It is not advisable to save on material, since cheap products change color over time, it is also possible that stiffening ribs appear through the plastic, which will negatively affect the appearance of the slopes.
 Sandwich panels
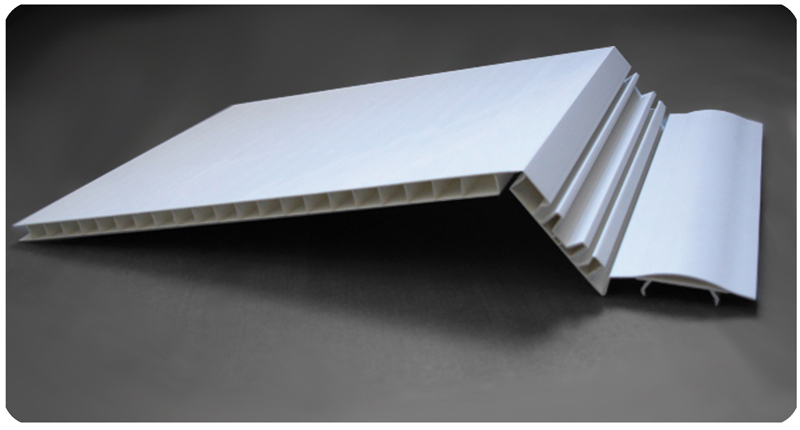
 Panels for the manufacture of slopes are of two types - PVC plastic and sandwich panels. The former are cheaper, but inferior in strength and quickly fade in the sun. It is easy to accidentally pierce or crush such material. Sandwich panels, especially two-layer ones, on the contrary, cope well with the load, do not bend and have increased resistance to UV light. In addition, they provide additional thermal insulation, although this does not mean that such slopes do not need to be insulated.
Which option to choose is up to you, but if there are no financial restrictions, it is better to give preference to more practical sandwich panels. You will also need auxiliary materials - a starting strip of plastic (in the shape of the letter P), an F-shaped profile, a wooden strip 10-15 mm thick and a cement mixture.
If you plan to insulate a window, you need to purchase mineral wool and polyurethane foam. To fix the material, stock up on small (4.5 mm) and large (95 mm) screws, dowels, brackets and a construction stapler. To seal the seams, it is advisable to take a white silicone.
Choosing tools
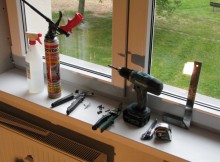 Prepare the necessary tools
 The manufacture and installation of plastic slopes is carried out using the following tools:
- drill with mixing attachment;
- puncher;
- building level;
- assembly knife;
- saw on wood;
- scissors for metal;
- sealant gun;
- putty knife;
- master OK;
- hammer and screwdriver.
Manufacturing technology of plastic slopes
How to make plastic slopes with your own hands? Let's consider the order of actions. First of all, measure the dimensions of the upper and side window slopes with a tape measure - the height and width. The size of the starting strip of plastic is marked and the parts are cut out. They will serve as the basis for the plastic panel.
The next step is to make slope panels. To do this, a piece corresponding to the dimensions of the upper slope is first cut out of plastic, and then two sidewalls. In the future, they are installed in the grooves of the starting strip. It is important that the resulting frame meets the following requirements:
- the side elements have the same turning angle (checked with a square);
- the gap between the starting profile and the plastic is at least 2 cm;
- the panels do not protrude beyond the window opening (if necessary, they are cut with a mounting knife);
- the absence of irregularities at the joints of the plastic (you can hide the flaws by mounting the starting strip on top).
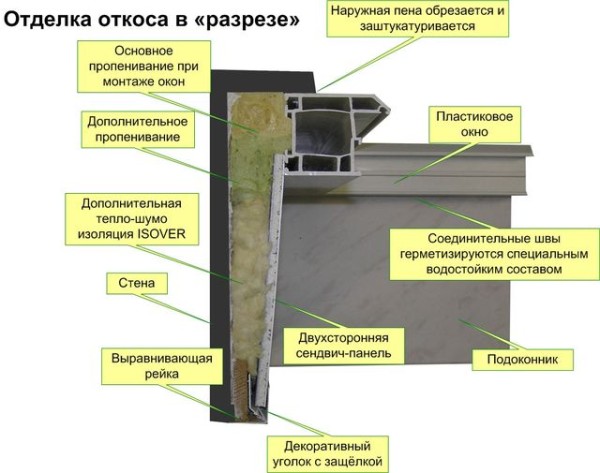 The structure of the plastic slope
 Then edging is made. The material for them is an F-shaped profile, fitted to the dimensions of the slopes. For a snug fit, its joints are cut at an angle of 45º.
Particular attention should be paid to foaming voids in slopes. The polyurethane foam is distributed between the surface of the slope and the plastic in small transverse strips. It is not recommended to fill the space completely, because when the foam hardens, it increases in volume and can warp the plastic panels. The process of fixing slopes will be described in more detail below.
To make high-quality plastic slopes with your own hands and avoid mistakes during their installation, we recommend following these tips:
- Purchase high-quality plastic of the same shade with a window frame for slopes.
- Do not forget to cut the mounting spikes from the PVC panels before installing.
- Use a special knife or electric roller to cut plastic.
- Before installing the slopes, the surface of the window opening should be treated with a primer and an antifungal compound.
- Use polyurethane foam with a low expansion coefficient during installation.
 Plastering will give the window a complete look
 - Apply foam at temperatures above -12 ° C.
- Place thermal insulation materials underneath the plastic panels to prevent heat leakage from the room.
- If there are traces of masking tape on the surface of the plastic, it is easier to remove them with a cotton swab soaked in acetone.
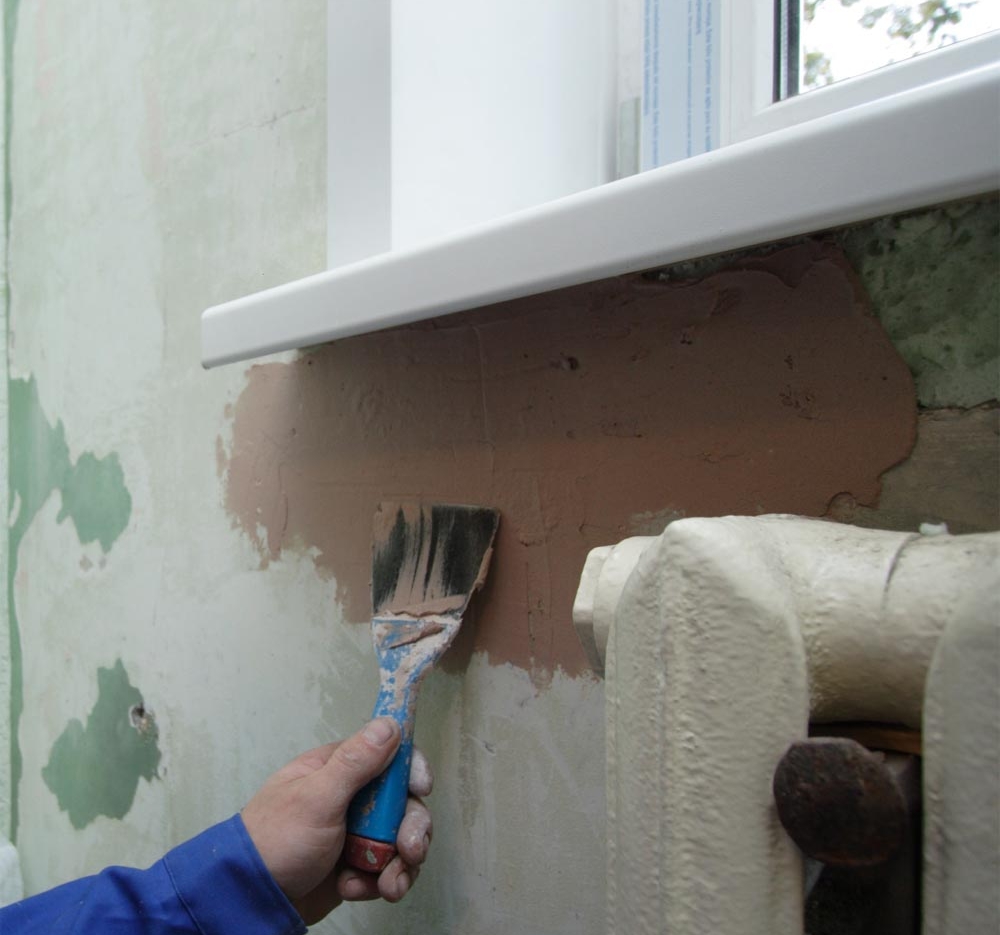
- Cover the cracks and plaster the surface under the windowsill. This will give the window a complete look and eliminate drafts.
If the work was done incorrectly, moisture begins to accumulate on the surface of the glass unit and the window sill, and ice forms in winter. When these signs appear, the slopes should be redone to prevent damage to the window structure.
Installation of plastic slopes
Do-it-yourself installation of plastic slopes consists of several successive stages. Installation can be started 1.5 days after the installation of the window unit.
Important! Before starting work, the window surface is tightened with a film, fixed with masking tape to prevent contamination.
First step
First you need to level the surface of the window opening vertically and horizontally. To do this, it is better to use frost-resistant polyurethane foam, applying it to the slopes in horizontal stripes at regular intervals. The voids are filled with insulation, wait 20 minutes and remove excess foam.
Second phase
At this stage, wooden slats are attached around the perimeter of the opening. The bars are fixed with long self-tapping screws (95 mm), having previously drilled holes of the required diameter in the fasteners. In this case, the slats are positioned so that they do not protrude beyond the edge of the opening. To screw in self-tapping screws, a drill with a special nozzle is used, and the verticality of the fastening must be checked with a building level. Thus, you get a rigid frame, on which the plastic will subsequently lie.
 Installing the rack frame
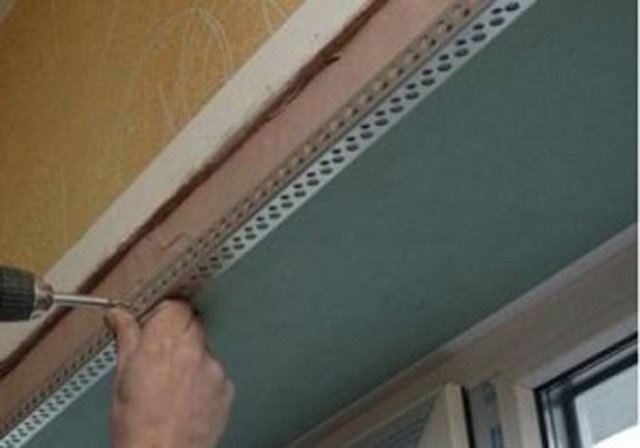
 Stage three
The next task is to fasten the starting U-shaped strip to the rails. It is placed along the outer edge of the opening, fixing it every 30-40 cm with short self-tapping screws. To avoid deviations in verticality and horizontality, markings are applied to the wall before installation with a pencil and a profile is attached along this line.
Advice! Pay attention to the tightness of the joining of the starting strip with the inner edge of the window. The fit should be as tight as possible.
This completes the dusty work. The protective film on the window is no longer needed, it can be removed.
Stage four
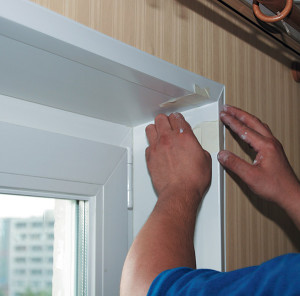
The time has come to secure the F-shaped profile. Before installation, it is marked out according to the height of the opening and the excess is cut with metal scissors. The profile is attached to the timber with the staples of the construction stapler. They fix it only by one of two parallel ribs, and the second will hide possible defects at the joints of the plastic panels with the opening and each other.
 F-profile installation
 Fifth stage
At the fifth stage, we install plastic panels into the grooves. At the same time, you can execute additional insulation windows. We take pre-prepared panels, insert them into the U-shaped strip and fix them in the F-shaped profile, after placing a layer under the bottom thermal insulation material.
 Grouting
 The finishing touch is to cover the joints with white silicone or sealant. This will hide minor flaws in the fit of the panels. Before applying it, the joints of the plastic are thoroughly degreased, a sealant is applied, and then the excess composition is removed with a cloth soaked in acetone. This completes the installation of plastic slopes with your own hands, and you can enjoy the result of your labors. Happy repair!
Buying expensive PVC windows, many strive to save at least something. Slopes often become the subject of economy - they say, they are only for beauty. However, in addition to the aesthetic side, there is also sound and heat insulation. Plastic slopes are a modern finishing option, which has a lot of advantages, including cost savings.
1 Plastic panels for window slopes - should you trust?
For many years, external and internal slopes in houses and apartments were finished with plaster, then drywall appeared, which was also adapted for these purposes. The question arises: why reinvent the wheel? Believe me, it makes sense. With the advent of PVC windows, plaster and drywall are far from the most convenient options.
They have a lot of disadvantages. They take a long time to make, create a lot of dirt and dust, crack due to shrinkage processes and changes in temperature conditions, and most importantly, the components of the plaster do not create the necessary adhesion to the plastic, which is why slopes can peel off from PVC windows over time.
Drywall allows you to make the slopes faster and warmer. However, even the moisture-resistant type of this building material does not withstand frequent temperature changes and constant exposure to condensation for a long time. In addition, it is necessary to paint or putty, or better, both.
The plastic version, especially in combination with plastic windows, looks much more attractive. But the appearance is far from the only advantage of the panels.
Of course, even in a barrel of honey there is a fly in the ointment. In case of plastic panels this "spoon" is the impossibility of partial repair - in case of damage, the entire panel will have to be replaced. However, modern slopes are not so easy to damage.
2 Plastic window slopes - types and possibilities
Today, there are two types of plastic slopes on the market: sandwich panels and wall products. The best choice are sandwich panels, since they consist of two or even three sheets of plastic, between which there is a foam insulation and stiffeners. Unlike wall panels, this option is much more frost-resistant.
Of course, with plastic panels, it is still recommended to lay another layer of insulation under them or apply polyurethane foam. In the second case, you will also receive additional adhesion of the slopes to the surface.
If you focus on external parameters, you can highlight glossy and matte products. On the gloss, stains and fingerprints will be better visible, so if the window is in a room with children or a lot of traffic, it is better to install a matte version - it will have to be washed less often.

Plastic products do not delaminate and do not require additional painting. However, if after a while you get tired of their appearance, you can change it thanks to the self-adhesive film. The film can imitate almost any material or have a special pattern - a lot of printing companies are engaged in printing patterns, photographs or drawings on self-adhesive.
3 Sheathing slopes with plastic - how does it happen?
Today, many companies that produce plastic windows also offer a number of additional products, ready-made and adapted to the parameters of the window frame. We recommend buying slopes, window sills, corners and other elements in one place - this will save you a lot of time and nerves. Manufacturers take into account the wishes of customers and the parameters of the walls around the windows, so you do not have to adjust the size of the panels to the width of the openings.
The installation begins with the removal of the protruding excess of polyurethane foam around the window block, as well as leveling those places where the edges of the slope will adjoin the walls.
If the panels were not pre-adjusted to the width of the walls, strips of the required length are cut from the purchased sheets. A jigsaw is best used for cutting. The panels are fixed to the cleaned surface using a special glue for PVC or liquid nails. The first option is preferable.
If the panels have special grooves, then the installation process is reduced to fixing a special rail with a special corner that snaps into place. You just need to insert the panels and fix them in the desired position.

If there are no such grooves, then you can get by with ordinary wooden slats, which are pre-attached to the wall by means of dowels or self-tapping screws. The panels are fixed to the rails with brackets, which are closed with special corners. By the way, they perform another pleasant function - they protect wallpaper or other finishes from being ripped off by children and animals.
Usually the slopes are made the next day after the windows are installed. It is quite obvious that you can carry out all the work yourself, saving on wages to employees.
4 Maintenance of plastic slopes - to make windows shine
Although plastic is much more reliable than plaster or drywall, nevertheless, it has a shelf life. However, it is impossible to give exact numbers - it all depends on how the slopes will be looked after. Fortunately, leaving is not difficult - such work will be a joy to you.
It is best to find special plastic detergents. With their help, you can wash not only the slopes, but also the window frames. If you have not found the necessary chemistry, you can get by with an ordinary soap solution. But what you should not do is use detergents with abrasive particles - plastic, especially glossy, can be scratched.

Microfiber cloths are ideal for polishing glass and glossy edges. Do not forget to periodically lubricate rubber and silicone seals with special agents - this will help you to keep them firm and elastic.

To prevent condensation from accumulating on slopes and glass, you can use a little trick - wipe the windows with a mixture of glycerin and alcohol. It is quite simple to prepare this product - in any pharmacy there are the necessary components. One part of glycerin needs 20 parts of alcohol.


