After buying a new house, I could not even think that it would soon require drastic measures related to wall insulation. All I've heard about log houses is that they are great at keeping heat and regulating humidity levels. However, having lived in it until the first cold weather, I realized that the issue of insulation is brought to the fore for me. Since everyone renovation work I always do it with my own hands, then I decided to carry out the insulation of a log house myself.
We insulate log house do it yourself
Reasons why insulation is needed
We insulate a log house on our own
Most often, the fault of the presence of constant drafts and rapid cooling of the house after the heating is turned off is the wrong location of the radiators and the "shabby" of the structure. The fact is that wood, being a natural material, is prone to undergo various negative influences. The time comes when a log house begins to lose its properties and it should be insulated from the outside.
To insulate a log house, you can use the treatment of the attic, caulking the walls, as well as thermal insulation of the floors. However, I decided to start outside the house as there were no plans to renovate the interior anytime soon. When preparing materials for log walls, I created a list of the necessary properties that they should have:
- Vapor permeability is the key to successful thermal insulation, therefore, for use outside the house and also for finishing log surfaces, the material simply must have this property
- Moisture resistance - due to the possible accumulation of moisture, the wood begins to rot, so the material must repel it
- Fire safety is necessary for any finishing material, especially if it will be used together with wood, which by its origin is susceptible to the influence of fire
- A loose structure, which the insulation can have, allows it to adhere to the log surface tightly enough and not form unfavorable gaps at the same time
Based on this list of properties, several types of thermal insulation can be distinguished, which we will talk about later.
Insulation materials

We insulate a wooden house
The modern construction market is full of different types of insulation and each of them can be used to achieve the same goal, but on different surfaces. Judging by the above list of properties, I have identified several materials that can be used to insulate a log house:
- Slag and expanded clay - being free-flowing materials, they allow you to fill in possible cracks and cracks that are so characteristic of wooden structures. Together with this, they are affordable, and all work can be done by hand
- Ecowool - the advantage lies in the fact that when installed on the surface, ecological wool merges with wooden wall, while forming a strong and dense coating with good thermal insulation properties. The material is made by processing waste paper, after which cellulose fibers are extracted
- Sawdust is a fairly common option for insulating log houses. Despite the use of high technologies for the manufacture of material with excellent qualities, the insulation is quite inexpensive
- Styrofoam - also called polystyrene foam or expanded polystyrene. One of the cheapest insulation options, very lightweight and easy to install. However, its use for log houses is not justified due to its high vapor permeability. Because of this, the wood lends itself to rot
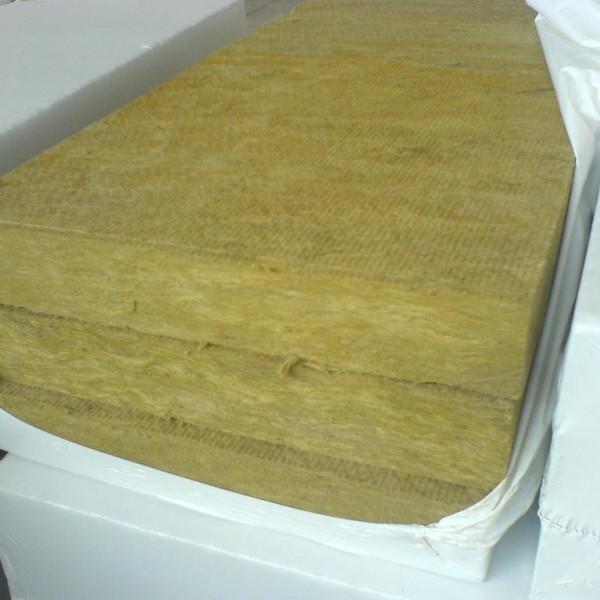
- Mineral wool - a good option for wooden house... With proper thermal insulation, the walls will be reliably protected from rotting and fungal manifestations. In addition, rodents are indifferent to mineral wool and do not make their homes in it. Mineral wool is characterized by good combustion resistance
Thanks to this variety, I was able to choose the most the best insulation for my home, which suited me, both in terms of installation technology and price.
Important! All finishing work for a log house, both outside and inside, should take place no earlier than a year after the completion of construction.
So the house I bought was already quite old, I didn't have to wait for a while, and I immediately proceeded to insulate it with my own hands.
Self-warming process

As it turned out, the choice of thermal insulation and surface mounting was not enough. As one friend of mine said: before all finishing works it is necessary to qualitatively dig the log house. However, not all cracks can be sufficiently visible and therefore there is a good way to identify defective places:
- This method consists in identifying inconspicuous cracks from which it can blow out in winter. To do this, take a candle and hold it extremely close to the surface of the walls. If the candle fire will noticeably lean towards the wall, then there is a gap in this place
- It is recommended to hold this event in calm weather.
- By the way, if it's winter outside and you want to identify cracks right now, then you just need to carefully revise the surface of the log walls. If in some places there are even small manifestations of frost, then there is a heat leak in this place.
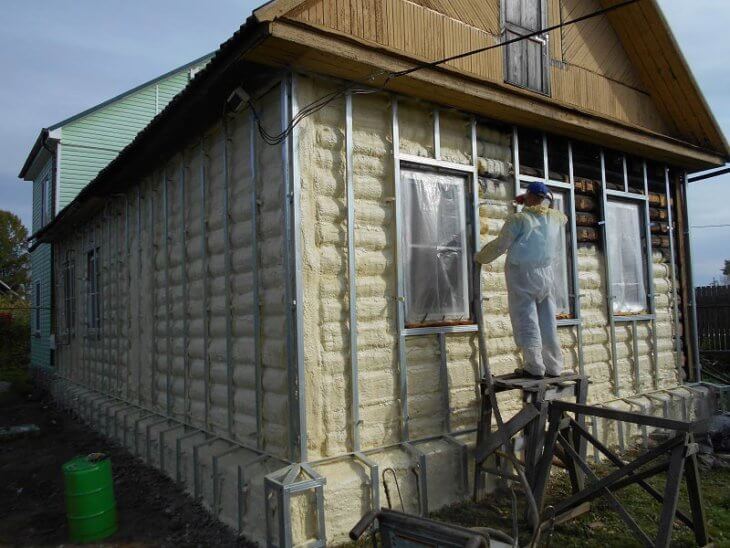
All do-it-yourself caulking processes should be carried out only in dry and warm weather. The outside of my house was insulated with mineral wool. And I want to note that thermal insulation is carried out with the help of arranging a ventilated facade for a timbered structure. So let's take a look at how to insulate a log house.
The entire do-it-yourself insulation technology outside is in the following sequence:
- The first step is to process the walls. For this, an antiseptic and a fire retardant are used. For owners wooden houses or cladding, these terms will not be new, since these materials protect wood from fire and mold
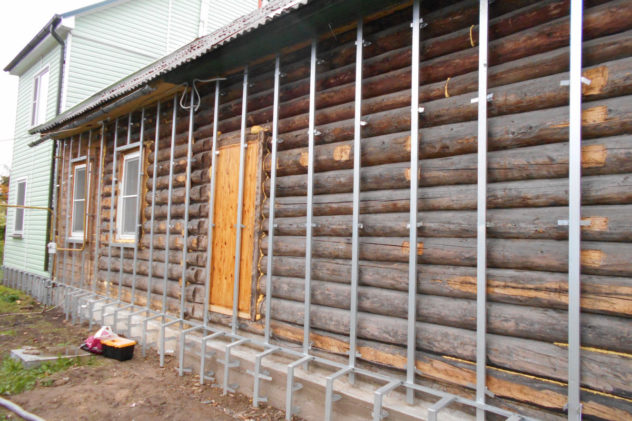
- Next, the crate is made. Bars with a cross section of 5 cm should be stuffed vertically on the walls. The distance between the beams should be a couple of centimeters less than the width of the insulation used. I used slabs of mineral wool with a density of 35-50kg / m3
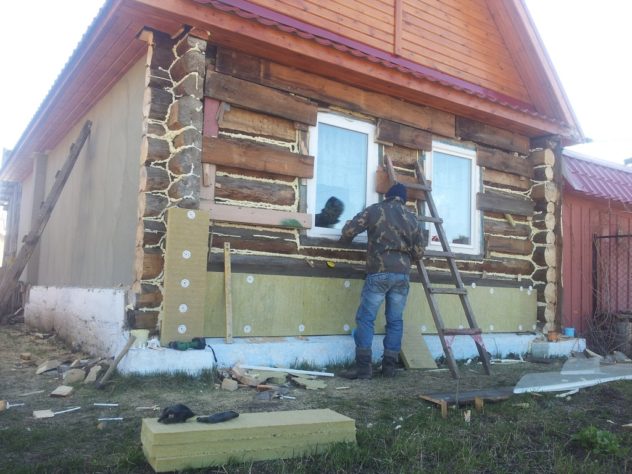
- Insulation is inserted between the lathing structure and is tightly pushed into the opening. The process starts from the bottom up. Very often at this stage, problems can arise, since it is very difficult to lay the material close to an uneven log wall. For this purpose, “basalt” in rolls is placed in the gaps between the frame beams and the wall surface
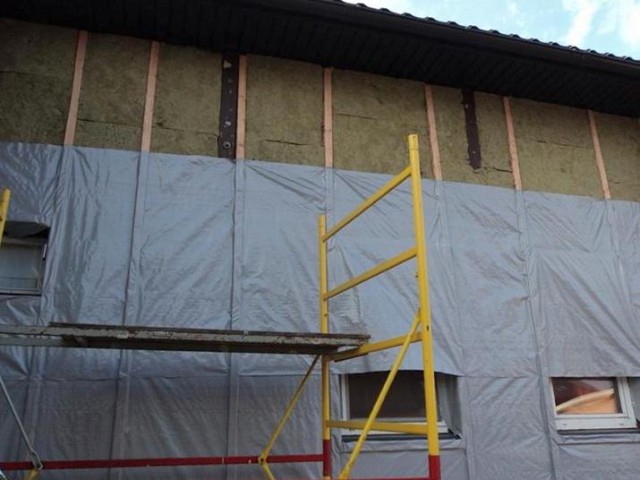
- When the boards are installed, it is necessary to install a windproof waterproofing membrane. This stage must be taken very seriously, as it can nullify all your efforts. I used a membrane with a vapor permeability of 1400g / 1 day
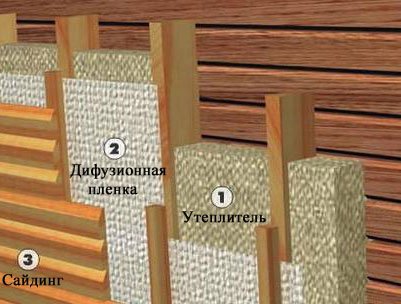
- On top of the windscreen, the sheathing beams are re-stuffed, onto which the siding panels are subsequently installed. Of course, I decided to use a wooden blockhouse and thus restore the appearance of my log house as much as possible. However, you can use metal or vinyl siding, the wide color palette of which allows you to create incredible facades.
If you have not yet decided with the help of what and how to insulate a log house, then I hope my article helped you decide on the place of work. Carrying out insulation outside allows us not only to create a favorable microclimate in the room, but also to preserve the precious living space that we so need. In addition, it is very advantageous to carry out insulation from the outside when decorating log walls with a ventilated facade.
Log houses are characterized by their uniqueness manifested in the natural supply of warmth and humidity inside the house. But over time, this quality deteriorates, and with the arrival of cold weather, in some cases, problems in terms of thermal adaptation are revealed. A similar inconvenience haunts the owners of homes purchased on the secondary housing market. There is only one way out - insulation of a log house.
Where does the heat go?
The unpleasant cold in the house is unsettling and makes us look for additional ways to warm up the room. The inhabitants in all ways begin to catch up with heat: they purchase various heaters, use all methods of insulating windows and turn on indoor heating at full capacity. All this takes time and money, and does not always justify the goal. First, you need to decide where the heat goes?
A common reason in a new home is marriage. Through cracks that appeared during shrinkage due to the fact that undried wood was used in the work - the most unpleasant thing that can happen to a log house. The loss of heat is affected by poor-quality vapor barrier and insulation, which are not selected according to building standards.
You can identify the leak yourself. You need to start with the attic structure, because up to 40% of the heat goes through the ceiling. Then check the flooring. The gaps that appear between the boards when the wood shrinks become direct suppliers of cold to the house. Examine the walls last.
Heat loss can be detected simply by placing a hand on wallpaper or other finishes. If the wall is cold, then the leakage occurs through them. The fact that heat seeps through the walls can also be judged by the peeling wallpaper, if the design in the house is made using this material. Cold and heat coming through the cracks from inside the house, accumulate inside the walls and decompose adhesive composition.
If the problem is in the flooring, you can tell by the cold surface. In this case, no insulated linoleums and laying of the thickest carpet will help. The cold will always haunt you if there are problems with its design.
It is difficult to visually identify heat losses through the ceiling. This can be judged by checking the attic space. If the house is not new, then it is better to change the insulation. It is not known what principles of warming the previous owners were based on. By designing own house to insulation attic space must be treated responsibly at all stages of construction. In this case, you will not have problems with heat loss through the ceiling space.
Cold protection options for a log house
When building a new house, thermal insulation is thought out and implemented in the construction process. But over time, any structure will decay. Even if you did everything according to the instructions and used high-quality wood, the wood will crack and the cracks will become the primary sources of cold.
In the last century, no thermal insulation was used in the construction of a log house. Only insulation with tow and, if possible exterior decoration protecting houses from the wind. In this case, only new lining on the outside of the structure will help, with the installation of the heat insulator in the frame.
The house is additionally insulated from the inside. For these purposes, you can sew up the room with drywall or plaster with a hydrophobic mixture. A certain percentage of the area will be lost, but in this way you can return the former comfort and warmth to the house. When working, you need to strictly plan all the manipulations. Leave space for ventilation between the lining so that condensation does not form underneath.
There are some guidelines for interior decoration... Drywall can be used in any environment. Even if the house is used infrequently and only come in winter for the weekend. Plastering the walls is allowed only if you live in the house permanently. When cooled, the mixture will crack and become unusable not only for insulation, but also for its appearance.
What material is better to choose?
Everyone knows that the material used to insulate the house must be of high quality. The main requirements for thermal insulation materials are characterized as follows:
- high degree of vapor permeability;
- fire safety;
- moisture resistance;
- environmental Safety;
- immunity to mold and mildew.
On a note. It is necessary to carefully read the recommendations of the manufacturers regarding the possibility of using thermal insulation. Almost all modern materials have the presented characteristics, and you can protect them from fungus and mold with waterproofing films.
Consider what the market offers in this regard building materials?
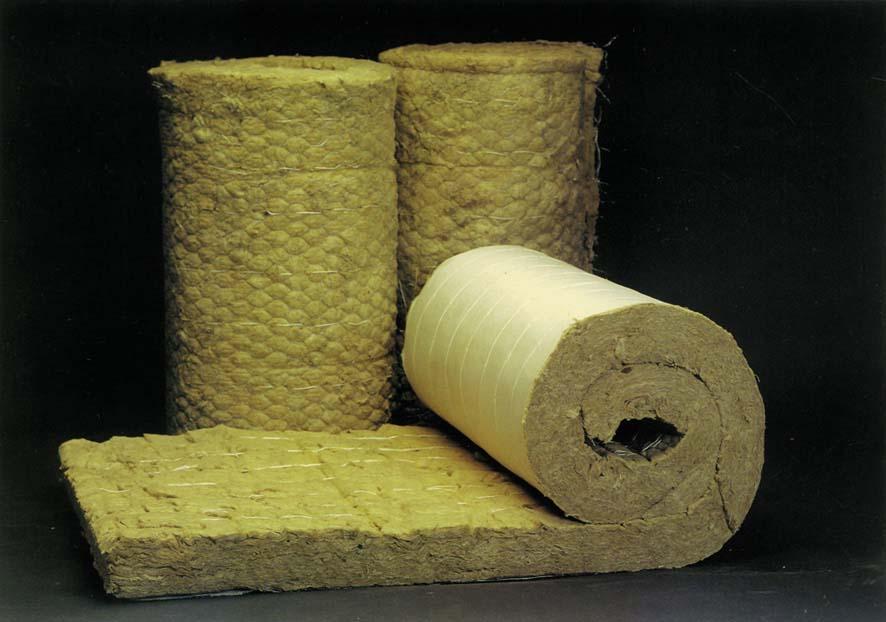
Mineral wool
The production of this cold insulator is based on the use of silicate alloys of rocks as a base. The participation of ingredients obtained in a natural way indicates the environmental friendliness of the product. Mineral wool does not rot, does not burn and does not emit any harmful impurities.
It is produced in convenient formats: in the form of mats of various sizes and in roll batches. Easy to process and attach to any surface. A small disadvantage is the time cost, which affects material density and cost. Over time, the mineral wool is deformed, but this will not be visible under the outer lining. In addition, a slight shrinkage has practically no effect on the quality of insulation.
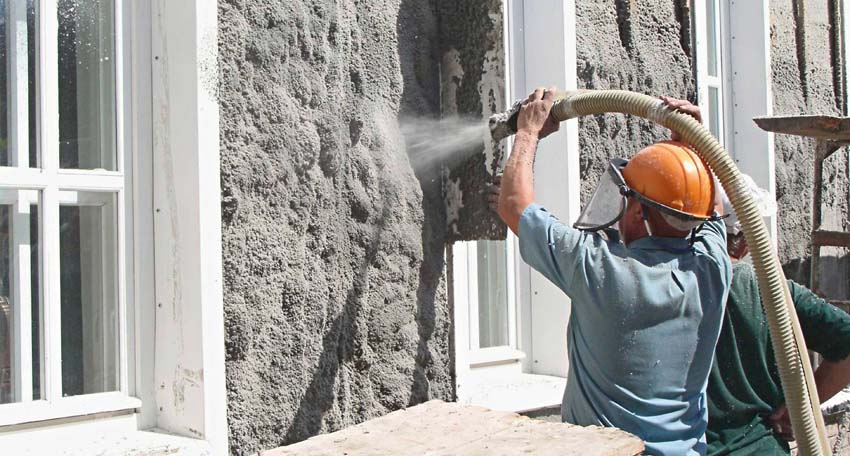
Styrofoam
Thermal insulation of a house with foam is one of the most inexpensive and in-demand methods. The material is easy to assemble and process. Insulation is carried out in the usual way - a crate is mounted, foam panels are placed in it, and the frame is sewn on top decorative panels.
Experts note one significant drawback - the vapor permeability of the plates. The density of the material does not allow air to pass through at all, as a result of which warm fumes leaving the house condense on the tree. And as everyone knows, water is the main enemy of wood. Over time, under the sewing, the logs will begin to rot and decompose. Therefore, for insulation wooden structures it is better not to use it. And if a choice is made towards this option, then you need to additionally cover the structure with plastic wrap from the outside.
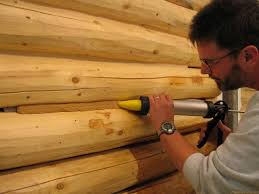
Ecowool
Also environmentally friendly material. Ecowool is produced from cellulose fibers. Not a bad option for insulating a log house. It has all the characteristics of mineral wool. The cost is slightly cheaper, but inferior in strength.
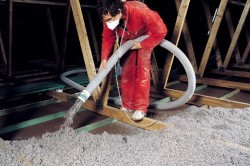
Despite the similar name in structure, it is completely different materials... Ecowool is something like construction foam. It is supplied in special containers and sprayed on the walls. When mounted, it fits snugly to the surface, repeating all the contours of the frame.
To keep the applied layer on the wall more confidently, a crate is sewn onto the frame. Additionally, it is moistened with water or special glue. When sprayed, a dense layer forms on the surface of the walls. The quality is proved by the fact that during application the material gets into even the smallest cracks, clogging them. Thus, the insulation with ecowool is practically deaf.
Important! Before applying ecowool to the surface of the walls, they are pre-cleaned from any deposits, debris and sawdust. After spraying, the walls should be covered with plastic wrap and left to dry for 4–5 days.
Sawdust
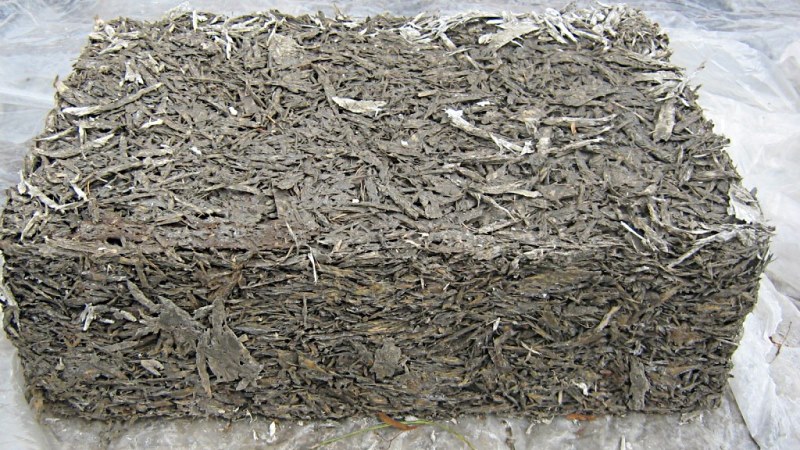
The most environmentally friendly product. In terms of heat preservation, sawdust is not inferior to modern materials, but they are highly flammable, unstable in front of any manifestations of moisture and rodents and insects like to visit them. In its pure form, shavings are not used for insulating log cabins. It can only be poured into an underground space, and even then mixed with glass.
Sawdust concrete is used for thermal insulation of the house. It can be in bulk or assembled slabs. In its pure form, sawdust can be poured onto the ceiling from the attic. It is only imperative that a vapor barrier layer is first laid on the boards so that moisture does not condense in the shavings. The volume will be given by a bedding from expanded clay.
Of all the materials presented, mineral wool will be beneficial in all plans. Using her example, we will consider the process of warming a log house.
External wall lining
In any case, a new house is protected or life is breathed into an old building, at first the walls are insulated on the outside for siding or other finishing, only after that inside. And the first step is to thoroughly prepare the walls for work. At this stage, the following manipulations are carried out:
- the entire surface of the log house is cleaned of slag, sawdust and other debris;
- sealing of cracks and, if necessary, caulking of the crowns of the log house
- then the wood is treated with antiseptics.
After that, we stand for 2-3 days and proceed to the installation of the battens. It is stuffed upright. It is better to maintain the distance between the bars according to the size of the insulation mat. All boards should be as flat as possible.
After assembly, a vapor barrier is laid, a heater is placed on top of it, again protective layer and at the last stage, the frame is sealed with siding. This is the easiest and most effective way to insulate the walls of a log house. Now let's look at what can be done with the ceiling.
Insulation of the attic
The actual heat leaving through the ceiling somehow bypasses this room. Therefore, we will insulate here. The material can be used the same as for wall protection. Sawdust with concrete chips is often used. The work is carried out as follows:
- bars are stuffed, like a crate;
- the vapor barrier is laid;
- a heat insulator is poured into them;
- the board is sewn up.
When it comes through the floor
Cold passing through the genital crevices is the most unpleasant. In log houses, deformation occurs due to prolonged use of the house or improper installation of the flooring. Floor insulation will be the most laborious.
First, the old flooring is removed. The internal space is checked for rotten supports. If there are beams "eaten up" by rot, they must be replaced. At this stage, the integrity of the foundation is also checked. Cracks and deformations result in severe heat loss.
The floor is insulated with rubble backfill with cement filling. When the mixture hardens, the floorboard is stuffed, preferably a new one. If the old coating will fit during dismantling, all elements are marked so as not to confuse the sequence.
If possible, you can implement the option of laying the contour of warm floors. These can be water-based systems. Only this option fits under the boards. If you radically change everything and make concrete floors, then a system of electric heating systems is installed under them.
Insulating a log house, new or old, is a whole ritual that must be approached fully armed. If comprehensive measures are introduced, then any mistake in creating protection for even one element of the walls, floor or ceiling will subsequently affect the general microclimate, reducing the quality of heating.
A unique feature of log houses is that they are able to maintain heat in the interior and regulate air humidity within certain limits. But sometimes owners with the onset of winter find flaws in the level of thermal insulation.
This often happens if the log house was recently purchased and itself is not in the best condition. Then there is a need to carry out high-quality insulation of such a building.
Does a log house need to be insulated?
For the owners log houses sometimes they notice that a draft appears in the premises, and the floor and walls cool quickly after the heating is turned off. To prevent this from happening, you should carry out high-quality thermal insulation of the building. Many building elements need to be insulated. Especially serious heat loss is characteristic of the attic, because up to 70% of the heat lost by the house can go through it.
In addition to the attic or attic, walls and all those elements through which heat leaks can be observed need thermal insulation. The latter include slopes, window sills, windows, entrance doors. Log walls should also be well buried if noticeable cracks appear in them. An excellent addition to the usual heating system there will be a "warm floor", which is easy to lay even on your own.
The main reason for the rapid cooling of air in the interior is the insufficient thickness of the outer walls. But one interesting specificity is observed here: the lower the natural humidity of the air, the thinner the walls can be. For those regions where the humidity is at a low level, it is enough to use logs about 20 cm thick. But for most regions of the country, "wet" winters are still characteristic, therefore, to obtain decent thermal insulation, you have to erect buildings from logs with a diameter of 40 cm or more. When such a moment is not immediately taken into account, subsequently there are problems with the level of insulation. How to raise it? This will be discussed further.
Materials for insulating a log house
To maintain a favorable microclimate in a log house, it is best to use natural materials. The so-called "old-fashioned" methods of insulation allow you to obtain excellent thermal insulation, and are much cheaper. You can insulate the attic if you pour a mixture of earth and clay in it. For the implementation of such a process, including expanded clay and ecowool are suitable. You can dig through the walls using materials such as hemp, moss, jute, tow, and so on. The surface of the floor can be protected by using expanded clay or slab mineral wool.
But even such events are sometimes still not enough to make the thermal insulation of a house from logs high. Then you will have to use additional methods of providing thermal insulation. For wall insulation, it is necessary to use materials with high vapor permeability. At the same time, the insulation should not accumulate moisture. It's good if it is fireproof, environmentally friendly and uninteresting for insects and other pests.
Based on such requirements, it will turn out to be called such as suitable heaters for log buildings. It is better to insulate the walls with mineral wool or ecowool. The attic will be reliably insulated with sawdust or expanded clay. At the same time, you should not use polystyrene, polystyrene foam and other materials based on polystyrene. Their low vapor permeability will lead to the fact that the walls of wood will rot very quickly, as they become covered with moisture.
Stages of insulating a house from a log outside
The most correct method is considered to be the thermal insulation of the log walls from the outside. The reason is that wood has a unique ability to let air through itself. When arranging a ventilated facade, all the conditions will remain for achieving a good weathering effect. But here you have to take into account that it is possible to move on to insulation measures only after the log frame shrinks. This takes about a year.
1. Caulking a log house
Regardless of the chosen method of insulation, the first action of the owner should be caulking. To begin with, the walls must be examined for cracks. All identified problem areas are covered with hemp or tow. In order to qualitatively dig through all the gaps, you will need to push the material used with a special spatula. This must be done until the moment when he hits the "obstacle".
2. Arrangement of a ventilated facade
The best method of external insulation of the house is the installation of a ventilated facade. The work is carried out in a specific order. They look like this.
1. Wooden walls are covered with an antiseptic.
2. A crate is installed, the distance between the elements of which is almost similar to the width of the insulation plates. It should be about 1.5 cm less.
3. Laying of heat-insulating materials. Plates should fit tightly between the frame elements.
4. Decking of windbreak or waterproofing.
5. Installation of the second lathing followed by installation of siding.
For waterproofing purposes, it is best to choose a super-diffuse membrane. It allows you to protect the insulation from contact with moisture. But on the reverse side, that is, from the wall, moisture will be effectively removed. Therefore, the walls can breathe. But it is important that the superdiffuse membrane fits with some siding clearance. Also, air vents are left in the upper and lower parts, allowing air to circulate normally.
How to insulate a log house from the inside
Experts advise to resort to internal insulation only in exceptional situations. When placing insulation on the inside, there is a risk that the logs will stop breathing. Subsequently, this will cause the development of mold. During interior work, it is better to lay the heat insulator in the attic and the floor, as well as additionally insulate doors and windows.
1. Insulation of the attic in a log house
In a one-story log house, waterproofing is laid along the attic floor, which is then covered with heat-insulating material so that the insulation layer is about 25 cm. attic floor Insulation on the inner side of the roof with insulation between floors will be more effective. Interfloor ceilings are insulated so that the protective layer is 5-10 cm thick. Roof insulation involves waterproofing flooring followed by a 20 cm layer of mineral wool. The thermal insulation is covered with a vapor barrier membrane and sutured with plasterboard.
2. Insulation of walls inside a log house
The walls themselves should be left without insulation. But you need to get rid of all the cracks and gaps. For these purposes, jute, moss, tow, special mezhventsovy heaters are used. It will be possible to increase the thermal insulation if you carry out the inner lining wooden clapboard.
3. Insulation of the floor in a log house
At this stage, the space between the lags is filled with insulation, after which a rough floor is formed. Expanded clay or mineral wool is suitable as a heater.
Thermal insulation of a log house - a complex procedure
Only with an integrated approach to warming a house from logs will it be possible to obtain decent thermal insulation. If the procedures described above still did not provide adequate protection from the cold, an extension in the form of a veranda must be made on the north side of the building and additionally insulated. Then the heat loss will decrease, an additional air gap will appear between the external environment and internal rooms.
Well thought out and properly designed, wooden houses show excellent indicators of comfort and coziness. However, buildings erected without adequate thermal protection and internal heat circulation requirements often require acceptance additional measures, therefore, it is important to know how you can insulate a log house from the outside.
What problems arise in wooden houses over time
Any structure is not eternal. Over time, a timber house can reduce its heat retention performance.
There are:
- cracking of structural elements;
- destruction of the tree due to insect attacks, rot;
- cracks due to drying of the material and changes in the geometric dimensions of the wall elements.
It should be noted that modern projects take into account the impact of time as much as possible and during construction all measures are taken to ensure a long service life of wood. But the old houses are fully suffering from the destruction caused by long-term use.
Over time in wooden house there are light drafts, zones of ice on the walls, irregular air flows from heating zones. As a result, the building becomes uncomfortable, especially during the winter months. Heating costs are growing, in addition, if it is improperly designed, the presence of drafts cannot be overcome. The best way to regain comfort is to insulate the walls from the outside.
What general actions are required before insulation
To achieve maximum results when using any method of insulation, you need to carry out a series necessary work... Their list is as follows:
- carefully check the outer surface of the walls. Remove from them all materials that impede steam circulation;
- if possible, remove areas damaged by rot;
- repair visible damage, where necessary - apply patches;
- carefully caulk all the cracks;
- treat with antibacterial and anti-rotting agents. It is cheap enough to use salt-based formulations.
When choosing a specific heat insulator for the construction of thermal insulation of wooden walls, it should be remembered that it must correspond to its task, namely:
- ensure vapor permeability not lower than that of wood;
- do not accumulate moisture;
- do not serve as a breeding ground for the fungus;
- do not burn, let air in;
- be loose or pliable enough to adhere to a log wall.
From this list of requirements, it is easy to understand what is not suitable for wooden walls:
- foam and extruded polystyrene foam;
- polyurethane foam, construction foam;
- sealants of any class, if wet facade technology is used.
Ideal to use, especially if ventilated structures are installed:
- in the role of sheet materials - ecowool and mineral wool, both classical on the basis of glass, and basalt, slag;
- in the role of filling materials that require a frame with an outer wall - special sawdust-granules or expanded clay, ecowool, and so on.
By choosing the right materials for creating wall insulation, you can guarantee not only a good level of comfort inside, but also ensure the long service of the walls of the house and the best operating conditions for wooden structures.
Different ways of insulating a wooden house
Let us dwell on the available methods by which you can properly insulate a wooden house. Modern techniques make it possible to properly insulate a wooden house and guarantee the desired level of comfort. At the same time, the insulation will last for a long time, and the walls will have a pleasant and neat appearance.
The exterior insulation of a building has a number of advantages:
- thermal insulation takes over temperature fluctuations and compensates for them. As a result, the walls have a longer service life, since they are less destroyed, they are not exposed to significant changes in humidity, temperature, and the degree of mechanical stress is reduced;
- the user can choose the type of facade he likes, so insulation can become a form of design;
- wall insulation from the outside does not in any way affect the interior space of the house, no repairs are required, the decoration used inside is not limited;
- the configuration of the rooms does not change;
- while the external wall insulation is performed, you can take your time. There are no changes inside the house, the same comfort and coziness remains.
As a result of finishing the external facades, it is possible to significantly change the heat retention rates, ensuring the comfort of living, which is very important for old wooden houses.
Ventilated facade
 Modern insulation, capable of providing the best performance both in terms of heat preservation, as well as in terms of durability and the required appearance, is a ventilated facade system, which is a rather complex, multi-layer structure. Let's consider the creation of such thermal protection in more detail, since it is universal, gives a lot of advantages and therefore - is most often used by owners of wooden houses.
The main requirement that must be met when creating a ventilated facade is to ensure correct steam exchange. The insulation should not get wet. Therefore, the first layer creates a vapor barrier, which is located between the insulation and the wall.
For a wooden house built from round logs, vapor barrier is not necessary, as there is sufficient space for air circulation. In buildings with a smooth wall, vapor barrier is necessary, therefore, a thin crate is sewn onto which a plastic film is applied, a reinforced construction option. You can also cover the wall with polyethylene foam, which will additionally retain heat.
The second stage is the stripe of the frame for laying the insulation. This is a structure made of strips, the distance between which must correspond to the dimensions of the material plates used, the recommended parameter is no more than 600 mm. At the same time, if mineral wool is used, you should immediately remember that it sags over time and therefore the frame should have not only vertical, but also horizontal beams.
After the lathing is sewn, insulation is laid in it, while gaps should not be allowed. If two layers of insulation are used, the elements are arranged so that the joints between the inner ones are in the middle of the outer ones. 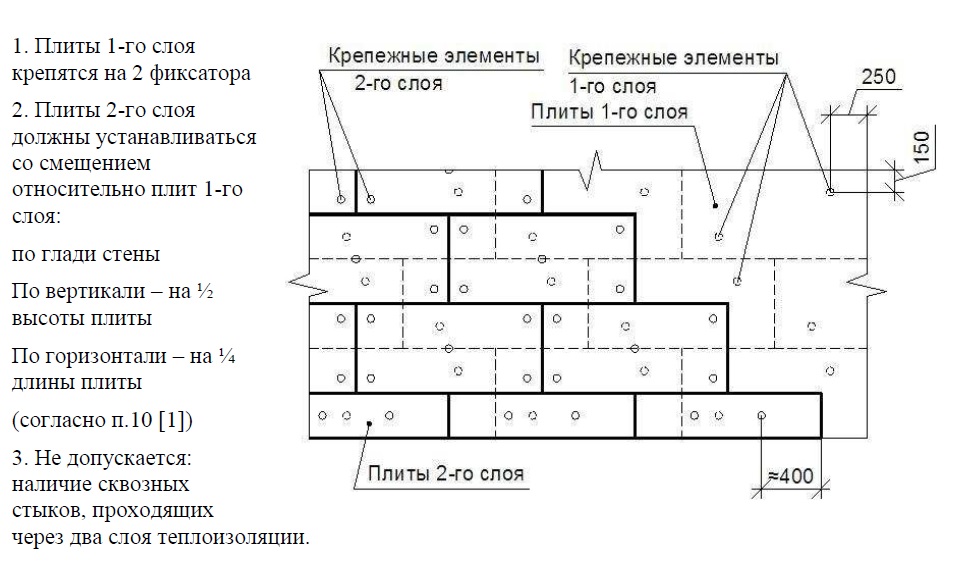
Outside, the insulation is covered with a special windproof layer. This is the so-called superdiffusion membrane, a non-woven textile that perfectly permeates steam, but at the same time retains water. The layer is mounted neatly, the joints of the elements are glued with adhesive tape.
After installing the windscreen, a frame is sewn onto which the external trim of the ventilated facade will be attached. These are slats of small thickness, 40-50 mm. Immediately, we note that there are many options for creating external finishes, some of which put forward requirements for the insulation used and the methods of installing the internal "layers" of the ventilated facade. The article discusses only simple types of exterior finishes available to the average performer.
Various decorative shields or materials can be sewn onto the outer frame. This could be:
- vinyl siding that looks like a wooden board;
- cement particle boards;
- steel corrugated board;
- house block, with which you can simulate the look of a wall made of logs.
In the simplest and most economical version, eurolining, plastic lining can also be used. It all depends on the financial capabilities of the owner of the house or his work skills.
External insulation by the "wet facade" method
 Quite often, a method is used when the walls are insulated by attaching a layer of thermal insulator to its surface. The outer part is finished using the wet facade technology, as a result, the insulation consists of the following elements:
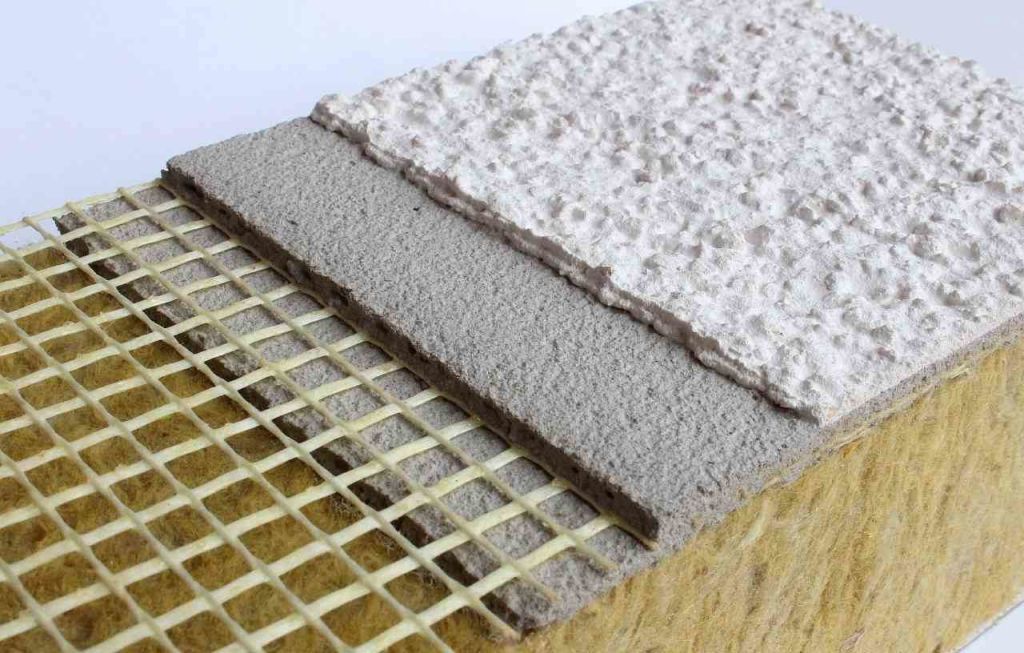
- a layer of insulation that can be glued or mounted with dowels;
- reinforcing mesh;
- several layers of coating, usually formed from ready-made building mixtures.
If you carry out such wall insulation professionally, you need to ensure the quality of the outer coating. Therefore, it will consist of a reinforcing layer, an intermediate layer, which will provide a smooth, durable surface, as well as a decorative layer, which can be a relief finish or a "fur coat" type coating that improves heat retention.
Tiles can be used as a finishing layer of external insulation, decorative rock, artistic plaster, paint and other materials designed to provide the desired appearance of the wall surface.
 Conclusion
As you can see, even the most modern methods of insulation, which show excellent results, are not so difficult even for do-it-yourself work. However, it is worth remembering that when creating any class of finishing, it is necessary not to forget about the ventilation of the house and the decoration of window areas, since there is an inevitable thickening of the walls of a wooden structure.
Since ancient times, a log house is considered one of the warmest known buildings. And all thanks to the fact that a traditional log cabin is able to perfectly store heat and maintain a balanced humidity. It is known that wooden wall 24 cm thick gives the same insulation of the interior space as a meter-long brick wall.
Penofol - thermal insulation materialused to insulate all surfaces of a house, bathhouse, warehouse, pipeline, car, etc.
But wood is not an ideal cold remedy.
Often, residents in a new wooden house find that with the arrival of cold weather, the house does not seem cozy from the inside and is unpleasantly striking with drafts.
And then, despite the natural building material, you have to look for a suitable insulation. This problem applies even more to old houses.
This problem is completely solvable. For example, you can install thermal insulation both inside and outside. But many people want not only warmth in the home, but also preservation of the unique log structure of the building. And in order to make the house as comfortable as possible, it is enough to figure out how to insulate a log house from the inside, and to bring this idea to life.
Surfaces involved in heat transfer
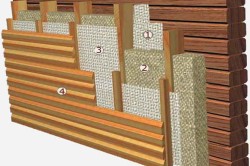
Thermal insulation scheme of a log house: 1. vapor barrier system; 2. thermal insulation; 3. waterproofing; 4. clapboard sheathing.
Before starting the insulation of a house or a bath, it is necessary to determine the areas involved in heat exchange. This list includes ceiling, floor and walls. They are the ones that need to be checked for heat leaks. On these surfaces, you will have to make the main insulation if the house is cool.
- Ceiling. Up to 70% of all heat goes through it. To eliminate this problem, it is recommended to insulate the attic space.
- Walls. Most of all openings are located here - windows, doors. In the places of their installation, as well as in the walls themselves, gaps can form between the logs. To avoid drafts, the joints of the logs must be carefully drilled.
- Floor. Checked for cracks. Insulated as standard, as for all other floors. The device of warm floors can be a good help for warming premises. In addition, on the eve of winter, the ventilation of the subfloor should be reduced by covering some of the ventilation openings.
When developing a project for a log house, it is imperative to take into account in which climatic zone the building will be operated. To determine the thickness of the walls of the future wooden house, the average temperatures of each of the seasons and the humidity of the air are of no small importance. So, the more severe the climate of the region, the thicker the walls should be. But low humidity, even with severe winter frosts, makes it possible to erect log cabins with slightly thinner walls than in cases with high humidity and milder climate.
Back to the table of contents
Tools used when insulating a house from the inside
For insulation work, you should prepare the following tools:
- Hacksaw.
- A hammer.
- Screwdriver.
- Pliers.
- Scissors.
- Blades and caulking tools.
- Measuring ruler (tape measure).
Back to the table of contents
How to insulate a log house from the inside: solution options
Complete insulation of a house from logs involves the treatment of all surfaces involved in heat exchange with the external environment: roof, floor, ceiling and walls, as well as window and door openings. Often, standard measures are sufficient to provide a home or bath with guaranteed protection from cold weather and drafts.
It should be borne in mind here that usually log buildings, including wooden baths, are chosen for construction precisely because of environmentally friendly building materials. Therefore, a smart and demanding customer traditionally tries to insulate a log house from the inside. natural materials... In particular, caulking the joints of logs in the walls is a mandatory operation when insulating a room - in this case, it is made by the well-known and well-proven hemp, tow, moss, jute, linen-based insulation tape.
When spraying, ecowool fills all cracks and cracks, so that subsequently the walls, ceiling and floor of a log house do not need to be caulked.
However, even after all the standard insulation measures, it can be quite cold in a log house. This usually happens if the heating system is improperly arranged in the house, or the previously selected thickness of the logs does not correspond to the severity of the local climate. Then it is recommended to conduct additional insulation of the above surfaces.
Ceiling (roof) insulation. Produced at the first sign of cold indoors. To do this, a special waterproofing film, and then the insulation is laid (poured) on top. Materials such as sawdust, dried seaweed, ecowool (cellulose wool), standard mineral wool in rolls or slabs can be used in this capacity. For ease of movement in the attic, boards are laid on top of the insulation.
If a residential building is crowned not by an attic, but by an attic, then not only the overlap between the attic and the lower room requires insulation, but also the roof. Usually, in order to make the overlap heat-insulating, any insulation laid between the base logs with a layer from 50 to 100 mm thick is sufficient. At the same time, the roof slopes from the inside are covered first with a waterproofing film, and then with a heater (preferably mineral wool) with a layer of 100-200 mm (depending on the climatic conditions of the area).
Floor insulation. After preliminary standard bedding and waterproofing, the wooden floor in a log house is covered with insulation. Mineral wool slabs are placed between the floor joists. The insulation layer must be at least 100-150 mm. From above, it is covered with a rough, and then a finishing coating.
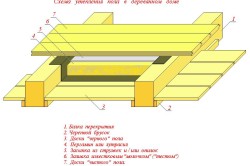
Scheme of floor insulation of a log house.
Wall insulation. As noted above, the minimum insulation of walls lined with logs is reduced to caulking the joints (cracks) between the wall logs. Additional thermal insulation of the walls in such a house is provided by one of the options below.
Decorating a wooden house or a log bath from the inside, to make the room warmer, can be done with wooden clapboard. This is done without placing insulation between the main and additional walls. Thermal insulation is provided due to the air gap formed between them.
Another option is the construction of false walls made of plasterboard with a depth of 50-100 mm on profiles. Unlike insulation with clapboard, this method gives a greater effect of thermal insulation and is used in buildings that are located in a region with severe frosts. Persistent heat retention in rooms is ensured by the presence of multilayer thermal insulation (for example, mineral wool, foam, etc.). However, with this option, you will have to come to terms with a slight decrease in the usable area of \u200b\u200bthe room.
Environmentally friendly methods of insulating a log house or a bath include wall decoration with oriented strand board (OSB). Solid insulation consists of 3-4 layers of shavings of different types of wood. It should be noted that this strong and durable material has a high degree of moisture resistance, which is why, when using it as a heater, you can completely do without vapor barrier. Such slabs are simply attached to the wall logs with dowels.
IN last years Thermal insulation of walls, including log walls, by means of penofol, a foil sheet based on foamed polyethylene, has been widely used. Along with the properties of a good vapor barrier, penofol perfectly retains heat due to the numerous air bubbles clogged under the plastic wrap. At the same time, the aluminum coating on the reverse side of the foam sheet effectively reflects the thermal radiation directed from the inside of the heated rooms, preventing the radiation from leaving through the wall to the outside.
Installation of this canvas on the wall is quite simple. On the log surface, guide rails are pre-packed in such a way that the step between them is convenient for fastening the canvas and corresponds to its size. During installation, the penofol strips are attached with an overlap of 10 cm. The gaps are glued with foil tape. A frame is made on top of the penofol, on which the finishing finishing material is attached. It is necessary to ensure that the air gap between the penofol and the cladding is at least 2 cm.


