In this case, before proceeding with the cladding, they must be repaired and properly strengthened.
Brick wall repair
The main defect in brick walls is cracks. They can arise for various reasons.
Before starting repairs, you need to find out exactly why the wall cracked. Without detecting and eliminating the original cause of the damage, it is impractical to start repairs, since cracks will appear again and again on the already repaired walls.
Namely: this operation can be messy. Feel free to place a protective cover under the facade to easily recover debris. Depending on the material of your wall and the depth of the crack, you should apply filler. Depending on the case, you may need.
Concrete repairs for cracks, facade fillings. ... Apply filler along the entire length of the crack and smooth with a spatula or finger. If you are using an extruder gun and cartridge coating, it is important to cut the cartridge cannula according to the size of the crack being treated.
The causes of cracks
As mentioned in the first chapter, the main reason for the appearance of cracks on the walls is the subsidence of the building foundation and its deformation. It sags under the influence of unfavorable external factors and "drags" the walls behind it. Under the influence of such a displacement, the brickwork does not withstand and cracks. Slight subsidence is a natural process in the first 1-1.5 years after the construction of the building and does not cause significant damage. It is worse when the drawdown does not stop - this can already lead to serious consequences for the walls of the house.
Processing cracks in plaster: video tutorial
Once the renovation is completely dry, it may be necessary to remodel the façade or paint the façade to make the renovation invisible. If you think that your facade has lost its tightness, do not hesitate to pay for a facade treatment. Need more advice on how to remove walls? In that case, feel free to take three minutes of your time to watch this video.
If your plaster is in very poor condition. As always, our estimates can help you prepare a budget for such an operation. And if you have questions about the cost of repairing a crack, do not hesitate to ask for a cost estimate with our free form!
The second reason for the formation of cracks is errors in the structure of the building, caused by its incorrect design. As a result, the walls can be loaded with too much load from the floor. Unable to withstand the pressure, the walls crack.
Another one possible reason - poor quality wall masonry. If the walls were erected by non-professionals, the brick laying technology could be violated. This can also include the use of a poor-quality solution.
It is not necessary to demolish the old windowsill. You can just try to repair the damaged one. This is a simple operation, but requires a minimum of knowledge about some practical masks. To repair a windowsill you will need: alcohol level, drill, tape measure, mason's spatula, ankles, screws, mortar, spatula, ruler, linseed oil and holds.
Preparation and installation of external plaster
First, you must prepare the surface with a triangular scraper by removing any parts that are already detached from themselves. Then clean the dust with a vacuum cleaner. Your mortar will adhere better to a clean, level surface. It's time to prepare the plaster. You get an effective, lump-free solution by mixing two doses of powder for a dose of water in a bucket. Your grout should be smooth and thick. This coating dries very quickly, so it will need to be applied without waiting for damage to the surface of your window.
The lack of drainage on the roof can also lead to the formation of significant cracks. Rainwater, flowing down the wall, falls into the microcracks in the masonry. When the air temperature falls below zero, the water freezes, expands and destroys the seam brickwork... Over time, such a crack can grow to a critical size. It is possible to determine this origin of a crack by a recess extending from the roof - a path washed with water, constantly flowing down in this place.
Refer to the coating insert for the preparation steps. Let dry before starting finishing works: sanding, applying one to standardization, etc. however, overcoating should be avoided as this makes the sanding process difficult.
The grafted and half-timbered buildings with the so-called quote are almost synonymous with the traditional North Bohemian countryside. However, it does not always take good care of the surviving vernacular buildings. An example of successful renovation of traditional handicraft methods, general renovation of a storied farm building with a log cabin and curb the chamber floor carried by wooden columns Supporting structure are called.
In order to pinpoint the causes of damage to the walls, it is recommended to invite specialists for a thorough professional survey of the building. But a preliminary conclusion can be made independently, by the appearance of the cracks.
- If the crack is narrow at the base, and its expansion begins upward.
- If, on the contrary, the crack is narrow at the top, and the expansion begins downward, it was formed from excessive pressure of the ceiling on the walls.
- The vertical location of the crack, as a rule, indicates an insufficient depth of the foundation. It is located above the freezing level groundwater, as a result of which it shifts up and down from the seasonal swelling of the soil.
- The formation of oblique diagonal cracks indicates an uneven subsidence of the foundation. This happens when voids form under a part of the foundation or with different bearing capacity soil under different areas of the base of the house.
- If all oblique cracks have the same direction, then one corner of the house has subsided. If they are directed in different directions, this indicates multiple uneven subsidence of the foundation.
- The formation of horizontal cracks above the window opening indicates deformation of the overlap or its insufficient strength.
- The formation of arcuate horizontal cracks is a consequence of too much heavy weight a ceiling that the walls cannot cope with.
- The formation of a vertical crack at the junction between the main residential part of the house and the extension speaks of constructive negligence - an expansion joint was not made between these parts of the building.
Before starting to repair cracks, you need to check the dynamics of their increase. To do this, a paper beacon tape is glued across the crack.
When this happened before the exchange of concrete shingles for Gray Clay Plains tiles, including the construction of new attic in the form of scrambled eggs, and renovation of the rear brick house, where the first floor was created by the museum exposition. The lower threshold of the sill girder and formwork were missing, as in the past, to replace the elevated brick retaining wall, which is already documented in the historical postcard of the corner column sockets are also used to replace the brick pillar.
After opening the wall, a local authentication probe was carried out to assess the situation and the degree of damage to individual wooden elements of decaying insects, and after several expert consultations with Czech and German specialists who have practical experience in the repair of historical wooden buildings of this kind, a preliminary range of exchanges and prostheses and the procedure repair.
How to work with lighthouses was discussed in detail in the first chapter. We add that the lighthouse can only be glued to a prepared, cleaned of plaster and washed section of the wall. Otherwise, the adhesion of the lighthouse to the edges of the crack will be weak and it will not show reliable data.
So, if in two or three weeks the lighthouse remained intact and unharmed, it means that the process of deformation of the walls has stopped and you can safely proceed to repairing them. Otherwise, it is necessary to establish the exact cause of the ongoing deformation and eliminate it. For example, repair the foundation if the problem lies in it.
The carpenters' repairs were carried out by the local carpenter Matous Kirchner from the nearby Wenceslas. Both curved and half-timbered walls were simultaneously reinforced against double-sided fastening and a threaded collet. The renovation began with lowering and reversing the crown of the base from locally harvested stones using lime mortar to the floor level of the room. After laying the waterproofing tape and the diffuse coconut diffuser, the threshold beams of the grafted walls were installed, which were connected at the corners with a lock with short projections.
Gradually, a wooden wall was added below the level of the sills, replacing the very damaged lower grafting beams that preceded the renovation on the raised sill. Massive profiled window sills have replaced replicas. The pillars of the underpass, which were not preserved, were made completely new, while others received only prostheses and seals.
Repair of wooden walls
Wooden walls can be of different types - solid timber walls, log walls, wooden planking. All of them can be subject to various types of damage. The most common defects wooden walls are as follows:
- skewed or bulging walls;
- decay of wood;
- damage to wood by fungus or beetles;
- freezing and blowing of the seams;
- destruction of elements exterior decoration wooden wall;
- violation of waterproofing.
Strengthening a cobblestone wall
With prolonged use of a block house, a serious problem may arise - the wall bends, it loses its verticality, begins to bend in some places in a wave. This defect can be eliminated by installing a hard metal corner in the doorway.
Half-timbered floor and shield replica
The home's renovations also included local stock exchanges and half-timbered wood floor prostheses, especially in the northeast corner, which was damaged by a long-term leak. After the carpentry work, wood-paneling panels of wood dowels and crushed clay slag were rebuilt and supplemented. Similarly, the traditional earthenware washes of the joints between the beams of a log room using wooden pins were considered. The new formwork of the main shield, consisting of wide planks replacing the previous shield from narrow decks, is based on a historical photograph with decorative carving and profiling details obtained from the original surviving shields from the surrounding area.
To perform this type of repair, you will need a metal corner with a cross section of 60 mm, a drill with a drill for metal, a grinder and screws with reinforced washers. They begin by measuring the height of the doorway. Then, with the help of a grinder, a segment 10 cm longer than the obtained value is sawn off from the metal corner. On each side of the segment, it is necessary to saw off a 5-centimeter piece of one wall. It turns out a kind of ears, for which the corner will be attached to the upper and lower bars of the opening.
The clad half-timbered floor panels and the joining of the log walls were then painted with lime paints. The visible timber structures were treated on the outside with a protective natural oil, whose tint could be darker to avoid such a significant contrast between old and new timber, although this was a more demanding renovation. Wooden windows remain behind the previous partial renovation of the building, which was complemented by newly installed wooden window sills and carved pavers in accordance with the historical design.
In each ear, one hole is drilled with a diameter of 10 mm. The same holes are made further along the entire length of the corner. They should exactly line up with the middle of the wall bars. For this, the corner is placed in the opening and the necessary places are marked on it with a marker, along which they are drilled. You can do this directly in the opening. But if it is inconvenient to drill a corner in an upright position, it is placed on the floor.
After the grafted walls were repaired, the wooden swinging ceiling was partially replaced, including the restored wooden ceiling beams. The surfaces of the grafted walls and ceilings were cleaned of the remnants of wallpaper and old coatings, and felt the surface of the scented wax surface. On the other hand, on the side of the walls with the damaged surface of the beams, the wooden pins were restored with internal clay plaster, which was also adjacent to brick walls... Wooden floor with wide solid floor covering with a breathable ventilation structure surrounds the dominant so-called heavy tiled stoves and tiled stove, the main source of heat for the room, as well as the upper rooms on the floor.
The corner with ready-made holes is returned to the opening and holes are drilled in the bars along them. The depth of the holes in the tree must be at least half the thickness of the block, otherwise the fastening will not be strong enough. Through these holes, the corner is attached to the wall using screws with reinforced washers put on them.
First, the screws are not screwed in completely, without bringing them all the way. It is convenient to do this with a drill. Then each screw is carefully tightened with a wrench, making sure that each block is tightly attracted to the corner and falls into its original place. In this case, the wall must be leveled. Do not tighten too much to avoid ripping off the screw head.
The completed and demanding renovation of the log room in Jindřichovice, where the use of traditional traditional handicraft technology was generally preferred, can rightfully be called the reanimation of the original heart of the house. On various construction methods wooden structures the chosen building system and other materials used are affected. In the case of our house, it is a prefabricated panel structure based on a massive construction of massive spruce beams filled with thermal insulation.
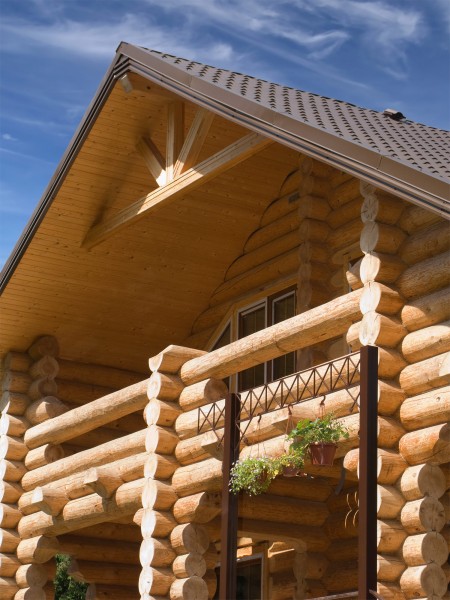
If you are thinking about wood construction, your options for appearance are practically unlimited. Wooden buildings today are modern modern houses, multi-storey buildings and residential complexes where no one will look for a wooden heart. At the same time, however, the number of buildings in which wood is an elementary element can be detected at a glance. Log cabins and lumber have not been built as seasonal or recreational facilities for a long time, but their owners enjoy the unique atmosphere that wraps around timber all year round.
After one side of the opening has been reinforced, the same steps are repeated with the other side. This method of leveling walls is very effective and uncomplicated. But the disadvantage is that it only applies to a wall that has an opening.
Other types of defects in cobbled walls include longitudinal cracking of a bar, rotting of a bar in its entirety or its separate section. In this case, the repair work is similar to that carried out with log walls.
He returns to the path of construction and housing, proven for centuries, but using modern knowledge and technology. Just as individual timber structures differ in appearance, the way they are built and the speed at which timber is used is different compared to other materials. The basis is different types construction systems that make sophisticated use of the properties of wood as a unique building material... Although even in the case of timber structures we distinguish between light construction systems and heavy timber scaffolding, in general, all timber based construction systems - compared to conventional stone materials - are designated as light.
Repair of wooden planking
If you have frame house with wooden sheathing, then over time various defects may appear in the sheathing - cracks on the boards, splitting, rotting of individual boards.
If only certain parts of the casing are damaged, and in general it is in a satisfactory condition, a partial repair can be carried out.
In addition to many of the aforementioned benefits, their benefits also include lower load requirements on the foundation of the house. Currently, there are about two dozen basic structural systems of wooden structures, of which only a few types are widely used in our country. Most often we are faced with structures made of prefabricated parts and elements and structures based on the so-called "two by four" system, followed by log houses and logs.
The heavy wood skeletons, ideal for high-rise apartment buildings, office buildings and industrial buildings, are used only marginally compared to other European countries. The same can be said about half-timbered houses, which are popular with our western neighbors.
To eliminate minor defects, you will need a hammer, chisel, nails, waterproof glue and new boards. A thorough examination of the plating is carried out. If a cracked or broken section of the board is found, it is carefully picked up with a chisel and removed. Then, from the inside and along the edges of the fracture, they are abundantly coated with waterproof glue. Then the piece of the board is returned to its original place, making sure that the edges of the break are exactly aligned with the part of the board that remains in the wall.
Prefabricated sandwich panels. Probably the most common construction method wooden houses in our country are houses assembled from prefabricated panels with a sandwich structure. The composition and thickness of the walls, as well as their technical specifications differ from one manufacturer to another, but the structure is always based on the load-bearing wooden framefilled with thermal insulation.
The main advantages of this type of building system are the speed of pre-processing in controlled production facilities, which also guarantees the quality of the construction and processing of panels and a lower wall thickness than for massive structures, while at the same time achieving low energy and passivity parameters.
After the glue dries, the inserted area is securely fixed with one or more nails (depending on the size of the piece of board).
If any of the planks are completely worn out, they are replaced entirely. To do this, using a lever, the damaged board is removed from the wall, the fasteners are unscrewed and the board is removed. In its place, a new, durable board is inserted and reinforced with the same type of fastener that was used before.
After the repair of all damaged sections of the sheathing has been carried out, the boards are impregnated with a special antiseptic impregnation, they are primed and putty. Next, proceed to any selected type of finishing work.
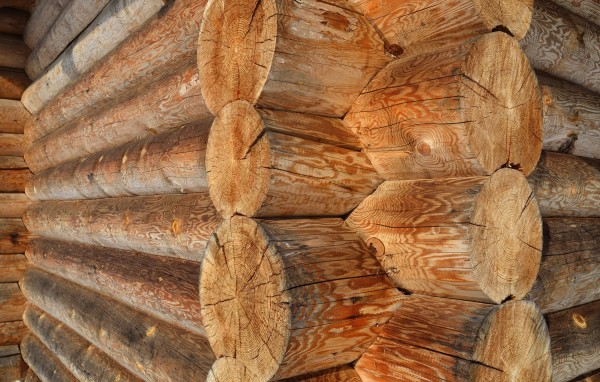
Repair of a log house
The repair work that may be required in a log house can be divided into three types according to the degree of increasing complexity: elimination of cracks in the logs, replacement of the damaged part of the log, and complete replacement of individual logs.
Elimination of cracks is necessary, because even through minor cracks, moisture will penetrate into the depth of the log and destroy it. The same goes for insects. If you find even small cracks, you need to immediately take measures so that later the damage does not grow and does not lead to a more complex appearance. renovation works.
If during repairs it is necessary to raise the house above the foundation, you should not do this immediately to the required height. It is better to lift it in several steps, lifting each time by 10-15 cm. For example, lifting a house by 50 cm should be done in 4-5 steps.
In a situation with cracks, there are two ways to go. The first is to make a cladding that prevents moisture from entering the crack.
To do this, first lay a layer of waterproofing - a special film is attached with a construction stapler over the entire surface of the walls. If you don't have a stapler, you can use a hammer and nails.
On top of the waterproofing layer, sheathing is attached - siding, boards or panels.
However, most often the owners log houses they do not want to cover the facade of a log house with another finish, since it itself looks very attractive. Then you can go the second way. The damaged areas are thoroughly cleaned, rotten or crumbled wood is removed from them. Then the entire surface of the wall is treated with an antiseptic. Then the crack is sealed with a special wood sealant. Such sealants are distinguished by high elasticity, resilience and adhesion, adhere perfectly to wood, repeating its natural lines. Their color scheme allows you to choose the composition with the most suitable shade for each type of wood. After sealing with such a tool, the crack will not be noticeable at all. Also, the sealant completely blocks the access of moisture to the crack.
The second most difficult type of repair work is the replacement of a damaged section of a log. This measure is used when part of the log is rotten to such an extent that stripping is impossible. This happens if water constantly gets on this area - it flows from the window drain or from the roof, it is heated from below. If the damaged area is localized and the rot has not yet spread to the entire log, only this rotten piece can be replaced.
The damaged piece is simply cut out, and in its place an exactly matching piece of a new durable log is placed. It is connected to adjacent sections of the old log using metal staples. One end of the staple is driven into an old log, the other into a new one - one staple from both ends of the new piece. Instead of metal brackets, you can nail wooden combs from the ends of an old log and put a new piece on them.
The most difficult type of work is the replacement of whole logs. As a rule, we are talking about the lower rims, which are most exposed to moisture and therefore rot in the first place. If they are not replaced in time, the overlying heavy, strong logs will simply crush them. Then the whole house will be distorted, which will require a complete reconstruction of the walls.
To replace the bottom crown (or multiple bottom logs), you will need a jack, lever logs, and hardwood wedges. In addition, assistants will be needed - you cannot cope with such work alone.
Wedges are driven between the foundation and the lower crown. With the help of a jack and levers-car, the house is raised above the foundation to the required height. For the convenience of work, it is supported by stands - strong boards or pieces of logs. It is best to raise not individual walls, but the whole house. Otherwise, a tilt will occur, which can damage some internal elements, such as a stove or fireplace. To lift only one wall, they will first have to be partially disassembled.
When the house is raised and secured, the decayed logs are removed and new ones are put in their place, exactly corresponding in length and diameter to the previous ones. Before replacing, a new crown must be coated with hot bitumen and pasted over with a waterproofing material, such as roofing material. This will prevent subsequent decay of the log.
You can replace the lower crowns without lifting the house. To do this, you will need to disassemble the upper part of the foundation or plinth. It is also important to take into account that if the floor beams are cut into the lower rims, then they will have to be replaced at the same time as the logs.
A log house built according to the rules can be operated for 100 years or more. Naturally, log house major repairs may be required. If the building, as a whole, is in a satisfactory condition, then partially rotted logs are not a reason for organizing new construction. As a rule, the owners initiate such a major overhaul when they plan to replace old windows with metal-plastic double-glazed windows. Before ordering new windows, they analyze the need for such measures and their feasibility, begin to examine the walls to find out their strength and ability to withstand the planned replacement. It was at this moment that they found out that the cause of heat loss is not only old windows and doors, but also logs that have rotted in places. Do not despair and be afraid of the impending colossal purchase or construction costs, spoiled logs can be replaced with new ones, windows can be replaced, entrance doors replaced or insulated, the foundation, walls and ceiling insulated and continue to live in your house for another 100 years. Before dealing with the replacement of logs and their strengthening, let's define the concepts applied to the construction of wooden logs:
- log walls - vertical structures made of logs located around the perimeter of the house;
- crown - one row of logs around the entire perimeter, connected to each other;
- flap - 4 lower rows of the log house connected to each other along the perimeter;
- cuttings - mating logs in the corners of the house;
- groove - a recess in the lower part of the log along its entire length, triangular or semicircular;
- lining - a thick board lying on the foundation, on which the frame is laid.
How to find out the need to replace logs
The load of the structure on the lower part of the house is always greater than on the other parts, so the lower logs collapse faster than others. In addition, the lower logs are most exposed to moisture, their rotting occurs also because it collapses over time waterproofing materialseparating the logs from the foundation. Often the cause of log decay is the shrinkage of the backfill and freezing of the lower crown. In order to determine the integrity of the logs, you must carefully examine them. More often than not, logs rot in the corners of the bottom of the house. Suspicious places need to be tapped with a hammer or the back of an ax: the whole log will emit a dull sound, while the damaged one will give itself out with an empty sound. Thus, it is possible to identify all rotten logs and purchase new material to replace them. In the event that all the logs turned out to be intact, but you still have doubts about the strength of the building, you can strengthen the walls by using screeds in the corners of the house. To do this, take processed boards of the required length with a thickness of about 25 cm and nail them to the logs. You can also strengthen the foundation by building it up with supporting pillars.
Material selection
The replacement logs must be exactly the same diameter as the old ones. Logs with a diameter of 200, 240 or 280 mm are considered standard. You can easily measure the diameter of an old log in the corner of the house. New material must be made of trees conifers, the moisture content of the log should not exceed 20%. A log acquires such an indicator after a year of aging after a tree was cut down. The log should be barked, trimmed, impregnated with a fire-fighting mixture and treated with an antiseptic. A groove should be made in the middle of the log along its entire length; semi-oval grooves have proven themselves better. Caulk is laid in the grooves, and this design of the log ensures the greatest fit of the logs to each other.
Preparing for repair
In order to avoid surprises, it is necessary to provide a number of measures:
- the walls of the house need to be fastened; for this, boards that need to be nailed to the outer part of the wall are suitable;
- logs that do not need to be changed are also fastened in the corners, the expediency of fastening certain sections is determined visually;
- it will also not hurt to fasten the logs on all sides of the house.
In the event that the replacement of the logs is supposed to be carried out with the dismantling of the foundation, then the foundation must be freed from the soil to the entire depth of its occurrence.
Depending on the complexity of the work, when replacing logs, it may be necessary to lift (prop) the house.
Replacing 1 log of the bottom row of the cover ring is considered the simplest and most typical case, the work is carried out without performing a general lifting of the house.
First you need to disassemble the foundation in the place where the log is supposed to be replaced. To complete the work you will need:
- several strong levers (thick-walled metal pipes, and better crowbars);
- jacks 2-3 pcs with a carrying capacity of up to 5 tons;
- wooden blocks of various heights for props;
- strong wooden wedges;
- chainsaw;
- hacksaw.
Having disassembled the foundation and sawed off the damaged part of the log, you must remove it. A new log must be mounted in place of the decayed fragment. To avoid rotting, it is necessary to place a waterproofing material in 3 layers on the lining. Caulking material (tow, flax, jute fiber, etc.) is laid on top of the new log. Further, the new log is carefully installed in place of the old one, with the help of wedges tightly pressed against the upper one, then the immediate restoration of the foundation begins. To do this, it is necessary to pour the mortar into the previously prepared formwork and let it dry completely, and then remove the formwork. Having removed the wedges, it is necessary to preserve the position of the log by placing fragments of bricks and stones under it.
Replacement of the two lower layers of the crown around the entire perimeter of the house can be carried out both with the rise of the house, and without it.
Work without lifting can be done as follows: dismantle the foundation from the side where the log will change; cut on both sides the corner joints of the two logs of the lower and upper. The upper log is removed, and a new log is mounted in its place. On the top along the entire log, a caulking layer is laid and the log together with the lining is raised to the desired height and installed in place using wedges driven between the foundation and the lining. Thus, the log on the opposite wall is changed. Next, the first logs are replaced according to the method described above.
There is a method for replacing the lower crown without destroying the foundation. But at the same time, it is necessary to perform a general lift of the house.
If it is necessary to replace the bottom row of the flashing ring, the wall is raised with the help of jacks installed on different sides of the wall to a height exceeding the size of the log by 6-7 cm.In the event that there is a danger of pushing the rotted log with a jack, it is necessary to make two niches in it and jack up the second row of the crown. It is possible to destroy the foundation a little, if necessary. Jacks are installed in the strongest places of the log and must raise the wall synchronously.
During these events, the second logs are also raised; under them you need to put blocks of the required height and, if necessary, wedges. In this case, the jacks are wound under the third row of the crown.
After completing the replacement, it is necessary to dig in all the logs with special care, if necessary, you can use a gun with polyurethane foam.
Measures to prevent decay of flashing rings
Wood is a natural hygroscopic material that is a breeding ground for many microorganisms. Therefore, the methods of preventing damage during the operation of the logs of the cap are:
- antiseptic treatment;
- waterproofing - making a gasket from three strips of roofing material and placing it between the bottom row of the cover ring and the lining;
- ensuring good ventilation of the basement, this prevents the formation of condensation inside the underground and the appearance different kinds harmful factors.
According to fire safety requirements, it is also recommended to make fireproof impregnation of logs.
Do not save money by starting one day serious work on replacing the crown. It is necessary to replace all suspicious logs in order not to return to this issue for many years.
If you perform wall cladding outside the house, then this will greatly increase the life of the house.
In order to reduce heat loss at home, it is possible to recommend insulation of the outer walls of the house, ceiling, floor, insulation of the underground room and foundation.


