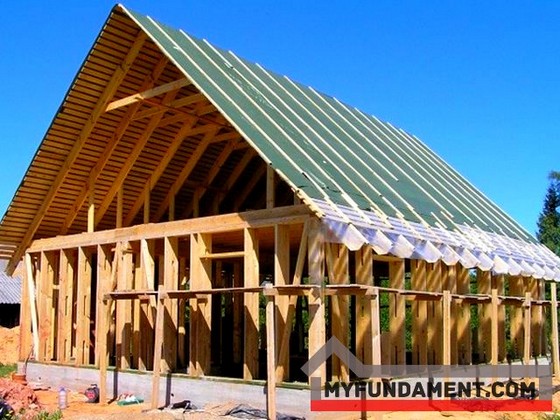
Competent calculation of the foundation structure, taking into account the peculiarities of the soils on the site, the selected wall material, the structural design of the building, as well as strict observance building technologies and project requirements is a guarantee of creating a reliable, solid and durable foundation country house
The foundation of any home is the foundation.
A well-designed and well-built foundation in the total construction budget accounts for 15 to 25%. Agree, this is a lot. And when the budget is limited, you have to look for the most economical options. Let's talk about them
Any competent specialist, having heard the question about which foundation is better to choose for a particular house, will answer that it is impossible to simply choose a foundation, like a product in a supermarket. The choice of the foundation is influenced by a number of factors: the weight of the walls, the design features of the building, the types of pounds on the site, the level of occurrence of groundwater (GWL), the depth of soil freezing, etc. This is at least. Only specialists can accurately determine the type of soil and GWL when conducting engineering and geological surveys. Based on these studies, in each specific case, one or another type of foundation will be selected.
However, today we would like to consider the influence on the choice of the foundation of the first of the above factors and offer readers the most economical options for each type of house - wooden, frame, stone. The final cost of the foundation largely depends on the weight of the walls: the heavier they are, the more area and strength it should have. If the weight of the walls is relatively small, then there are much more options for budget foundations.
5 most economical types of foundations for a country house
- Columnar
- Shallow tape
- Bored
- The foundation created using the TISE technology
- Pile-screw
The simplest and most economical foundation
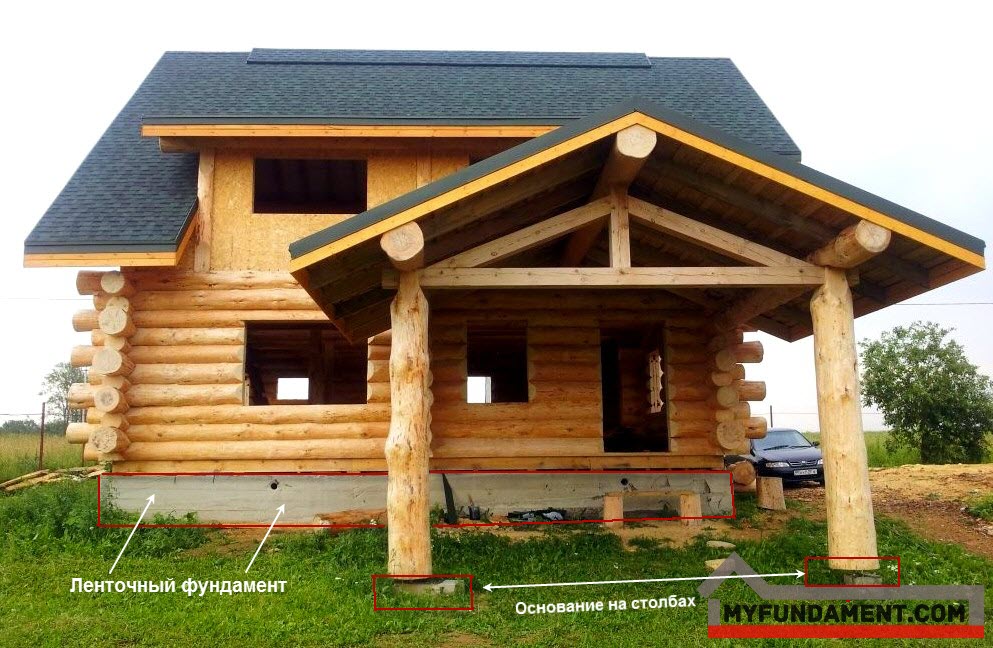
The most economical of all types of foundations is columnar. It is a system of unconnected pillars that are installed in all corners, intersections of walls and other points with increased load. The pillars can be industrial (concrete) or construction (brick, rubble, from foundation blocks).
The column foundation is recommended for houses without a basement with light walls. Its advantages include efficiency (in terms of material consumption and labor costs, it is 1.5-2 times more economical than tape), speed of manufacture (moreover, without the use of heavy equipment on the construction site), durability: a foundation erected in compliance with all requirements can withstand more than 50 years. Columnar foundations are less susceptible to the negative effects of frost heaving forces. The most simple option columnar foundation is a foundation using solid concrete blocks measuring 20 x 20 x 40 cm, from which low
(60 cm) columns. After marking the base of the future building in the ground, they make recesses for the supports (150-200 mm), fall asleep in them sand pillow, spill water and ram. The blocks are arranged in a column so that there are two blocks in each row, and each row is laid with a dressing. The blocks are fastened together using masonry mortar. The thickness of the pillars should be equal to the thickness of the walls plus 10-12 cm. The distance between the pillars (1.5-2.5 m) depends on the value of the load on them. From above, the pillars are covered with waterproofing material, on which the lower piping of the building will be located. The depth of such a foundation is at least 0.5-0.7 m, that is, it is located above the freezing depth, and a light structure (wooden or frame house) in winter will rise and fall with the foundation.
However, since each column "walks" up and down individually, some of them stop "working" in the spring. This is the main disadvantage of the columnar foundation. Another drawback is the lack of a base. To keep heat in the underground space and protect it from moisture, dust, rodents, they make a pick-up.
A pick-up is a wall that connects the posts.
In fact, this is the simplest type of base. For its construction, you can use bricks, concrete, rubble stone (masonry with a thickness of 10-20 cm), cement-bonded concrete sheets. If the soil is heaving, then a sand cushion of 15-20 cm is arranged under the filling. The filling itself is deepened into the ground by 10-20 cm. For ventilation of the underground space, ventilation holes are provided in it. If the pick-up is made of stone or brick, then it is not associated with the pillars, since the uneven settlement is fraught with the appearance of cracks. However, bricking (especially reinforced concrete) may be more expensive than the foundation itself. Therefore, from the point of view of reasonable economy, it is better to use a DSP.
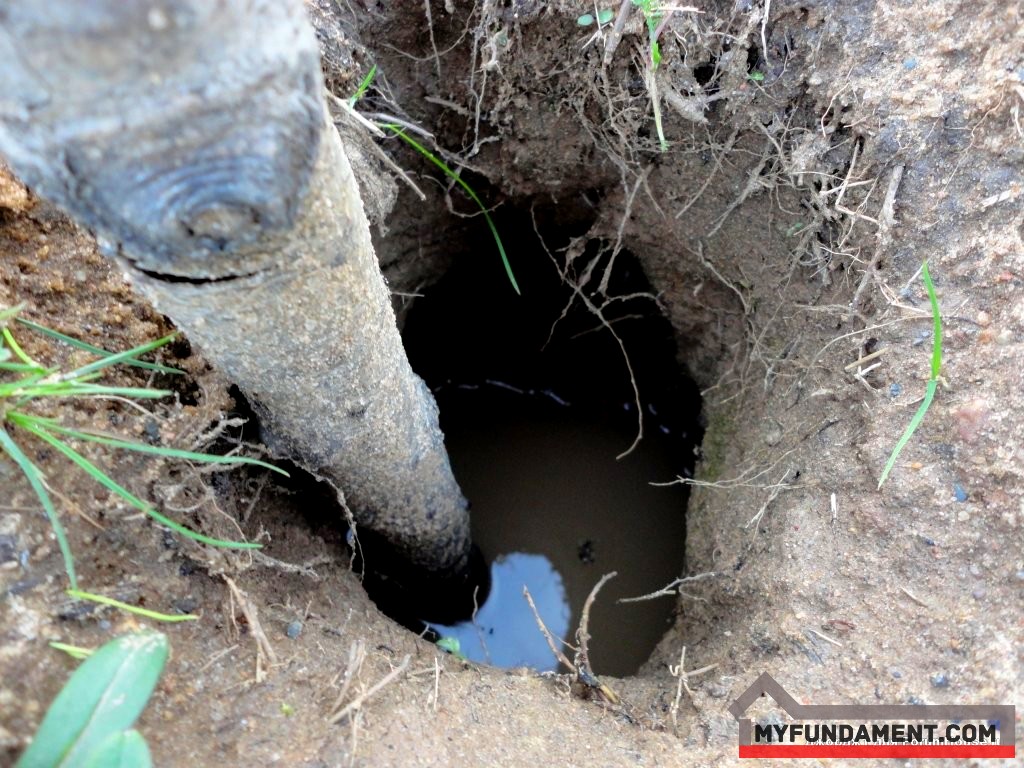
As mentioned above, columnar foundations are only suitable for timber and frame houses no basements. There are restrictions on their use and depending on the characteristics of the soil at the site. So, it is not recommended to put columnar foundations on weakly bearing soils (peat, subsiding rocks, water-saturated clayey), in areas with a sharp difference in height (2.0 m and more). It is impossible to erect a columnar foundation even with a high level of groundwater, since its base will rest on soil saturated with moisture and having a low bearing capacity, because of which the pillars will sag unevenly under the weight of the house.
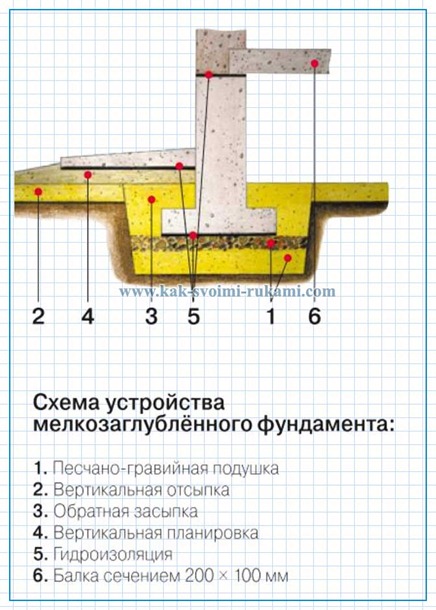
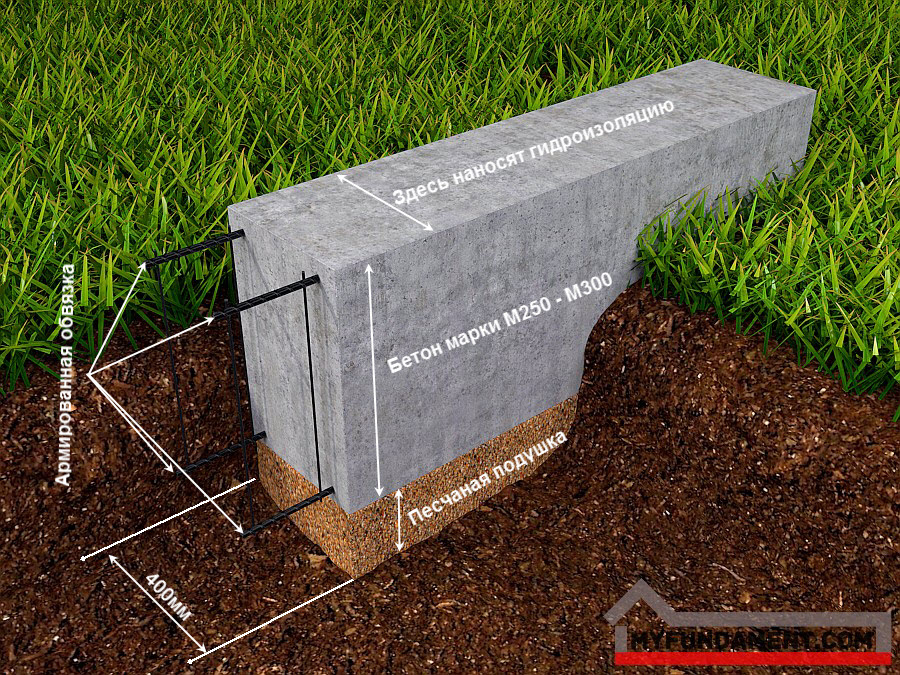
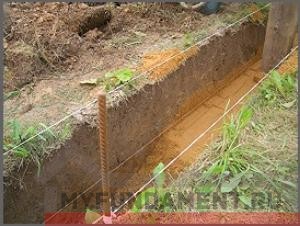
Diagram of a shallow foundation device:
1. Sand and gravel pad
2. Vertical filling
3. Backfilling
4. Vertical layout 5- Waterproofing
6. Beam with a section of 200 * 100 mm
From an expensive foundation to a budget one
The traditional buried strip foundation is one of the most expensive today. An excellent alternative to it is a shallow strip foundation. It is much easier to manufacture and not less than 35-40% cheaper than a buried one. And this is understandable: when deepened by 0.3-0.5 m, and not 1.5-1.8 m
labor costs and the cost of building materials are significantly reduced. In terms of reliability, such a foundation is not inferior to the traditional one. The main feature of the construction of a shallow foundation is the replacement of part of the soil under the sole with a sand cushion of such a height that would guarantee the permissible deformation of the foundation, but no more. A shallow foundation allows you to arrange a basement or a small cellar. It is used on almost all types of soil. The exception is excessively heaving.
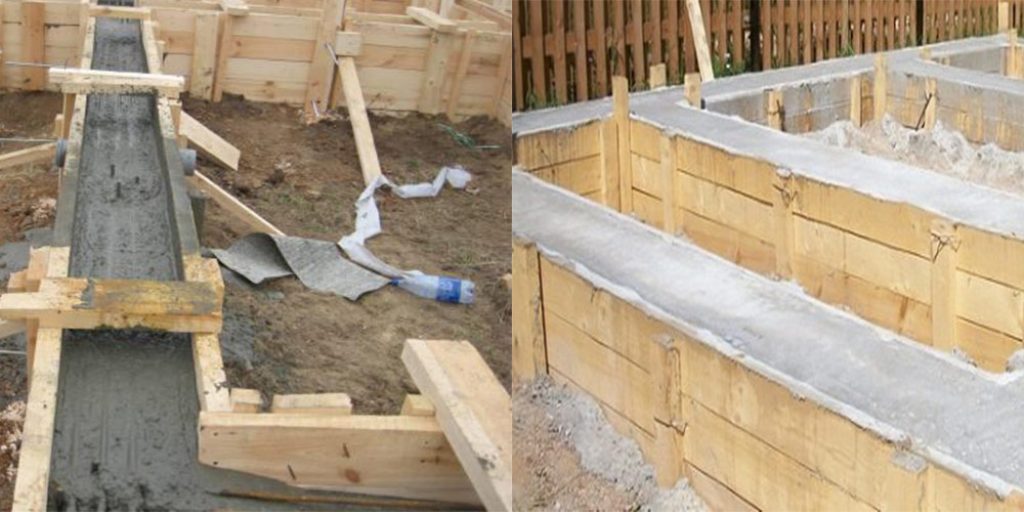
The construction of this type of foundation is as follows: according to the project, trenches are dug to the calculated depth (usually 0.7 m). The thickness of the cushion is 0.3 m. The lower part (0.2 m) is made of coarse sand, the upper (0.1 m) is made of a mixture of sand with gravel.
Each layer is carefully rammed. Then a polymer film is placed on the base so that the cement milk from the concrete does not go into the sand cushion. When installing formwork panels, roofing material panels are attached to them. Their purpose is to prevent the flow of laitance from the freshly poured concrete mixture through the cracks between the boards, to facilitate the dismantling of the formwork, and also to save the lumber for future use. Then the reinforcement cage is knitted and concrete is fed into the trenches. After two weeks, you can start erecting the walls of the building. This type of foundation is suitable for the construction of wooden, frame houses, aerated concrete cottages, gas silicate blocks. It should be borne in mind that it is not recommended to leave the shallow foundation unloaded in the winter.
Bored foundation
Another type of economical and reliable foundation is a pile foundation. In parts of housing construction, two of its variants are most widely used - bored and pile-screw.
Printed ( bored piles) are made in the ground under the foundation of the future structure. Wells are drilled in the places determined by the project, a metal reinforcement cage is installed in them, and then poured with concrete. In loose soils, to maintain the stability of the borehole walls, a roofing felt lining or a casing pipe is used (after pouring it is removed or left to increase the strength of the pile).
It is possible to drill wells for piles both manually and using special equipment. In the first case, the well-known (Technology of individual construction and ecology), developed by a team of designers under the leadership of R.N. Yakovlev, is used.
Its main feature is that the pillars at the base have an expansion, which increases the support area, and also contributes to the resistance of the pillar to buckling by the forces of the soil. Wells for pillars are made by means of a special hand auger equipped with a sliding bar, a soil accumulator and a folding plow controlled by a cord. The plow descends under its own weight, is securely held in intermediate positions by a two-link locking mechanism, and rises vertically by the cord. When folded, the length of the drill is 125 cm, when extended, it is 225 cm. The width of the handle is 55 cm. The length of the rod is fixed with a screw stopper.
The process of drilling a well using the TISE technology is as follows. The plow is removed, after which the drill begins to rotate clockwise. As it deepens, it is lifted and cleaned of the captured soil. The expansion of the lower part of the well is carried out with a plow, while the drill is rotated counterclockwise. Then reinforcement is inserted into the well body and the expanded part is filled with concrete. Then a roofing jacket is placed in the cylindrical part, which protects the column from destruction by axial forces caused by the heaving soil. Then the concreting process is completed.
If the foundation is not created on its own, but with the involvement construction company, she, as a rule, uses special equipment for drilling wells. For example, such as a multifunctional compact tractor. It is mobile, exerts little pressure on the ground and increases the speed of foundation construction several times. After drilling, a layer of sand and crushed stone is poured onto the bottom of the well so that the bottom of the concrete pillar dampens ground movements. Then a reinforcing cage is placed in the well and the concrete mixture is poured.
The last stage of work (both in the first and in the second case) is the creation of a grillage (upper part pile foundation, which is a reinforced concrete or metal beam or tape). The task of the grillage is to tie together underground part foundation, thus ensuring an even distribution of the weight of the house on the piles and their equal vertical movement.
The grillage can be high (it is much higher than the ground level) and low (underground). It should be noted that when using a columnar-grillage foundation, a terrace, veranda, porch attached to the house cannot be connected into a single constructive whole. Under them, it is necessary to build your own foundations and separate the buildings with an expansion joint, since the load from the porch (terrace) is not comparable to the load from the walls of the house, and therefore the draft will be different for them.
A bored foundation is able to withstand the load of not only light wooden or frame houses, but also heavy stone ones, without giving a draft. At the same time, you can ignore the level of groundwater and build it on almost all types of soil, without fear of negative consequences. Laying the foundation pillars below the level of freezing of the soil will provide the finished structure with strength and protection from the forces of frost heaving.
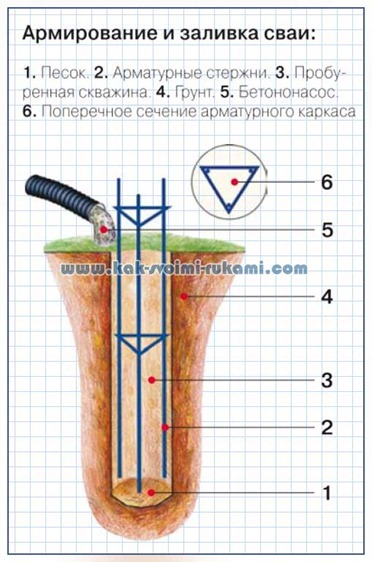
Reinforcement and pouring of piles:
1. Sand. 2. Reinforcing bars. 3. Drilled well. 4. Ground. 5. Concrete pump. 6. Cross-section of the reinforcement cage
Foundation on screw piles
And finally, another type of foundation that can be classified as economical is the foundation on screw piles. Cost reduction in this case occurs due to the lack of a large volume earthworkswhich saves time and labor. At the same time, there is no need to use heavy equipment. This type of foundation costs 30-40% less than a traditional strip or slab foundation.
Screw piles are made from steel pipes... The lower part of the pile is equipped with a cutting blade of a certain shape, due to which it is screwed into the ground to almost any depth. A head is welded to the opposite end of the pile, on which the grillage is fixed. The small area of \u200b\u200bcontact of the screw pile with the pound in combination with the cutting blades does not allow the foundation to move even when the pound is deeply frozen. When screwing, the turn-to-turn gaps of the soil are not loosened, but, on the contrary, are compacted by the blade of the pile. Screw piles provide high support strength. For example, with a length of 2.5 m, a barrel diameter of 108 mm, a barrel wall thickness of 4 mm, a blade diameter of 300 mm and a blade thickness of 5 mm, the screw pile will withstand a vertical load of at least 5 tons (for wooden buildings 2-3 t is enough).
When installing, the piles are screwed in to the calculated depth, the central cavity of the pile is concreted (M300 concrete is enough). To create a single and coherent structure screw piles fastened together with a channel, a bar, a reinforced concrete grillage or a monolithic reinforced concrete slab, depending on the type of building. Immediately after screwing in, the piles are ready to receive the design load.
The pile-screw foundation perfectly copes with the tasks assigned to it, not only on soft soils, but also in difficult conditions: on a slope, in a coastal strip, in a forest area (while the natural landscape is preserved as much as possible). In cases where the soil has a heterogeneous structure, screw piles are installed at different depths, and then the above-ground parts are leveled. The pile-screw foundation is suitable not only for wooden and frame houses, but also for stone and cellular blocks, but in the latter two cases there will be a slightly different construct - in addition to the reinforced concrete grillage, a monolithic slab is cast on piles. Thus, a subfloor is immediately obtained. Work on the creation of the pile-screw foundation can be carried out year-round.
Concluding the conversation about economical types of foundations, I would like to invite our readers to familiarize themselves with the estimates for their construction prepared by Russian construction companies.
The foundation is the foundation of any building. Its main purpose is to ensure the strength and reliability of the erected structure. The construction of the foundation is the key to the overall construction of the house. If you want to build a foundation with your own hands, then do it as efficiently as possible! A well-laid foundation will extend the life of the building and protect it from the negative effects of the environment. Great importance has a type of foundation, the choice of which largely depends on the type of soil at the construction site and the type of structure.
Varieties of the foundation and their features
You can build a house on any foundation, it is only important to take into account the natural conditions of the area where the site for construction is located. In modern construction, the following types of foundations are used:
- The columnar base is erected for wooden or light frame structures, as well as for houses in which the arrangement of the basement is not planned. The pillar base is ideal for a sloped site. From an economic point of view, such a foundation is more profitable to erect at a large depth of soil freezing or in swampy areas.
- A base in the form of a concrete tape is the most common option. The strip foundation can be erected under brick houses, and fences. However, it is not recommended to erect heavy stone structures on a strip base. The tape base allows you to equip a basement in the house. The best place for the construction of the belt is considered to be an area with deep groundwater and an insignificant amount of soil freezing.
- A slab base is an ideal foundation for questionable soil characteristics. It is a solid, solid foundation. The stove is one of the most expensive construction processesrequiring accurate calculation. Therefore, you need to choose only as a last resort.
- The pile-screw foundation is very popular due to its high bearing capacity, low price and high installation speed. The weak point of such a foundation is. It is possible to erect a pile foundation on all types of soil with the exception of rocky soil.
Self-construction of the foundation for the house
In order for the foundation of the house to be strong and reliable, it is necessary to treat each stage of its construction very responsibly.
Stage 1. Layout of the foundation.
We make markings for the foundation
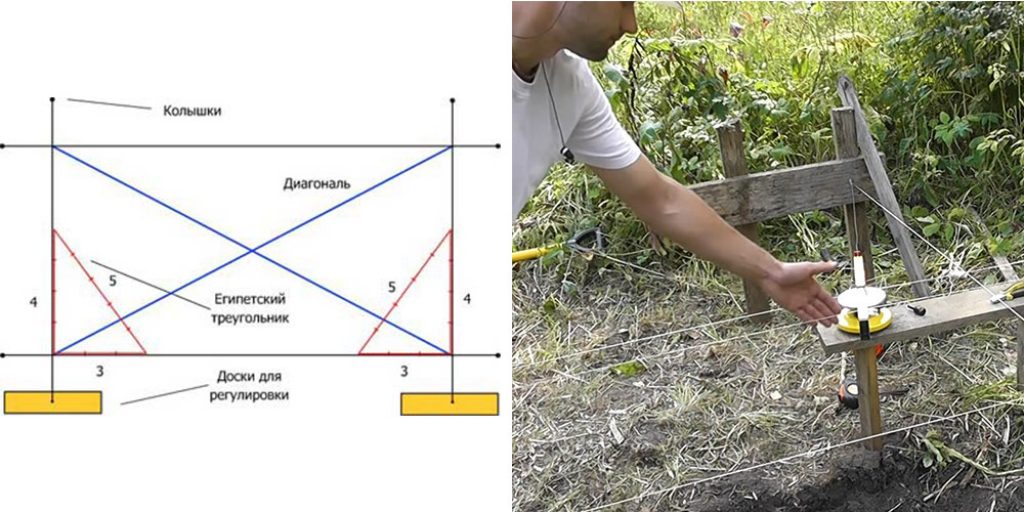
The markings indicate the position of the future house, therefore the strength of the entire structure depends on its correct implementation. The main tools for this step are wooden pegs and thick threads. The following steps are taken:
- Pegs are driven in along the proposed line of the facade of the building and a thread is pulled between them. The distance between the stakes should exceed the length of the house by 0.5 m.
- On the thread, they mark the places where the corners of the house will be located, and draw perpendicular lines of the facade through these marks. They should be slightly longer than the planned width of the house.
Advice! To check the perpendicularity of the corners, measure 3 m on one thread, and 4 m on the other. If the distance between these points is 5 m, then the corners are straight.
- A distance equal to the length of the side walls is measured along these threads, and marks are made using pegs.
- A thread is pulled between the marks, parallel to the line of the facade of the house.
Advice! To check the accuracy of the location of the corners, you need to measure the diagonals of the resulting rectangle. If these parameters are equal, the markup is correct.
- After all the control measurements, the internal lines of the foundation are marked.To do this, it is necessary to make deviations of 0.4 m inside the perimeter. For a more accurate indication of the corners, the pegs are placed outside the perimeter.
Stage 2. Earthwork.
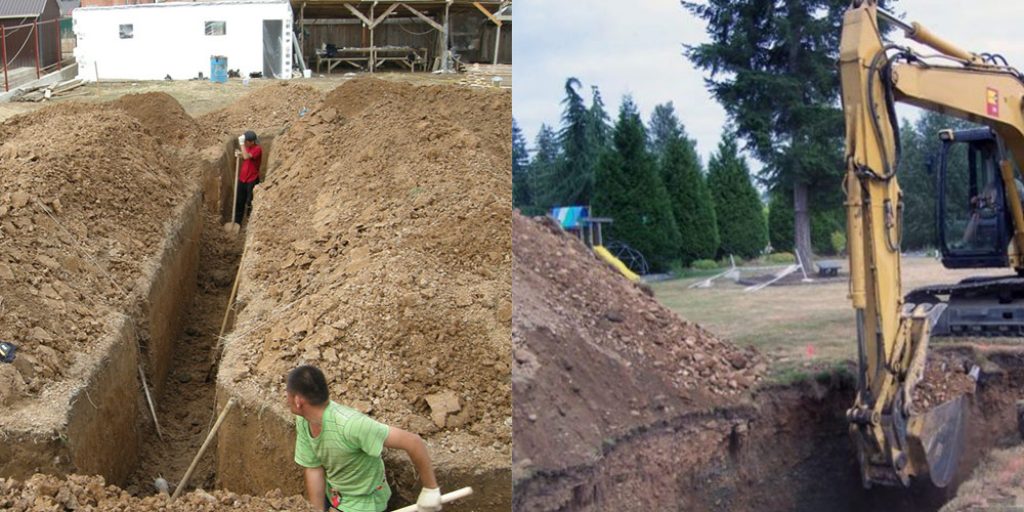
Earthwork during construction
You can do the work at this stage manually using a shovel. You can attract a special technique, which will speed up the process several times. depends on the type of foundation chosen: for a shallow tape - 0.6-0.7 m, for a conventional base - about 1.8 m.For arranging a sand and gravel cushion, an additional 20 cm is dug out.
The walls of the trench must be strictly vertical; they use the building level for checking. Supports can be installed to prevent soil shedding.
The bottom of the trench is carefully leveled, also using a building level to check the horizontalness.
The gravel-sand pillow is arranged in the following order:
- Sand is poured onto the bottom with a layer of 10-15 cm, moistened and compacted.
- Sand is poured again and again thoroughly rammed.
- A layer of gravel up to 15 cm high is laid on top of the sand, which is also carefully tamped.
Advice! To avoid erosion or silting of the shallow foundation cushion, the bottom of the trench can be covered with geotextiles.
Stage 3. Installation of the foundation formwork.
We make the formwork
Formwork arrangement strip base - this is a very important stage. Its main task is to choose the right material. After all, the formwork must withstand the load of a huge mass of concrete mortar. Most often, edged boards with a thickness of more than 20 mm or sheets of moisture-resistant plywood are used for the manufacture of formwork. These materials are inexpensive and more readily available than other options.
The installation of the formwork is carried out in the following order:
- Rectangular shields are constructed from the boards, fastening them with transverse bars. It is better to use self-tapping screws as fasteners. This will make it easier to dismantle the formwork system later.
- Installation of shields is carried out on both sides of the trench with reinforcement through 50-70 cm with wooden struts. By using spacers of the same length, it is possible to achieve the same distance between opposite sides of the formwork.
- Outside, the formwork is secured with wooden supports. One side of the blocks should be cut 45 0. It is with this end that the bar rests against the formwork panels. This design will make the shape more durable.
- Further, the formwork and the bottom of the trench are covered with waterproofing material, which will prevent the tree from absorbing milk from the concrete solution. For this purpose, you can use.
Stage 4. Creation of a reinforcing frame.
The reinforcing frame laid in the foundation serves to strengthen the foundation and extend its service life. Most often, the frame is made of steel rods with a diameter of 10-16 mm, and a soft knitting wire is used to bind them. The wireframe is created in the following way:
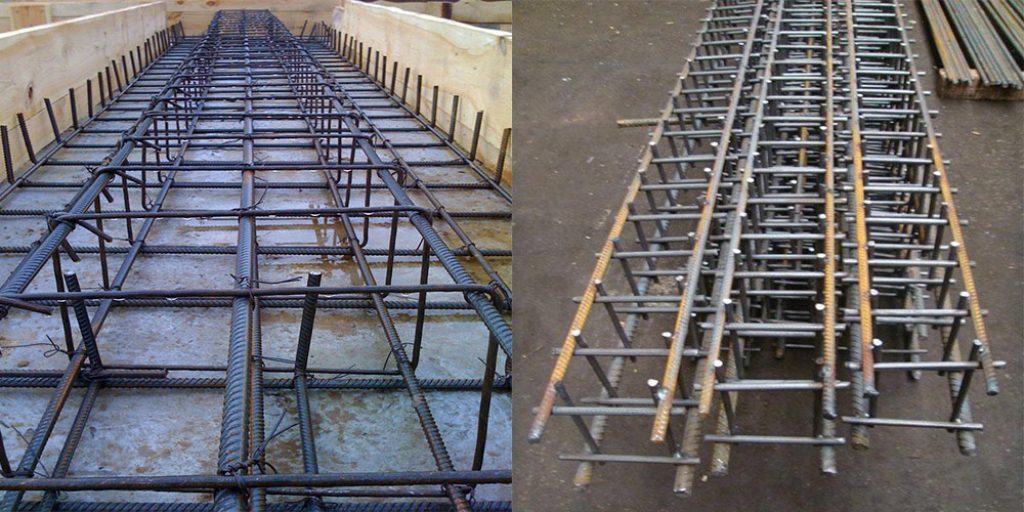
- The reinforcement is cut into rods along the length and width of the trench.
- Longitudinal rods, laid at a certain distance, are fastened with transverse elements every 25-30 cm. The result is a horizontal grid.
- To create a three-dimensional shape, horizontal gratings are laid in several rows, also fastened with transverse rods.
At the corners of the foundation and at the intersection of the main tape with the load-bearing partitions, it is necessary to additionally tie the frame.
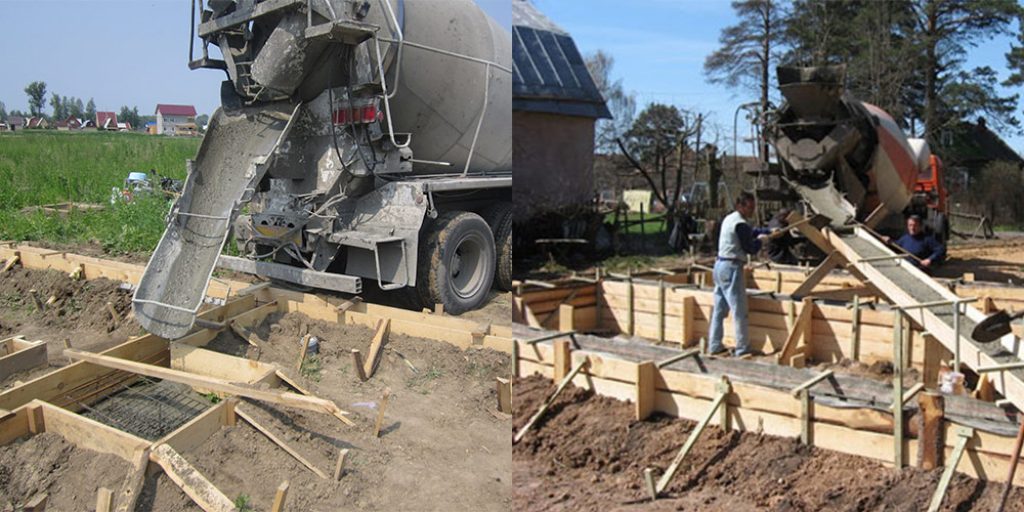
Stage 5. Pouring concrete.
To fill the foundation, you need to use high quality prefabricated concrete. It will be delivered to the site using specialized equipment. But to save money, you can prepare the mixture yourself on the site. To do this, you will need cement of the M400 brand, fine crushed stone and coarse sand. Compliance with the proportions of the batch is a very important condition to guarantee a high quality mortar. The mixture is prepared using the following technology:
- Sift 3 parts of sand and combine them with 5 parts of crushed stone.
- Mix everything thoroughly and add 1 part of water. In this case, the liquid is introduced in small portions until a solution of medium density is obtained.
- The solution is stirred until a homogeneous consistency is obtained.
It is necessary to fill the resulting composition in layers of no more than 20 cm. It is very important that the solution fills all the voids in the reinforcement cage. For sealing, you can use small rods of reinforcement, piercing the filled mixture with them. This will also remove air bubbles that have formed when mixing the grout. If you use a special vibrator, you can increase the strength of the poured base several times.
The next layers should be poured in a similar pattern until the concrete is level with the stretched line. The top of the concrete mix is \u200b\u200bleveled with a trowel.
Dismantling of the formwork can be done in two weeks, and further construction is recommended to start only after a month.
Important! During the entire period of strengthening the foundation, it is necessary to monitor its surface. It is necessary to cover the foundation with plastic wrap from rain and sunlight. To avoid cracking - carry out constant moisturizing.
How to equip the foundation for an extension to a house
Sometimes, at the end of the main construction, it becomes necessary to build an extension to the house. To avoid troubles during the operation of this part, it is necessary to build it on a qualitative basis. To do this, you must follow the established rules:
- The foundation of the house and the extension must be exactly the same.
- For rigid fastening of the additional base, the reinforcement cage of the main building is connected to the reinforcement of the extension.
The process of pouring the foundation for the extension is carried out using the same technology as the main tape.
Creating a foundation for your home with your own hands is a very responsible and laborious process. However, subject to all the rules and regulations, you can make a high-quality and reliable base with your crayfish.
A high-quality foundation, laid with the implementation of building codes, is a guarantee of the reliability of any structure and the lines of operation of the building directly depend on it.
Before starting the construction of a house, many questions arise as to how to make the foundation for a house correctly. Since mistakes made when laying the foundation, after a while can be the result of subsidence of the building, the appearance of cracks in the walls and the destruction of the building itself, it is necessary to approach the laying of the foundation with the utmost seriousness.
In this section, you will receive answers on how to mark the foundation, how to build the formwork yourself, how to properly make waterproofing and what concrete composition to use. It also contains a lot of valuable information regarding the types of soils and types of foundations for each of them, reinforcement techniques, the choice of building materials, and much more that will help you to independently fill a reliable foundation for a house or cottage.
In practice, floor screed is an affordable process that can be done without the involvement of craftsmen. The main task is to choose and make the right solution. The composition of the floor screed solution depends on the requirements that you set.
![]() Development of soil for foundations using special equipment is good option organization of construction, saving labor costs. With compact excavators, excavation of a trench or foundation pit is quick and affordable.
Development of soil for foundations using special equipment is good option organization of construction, saving labor costs. With compact excavators, excavation of a trench or foundation pit is quick and affordable.
 One of the fundamental works in the construction of a cottage or a country house is geodetic support of construction. Geodetic works are carried out, starting from the vertical planning of the territory and up to last leaf exterior cladding
 How to choose the right concrete for the foundation of a house? What technique should you follow? Let's take a look at the recommendations of experts on choosing the optimal concrete grade for manufacturing strip foundation.
The importance of the foundation for any building is difficult to overestimate, because a reliable foundation of a building is the primary condition for its long-term trouble-free operation. You can erect any, arbitrarily strong and beautiful walls, a well-designed and installed roofing system, reliable floors, and expensive finishes. But all this can "go to pieces" if mistakes were made in the calculation of the foundation, and in the course of its construction there was negligence, unacceptable simplifications were made, low-quality materials were used, the established technology was violated.
So, the foundation is a key stage of any construction, which sometimes takes up to a third of the total budget. In an effort to somehow save some money, some potential homeowners are seriously thinking about the problem: is it possible to build a foundation with their own hands? The answer to this question, alas, is not obvious. It's one thing to create a foundation for a small country house, a garage or a farm building, and completely different - for a full-fledged country mansion, which has several levels, and even with adjoining extensions.
This article will consider the main types of foundations, but the main emphasis will be on its tape version. We hope that after reading the article, it will become more clear to many site visitors whether they should undertake the independent construction of the foundation, or whether it will be better to use the services of specialists.
There are a lot of varieties of foundations used in individual construction, but basically four basic schemes are used, as well as their various combinations. And the main types include strip, columnar, slab and pile foundations.
Strip foundations
This is the most frequently used scheme, as it is suitable for almost all construction conditions, with the exception, perhaps, only of regions with a close occurrence of permafrost or for buildings erected literally “on the water”.
Despite a certain difference in technologies for the construction of strip foundations different types, they all have a common feature - this is a solid, closed strip-base along the entire perimeter of the house being built and under the internal supporting structures... The tape itself is buried in the ground for the required design value, and protrudes from above with its basement part. The width of the tape is kept uniform throughout the foundation - this parameter should also be based on the calculations performed.
The versatility of strip foundations lies in the fact that they are suitable for almost any building - from a small outbuilding to a large multi-storey mansion - the difference will be only in the depth and width of the strip. This type of foundation allows you to organize a full-fledged basement or basement, carry out high-quality floor insulation, conveniently place all engineering communications suitable for the house.
The disadvantage of strip foundations is considered to be large volumes of earthworks and necessary materials, but this, in principle, is fully justified by the high reliability and durability of the resulting base.
More details about strip foundations will be discussed below.
Columnar foundations
If construction is planned small house, buildings with a light frame structure or other structure that will not create excessive loads on the base, it makes sense to consider the option of a columnar foundation.
The pronounced savings in both materials and labor costs are obvious - the support is not created along the entire perimeter of the building, but only in the corners, at the intersection points of the wall structures, and with a certain step - on straight sections. Supports-pillars can be laid out of brick or rubble stone, made of monolithic concrete, built from ready-made reinforced concrete blocks, and sometimes they even use high-quality wood of species that are resistant to decay. An integrated approach is often used. For example, the lower part of the post is laid out of rubble stone, and the top is made of reinforced concrete - monolithic, to ensure a reliable connection with the tying grillage.
The depth of the base of the pillars and the features of the technology for their installation depend on the material used and the characteristics of the soil at the construction site. A columnar foundation is good because with a small difference in the height of the site, you can adjust the horizontal level of the strapping without much expense, only by changing the height of the supports.
From above, the pillars are connected by a grillage, reinforced concrete or from rolled metal (for example, a channel), or immediately with a waste strapping. In any case, such a strapping will connect all the supports into a single solid structure and become the basis for the further construction of walls, laying floor beams, etc.
With all the advantages of a columnar foundation - its economy, speed of construction and others, it also has considerable disadvantages. So, the possibility of creating a full-fledged basement or basement room is completely excluded. It is not suitable for massive buildings - the load on each pillar will be too great, and if the house still has a complex configuration, then the load on the foundation may not be distributed evenly enough. With very great caution, one should consider the possibility of creating such a foundation on weak, unstable soils, prone to winter swelling, with close occurrence of aquifers. Even if only one or several supports begin to "walk" in height, this will immediately affect the condition of the entire grillage - due to the emerging internal stresses, it will begin to deform, collapse, which will inevitably affect the walls and the entire building as a whole.
Another way is when the piles are "created" directly in place, using bored technology. Wells of the required diameter and to the calculated depth are drilled at the marked points of the future foundation. With the help of special devices, a significant widening is made in the lower part of the well. A reinforcing structure is inserted inside, so that it captures the entire future pile in height and comes out from above - for subsequent bundling with the grillage reinforcement belt. A kind of round formwork is made from roll waterproofing material, and then the entire cavity is filled with concrete.
As a result, after complete maturation of the concrete, the builders have at their disposal a ready-made pile field with the required performance characteristics.
Pile foundations perfectly justify themselves on unstable, heaving, swampy soils - there is an opportunity to "pierce" them through and through and gain a foothold in a stable rock. Foundations of this type are often used in areas with highly rugged relief - it is easiest to reach a common horizontal with piles.
The main disadvantage of the pile foundation (if we are talking about the construction of a full-fledged house, and not an easy extension) can be considered the need to use special equipment - for drilling deep wells and for strictly vertical pile driving with great effort. However, there is an exception, which makes it possible to build a pile foundation on your own.
This refers to a relatively new technology in our area, but rapidly gaining the number of supporters, the technology of creating pile-screw foundations. Supports in this case are metal pipes with a pointed end and welded blades. In fact, they are screwed into the ground (an analogy with self-tapping screws suggests itself!) In such a way that the blade part reaches dense rocks below the freezing level. Then it is easy to cut the piles along the general horizontal level, fill them to the top with concrete mortar, weld the heads with the mounting pads, and already from them "dance" further - to perform strapping of one type or another.
This is not to say that the installation of a pile-screw foundation is a simple task, as it might seem from the outside. Judging by the truthful, sometimes self-critical comments of the same masters, they often have to face a lot of difficulties. These can be individual boulders or even rocky fields at a certain depth. In some soils, the pile, when screwed in, behaves somewhat unpredictably, trying to move away either from the marking point or from the established vertical. Sometimes even the maximum application of torque with long levers does not help to screw the pile in an inch deeper than a certain level. In a word, it can be difficult to cope with such "force majeure" circumstances without gained experience. And although such a foundation is classified as "do it yourself", it is still very risky to take on it without an experienced assistant.
This technology has undeniable advantages. So, such a foundation is practically independent of the state of the soil, it is completely not subject to frost swelling. It seems to "float" on the surface of the earth, distributing evenly over a large area all the load from the building. Usually for this, a well-reinforced slab with a thickness of about 250-300 mm, poured on a sand and gravel bed of approximately the same thickness, is sufficient.
However, such a foundation has very significant drawbacks. First of all, this is a very considerable expense. building materials for pouring a monolithic slab. Such a foundation is inapplicable in an area where there is even a slight slope of the terrain. It is clear that we are not talking about a basement or a basement, even in a pseudo-version, as in the case of a pile or columnar base.
Well, if it is planned to bring any underground utilities to the house (for example, the same sewer pipes), then the cost of any mistake made at the preliminary stage of planning increases enormously. In this case, it will be extremely difficult to correct any defect.
We build a foundation of increased versatility - tape
Let us return, however, to the most universal type of foundations - to its tape version. All further presentation will be devoted exclusively to him.
Why is a strip foundation good? Are there any disadvantages?
So, a strip foundation is a solid, without gaps, a strip of base of a certain width and depth, installed along the perimeter of the building and at the location of others load-bearing walls and partitions.
This is usually chosen:
- If you plan to build with the use of heavy materials that exert a large load on the base, requiring its even distribution over a large area. This applies to brick, stone houses, reinforced concrete buildings, cinder blocks and other similar materials.
- As a rule, a strip foundation becomes mandatory for multi-level construction, when using heavy floor slabs, when using the attic as a full-fledged attic living space.
- You cannot do without a strip foundation if the owners plan to have an equipped basement or basement, for example, for arranging a garage, workshop, bathhouse, recreation area or sports, etc. None of the other foundations provides such an opportunity.
- A strip foundation will be preferable in an area with obvious heterogeneity of the surface layers of the soil.
This type of foundation is generally not too "capricious" in relation to soils, there are very few restrictions - it is usually not used on peatlands and in clearly subsiding areas.
In addition to the above, the strip foundation has a number of characteristic merits:
- In terms of its strength characteristics, it is in no way inferior to a monolithic slab, but it requires significantly less material and labor costs.
- The technology of its construction is quite simple and straightforward, and any homeowner can handle such work, if desired and diligent. In principle, it is possible to completely do without the involvement of construction equipment.
- The service life of a high-quality strip foundation exceeds 100 years - no columnar or pile foundation can come close to such indicators.
- There is a choice between several types of strip foundations - depending on the specific construction conditions and material capabilities of the owners.
- Such a foundation opens up a wide "field of maneuver" in terms of laying communications, insulating the floors of the first or "ground" floor. The strip foundation lends itself easily reliable waterproofing and insulation.
A few words about disadvantages:
- The whole cycle of construction of a strip foundation will take a lot of time, taking into account labor-intensive earthworks and the expectation of full maturation of the poured concrete.
- When pouring a monolithic strip foundation, you should try to complete it at one time, during the day, otherwise the stratification effect may appear, and such areas will subsequently become a very problematic place. It is not an easy task to prepare a large amount of mortar on your own, therefore it is for this stage of work that you often have to resort to third-party help - to order the required amount of concrete from the relevant companies.
If these difficulties are not scary, then you can proceed to the choice of a specific scheme and to the calculations.
Some types of strip foundations
- Strip foundations can be conditionally divided into two categories according to the degree of penetration into the ground.
- For small buildings, for frame structures, erected on dense soils, there is no need to go deep into the ground - there is enough tape with a height of about 300 ÷ 500 mm (excluding the protruding basement part).
- If the building is massive, constructed of heavy materials, and even more so, if the condition of the soil raises certain concerns, it is required to prepare the foundation with a deep bedding of its base. As a rule, they are guided by a depth, approximately 300 mm below the level of winter freezing of the soil, typical for a particular construction region - this will help to avoid the negative impact of frost heaving phenomena.
- The strip foundation is not at all necessarily only monolithic concrete pouring... There are technologies for the construction of such bases from piece materials - ready-made blocks, waterproof bricks, rubble stone. In some cases, this allows you to achieve a serious reduction in the time of foundation construction or material savings.
So, for example, in private construction, for "solid" houses with spacious basement rooms, a prefabricated foundation is often erected from special blocks manufactured at the factory.
There are usually two types of prefabricated blocks. In the open pit, first, on the compacted sand and gravel dump, foundation slabs - pillows are laid, which set the direction of the future belt. They can be installed in full, or with small gaps, which are densely filled with sand. Then, on this base, foundation wall blocks (FBS) are laid on the mortar, and the tape is thus raised to the required height in the basement. After laying, the upper row of blocks is connected with a monolithic reinforced concrete belt - and wall work will go further from it. A prerequisite for such a foundation is high-quality waterproofing of the tape walls in order to completely eliminate seepage ground water through the seams between the blocks.
Such a foundation is not used on unstable soils or in seismically active regions, since there is a high probability of deformation with rupture of joints at the seams between blocks. Here it is worth giving preference to a monolithic tape.
It is clear that building a prefabricated block foundation on our own is an almost unrealistic task, since in any case it will be necessary to involve construction lifting equipment. The issue is also complicated by the problem of delivery of heavy building structures to the place of work. But if we calculate the total costs, then they will probably be quite comparable (if not less) than the pouring of a monolithic tape, since labor-intensive operations for installing the formwork for pouring and tying the reinforcing belt are almost completely eliminated.
But since we are more focused on the consideration of issues on conducting independent construction, then we will only talk about pouring a monolithic foundation tape.
How the strip foundation is calculated
Erection of any building structure, and the foundation - in particular, should be carried out only on the basis of carefully performed calculations.
From the initial data, as a rule, only the length of the tape laying is known, that is, the perimeter of the future house and plus, if available, the tape under the internal bearing walls.
The main purpose of the calculations is to determine the depth of the foundation and its width in order to ensure the strength and stability of the building erected on this basis.
An important caveat will be made right away. On the Internet, you can find a lot of different calculators, which, according to their creators, make it possible to carry out accurate independent calculations of all parameters of the strip foundation. Nevertheless, the principled position of the author of these lines is that such calculations should be carried out exclusively by specialists.
This does not mean that the professionalism of the developers of such calculators is being questioned - undoubtedly, most of them created their applications in strict accordance with the current SNiP requirements, taking into account all the defining formulas and tabular coefficients. The point is somewhat different.
For really correct calculations, it is necessary to be able to correctly assess the many initial conditions - these are the type and features of the state of soils on the site, climatic conditions, the location of underground water horizons and a number of others. It is impossible for an inexperienced person (and agree, no offense that all such articles are designed specifically for non-specialists) to accurately assess all these nuances.
Further, for calculating the foundation, the values \u200b\u200bof the planned load falling on it are required, and with its distribution along the axes, since it is often uneven. And the load consists of the weight of the entire structure, taking into account all of its structural elements, from the foundation itself to the roof and roof, floors, external and interior decoration and much more. Plus, external loading effects are added to this - snow, wind, operational dynamic and others. You have to be a very "savvy" specialist to be able to correctly assess all these parameters and determine the general characteristics.
In short, no matter how sophisticated the online calculator is, it will not give the correct result only for the reason that there is no guarantee that the correct initial values \u200b\u200bhave been entered.
Carrying out "bold experiments" in matters directly related to the reliability and durability of the future expensive home, and by and large also the safety of the people living in it is hardly a reasonable approach.
It's a different matter when, on the basis of the calculations of the foundation parameters carried out by specialists, it is required to find out the amount of necessary materials - here you can also carry out independent calculations. The price of a mistake is either the need to buy what is missing, or a certain surplus, which in any case will sooner or later be required at the construction site.
Such calculators will be offered to the reader in the course of publication, each in its own section. This is done so that there is no confusion, and so that the visitor can always return to one or another calculation, making individual adjustments, and without resorting to running the entire calculation algorithm from start to finish - in most cases this is not required at all.
Depth of tape
When calculating the depth of the strip foundation, experts evaluate several criteria:
- Geological factor. The foundation should rest against a dense, load-bearing soil layer, immersed in it at least 100 ÷ 150 mm.
- Design features of the projected building - for example, requirements for the presence of a basement or basement, layouts of utilities.
- Climatic features of the region - the estimated value of the depth of soil freezing at the construction site.
- Site hydrology - the location of aquifers and the degree of their influence on freezing and swelling of the soil.
Naturally, for a large building, it is impossible for an amateur to correctly assess all these parameters.
An exception can only be a shallow foundation erected for lightweight buildings - household buildings and small summer cottages or residential buildings. In such cases, strong deepening is not even welcomed - usually up to 500 mm is enough. This allows you to minimize the consumption of concrete, and in addition, the external influence of the tangential application of forces when the soil swells is significantly reduced.
Very often, for a shallow foundation, the recommended depth is chosen, guided by the tables - this, as a rule, is quite enough. An example of such a table is posted below:
Building type Average value of soil load, kN / m ² Strongly rocky ground, flask Dense clay, loam that does not decay after being squeezed in the hand Caked dry sand, sandy loam Soft sand, silty soil or sandy loam Very soft sand, silty soil or sandy loam Peat bog Barn, bathhouse, outbuildings, small garage 20 200 300 400 450 650 One-storey country house + attic 30 300 350 600 650 850 Strip foundation is not possible Two-storey cottage 50 500 600 only on the basis of professional calculations only on the basis of professional calculations Strip foundation is not possible Two or three story mansion 70 650 850 only on the basis of professional calculations only on the basis of professional calculations only on the basis of professional calculations Strip foundation is not possible For the total value of the height of the tape, the height of the basement part of the foundation protruding from above is also added to the laying depth - it already depends on the design features of the planned building.
Foundation tape width
When calculating the width of the tape, it is assumed that the load distributed along the support should not exceed the calculated values \u200b\u200bof soil resistance, that is, the foundation should not sink into the ground.
The following relationship is used for calculations:
S\u003e (kn × ΣF) / (R × γc)
S - support area (base of the foundation);
kn - the coefficient of reliability, that is, the structurally laid safety margin. Usually taken equal to 1.2.
ΣF - total load applied to the base of the foundation. What it consists of - it was described above.
R - the value of soil resistance (in fact - its load bearing capacity) Is a tabular parameter calculated for all types of soils. The value can be taken from the following table:
Soil type Calculated value of soil resistance R (kg / cm²) Gravel with filling: - silty clay 4,0 - sandy 5,0 Pebbles or crushed stone with filling: - silty clay 4,5 - sandy 6,0 Sands: Dense Medium density - large 4,5 4,3 - middle fraction 3,5 2,5 - small: • medium humidity 3,0 2,0 • wet 2,5 1,5 - dusty • medium humidity 2,5 2,0 • wet 2,0 1,5 Clays and silty clay soils A type Porosity coefficient Dry soil Wet ground Sandy loam 0,3 4,0 3,5 0,5 3,0 2,5 0,7 2,0 1,5 Loam 0,3 4,0 3,5 0,5 3,0 2,5 0,7 2,5 1,8 1,0 2,0 1,0 Clays 0,3 9,0 6,0 0,5 6,0 4,0 0,7 4,0 2,5 1 2,5 1 γc - a correction factor that takes into account the characteristics of the soil and the structure under construction. This is a tabular value given in SP 22.13330.2011. Varies from 1.0 to 1.4.
If you wish, you can try to carry out the calculation yourself. But again, if you look at the table, it will be difficult to give a clear assessment of the soil - certain knowledge is required. And to accurately calculate the total load taking into account all the features of the future building is an extremely difficult task. Therefore, I repeat, the calculation should still be entrusted to a design specialist.
For shallow foundations intended for small buildings, the width of the tape is usually taken as a multiple of 100 mm - 300 or 400 mm, depending on the type and thickness of the walls erected on it and on other features of the house.
Reinforcing belt of strip foundation
In general, the process of reinforcing a strip foundation is a whole science, which certainly deserves a separate detailed publication. Here we will consider only the main provisions of this stage.
First of all, the number of longitudinal reinforcing rods must correspond to the design parameters of the foundation tape. Of course, if the calculation is carried out by a specialist, then the number of rods, and their diameter, and the diagram of their location in the section of the concrete belt will be immediately issued. It is a different matter if the decision on the size of the foundation is made independently, in accordance with the recommendations of the tables. In this case, one should proceed from the requirement that the total cross-sectional area of \u200b\u200bthe reinforcing structure should not be less than 0.1% of the cross-sectional area of \u200b\u200bthe tape. In this case, it is preferable to place the reinforcement rods in at least two "floors", in pairs, closer to the upper and lower edges of the cast belt - it is there that the foundation experiences the greatest stresses.
Typical "pattern" of the reinforcing belt of the foundation tape
1 is the main reinforcement, longitudinal rods with a diameter of 10 ÷ 12 mm and more. It is their number that is determined by calculation. For tape more than 150 mm wide, at least two rods must be installed in each tier.
2 – additional elements reinforcing structure, ensuring its strength and correct geometry. These vertical and horizontal jumpers (clamps) are installed with a certain pitch (usually around 500 mm, but no more than 0.75 of the total belt height). For their manufacture, a smooth reinforcing bar with a cross section of 6 ÷ 8 mm is usually used.
Calculator for calculating the minimum number of main longitudinal reinforcement bars
The construction of the foundation begins with the layout of the site. The technology of land works is chosen depending on the type of soil and the level of soil water. Also, before you make a foundation for a house, you need to determine its type that is most suitable for your conditions.
A strip foundation on dry soil is made of brick, stone or concrete, on wet soil - of reinforced concrete or concrete with mesh reinforcement and waterproofing.
- Sandy... Set up on soils with deep soil waters. They dig a trench 70-centimeter deep, poured coarse sand on the bottom in 15-centimeter layers, each of which is watered abundantly with water. The top layer, up to 30 cm wide, consists of gravel, bricks or crushed stone, fastened with a mortar of sand and cement.
How to build a foundation yourself: a step-by-step guide
You can also watch a video on how to make a foundation for a house. Below we will consider the features of the construction of foundations for the most popular types of buildings.
How to make a foundation for a wooden house
A wooden house is lighter than a stone one, but the foundation must be strong and reliable
The foundation for a wooden house has two main functions:
- Stability of the wooden structure.
- Creation of a barrier for microflora and moisture that destroy woody walls.
Also, a dense thick foundation prevents the penetration of cold into the basement. If the soil on the site is dry and dense, a strip or slab columnar foundation is made. The most popular base for such houses is a shallow belt... It is suitable for light timber buildings.
Shallow foundation design
The most durable is the foundation of concrete slabs.... However, houses with concrete floors are not very comfortable. In areas with high soil moisture, a pile is arranged. If you are thinking about how to build the right foundation for your home, start by identifying the most suitable type.
It should be borne in mind that the construction concrete base perform no earlier than a month before the start of the construction of the walls, otherwise it will not have time to settle, and the structure may deform. Under wooden houses be sure to make a blind area and roofing felt or bituminous waterproofing.
Brick and concrete protect not only from moisture, but also from exposure to sunlight, covering them with resistant paint or plaster. To ensure dryness in the upper part of the base of the house, through holes are left in the foundation for ventilation.
How to make a foundation for a house from a bar
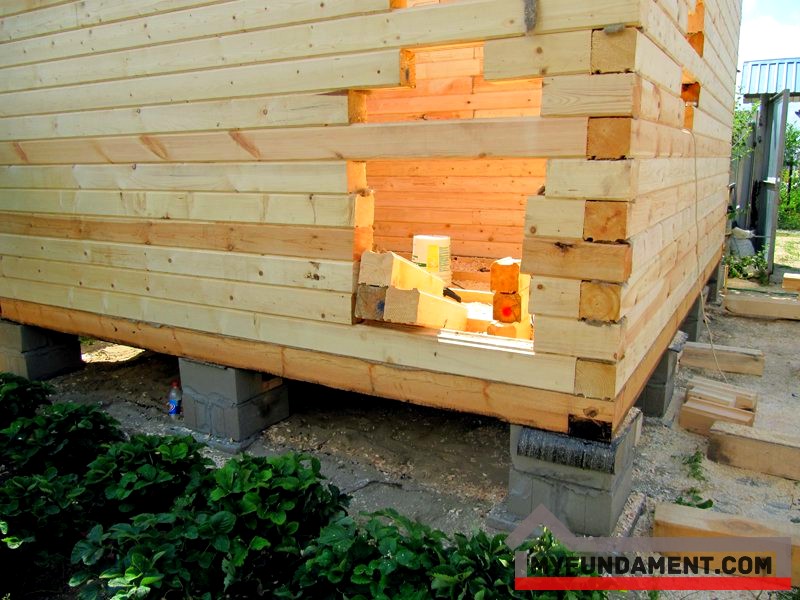
Pole-based base is a great saving way for an easy home
For log house of small mass and dimensions, a support-column foundation of square pillars installed at a distance of 2.5 ± 0.5 m is suitable. You can also use concrete, stone or brick. The stronger the material, the longer the base will last. In areas with heterogeneous soil, the base for a house from a bar is equipped with screw piles.
For large houses, it is advantageous to install a tiled foundation of 25 cm monolithic slabs... But most often for buildings, a strip-type reinforced concrete foundation is made from a bar. This base can also be used for massive houses. The basic rule is that the foundation should be several centimeters thicker than the walls of the building.
- Before making the foundation for the house, mark the site and dig a trench, the depth of which is usually about 70 cm.
- Sand is laid at the bottom, tamped, mounted wooden formwork... It should rise above the ground by a maximum of 30 cm.
- Also carry out waterproofing of the base.
- After choosing and laying the foundations of the house, timber walls are installed.
- To increase the reliability of the structure, the beams are attached to the foundation using large anchor bolts or studs previously cast into the base. The nuts are screwed onto the latter.
- After that, the studs are sunk into the timber to the base.
How to make a foundation for a frame house correctly
For frame houses, it is usually made columnar or tape. The latter is mainly used for heavy multi-storey buildings. The columnar foundation is great for one-story frame-type houses. But when choosing a base, you should take into account not only the parameters of the building. The properties of the soil, especially its heaving, are of great importance. The higher it is, the stronger the foundation will be needed. In some cases, it is advisable to equip a tiled base for frame house.
The strip foundation is usually made shallow. It should be borne in mind that on such a basis a lightweight building can float during periods of high soil moisture. The tape-type foundation for frame houses is made of concrete or reinforced concrete, having previously equipped a pillow from any non-porous material, which will reduce the mobility of the structure.
Column foundation is less expensive than strip foundation. You can make it out of concrete or brick. It turns out good from red burnt bricks. Pits 0.5-1.5 m deep are dug under the supports.
The disadvantage of a brick columnar foundation is that it can move or deform due to the pressure of the moving soil. A concrete foundation of this type is considered the most durable and can last over 150 years, but it costs much more than its brick counterpart.
- Supports for the foundation are placed along the perimeter of the base of the frame building at a distance of 1.5-2 m.
- Be sure to install posts under the load-bearing partitions and corners of the house. The diameter of the holes should be at least 40 cm, the depth depends on the level of freezing and heaving of the soil.
- The bottom is covered with sand or other material that is suitable for arranging a pillow. Formwork is performed, the reinforcement cage is inserted and the pit is poured with concrete with periodic compaction.
- You can make a concrete screed between the supports, which will become the basis for the basement and protect the basements of the frame house from cold, dust and moisture.
- The screed is placed on a pillow, recessed by 20 cm. To arrange the screed, formwork and reinforcement will also be needed.
Desirable all construction works complete in one season and put the house into operation. If construction is postponed until next year, the foundation without loading the walls and roof can deform during the winter. The laying of the foundation for the house begins after the purchase of all the necessary building materials.
Read more:

What criteria should be paid attention to in order to choose the right foundation for a foam block house. Characteristics of suitable types of bases. How...
The fact that a solid foundation is a guarantee of well-being and many years of trouble-free living in the house is a common truth, in which no one can be convinced ...


