The most logical thing is to use natural wood for finishing the floor. It will organically fit into the interior in country style, modern, hi-tech. Although you can take a closer look at laminate or linoleum. A high-quality laminate will look soundly, and you can hardly distinguish it from natural wood; it is good to use it if you plan to install a warm floor. It is possible to increase the thermal insulation properties of the floor with the help of insulation, especially if you are going to live in a log house all year round.
Sten:
One of the key points of interior decoration of a house from a bar. The appearance of fresh wood is so good that it is a pity to spoil it. However, even if you want to leave the walls in their original form, some work will still have to be done. Firstly, it is imperative to treat the timber with an antiseptic composition in one or two layers. Secondly, you need to take care of applying a refractory impregnation; for high-quality protection, at least five layers are required. Only after that you can proceed to decorative design, if you have such a desire. To do this, you can sheathe the walls with plasterboard, followed by wallpapering, block house, clapboard, or paint it with paint.
![]()

Interior decoration at home will help to polish, make it truly habitable and comfortable. So that the repair does not turn out to be a bottomless abyss into which all your strength and financial resources go, do not save on quality materials and labor of skilled workers, order from our company, because even minor defects in the interior can deprive you of peace and joy of life in a new home for a long time.
The use of profiled or rounded timber during construction is one of the best solutions for building an environmentally friendly, beautiful and comfortable home. But it is important to create not only a beautiful appearance - it is important to create a strong and reliable structure. Correctly chosen interior decoration will help in this matter.
What are the popular finishing materials and how to install them correctly? Where is it more appropriate to use certain materials? We will try to understand all these issues and find the best solutions for interior decoration of a house from a bar.
The interior of a house from a bar: the most popular materials for decoration
![]() Finishing work can be divided into two groups: external and internal. Outdoor decoration wooden house used very rarely - wood is very beautiful material, which does not need third-party revision or finishing.
Finishing work can be divided into two groups: external and internal. Outdoor decoration wooden house used very rarely - wood is very beautiful material, which does not need third-party revision or finishing.
Interior decoration is used everywhere, since it is it that is designed to insulate and strengthen the walls of houses.
Builders use many materials for interior decoration of a house from a bar. The most common are:
- Decorative rock
- Plastic lining or panel siding
- Wooden lining
- Block house
- Drywall and other materials
As a rule, when decorating a house from a bar, all materials are used inside. A bathroom, a hallway or a kitchen can be covered with waterproof plasterboard, a corridor, a hall or a living room can be covered with decorative stone inserts; wooden lining can be a versatile background material for walls. In general, great opportunities open up for the realization of your own fantasies and design solutions in interiors country houses from a bar.
If you are thinking of building an extension to the house from a bar, then you can read about it. The article contains all the features of the construction of extensions.
Video about interior decoration of a house from a bar
Detailed instructions for laying decorative stone
Wall decoration decorative stone
Video about various elements of interior decoration
How to correctly and quickly make a drywall partition with your own hands
There is nothing more environmentally friendly and original wooden structure... The house can be made of rounded and profiled timber.
For a building made of such a building material to serve long years high-quality interior decoration of the log house is made.
All finishing works in a wooden structure are divided into: external and internal finishing of a log house. If the outside of a house made of wood is rarely finished, since it can significantly spoil the appearance of the structure, then it can strengthen and insulate the walls of the house.
There are various options for interior decoration of a house from a bar.
This could be:
- Decorative rock.
- Block house.
- Plastic lining.
- Panel siding.
- Wooden lining.
- Drywall and more.
Photos of the interior decoration of a wooden structure are very diverse. Very often in finishing worksah, more than one material is used.
There are interesting and original room designs that are striking in their practicality.
Decorative stone in the decoration of a wooden house

Decoration inside a log house can be done with decorative stone... This room design looks very original and aesthetically beautiful.
Since the walls made of profiled timber have a fairly flat surface, the cost of leveling them will be insignificant.
The main characteristics of the material:
- Decorative stone is analogous to natural natural stone.
- It is moisture resistant and very durable.
- Although it is not made from natural substances, the decorative stone is still environmentally friendly.
- With its help, unique and original interiors of wooden buildings are created. Stone and wood have long been used in decoration.
They look very original together. - The surface of the decorative material is not capable of absorbing a variety of dirt. It is easy to clean. To do this, it will be enough to use a damp cloth.
Council. do not clean the surface of the decorative stone with abrasives... It can be damaged and the appearance of the material will simply deteriorate.
What must be foreseen during installation work
So:
- Artificial stone is very easy to install. To do this, you will need to do some preparatory work on a wooden wall.
Since wooden walls made of profiled beams will have small gaps that have formed as a result of masonry, you need to caulk with linen thread or use moss for this purpose. - All slots are sealed with high quality and only after that you can start finishing work on the wall surface.
- The decorative stone lies on a flat surface. Since it is lightweight, it will not need to be pre-mounted on the wall surface reinforcement mesh made of wire and construction mesh for plaster, which cannot be said about natural natural stone.
- You can level the surface of a wooden wall using drywall or plaster. Sometimes a thin sheet of plywood or OSB is used for such purposes.
- Plastering on wooden walls is quite simple. It is sold in bulk form.
- In order to obtain a high-quality solution, you need to dilute it with a certain amount of water. For this, there is a special instruction on the package, according to which such actions are carried out.
- There is a starting and finishing plaster. They cannot be interchangeable, since they perform only those functions that are assigned to them.
The starting plaster serves to level the surfaces, and the finishing plaster performs decorative functions and hides the defects of the starting layer.
Council. It is also possible to use drywall for leveling the surfaces of wooden walls. It is attached to the profile metal carcass.
That is, it turns out a kind of lathing on which sheets of drywall are attached.

To install decorative stone you need:
- Special glue or cement mortar.
- Decorative rock.
- Two spatulas (small).
- Level.
- Putty (if necessary).
Laying:
- The entire installation process will depend on the size of the finishing material itself. The glue or cement mortar is applied to the inner surface of the stone and to the wall with a spatula.
The second spatula removes excess mortar from the surface of the material. You need to fix the decorative stone close to each other. But, it all depends on what type of masonry was chosen. - Each element of such a finish must be laid strictly according to the level. Of course, there are such sizes of stones that are stacked in a chaotic manner.
Then you will need to measure the required finishing area and outline it on the surface. - After installing the decorative stone, all the seams can be covered with special tools, or you can add dyes to the solution and do the laying and surface finishing at the same time.
The video shows an example of installing a decorative stone. Anyone can cope with such works.
Wooden lining and block house in the decoration of a wooden house
Internal from a profiled bar can be made using a wooden lining or block house.
These materials are similar in their technical specifications... They create the integrity of the design.
Distinctive features:
- But, before using such materials, you need to take into account the moment that wood absorbs moisture quite well and it is for this reason that you should not use them in rooms where there is high humidity.
- Finishing materials of this type are distinguished by their environmental friendliness and practicality. They look great in timber construction.
Their surface is very protected from a variety of dirt and insects. As a rule, it is varnished. - The materials are quite strong and durable. Most often they are used to decorate a living room or bedroom.
They are very interestingly combined with decorative or natural stone.
For the installation of a wooden lining or block house you need:
- Self-tapping screws for wood.
- Screwdriver.
- The material itself.
- Level.
- Wooden bars.
A starting wooden strip is installed on the wall surface. The installation of the material itself is already being carried out on it.
It will be possible to make a wooden crate and place insulation in its cells. Thus, insulation and finishing work will be carried out simultaneously.
Plastic lining and siding in the design of wooden walls
Very often, interior decoration of houses from a bar is carried out using plastic or siding. The materials are moisture resistant and it is for this reason that they are used in the kitchen and sanitary area.
Distinctive features:
- The surface of such materials is not able to absorb dirt and therefore it is very easy to clean.
- They are also characterized by their easy installation and it is possible to carry out it with your own hands and not resort to the help of a specialist, which will largely save the family budget.
- The price of these finishing materials is quite affordable compared to wooden clapboard or decorative stone.
For installation you will need:
- Small wooden blocks and boards.
- Self-tapping screws for wood with long and short legs.
- Screwdriver.
- Sealant.
Installation:
- Decorating a house from a bar inside with siding or plastic begins with the manufacture of the lathing. They are mounted from wooden planks and beams directly on the wall surface.
It is fastened with self-tapping screws with long legs. All elements are self-tapping screws with small legs. - As soon as the crate is ready, the fastening of the materials begins with the installation of the starting strip, which touches the entire direction of the material. Plastic strips or siding sheets are already inserted into it in the process.
You can fasten individual elements together with a construction stapler.
Council. To give strength to the entire finish, each joint of these materials must be sealed with a sealant.
The use of drywall in the decoration of a wooden structure

Drywall has been used for many years in almost all finishing works... With its help, not only surfaces are leveled, but also various ceiling structures are constructed.
Interior decoration with plasterboard of a house from a bar will be practical and durable.
Council. It is not recommended to use drywall in small rooms, as this method of finishing can hide the space.
For the installation of such a finishing material you will need:
- Metallic profile.
- Drywall sheets.
- Self-tapping screws with wide heads.
- Screwdriver.
- Dowel.
- Perforator.
Installation:
- Decorating the interior of a house from a bar using drywall begins with the construction of a frame. It is made of a metal profile that is attached to the wall surface with dowels.
- Sheets of drywall are mounted on this frame with self-tapping screws and a screwdriver. It will not be difficult to fit the required sheet size.
This material is cut with an ordinary clerical knife. - After that, the joints of the sheets are processed with putty and the surface can be painted or pasted over. Very often it is applied decorative plaster, which gives the room a rich look.
Well, it's finished!
As a rule, decorating houses from a bar is not difficult. To do this, you will only need to choose the right finishing material, and you can carry out all the work with your own hands.
There is nothing difficult in this today.
Wooden houses have always been, are, and will probably remain for a long time perhaps the most popular structures among private developers. A log house is beautiful, but it is quite expensive, so most owners prefer a log house. In this article I will tell you how to finish a log house from the inside and outside, and this material is designed for those who are going to equip a house with their own hands.
Why decorate a log house at all and when can work start
Most ordinary people, far from the intricacies of construction, do not understand why a wooden house may need exterior and interior decoration. After all, wood is already a beautiful self-sufficient material in itself and all that can be done with it is only varnished or painted.
They are partly right, but only if we are talking about the so-called glued profiled timber. The construction material really very nice and comfortable. Such beams are glued together from several layers of well dried and impregnated protective compounds wood.
In addition, grooves (profiles) are cut on them that allow you to assemble a house as a designer, by the way step-by-step instruction attached to such sets. As a result, the owners get a solid house without large gaps and distortions.

But the price of such a "constructor", to put it mildly, "bites" and therefore many people, instead of glued laminated timber, use an ordinary one, and even not always well dried. And an ordinary timber, to tell you honestly, looks good only on an advertising stand in a store, as soon as you fold the coveted environmentally friendly housing out of it, its appearance is unlikely to suit you.
Although even structures assembled from laminated veneer lumber, despite their attractive appearance, often require finishing. In order for the house to be warm, you need to either buy very thick and expensive beams, or additionally insulate the building. And here the warm finishing of the facade of a log house comes to the rescue.
We figured out the reasons, now let's talk about when you can start finishing work. As you know, any wooden structure shrinks over time.

If you bought a ready-made "constructor" made of laminated veneer lumber, then this indicator is minimal. In this case, the total shrinkage will last about 3 years, and you can start finishing in six months, maximum a year.
Monolithic well-dried beams with cut grooves will not shrink much more, but nevertheless, finishing should not be started earlier than a year later. And in this case, such a house will need to be abundantly "flavored" with various kinds of protective impregnations.

The worst situation is with a simple flat timber, which at the time of construction has natural moisture. Such buildings sit for at least 5 - 7 years. As for the beginning of finishing work, many masters advise starting them in a year, although I always recommend letting such a house stand for at least one and a half, and preferably 2 years.
It does not matter what kind of wood you are going to build your home from, immediately after construction the box must be covered with a roof and must be treated with protective impregnations so that the tree does not start to deteriorate while the shrinkage continues.
Existing types of finishing of a log house
By and large, for finishing a log house, all the same materials are used that are used for facing a brick, block or any other structure. But they need to be applied selectively, because the external and internal facing of wooden structures have their own specifics.

| How can you decorate a log house | |
| Cladding types | Characteristics |
| Plaster | One of the most durable cladding methods, but in this case it is extremely important that the shrinkage processes in the house end, otherwise any movement of the base can cause cracks and even delamination. Plaster is more suitable for older houses. |
| Siding | Siding panels can be plastic, metal, cement and wood. Depending on the material, the service life of such a finish ranges from 15 to 50 years. Siding has always been considered an exterior cladding option, I personally have not seen it installed from the inside. |
| Facing facade brick | Everything here is clear from the name. If the brick is of high quality, then such a cladding will stand for at least 50 years. Typically between wood and brick wall insulation is laid. The only limitation may be the foundation, for such a cladding you need a wide, capital structure. |
| Natural or artificial stone | It can be used both inside and outside. Although in most cases, stone decoration of wooden buildings from the outside is limited only by the basement. Plus, natural stone has a solid mass and needs to be equipped with an appropriate foundation. |
| Different types of lining | Lining material is universal, it can be used everywhere. Modern planks have a groove-tongue connection and are mounted quite simply. In our case, trimming with a false beam is best suited, in fact, this facing is one of the varieties of lining, in some sources it may be called a block house, for a log house this is the best option. |
| Varnishing or painting | This type of wood processing can also be considered universal. But, as you understand, we are not talking about insulation here, so varnishing or painting is more often used as interior decoration, although in the case of wooden lining, such processing can be performed outside. |
| Tile | In this case, the tiles are more relevant for the interior cladding of services in the house. Outside, it can only be trimmed with a basement and a porch. |
| Drywall | Drywall is a convenient facing material, but it can only be used for interior work. |
Facade cladding
Naturally, the first thing that interests home craftsmen is how to decorate a log house from the outside. Since our priority is the installation of cladding with our own hands, then it is better to forget about such things as brick, plaster and natural stone right away, without experience you are unlikely to cope with such work.

We are left with only varnishing and ventilated facade technology. In this case, the technology of a ventilated facade should be understood as the installation of siding and all types of lining. It's not for nothing that I combined all this, the fact is that the instructions in all these cases are similar.
Before starting the finishing of any wooden structure, you should once again dig in all the cracks, both outside and inside the house. First, hemp or jute is pushed into the joint, and from above the gap is closed with a special sealant. By the way, such a sealant was created specifically for these purposes and another will not work here.

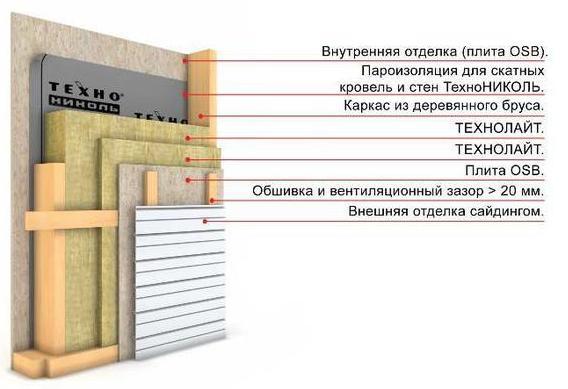
Ventilated facade technology
It is my deep conviction that for novice craftsmen, a ventilated facade is, if not the only, then certainly one of the most acceptable options for finishing a wooden house.
This type of facade is called ventilated because a gap is left between the finishing cladding and the base, and insulation becomes excellent in this gap. But first things first.

- Since, in any case, the walls of the house themselves will not be visible, it is not worth cleaning, grinding and leveling them, it is enough just to caulk and cover the cracks between them with sealant. True, some masters insist on such processing, but I think that this is unnecessary. But protective treatment in this case is mandatory, and you do not need to save on impregnations;
- There is nothing complicated in such processing, you just buy a composition for biological protection of wood (antiseptic) and a composition for protection against fire (fire retardant), take a paint roller or a wide brush and apply everything in layers, while letting each layer dry.
Ideally, all protective compounds should be applied even before the start of the construction of the house, so that the timber is protected throughout the entire area, but if for some reason this was not done or you are finishing old house, then you can impregnate the finished structure;

It is better to take professional impregnations with comprehensive protection, now the price for them is acceptable, homemade liquids according to folk recipes are no longer relevant, plus the quality of homemade products is an order of magnitude lower.
- When the impregnations are dry, a vapor barrier is attached to the wooden wall. In general, she is pressed against the battens of the crate, but for me it is easier to first shoot her with a stapler, so you can do without helpers. And do not forget, the steam moves from the room to the street, if you fill the membrane incorrectly, condensation will form under it (on such a canvas there are always marks indicating the vapor-permeable side);
- Next, you will need to fill the crate on the wall. If on block houses most often the crate is made of metal UD and CD profiles, then for wooden walls it is better to use wooden blocks, it is much easier to work with them. The thickness of such a bar should be at least 40 mm, and the width is selected according to the thickness of the insulation;

- The upper cut of the batten should be in the same plane. Even if it seems to you that your walls are even, it is better to play it safe. The first 2 extreme bars are attached to the wall, then 2 - 3 cords are pulled between them and the rest of the crate bars are exposed along these cords.
If the next bar protrudes beyond the cord, then it needs to be corrected with a plane, and when it does not reach the cord, a wedge is placed. The strips themselves are screwed to the wall with long screws; - As for the step between the planks, it is considered the thicker and stronger finishing, the wider you can take a step, the maximum is 70 cm. But personally, I mount a crate for any material with a step of half a meter or along the width of the insulation;

- Siding panels, as a rule, are mounted on a vertical lathing, but under the lining, the lathing should be installed perpendicular to the direction of laying the slats. The only exception is the diagonal laying of the lining, it is attached to the vertical crate. Although I do not advise you to undertake diagonal installation, firstly, there is 30% more waste, and secondly, this requires experience;
- As insulation for wooden structures mineral wool is commonly used. The fact is that the tree must breathe and it is undesirable to clog it with foam or extruded polystyrene foam. Of course, you can take any kind of cotton wool, but soft glass wool and the like are caked for 2 - 3 years, so it is better to pay a little more and install dense mineral wool slabs. Basalt cotton slabs have the highest quality now;
- The thickness of wadded insulation for the middle zone of our great and mighty homeland varies around 100 mm. Naturally, the farther north the region, the thicker the insulation should be taken;

When cutting cotton slabs, make the width 20 - 30 mm larger than the distance between the battens. So your insulation will fit tightly between the bars without gaps.

- Cotton wool cannot be left unprotected, it is afraid of moisture, so we attach the so-called wind protection from above, in fact it is the same vapor barrier;
- The windscreen is fixed to the guides with a counter lattice, but for convenience it is better to first fix it with a stapler;
- The counter-lattice slats provide the same gap, plus it is on them that the finishing lining is attached. For lining, I usually use bars of 30x40 mm, it makes no sense to take less, they will crack from nails, but for a heavy block house or siding under a counter-lattice, it is better to take bars of 50x50 mm;

- Now all types of lining are mounted using clamps, these are small plates with a protruding tongue. The tongue clings to the edge of the groove, and the plate is nailed or screwed to the counter-lattice;
- The siding is fixed on self-tapping screws with wide caps. There are special mounting holes on the panels, so the self-tapping screw must be driven clearly into the center of the hole and not tightened all the way, the panel on one side should, as it were, hang on the self-tapping screws, and the lower part clings to the groove of the previous panel.

Wood varnishing rules
The technique of applying varnish and painting is practically the same. Initially, you will need to properly sand the surface. If glued laminated timber is already well processed, then you will have to tinker with the usual.

Start with a coarse emery and gradually work your way up to a fine-grained skin. With such volumes, it is very difficult to do it manually, so it is better to get a grinder.
By the way, before varnishing or painting, the wood will also need to be treated with protective impregnations.

If your plans include a color change, then the surface is treated with a stain. Then let the wood dry and apply the first coat of varnish. After it dries, no matter how well you grind the bar, the pile will inevitably rise on it and the surface will become rough.
A thin emery is used to remove the pile. Moreover, it is not necessary to grind especially hard here, the pile is removed with several light movements, after which the dust should be wiped off with a damp cloth.
From experience I can say that one finishing layer of varnish is not enough, there should be at least 3 such layers, although in order to achieve a perfectly varnished surface, sometimes it is necessary to apply up to 5-7 layers of varnish.
![]()
After sanding, do not delay the application of varnish. In order for the wood to look decent and the varnish is good, it needs to be applied within 3 - 4 days.
As for the type of varnish, I will say this. Now many people recommend water-based acrylic varnishes, it is believed that the wood under them breathes, they are of course of high quality, but they are quite expensive.
I personally prefer to use yacht varnish (urethane-alkyd), it is durable and well tolerates all the vagaries of the weather. Now the price for urethane-alkyd varnishes for outdoor use starts at about 400 rubles per liter can.

Home decoration from the inside
It is impossible to answer briefly the question of how to decorate a log house inside, it all depends on what exactly you are going to veneer. Plus, the type of room plays an important role, you see, the decoration in the living room and in the bathroom is significantly different.
Floor and ceiling cladding
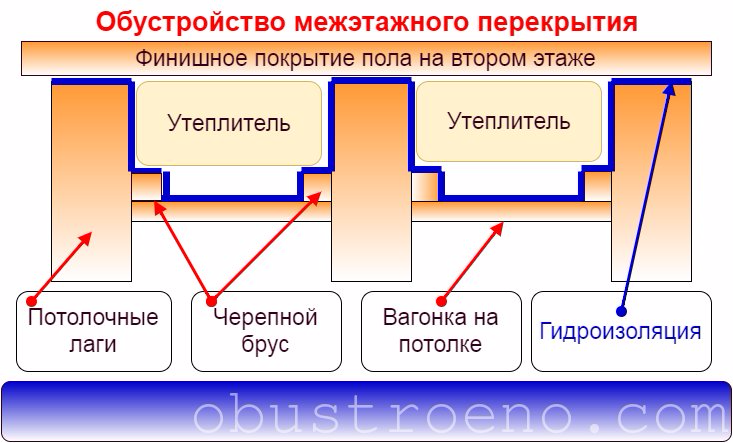
Facing the floor and ceiling in a house made of timber are two adjacent directions, because the ceiling, in fact, is either an interfloor overlap or a floor attic space... Therefore, it is impossible to consider them separately.

The floor itself is wooden house can be based on floor logs or settle directly on a monolithic reinforced concrete slab, while the difference in finishing technology is small, but it is still there.
Solid wooden joists are a good base for construction. Naturally, in order for the floor to be warm, insulation will need to be laid in it. There is a small nuance here.
If the walls of a wooden house are better insulated mineral wool slabs, then foam is more suitable for the floor and interfloor floors. You can, of course, buy extruded polystyrene foam, but I believe that in this particular case, ordinary PSB-S25 foam is more suitable, the effect is the same, but such foam costs at least 2 times cheaper. I usually buy 50mm foam boards.

Let's start with the arrangement of the floor on suspended logs. After the logs have been treated with protective impregnations, at the bottom of them you need to build a sub-flooring. There are several ways here, I will tell you about the method that I myself use.
The first, on the sides of the lower cut of the lag, are cranial bars with a cross section of 50x50 mm, they will become the basis for the rough flooring. Further, a planed board with a thickness of about 20 - 30 mm is laid on these bars in even rows.
It will constantly pull from the ground with moisture, therefore, both the cranial beam and the rough flooring boards must be well impregnated with protective compounds.

For this I use creosote, previously they impregnated railway sleepers with it. In a living room, such an impregnation is undesirable, but for a subfloor it suits perfectly. But this is a personal matter, you can take any impregnation you like.
The slats of the subfloor are cut clearly in size and fit on the cranial beam, they can certainly be nailed, but I don't see much sense in this, they will not go anywhere anyway.
Now, in a continuous layer throughout the room, wrapped around the log, a sheet of technical polyethylene is laid and fixed with a stippler. It will protect you from moisture, plus even if there are gaps somewhere, it will not blow up in them.

Polyfoam itself does not allow moisture to pass through, so it makes no sense to mount any hydro or vapor barrier on top. If there are large gaps left somewhere, do not worry, they can be blown out with polyurethane foam.

For a wooden house, the best and easiest, in my opinion, option is to install a floorboard. For this, a planed grooved board with a thickness of 40 mm or more is used. In order not to spoil the view with nail heads on the floorboard, the planks can be fixed with clamps or nails can be driven into the bottom of the board groove.
To equip parquet, laminate and other newfangled coatings, you will need to make a solid monolithic flooring. In such cases, I sew on plywood brand "FK" 10 - 12 mm thick in 2 layers, while the joints between the layers should not coincide.
Some craftsmen mount OSB flooring, but I haven't tried it, so I can't say anything about this. The only thing I definitely do not advise to do is to use chipboard sheets for arranging the base on the floor, at the slightest moisture they will swell and begin to flake off.

If a wooden house is erected on a concrete slab, then there is less work here. You need to line the concrete with an overlap of plastic wrap on the walls. After that, install the logs with a section of 50x50 mm and lay foam plastic between them, and sew on the finishing floor on top using any of the above technology.
As for the ceiling, the easiest way is to hem the lining from the bottom to the lags. From the side of the second floor or attic, cover everything with technical polyethylene, insert polystyrene between the logs and equip the floor in the attic or on the second floor.
Both in the attic and in interfloor overlap it is imperative to lay in some kind of sound insulator, it is cheapest to take polystyrene, but no one bothers you to use, for example, mineral wool or expanded clay.

It is now fashionable to leave the load-bearing beams on the ceiling open. The depth of such a beam usually fluctuates around 200 mm. In this case, I stuff the cranial beam along the entire length approximately in the middle of the beam and hem the lining to it. Further, as usual, polyethylene, insulation and topcoat of the second floor.
There is, of course, also a multi-level plasterboard ceiling and a stretch ceiling. But the installation of multi-level plasterboard structures requires some experience, and stretch ceiling this is a rather expensive piece and, not having the knowledge and special tools, I generally do not advise undertaking their installation.

Arrangement of walls from the inside
As I already said, finishing inside the house with a false beam is a priority method, because the house is, after all, made of timber, and in this case we simply correct the visual defects of the supporting structure.
False beam is the same lining, only in large sizes. In theory, if the walls are even, then you can sew the cladding directly onto the walls, but believe me, it is better to fill the crate on the walls and mount the false beam on it. In this gap, you can hide electrical wiring and communications.
The cross-section of the lathing bars depends on what kind of gap you need. For arranging only electrical wiring, a bar of 30x40 mm is enough. But if you want to hide, for example, heating pipes, then you will have to take a block with a section of 50x50 mm or even more. Of course, with such an installation, useful internal space is lost, but you will have to put up with this, otherwise there is no way.

And don't forget that electrical wiring in wooden structures must be well protected. All wires must be put into a metal hose. Now for these purposes, corrugated plastic tubes are sold, they, of course, are considered self-extinguishing and are cheaper than a metal hose, but mice can easily gnaw through plastic.
Insulation of a wooden house from the inside is mounted only in exceptional cases, extremely rarely. The thing is that with external insulation, the dew point is in the insulation, and if you mount the insulation inside the house, it will be in the wooden walls, which will inevitably lead to freezing.
The second most popular way of interior decoration of a log house is drywall. Drywall is especially relevant in services and in the kitchen. True, for damp rooms you need to buy sheets with appropriate protection (moisture resistant).

In a wooden house, I prefer to mount drywall not on a traditional metal frame, but on a wooden crate. Or screw the sheets directly to the walls, but this can only be done if all the wiring is already mounted in the walls.
I already told how to fill the crate, under the drywall, the step of the planks is chosen in the region of 30 - 40 cm.The sheets themselves are screwed to the base with self-tapping screws, the caps of the self-tapping screws should be slightly recessed into the sheet. But you can't leave drywall clean, you need to putty it.
The technology is not complicated here. All the joints between the sheets will need to be slightly widened with a knife, the groove should be about half the depth of the sheet, otherwise the putty will not take well. Next, prime the sheet, and when it dries, glue a serpyanka (reinforcing fiberglass mesh) onto the extended joints.

Now dilute the finishing putty and trim the sheet with it. Start by filling in the joints and covering the screws. When these areas are dry, take a wide metal spatula and put putty on the entire surface of the sheet with a layer of 1 - 2 mm.
If you plan to tile the drywall, then the entire wall before the putty will need to be reinforced with a serpentine. If you were unable to buy a self-adhesive serpyanka, then take PVA glue and glue the mesh on it.
When finishing drywall for wallpaper, you can do without reinforcement, you just need to lightly sand the putty with emery. For painting, the plastered walls will have to be sanded to perfect condition. That is, start with coarse emery and finish with fine sandpaper.

Often, inside a log house or in the area of \u200b\u200bthe basement, a fragmentary finish with natural or artificial stone... This coating is quite heavy, plus there is a possibility of base movement, so you need to strengthen the base well.
After processing with protective compounds and soil, a galvanized metal mesh is attached to the wooden wall. I usually use a chain-link and fix it with self-tapping screws, on which I additionally put on wide washers.

Most often, tile glue is used for stone installation, but here it is better to consult a consultant, the fact is that special adhesives are produced for some minerals.
Previously, a reinforced wooden base was thrown with a layer of cement-sand mortar, after which it was slightly leveled with a trowel and a stone was already laid on such a base.
Now, instead of a cement-sand mortar, craftsmen use the above-mentioned tile adhesive, it costs more, but the reliability and quality are much higher. By the way, the glue must be applied not only to the base, but also to the stone itself. Installation of such a cladding is carried out from bottom to top, while the support bar is attached below.

Conclusion

If you want to express gratitude, add clarification or objection, ask the author something - add a comment or say thank you!
Asking the question of how to decorate the walls of a log house, the owners, despite the limited budget, dream of seeing their own building presentable and expensive. This can be implemented using affordable methods, using inexpensive finishing raw materials for this purpose. Which is described below.
Review of inexpensive material for interior decoration of a log house
The raw materials will be examined in detail in terms of not cost, but the complexity of the installation process. After all, home-grown builders who have not made a career in the field of repairs will not be easy to navigate in multifaceted actions. So:
- Drywall. A popular coating for any decor - the raw material alone does not represent any presentability. It not only aligns the walls, but also insulation and communications can be laid under it.
After installing it and grouting the joints, the interior decoration of the walls of the house from the timber will lie on a perfectly flat surface so that the process will not be difficult even for non-professionals - you will not have to adjust the decor because of the curvature.
Drywall is presented in several options - from simple to fire resistant. For a wooden structure, a predominantly moisture-resistant version is purchased. The price is absolutely acceptable, and the large sheet areas will allow finishing the finishing in a matter of days.
Wallpaper is glued onto drywall, plaster is laid, and they are painted. It can be a base for laying stone, ceramic tiles and other things.
- Wall plastic panels... An irreplaceable coating in aggressive rooms such as a bath or kitchen - moisture does not come into contact with them in any way and does not affect the structure. As for the decorative part, such panels successfully imitate stone, wood, brick.
A variety of fantasy patterns will help create pictures that are not related to natural drawings. Installation is not difficult - all panels are equipped with tongue-and-groove locks, the length allows you to close standard walls of 2.5 m from floor to ceiling. Wires or thin water pipes can also be laid under the cover.
It is unpretentious to wet cleaning. The cost allows you to trim large areas with such material. The disadvantage will be the lack of environmental friendliness. In addition, in the event of a fire, they are capable of emitting corrosive gases that are harmful to humans.
- Plaster. Some styles of a wooden house suggest the presence of simple plastered walls - a wooden hut, chalet, modern. Therefore, such wall decoration in a log house does not lose popularity, although it is laborious in execution.
This is connected, first of all, with the difficulty of accepting wood with a wet cement composition. Therefore, before the base layer is exposed, several stages are completed - leveling the walls with moisture-resistant drywall and laying a reinforcing mesh. The plaster itself is laid in several stages - base, leveling, decorative layer, which is made smooth or textured with the help of tools.
During the process, it is necessary to use the level and beacons - this will make the coating ideal. The downside of plastering in a wooden house is the fact that it cracks when shrinking, and the walls will have to be constantly updated.
- Plywood and veneer. Contrary to the natural origin of the constituents of these materials, they do not possess ecology. This fact is associated with big amount the glue used to join sheets or pasting the walls themselves.
However, the decor from such raw materials is at a level - it does not have to be constantly painted or varnished - it is enough to carry out the procedure once every few years. Decorating the walls of a house from a bar using such raw materials will visually create the effect of an expensive mansion, where valuable types of wood were used.
- Paints and varnishes. Decorate own house inside it is possible without the use of any coatings. These are well-known varnishes and coatings based on water emulsion.
Some of them may even contain protective components - they will have a beneficial effect on wood. Such raw materials are suitable for interior decoration when the owners do not want to lose the natural beauty of the wood. So:
- Glazing compositions. They do not hide the natural pattern, they penetrate deeply into the structure. Gives rooms a matte or glossy effect.
- Lucky. Drying, they form a polymer film, which makes the wood shine in the light. However, the disadvantage of such processing is that it does not allow natural raw materials to breathe and cracks during shrinkage.
- Coating compositions. They reliably protect the timber, they can contain pigments or be without them, giving it a gloss. Colored paints are popular with owners whose home is made from simple sanded or planed raw materials.


