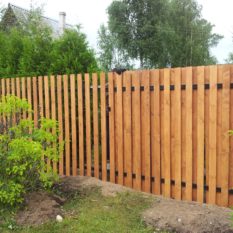
Fence from wooden picket fence - a simple type of fence for summer cottages. It is an environmentally friendly structure that does not harm the environment. You can install such a design at an affordable price, since consumables are cheap.
Externally, a wooden picket fence looks attractive, but it is important to choose the right color for the exterior of the house.
The main disadvantage of this material is the fragility of its use (up to 15 years). You can maintain a sectional decorative fence in good condition with the help of special antiseptics. Such products prevent the process of rotting, protecting the wood from moisture and dust. When using antiseptics, the tree can last 20 to 25 years.

Combined fence made of picket and brick
Preparatory work
Before making a fence with your own hands, you need to buy:
- screwdrivers;
- pliers;
- pencil and tape measure;
- sandpaper;
- hammer;
- screwdriver;
- drill;
- welding machine;
- level;
- primer;
- self-tapping screws;
- varnish for covering wooden products;
- shovel;
- stakes made of metal or wood;
- brush for working on metal surfaces.
The fence is installed taking into account the following criteria:
- the area of \u200b\u200bthe summer cottage;
- section cost;
- budget.
The choice of materials and devices for building a fence from a picket fence is important to carry out carefully, since the service life of the structure depends on this. Calculate quantity consumable you can do it yourself or with the help of professionals. 
In the first case, you will need to know the area of \u200b\u200bthe fenced area, which picket fence has a size, installation step. The carved fence is installed with strong supports. You will need to buy wooden beams or pipes as racks.
The tree is preliminarily protected with a special bituminous mastic. The beams are impregnated with antiseptics immediately after installation. To avoid moisture penetration into the wood, sand the end part of the beam, and then cover it with a water-resistant putty.
When installing a picket fence, experts recommend using iron beams. This material is more resistant to long-term loads, more resistant to mechanical and chemical damage. Metal is more durable than wood. The protection for metal pipes is rust removal. To carry out such manipulations, a metal brush is used.

The process of impregnating a fence from a wooden picket fence
After cleaning, you need to apply a primer to the pipe, painting the fence with frost-resistant paint. It is considered more functional and practical to install a wooden picket fence using metal fasteners.
Before installing a wooden picket fence, you will need to carry out the following preparatory work:
- vein gouging;
- filing the upper part of the picket fence.
Parts that have been planed are easier to paint and will last longer. The veins are load-bearing elements. Their manufacture is carried out using beams with a section of 50x80 mm.

Several design options for a picket fence
The veins can be made using a pole 6-10 mm in diameter. Splicing can be carried out anywhere in the run. For this, 2 methods are used:
- half a tree across its width;
- using slanting structures vertically.
It is important to keep track of the joints - they must not match. Fastening the carved fence is easy: the middle of the bracket is bent with a hammer blow, and then pressed into the wooden base.
Step-by-step installation instructions
Manufacturing of a fence lathing from a picket fence is made according to a previously made template. A template is a specially created cross-shaped rack made of boards. The width of the template is equal to the gap between the fence boards. The cord or rope is pulled using two slats. The height of the rope must match the height of the top end of the fence.
The size of the cross bar is 40-50 cm. The bar must be nailed to the stand at an angle of 90 ° C in relation to the cross. Such a template allows you to quickly make a crate for a fence using only a cord. The fence posts must be sanded by sawing the top of the tree into 2 slopes. Half of the posts, which will be in the ground, are pasted over in 3 layers with tar paper. To do this, you can buy tar. 
The veins are planed per 1 slope (to reduce putrefactive processes when water flows from the beams). Before digging holes for the posts, you need to mark the area. The step between the 2 posts is 3 m, and the length of the veins is 6 m. The installation of a fence made of a wooden picket fence is carried out according to the same principle as the installation of other types of fence. It is important to determine the direction of the fence construction. Then you need to clear the ground of bushes, greenery, weeds, broken branches. Using a cord or rope, we measure the place for the sectional fence.
Then you need to install a wooden or metal pipe for the fence in the ground. To obtain a more durable structure, it is recommended to fill the installation sites of the support with cement-sand mortar. The depth of the pit for the posts should be 1.3 m. The supports should be placed in a 20 cm gravel cushion. In this way, the support is prevented from being squeezed out during a cold snap.

Scheme for installing fence posts
When the pillars are already installed, you need to fix them in the ground with mortar. The installation of the veins should be carried out immediately after fixing the support. They are attached to screws or nails.
Due to the ease of installation and the ability to most naturally fit into the landscape, wooden picket fences remain one of the most popular types of fences, especially for private houses and summer cottages.
Advantages and disadvantages
Beautiful picket fence fences have won recognition for their numerous advantages:
- Versatility - they can be used for fencing plots, zoning, as well as for decoration.
- Aesthetics - the original fence is able to fit into any design and style.
- Durability and reliability - subject to regular maintenance, periodic painting and elimination of defects, its service life is 10-20 years .
- Ease of installation - a fence made of a wooden picket fence can be installed on its own, without having professional skills.
- Excellent compatibility with other materials: wood, stone, brick, metal, concrete.
- Ease of care.
- Variety of designs by color, size, interval.
- Does not shade or interfere with air circulation, which makes it possible to plant plants right near its base;
- Low cost.
The disadvantages of a wooden picket fence include the need for periodic maintenance.
Photo gallery


Materials
Planks for the construction of a fence from a wooden picket fence can be made independently or you can buy ready-made ones. Buying ready-made saves time, with self-production there is the possibility of choosing high-quality material and design at your own discretion.
When choosing a material on your own, preference should be given to well-dried boards. Substandard raw material can lead to curvature and rotting of the fence during operation.
For construction wooden fence it is necessary to prepare the crossbars and pickets, carefully saw down and sand the tops.
Wooden and metal supports in the lower part it is necessary to coat it with hot stew to prevent rotting and extend the service life. For better adhesion of paints and varnishes and wood, you need to clean its surface with medium-grained sandpaper.
To make a fence from a wooden picket fence with your own hands, you will need a simple set of tools and materials:
- Supports and pickets;
- Veins - transverse strips 2-2.5 m long with a section of 40 cm are suitable;
- Drill or shovel;
- Gravel;
- Cement and sand;
- Nails, screws or bolts;
- Hammer;
- Varnish and stain for painting.
Fence installation
Step-by-step instructionhow to make a fence with your own hands:

Video
An easier installation method is sectional:
- Spans are collected separately in advance: a picket fence is nailed to the beams on the ground.
- The finished sections are nailed to the posts.
Wooden fence made of horizontal picket fence has many varieties: "", "Herringbone", "chess". It is very decorative, structurally different from the vertical only in details.
A picket fence, being a traditional fencing option, provides immense scope for imagination and personal taste.
Just 50 years ago, wooden picket fences could be seen around most country houses... But, these were the same type of vertical structures. Now a reliable and durable picket fence can be erected in various configurations and even in combination with other materials. It is quite easy to erect fences with the correct calculation and preparation of the material. He will serve reliable protection site, and decorate it with your appearance.
Advantages
Everyone wants to make their home beautiful, and the fence is that element suburban area, which is paid attention to first. Therefore, it is important to give this element maximum aesthetics. One of the materials that fall into the category of aesthetic and malleable for unique buildings can be considered wood. If you have the skills to work with wood and the desire to independently build a fence around the site, then the question of how to make a fence from a picket fence will be solved by itself.
A do-it-yourself picket fence, with applied imagination and a little skill, will look great on any terrain and against the background of any building.
Reliability wooden fencing depends on the selected type of wood for its manufacture, as well as on the size of one picket fence. If you do right choicethen the fence will last for many years.
To lead proper care it is not at all difficult for him. All the owner has to do is apply protective substances to the surface in a timely manner. It is also important that the picket fence almost does not shade the area and has excellent throughput air. Near it, you can plant any plants that need sunlight.
Basic types of styling

Vertically and horizontally
Traditionally, in the manufacture of a wooden fence, the pickets are installed vertically. But horizontal installation is also possible. This design is made from several planks or poles. In another way, this type of fencing is called "ranch". It works well for creating a rustic look.
You can even tilt the slats to one side, and then you get an even more unusual fence. And given that the angle of inclination can be different, there are countless options for creating unusual designs.
Staggered
The chess fence also has an attractive appearance. It looks beautiful not only from the outside, but also from the inside. Location feature wooden parts consists in the fact that the pickets are installed on both sides, but are displaced in relation to each other. The gap, on the one hand, is closed by the rail on the other, and vice versa.
Preparation and calculation of material

A wooden picket fence is so easy to install that you don't even need a lot of tools to install it.
For the manufacture of the picket fence itself, in addition to wood, you will need:
- fasteners - nails or screws;
- hand saw or jigsaw;
- screwdriver;
- protective agent for application to the surface. These products include water-repellent and antiseptic impregnations, as well as varnish, stain and paint;
- shovel for digging a hole under the support pillars;
- hammer if nails were selected as fasteners;
- building level so that all elements of the fence are set evenly.
You can buy wood and make a picket fence yourself, or you can buy a picket fence ready-made. In the latter case, you will have to pay more, but there will be less work.
Note! Before making a picket fence, it is important to perform the correct calculation of the wood material. Based on the perimeter of the territory, as well as the width of the shtakentin and the gaps between them, the required number of wooden elements is calculated. For example, if the width of one picket is 4 cm, and the width of the gap is 6 cm, and at the same time it is planned to make a fence 30 m long, then to calculate the amount of 30 m must be divided by 10 cm, that is, by the total width of one gap and one shtakentine.
How much picket fence is needed depends on the chosen design. For example, if a fence will be erected with gaps, then less material will be needed for it than for a blind structure of the same length.
It is important to remember to calculate everything in the same unit of measurement. It is easier to express meters in centimeters, and then 3000 will need to be divided by 10. After the calculation, it turns out that such a fence will require 300 pieces of pickets. In addition to the material for the manufacture of the picket fence itself, beams for the supports will also be needed. These posts must be long enough and strong enough. It must be remembered that they will submerge at least half a meter.
Stacking the picket fence in a checkerboard pattern

You can install a picket fence by working in the following order:
- Markup. It is necessary to determine where the support pillars will be located. A strong rope stretched around the perimeter can help in this matter. The optimal distance between the supports is 2-3 meters. Given this, it is necessary to make marks on the ground in those places where holes will be dug.
- Digging grooves. Their diameter should be greater than the diameter of the support post. The calculation of the depth of the pit depends on how much the height of the future fence will be. Most often, it exceeds 1 meter.
- Installation of pillars in prepared recesses. If they are wooden, you can simply do with applying protective agents to the surface. It is possible to lay a wooden picket fence and, using metal pillars, in this case, you will have to lay a concrete mixture in the recess.
- After the supports are installed, you can begin to attach veins or slugs to them - thicker boards that should be located parallel to the ground surface, that is, perpendicular to the support posts. At least two veins are required. Their number depends on the total height of the building.
- The calculation of the distance between them can also vary. It depends both on the height of the mounted fence and on the method of fastening the pickets to them. The main thing is not to bring the lower slug closer to the ground by less than 25 cm, and the upper one should not be raised too high so that the edges of the nailed pickets rise above it by at least 25 cm.
- When the installation of the veins is complete, you can start attaching the picket fence itself. When installing the very first picket fence, it is better to use a building level so that the entire fence does not turn out to be crooked. If there is no level, you can use a plumb line instead, which is easy to make yourself using a heavy weight and thread. To attach all the other pickets, it will be enough just to determine the width of the gap. You can make it equal to the width of the pickets and easily measure the required distance by applying one of the rails. But you can specially make a rail of the required width, so that it can then be used only to make gaps.
- When slats are nailed along the entire length of the fence, you can be content with the work already done, since, in essence, the classic fence is already ready.
To make a "checkerboard", you will need to go to the other side to install another row of pickets. In order to avoid distortions and inaccuracies, it is necessary to correctly install the first rail. It should be located strictly opposite the gap between two adjacent pickets on the other side. After installing this rail, it remains only to nail down all the others, measuring the length of the gaps using a template.
Painting secrets

Painting the finished structure
It is not difficult to paint a picket fence with your own hands, but nevertheless, you need to be careful about the details. The durability of not only the paint layer, but also the entire structure depends on the quality of this work. For a high-quality coating, you need to clean the wood from contamination, and then prime it with a substance that can deeply penetrate into the structure.
Multiple coats can be applied. Wait until the previous coat is dry before applying the next one. Many manufacturers can assure that there is no need to prime the surface before painting. But, nevertheless, it is better not to pay attention to this statement, and carry out a primer. This will have a positive effect on the durability of the wood and on the economy of the main coating.
It is also better to paint in several layers. After applying the first layer, it is better to sand it after drying with sandpaper... For painting, it is better to use a brush rather than a roller, as it will allow you to get to hard-to-reach places. But if there is a desire to speed up the process, you can take a roller, but only in this case it is necessary to bear in mind that then you will still have to paint many places with a brush.
A fence made of wooden planks originates in ancient times, but still does not lose its relevance. True, more attractive products, for example, a picket fence, are replacing ordinary boards. It is a piece of wood processed from all sides, brought to a certain aesthetic appearance. It can be a classic pointed or rounded board, more expensive and attractive products - curly picket fence.
Why choose a picket fence
If you have not yet installed a fence for the site and are thinking about suitable material, pay attention to the wood for making a picket fence. It has several advantages:
- The picket fence is universal - suitable for fencing a summer house and a private house from any material and color;
- You can adjust the height of the fence at the installation stage right on the site without much effort and the use of special tools;
- Variety of shapes;
- The fence can be given any color, periodically changing it completely;
- The cost of a picket fence is low compared to metal and concrete;
- Do-it-yourself quick installation and dismantling;
- A wooden picket fence is combined with other materials: stone, brick, metal.
Using a wooden picket fence, any owner can independently assemble a fence that will organically fit into any area.
Preparation of material and tools
Installation of a fence made of a wooden picket fence is carried out on horizontal slats attached to vertical supports. The entire structure is installed on a point foundation. The tape one is also suitable, but its installation is advisable only on dry soils, it will float on clay. Reliable fixation is possible only to the depth of freezing of the ground, but this is a very time consuming and financially costly exercise. Choosing a point foundation.
So, we need the following materials:
- 1) For support pillars - metal pipes with a section of at least 60x60 mm or the same diameter, or a bar, a log;
- 2) It is better to make transverse veins (horizontal beams) from a wooden beam 50x50 mm;
- 3) Picket fence. It can be bought ready-made or made by hand by a master. The first option will save time, the second - money. It is not necessary to paint products before installation4
- 4) Concrete mortar M150 for fixing the supports;
- 5) Self-tapping screws or nails.
From the tool you will need:
- Drill or shovel;
- Level;
- Roulette;
- Saw;
- Hammer or screwdriver.
Get to work.
How to build a fence
A do-it-yourself wooden picket fence can be assembled in a couple of days. The following is detailed instructions for beginners.
Stage 1. Design
On a sheet of paper, draw up a plan for the fence on a scale, for convenience, take 2 cells per 1 meter. Install supports at every corner and intersection of walls, at gates, at a height difference. Along the rest of the length, distribute evenly with a step not exceeding 3 meters.
The resulting number of supports must be prepared in advance.
Stage 2. Preparation and marking of the site
The perimeter must be cleared of bushes and their roots so that there is no difficulty when burying into the ground. According to the plan, place pegs made of wood or reinforcement in the places where the supports are installed.
Stage 3. Installation of the frame
Dig holes in the locations of the supports with a drill. Their diameter should be 20-30 cm larger than the size of the posts. The depth of the hole should be at least 600 mm, it is optimal to deepen to 800-1000 mm. Fill the bottom of the pit with 15-20 cm crushed stone to create a safety cushion in case of heaving and freezing of the soil.
Install pipes or timber in the prepared holes. Check the verticality with a level, with a tape measure - the evenness of all lengths. Secure the support with gravel and fill the gaps with concrete.
After 5-7 days, when the concrete has gained about 70% strength, horizontal veins will need to be attached to the posts. You will need to mount 2 horizontal rows, without bringing the beam 15-20 cm to the top and bottom of the support. You can attach the guide to nails or screws.
Stage 4. Preparation of the picket fence and template
Making a wooden picket fence for a fence experienced craftsmen spend on their own. To do this, take planed boards, cut them to the desired height, shape the ends. The main thing is to process the edges of the product well from burrs and knots.
It will be much more expensive to buy a ready-made crate for the fence, but it will save you time, it will be possible to assemble the fence in 1 day. But before you fit the picket fence to the horizontal bar, check the quality of its processing: even in mass production, errors and malfunctions occur. Sand the garments if necessary if they have jags or burrs.
It is advisable to treat the products with antifungal and compounds to prevent decay.
In order for the appearance of the fence to be neat, it is important to maintain the same distance between the pickets. And what it will be - 2 cm or 10, this is an exclusively master's decision. To facilitate installation, a template should be made - a regular rail of the required gap thickness. Suppose the distance between the lathing was taken as 5 cm. Take a bar or a piece of board and give it a width of 50 mm along its entire length. When fixing the boards, you will apply a template and press the pickets against it. In this case, the distance between them will be equal.
Stage 5. Installation of battens
When the frame is ready and the pickets are finished, they can be secured to the vein. Nail the lathing on the nails or use the self-tapping screws. For wide pickets, make 2 fasteners per rail, for narrow ones, one will be enough. Use the fabricated template to check the distance between the battens.
Stage 6. Decorating
Painting a wooden picket fence is the final stage of construction. If you do not want to acquire a bright fence, cover it with several layers of stain.
Use decorative paint for outdoor use - it is less susceptible to rainfall and seasonal climate changes than others. Modern industry offers effective formulations on polymer bases:
- Acrylic;
- Latex;
- Alkyd enamels.
The operation of fences built using the correct technology and covered with modern compounds will not require additional intervention in their renovation for up to 10 years.
Application
- Fencing
Wooden picket fence price with installation from 1190 rubles
The growing popularity of euro bars and corrugated board does not diminish the liking of consumers to timber fences. The reason that the wooden picket fence remains at the forefront of the changing fashion is its aesthetic appeal and affordable prices. And only doubts about the durability bother clients who dream of a beautiful fence. Forget any worries and worries. Call the employees of our company. We create for customers a wooden picket fence that can serve its owners for many years.
- We install fences within 300 km. from MKAD
- Dismantling the old fence
- Discounts garden partnerships and cottage villages
Wooden picket fence - price per meter:
| height, m | solid | gap 2 cm | clearance 5 cm | |||||
| 1,5 | 1300 | 1220 | 1170 | |||||
| 1,7 | 1330 | 1230 | 1180 | |||||
| 1,8 | 1330 | 1230 | 1180 | |||||
| 2 | 1350 | 1250 | 1200 | |||||
| Staggered wooden picket fence | ||||||||
| height, m | Gap 7 cm | |||||||
| 1,5 | 2074 | |||||||
| 1,7 | 2091 | |||||||
| 1,8 | 2091 | |||||||
| 2 | 2125 | |||||||
| The cost of a wooden picket fence in a checkerboard pattern for covering the frame (gates and wickets) | ||||||||
| height, m | Gap 7 cm | |||||||
| 1,5 | 1874 | |||||||
| 1,7 | 1891 | |||||||
| 1,8 | 1891 | |||||||
| 2 | 1925 | |||||||
Prices for timber fences depend on the dimensions of the pickets and the area of \u200b\u200bthe adjacent areas. When purchasing a wooden picket fence from our company, you should know that the price per meter of the fence includes its installation.
- The assortment includes boards of natural moisture, calibrated in sizes 50x100 mm and 20x100 mm.
- The length of wooden pickets starts at 150 cm and reaches 200 cm.
- The table shows the cost of boards of various sizes. Note that the prices for two-meter planks are only 2.5% more expensive than one and a half-meter picket fences.
- Specific prices for a wooden picket fence are given for cladding with 2 cm gaps. A different arrangement of boards changes the final price tag.
A fence made of a wooden picket fence - the price per meter of the fence, including poles 60x60 mm in cross-section, wooden logs, fixing angles, metal plates and galvanized hardware. Once again, we remind customers who buy a wooden picket fence, prices in the table are given with installation.
Free bonuses of our company - professional measurement and installation of fencing - this is an opportunity to significantly save money. And if customers need other services, then the dismantling of the outdated fence, the manufacture of durable gates and gates "Zaborchikov" will perform at affordable prices. However, not only affordable cost is a reason to buy a fence in our company. There are four good reasons for this.
The cost of delivery of material and equipment in the Moscow region
| up to 25 km | up to 50 km | up to 75 km | up to 100 km | up to 125 km | up to 150 km | up to 175 km | up to 200 km | up to 225 km | ||
| Zone 1 | 2500 RUB | RUB 3000 | 3250 RUB | 3500 RUB | 4000 RUB | RUB 4500 | 5500 RUB | 6500 RUB | RUB 7,000 | |
| Zone 2 | 2000 RUB | 2500 RUB | RUB 3000 | 3500 RUB | 4000 RUB | RUB 4500 | RUB 5,000 | RUB 6000 | RUB 7,000 | |
| Zone 3 | 2500 RUB | 2500 RUB | RUB 3000 | 3500 RUB | RUB 4500 | RUB 5,000 | 5500 RUB | 6500 RUB | RUB 7500 | |
| Zone 4 | 2500 RUB | RUB 3000 | 3500 RUB | 4000 RUB | RUB 4500 | RUB 5,000 | RUB 6000 | RUB 7,000 | RUB 7500 |
Phone to call the measurer 8 903 596-65-96
Four reasons to order a wooden picket fence
Working professionally in the field of fence construction, we have accumulated sufficient experience to provide a guarantee of quality and reliability for each fence made of wooden picket fences. We are preferred by private sector representatives and commercial building owners. Make the right choice, entrust the work to experienced professionals. And your wooden picket fence will become a reliable and solid fence.
1. Verified suppliers of wood
In the construction of the fence, we use wood of natural moisture supplied from proven forest lands. High-quality planed board, calibrated to uniform dimensions, has beautiful aesthetics and excellent performance.
2. Quality and safety certification
The quality factor of the design depends on the impeccable quality of every detail. We use components and materials in construction that have passed certification for compliance with industry standards. A wooden picket fence is reliability and safety.
3. Highly qualified installers
The company's specialists, who have installed thousands of meters of fences, know from experience the nuances of various sites. Having excellent knowledge of the method of soil compaction, butting with crushed stone, as well as pouring with concrete, the builders guarantee the operational durability of the fence.
4. Working with clients without subcontractors
The high-quality wooden picket fence, the cost of which is lower than the market average, is the merit of thoughtful business chains. Without involving third-party firms in various stages, we work directly with the client and guarantee a favorable price tag for the construction of any fence.
How a wooden picket fence is created
1. Marking the territory
At the first stage, installers mark the work area with a tape measure and special construction laces. Pegs are used to mark points for corner supports, gates and wickets.
2. Installation of bearing pillars
A gasoline drill is used to dig 80-centimeter holes. Corner supports are driven to a depth of 40 cm, and the total depth is 120 cm. Similar holes are drilled from these pillars every 250 cm for the rest of the supports.
3. Installation of cross pieces
The posts are pipes with welded corners. The workers fix reliable wooden logs on these supports. Fastening is carried out using galvanized self-tapping screws, which excludes corrosion from moisture.
4. Finishing plating
In the end, the workers fix a wooden picket fence. A special latch bar helps them to achieve a uniform level of boards. The fences, calibrated to size, are mounted on the crossbars with galvanized nails.
Wooden picket fence must be durable
The standard set of operations and the base price tag are a guideline for customers. But each wooden picket fence is an individual project based on the wishes of the customer and taste preferences. Tell us which parts of the fence you want to "strengthen", we will complete your task with millimeter precision.
- Practical homeowners will order the frame finish with an anti-corrosion compound. Let's make priming shaped pipes and paint with enamel - a democratic analogue of the popular "Hammerayt".
- For those who are worried about the effects of atmospheric precipitation, we will offer protection of picket fences from biocorrosion. Reliable antiseptics with fungicides keep elegant boards from rot and mildew.
- A wooden picket fence will receive a finished look and become a spectacular detail of the landscape when applying the finishing paint. For examples of various solutions and design options, see our portfolio.
- To increase the strength of your fence, we offer different methods installation of the frame. Normal soil - compaction is sufficient. We will build a monolithic foundation for you on difficult areas.


