In many countries, floor showers have been popular for several decades, but in our country this is a new trend for bathrooms: shower cabins without a pallet (flush with the floor). A drain hole in the bathroom floor seems to some to be a very convenient solution, while others prefer a shower stall with a tray. How do you know which is right for you?
Why do you need a bathroom floor drain?
There are two main reasons for this decision:
- A floor drain will insure your downstairs neighbors against accidental flooding. No amount of waterproofing will help if water rushes through the sump. Through a drain arranged in the floor, water will safely flow into the sewer.
- For people with limited mobility, for whom even a low obstacle is a serious obstacle, a floor drain will be an excellent alternative to a shower stall and bath.
Disadvantages of the bathroom floor drain solution
 Any event, in addition to its pluses, should have minuses:
For effective drainage, the floor must have a slope of about 3 cm per meter. This circumstance creates some inconvenience for the user.
For drain equipment, the bathroom floor must be raised by at least 15 centimeters. This makes the ceiling lower and adds a step to the room.
For effective water drainage, the drain must be equipped above the connection level to the sewer riser. For apartments in high-rise buildings this is a serious problem, but in a private house the solution is much simpler.
There is a good way to solve this problem if there is a toilet in the bathroom with a vertical outlet with a floor drain. In this case, a toilet bowl with a horizontal or oblique outlet is installed, a sewer tee is mounted at floor level, into which drains are diverted.
Floor shower drain
 Beginning of work
Let's prepare everything necessary materials and tools:
- Sewer pipe with a diameter of 0.4 - 0.5 cm, tees, corners and other devices.
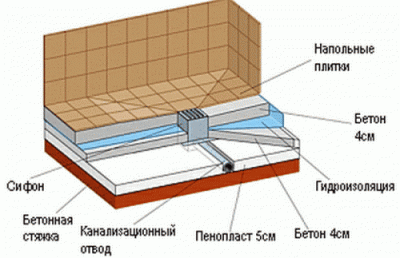
- 5 kg of dry screed mixture per square meter.
- Heat-insulating polystyrene foam 4 cm thick.
- Dismountable siphon for mounting under the tiles, with screw fastening of the retainer.
- Reliable sealant.
- Tile adhesive.
- Two layers of fused roofing material for waterproofing.
- Cement-polymer screed (for example, Ceresit CR65) with a slope under the tile.
- Planks or plywood for formwork.
- Level.
- Straight rail.
- Notched trowel.
- Tile cutter.
- Building hair dryer.
- Master OK.
Work order
- After marking, you need to lay a siphon without a grate in the center of the future booth and connect it with a pipe laid at a slope with the sewer. Flare connections must be coated with sealant. It will not be possible to replace the rubber seals as the pipe remains in the concrete.
- Thin strips of waterproofing polystyrene foam are glued to the wall with a sealant and will muffle sounds and shock loads.
- The next step will be pouring on polystyrene foam and leveling the screed.
- Without gaps near the walls and a siphon (without a fixing ring), roofing material is fused with a height of entry to the walls above 20 cm.
- Around the drain grate installed in the siphon, a formwork of 4 elements is made from the boards, which has a slope towards the grating and performs the function of beacons.
- Having previously glued the grating so that no cement mortar gets into it, fill the formwork tightly with a floor screed. Remove the beacons after the mixture has set and fill the cavities with a waterproofing mixture. The tiles can be laid as soon as the screed has set.
- Tiles are started from the bottom, overlapping the edges of the floor to provide additional waterproofing of the coating.
The sewer pipe must increase with the flow of water and in no case narrow, so that there are no permanent blockages.
It is convenient to make a slope for draining with expanded polystyrene, using different sheet thicknesses and aligning the ledges when pouring the screed.
The best splash protection is a plastic curtain or small curb. A swing screen installed from floor level will be a convenient solution for people with reduced mobility.
Video how to make a shower drain in the floor
Conclusion
The floor drain should no longer cause you problems. A video will answer all questions along the way.
Thanks to the compact product, you can modernize the design of the bathroom, and reduce the cost of its equipment.
Waste water drain is a plumbing device that provides drainage to the main sewer shaft. In fact, it is a drain of a simplified design, placed under a moisture-resistant floor. In addition to the main purpose, the shower ladder performs a number of equally important functions:
- prevents pipes from clogging, filtering waste water from large elements;
- guarantees a tight, impervious connection with the tile floor;
- prevents odors from entering the room from the sewer;
- provides additional drain in case of emergencies.
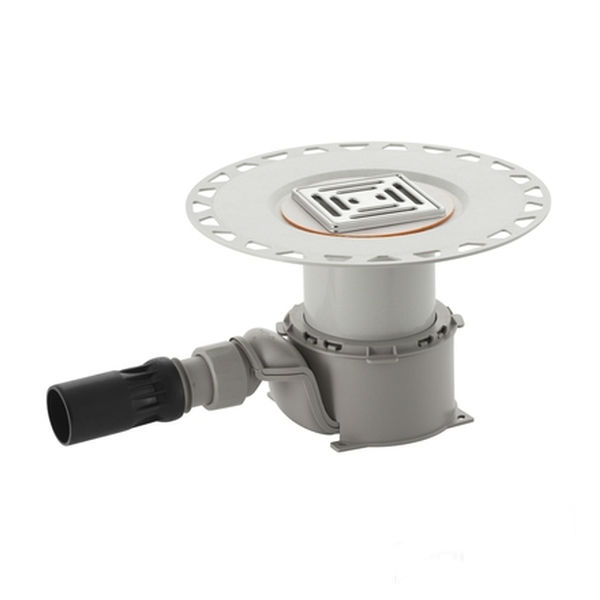
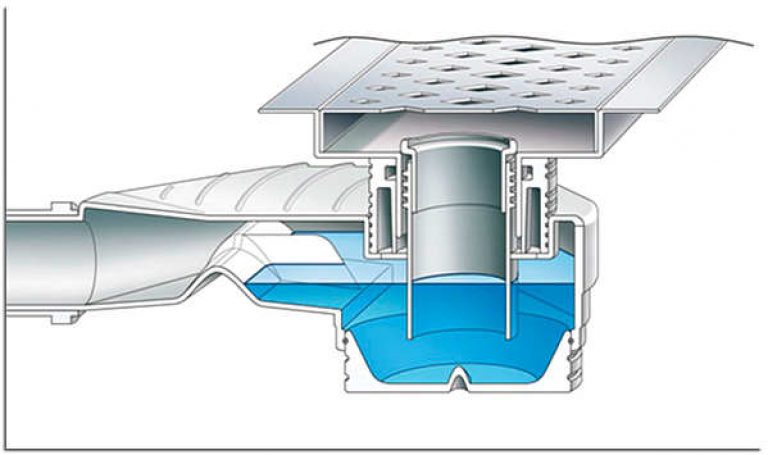
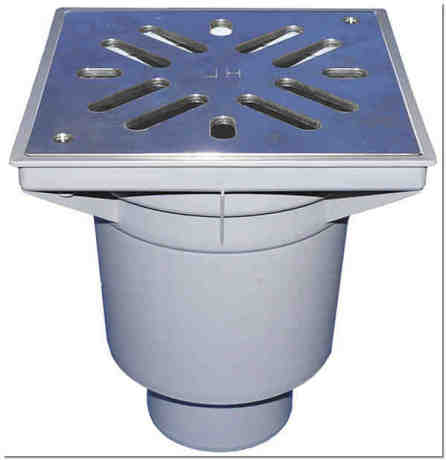
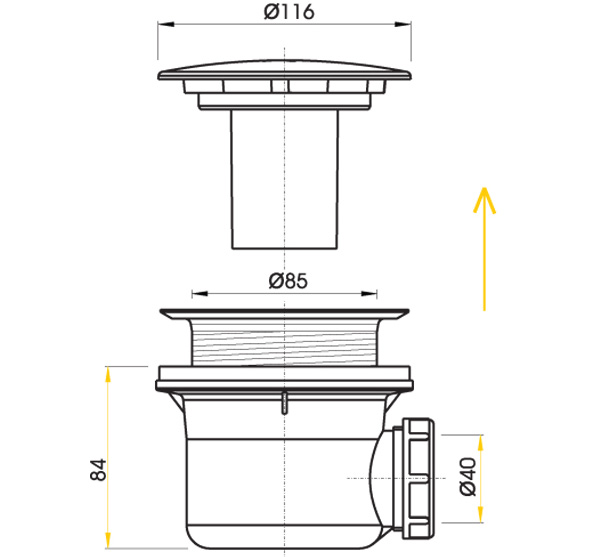
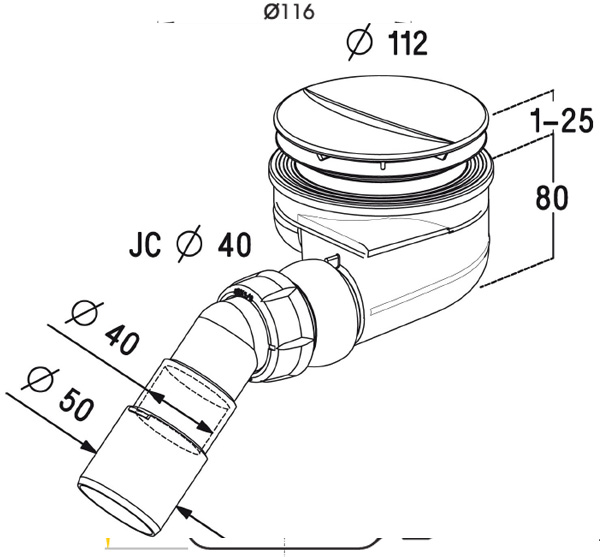
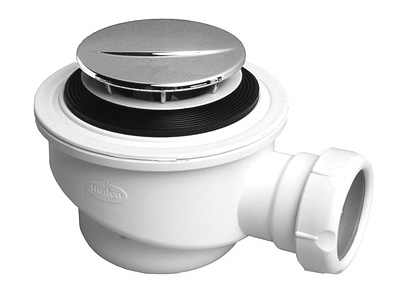
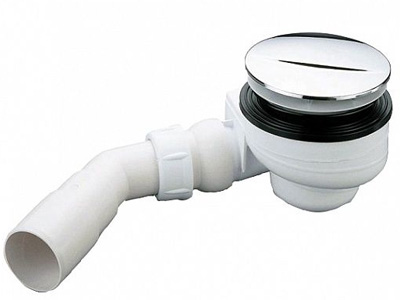
Typically, a shower trap for a tile is a funnel, which is assembled from several nodes and can be easily disassembled if necessary. Here are the main structural elements ladder:
- upper decorative grill (usually metal);
- main filter grid that traps debris and hair;
- fasteners, sealing rings and flanges for fixing the grille and waterproofing film;
- drain - is a body with a discharge outlet (straight or side) and a coupling for connection to a sewer pipe;
- a shutter is located inside the body (it does not let odors from the sewer).
Advantages and disadvantages
If you liked the idea of \u200b\u200binstalling a drain in the bathroom, but there are doubts about the advisability of such a modernization, you should familiarize yourself with the pros and cons of the plumbing novelty.
Benefits help to use the bathroom space more efficiently:
- equip a shower in a small bathroom;
- if there are two closely spaced cabins, a common drain can be made for them;
- combine a shower with a changing room or laundry room (the main thing is that 100% water ingress on the floor is ensured and a certain floor slope is maintained);
- implementation of design ideas.
Due to the absence of a pallet, cleaning the bathroom is simplified, water procedures become more convenient for the elderly.
The disadvantages of ladders are due to additional financial and labor costs when arranging bathrooms.
- When carrying out installation work, knowledge and skills are required for installing plumbing, laying waterproofing, making screeds, and tiling.
- For correct installation, various tools and decoration Materials.
- Although the sewer ladder is a fairly reliable and durable device, if it fails, dismantling will be expensive.
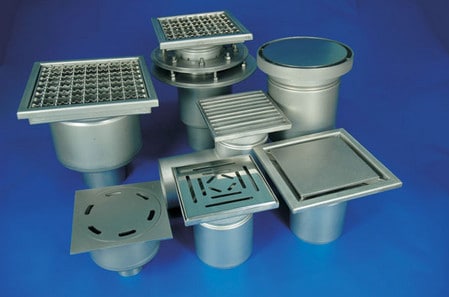
Types and varieties
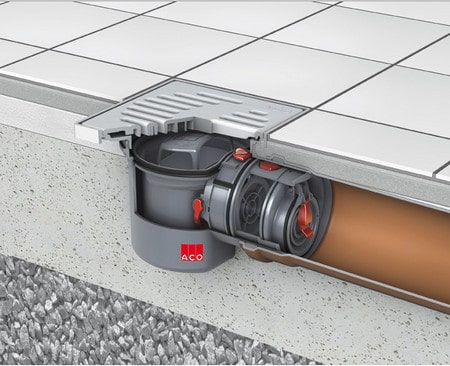
All shower drains installed under the tiles, according to their external design, are divided into two groups: the funnel described in detail earlier and the channel. The funnel is covered with a round, square or triangular grate. The duct is a long slotted grate channel, usually placed along the wall or plastic shower enclosures.
Drainage devices are distinguished by the design of the valve:
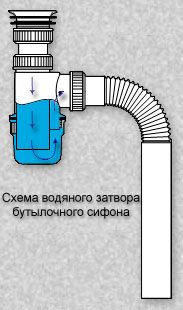
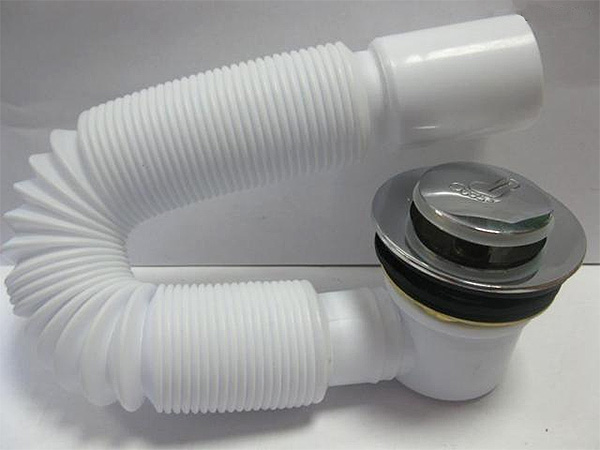
- Floor drain under tiles with water trap. The shutter looks like a curved tube (siphon). During operation, a water plug is created in the lower part of the pipe, which "closes" the sewer and does not let the fetid odor from the sewer channel.
- Tiled floor sanitary shower drain with dry closure. Diaphragm, pendulum or float valves are used in this type. They open under the pressure of the incoming water, and after it is drained, they close tightly and block access to extraneous odors.

Models of shower drains provide for different connections to the sewer shaft - this can be seen from the location and number of outlet outlets:
- with one or more releases;
- with vertical, inclined or side outlet.
What to look for when choosing
To purchase a drain ladder of decent quality at a reasonable price, you should be creative in choosing a model, comparing its characteristics with real conditions.
- Drain installation location. If it will be mounted in the center, a funnel-drain with a square or round lattice is suitable; for an angular arrangement, it is better to take a triangular-shaped model. An elongated slotted ladder channel is placed along the wall.
- Distance to the sewer shaft. If the drain is located directly above it, buy a model with a vertical outlet. When laying the grooves under the drain pipe at an angle (in the floor screed), the option with a side outlet is preferred. An inclined outlet is suitable if you want to divert water to the wall.
- Bend diameter. It is selected according to the diameter of the sewer pipe - by 50 or 100 mm. The first option prevails in apartments and private houses. The 50 mm hole ensures almost instant water drainage.
- Ladder height. It must be coordinated with the total floor height: the drain device should not protrude above its surface.
- Hydraulic or dry valve? The second option is preferable to a water seal. If the shower is used inconsistently, the water "plug" in the pipe simply evaporates, so the stench from the sewer seeps into the bathroom. If the drain is equipped with a dry shutter, this problem is excluded.
- Lattices. The most durable are stainless steel products. In terms of reliability and appearance, they are not inferior to glass gratings. The plastic version is cheaper, but it serves much less.
- Manufacturers. Channels and shower trays from the German companies Sanit Eisenberg Tece Viega, round and corner drains-funnels from the Czech manufacturer Alcaplast are in demand among consumers.
![]()
When buying, you should pay attention to the quality of the product: check the absence of defects and chips, make sure that the fasteners are in good condition. Additionally, pipes and couplings of the required size are purchased.
DIY installation
In order to reliably and efficiently mount a shower drain under the tiles in the bathroom floor, first markup is carried out. They are determined with the option of connecting the drainage system to the sewer pipe and outline the location of the drain, on which the preparation of the floor surface depends to ensure water flow:
- in the center - the slope of the floor should be on four sides;
- in the corner - a slope is required on both sides;
- along the edge, parallel to the wall - the floor should be tilted to one side.
Usually assembly work combined with the arrangement of a waterproof insulated floor. For such a serious procedure, materials and tools should be prepared:
- cement-sand mixture for screed;
- ceramic tiles with anti-slip properties for flooring;
- thermal insulation - 5 cm thick expanded polystyrene;
- waterproofing - membrane (isoplast), tape, mastic;
- pVC sewer pipes, couplings and fasteners for them;
- tile adhesive, sealant, grout.
The installation of the shower ladder is carried out according to the following scheme:
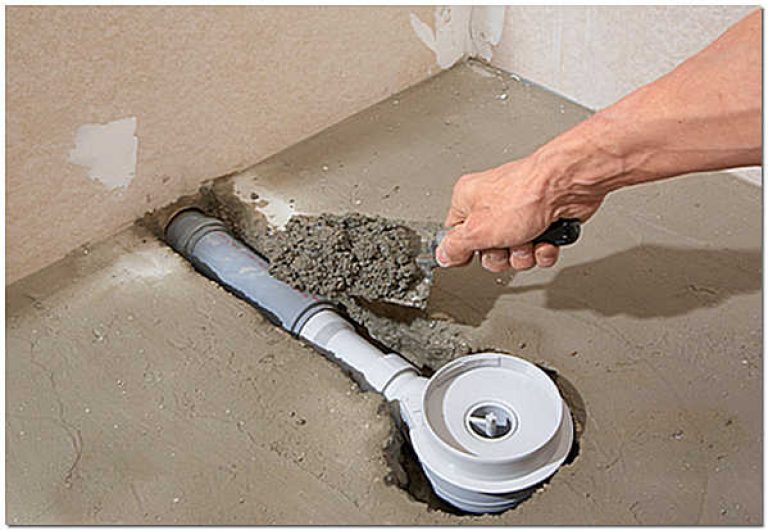
- With the help of a chisel and a hammer or a hammer drill, old tiles are removed. As a result, the concrete floor and drainage pipe are exposed. If it is made of cast iron, it is advisable to replace it with a modern plastic product.
- The joints of the floor and walls, as well as the corners, are carefully waterproofed with mastic. This operation is then repeated after the installation of each subsequent layer. To compensate for thermal expansion, a damper tape is glued over the dried mastic.
- Mount the body of the ladder. Its location is adjusted so that the hole is at the junction of 2-4 tiles, and does not cut one of the ceramic elements. For small tiles, a decorative grid is placed instead of one of them.
- The drain pipe is connected to the sewage system, a waterproof silicone sealant is applied along the joint line.
- Lay on the concrete floor thermal insulation material - regular or extruded (denser) expanded polystyrene. In the places where the sewer elements are located, corresponding holes are cut. It happens that they refuse insulation - then the screed is immediately poured. With this technology, plastic communication nodes will be walled up in concrete.
- Equip a screed with a slope. According to instructions from cement-sand mixture prepare a solution and lay it on polystyrene foam with a thickness of 35-40 mm. People often ask how to install a shower drain so that water can drain well. With a central location of the drain, all 4 sides of the screed are raised by 5 mm, in other cases, the height difference is determined at the rate of 5-15 mm / m. When concreting, the ladder is completely recessed into the floor (it is even better to underestimate by 1-2 mm). A siphon head is left above the screed - so that the decorative grille is then flush with floor tiles.
- After 3-4 days, after the concrete has hardened, lay waterproofing membrane with a hole cut out for the drain. Then the flange is bolted. Instead of roll insulation, you can use coating - Elastomix, Technoprok. The screed is preliminarily impregnated with a Ceresit primer.
- A siphon with an upper grill is screwed to the drain body, placing an O-ring between them. The second layer of the screed is poured, closing the lattice for a while with a piece of membrane so that the cement does not end up in the siphon. The mixture is leveled by the rule, observing the slope.
- Lay the tiles, starting from the drain and moving to the walls. The central elements are trimmed, if necessary, by framing the ladder.
If you make the calculation correctly, you will not need to cut the tiles in the last rows (near the walls). A day after laying, grout is performed using material of waterproof grades.
Until relatively recently, the ultimate dream of the majority was a comfortable "Khrushchev" with a typical bathroom. Few people equipped the bathroom to their liking - the lack of basic equipment and suitable building materials interfered. This is not a problem today. And now almost everyone removes and decorates a bathroom "for themselves". Interesting, previously completely unclaimed solutions appear. For example, traps for draining water. Thus, residents are trying to protect themselves from the serious consequences of possible leaks of plumbing equipment.
An obligatory element of an emergency drain in the bathroom is a ladder, a device that ensures an unhindered flow of water into the sewer. The system design should ensure:
- filtration of waste liquid from large impurities;
- efficient and fast drainage of water;
- the ability to clean the drain system;
- preventing the penetration of unpleasant odors from the sewer into the room.
The ladder is designed for unobstructed drainage of wastewater into the sewer
There are several types of ladders, the design of which is seriously different. There are two main types:
- A device with a water seal. Equipped with a specially curved tube filled with water. It is an obstacle to odors from the sewer. the main problem such systems - the need for constant water spillage. Otherwise, the liquid in the hydraulic seal dries up and unpleasant odors appear in the room. The reason for drying out can be irregular use of the ladder, heat in the room, the presence of warm floors, errors in design, etc.
Plumbing drain with odor trap and cast iron grate
- Dry shutter system. It is a mechanical device that, under the influence of gravity, constantly strives to occupy a position that closes the sewer pipe. There are varieties of the device: float, membrane, pendulum and using the molecular memory of the material. The equipment is devoid of the disadvantages of devices with a water seal. It can be additionally equipped with a non-return valve that prevents waste water from entering the room.
When buying, in addition to the design features of the device, it is imperative to take into account the size of the system. The height to which you will need to raise the floor level in the bathroom will depend on them. You can pick up an ultra-thin device, about 6 cm high, or purchase a standard 12-centimeter ladder. Another important metric is throughput. It must be sufficient, otherwise the device will "choke". To determine, you need to compare the maximum volume of water passed through the drain and the amount of liquid supplied. The first indicator can be found from the seller or in the technical documentation.
The drain can be additionally equipped with a non-return valve to prevent the return of contaminated water to the room
Features of installing a drain
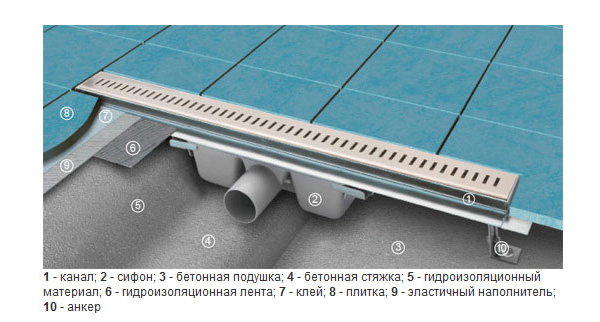
Installation of a ladder of any type takes place practically according to the same scheme. The floor on which the device is installed must be a multi-layer system:
- rough concrete screed;
- waterproofing;
- screed tilted towards the equipment;
- ceramic tiles with minimal water absorption and a rough surface, laid on a special mortar.
When installing the drain, it is imperative that the floor slope towards the equipment
Getting started with the direct installation of the system, it should be understood that improper installation will damage the equipment and can cause flooding of the room. The work is carried out in the following order:
- We start by marking up the artboard. On the installed waterproofing layer, we determine the location of the drain and its height, taking into account the difference in the width of the floor covering. It is better that the distance of the drain from the walls is a multiple of the dimensions of the tiles plus 2 mm for each joint. This will avoid unnecessary cropping.
- We take the part, outline its height and cut off the excess with a hacksaw. We put on the groove sealing ring, install the node in the designated place. We adjust the device.
- We cover the upper part of the installed ladder with a film or other material to prevent the ingress of litter, dust or dirt during the pouring of the inclined screed.
- Using the beacons, we set the desired slope to the drain. Its minimum value is 1 cm per meter, with less water simply will not have time to go into the sewer. We lay an inclined screed.
- We remove the protective material from the ladder and replace the siphon glass. Mount the O-ring on top. We close the assembly with a lid and turn it all the way to the direction indicated in the instructions. The design can provide an additional rubber insert to protect flooring from liquid.
- We mount the tiles. We start facing work from the ladder, gradually filling the entire surface. The width of the tile joints should be no more than 2 mm. To seal them, we use a special moisture-resistant grout.
- We cover the ladder with a decorative lattice. It can be plastic, stainless steel or brass.
Floor drains can be equipped with decorative gratings of various types and materials
Video review of a mosaic shower cabin with a drain in the floor
In apartments where, for whatever reason, there is a potential danger of leaking plumbing equipment, it is best to equip the bathroom floor with a drain. The device will prevent serious problems associated with flooding of neighboring apartments. You need to choose the most suitable model drain ladder and correctly install the equipment. You don't have to think that it is very easy. An incorrectly selected and installed ladder will become a source of an unpleasant odor in the apartment and will not be able to function normally. It would be right to entrust the arrangement of the emergency drain to professionals who will quickly and efficiently equip the sloped floor with a ladder.
The importance of choosing a drain for a shower cabin should not be underestimated, since the use of even the most modern plumbing will not give you any pleasure, if the connections begin to leak, the water from the pallet will stop draining, and unpleasant sewer odors will begin to penetrate into the cabin itself. Therefore, you need to be absolutely clear that only at first glance all shower plums look the same, in reality there are several types of them at once with their own nuances of installation and use.
Types of drains for shower cabins
The choice of draining the shower tray comes down to the choice of a certain type of siphon with a water seal. There are not so many options in this case, and they are determined, on the one hand, by the depth of the pallet, its design, the presence of an overflow, a plug, and the height of the mounting opening.
There are the following types of siphons for organizing the drain of the shower tray:
What to look for when choosing a drain for the pallet
If a siphon is not included in the kit with or a pallet, then measure the diameter of the drain hole before purchasing it. European standards provide for only three standard diameters: 52, 62 and 90 mm. Accordingly, siphons for pallets are mainly produced for them. It should be borne in mind that for siphons for drain holes of 52 and 62 mm, openings should be organized with the possibility of unhindered access to this plumbing equipment for cleaning. Conversely, 90 mm siphons can be floor mounted as they can be cleaned through the drain if necessary.
Also, attention should be paid to the design features of the siphons, or rather, to the number of butt joints that will need to be performed during installation. The fewer, the better - there is less chance that one of the connections will leak over time for some reason.
Another important element of the drain design shower tray — drain valve... It is necessary for deep pallets, which are usually filled with water during use. In fact, the valve may not be provided in the design - in this case, the drain is blocked by a conventional plug, but this, to put it mildly, is not modern.
Modern shower cabins often provide for the installation of semi-automatic siphons, the drain valves of which can be opened and closed by simply turning the handle. It is clear that no stubs are required in this case.
However, the most advanced models of semi-automatic siphons are equipped with click-clakc valves that open and close by simply pressing the valve with your foot. Accordingly, to collect or drain water in the pan, you do not even need to bend over.
Features of installation of drainage shower trays
The installation of the drain is started after the completion of the work. After checking the siphon for thread strength and the absence of debris, the presence of all gaskets, you can proceed to the installation of the drain, which is done as follows:
Flat pallets, often installed on polyurethane foam or cement screed, are equipped with a shower drain - a special siphon that does not have a plug and a drain valve, instead of which a regular grill is installed. The drain ladder is mounted in a specially equipped opening and is connected to the sewer at an angle of about 3 degrees. To maintain and clean it, simply remove the siphon grill.
For detailed instructions for sewage, see the next article.
The bathroom is the main place of accumulation of moisture and dampness in the apartment. For this reason, many owners are thinking about installing an emergency drain in the floor to ensure high-quality waterproofing of the room.
Installation of an emergency drain (ladder) will prevent mold and damp odor in the bathroomAn emergency drain is a hole into which water trapped on the floor flows out of it through a pipe into the sewer. A siphon is mounted in the drain hole. The siphon removes water from the floor, and also prevents foreign odors from entering the apartment. Often, the siphon is additionally equipped with a non-return valve that prevents water from the drain from getting back into the room.
What is an emergency drain for?
Drainage from excess moisture, puddles on the tiles, eliminates the smell of dampness, prevents the appearance of mold. The puddles constantly remaining after water procedures negatively affect the walls and plumbing, as well as provoke the reproduction of pathogens. Installation of an emergency drain keeps the bathroom dry and odor-free.
Reasons for waterproofing
The drain is installed when there are objective reasons for additional waterproofing:
- additional insulation from water is planned and needed. Or a cabin without sides and curtains, so the drain, along with fulfilling its direct function, insures against a flood.
- Additional safety net in case of flooding in the apartment. This reason is especially relevant in apartment buildingswhen the apartment is not on the ground floor. Often about installation, if a jacuzzi is planned in the bathroom.
Types of devices for emergency draining: DIY making
A device that provides an emergency drainage of water from the bathroom floor is called a drain. The main tasks that the ladder solves:
- easily and quickly drains water into the sewer
- filters waste water from foreign objects, preventing pipe clogging
- blocks unpleasant odors from the sewer
- has a design that makes it easier to clean the drain in case of blockage
Emergency drain devices are divided into dry seal designs and those where water is held back by a water seal.
The floor drain, equipped with a dry seal, has an element that closes the pipeline under the influence of gravity. Such ladders can be pendulum, membrane or float. Sometimes a drain with a dry seal is equipped with a check valve that prevents water from the drain from flowing back into the bathroom. Dry seal designs do not require the constant presence of liquid, do not dry out if they have not been used for a long time.
Drainage scheme with a water sealThe drain system, equipped with a water seal, has a pipe in its design, in which water is constantly present. The water seal device, constantly filled with water, becomes an obstacle on the way of odors from the sewer to the bathroom. For a drain with a water seal, it is very important that there is constant water in the pipe, because if there is no water, unpleasant odors can return to the room. The liquid in the seal can evaporate if the temperature is in, the device was not installed correctly, or if the drain is rarely used for its intended purpose.
When deciding which ladder to buy, take into account its design features and size. To install an emergency drain in the floor, the floor surface is raised to the height of the ladder. Therefore, the smaller the drain, the easier it is to install a drain in the bathroom and the less noticeable the difference in floor height between the bathroom and other rooms will be. In addition to height, you need to pay attention bandwidth: it must be sufficient to drain off all excess water. The drain should only be done by a specialist in this matter.
Installation of a drain: an option for a shower cabin under a tile with a dry shutter, a grill for a stainless steel bath, bath, pool
The main element of the emergency drain is the ladder: flat siphon, enclosed in a cubic case. A drain pipe is connected to the drain, which connects it to the sewer drain. The gangway and outlet are recessed into the floor screed. A waterproofing substrate is laid between the main screed and the drain screed, on which the tile is directly laid. Such insulation is needed to protect the floor slab from contact with water seeping through the pores of the concrete.
If the bathroom is combined with a toilet, but with a vertical outlet, then you can simply replace it with a similar one with an oblique or horizontal outlet. This will allow you to install a sewer tee at floor level and direct waste water from the drain into it, and not gouge holes for pipes in the screed, bothering neighbors.
It is important to properly drain the bathroom, correctly install the equipment. If the ladder is installed with violations of technology, the room can be flooded.
Step-by-step work on the installation of the sewer drain Alcaplast, Viega, Alkaplast: straight, linear, horizontal
To install the ladder correctly, you need to do the following:
To use the floor tiles rationally, already at the marking stage, it is worth calculating the distance from the drain to the walls in such a way that it is a multiple of the size of one tile. This will reduce the number of tiles cut and make the flooring more aesthetically pleasing. When the installation is finished, the drain is firmly fixed in the floor, and the floor surface is well insulated from moisture.
WATCH THE VIDEO
Emergency drain ensures the movement of water at a slope to the drain hole and drains water into the sewer, protecting the neighbors from below from the flood. The drain ladder is convenience and safety.


