For the wastewater disposal system to function flawlessly, several nuances must be taken into account when arranging it. We will tell you today what a sewage system is for a private house, how to install it correctly and what mistakes should be avoided.
Pipe routing
Sewerage wiring is one of the most difficult processes, therefore, its arrangement should be given the utmost attention. Its assembly must fully comply with the requirements of SNiP.Installation of the sewerage system is carried out in stages:
first fits release (a pipe connecting the external street and indoor system);
Release device
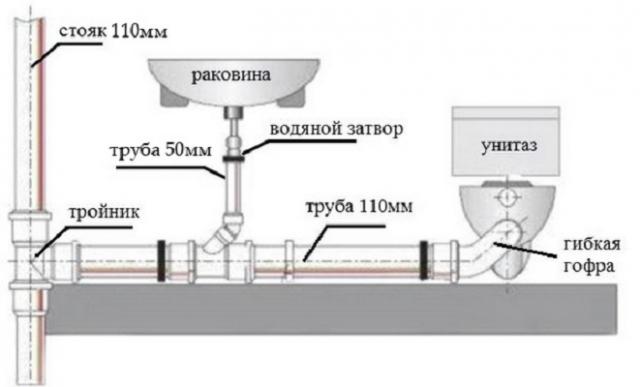
Further mounted riser - a central tube located vertically; to facilitate maintenance, it is better if he is alone in the house; as a rule, it is located in utility rooms or a toilet; do not mount it in living rooms or kitchen; it is installed openly or fits into a special shaft;
The last to connect bendsstarting with the crosses, only flared up; at the same time, the toilet bowl is connected to the riser only separately with a pipe of 100-110 mm, the rest of the devices can be connected to a single common supply with thin pipes of 50 mm.
Advice... Liquid soap can be used to facilitate the entry of the pipes into the fasteners.
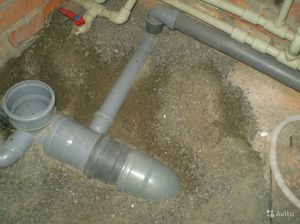
Installation of the outlet
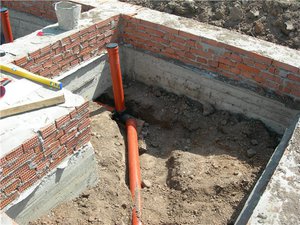
1. For him, it is better to mount a special hole during the construction of the house. If it is not there, then a hole is made in the foundation 200-250 mm wider than the very diameter of the pipe.2. Hole waterproof using bituminous mastic.
3. Next, a special sleeve is inserted into it (a segment with a diameter of 20-40 mm larger than the outlet pipe). It serves to prevent the main pipeline from collapsing. The sleeve should protrude 150 mm from the foundation on both sides.
4. The outlet pipe is placed in the sleeve. The space between them is carefully filled with foam.
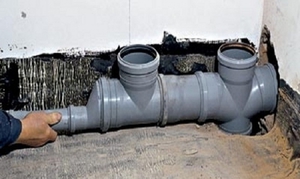
5.With the domestic sewer pipe, the sleeve is connected oblique tee (tee 45 °) and by diversion.
Sewer crosses, tees and bends
Slope angle
Since the wastewater flows through the pipes by gravity, in order to avoid blockages, the angle of their slope should be correctly determined. It is calculated based on the diameter of the pipeline. Moreover, for each plumbing fixture, it is selected separately:40-55 mm - from 3%;
85-100 mm - from 2%.
Naturally, the further the device is from the riser, the more the slope should be increased. Let's say drain pit located at a distance of 200 m from the riser itself. To obtain the required angle of inclination, the pipe should be displaced in height by 60 mm.

Angle of inclination of pipes
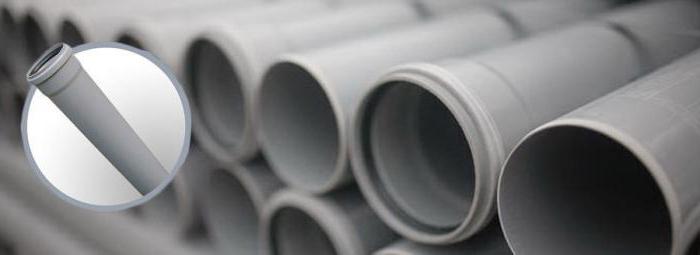
Council. When choosing pipes for sewage, please note that outdoor pipes are always painted orange, and pipes intended for indoor installation are always gray.
Installation of a riser
1. He is only going to down up... For such a pipe, appropriate openings are prepared in the floors and roof. To reduce the noise of the passage of water from the wall or groove, retreat 20 mm.2. The riser is mounted only strictly vertical... Minor deviations of up to 2 mm for every 2 m are allowed.
3. So that the joints do not interfere with the passage of liquid, the sockets are mounted from above.
4. When assembled, gradually connect side bends and inspection hatches. For this, oblique tees and crosses are used.
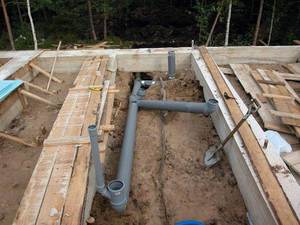
5. When connecting branches, pipes running parallel to the floor are laid on special supports.
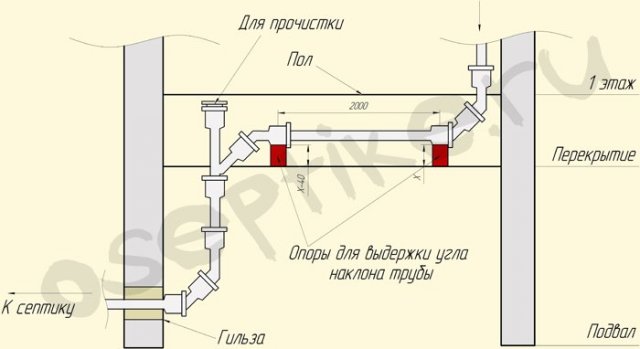
Sewer system diagram
6. Excessive turns of pipes should be avoided, if they cannot be dispensed with, it is better to use two tees at 45 °, and even better three at 30 °; if you choose one at 90 °, then the waste in it will be stagnate; in addition, when connected at a right angle, the pressure in the riser will be limiting, which will lead to excessive noise in room.
Council. Since blockages occur most often in places of turns, be sure to provide inspection or inspection hatches next to them.
7. The riser is fixed to the wall with clamps, which must be located under the sockets. The distance between the clamps is up to 4 m. In order not to damage the system, the holes for them should be prepared in advance or, during their preparation, disassemble the riser for a while.
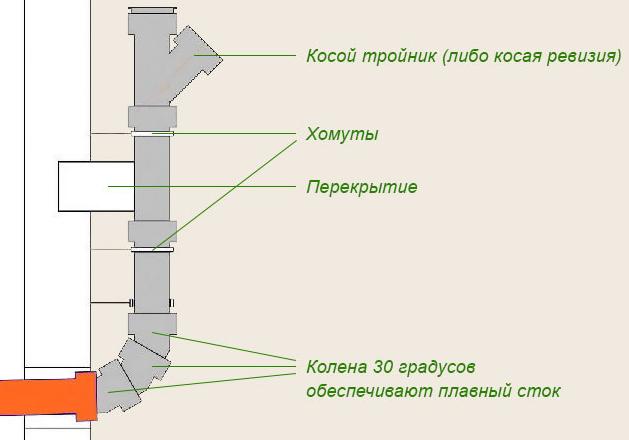
Riser assembly diagram
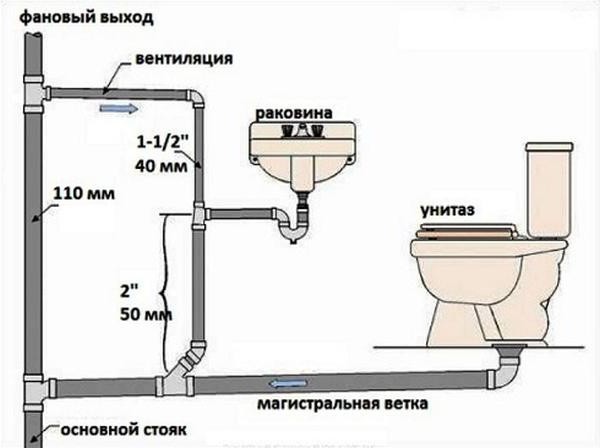
Hood arrangement
To prevent odors from entering the room, a curved pipe is provided at the bottom of all plumbing fixtures (sinks, toilets, etc.) - odor trap... However, with intensive use of the sewage system, a vacuum is sometimes formed in the riser. In this case, there is a "breakdown of the hydraulic seal" - gases without water resistance begin to penetrate into the house.To avoid this, it is necessary to provide for their removal to the atmosphere. The drain pipe for ventilation of the sewer system is led out through the roof. Its diameter is always equal to the diameter of the main pipe. If the waste pipe runs through an unheated attic, it must be insulated.
With a small bandwidth sewers sewerage equipment without hood is allowed... However, in this case, the riser must necessarily end with a cleaning or inspection hatch.
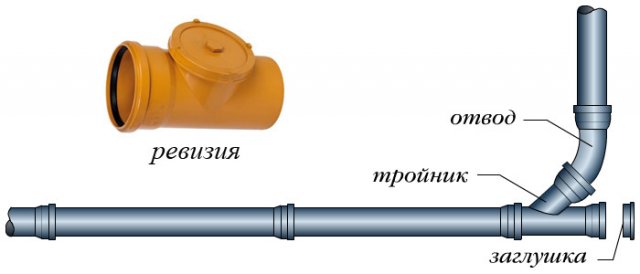
Inspection hatch and opening for cleaning (equipped with a plug)
Basic wiring rules
So that during operation there are never problems with the sewage system, the following rules should be followed when arranging it:To prevent the splash of sewage, all plumbing is connected above the toilet;
To avoid blockages, strong bends and unnecessary tight pipe bends;
Sewerage system installation
pipe diameter is selected equal to or slightly larger than the size of the largest pipe from the plumbing fixture;
If there is a toilet in the house common riser diameter must be greater than or at least equal to 100 mm - the diameter of the toilet bowl pipe;
The lead to it should not exceed a meter; from other plumbing fixtures allowed eyeliner length up to 3 m; if for some reason it is made larger, then its diameter is increased to the size of the common riser (at least 100 mm); in order not to increase its diameter, it is possible to equip a vacuum valve at its upper end;
To service the system, provide inspection and cleaning hatches; they should be placed every 10 m;
To prevent the pipes from freezing in winter, in the places where they pass underground they should be carefully insulate.
If desired, even a private house in the countryside you can equip. The first thing that a resident of a country faces is the absence warm toilet in the House. Without sewerage, a person is deprived of many amenities. This is not a luxury, it is a necessity. Sewerage in a private house is a complex process that requires taking into account every little thing. How can this be done?
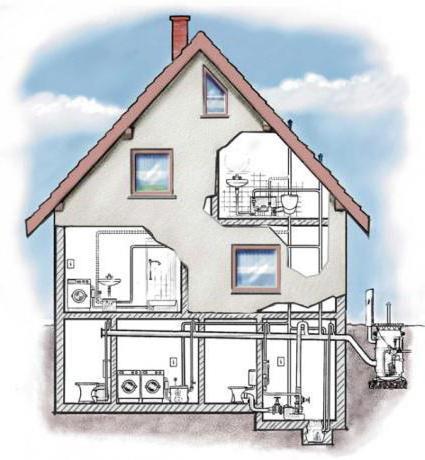
External and internal
The work related to the arrangement begins with the design of the internal and external system. In the first case, the installation of a drain pipe, a riser is required, as well as the distribution of pipes to all rooms where it is required: a kitchen, a toilet, a bathroom, and so on. As for the external system, this is everything that is located outside the house. Its arrangement requires piping to the septic tank. You can also connect the sewer to a deep cleaning station.
The task is greatly facilitated if it is possible to discharge waste water into a centralized system. If the house is located in an isolated area, then a system with a homemade septic tank should be created. It can be with or cumulative. A cesspool is not suitable in this case.
Scheme of laying sewer pipes in a private house
Before starting work, a plan should be drawn up for laying pipes inside a private house. The process is greatly simplified if all wet rooms are located in close proximity. The scheme is drawn up strictly individually. In the process, you should take into account all the features of the house and the location of the premises. The finished version can look anything you like.
When designing a sewage system inside a house, it is necessary to accurately calculate the location of the collector pipe. Only then can you determine where the rest of the system will be laid.
How to make a correct diagram
The sewerage scheme in a private house is an important stage. The quality of the system and its reliability depend on how correctly the plan is drawn up. Stages of drawing up a diagram:
- On a piece of paper, preferably in a box, you need to recreate the plan of the house. When drawing up a plan, scale is worth considering.
- Then it is worth deciding on the location of the riser or collector pipe.
- At all levels of the building, the location of the plumbing should be noted. On this stage you should learn about how to connect it.
- From plumbing, it is necessary to lay pipes on paper to the riser. In this case, all connecting elements, tees, branches and corners should be taken into account.
- It is necessary to measure the length of each element of the internal system and summarize the data. The result will be required amount pipes. In this case, the diameter of the material must be taken into account.
The final stage is drawing up a diagram of the external system: the release of pipes, their laying to the septic tank. In this case, it is necessary to take into account all the requirements specified in SanPiN 2.1.4.1110-02, as well as SNiP 2.04.03-85.
What you need to consider when arranging an internal system
Laying in a private house begins after drawing up an approximate scheme. There are several nuances to consider at this stage:
- To drain wastewater from the toilet, pipes with a diameter of 10-11 cm are required. Their total length must be at least 100 centimeters.
- For gray drains that enter the common riser from the kitchen and bathroom, pipes made of PP or PVC are required. The diameter of the material should be 5 centimeters.
- To arrange turns in the system, it is necessary to use several plastic elbows made at an angle of 45 °. This reduces the risk of blockages during the use of the sewer.
- It is best to use polypropylene or polyvinyl chloride pipes for arranging the sewage system inside the house. Such material is more durable, reliable and relatively inexpensive. When using such pipes, laying a sewage system in a private house is simplified.
Choosing pipes
Sewerage in a private house requires careful preparation. After drawing up a diagram and making the necessary calculations, the purchase of materials is required. Pipes are used for wiring inside the house. gray... For the arrangement of the external system, orange pipes are required. You can explain the difference in color based on logic. Orange hues are best seen in the ground. In addition, the pipes have differences in properties. First of all, it concerns the material. Pipes buried underground have to withstand more severe loads. The material for their manufacture must be more rigid.
For a successful installation, double-layer corrugated pipes can be used. But, as practice shows, their use is often inappropriate. After all, the depth of the sewerage in a private house is from 2 to 3 meters. It is much cheaper and no less effective to use orange pipes. Most often, a material with a diameter of 11 centimeters is used to equip an external system. This is enough for normal wastewater disposal.
How to lay pipes? It's simple!
Do-it-yourself sewerage installation in a private house requires certain skills and patience. The most difficult stage is the placement of the pipes and their fastening. It is almost impossible to do this alone. Therefore, an assistant is required to work. This will not only speed up the process, but also improve quality.
The easiest way to lay sewers is to use pVC pipes or PP. A fairly wide range of similar products is produced. If necessary, you can purchase material of the required diameter, tees, elbows and revisions. It should be noted that each part is equipped with a special rubberized insert - a cuff. Thanks to this element, laying the sewage system of a private house takes a little time. Joints are connected easily and reliably. If desired, you can process the seams additionally. A silicone-based plumbing sealant is suitable for this.
What to consider
When laying pipes, it is necessary to take into account some of the nuances:
- If pipes run through walls or ceilings, then they must be placed in special sleeves that reduce the load on the system fragments.
- The slope of the elements of the sewer system depends on their diameter and is prescribed in SNiP 2.04.03-85. For example, for a material with a diameter of 5 centimeters, this indicator should be 3 cm / m, and with a diameter of 10 to 11 centimeters - 2 cm / m.
Sewerage outlet arrangement
If a problem has arisen and the internal system has a discrepancy with the external one, then the laying of sewer pipes in a private house should begin with the release. This is the border area between systems. At this point, the riser is connected to the pipe leading to the wastewater collection tank.
It is necessary to mount the outlet through the foundation wall. The depth of its laying should be lower than the depth of soil freezing. Otherwise, in winter, difficulties may arise during the operation of the sewage system. If an outlet hole was not specified during the construction of the building, it will have to be punched. Its diameter must match the size of the pipe in the sleeve. The latter should be longer than the hole. On each edge, the sleeve must cover the pipe by more than 15 centimeters. These are the basic requirements for a sewer outlet.
Installation of a riser and further wiring
The pipe size from the riser to the toilet should be 1000 mm. This allows you to determine its location. It is better to mount the riser in the toilet itself. The installation can be hidden or open. It all depends on where it will be carried out. You can install the riser close to the wall. For this it is worth using suspensions and clamps. You can also mount the pipe in a niche, in a channel or in a box.
To connect the riser and the rest of the system, you can use oblique tees. If the pipes are different in diameter, then adapters should be used to connect them. They eliminate the need for a sealant. In places where there is an intersection of elements coming from a shower, sink or bathtub, it is necessary to install a collector pipe. Its diameter should be between 10 and 11 centimeters. Do not forget about water seals. These elements prevent unpleasant odors from entering the living space.
On each floor, a revision is installed in the riser - a kind of tee designed to clean the system with a strong blockage. 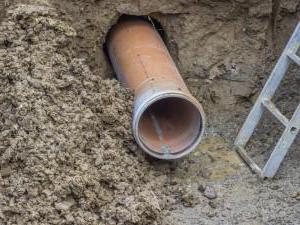
What is a fan pipe
Observing the rules for laying sewerage in a private house, you can easily create an external and internal system. In addition to installing a riser, a fan pipe is also required. This is its continuation, which is displayed on the roof of the house. This part is installed on the riser. The revision is mounted at the junction. After that, the funnel is led out into the attic at an angle. Do not connect it to the building ventilation system or to the chimney.
The funnel should be located away from windows and doorways. This distance should be over 4 meters. This piece of sewage should be located at different levels with general ventilation of the house and a chimney. ![]()
Varieties of septic tanks
Laying an external sewerage system in a private house is no less important stage than installing an internal system. With the wrong arrangement, problems can arise not only with comfort, but also with environmentalists. One mistake can turn sewers into a big smelly problem that will take a lot of time and money to fix.
You should start with a septic tank device. Sludge-type structures are most often used. This is a container or their combination through which the drains pass. They are gradually cleared. This is due to the precipitation of heavy inclusions. After that, the drains undergo additional purification in a filtration well or on the field. In this case, both mechanical and biological cleaning methods are used.
There is another, simpler type of septic tank - accumulative. In this case, a closed container of a sufficiently large volume is installed. All drains are collected in it. To empty such a septic tank, a sewage pumping out is required, which is carried out.This method of arranging an external system is easier to carry out. Plus it's cheaper. 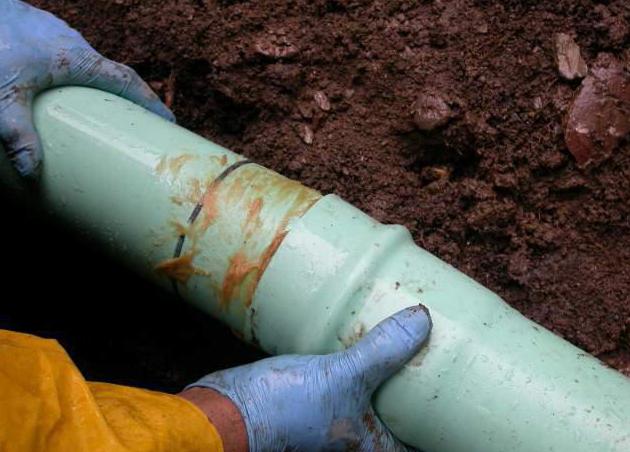
How to calculate the required volume
It is not so difficult to calculate the size of a tank for a septic tank. The volume is determined on the basis of settling for 3 days. The average consumption per person per day is 200 liters. If desired, this indicator can be calculated individually. If two people live in the house on a permanent basis, then the volume of the tank for the septic tank should be:
2 x 200 x 3 \u003d 1200 liters or 1.2 cubic meters.
Stages of installation of the outdoor system
Sewerage in a private house does not end after the complete installation of the internal system. After all, the arrangement of the outer part is required. Stages of arrangement of the external system:
- First, you need to prepare materials: a ready-made container of the required volume from PP or a ring of reinforced concrete. If desired, you can lay it out of bricks or fill in a monolith.
- The next step is to determine the appropriate wastewater treatment method.
- After held excavation: a pit is dug under the container and trenches for laying pipes.
- All structural elements must be connected. At the same time, do not forget about the comfortable maintenance of the septic tank.
- The pipes should be installed at a specific slope. This indicator should be 2 cm / m. The joints must be sealed.
- The septic tank should be equipped with a ventilation system.
- Carrying out work on heat and waterproofing selected fragments systems, you can fill the structure with soil.
When placing a septic tank, it is worth considering the location of buildings on a personal plot. You should not place a waste container near a recreation area or playground.
In conclusion
Now you know how to lay sewer pipes in a private house. If you follow all the rules, you will get a reliable system. Before starting the operation of the sewage system, it is worthwhile to run it. For this, the system must be flushed with clean water. This will allow you to identify all the shortcomings and correct them. Only then can the operation of the sewer system begin.
In fact, the process of assembling individual fragments is not difficult. The main thing is not to make mistakes when drawing up a sewage scheme, as well as to make the correct slope of the pipes. Otherwise, the system will not function normally.
Have own house - the dream of many people. When the opportunity arises, they begin to build the mansion on their own. In the process of its construction, many questions arise. One of the most common is the laying of sewers in a private house. If available, it provides comfort while living in the house. It allows you to drain wastewater from the home into a special well.
When it comes to sewerage when building a house, many people turn to the services of specialists. Although their work is of high quality and after its completion, the owner receives an effective sewage system, nevertheless, their services are not cheap and require certain financial expenditures. Or maybe refuse outside help and do all the work on your own? Moreover, although there are difficult moments here, the task of independent device sewage is not an impossible one. If you delve into the intricacies of the structure sewer network in your home, then all the work can be done with your own hands, you can save a lot and get an effective sewage system.
What should you know?
When the owner decides to lay a sewer system in the house, then first of all it is necessary to find out if there is access to the centralized highway. If such a line passes in your village, then the installation of a sewerage system in this case is not very difficult. You just need to find out from specialists:
- which pipes are best suited for draining wastewater and water from the house;
- how to lay pipes correctly;
- how to properly bring the pipes to the manifold.
The greatest difficulty when connecting to a centralized highway is laying pipes on the street. During this work, you have to dig a trench. How deep the trenches are required depends largely on the level of soil freezing. Usually pipes for sewage on the street are laid at a depth of 0.5-1 m.
If your house is located far from the sewer main and there is no way to connect to it, then in this case you will have to start working on the device of an autonomous sewer system.
Types of sewerage in a private house
First, you need to decide how the sewer system will look like. It can have a different look:
- cesspool;
- septic tank.
Cesspool
Traditionally, cesspools have been used to drain wastewater from dwellings. Now they are considered a relic of the past. However, they have the right to life, if only because:
- they efficiently handle wastewater disposal;
- construction work is devoid of difficult moments.
If you decide to create a sewage system like a cesspool, then before embarking on the implementation of this idea, you need to learn about the engineering and geological features of the soil in your area.
The easiest option to build a cesspool is to make brickwork... It is most reasonable to use red ceramic brick as a material. If you are ready to spend money on attracting special equipment, then you can arrange this structure from concrete rings... When constructing such a pit, the bottom is concreted, and then rings are installed. From above, the structure is covered with a plate with a ventilation hole and an inspection hatch.
Septic tank
 In many homes, a septic tank is used as a sewerage system. Its main advantages are:
- ease of construction work;
- reliability during operation;
- the ability to install on your own;
- simplicity of work on the device of such a sewage system.
At the moment there are several types of septic tanks. There are even three-chamber ones that have a high degree of waste and domestic water treatment. And all due to the fact that such systems include a complex of aeration and biofilters.
Sequencing
Before starting work on the device autonomous sewerage in your home, you need to decide on a work plan:
First you need to decide where the cesspool will be located on your site. You should know that the drainage well must be below the level of the house.
Determining where the collector exits the structure is also important. It is necessary to carefully inspect the place where the pipe comes out, taking into account that at this point all the waste water from your home will be concentrated. It is necessary to inspect the place of intake in order to make sure that the collector is installed correctly. There must be no distortions and deviations during installation.
When the site has been examined and important issues have been resolved, you can proceed to drawing up a sewage project.
It must be borne in mind that the external sewerage system must be straightforward. The inner one has many corners and bends, therefore, when working on its laying, all dimensions of pipes and bends should be calculated.
When all the important points have been resolved and all calculations have been completed, you can proceed to the acquisition of the necessary materials.
 The internal sewerage system does not differ from that installed in the apartment. But the scope of work for its construction will vary significantly.
The time and effort to create it will have to be spent less if the dwelling has an old sewage system. In this case, the main work will be associated with the dismantling of old pipes. You can use old sewer pipes. However, it may turn out that you have to redo the entire system as a whole. In this case, it will take a lot of time and effort to create a new autonomous sewage system in the house. The floor will need to be raised.
And if it turns out that the depth of the sewerage is insufficient, then you will have to deepen it. To do this, you will have to dig a hole under the foundation, and then measure the distance from the bottom edge of the foundation to the top. It should be at least 1 m. In this case, the drains transported through the laid collector pipe will not freeze even in the harsh winter.
It is necessary to dig a trench from the outside of the house directly to the well. It should be deeper than in the house. This is necessary to ensure a constant slope for the pipe. In this case, the drainage water will flow freely into the well.
At the exit from the house, the trench should have a depth of at least 1 meter, and every 10 meters the depth of the trench should decrease by half a meter.
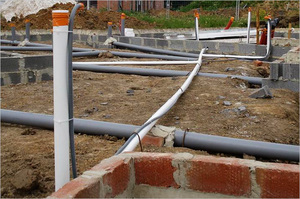
Laying sewer pipes in a trench
 The construction of a wastewater disposal system involves laying pipes both outside the house and inside. Next, let's talk in detail about how the outer pipes should be laid. Experts in this regard give the following recommendations.
At the bottom of the dug trench, it is necessary to pour a layer of ordinary sand. Its thickness should be 15-20 cm. Creating such sand pillow will provide protection sewer pipes from excessive pressure, even if these are polypropylene pipes. Having laid the pipes on the sand, they will shrink slightly and take a comfortable position. This will eliminate the excessive load on them in the form of the pressure of the backfilled soil.
Another important point is the connection and sealing of joints. A tee must be inserted every 3 m of pipe. Thus, an audit will be equipped, which is the same pipe that goes to the surface of the earth. Revision is necessary so that in the event of a blockage in the pipe, it could be cleaned without any difficulties. Experts do not advise saving on the installation of an audit. The funds spent on the purchase of tees will pay off during the operation of the sewer system. After every four meters, it is advisable to install a revision. The outside of the pipe outlet is closed with a special plug.
When device internal sewerage many private home owners are increasingly using polypropylene pipes. These products have many advantages:
- they are not subject to corrosion;
- have a long service life;
- installation of such pipes is not difficult and affordable for every owner.
 Having made a choice in favor of polypropylene pipes when laying an internal sewage system, it is necessary to take into account how many sources of wastewater are available in a private house. If a large number of plumbing fixtures are installed in the dwelling, then in this case it is optimal to use pipes with a diameter of 100 millimeters for laying the internal sewage system.
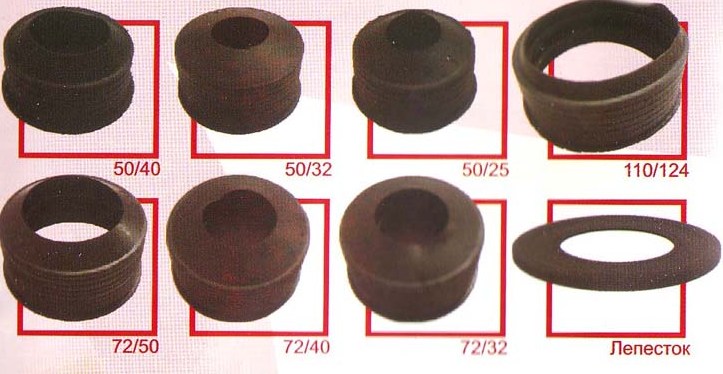
It should also be taken into account that when leaving the sink, the pipe must have a diameter of 50 mm. Therefore, during the laying of the internal sewage system, pipes of different diameters will have to be joined. However, note that at the moment this is not a big problem, since there are special adapters. Therefore, you can not worry about reliable sealing of joints.
When connecting pipes to each other, it will be useful to check the quality of the gaskets. They should be free of damage, in this case, leakage at the joints will be excluded.
Risers are also equipped with an audit. Its installation is carried out from the floor at a height of at least one meter. In addition, special exhaust pipes are installed, which should be located above the roof at a distance of 70 cm. Why is such a complex riser design necessary? When a private house is connected to the sewage system, gases and unpleasant odors are inevitable. If the riser has reliable ventilation, then you can get rid of such unpleasant phenomena. Installation of a riser for ventilation of the sewage system ensures the displacement of polluted air. Therefore, spending time and money on its device, you can get rid of the unpleasant odor in your home.
Another important point to be aware of: if the riser is located in unheated room, then it is necessary to perform work on its insulation. A special release must be used to connect the riser to an external sewer. Its diameter should be smaller than that of the pipe on the riser.
The installation of the outlet to the riser in the direction of the movement of polluted water should be carried out at an angle of 90 degrees. In addition, two 135 degree bends must be used to connect the risers. If there is a need for another additional riser, then an oblique tee with an angle of 45 degrees is used. And besides this, an additional branch is installed.
It is much easier to arrange an autonomous sewage system in a household if there is one riser and one collector pipe. When laying outdoor sewerage, it is best to use polypropylene pipes 150 mm.
Conclusion
Sewerage should be in any private house. It provides a comfortable stay. If your home cannot be connected to a centralized sewage main, then in this case you will have to carry out work to create autonomous system sewerage. This work is not so difficult, so you can do it yourself. Most often, when laying sewers in a house, polypropylene pipes are used. It is necessary to choose the right materials and correctly perform the installation so that the joints between the pipes are tight.
The depth of the trench in which the pipes will be laid is of great importance. It should be below the freezing depth in order to exclude freezing of drains in the pipe in winter. If this is the first time you are starting work on laying an autonomous sewage system and do not know how to do it, then for a high-quality installation of a sewer structure, you should familiarize yourself with the instructions for its construction and find out about the recommendations of specialists before starting work. By following them and performing work in accordance with the technology of laying the sewerage system, you can get an effective system that will ensure effective drainage of wastewater and used water from the house into the well.
The need to connect the toilet to sewer system can occur both at the stage of installing a new device in the bathroom, and in the event of a planned or emergency replacement of plumbing. At the time of buying floor-standing toilet evaluate not only the design features of the selected model, but also the form of discharge of polluted water, which can be vertical, oblique or horizontal.
In Stalinist houses, toilet bowls with vertical outlet were most often installed, in Khrushchevs - with oblique, and in modern new buildings, models with horizontal outlet are designed and installed. Direct connection of the toilet to the sewerage system is carried out using special pipeline fittings.
The fastest way to work is when using a corrugated pipe. You will have to tinker a little longer if you connect the plumbing product through a fan pipe, an eccentric cuff or plastic taps.
The device is chosen depending on the location of the sewer riser and the outlet of the branch pipe, while calculating how to connect the toilet with minimal financial and time costs. Otherwise, you will have to redo the sewage system, adjusting it to the features of the toilet bowl exhaust system.
Various devices for connecting the toilet to the sewage system provide variability in the installation work with your own hands
If the connection of the toilet bowl to the sewage system is carried out using fan pipes, then it is possible to achieve a visual visibility of the unity of the installed product with connecting elements made of the same material (sanitary ware, ceramics, porcelain, etc.).
The complexity of installation lies in the need for exact match of the parts with the location of the sewer pipe socket, since there is no possibility of adjusting the connecting element by cutting it.
Eccentric cuffs, produced from polymers, are a design of two branches, the axes of which are shifted relative to each other.
Cuffs are sold in various lengths, so you can easily find the right part for connecting the purchased toilet to the sewage system, which has different parameters for the drain and the socket of the sewer pipe.
Corrugated pipes or corrugations have a plastic shape, due to which parts can stretch or contract, as well as bend at any angle.
All these qualities make it easier assembly work, during the execution of which the master only monitors the slope of the corrugation, ensuring normal passability.
A cast iron or plastic sewer pipe is connected to the toilet using a rubber cuff, which is turned inside out during installation, which ensures one hundred percent tightness of the connection
To enhance the reliability of the connection, a sealant must be used. It turns out a fairly reliable connection that will last for many years.
The independent connection of the toilet is carried out according to the scheme, while the master must have the necessary tools:
- wrenches in a set or at least one adjustable wrench;
- several screwdrivers;
- a metal saw used when dismantling an old toilet;
- tape measure, hammer, knife;
- sandpaper;
- sealant, a little tow, cement;
- hammer drill with a set of victorious drills;
- dowels.
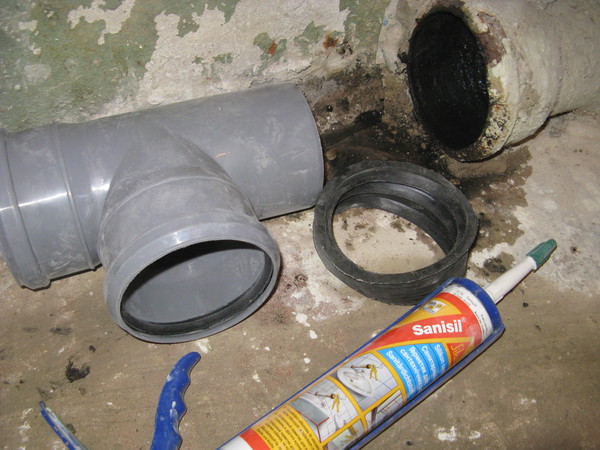
Transition from cast iron pipes to plastic products
The cast-iron sewer pipes from the toilet bowl to the riser are 123 mm in diameter, and 73 mm from the bathroom and kitchen sink. Plastic products of gray or orange color differ from the elements of the cast-iron sewage system in diameter: 110 mm and 50 mm, respectively.
When connecting a new toilet or replacing an old pipe wiring, it becomes necessary to connect plastic pipes to a cast-iron riser with a larger diameter.
To solve this problem, a special rubber cuff is purchased, which is inserted into a cleaned sewer socket.
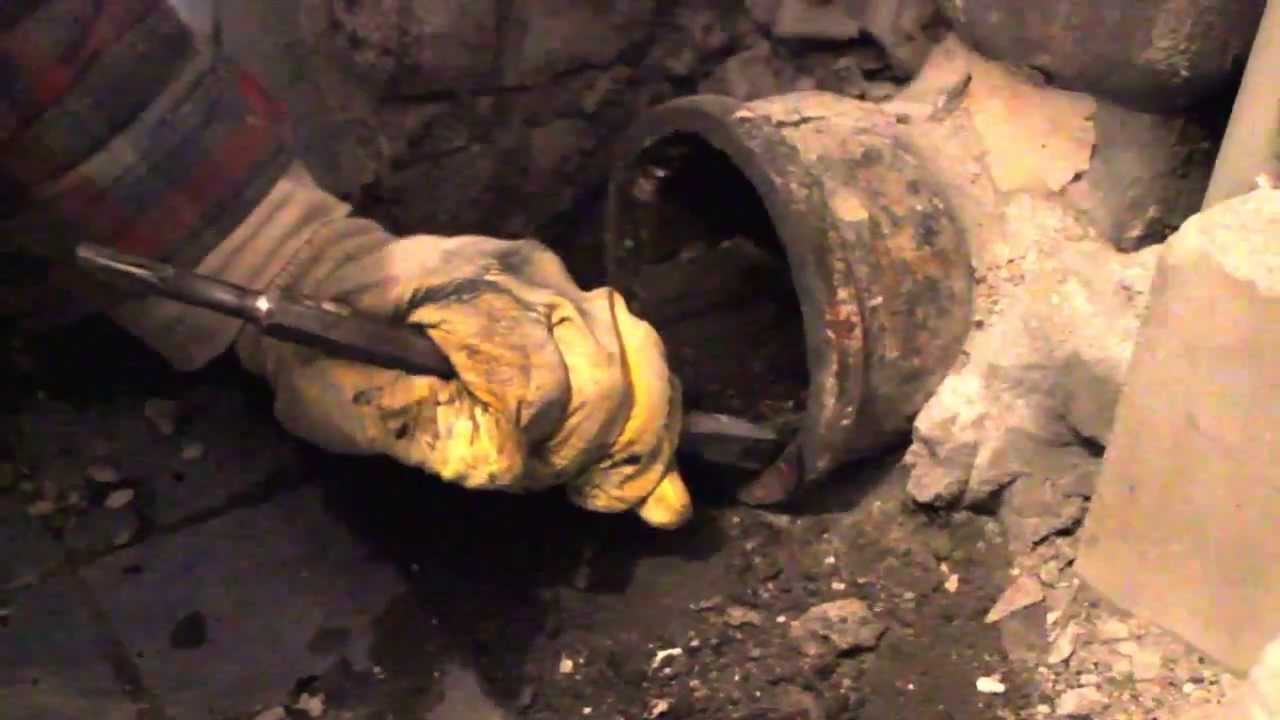
Dismantling of cast iron pipes and cleaning the socket
To carry out dismantling work associated with the removal of the hardened cement mortar at the junction of the old pipe with the socket, it is necessary to stock up on a hammer, flat screwdriver, and a pry bar.
Tapping gently with a hammer on the screwdriver handle, slowly but surely, release the cement mortar from the connection of the sewer system elements. When all the cement layer has been removed, a wooden stick is inserted into the pipe.
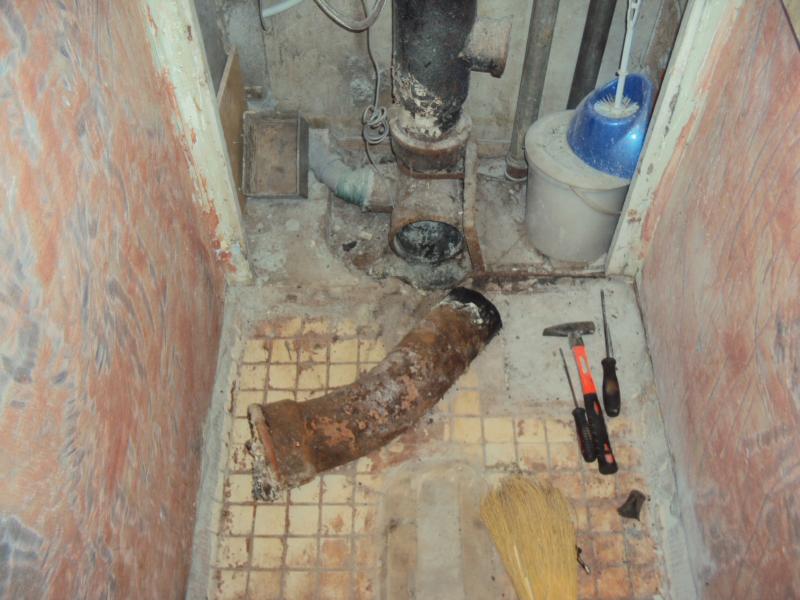
Raising and lowering the stick, stir the fixed position of the cast-iron pipe, and with a little effort pull it out of the socket
Rust, plaque, deposits are removed with a metal brush set on an electric drill. Also, a flat screwdriver or chisel is used to clean the cast-iron walls.
You can treat the inner walls of the socket with a special substance that corrodes dirt in the sewer pipes. This will greatly facilitate the cleaning process. sewer outlet... It is necessary to complete the cleaning of the socket by wiping its walls with a clean cloth or rag.
The cleaner and smoother the walls of the socket, the better and more reliable pipes made of different materials will connect.
The process of cleaning an old cast-iron sewer socket from the remnants of a linen cord impregnated with red lead for installing a transition to a plastic sewer
Installing the rubber sleeve on the bell
Reliable fixation of the cuff in the sewer socket is ensured with the help of a sealant that is applied to its walls.
The sealant is applied in a thick layer to the outer surface of the cuff, after which it is inserted into the hole of the bell
Gently tapping with a hammer on the edge of the cuff, they achieve a tight adhesion of the adjoining walls of the two elements of the system. A small amount of technical petroleum jelly or special plumbing grease is applied inside the cuff, which makes it easier to push the plastic tee outlet into the socket.
If the pipe does not want to climb into its intended place, take a piece of plywood, attach it to the pipe and knock on it with a hammer. This will block the pipe and not damage its walls.
Corrugated pipe connection
Corrugation (this is the abbreviated name for a corrugated pipe), intended for mounting a toilet in the sewer system, is used when other materials simply cannot be used. Installation is carried out as follows:
- install the toilet in the selected position;
- determine the drilling sites of the floor tile, marking them with a simple pencil inserted into the holes in the plumbing fixture;
- after applying the marking, the toilet bowl is rearranged to another place in order to drill holes for the dowels at the designated points;
- inserted into the drilled holes of the dowels, fixing the stable position of the toilet bowl;
- one end of the corrugation is inserted into the sewer hole, lubricating the joint with silicone sealant;
- the other end of the corrugation is put on the outlet of the toilet;
- carry out all other installation operations and test the plumbing fixture, using it for its intended purpose.
- check the reliability of the connection by drawing water into the drain tank and performing a control drain;
- the absence of leaks indicates a tight connection of all elements.
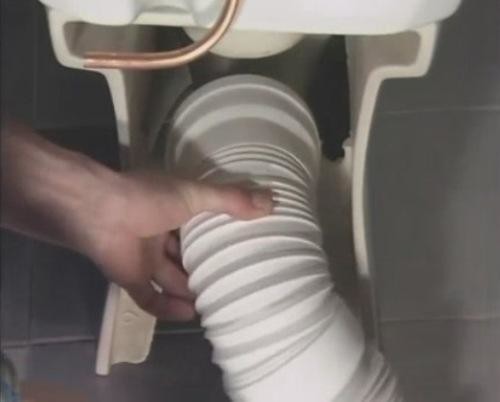
Connection to the outlet of the toilet bowl with corrugated plastic pipe that connects the device to the sewage system
Check horizontality concrete base until the installation of the device. If a difference in height is detected, fill in a self-leveling screed. Otherwise, the toilet will wobble after installation.
Connecting the toilet using an adapter
You can connect the toilet to a centralized sewage system using special pipes called adapters or waste pipes. With this method of connection, the form of release of the toilet plays an important role.
If the outlet has an oblique shape, then the toilet is installed "on the floor". Devices with a vertical form of release are mounted "in the wall", maintaining a straight 90-degree angle of the branch pipe. Toilets with oblique outlet are also installed "in the wall", but the connecting pipe is already started at an acute angle of about 30-40 degrees.
When replacing plumbing, as a rule, a new toilet model is selected with the same form of release. If, when buying a new device, you ignore such a criterion as the release form, you will have to modify the connection method using corrugation or eccentric cuffs.
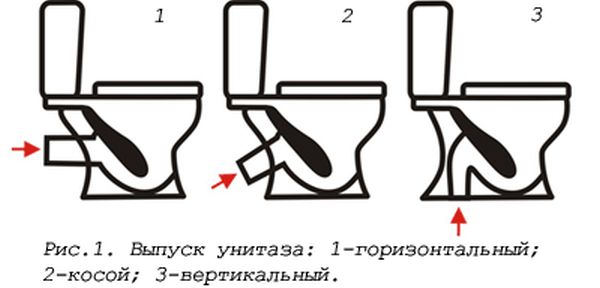
According to the existing classification, all models of toilet bowls by type of release can be schematically divided into three large groups, presented in this picture
Installation of a toilet bowl with vertical outlet
Models of toilet bowls with a vertical release form are installed in cottages and old buildings. The siphon and the branch pipe are an integral part of the device, and therefore, after the installation is completed, these parts cannot be seen.
The product can be installed at a close distance from the wall, since it is not required to leave space for placing pipeline fittings. The installation of a plumbing fixture is started after dismantling the old product and cleaning the surface of the site reserved for the new toilet.
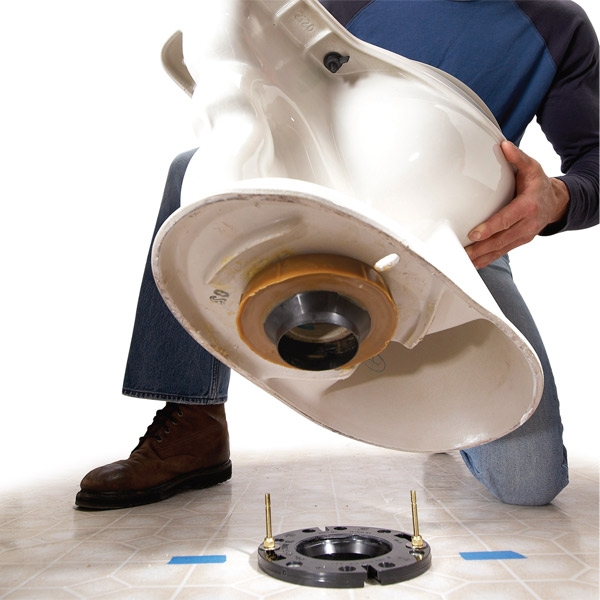
The installation of a toilet bowl with a vertical form of release is characterized by the presence of a special flange connection, which ensures reliable sealing of the joint between the device and the sewage system
Having made the markings for the fasteners, they begin to install a screw-type flange into the floor, which has a retainer and a hole designed to dock the device with the sewer system.
All flanges are the same size. Manufacturers that produce vertical toilet bowls complete them with special elements necessary for a tight connection with flanges.
Putting the toilet in place, and making sure that all the existing holes and joints coincide, the whole structure is slightly turned.
In this case, a connection of two elements occurs, the tightness of which is guaranteed by the presence o-ringbetween the parts.
A method of connecting a toilet bowl with a horizontal outlet to a plastic sewer pipe located in the floor of a bathroom in a private house using a corrugation
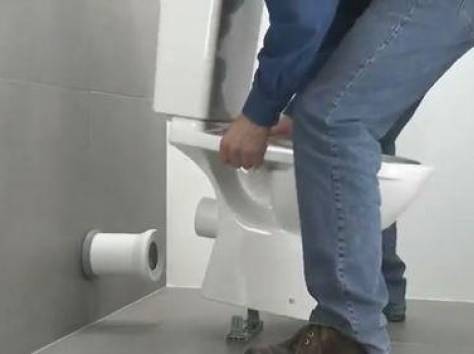
Installation of a toilet bowl with a horizontal outlet
It is convenient and easy to connect a toilet bowl with a horizontal outlet to a vertically standing sewer riser. The device is installed at a short distance from the socket of the sewer pipe.
This requirement is taken into account when planning the bathroom area. In multi-storey buildings, it is impractical to design and create a sewerage system with a horizontal outlet, since in this case the 110 mm pipe must be embedded in the floor or hidden in a decorative box.
A toilet bowl with a horizontal outlet is connected to the vertical riser of the central sewerage, using a sealing collar or corrugation as a connecting element. It is recommended to seal the connections with silicone sealants to prevent leaks and unpleasant odors.
When the center of the horizontal outlet is displaced relative to the bell of the sewage system, a corrugation or corner is used to connect the elements, paired with a short pipe. The toilet is connected to the pipe through a rubber sleeve.
Installation and connection of a toilet bowl with a horizontal form of release to the sewer system using a rigid fan pipe
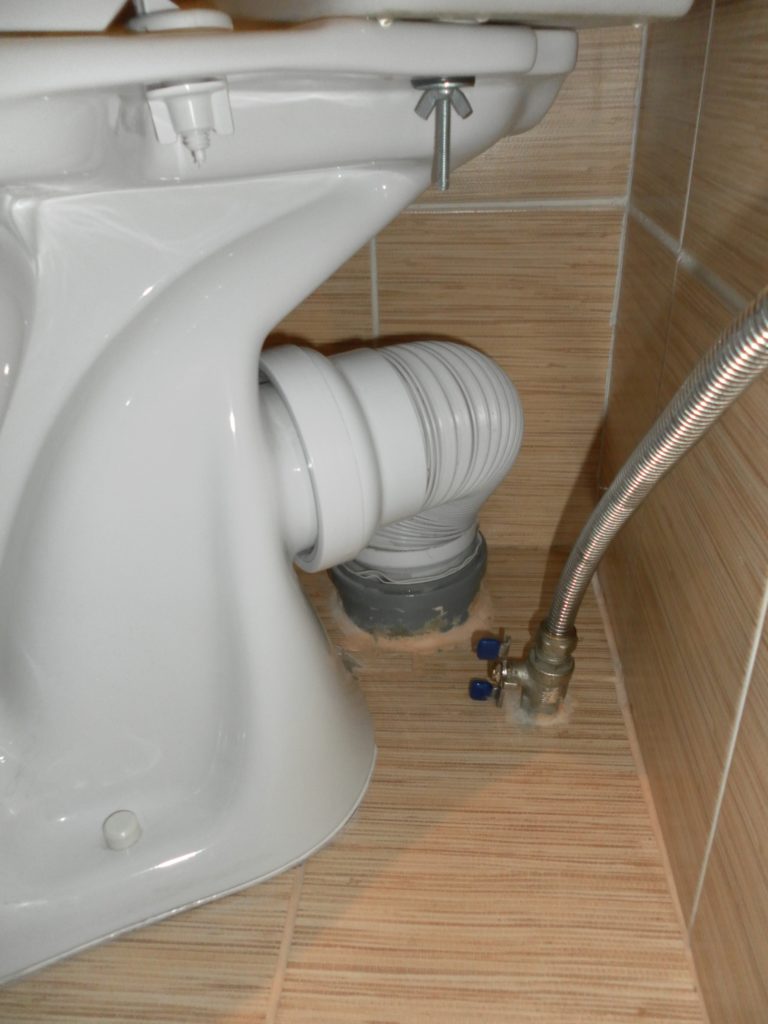
Installation of a toilet bowl with an oblique outlet
This form of sewer release is typical for houses built in the second half of the twentieth century. At that time, cast iron fittings were used to equip the sewage system at the facility.
Now we have to dock the oblique outlets of the toilet bowls with cast-iron sockets, carefully covering the resulting joint with cement mortar. During the execution of work, carefully monitor that the solution does not enter the sewer riser.
Before starting the release of the toilet bowl, a mixture of red lead and drying oil is applied to the socket on its surface. Then the resin strand is wound tightly, leaving its end free. Once again, the release with the wound strand is coated with red lead, after which it is inserted into the sewer bell, firmly fixing its position.
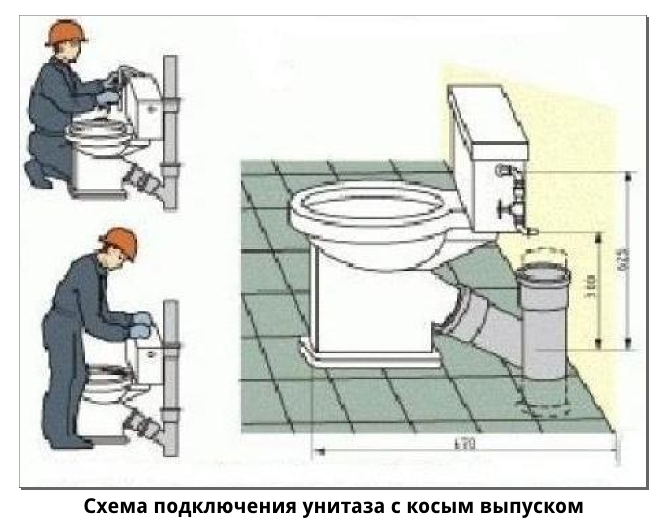
A toilet bowl with an oblique outlet and a diagram of its connection to the sewer riser by a plumber, indicating the height of the main structural elements instrument
There is another way to connect a toilet bowl with an oblique outlet to the sewage system, which is not associated with "dirty" work.
We are talking about using a rubber cuff, which is put on the outlet and then connected to the sewer pipe. To ensure reliable tightness of the connection, the old dried solution is thoroughly cleaned from the cast-iron socket. With the forced displacement of the toilet bowl relative to the location of the hole in the sewer pipe, a corrugation is used.
If the sewage system in apartment building is made of plastic pipes, then the toilet bowl is connected using the methods described above with one difference: you do not need to use cement mortar to seal the connections.
Installing a toilet bowl with a sewer connection: video tutorial
Having learned how to connect the toilet to the sewer in each of the above ways, you can more accurately determine the type of connection. Also detailed description necessary work gives a complete understanding of whether you are capable of doing them yourself.
If you don't intend to mess with the toilet, invite a plumber. The master will advise or acquire the necessary consumablesby including them in the cost of the service provided.


