Not often, the owners of modern apartments can boast of a large bathroom area, the space of which allows you to arrange any kind of plumbing. Usually bathrooms are very small, there is nowhere to roam the designer's imagination. Often, having installed a large and beautiful bathroom, there is a problem with movement. Therefore, it is most advisable to install a shower cabin in a small bathroom.
On the market of modern shower enclosures, there is truly a huge selection of various models, differing in shape, as well as various accessories. You can choose a good, high-quality cabin to your liking, with a telephone, radio and other accessories, which will turn the process of taking a shower, after an active day, into a comfortable relaxation.
We determine the design of the future cabin
Showers, which are sold in specialized stores, differ in a variety of designs, sizes and finishes. For any interior of the house, be it high-tech, baroque or classic style, you can choose the appropriate cabin.
But you can also go the other way by building a shower stall yourself, which will also be quite beautiful and practical at the same time. In addition, the design of the shower cubicle, built, will give the interior of your bathroom and the house as a whole its own zest.
You can build, or rather lay out a shower cabin from materials such as stone or tiles.
Initially, the development of an individual design of a shower stall may seem like a difficult task, but if you approach this matter with all responsibility, attention, a positive attitude, with a little imagination, you can achieve a wonderful result that will amaze not only you, but also your family and guests ...
Let's consider one of the best optionsthat can help you create an unusual and cozy atmosphere in the bathroom.
Tiled shower room
This type of sanitary facility for taking a shower can be built by yourself. This work will take a certain amount of time, but it will help save finances. In addition, such material as tiles is a very interesting, reliable and practical option. First, a tile shower stall will serve you long years, since this material is quite durable. Secondly, the tiles can be selected in a variety of shades and colors.
By choosing the right tiles, you can also emphasize the style of the interior in the house, from Empire to minimalism.
Lovers of bright colors can choose juicy colors for themselves. You can choose shades by contrast, as well as decorate the bathroom in one color scheme, painting the walls and even the floor.
Through of this material you can beautifully overlay the room by laying out a drawing that highlights a certain interior of the apartment, panels with various patterns or images of animals and birds.
A variety of shapes and sizes of tiles will make any design fantasy come true. Also, you can use decorative glass or ceramics by laying out mosaics on the tiles.
Photo of tile cabins

Benefits
It is quite possible to do without a bathroom in the house, but a shower is needed both in a city apartment and in a country house or in a village. You should not overpay money by buying a shower stall in a store, because everyone can lay it out.
First, decide what height, size, and shape you would like to see a shower cubicle in your bathroom. Based on this, you can calculate the approximate amount required material... Then, when buying tiles, choose the color and size of the given building material.
Undoubtedly, this type of handmade plumbing has many advantages.:
1.Allows the owners of the house to choose the size of the shower themselves, suitable
under the bathroom area;
2. simplicity and practicality;
3.more low level the possibility of injury, compared to
purchased cabins.
Drawing and additional accessories
As with any type of construction, at the beginning of work it is necessary to sketch a drawing so that not only in imagination, but also visually represent the general view of your ideal shower stall. In shape, the cabin can be round or rectangular, have a decorative door, or maybe you want to do without a door, high or low, or maybe the cabin will simply act as a kind of screen separating the bath or any part of the room.
Also, it is extremely important to decide in advance on the desired additional accessories, their correct location and, in the future, correct functioning.
Organizational matters
Make sure that everything you need to connect to the sewer and water supply is ready. Having dealt with these organizational issues in advance, you can save an order of magnitude in building a shower cabin, as well as avoid unnecessary costs.
Construction material
In order to build a shower cubicle according to all the rules, you should not neglect any separate mechanisms for its correct operation.
It will be necessary to prepare all the necessary accessories, pipes, mechanisms for waterproofing, building materials such as brick, sand and cement.
You will need special corrugations. And also the material itself itself - ceramic tiles and special glue.
Doors
You can also build a door to the shower room with your own hands, but it is better to buy a good one at a plumbing store. Fortunately, there is a wide selection of durable, quality and waterproof doors.

The answer to the question of where to place the cab is strictly individual, however, an economical option would be to place it in a corner. The savings are due to the fact that when building a corner cabin, only 2 walls will need to be erected, one of which, moreover, will be with a door. This will save building material well.

Before starting the construction of the cabin, you need to draw the markings on the floor and walls, and also walk over the entire area of \u200b\u200bthe bathroom with a waterproofing sealant. Further, you can build a wall, adhering to the desired level, according to the markup.
![]() Having folded 3 rows of the future wall, it is necessary to deal with the most important part of the entire structure - the pallet. When stacking the pallet, you need to make maximum effort and attention, since the quality and convenience of the future shower depends on the pallet itself. The pallet should be 15 - 20 centimeters above the floor level, always with a slope to one side, where the water should drain.
Having folded 3 rows of the future wall, it is necessary to deal with the most important part of the entire structure - the pallet. When stacking the pallet, you need to make maximum effort and attention, since the quality and convenience of the future shower depends on the pallet itself. The pallet should be 15 - 20 centimeters above the floor level, always with a slope to one side, where the water should drain.
After that, the inside of the cabin must be covered with bricks, drain into the sewer  and remove risers with hot and cold water.
The drain deserves due attention; after finishing the cab arrangement, it should be flush with the pallet facing tiles.
In order to avoid residual moisture in the pallet itself after taking a shower, the tiles must be laid with special precision, avoiding the formation of depressions and other flaws.
Pallet construction, workflow photo
Door installation
After the drain device is ready, you can put another row of bricks, which must be filled with a special leveling solution. Further, as soon as the solution hardens, you can begin to install the door. Having secured the door, it is necessary to continue laying the brick. Having completed the wall to the required height, you need to prepare the walls for cladding ceramic tiles, not forgetting to level the walls with the same special mixture.
We lay out the tiles
You can start laying out the tiles only after the waterproofing and brickwork have dried.
When laying out tiles, do not forget to use crosses for seams and a level. After finishing the masonry, the formed seams must be wiped with a sealant.
A tile shower is not only beautiful, but also very high quality!
 How pleasant it is in the evening, after a busy day, to take a relaxing shower, which, pleasantly murmuring, washes away the tiredness accumulated during the whole day from the body. Or an invigorating cool shower in the morning for a great mood for the day. These simple pleasures of life can be enjoyed by everyone.
A shower cabin made of ceramic tiles, of course, will take a certain amount of time, effort and attention, but the result will exceed all your expectations. Family members will be able to appreciate this during their daily water procedures, as well as guests of your home, admiring the beauty and sophistication of this structure.
In addition to beauty and convenience, the tile cabin is of very high quality, it is able to withstand enough high temperature, it is not spoiled by prolonged exposure to water and steam, it does not allow moisture to pass through and has a long service life, retaining its original positive qualities.
In total, a well-built cabin with correctly laid tiles will serve you for at least 5 years. Comparing the financial costs of building materials with those positive emotions that will accompany you during each water procedure, you will understand that these investments have paid off a hundredfold, even if you buy one of the most expensive and ultra-modern tiles.
Video
Shower tray, installation
How to properly lay tiles with a slope under the drain
Facing the shower cabin with tiles
In contact with
- Manufacturing
- Equipment
- Laying tiles
- Making a door
Back to the table of contents
Laying tiles

In the shower stall, tiles are laid on the surface of the walls and floor in the same way as in any other room. in the shower stall does not differ from the usual one. It is only necessary to grout the tile joints with silicone sealant. Then the tile will hold firmly.
First you need to prepare the surface. It should be perfectly flat. In the presence of defects, the walls are plastered. For plaster, a ready-made mixture based on gypsum is purchased.
When laying tiles, the adhesive is applied with a comb. To keep the thickness of the adhesive layer the same, the comb is held constantly at the same angle.
Tiles are laid on the walls from bottom to top. Glue tiles to the entire wall. Leave only a trim at the floor.
Then the tiles are laid on the floor. They start from the corner and end at the entrance to the booth. After the tiles have dried, the trim must be mounted on the wall adjacent to the floor.
After that, grouting is performed. Before that, wipe the seams with a wet sponge, remove the remnants of glue in the seams with sandpaper... Dilute the grout - silicone sealant.
Seams are filled with a rubber trowel. Excess grout is removed with a spatula. After 20 minutes, wipe the tiles and seams with a damp sponge. After 2 hours, wipe with a dry cloth. The ceiling can be tiled or plastic panels can be laid.
Fittings installation
The shower cabin is equipped with a mixer, a watering can, and, if desired, a Charcot shower receiver. They are made to order from steel. Then you need to fix the shelves for soap and shampoos.
Some people like to take a bath more, while others prefer to shower after a hard day at work. If you mainly use a shower instead of a bath, then it is advisable to equip a shower cabin, and to do it this way, visiting it was not just a routine hygienic procedure for you, but also brought pleasure.
Many people now install shower cabins for the bathroom. Someone buys ready-made cabins based on glass or plastic, while someone else creates cabins from tiles with their own hands. On the Internet, you can always find a photo of how the cabins look from certain materials. But today we will talk about how to make a tile structure with your own hands and what is required for this.
Tile shower cabins: advantages and photos
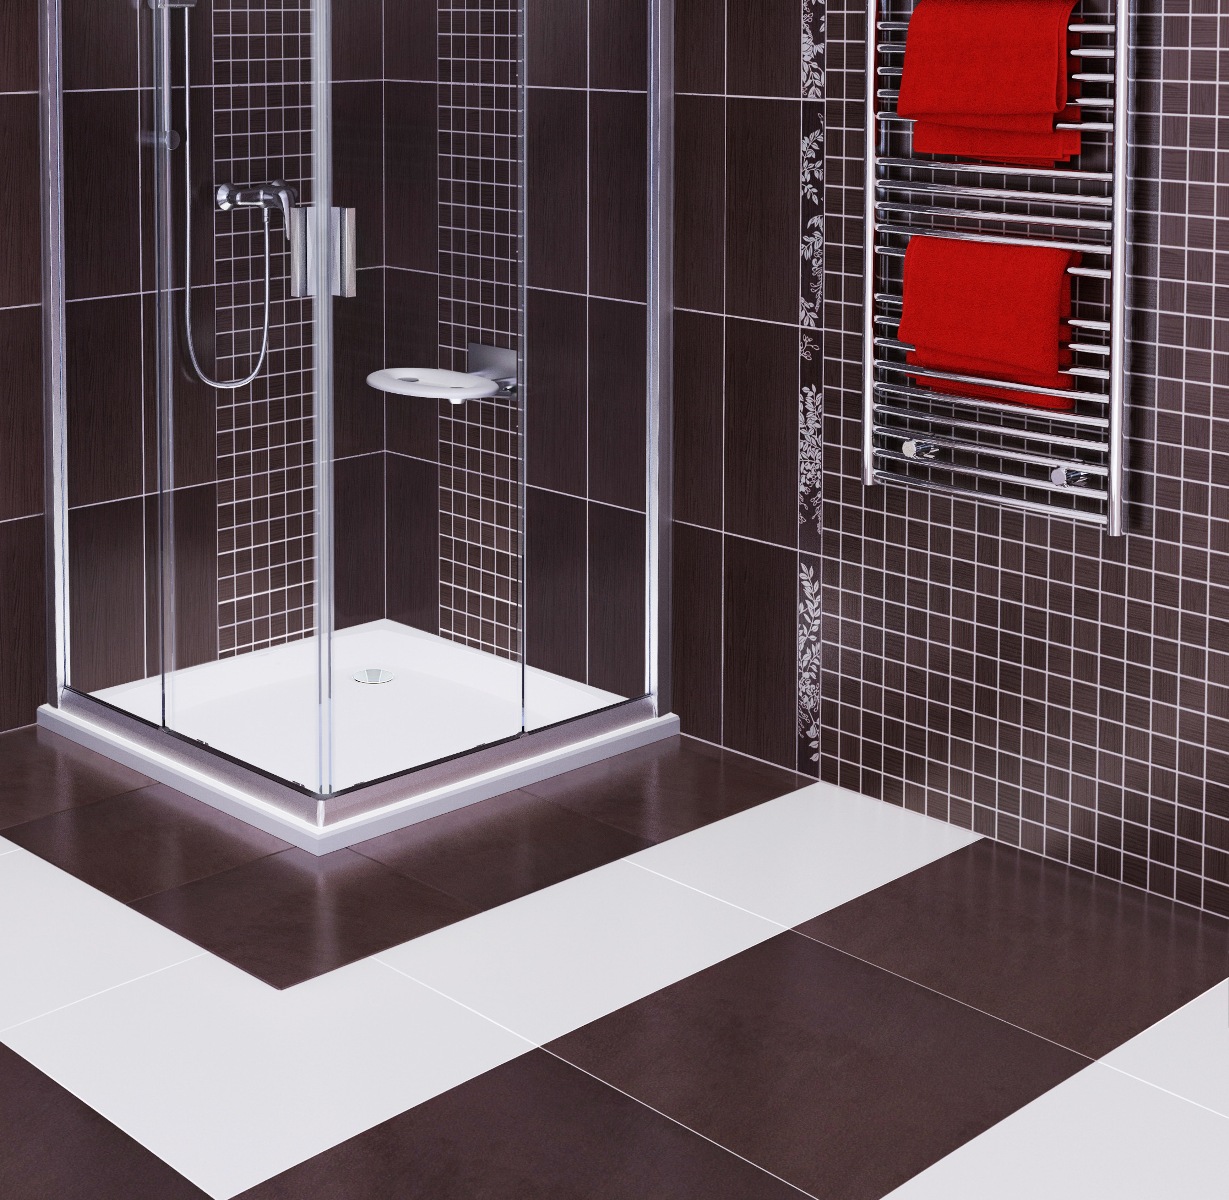
Making a tiled shower stall with their own hands is preferred by those who are not satisfied with the choice of ready-made plumbing plastic or glass models, as well as lovers of original interior solutions... In the photo you can see ideas for self-construction of shower cabins from tiles. More photos can always be found through a search engine on the Internet.
In addition to aesthetics, ceramic tiles as a material for a shower stall have the following advantages over the same plastic:
- the tiles are not afraid of constant humidity;
- direct contact with water is not hazardous to the material;
- ease of care;
- a wide range of colors and patterns.
It is worth noting that complex graphic designs, three-dimensional compositions and much more can be laid out of tiles. You can find a photo of samples of such solutions and choose what you would like to see in your bathroom.
 After you have decided that you will assemble a shower stall from tiles with your own hands and have chosen its approximate design from the photo, you also need to determine the following parameters:
- where the cabin will stand;
- what will be its shape;
- height;
- total number of tiles;
- its colors.
And only after you calculate all the parameters, you can go and buy tiles of the desired design in the required quantity. Also, do not forget about the tools and materials, without which you simply will not be able to assemble the cabin with your own hands.
Classification of shower cabins by type of pallets
The difference between shower stalls, which are made of tiles, is how water is collected. So, cab pallets are of three types:
- classic steel, acrylic or cast iron pallets up to 45 cm high from the floor. They are equipped with all the elements that help to drain the water and drain it into the sewer. The tile in this case is used as a cladding. The pallets themselves are installed in the fixing legs, then they need to be tiled by analogy with small baths;
- flat and shallow pallets with a height of up to 15 cm. Sometimes it is necessary to make a deepening under them if you are using preformed factory products. Also, such pallets can be made by hand if you take bricks as sides. The entire structure must first be covered with concrete, and then with tiles;
- inclined floor coverings. Thanks to this solution, you can successfully combine in terms of style flooring bathroom as a whole with shower stall floor.
However, when creating a water outlet, you do not need to go deep into the concrete floorbecause the coating has a limited thickness, and if it is shortened, it will weaken. This can provoke problems such as collapse of the coating, and if you do not live on the ground floor, then not only you will suffer, but also your neighbors below.
When you have decided on what pallet your cabin will be, you need cover walls and floors with waterproofing... This is done like this:

Do-it-yourself brick pallet assembly
A brick shower tray made of tiles is a rational and competent solution, thanks to it the whole cabin will have a finished look, and you will be able to adapt the design to your requirements in the future.
To do it yourself brick pallet, prepare the following tools and materials:
- bricks (ordinary or silicate);
- cement with sand;
- waterproofing mixture;
- metal mesh;
- drill;
- spatulas;
- roulette;
- tassels and other accessories.
Pallet stacking steps for a tile cabin are:
- prepare a place to place the pallet. Remove all unnecessary from the floor and walls and waterproof. This stage can be entrusted to specialists, or you can do it yourself, as described earlier;
- the last layer of waterproofing should be done as carefully as possible;
- wait until the waterproofing mixture is completely dry, then fix the contours of the future structure with bricks and mortar based on cement and sand;
- so that the base is as strong as possible from the inside of the pallet, lay a metal mesh there;
- decide on the location of the drain and system for draining water. Here you need to do everything very carefully, otherwise the reliability of the entire structure will remain in question. Remember that if something is done incorrectly, then in order to correct the operation of the drain system, you will have to dismantle everything, and then put it back, and this is very difficult;
- put beacons and fill the surface inside with a cement-based solution with sand, you can add a little rubble to it. Level the surface with a spatula;
- after finishing the screed, place a double layer of waterproofing at the joints and in the drain area.
Next, you need to carry out all communications: make a strobe in the wall and lay pipes there up to the mixer connection point. After the tiles are laid, all that remains is to connect the plumbing fixtures.
We carry out facing work
 Then it should be tiled already prepared base for the pallet of the future cabin. There is no consensus here on how to do this correctly, since there are many ways of laying tiles, and each of them requires application different materials and tools.
If you do not understand this at all, and have never performed work of this kind, it is better to entrust them to professionals or do everything yourself according to the chosen method, but carefully observing all the recommendations and the order of actions.
After the process of tiling the structure with tiles, its surface should be well rinsed and then wiped dry.
It is not recommended to use a tile-based shower cabin for its intended purpose at first, and it must also be observed in the bathroom where it is installed, minimum humidity level... This is achieved by opening doors or operating a forced ventilation system.
If the bathroom has an electric heating radiator, you can put it on a low temperature and gradually raise it. This will help dry the pallet faster. When it is completely dry, the shower stall can be assembled further.
Cabin assembly process
After installing the pallet and facing work, you need to assemble the cabin from previously prepared materials. These can be structures based on fiberglass or glass, or custom-made walls made of other materials.
The installation process looks like this:

After all this, the cabin equipped with plumbing fixtures and fittings, which may be needed when using it, for example:
- mirror;
- soap dish;
- holder for shampoos and other appliances, etc.
As you understand, the most difficult thing in installing a tile-based do-it-yourself shower stall is installing a pallet, however, if you have necessary materials and tools is not as hard work as it might seem at first glance. But laying out the tiles and assembling the structure itself will be even easier.
But if you have doubts about your strengths in terms of implementing the desired project with your own hands, then it is better to contact the professionals. Naturally, then the installation will cost much more, but at the same time you will receive quality productthat will serve you for more than one year. If you have made a clear decision to take up the work with your own hands, take your time when working and strictly adhere to the rules, you can find articles with a photo, which clearly depicts each stage of building a cabin with your own hands.
Shower cabins have long gained immense popularity among users. The advantages of this type of plumbing cannot be denied: saving free space, high hygiene, saving time and money. But each shower is complemented by moving parts, piping, sometimes even electronic controls and a steam generator. When there is no need for numerous additions and functions,. In addition, this type of plumbing will last for many years.
Benefits of a built-in shower
For a long time they have used a shower, in which the wall of the room is used instead of one side. It is distinguished by a high degree of practicality and an affordable price. Therefore, the tile shower stall is very popular.
The advantages of this design:
| Long service period | The shower room can be used for many years, it will not lose its original appearance. |
| High level of reliability | Due to the absence of small moving parts. |
| Easy to clean | The absence of gaps and corners will simplify the process several times. |
| Strength | The tiles are very difficult to damage. |
| Stylish appearance | You can choose the material at your discretion, in almost any color and decorated with an interesting pattern or ornament. |
| Availability | A do-it-yourself shower stall made of tiles will cost much less than factory stalls. |
The disadvantages of this type of plumbing include:
- limited functionality - use only a watering can;
- it will be possible to make a replacement only by overhauling;
- difficulties in connecting to the sewer.
A do-it-yourself shower cubicle from a tile can be decorated according to a photo. Concise and clear instructions will help you cope with installation work many times faster.
Stages of work
When starting to install a shower cabin, you need to familiarize yourself with the sequence of work. The design of a tile shower cabin can be chosen from a photo, but for its independent arrangement, it is better to study a simple instruction.
- At the first stage, the type of pallet is selected. The purchased models are made of various materials: acrylic, cast iron, metal. But a convenient and high-quality option is a self-laid brick floor, covered with tiles. A homemade pallet must be mounted with some slope towards the drain. Water leaves the cabin through the ladder. Therefore, you will have to buy a sewer drain for the shower stall under the tiles.
- Insulation of flooring and walls. The old screed is removed from the floor and primary waterproofing is done using specialized waterproofing materials: mastic, powder or liquid mixture. All this can be bought at any specialized store. The material is applied to the entire surface of the floor and walls, where the pallet will be located.
- The waterproofing must be completely dry, after which they start laying the base from ordinary or silicate bricks. The solution is prepared independently or bought ready-made building mixture in the supermarket. It is based on a reinforcing mesh. The pallet size is selected at your discretion: small for small rooms or large for rooms of significant size. At the same time, it is worth considering the place of the drain, the installation of the ladder, it is attached to the sewer pipes and the drain. To avoid unpleasant odors, pipes should be sloped towards the drain.
- Then the screed is poured using construction beacons. After drying, it is re-treated with waterproofing. A self-leveling mixture is applied on top. The drain is located with a small depression, which allows the water to drain unhindered. The level of the tiles must coincide with the grate of the ladder. The surface should once again be treated with waterproofing. The next step is to lay the tiles on a pallet with a slope towards the sink. The glue under the tiles for the shower stall must be taken waterproof, which is used in rooms with elevated level humidity.
- Plumbing is connected after tiling. It is worthwhile to lay the electrical wiring and connect the electric motor of the ventilation system in advance.
- After the pallet is completed, they are engaged in wall decoration. When the tiles are dry, you can start collecting the booth. The walls of the future shower are attached to the walls, ceiling and floor using dowels, starting with a blank wall. The door is installed on special rollers. An important step is sealing the booth seams.
- The very last and easiest stage is the installation of additional plumbing fixtures and fittings: a soap dish, a mirror, a shelf, etc.
You can decorate the booth to your taste. Combined models will cost more, but they look very original and stylish. The shower curtain can be assembled by yourself.
Shower room without tray
The tiles can have several variations. For example, you can skip the pallet. This design looks a little simpler, but its installation is much more difficult.
The key nuance in this installation is the preparation of a drain for a shower stall under the tiles. The "correct" direction of the water to the drain depends on it. Waterproofing plays a very important role here too. This type of work requires certain skills, so it is better to watch the video with detailed instructions about the features of the work. Only specialists will help to deal with delicate issues.
Is your dream shower enclosure made of tiles? You can cope with this task yourself - your bathroom will be transformed, and you will save your family budget, because the purchase of a pallet or a one-piece shower box can be postponed until better times. If you finish the floor and walls in the bathroom with tiles, you can thus make a beautiful and stylish shower stall.
Styling tile instead of buying a shower stall, it will save the family budget and make the size of this necessary attribute in the bathroom at your discretion. You can even do without a pallet, it is easy to make it from the same ceramic tiles or not to make a side at all. A place for a pallet will still have to be made or foreseen in advance (when building a house or finishing a bathroom) or a slope in this place so that the water flows into the drain hole and does not spread across the bathroom floor.
What are the advantages and disadvantages of tile shower enclosures without a pallet
If you carefully study the history, it becomes clear that in the last century and much earlier, people equipped the bathroom in this way. After all, there were no modern hydroboxes and showers at that time, by the way, baths were also not installed in every apartment. You could do without a bath, but without a place to take a shower - nothing. Therefore, enterprising owners equipped the room for bath procedures on their own. They allocated part of the room in the bathroom, laid ceramic tiles on the walls and floor, thought out in advance where the pipes would go and how best to connect the mixer. So it was customary to equip a shower room in private houses or in summer cottages. IN apartment buildings this idea has only recently become a reality. By the way, this is a great option to save space and not buy a bulky shower stall. You can do without a pallet and thus save money and buy beautiful tiles. In addition, the indisputable advantage of self-construction of a shower stall from a tile is comfort and convenience. Such a shower is suitable for people with disabilities.
What are the advantages of a shower cabin under tiles:
- long service life;
- reliable design;
- ease of use and maintenance. Tiles are easy to clean, they can withstand the effects of any cleaning agent, which cannot be said about a capricious shower stall. The tile does not attract dirt and does not absorb moisture;
- durable surface. If we compare the materials from which modern shower cubicles with tiles are made, then we can conclude that the material is durable and even after 10 years of operation nothing will happen to the tiles (with proper care);
- everyone can make a shower room from tiles, since there is no need to purchase expensive materials. You just need to choose the right tile and mixer.
And now you need to find out about the disadvantages of a shower stall made of tiles:
- compared to expensive shower boxes, there will only be one shower head in your shower corner;
- replacement of water supply and sewer pipes can only be carried out during the overhaul. You will have to tear off the tiles to replace the pipe section or install a new mixer. You need to take care of this in advance and choose only high-quality materials ”;
- complex connection to the sewage system.
Shower cubicle made of tiles. Photo:


Shower tiles
As it has already become clear, a tile shower stall is a simple solution. But even such an idea can be turned into a small masterpiece, if you choose the right facing material. Tile has been a popular finishing material for bathrooms for many decades.
When choosing this finishing material you need to take into account the main characteristics of the tile. Namely, the tile can have a glossy surface (smooth and slippery to the touch), matte (no gloss), smooth and also embossed. What is the best tile to buy?

Let's dwell on this issue in more detail:
- if you look at the glossy and smooth tiles, you will find that the tiles are capable of reflecting light. If you correctly position the lighting fixtures, then small space the bathroom will turn into a fantastic undersea world... Watch the play of light - the tiles reflect the rays that play in a stream of water and shimmer beautifully on wet walls. Such tiles are easy to maintain, since dirt does not linger on the surface. There are also disadvantages of the product: even if there is a little water on the floor, the tiles become very slippery, like a roller. Therefore, you need to think carefully about all the details and if you decide to make a shower stall from such a tile, then you need to immediately buy a rubber mat on the floor that prevents slipping on the surface;
- an excellent alternative to a slippery surface is laying matte tiles. Large building supermarkets have separate display cases with ceramic tiles intended only for bathroom installation. There are many collections of such tiles for wall and floor decoration. You do not need to worry about your safety, even if excess liquid accumulates in the pan;
- embossed tiles are not only the most practical. With the help of this material, you can embody the most daring ideas into reality, for example, make a shower stall under a tree or natural stone.
Which tile color remains the priority? Designers will advise you to stay on soothing colors, tiles of gray tones (all shades), brown, as well as white and black are always in fashion.
If you want to decorate the shower stall with tiles and get as close as possible to the water element, you should pay attention to blue or green (all shades, from gentle to rich). In the shower stall, the blue palette of tiles, beige and green, looks beautiful.
If your idea is to make the shower stall original, pay attention to the rich colors of the tiles. Bright elements on a plain wall will liven up a small space. Think of the mosaic technique, you can lay out fine mosaic tiles beautiful pattern and thus make the shower stall individual and unique.
DIY tile shower
We start with preparation. First you need to think about what the ladder will be. This nuance must be taken into account even when developing a project. If you decide to make a shower stall without a pallet, then you need to take care of the arrangement of the floor in advance. So, in order to make a shower stall with a flat floor (visually), the ladder itself must be mounted at a height of 15 cm from the floor level.

If you wish, think of a step - the shower tray can be made of tiles, but it is better and also safer to make the floor thicker for further operation of the shower stall.
It should consist of 5 layers:
- expanded polystyrene (thermal insulation layer);
- cement screed;
- waterproofing layer;
- a layer of cement screed;
- tile.

You need to place the ladder according to the following rules: in the center or at the entrance to the booth.
Do not forget about the need to build a slope to drain and drain water. Another point - the size of the tile shower stall can be different, depending on the area of \u200b\u200bthe bathroom and your personal preferences. And an important detail, what will be the doors of the shower stall? You can buy glass, frosted plastic or clear. The door will help prevent water from splashing around the bathroom. By the way, you can save money and not install doors, but limit yourself only to a shower curtain.
Tools and materials for laying tiles in the shower
To work on laying tiles, you must prepare the following:
- tile;
- tile adhesive;
- mixer with shower head;
- roulette;
- pencil;
- building level to determine the slope;
- trowel;
- a set of spatulas;
- container for mixing the solution;
- knife for cutting tiles.
How to lay out a shower stall from a tile
Let's start with the construction of the ladder - this device is a structure made of durable material (cast iron or plastic) in which there is a grate with a body, a siphon and a seal, as well as a pressure device to ensure the sealing of this area. Sewer ladder built into the floor and connected to the sewer pipes to ensure the outflow of water from the shower stall.
The next step is styling waterproofing material not only on the floor, but also on the camps. Let's start with the floor - you need to remove the old screed and lay a layer of waterproofing material (the photo shows liquid waterproofing).

Liquid waterproofing is a special powder that is diluted according to the principle of preparation concrete mortar... To get a homogeneous mass, you need to dilute the powder with water (proportions according to the instructions) or buy a ready-made waterproofing mixture. To prevent moisture from penetrating inside, it is enough to apply a thin layer of material with a wide brush or roller in the place where the arrangement of the shower stall is planned (on the floor and walls).
When the insulation layer dries up, you can lay out a brick base (it is better to work with silicate brick, it is more durable). Prepare a mortar for laying bricks from a bucket of cement and 3 buckets of river sand, add 1 bucket of water and a little plasticizer (70 g in total). You can buy ready-made masonry mix at a hardware store.
How to make a brick pallet:
- we lay a metal mesh and a layer of cement on the base;
- laying brick. Pallet sizes may vary depending on the size of the room. We comply with the condition that the finished pallet is 5 cm higher than the sewer pipe;
- in the process of laying bricks, you need to decide on the location of the drain hole, make a ladder to connect it to the sewer pipe;
- we place the pipes at a slope so that the water flows down and does not stagnate. If there is no slope, then a block should be placed under the pipes (slope angle 3 degrees);
- fix on the floor sewer pipe, pre-insert into a durable metal baseso that under weight building materials the pipe is not damaged or we buy in advance and install a solid structure (orange);
- we install construction beacons and fill the prepared base with cement. Mix the solution together with gravel and sand. To remove excess air, insert a trowel into the still uncured solution;
- after the screed has dried, we treat the surface with a waterproofing mixture;
- the next step is to apply a self-leveling mixture. We deepen the hole at the drain so that the water can drain without difficulty. The floor level must correspond to the level of the tiles (the height is equal to the grate of the ladder)
- when the screed has set, tiles can be laid directly on the pallet, taking into account the slope for the drain hole. Buy a special tile adhesive with water-repellent properties to keep the tiles well in a damp room;
- holding water pipes, installing a mixer, laying electrical wires for lighting and arranging forced ventilation - all this must be done before the tiles are laid;
- the final stage - laying tiles on walls and floors - is the most important and responsible part of the work. First you need to make a solution (or order a ready-made one in a hardware store). Laying the tiles should start from the bottom of the corner of the wall, gradually moving up. First, we put a layer of cement on the wall with a trowel, run it along the wall with a wide wavy trowel, and apply the solution to the tile. We level the mortar with a wide spatula and attach the tiles to the surface. The next tile should be planted in the same way. Between the tiles, while the mortar is still fresh, we put beacons so that the distance is the same everywhere.

How to make a shower stall with your own hands from tiles, watch this video:


