Recently, bituminous tile roofing has gained great popularity among developers. This roof covering has an attractive appearance that is not inferior in beauty to traditional tiles, long service life and high moisture resistance. Thanks to the self-adhesive layer on the back of the shingle, the installation of a soft roof with your own hands can be carried out even without professional experience. In this article, we will tell you how to properly prepare the base, assemble the sheathing and lay the shingles.
Flexible shingles are tiles with a shaped edge made of fiberglass impregnated with modified petroleum bitumen. Laid with an overlap, such a roof imitates a rare but aesthetic shingle covering made of wooden chocks. Fiberglass, which is part of the bituminous shingles, can be simple or reinforced polyester. The technology for the production of this material includes sprinkling the front side with an armoring dressing made of stone or basalt chips, giving color and a rough texture to the roof. The advantages of shingles are:
- Durability. The service life of a soft roof based on fiberglass reinforced with polyester is more than 70 years, which fully pays for the cost of installing the roof.
- Weather resistance. Soft tiles withstand the effects of atmospheric moisture, ultraviolet rays and other adverse environmental factors, while maintaining performance.
- Aesthetics. The variety of shapes and colors of the material opens up great opportunities for creating a harmonious, integral image of the house.
- Flexibility. Flexible, resilient shingle shingles are suitable for complex roofs with big amount stingrays, valleys and other decorative elements.
Important! The technology of laying bituminous shingles is distinguished by its simplicity, therefore it is easily performed even by a non-professional. Soft roof do it yourself - an excellent solution for the roof of a private house, country cottage, gazebo or townhouse.
Features of working with material
Before covering the roof with a soft roof, it is necessary to make sure that it is prepared for work. solid foundation... Also, the technology of installing a soft roof involves the performance of work subject to certain weather conditions. If you do not follow the manufacturer's recommendations, you may encounter the following problems:
- If you install bituminous tiles at an ambient temperature of less than 5-10 degrees, then the self-adhesive layer on the back of the tiles does not melt on its own. To melt the bitumen, you have to use a gas burner or a hair dryer. However, this makes it difficult and slow to install the tiles.
- If shingles are installed at temperatures above 25 degrees, the self-adhesive bitumen layer melts too much and flows down the slope. In addition, the high temperature leads to deformation of the roof.
- If you carry out the installation of the roof in damp weather or during rain, the rafter frame and lathing acquire excess moisture, which negatively affects the life of the tiles, leading to decay.
Important! The material installation technology recommended by manufacturers prescribes laying at a temperature of 5-15 degrees in dry weather. Most often, such conditions develop only in summer. However, in winter it is possible to assemble the roof truss and prepare the base for the decking.

Installation of battens
Before making a soft roof, you need to assemble a high-quality, durable crate. The technology of laying bituminous tiles involves the use of a solid base, which gives rigidity and mechanical strength to the soft roofing. The lathing should ensure an even distribution of the weight of the roof between the rafters, therefore it is created from 3 layers:
- Counter grill. A counter lattice for soft tiles is made of wooden blocks 3-4 cm thick. It is attached along the rafter legs of the frame on top of the waterproofing material. The task of the counter-lattice is to create a ventilation gap between the rafters with a roof covering.
- Sparse crate. This base element for soft tiles is made from edged boards measuring 20x150 mm. The boards are nailed perpendicular to the counter lattice at a distance of 30-50 cm.
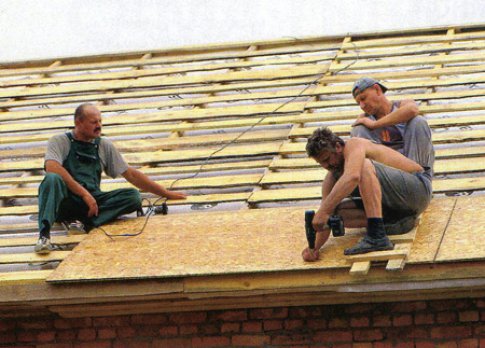
- Solid lathing. It is made of moisture-resistant plywood, OSB sheets or edged boards, laid in a solid with a gap of 1-3 mm, compensating thermal expansion material. To prevent damage soft tiles, it is necessary to sand or sharpen the elements of the sheathing so that they are smooth.
Please note that for the manufacture of lathing under a soft roof, it is correct to use wood dried up to 20 percent conifers... To prevent premature decay of wooden elements, they are treated with antiseptic preparations. If the structure has a high risk of fire, then the crate is impregnated with fire-blocking compounds.


Underlay carpet
Do-it-yourself soft roofing is laid on a solid crate made of chipboard or moisture-resistant plywood. Lay on top of the base underlay carpet - lining made of moisture-resistant bitumen material resistant to mechanical damage. The underlayment protects the roof from leaks, as well as from damage to the shingles by unevenness in the sheathing. The coating installation technology recommends:
- When the slope of the roof is less than 15-18 degrees, lay a lining carpet on the entire surface of the slopes with an overlap of 15-20 cm, since water can linger on it during the melting of large snow masses.
- At an angle of inclination of the slopes of more than 20 degrees, the lining carpet can only be laid in places especially vulnerable to leaks, where water can accumulate or stagnate. Additional waterproofing protects the valleys, the joints of the slopes with vertical surfaces, the ridge.
- Do not use ordinary roofing felt as a lining. The low price does not compensate for the poor quality, fragility and short service life of this material.
Experienced craftsmen advise using the material recommended by the manufacturer as a lining carpet, since it is guaranteed to be compatible with the selected bituminous tile.

Styling
Do-it-yourself installation of a soft roof is performed in dry, calm weather at a temperature of 5-15 degrees. If the material is laid on an old truss frame, then it is necessary to check the condition of the wood, and then replace the rotten or deformed elements. Installation is carried out in the following order:
- First, the slope is marked with horizontal stripes marking the location of the rows of soft roof using white chalk.
- It is correct to start laying the material from the bottom of the ramp using the starter strip. The roof covering is fixed with nails or a self-adhesive layer. If the tile is self-adhesive, then to glue it, it is enough to remove the protective film and then firmly attach it to the base of the roof.
- If nails are used to fix the coating, then they must be placed at least 2.5 cm from the edge, and also driven flush with the surface of the material.
- The second row begins to be laid on the left side of the slope using a tile, from which 143 mm is cut from the left edge, thus shifting the pattern of the bituminous tile diagonally.
- To start the third row, a 286 mm long fragment is cut from the tile from the left edge in order to also displace the coating pattern in a diagonal direction.
- After completion, the ridge is formed with the help of a ridge element, nodes of abutment with vertical surfaces and valleys.
Note! In order for a roof made of soft tiles to function correctly, it is necessary to equip a ventilation system in order to avoid the "greenhouse effect" and decay of the roof frame of the structure.

Video instruction
Until recently, only galvanized steel, roof tiles and slate were used as roofing material. For installation works several people were involved who spent a lot of time and effort on work. But today the range of materials has expanded, a lot of new things have appeared - for example, a soft roof.
In terms of its technical and operational characteristics, a soft roof is in many ways superior to other materials. Its advantages include:
- ease of installation (you can do it alone);
- strength;
- durability;
- flexibility;
- resistance to moisture and corrosion;
- tightness;
- attractive appearance.
Often the following types of roofing are used as roofing:

Attention! If the top layer of the roof will not be removed, then when buying a soft roof, it should be clarified whether it is compatible with the material from which the structure is made.
Preliminary work
Installation begins with preparation.
Stage 1. Prepare everything you need
As already noted, one person can also be engaged in laying a soft roof. To work, he will need a fairly standard list of materials:

Stage 2. Preparatory work
The base should be as strong as possible, its sagging is unacceptable. There are several materials that can be used for strengthening:
- plywood;
- OSB plates;
- grooved boards 10 cm wide.
It is characteristic that in winter small gaps (about 3 mm) should be left between the seams of the sheathing. If the structure is sheathed with boards, then 5 mm.
Attention! It is advisable to treat the rafter system with an antiseptic agent to protect it from decay and insects, as well as fire retardants to increase its refractory properties.
Step 3. Ventilation gap
Arrangement of ventilation allows to solve the problem of high humidity and reduces the amount of ice that forms in winter. Moreover, in summer, ventilation reduces the temperature inside the roofing sandwich.
Ventilation consists of three main elements:
- ventilation outlet;
- valves for fresh air intake (installed from below);
- air gap 50 mm wide between the base and the waterproofing layer.
Attention! If the slope is greater than 25ᵒ, then the ventilation opening should be 8 cm². If the slope is less than 25ᵒ, then 16 cm².
Step 4. Liner
In this case, a gasket means a special bituminous material laid along the entire perimeter of the roof. Installation is carried out from the bottom up, starting from the eaves. An overlap of 10 cm is observed.The material is fixed with nails every 20 cm.
When the roof slope is less than 18ᵒ, the lining can not be laid over the entire area, but only in certain areas, such as:
- skate;
- eaves overhangs;
- the junction with the vertical wall;
- the location of the chimney.
Attention! If the slope is less than 12ᵒ, it is not recommended to use a soft roof.
Stage 5. Installation of strips
Step 1. To protect the material from atmospheric precipitation, cornice strips are installed on the overhangs, you can directly on top of the cushioning material. Planks (another name - drip) are located with an overlap of 2 cm and are fastened with roofing nails (zigzag, along the entire length of the plank).
Step 2. Pediment strips are installed at the ends of the structure. This must be done with the same 2 cm overlap. The nails are driven in in 10 cm increments.
Step 3. The place where the chimney exits is marked (if the house has a heating stove).
Step 4. At the end of the installation of the planks, the valley carpet is laid, which will significantly increase the moisture resistance. The color of the carpet must match the color of the roof, the edges are fixed with nails in 10 cm increments.
After that, you can start laying the roofing material.
Below is the technology of laying bituminous tiles, since this is the most common type of soft roof.
Stage 1. Eaves tile
Cornice tiles are laid on the slats fixed to the overhangs. For fixing, galvanized nails are used - they are hammered in two rows 2.5 cm from the upper and lower edges of the material.
Instead of cornice tiles, you can use ordinary tiles, which will save a little. For this, the tile is cut out - the shingle is taken and the petals are cut from it. In this case, installation is carried out "end-to-end" at a distance of 2 cm from the eaves.
Stage 2. Ordinary shingles
Attention! Don't forget about color deviations. Even if all tiles are from the same batch, the tone in different packages may differ. For this reason, it is recommended to mix six to seven packs in advance.
Step 1. Installation starts from the center of the roof overhang and is carried out in both directions.
Attention! The protective film is removed from the shingles immediately before installation, since without it the material cannot be folded into packs.
Nails are used for fastening. Usually four pieces are enough for a shingle, but if the roof slope is more than 45ᵒ, it is better to use six.
Step 2. The first row is laid in such a way that its edges recede from the edges of the cornice overhang by 1-1.5 cm. In this case, the petals cover the joints between the cornice tiles.
Step 3. The second row is laid in the same way, but the petals should overlap the cutouts of the previous one.
Step 4. At the edges, the material is cut along the edge and glued. A layer 10 cm wide should remain.
The same is done in the end ones - the tiles are cut to obtain a 15-centimeter strip, after which the edges are coated with glue by about 7-8 cm.
Attention! When trimming shingles, it is advisable to put a piece of plywood underneath so as not to damage the layer below.
Stage 3. Ridge tile
Step 1. First, the scaffolds are prepared. They will greatly simplify the work with the roof ridge, but at the end of the work, do not forget to glue the shingle petals at the attachment points.
Step 2. The tiles are overlapped (about 5 cm), each shingle is fixed with four nails.
Attention! Ridge tiles are laid only after the completion of the ordinary laying.
Step 3. To obtain a ridge tile, the eaves are cut at the perforations. Further, each element is bent and laid in a short part along the ridge of the roof.
Stage 4. Passages and connections in the roof
There are several ways to organize roof passages. So, if the diameter of the passage is small, then it is better to use special rubber seals. This applies to inputs for antennas and other communications, but pipes are finished in a slightly different way - here it is necessary to take into account possible heating and, as a result, expansion, therefore, the technology is used differently.
Step 1. First, a triangular rail is nailed along the perimeter of the pipe and roof joint (in most cases - 5x5 cm).
Step 3. The pipe is pasted over with insulating material so that 25 cm of the slope and 35 cm of the pipe itself are covered.
On this, the installation work is almost completed, it remains only to fix the adjoining bar along the entire perimeter of the pipe. Next, an iron apron is fixed, and the seams are carefully sealed with a silicone-based sealant.
Adjoining vertical walls is done in the same way. The only difference is that the triangular rail does not form a perimeter, but is fixed along the wall.
Video - Installation of a soft roof
Roll roofing
Roll material, which is also called Euro-ruberodium, is laid mainly on flat roofs, although it can sometimes be found on pitched roofs with a slight slope.
Step 2. One side of roofing material is heated with a special burner until a special indicator melts.
Step 3. After that, the side is glued to the base. When the material has cooled, the roll is rolled back to the place of fixation.
Step 4. Fusing and gradual rolling of roofing material is carried out. In this case, you need to adhere to certain rules.
- Roofing material is deposited with an overlap of 5 cm. For this, a special orientation strip is applied along the entire length.
- Do not overheat the material, otherwise it will deteriorate, lose the ability to stick.
- A quality weld material must be uniform - no voids, dark spots, etc.
Video - Installation of euroruberoid
As a conclusion
The main points of installation, discussed above, will help to understand the essence of the issue, even for a layman. The main thing to remember is that compliance with the installation technology and strict adherence to all instructions will extend the operational life of the soft roof.
Even if a team of specialists is engaged in the construction of a house, then knowledge of construction technology, the market of building materials and the advantages of some over others will not be superfluous for the future owners of the house.
The question of what kind of roof should be planned is included in the estimate, as well as the foundation, walls and all other stages and elements of construction.
Where to start when planning a roof? Of course, with drawings, but, of course, with a choice building material and the estimated cost of material and installation.
Any purchase requires knowledge of the assortment, chemical composition, instructions for use, comparative characteristics of goods of one group, their advantages and disadvantages. The important question when buying is always the price. But do not forget that the roof of the house is not an article to save money.
In order to avoid problems with roof repairs in the future, it is better to take care of the strength and durability of the roofing in advance. It is also important to take into account the optimal service life, roof design features, climatic conditions, fire resistance and environmental friendliness of the material used.
The modern market offers a very wide selection of roofing materials, from different manufacturers, using various technologies and materials:
- Metal tiles;
- Natural tile;
- Composite tiles;
- Flexible shingles;
- Ondulin;
- Decking;
- Corrugated sheets (euro slate);
- Roofing made of mastic.
Of all the materials on the market, soft tile most consistent with the required ratio of quality, price and ease of installation.
What are soft tiles?
Name "Soft tile" has synonyms. There are other names: soft roof, bituminous shingles, flexible roof tile, shingles, shingles, ruflex, are names denoting the same material. The only difference between them is that "shingles", "shingles" and "ruflex" are derived from the names of manufacturers. The words "soft" and "flexible" indicate the ductility of the roofing material. And the word "bituminous" indicates the main component of the canvas.
Soft tiles - a sheet of fiberglass or cellulose, on which a layer of bitumen is applied from the front and back sides. From above, the roofing sheet is protected by a covering of basalt or slate chips. Slate shingle more reliably protects the canvas from ultraviolet radiation; shale chips have a flat oblong shape, due to which its plates adhere more closely to the surface.
The lowest layer of soft cover - protective film made of polyethylene. It, firstly, protects the canvas from sticking in a roll, and, secondly, during the installation of the roof, the film is gradually removed, while the bottom layer is glued to the surface.
Bitumen provides waterproofing, and additionally introduced into its composition polymers enhance water resistance. Cellulose or glass wool serves as the basis for a soft roof, while providing its strength.
Modern soft roofing meets the high technological and environmental requirements of the world.
The advantages of a soft roof include the following:
- The basis of the soft roof is fiberglass, does not rot, corrosion, provides thermal insulation, flexibility of the canvas.
- Polymer additivescontained in the bituminous coating ensure the durability of the material and the long service life of the soft tiles. Additional wear resistance is provided by the top layer of mineral chips.
- Modern technologies allow to provide a soft roof with high mechanical strength with a very wide range of temperature fluctuations: the lower threshold for air temperature is -45 ° C, and the upper one reaches + 110 ° C, which undoubtedly expands the possibilities of using soft tiles in different climatic zones.
- Modern technologies allow minimizing the thickness of the bituminous coating, which in turn ensures the release of condensate that accumulates under the roof.
- The flexibility of soft tiles makes it possible easy to perform roofing any, even the most complex roof structures, which allows you to implement the most original projects roofs.
- It is flexibility that provides strength material under mechanical stress. This property gives elasticity to soft tiles, as well as the technology of its laying, which provides for a continuous sheathing.
- Soft roof due to the use of bitumen and polymers have reliable waterproofing.
- Has a sufficiently high level of noise protection: sound insulation is provided by the softness of the roofing material itself, as well as laying it on a wooden flooring (lathing).
- By laying on a wooden deckrequired by the technology of installing a soft roof, soft tiles provide high thermal insulation.
- Relatively light weight of the material significantly reduces the load on the supporting structures; this saves on the strength of the foundation, load-bearing structures and walls. In addition, installing lighter roofing significantly reduces energy costs.
- Installation of a soft roof is quite simple, but at the same time, it is important to comply with all technological requirements. The surface of the soft roof is covered with a fifty percent adhesive layer, which ensures quick and easy installation. In addition, the manufacturers took care of completing the roofing sheet with all the additional elements necessary for installation.
- Unlike metal tiles, roofs made of soft roofs do not require grounding.
- Significantly saves money such a property of a soft roof, as a fairly small amount of technical waste.
- If you need to repair the roof made of soft tiles, it is possible to quickly and easily replace the damaged sheet.
- Availability includes cost material and the ability to purchase goods at the nearest outlet, which is not unimportant, taking into account the cost of delivery of the material. From the point of view of purchasing a flexible canvas and its delivery, it is worth noting that there are specialized enterprises selling roofing coverings, if not in every district of the city, then certainly in every city.
Now a few words about the price soft tiles. There are quite a few manufacturers involved in the manufacture of soft roofing. Moreover, they produce soft tiles, both in our country and abroad. It is known that the quality of the goods directly depends on the price. But recently, such a statement is not entirely accurate. The price depends not only on the quality of the material used, but also on transport costs, customs duties and sales. Therefore, expensive does not mean quality yet.
Hence follows a simple advice: when going to buy, it is better to first study the market and the offered assortment so that the choice of the roof of the house becomes a reliable and long-term investment of capital.
Installation of a soft roof in stages
Usually, for installing bituminous shingles, the surface is leveled using plywood, OSB, but sometimes boards with a thickness of at least 10 mm are used. If boards are chosen for the crate, then it is better to give preference to conifers.
The lathing is stuffed onto the rafter system. It will be better if rafter system will be pre-treated with an antiseptic. Self-tapping screws are used for fastening. What should you pay attention to when installing a sheathing for a soft roof?
The material used for lathing under a soft roof must be strong, have a moisture content of no more than 20%. The surface of the lathing must be thoroughly cleaned of debris, dried, after which you can start laying the lining layer.
- Distribute underlay carpet it is necessary in the direction from the bottom up, parallel to the overhang of the eaves, overlapping. The length of the transverse direction should be 150 mm, the longitudinal direction - 100 mm.
The backing material is fixed with nails (with wide heads), at a distance of at least 200 mm. To avoid moisture ingress, the seams of the backing layer must be treated with bituminous glue. The lining carpet is laid over the ventilation pipes, in the valleys, on the cornice to avoid precipitation.
For a flat roof, the underlay must be laid over the entire area. Shelter should also start from the bottom up. Each next layer should be overlapped by 100 mm on the bottom layer. Each layer is fixed with nails, in increments of 200 mm.
Roofs with steep slopes, with a slope of more than 20 degrees, do not need to be completely covered. It will be enough to lay the protective layer on the ridge, eaves and end parts. In this case, it will also be necessary to cover all protruding systems (chimneys, ventilation outlets) with a lining layer, as well as isolate the junction to the walls.
- Before starting flexible roof installation, on the slopes of the roof, around the chimney, gutter needs to be installed, which will direct the water in the opposite direction. In places of adjoining brick wall or pipe, the roof covering is fixed with metal strips.
- Before laying soft tiles, rolls are checked for defects... Thus, they can be sorted in order to use rolls with defects in those places where these defects will not be visible (cut off damaged pieces, lay under an overlap).
- Prepare glue for gluing the material.
For the tightness of the seams in the roof, overlaps of the lining material, valley carpet, K-36 glue is used. It is also suitable for bonding to brick pipes and walls. - Installation of a soft roof may well be performed by two people, but it will be better if specialists are engaged in roofing.
Installation of the roof must be started from the middle to the edges.
In order to avoid uneven shades for work, it is better to prepare at least 5 - 6 rolls of roofing in advance: they can be distributed in such a way that there is no contrast in color - Before laying the roof, it is better to mark the roof in advance., distribute coverage areas into sectors, depending on the complexity of installation.
In the case of blisters formed as a result of gluing, I pierce them, and then press firmly against the base. - First row the shingles are laid 10 mm above the edge of the cornice. The shingles should cover the joints.
The protective film must be removed immediately before gluing the canvas.
Then you need to fix the glued canvas with 4 - 6 nails. - Next row laid in such a way that the ends of the petals are flush with the previous row.
In the valley, the tiles must be cut so that an open strip of valley carpet remains at the border.
The edges of the strips must be glued 100 - 150 mm wide.
Optimal temperature conditions for installation of soft tiles + 5 degrees. In cold weather, roofing can also be carried out, but using heating.
More convenient for installation glue-based soft roof.
- Installation of valleys increases water resistance.
It can be done in two ways:
- Anchor additional layer end carpet, then nail the edges with wide-headed nails, at a distance of 100 mm, secure with glue.
- Endowas can be fixed with a "pigtail" of shingles and tiles.
- Before installing the curtain tile, on top of the lining carpet, a drip is installed. The eaves shingles are placed close to the eaves. It is also fixed with nails, retreating from the edge of 10 mm.
- For installing ridge tiles the shingle is divided into different tilespaying attention to their neckline. Skates and ridges are covered, bending around them with tiles from the leeward side.
In conclusion, it remains to say that if you follow exactly the technology of laying soft tiles, then this is the most optimal option for roofing, which can last for quite a long time.
General rules for roof construction
 The reliability and durability of the roofing will largely depend on how correctly the work on the construction of the roof is done and the strength of the materials used for the construction of the roof.
In any case, before starting the installation work on laying the roof, you should take into account the slope of the roof, especially the lathing, rafter system, steam, heat and waterproofing. It is also important before starting work on the construction of a roof, both from rigid and soft materials, determine the type of roofing structure.
The roof can be: single-slope, gable, hip, attic.
For any type of roofing cover, there is the same procedure:
- installation of the rafter system;
- connecting it with crossbars, ceiling slabs, with ridge and slope;
- then the crate is constructed.
Roof slope
Not only the choice of material will depend on the slope angle, but also the consumption of soft roofing. Unlike hard roofs, soft roofs are laid in several layers, taking into account the slope angle.
The angle of inclination of the roof also depends on the climatic conditions of the area: the amount of precipitation in the form of snow - the more snow falls, the greater the slope of the roof must be in order to avoid the accumulation of snow on the roofs of houses and, as a result, damage to the roof.
More details on the expediency of using soft tiles... Some experts say that soft shingles can be used even with a roof slope of 0 to 5 degrees, while laying the roofing material in four layers. Is there a need for this?
One of the purposes of soft tiles is their aesthetic appearance. At a low slope, the roof surface is practically invisible, therefore, for economic reasons, it is worth considering more economical coating options: mastic or roofing felt.
The best option the use of soft tiles will be roofs with a slope of 15 degrees, where the coating must be carried out in two layers.
A few words about the methods of laying a soft roof
Depending on the slope of the roof, one of three methods is used.
Ballast method It is used for laying roofs on roofs with a slope of up to 10 degrees.

- This method is suitable for flat roofs or roofs with minimal slopes.
- When using this method, a deep screed is first made, the surface is leveled, and only then the roofing sheets are attached along the perimeter of the roof.
- Then the sheets are covered with gravel, which is used in this case as ballast.
Mechanical method used for large roof slopes.
- This method consists in fixing the membrane to the base and a tight connection using special equipment, mechanically.
- Glue method most suitable for covering complex roofs.
Also, the glue method is used in those areas where the climate prevails with constant and strong gusts of wind.
When buying soft roofing materials, it should be borne in mind that the package indicates the calculation of the surface for a roof with a 45 degree slope.
Auxiliary materials for the installation of soft tiles
Often there are questions about why sellers "force" to buy components for installing a soft roof. Such questions cause, to put it mildly, surprise: they are equivalent to the questions "What are the fork and knife for at the table?" or "How to sew a dress without a needle, thread and scissors?"
Answer: to increase the strength of the roof and work neatly done in aesthetic terms. Just in case, so as not to be "forced" to buy too much, a list of necessary additional materials necessary for high-quality installation of a roof made of soft tiles:
- Cornice tiles and skates designed to protect the roof in areas most exposed to climatic conditions. Their function: roof protection.
- Aerators, for ventilation installation.
- Snow holders, to prevent sudden, avalanche-like snow slides.
- Plywood with increased moisture resistance or chipboard, for lathing.
- Underlay carpet - this material is made of bitumen with the addition of rubber. It is necessary on the ridge, end and cornice parts of the roof; also used for waterproofing mansard roofs, ventilation systems and other protruding roof sections.
- Galvanized Roofing Nails for mechanical fastening of soft tiles.
- Metal cornice strips protect the base of the rafter system from moisture ingress, directs water into the drainpipe;
- End strips fastened to the pediment, protect the ends of the roof from wind, water, snow.
- Junction strips are needed in the places where the roof is attached to the wall. Protect junctions from debris.
- End carpet serves as a reliable waterproofing of the most vulnerable internal bends (valleys).
- Sealing adhesive.
- Ventilation system it is necessary for hoods, sewer pipes, prevents moisture accumulation, unpleasant musty odors, increases the service life of the roofing.
The roof made of bituminous soft tiles is easy to use, durable and aesthetic. Its big plus is that self-assembly is quite possible. The technology is not the most complicated, the weight of the fragment is small, attached to an adhesive base, and additionally fixed with roofing nails. So the installation of soft tiles with your own hands can be done even alone.
Roofing cake for soft tiles
The attic under the roof can be warm or cold, depending on this, the composition changes roofing cake... But its part from the rafters and above always remains unchanged:
- waterproofing is stuffed along the rafters;
- on it - bars with a thickness of at least 30 mm;
- solid flooring.
We will consider these materials in more detail - what and how to make, what features each of them has.
Waterproofing
Waterproofing membranes are available in one, two and three layers. Single-layer membranes are the simplest and cheapest, they perform only a double task - not to allow moisture to pass towards the room and release vapors outside. So in a simple way not only is the attic protected from the penetration of condensate or leaked, suddenly, precipitation, but also excess moisture is removed from the air, which accompanies human life. Single layer membranes are poorly represented on the market. Practically they are produced by one company - Tyvek.

Two and three-layer membranes are more durable - in addition to the waterproofing layer, they also have an interlayer, which gives greater tensile strength. The third layer, if any, is the absorbent layer. That is, even if a condensate drop forms on the membrane surface, this layer absorbs it into itself, preventing it from spilling onto other materials. With sufficient ventilation, moisture is gradually carried away.
Three-layer membranes (for example, EUROTOP N35, RANKKA, YUTAKON) are desirable if your attic is insulated and mineral wool is used as insulation. It is afraid of getting wet and when the humidity rises by 10% it loses half of its thermal insulation properties.
If there is a cold attic under the soft tiles, it is advisable to use a two-layer waterproofing membrane... In terms of strength, it is much better, and slightly more expensive at a price.
Lathing
On top of the waterproofing film, parallel to the overhang, battens are stuffed. They are necessary to create a ventilation gap. It will maintain the normal moisture content of the roofing materials.

The lathing is made from coniferous boards (mainly pine). The thickness of the boards is at least 30 mm. This is the minimum gap that will ensure normal air movement in the under-roof space. Before laying, the wood must be treated with an impregnation that protects against pests, fungi, and then with fire retardants.
The minimum length of the board for the lathing is at least two rafter spans. They are attached and connected above the rafter legs.
Flooring
The flooring for soft tiles is made continuous. Materials are selected based on the fact that nails should be driven into it, therefore they usually use:
- OSB 3;
- moisture resistant plywood;
- grooved or edged board of the same thickness (25 mm) with a moisture content of no more than 20%.
When laying the flooring under soft tiles, it is necessary to leave gaps between the elements - to compensate for thermal expansion. When using plywood or OSB, the gap is 3 mm, between the edged boards 1-5 mm. The sheet material is fastened with a gap between the seams, that is, so that the joints are not continuous. Fix the OSB using self-tapping screws or punched nails.

Using boards as a flooring, it is necessary to ensure that the annual rings of the wood are directed downward. In the opposite arrangement, they will bend in an arc, the soft tiles will be lifted, the tightness of the coating may be broken. There is another trick that will allow you to keep the wood flooring even if the moisture content of the boards is above 20%. When laying, the ends of the boards are additionally fastened with two nails or self-tapping screws, hammered close to the edge. This additional fastener will prevent the boards from buckling when shrinking.
The choice of the thickness of the material for the flooring depends on the pitch of the lathing. The larger the step, the thicker the flooring is needed. The best option is a frequent step and thin slabs. In this case, a light but hard base is obtained.

Another point concerns the arrangement of flooring for soft tiles around the chimney pipe. With a brick pipe, the width of which is more than 50 cm, a groove is made behind it. This design is reminiscent of a mini roof.

After installing the flooring, its geometry is checked. The length, the width of the slope at the top and bottom, the height of the slope on both sides are measured, the diagonals are measured. And the last check - plane tracking - the entire ramp must lie entirely in one plane.
Soft tile roofing technology
When buying, you will most likely be provided with instructions, to which the installation of soft tiles will be painted step by step and in detail, indicating all the exact dimensions that this particular manufacturer requires. These recommendations should be followed. However, you should first get acquainted with the order of work and their volumes ahead of time - in order to understand the intricacies of installation and the required amount materials.
We must say right away that it is given with caution when laying soft tiles - she does not like to be bent. Therefore, try not to bend or crumple the shingles unnecessarily (this is one fragment, consisting of the visible and mounting parts).
Reinforcement of the overhang
The first is the drip bar. This is an L-shaped sheet of metal coated with paint or polymer composition. Polymer coating more expensive but also more reliable. The color is selected close to the color of the shingles.

The drip bar is installed along the roof overhangs
The task of the drip plank is to protect the battens, rafters and decking from moisture. With one edge, the drip is laid on the flooring, with the second it closes the overhang. It is fastened with galvanized (stainless steel) nails, which are hammered in a checkerboard pattern (one is closer to the fold, the second is almost at the edge). The step of installing the fasteners is 20-25 cm.
![]()
A drip bar is sold in two-meter pieces. Having laid the first element, the second is fixed with an overlap of at least 3 cm. If desired, the gap can be closed: coat the joint with bituminous mastic, fill with sealant.
At the same stage, hooks are installed, in any case hooks are nailed that will hold the gutters.
Laying waterproofing carpet
Regardless of the angle of the roof, in and along the slope, a waterproofing underlay must be installed. It is sold in one meter wide rolls. An adhesive is applied to the underside, covered with a protective film or paper.

Installation of a waterproofing carpet begins with laying it in the valley. Roll out a meter wide material, distributing 50 cm on both sides of the bend. Here it is desirable to do without joints, but, if necessary, the overlap of two canvases should be at least 15 cm. The laying goes from bottom to top, the junction is additionally coated with bituminous mastic, the material is well pressed.

Further, the waterproofing carpet under the shingles is laid along the eaves. Minimum width carpet on the eaves - the size of the overhang itself, plus 60 cm. The lower edge is located on top of the dropper, it can bend down a few centimeters. First, the carpet is rolled out, if necessary, cut, then the protective film is removed from the inside and glued to the substrate. Additionally, they are fixed at the edges with stainless steel or galvanized nails with a large flat head (step 20-25 cm).

In the places of the horizontal joint, the overlap of two canvases is at least 10 cm, in the vertical direction - at least 15 cm. All joints are additionally coated with bitumen mastic, the material is compressed.
Underlay carpet
The underlay carpet, as well as the waterproofing carpet, is sold in rolls of a meter wide, the back side is covered with an adhesive. The installation method depends on the slope of the roof and on the profile of the selected bituminous tile.

When using bituminous shingles with cuts (such as Jazz, Trio, Beaver tail), regardless of the slope, the underlay is spread over the entire roof surface.

Installation of underlayment often requires an undercut. This is done with a sharpened knife. In order not to damage the material below during cutting, put a piece of plywood or OSB.
Gable (end) strip
Pediment strips are mounted on the side sections of the overhangs. These are strips of metal, bent in the shape of the letter "L", along the fold line of which there is a small ledge. They close the laid roofing materials from wind loads, from moisture ingress. The pediment strip is laid on the flooring over the lining or waterproofing carpet, fixed with nails (stainless steel or galvanized) in a checkerboard pattern with a step of 15 cm.

These planks also come in pieces of 2 m, stacked with an overlap of at least 3 cm.
Ramp marking
To make the installation of soft tiles easy, markings in the form of a grid are applied to the underlay or flooring. This is done with a paint cord. Lines along the eaves overhang are applied at a distance equal to 5 rows of tiles, in the vertical one - every meter (the length of one shingle shingle). These markings make it easier to lay - the edges are smoothed along it, it is easier to track distances.
![]()
Valley carpet
On top of the already laid waterproofing carpet, still valley material is laid. It is slightly wider and serves as an additional guarantee of no leaks. Without removing the protective film from the lower side, it is laid, cut at the bottom in the overhang area, the borders are marked. Having departed from the mark of 4-5 cm, a special mastic of increased fixation is applied Fixer. It is applied from a syringe, with a roller, then triturated with a spatula into a strip, about 10 cm wide.

The valley carpet is laid out on the mastic, the folds are smoothed, the edges are pressed. Having retreated from the edge by 3 cm, it is fixed with nails in increments of 20 cm.
Adjoining a brick pipe
To bypass pipes and ventilation outlets, patterns are made from a valley carpet or galvanized metal painted in the appropriate color. The pipe surface is plastered and primed.
When using a valley carpet, a pattern is made so that the material extends at least 30 cm onto the pipe, at least 20 cm should remain on the roof.

The pattern is coated with bitumen mastic, placed in place. the front part is installed first, then the right and left.

Some of the side elements are folded onto the front part. The back wall is installed last. Its parts go to the side.
When correct installation on the flooring around the pipe, a platform is obtained, which is completely covered with a valley carpet. Before laying the tiles in this place, the surface is coated with bituminous mastic.

The shingles from three sides go onto the laid carpet, not reaching the pipe walls 8 cm.

The upper part of the junction is sealed with a metal strip, which is attached to the dowel.

All gaps are filled with heat-resistant sealant.

Round pipe outlet
For the passage ventilation pipes there are special pass-through devices. They are positioned so that the lower edge of the element overlaps the shingles by at least 2 cm.

Attaching the pass-through to the roof, circle its inner hole. A hole is cut out along the applied contour in the substrate, into which the round pipe is drawn.
The back of the skirt of the passage element is coated with bitumen mastic, set in the desired position, and additionally fastened around the perimeter with nails. When installing soft tiles, the penetration skirt is coated with mastic.

The shingle is cut as close as possible to the ledge of the penetration, the gap is then filled with mastic, which is covered with a special dressing that protects against ultraviolet radiation.
Starting strip
Installation of soft tiles begins with laying the starting strip. Usually it is a ridge-eaves tile or an ordinary one with cut petals. The first element is laid on one of the edges of the slope, with the edge going onto the pediment bar. The lower edge of the starting strip is laid on the drip, leaving 1.5 cm from its fold.

Before installation, the protective film is removed from the rear, the shingle is leveled and laid. Each section of bituminous shingles is fastened with four nails - at the corners of each fragment, departing from the edge or perforation line 2-3 cm.

If a cut from an ordinary tile is used as a starting strip, some of its part will be devoid of adhesive composition. In these places, the substrate is coated with bituminous mastic.
Installation of soft ordinary tiles
There is a flexible tile with an applied adhesive mass protected by a film, and there is a composition that does not require a protective film, although it also fixes elements well on the roof. When using the material of the first type, the film is removed immediately before installation.

Before laying bituminous shingles on the roof, several packs are opened - 5-6 pieces. Laying is carried out from all the packs at the same time, taking one shingle one by one from each. Otherwise, there will be pronounced spots on the roof that differ in color.
The first shingle is laid so that its edge does not reach the edge of the starting strip by 1 cm. adhesive composition, the tiles are also fixed with roofing nails. The number of fasteners depends on the angle of the ramp:

When installing soft tiles, it is important to drive in the nails correctly. The hats should press against the shingle, but not break through its surface.
Valley decoration
With the help of a paint cord, a zone is marked in the valley into which nails cannot be driven in - this is 30 cm from the middle of the valley. Then mark the borders of the gutter. They can be from 5 to 15 cm in both directions.

The upper corner, which is turned towards the valley, is cut
When laying ordinary shingles, nails are hammered as close as possible to the line, outside of which nails cannot be hit, and the shingle is cut off the floor of the gutter laying line. To prevent water from flowing under the material, the upper corner of the tile is cut obliquely, cutting off about 4-5 cm. The loose edge of the tile is lubricated with bitumen mastic and fixed with nails.

Pediment decoration
On the sides of the slope, the tiles are cut so that to the edge (protrusion) end plate 1 cm remained. The upper corner of the shingle is cut in the same way as in the valley - an oblique piece of 4-5 cm. The edge of the tile is coated with mastic. The strip of mastic is at least 10 cm. Then it is fixed with nails, like the rest of the elements.

If the flooring in the area of \u200b\u200bthe ridge is made continuous, a hole is cut along the ridge, which should not reach the end of the rib 30 cm. Bituminous tiles are laid before the beginning of the hole, after which a special ridge profile with ventilation holes is installed.

It is fixed with long roofing nails. On a long skate, several elements can be used, they are joined end-to-end. The installed metal ridge is covered with ridge tiles. The protective film is removed from it, then the fragment is fixed with four nails (two on each side). The installation of soft tiles on the ridge goes towards the prevailing winds, one fragment overlaps the other by 3-5 cm.

The ridge tile is a ridge-cornice divided into three parts. A perforation is applied on it, along it a fragment comes off (first bend, press the fold, then tear off).
The same elements can be cut from ordinary tiles. It is divided into three parts, regardless of the drawing. A corner is cut off from the resulting tiles - about 2-3 cm on each side. The middle of the fragment is warmed up with a construction hairdryer from both sides, laid in the middle on a block and, gently pressing, bend it.
Ribs and kinks
The ribs are covered with ridge tiles. A line is bounced along the bend at the required distance with a paint cord. The edge of the tile is aligned along it. The shingles are laid on the edge from bottom to top, each piece is glued, then 2 cm back from the top edge, and fixed with nails - two on each side. The next fragment comes on the laid by 3-5 cm.

In order for the roofing to last as long as possible, the laying of soft tiles must be carried out in accordance with the installation rules developed for of this material... Each manufacturer has its own installation instructions, but in general, the basic installation rules are the same.
Installation conditions
Installation instructions for bitumen shingles regulate the temperature regime for working with the material. It is recommended to install at an air temperature above +5 ° С. Shingles - the elements that make up a flexible tile roof, are connected to the base surface not only with the help of metal fasteners, but also thanks to a special self-adhesive layer on the underside. High adhesion and tightness of the mounted coating is ensured by heating from sunlight - the shingles are reliably soldered to the base and to each other.
If shingles are installed in cool weather, the adhesion of the sheets may not be strong enough. To warm up the adhesive layer of the shingle, you can use a hot air torch (building hair dryer). It is also practiced laying the material on bituminous mastic. But difficulties may arise with the installation of a ridge covering, since the material needs to be bent. In cold weather, bituminous shingles become more rigid and brittle, and in the process of giving the shingle the desired shape, microcracks may appear in the material.

If roofing work has to be done in cool weather, the packages with tiles should be kept in a warm, closed room for about a day.
If it is necessary to lay roofing flooring made of bituminous piece material in frost, a small enclosed space is arranged on the roof of the structure - a rack frame covered with plastic wrap is mounted. Heat guns are used to create the required temperature inside a limited volume.
Base for roofing
Under the basis for the installation of a piece of bitumen roofing means a rafter system with a continuous crate. To ensure the correct functioning of the roofing cake, a vapor barrier membrane is mounted on the inside of the rafter legs. Insulation is laid on the outside and attached diffusion membrane, which removes moisture from the thermal insulation layer and does not let it inside. Along the rafter legs, counter-lattice slats are packed on top of the membrane.
Laying soft tiles requires a flat solid base made of edged or grooved boards or sheet materials - OSB boards, moisture-resistant plywood. The moisture content of the lathing material should not exceed 20%.
The sheet material is laid with the long side parallel to the cornice. The boards should overlap at least two runs and be attached to each rafter leg. The joining of the lathing elements is performed on a support, while the joints of adjacent rows of the lathing should be located on different supports.
It is important to leave an expansion joint between the elements of the sheathing - wood materials change their linear dimensions under the influence of temperature and moisture.
The roofing cake containing shingles must be well ventilated. This will significantly reduce the formation of ice on the surface in winter, since the transfer of heat from the premises of the house to the roofing will decrease. In summer, the ventilation gap, which must be at least 5 cm high, reduces the temperature inside the roofing cake, resulting in less overheating attic room... In order for the air circulation to be sufficient to remove moisture from the inside of the roof, special holes are left in the lower part of the roof (in the overhangs), and an exhaust box is installed in the ridge.

Lining layer
Installation of shingles requires the use of a special backing material. Piece bitumen coating is used on pitched roofs with a slope angle of at least 12 °. If the slope of the slopes is 12-30 °, a waterproofing lining is attached to the entire surface of the solid sheathing. A slope angle of more than 30 ° requires the installation of waterproofing material in the valleys, along the cornice, above the chimney pipes and ventilation slopes, in the places where the roof adjoins the walls, around the attic windows. This allows you to reliably protect places where there is a high probability of accumulation of snow and ice.

The installation principle of the backing layer depends on its characteristics. Composite material made of polymer film and bitumen filler, it is self-adhesive: it is carefully laid on the crate and rolled with a roller to ensure a tight adhesion and remove possible bubbles. Waterproofing material made of polyester, it is laid with the use of bitumen mastic and is additionally attached in the upper and side parts with a pitch of 20 cm with nails with wide flat heads, which are then processed with mastic. The backing layer is formed from strips of rolled material laid parallel to the cornice. The longitudinal overlap should be 100 mm, the transverse overlap 200 mm.
The technology of laying soft tiles provides for certain principles for installing the lining in places of probable leaks. The width of the waterproofing layer is:
- for valleys - 500 mm from its axis in each direction;
- for a ridge - 250 mm each;
- for end and eaves overhangs - 400 mm.

To ensure the tightness of the overlap, they are coated with bitumen mastic.
Installation of strips
To protect the lathing from rain moisture, pediment and cornice strips are mounted. Installation of cornice strips (droppers) is performed on top of the lining layer. The instruction requires the installation of elements with an overlap of at least 200 mm. Fasteners should be arranged in a zigzag (checkerboard pattern) with a pitch of 10 cm. Gable strips are intended for the ends of roof slopes. Fastening is also carried out using roofing nails, set in 10 cm increments.

The valley waterproofing carpet is laid after the planks are installed on the slopes. The color of the carpet is selected taking into account the color of the shingles. The material is fixed with nails in increments of 10 cm. If there are vertical structures on the roof slopes, a waterproofing coating is also laid around them.
If the arrangement of the chimney passage through the roof is planned to be carried out after the installation of the topcoat, when planning the roof, the place where it will be located should be noted.
How to properly prepare a roofing system for the installation of soft tiles can be found in the thematic video.
Installation of roofing material
First of all, the installation of cornice tiles is carried out - a special element of a soft piece roof. Not all manufacturers offer special eaves shingles. In this case, it is required to use a strip of material, which is cut out of an ordinary shingle - petals are cut from it. Having retreated from the eaves overhang 2 cm, the resulting elements are glued.
Before starting installation, markings must be applied to the roof. Chalk lines indicating the location of the rows of material make it possible to lay the shingles strictly parallel to the cornice. The vertical line indicates the middle of the ramp. To make the roof look aesthetically pleasing, the coating is assembled from bituminous tiles taken at random from several packs. This allows you to neutralize differences in shades of the material.

Laying of shingles begins from the middle of the eaves overhang - the shingles are mounted to the right and left of the first. The protective film is removed from the elements of the roof covering immediately before installation. The shingles are tightly pressed to the base, and then additionally secured with roofing nails driven in above the groove: 4 pieces for each shingle.
If the roof pitch is more than 45 °, it is recommended to use 6 nails each for fixing the shaped bituminous tiles.
The first row of shingles is positioned so that their lower edge is 10-15 mm higher than the lower edge of the eaves tile. Laying is carried out with the expectation that the petals of the bituminous elements cover the joints of the cornice shingles. The petals of the subsequent rows with their tip should be above the cutouts of the previous layer or at their level. In the places where the shingles adjoin the pediment strips, the material is cut along the edge of the roof, the edges are glued using bituminous mastic, and they must be coated 10 cm.
In order not to damage the lower layer of the tile, when cutting off excess material, place a small board or piece of plywood under its edge.
Arrangement of the valley
Installation of shingles requires a special approach to creating a reliable and durable construction valleys. Before laying ordinary tiles, a waterproofing lining is mounted under the valley, to which the flexible tiles are fused with a hot air gun or fixed using bitumen-polymer mastic.
The work on arranging the valley should begin with a slope with a shallower angle of inclination or a slope with a shorter length.

Draw a line on the opposite slope, parallel to the valley axis, at a distance of 30 cm from it. Shingles reaching this line from the first slope (with an overlap of the valley axis) are cut along the line and fixed with mastic or fused with a hot air gun. In this way, all shingles are mounted that come from a gentle (or short) slope. Then a line is drawn on this slope, parallel to the axis of the valley and 10 cm away from it. The shingles reaching the line from the side of the opposite slope are cut exactly along the line, and their upper corners should be cut by approximately 60 °.
Roofing nails can be used at least 30 cm from the axis of the valley. Therefore, when arranging it, the material should be glued or fused.
Ridge cover
The ridge covering is laid after the completion of the installation of ordinary tiles. For these purposes, cornice elements can be used. In other cases, the material is cut out of ordinary shingles.:
- if the shingle petals have rectangular shape, they are cut off, and the remaining wide strip is mounted on the ridge;
- the shingles that form a pattern of hexagons during installation are cut into hexagonal fragments from which the ridge covering is made.
To make it easier and safer to work with the roof ridge, the scaffold should be installed.
Straight strips are heated with a hot air gun, bent along the axis and laid on the ridge with an overlap of 50 mm. Fixation of each strip is carried out on 4 nails.


