Soft roof - This is a type of coverage that has long been familiar to most people. Not so long ago, one of the most widely used materials for covering roofs of various structures was ordinary roofing felt, which also belongs to this category of roofing decks. In fairness, it should be noted that the old roofing felt was not particularly durable and high performance, so it needed periodic repairs.
Roofers know that any combination of two sides that slope less than 180 ° is a location that is particularly vulnerable to leakage. Water from rain or the melting effect of snow so that it can penetrate inside the house. This applies to both roofs and gable roofs with glaucoma. Thus, the basket located at the intersection plays a significant role in the roof structure.
As we already know, a soft roof basket can be made using roof tiles. However, remember that wedge tiles and roof tiles are also used. The tapered roof prevents slab penetration and cut. More accurate basket placement and elimination of possible "bumps" of tiles. The cutting is also limited, or rather the crushing of the bottom of the tile. However, softening trays should occur. On one roof, there are several more baskets that connect to each other.
Today, thanks to the emerging new technologies, soft roofing material has undergone significant modernization. It is produced in various versions, including bitumen shingles. Such coatings already have a long service life, combine high quality, excellent waterproofing characteristics and a very elegant appearance. Therefore, many do not even realize that modern soft roofing is still the same roofing material, only produced in improved variations.
Structures of this type must be carried out taking into account the roof experience and experience. The carpet and thus the basket structure can be expanded in two ways: sheath or crown. In the case of roofing, the roof tiles expand one below the other less than half of their nominal length. Thus, most of the tiles are hidden under the tiles, which are arranged in a higher order. Notably, the higher order of tiles is offset from the lower half of the width so that the tiles in the higher rows touch each other exactly halfway across the tile width in the row below.
The technology of laying a soft roof made of bituminous shingles is rather complicated and requires a large number of different materials, since the structure of such a coating consists of several layers, therefore it has earned the name roofing cake". Therefore, if a decision is made to make an independent installation of the coating from this material, it is necessary to carefully study all the recommendations that should be followed when performing work.
This rule is nothing new, as the roof of carp shingles, regardless of the path and location on the roof, always fits with half the offset. In the second method of laying carpets in the so-called. Lace, tiled roofs are visible almost the entire length, but there are still small fragments of tiles under each row. Each tile has two rows of tiles. The first one, the trousers, hangs with the noses engraved on the patch, and the second one with the upper one engages with the noses on the upper edge of the lower plates, taking into account the half-width of the tile.
The tiles in the top row are in contact with each other exactly halfway across the width of the tiles in the bottom row. On subsequent patches, the tiles are laid in such a way that the tiles of the trousers in all areas lie exactly one above the other. The tiles are the same the same.
Before deciding on the choice of a soft roof, you must have an idea about this material, evaluate its advantages and disadvantages.
Advantages of soft roofs
There are various types of soft roofs, but they all have very high physical, technical and operational characteristics:
When making a soft basket, we start with a basket with eaves. The tiles are laid for laying the basket and two roof tiles from the basket. The other layer is shingle shingles, which ends with wedge plates to pass smoothly. So we have a complete trash wireframe and you can trace the dividing line. There are two rows of trash tiles on each row of shingles. Tiled roof layers can now be made, complete with wedge patterns. With another layer of tile, the next layers are routed.
The tiles must be laid on the full support of the skirting board. Be sure not to trim items less than 80mm wide. It is also important that the tiles are mechanically cut. In the case of a basket, nails or screws are not used as fasteners for the tiles. Roofs, especially those cut without hooks, are secured with copper wire in a basket or nearby patch. To ensure the reliability and durability of the joints, it is recommended to use fasteners that are resistant to external factors and do not corrode and therefore are durable.
There are several points that can be called the disadvantages of this roofing material, but, to be honest, they are very conditional. So, such "disadvantages" include:
- Quite complicated installation of the "roofing pie", which requires strict adherence to all technological recommendations.
- Any soft roof is laid only on a solid solid base. And this, in turn, will entail additional work and, accordingly, costs.
However, as you can see, there are much fewer negative aspects in arranging a soft roof, and therefore more and more often the owners of mansions opt for it.
The final effect of the soft roof rack with the rest as well as with other baskets is also determined by proper preparation wooden structure, as well as foil, formwork, choice of type and method of forming the bottom of the basket. The amount of work we have to do is to produce results in the form of the aesthetic aesthetics of the building, its prestige and, of course, adequate remuneration for the roofer. The quality of the roof depends on the knowledge and skill of the roofer.
The desire for complete satisfaction from the need to have the most important facade - the fifth facade or roof, prompted the investor to come up with the strangest forms that distinguished his building from the environment. Methods for covering such roofs in the long term. The penetration point of roofing slabs, called the basket, is one of the most difficult parts of the roof for both carpenters and baskets, as well as sheet metal or roofers - roofing. Depending on the type of covering used, there will be different ways to "meet" the roofing slabs in the basket.
Various types of soft roofs
Soft roofs include several types of materials that can be easily found on the Russian market - flexible bituminous shingles, rolled soft roofing different types, and euro slate (ondulin).
Rolled soft roof
Roll roofing materials are classified according to several criteria. So, the following types of coatings are produced:
In principle, these “paths” can be divided into two groups: “sharp” and “soft”. The "sharp" basket gives the visible penetration line of the roof slopes. This type of basket is doomed to have a wavy casing. Flat coatings - for example, carp shingles can be “soft” in baskets. They are very aesthetically pleasing - the arcs are joined together, there is no optical separation of the roof on the walkway, and there are no visible other materials such as sheet metal.
The procedure for laying soft tiles
Soft carp baskets can be divided into tethered and flat. In the basket, only some of the tiles from the basket are tied and are cut and sanded in the surface wedge when we do not have the wedge-shaped tiles. In an isosceles basket, all roof tiles are tapered.
- Baseless and coated.
- The basis for roofing roll materials can be fiberglass, asbestos fiber, cardboard, polymers, or several materials can be used for it in a complex.
- The roofing material can be equipped with various protective layers - fine-grained or coarse-grained mineral crumbs, dust-like or flake powder.
In addition, roll coatings can be divided according to the type of base and the method of installation:
High workload, increased use of roof tiles requires the use of suitable auxiliary materials such as stainless steel ties, screws and nails. When revealing the natural color of the raw materials inside the tiles on soft baskets, natural tiles should be used, and if they are painted, they are painted in mass. The cost of 1 mb of a soft basket is the price set individually and is 5-6 times higher than the cost of 1 m² of roofs.
The following steps for installing a soft roof rack
There are few specialists in this area. The agreements worked out are several dozen. The placement of all components in the housing of an electronic device is becoming more complex and expensive. However, general limitations can be overcome by using rigid-flexible printed circuit boards that are not new technology rigid bending, but for many reasons they are becoming an alternative to the traditional technology of rigid plates.
- Self-adhesive coverings. Such material has a layer of adhesive applied to the back side of the canvas and protected by a special membrane, which is removed immediately before installing the coating.
- Glued canvases. These coatings are glued to the mastic in various ways, which are called hot and cold. But in any case, the material is heated to a certain temperature during installation.
- Deposited coatings. This type of coating is fixed to the roof surface using gas burners. The flame of the burner melts the composition applied to the back of the soft roofing material, after which the coating is rolled. This type of coating, correctly installed on the prepared roof surface, makes it practically airtight and resistant to leaks. In addition, this type of material is considered the most durable of all roll options.
Membrane roll roofing
The membrane coating is a high-tech material that can be made on various bases: polyvinyl chloride (PVC), synthetic rubber (EPDM), thermoplastic polyolefin (TPO).
Two rigid plates connected by a flexible cable work well over short distances, but the total cost is greater than their rigid elastic counterpart due to the need for cables, connectors, and assembly of these components. In addition, this structure is susceptible to breakage and has a shorter service life. In rigid-flexible circuits, contact problems do not occur, which increases the reliability and, consequently, the quality and service life of the product.
Comparison of the cost of producing a rigid flexible plate and its equivalent in the form of two rigid plates connected by a cable, depending on the number of pieces produced. In some projects, using rigid bend will not be cost effective, so it is important to determine which of the two can be compared. Such a simulation can be performed based on the manufacturing and assembly costs. Figure 1 compares the cost of making a four-layer rigid sheet with two flexible inner layers using its counterpart in the form of two four-layer rigid plates connected by a cable.
- The PVC membrane, reinforced with ether fiber and containing plasticizers, is highly elastic and resistant to temperature extremes. In addition, the material does not fade in the sun, is fire-resistant, comes in a range of colors, and can be easily and quickly mounted on the surface. However, this coating has its drawbacks - it is not resistant to organic solvents, bitumen and oils. In addition, when heated, PVC coating is capable of releasing substances toxic to humans into the air, since it is not environmentally friendly.
- EPDM membranes, made from rubber and reinforced with polyester meshes, have high elasticity and resistance to various solvents.
The negative qualities of this material can be called the fact that its installation is carried out with the help of glue, and the joints over time, under the influence of external factors, can diverge, therefore, the roof will begin to leak, since the coating will lose its tightness.
After reaching 100 pieces, the rigid-flexible design becomes cheaper than its rigid counterpart, the main reason is the lack of cables, connectors and the need to install them, which leads to fewer assembly operations and easier testing, which reduces the overall cost. Smaller ordering components reduce supply chain risk, and the rigid flexible plate can be designed to be more comfortable and therefore cheaper over the life of the product.
The cost of manufacturing, assembly, testing and logistics is a key factor in analyzing the reality of rigid applications, but you cannot forget the cost of design and development. This is a long, costly and error-prone process. They don't even let you define different layers for different parts your design, for example, others in the flexible part.
- TPO membranes made from thermoplastic polyolefin can be reinforced or manufactured without it. Polyester or fiberglass is used to reinforce this material. The sheets of material are welded together with the help of hot air, and a sufficiently strong and reliable seam is formed at the welding site. Therefore, the coating has a long service life, high strength and resistance to negative temperatures, up to -60 degrees.
The disadvantages of such a coating include its low elasticity and rather high cost in comparison with other membrane materials.
They then manually marked all of the flex areas in the project and made sure that the components and guides were not positioned close to the aisle between rigid and flex areas. The greater complexity of the rigid flexible design than the rigid plates results in significantly lower cost competitiveness of this technology.
Installation instructions for roofing with soft bituminous tiles
The figure shows how the transition is made between flexible and rigid chains. Early collaboration between designers and PCB manufacturers is another factor in increasing the price competitiveness of rigid bending technology. To create a successful project of this type, the designer must work with the manufacturer to develop the rules that he will apply. These include the number of layers in the project, material selection, track and guide sizes, connection methods, and dimensions.
Briefly - about the principles of membrane roofing
There are four main methods for installing membrane roofs - ballast, mechanical fastening, gluing and hot air welding.
- Ballast anchorage used if the roof has a slight slope not exceeding 15˚.
In this case, the canvas is laid on concrete base flat roof or on a layer of installed thermal insulation. Then the material is stretched, fixed around the entire perimeter, the joints of the sheets are connected by welding or special glue.
Laying eaves soft tiles
The use of rigid-flexible technology can decide product success. Current industry trends and growing customer needs mean that engineers are reaching their limits, forcing them to seek alternatives in electronic design. In addition, the demands placed on current mobile devices make rigid bending technology mainstream and become much more real in many applications.
Roofing Tile Roof Tiles Cemented roof tiles are made of durable and safe material consisting of Portland cement, volcanic tuff, cellulose, polyvinyl alcohol, sealing air in microscopic pores and water. In addition, the product is non-flammable and does not corrode or corrode. Fiber cement roofing looks like natural slate. The tiles are available in a wide range of colors. The tiles can be used not only on roof slopes, but also to cover chimneys, under-strip tapes and any finishing element.
Then, on top of the membrane, ballast from pebbles, gravel or rubble is laid.
- Mechanical fasteningis produced if basic structure not designed for ballast weight.
The basis for membrane installation in this way can be wood, concrete, profiled sheets, as well as any other material.
A layer of insulation material is laid and fixed on the base. Most often, mineral is used for this basalt wool high density, specially designed for this application, on top of which the membrane is spread and fixed. To fix the materials to the base, disc or telescopic fasteners are used, which are installed at the joints of sheets overlapped by 80 ÷ 100 mm.
- Membrane bondingproduced on high-quality adhesive mixtures with good durability. The material is glued only along the perimeter of the web, at joints and in problem areas, for example, around chimneys, on ribs, valleys, etc.
- Membrane welding with hot air- this way more often all used for bonding membrane sheets.
The work is carried out using a special apparatus that squeezes two overlapping canvases, using a roller and hot air, the temperature of which reaches 600 ° C. The welded joint can be from 20 to 100 mm wide, which ensures the reliability of the connection and guaranteed its sealing.
Euroslate or Ondulin
Another option for roofing material, which can also be classified as soft roofing, is ondulin or euro slate. It is a lightweight and reliable undulating material made from a bitumen-fiber mixture with the addition of mineral and polymer additives. Roofing sheets are easy to install and usually have a very long service life. The material is produced in various shades of calm tones, from which you can always choose the one suitable for a specific facade design.
Installation of this material can be carried out not only on a solid base, but also on a crate made of boards 150 ÷ \u200b\u200b170 mm wide, fixed with a step of 200 ÷ 250 mm.
Ondulin is the only material from the category of soft roofing that has a sufficiently rigid relief structure, and therefore can be fixed to the lathing.
Installation of ondulin, like any undulating roofing material, is carried out from the cornice. The upper rows are laid with an overlap on the lower ones by 250 ÷ 300 mm, and adjacent sheets located in the same row are mounted with an overlap, on one wave. The ondulin is fastened with special screws with waterproofing gaskets and special covers. They are screwed into each crest of the wave along the cornice and ridge, and in the middle part of the slope - with a step every two to three waves.
Flexible bituminous shingles
Bituminous shingles can be safely attributed to the most popular types of soft roofs, as they are distinguished by their aesthetic appearance, a variety of shades and shapes, strength and durability.
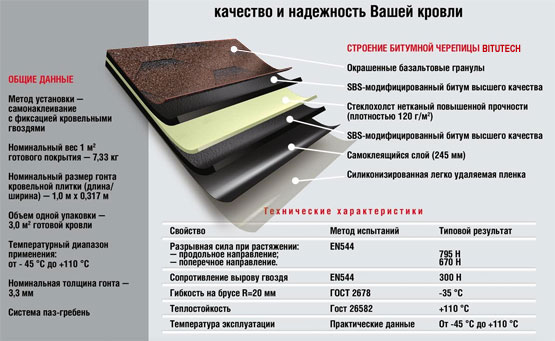
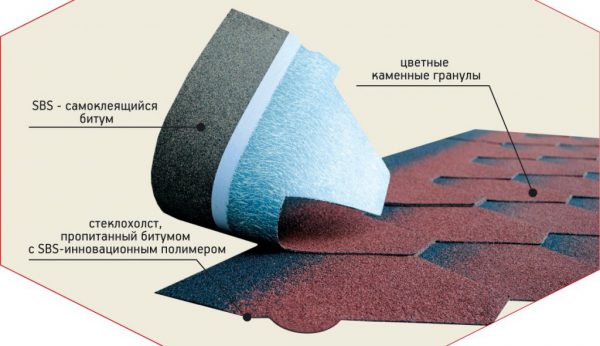
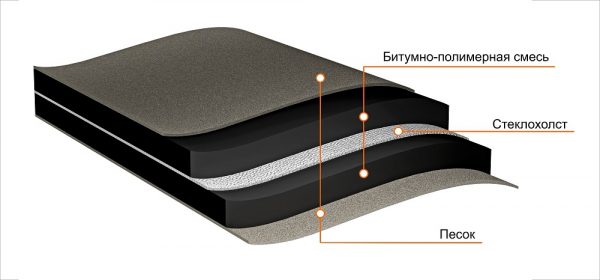
The shingles are produced on a fiberglass base, which is impregnated with high-quality bitumen, on top of which mineral chips of various colors are applied. The upper mineral coating performs not only a decorative function, but also a protective one, as it prevents mechanical damage to the softer lower layers. Shingles are used to cover houses with pitched roofs of any size and configuration of any complexity.
Since the most popular material from the category of soft roofing is bituminous shingles, its installation will be considered in more detail.
Installation of roofing with bituminous tiles
First, it is worth understanding the roofing "pie", which must be mounted under the flooring soft tiles... It is very important to do this work correctly, otherwise the roof will be devoid of reliability and will not last a long time, and it will be impossible to maintain a comfortable microclimate in the rooms under it.
Approximate sequence of work
In order to comply with the sequence of installation of all elements, it is best to draw up a list of all work in order:
- The first step is the installation of the rafter system.
- Further, from the side of the attic, a vapor barrier membrane is fixed to the rafters.
- On top of the vapor barrier, also from the attic side, a crate made of timber is fixed to the rafters. It is needed for the subsequent installation of the inner lining of the attic, fixing the membrane and creating a rigid base for laying insulation.
- Next, there is a laying of insulation mats between the rafter legs. Basalt mineral wool is usually used for this.
- The insulation is closed with a waterproofing roofing membrane. It is fixed to the rafters.
- The membrane is pressed against the rafter legs with counter-beams.
- Next, the installation of a sparse lathing follows - the basis for flooring a solid base.
- Sheets of moisture-resistant plywood or OSB are fixed on the crate.
- The solid plywood sheathing is covered with a lining carpet.
- Further, the laying of soft bituminous tiles is underway.
- Securing the drainage system, covering the eaves with an anti-mosquito net, and then PVC clapboard or soffits can be carried out at various stages installation works - as it will be more convenient for the masters.
Calculations of the sheathing system for a soft roof
Now, knowing the approximate sequence of installation of the "roofing pie", there is a need to consider them in more detail, since there are nuances that are important to take into account when performing these rather complex technological operations.
The first thing to determine is what parameters the elements of the rafter system and battens should have, and with what step they are installed.
Let's start with the rafters. The cross-section of the timber from which they are made depends on the steepness of the slope, possible external loads on the roof and on the step of installing the rafter legs. The dependence is expressed in the following.
External loads include the weight of the structure itself, with insulation, lathing and roofing material, the mass of possible snow deposits in winter and the impact of winds. Both snow and wind loads strongly depend on the steepness of the slope, and with an increase in the angle of inclination, the significance of the snow load gradually decreases, but the wind load increases.
The total load, expressed in kilograms per square meter, should be evenly distributed on the rafter legs. And this, in turn, depends on the step of their installation - the more often they are located, the less load falls on each running meter rafter beam, and the smaller its cross-section can be. If the value of the distributed load is known, then according to the table it is easy to determine the parameters of the required material.
There is a rather complex physical and mathematical algorithm for calculating the distributed load on the rafter legs. But let's not bore the reader with an abundance of formulas and tables, but suggest using a convenient calculator. The initial data for the calculation will be:
- Region of construction;
- The steepness of the roof slope, degrees;
- Roofing material;
- Features of the location of the house on the ground and its height.
In the last paragraph of the calculator, you will need to put down the estimated step of installing the rafters. By changing this value up or down, you can determine the optimal load distribution. And then, according to the table, knowing the length of the rafter, select the required section of the bar (log).
The calculator comes with two schematic maps that make it possible to determine the zones of the construction region by the level of snow and wind loads.
Calculator for calculating the distributed load on the rafter legs
So, to begin with, we define the zones using the schematic maps:
Now we substitute the known values \u200b\u200binto the calculator - and we get the result
Recently, bituminous tile roofing has gained great popularity among developers. This roof covering has an attractive appearance that is not inferior in beauty to traditional tiles, long service life and high moisture resistance. Thanks to the self-adhesive layer on the back of the shingle, the installation of a soft roof with your own hands can be done even in the absence of professional experience. In this article, we will tell you how to properly prepare the base, assemble the sheathing and lay the shingles.
Flexible shingles are tiles with a shaped edge made of fiberglass impregnated with modified petroleum bitumen. Laid with an overlap, such a roof imitates a rare but aesthetic shingle covering made of wooden chocks. Fiberglass, which is part of the bituminous shingles, can be simple or reinforced polyester. The technology for the production of this material includes sprinkling the front side with an armoring dressing made of stone or basalt chips, giving color and a rough texture to the roof. The advantages of shingles are:
- Durability. The service life of a soft roof based on fiberglass reinforced with polyester is more than 70 years, which fully pays for the cost of installing the roof.
- Weather resistance. Soft tiles withstand the effects of atmospheric moisture, ultraviolet rays and other adverse environmental factors, while maintaining performance.
- Aesthetics. The variety of shapes and colors of the material opens up great opportunities for creating a harmonious, integral image of the house.
- Flexibility. Flexible, resilient shingle shingles are suitable for complex roofs with big amount stingrays, valleys and other decorative elements.
Important! The technology of laying bituminous shingles is distinguished by its simplicity, therefore it is easily performed even by a non-professional. A do-it-yourself soft roof is an excellent solution for the roof of a private house, country cottage, gazebo or townhouse.
Features of working with material
Before covering the roof with a soft roof, it is necessary to make sure that it is prepared for work. solid foundation... Also, the technology of installing a soft roof involves the performance of work subject to certain weather conditions. If you do not follow the manufacturer's recommendations, you may encounter the following problems:
- If you install bituminous tiles at an ambient temperature of less than 5-10 degrees, then the self-adhesive layer on the back of the tiles does not melt on its own. To melt the bitumen, you have to use a gas burner or a hair dryer. However, this makes it difficult and slow to install the tiles.
- If shingles are installed at temperatures above 25 degrees, the self-adhesive bitumen layer melts too much and flows down the slope. Besides, heat leads to deformation of the roof.
- If you carry out the installation of the roof in damp weather or during rain, the rafter frame and lathing acquire excess moisture, which negatively affects the life of the tiles, leading to decay.
Important! The material installation technology recommended by manufacturers prescribes laying at a temperature of 5-15 degrees in dry weather. Most often, such conditions develop only in summer. However, in winter you can assemble the roof truss and prepare the base for the decking.

Installation of battens
Before making a soft roof, you need to assemble a high-quality, durable crate. The technology of laying bituminous tiles involves the use of a solid base, which gives rigidity and mechanical strength to the soft roofing. The lathing should ensure an even distribution of the weight of the roof between the rafters, therefore it is created from 3 layers:
- Counter grill. A counter lattice for soft tiles is made of wooden blocks 3-4 cm thick.It is attached along the rafter legs of the frame on top waterproofing material... The task of the counter-lattice is to create a ventilation gap between the rafters with a roof covering.
- Sparse crate. This base element for soft tiles is made from edged boards measuring 20x150 mm. The boards are nailed perpendicular to the counter lattice at a distance of 30-50 cm.
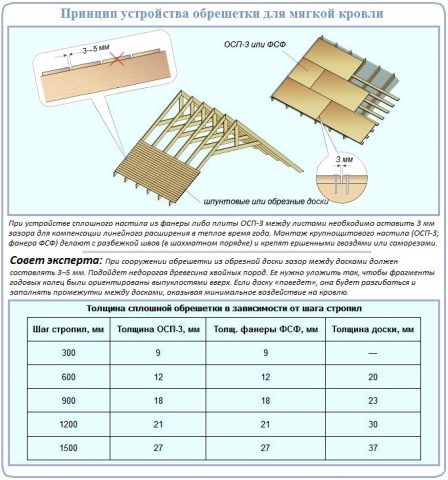
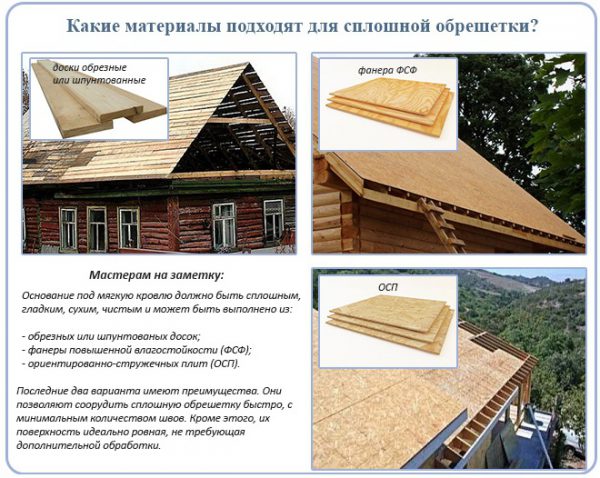
- Solid lathing. It is made of moisture-resistant plywood, OSB sheets or edged boards, laid in a solid piece with a gap of 1-3 mm, compensating thermal expansion material. To prevent damage to soft tiles, it is necessary to sand or sharpen the elements of the sheathing so that they are smooth.
Please note that for the manufacture of lathing under a soft roof, it is correct to use wood dried to 20 percent conifers... To prevent premature decay of wooden elements, they are treated with antiseptic preparations. If the structure has a high risk of fire, then the crate is impregnated with fire-blocking compounds.
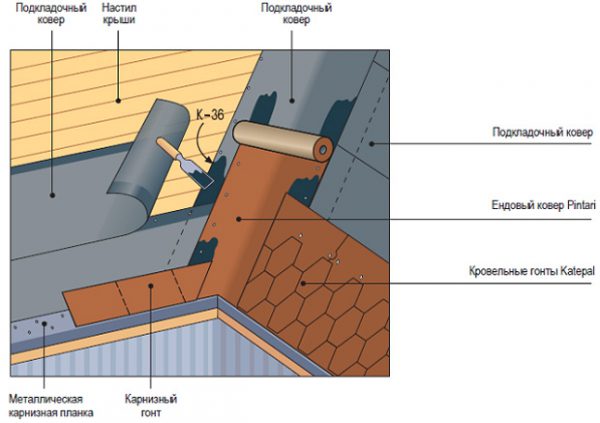
Underlay carpet
The do-it-yourself soft roof is laid on a solid crate made of chipboard or moisture-resistant plywood. Lay on top of the base underlay carpet - lining made of moisture-resistant bitumen material resistant to mechanical damage. The underlayment protects the roof from leaks, as well as from damage to the shingles by uneven lathing. The coating installation technology recommends:
- When the slope of the roof is less than 15-18 degrees, lay a lining carpet on the entire surface of the slopes with an overlap of 15-20 cm, since water can be retained on it during the melting of large snow masses.
- If the slope of the slopes is more than 20 degrees, the lining carpet can be laid only in places that are especially vulnerable to leaks, where water can accumulate or stagnate. Additional waterproofing protects the valleys, the joints of the slopes with vertical surfaces, the ridge.
- Do not use ordinary roofing felt as a lining. The low price does not compensate for the poor quality, fragility and short service life of this material.
Experienced craftsmen advise using the material recommended by the manufacturer as a lining carpet, as it is guaranteed to be compatible with the selected bituminous tile.
Styling
Do-it-yourself installation of a soft roof is performed in dry, calm weather at a temperature of 5-15 degrees. If the material is laid on an old truss frame, then it is necessary to check the condition of the wood, and then replace the rotten or deformed elements. Installation is carried out in the following order:
- First, the slope is marked with horizontal stripes marking the location of the rows of soft roof using white chalk.
- It is correct to start laying the material from the bottom of the ramp using the starter strip. The roof covering is fixed with nails or a self-adhesive layer. If the tiles are self-adhesive, then to glue them, it is enough to remove the protective film and then firmly attach it to the base of the roof.
- If nails are used to fix the coating, then they must be placed at least 2.5 cm from the edge, and also driven flush with the surface of the material.
- The second row begins to be laid on the left side of the slope with the help of a tile, from which 143 mm is cut from the left edge, thus displacing the pattern of the bituminous tile diagonally.
- To start the third row, a 286 mm long fragment is cut from the tile from the left edge in order to also displace the coating pattern in a diagonal direction.
- After completion, shape the ridge with the help of a ridge element, nodes of abutment with vertical surfaces and valleys.
Note! In order for a roof made of soft tiles to function correctly, it is necessary to equip a ventilation system in order to avoid the "greenhouse effect" and decay of the rafter frame of the structure.
Video instruction

