Brick is a multifunctional building stone of artificial origin, with which you can build almost anything. Perhaps this is the most popular building material, without which the improvement of any suburban area cannot do.
For brickwork, it is necessary to have:
- trowels for applying mortar to bricks;
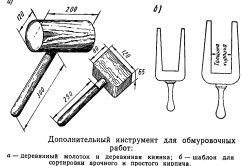
- a hammer-pick with which the products will be hung;
- additional tools, which include a cord, plumb line, level, etc.
For brickwork, an ordinary concrete mortar is used, prepared from cement and sand in a ratio of 1 to 5-6. The mortar is necessary for strengthening the masonry and gluing individual bricks together. Sometimes clay or ordinary washing powder is added there - due to this, plasticity and fluidity increase, but it is prohibited to use it for hollow products, since the solution will flow into the cracks, which will negatively affect the thermal insulation properties of the material.
The protected rivers Neamun, Neris, Nevezhis and other rivers, bars are being built here, defensive towers were built. However, they are mainly related to the strengthening of castles, their application to more advanced military techniques, unfortunately for firearms.
To cover wider defensive defenses, the towers were built to build fortresses outside the castle walls and for shooting and shooting for a new type of weapon. It was important to strengthen the castle walls and build new flanged towers. The stone castle was reconstructed even more intensively. Instead wood construction new stone and brick. Since wooden castles were mostly built on the high hills of the archipelago, their shape was usually an irregular polygon. Such plans survived the construction of a stone castle.
To prepare the mortar, you must first mix dry cement with sand, and then dilute with water as needed.
Note! It is undesirable to mix more than 50 liters at a time, as the solution is consumed slowly. It is better to take a small amount of dry mix and dilute it with water.
But if you plan to perform a large amount of masonry, and several builders are involved in the work at once, then it is more expedient to use a concrete mixer. We also note that it is recommended to use cement "three hundred" or "four hundred" grade.
If earlier, most of the castles were shelters, the inhabitants of the surrounding area surrounded the castle, now they have become fortified territories of the territory, the headquarters of the princes, without protection, their representative function has become no less important. The territory of the castle is divided into two zones: defense-economic and residential with the Palace of the Grand Dukes. This zoning of the territory was reflected in the structure of the castle plan.
But unlike Lithuania, this was not the only type of Gothic castle. In the lands occupied by crusaders and swordsmen, according to the monastic characteristics of these sacraments, ordinary castles were adapted not only for defense, but also for monolithic life, with traditional monastic buildings and a chapel. At that time, the castle of the monastery was also built on the territory of Lithuania, captured by the Teutonic knights.
After preparing the solution, you can start laying directly.
| Masonry size | Length, L | Width, B | Height, Н | Number of bricks excluding thickness mortar joint, PC. | Number of bricks taking into account the thickness mortar joint 10 mm, PC. |
|---|---|---|---|---|---|
| 1 cubic meter single brick masonry | 250 | 120 | 65 | 512 | 394 |
| 1 cubic meter thick brick masonry | 250 | 120 | 88 | 378 | 302 |
| 250 | 120 | 65 | 61 | 51 | |
| 1 sq. m masonry in half a brick (masonry thickness 120 mm) | 250 | 120 | 88 | 45 | 39 |
| 1 sq. m of masonry in one brick (masonry thickness 250 mm) | 250 | 120 | 65 | 128 | 102 |
| 250 | 120 | 65 | 189 | 153 | |
| 1 sq. m masonry in one and a half bricks (masonry thickness 380 mm) | 250 | 120 | 88 | 140 | 117 |
| 250 | 120 | 65 | 256 | 204 | |
| 1 sq. m masonry in two bricks (masonry thickness 510 mm) | 250 | 120 | 88 | 190 | 156 |
| | 250 | 250 | 65 | 317 | 255 |
| 1 sq. m masonry in two and a half bricks (masonry thickness 640 mm) | 250 | 250 | 88 | 235 | 195 |
How to lay the corners correctly
If you have seen how a professional bricklayer works, you probably noticed that he begins his work by removing the corners. First, each of the corners should be taken out in turn, while their height should slightly exceed the height of the middle sections of the walls. For this purpose, reference beacons are used, through which the cord is pulled - it will indicate the height and level of the masonry. It is necessary to pull the cord as tight as possible so that it does not sag during operation. Moreover, it is necessary to periodically re-lay with bricks-beacons.
To form rectangular corners, it is necessary to use the so-called ordering - a special device, which is a flat iron square. In order, you can make marks along the laying lines. The first two or three bricks must be laid using the rule, after which the order is established by means of brackets. A plumb line should be used for vertical positioning. According to the marks made in the order, a mooring cord is drawn.
Note! Experienced bricklayers do not like to use order, preferring to draw corners "by eye" and considering this tool the lot of only inexperienced craftsmen. But if you are laying bricks for the first time, then you cannot do without ordering.
Video - Laying corners
Types of seams
After laying out the corners in several rows, it is necessary to pull a cord between them (corners) and put the mortar on the foundation. After that, you need to start the main laying. To understand all the nuances, you need to familiarize yourself with at least the main types of masonry seams.
There are several such seams, the most common of them are listed below.
- Pustoshovka - the mortar in this case does not protrude above the surface of the bricks; there are small gaps that will be used for plastering. The plaster will flow into the cracks between the products, as a result of which it will adhere well.
- Convex seams perform a purely decorative function. To form them, a piece of a rounded pipe cut lengthwise is used.
- Concave seam function also purely decorative, but an ordinary, uncut pipe is used for the formation.
- Undercut the slots are completely filled and aligned with the brick surface. Such masonry is used mainly for smooth surfaces (stoves, fireplaces, chimneys) in order to avoid the accumulation of soot, less often as decorative.
Main masonry
So, after removing the corners in several rows, you need to start the main laying. In the future, as the construction proceeds, the corners will rise. After the formation of the corners, a layer of mortar is applied to the foundation, and a cord is stretched between them. You need to pull as tight as possible to avoid problems with the evenness of the masonry. A mortar is applied to the end of the first brick, after which it (brick) is placed close to the corner. All subsequent bricks are placed in the same way.
Note! The cord should only be pulled over the top level of the bricks.
For a tighter fit, more mortar is placed on the walls, after which each brick is tapped with the end of the trowel and aligned to the level of the cord. The solution that comes out is picked up with a trowel. Of course, if you are laying for the first time, then the first few rows will have to be shifted in any case, but after two days the work will go faster.
And remember the main thing - there is no need to rush. First, lay the brick dry, as we have already mentioned, then apply the mortar and start laying, tapping each product with the end of the trowel so that it takes the desired position. The solution that protrudes outward must be removed with a trowel and thrown back into the bucket.
You should not rush when working with a solution, because this is not a "Moment" that grasps in a few seconds. You will have plenty of time to experiment with the installation, remove and lay the mortar, turn the bricks to one side or the other - in short, make it perfect. After acquiring the appropriate skills, you will be able to draw the required amount of mortar on the trowel the first time and immediately install the brick in the required place. So the laying procedure will be performed much faster.
| Name | Average density, kg / m3 | Porosity,% | Frost resistance brand | Strength grade | Colour |
|---|---|---|---|---|---|
| Solid brick | 1600-1900 | 9 | 15-50 | 75-300 | red |
| White brick | 1000-1450 | 6-8 | 15-50 | 75-300 | from light brown to dark red |
| Hollow brick "super efficient" | 1100-1150 | 6-10 | 15-50 | 50-150 | shades of red |
| Facing brick | 1300-1450 | 6-14 | 27-75 | 75-250 | from white to brown |
| Facing bricks, glazed or engobed | 1300-1450 | 6-14 | 27-75 | 75-250 | any |
| Brick parameters | Hyper-pressed brick | Clinker brick | Silicate brick | Ceramic brick |
|---|---|---|---|---|
| Compressive strength, kg / cm² | 150-300 | 300-500 | 75-200 | 100-175 |
| Frost resistance, cycle | 75-150 | 50-100 | 35-50 | 15-50 |
| Moisture absorption,% | 6-8 | Less than 6 | 6-12 | 6-8 |
| Thermal conductivity, W / m ° С | 0,7-0,8 | 0,7 | 0,3-0,7 | 0,3-0,5 |
| Weight with a size of 250x120x65., Kg. | 4 | 3-4 | 3,8 | 3,5 |
And as a conclusion - a thematic video.
Video - Correct brick laying
- Description, application
- Preparatory work
- The process of laying in half a brick
The simplest in execution is half-brick masonry. It is often used to create interior partitions from bricks, cladding of buildings, construction of fences for beds, etc. Walls laid out in this way cannot be load-bearing structureshowever, they are strong enough to hang some decor or furniture on them. Laying in half a brick will save resources during the construction of secondary partitions, while the consumption of brick and mortar is reduced by at least 2 times. In addition, the operating time is also reduced, which saves not only materials, but also energy and time. How such brickwork is carried out, what is required for this and where it is profitable to use it, will be described below.
Description, application
Often, when building simple structures that will not carry a serious mechanical load, people try to save money. Therefore at construction works often cheap construction Materials (for example, drywall), which do not always have the required characteristics. A good solution for the construction of simple structures would be the construction of brickwork in half a brick. At the same time, in the case of the construction of indoor facilities, the floor does not require reinforcement - its strength is often sufficient to withstand the mass that the masonry has in half a brick.
For the first time this type of masonry appeared around 7000 BC. Archaeologists have discovered objects that belong to the ancient Indian culture in India and Pakistan.
Over the past time, the masonry technology has practically not changed. It is carried out in such a way that the visible part will only consist of spoon parts of bricks. The principle of laying is quite simple - the brick is laid in one row on a layer of mortar. In this case, the laying is carried out in a checkerboard pattern so that the vertical seams between the rows of bricks do not form one line. Failure to comply with this rule leads to a deterioration in the strength of the structure. Such masonry provides a wall thickness of 12 cm - the width of the brick (if there is no additional wall decoration). This thickness can support the weight of the hanging furniture, but cannot support the weight of the building structure. Therefore, such masonry cannot be carried out for construction. load-bearing walls (after all, according to SNiP and the Construction Law, the thickness of the load-bearing walls should not be less than 38 cm).

It is possible to rely on any structures (for example, roof rafters) on such walls only after an examination and a special permit (project) issued from the controlling services. In this case, the load on such a wall should be limited - it can withstand a mass of about 120-130 kg. Therefore, it is necessary to hang furniture and equipment on it based on these numbers (for example, you cannot hang a 150 liter electric water heater on such a wall). In the case of the construction of walls, one side of which is outside the building, additional reinforcement (reinforcement) of the masonry structure is required. For this, the reinforcement is laid so that it forms a transverse "lattice". Fastening of the reinforcing grid is performed by welding to the elements of the bookmark in the adjacent walls. The lattice step is carried out with a thickness of 3-4 bricks (rows). The reinforcement can be supplemented with a metal mesh, which is placed in the seam.
Such walls can be built for the following purposes:
- For fencing garden beds. Especially often this type of masonry is used to fence flower beds on the street in front of the entrance to the yard. This will prevent accidental or deliberate visits to flower beds.
- For the construction of interior partitions. Such masonry will allow you to create a solid wall that will have good sound insulation, in addition, it will allow you to finish with any materials. It is important to take into account the weight of the finish (for example, the total weight of the plaster) and not overload the wall.
- Construction of auxiliary buildings. For example, dog houses, small sheds, coal bunkers, etc. During the construction of such facilities, it is strongly recommended to organize a foundation for laying (more details will be described in the section " preparatory work»).
- Construction of all sorts of fences: to prevent soil creeping (if the site is on a slope), to visually separate any objects, etc. At the same time, such masonry should not be made when building full-fledged fences, since the wind load against a wall 1.5 meters high and more than 2 meters long exceeds 350 kg.
How to perform such a laying for different needs and under different conditions, read below.
Back to the table of contents
Preparatory work
Before starting the construction of the wall, it is necessary to carry out some preparatory work, which will differ significantly between laying the wall indoors and outdoors.
The first thing to do is to draw up a diagram. The scheme is drawn up based on the actual dimensions of the wall. This is done to count the required amount materials (brick + mortar). Having the exact dimensions of the wall (and knowing its thickness), the amount of material is calculated. So, by 1 square meter requires 61 pieces of standard brick or 45 pieces of one and a half. In the scheme, they also try to draw the brickwork.
Next, the construction site is cleared. If it is planned to build indoors, then the floor is carefully leveled, removing unnecessary areas or filling the cavities with cement. Similar work is done with the ceiling - the surface should also be perfectly flat. If there are gaps, then they should be cleaned of debris and filled with cement or concrete mortar.
In the case of building a wall on the street, it is necessary to prepare a foundation for it, since it has a large mass. To do this, a trench is dug about 30-40 cm wide, 50-60 cm deep. After that, formwork is made from boards, metal sheets, slate and other materials at hand. A "pillow" is laid at the bottom of the trench. To do this, an 8-10 cm layer of sand is poured, which is leveled and tamped, the same layer of gravel (or crushed stone), it is also equalized and tamped. Then they start pouring the foundation with cement or concrete mortar. Then the foundation is allowed time to dry, and the formwork is removed. Laying on the foundation should be done so that the longitudinal axis of the wall coincides with the axis of the foundation (i.e. the bricks are placed in the middle of the foundation, leaving the foundation protrusion on 2 sides). This completes the preparatory work.


