Do you want to functionally and visually zone the space of the apartment, but do not want to install standard interior doors? Then your choice is drywall arches. They not only separate the rooms, but also effectively decorate doorways, making them more original. In addition, these beautiful designs do not require large costs - they can even be made by hand. How? First, find out the features of different types of arches and evaluate the photo finished products in the interior to decide on the design of the model. Then read the step-by-step instructions and watch a video explaining all the stages of installation. And then you can confidently start installing the arch. Further on all this in more detail.
Choosing the type of arch
The main distinguishing feature of each arch is the shape of the vault. It is she who serves as a criterion for the classification of products. So, the following types of arches are distinguished:
- classic - the traditional version with a semicircular vault, the center of the section of which passes exactly in the middle of the doorway;
- portal - laconic arches with a rectangular vault;

- segmental - an asymmetric arch, the arch of which consists of two elements: one repeats the shape of the portal, and the second - the classical model;
- modern - semicircular arches with a non-standard radius of curvature of the arch - more or less than the classic radius in half the width of the doorway;
- romantic - a kind of portal arch with neatly rounded corners.
Council. When choosing the shape of the arch, you should take into account the size of the rooms. If the ceilings in your apartment or house are low, it is better to refuse the classic variations - they somewhat conceal the space. And for very low rooms, it is better to select arches without pronounced curves at all - segment or portals.
Preparing for installation
Before proceeding with the direct design of the arch, you need to perform several preparatory work... The first is the preparation of the necessary tools and materials. In particular, you will need:
- drywall sheets: two sheets 12 mm thick and one for the arch - 6.5 mm thick;
- metal profiles - at least 6 pieces;
- two arched corners;
- dowels and screws;
- hacksaw for metal;
- drywall knife;
- hammer drill, screwdriver and drill;

Tool for installing drywall arch
- building level;
- pliers;
- roller;
- gypsum putty and spatula;
- primer;
- sanding paper;
- pencil and tape measure.
Next, you need to prepare the opening for the installation of a new structure. First of all, you need to eliminate the door frame - this will help to significantly increase the opening area. After dismantling, it is necessary to thoroughly clean the surface from various flaking materials, dirt and dust.
After finishing preparatory phase proceed with the installation of the arch. Start by assembling and installing the structural frame.
We construct the arch frame
The construction of an arched frame consists of the following stages:

We mount drywall on an arched frame
After the arch frame is installed, it must be sheathed with plasterboard. Start with the side parts: use self-tapping screws to screw the prepared blades to the metal guides in increments of 15-20 cm.

Council. Screw in the self-tapping screws so that their caps are "buried" in the drywall - so they will not interfere with the performance finishing works and subsequently will not spoil the appearance of the arch.
Next, you need to fix the drywall to the curved top profile. This is the most difficult procedure, since the material, on the one hand, bends poorly, and on the other hand, it can quickly deform under force. The best way out of the situation is to slightly wet the drywall and, carefully bending, adjust it under the frame. When the required arch radius is reached, attach the plasterboard elements to the curved profile using self-tapping screws. Then the finished upper part of the arch with the same screws must be connected to the side walls of the structure.

We process and decorate the arch
The last stage in creating a drywall arch is finishing and design of the structure. The first procedure is performed in several stages:
- Rub over the surface of the arch with sandpaper to remove any roughness and unevenness.
- Fasten the arched corners to the putty - they will keep the shape of the upper part of the structure.
- Putty on all assembly seams.
- After the filler is completely dry, clean all the unevenness again.
- Cover the surface of the arch with a primer, and after it dries, apply a finishing putty on top and sand the structure again.

- wallpaper finishing is a simple option with great possibilities: thanks to the variety of textures, colors and patterns, you can choose the cladding for absolutely any style. It is best to use non-woven ones - they are not only aesthetic, but also durable.
- painting - this decoration option is good for its practicality: the painted structure can be washed an unlimited number of times. Choose water-based paint - its colors are more saturated.

- fabric upholstery is a custom finish that will give your arch a more noble look. The choice of fabrics is unlimited - from laconic cotton to exquisite jacquard.
- decorative patterns - a very easy-to-implement decorating idea: you only need template stencils, paint cans, protective film and your own imagination.
A drywall arch is an effective and relatively simple way to transform the interior of your home with your own hands. All you need to do is follow the instructions and carry out all the work in stages. And the result will not keep you waiting long - you will get an original and original doorway instead of the usual interior door.
How to make an arch with your own hands: video
Drywall arch: photo


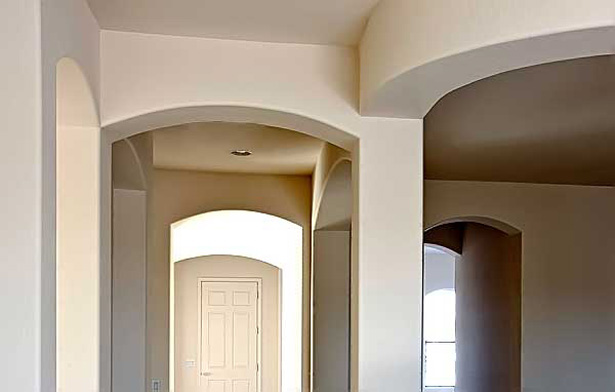


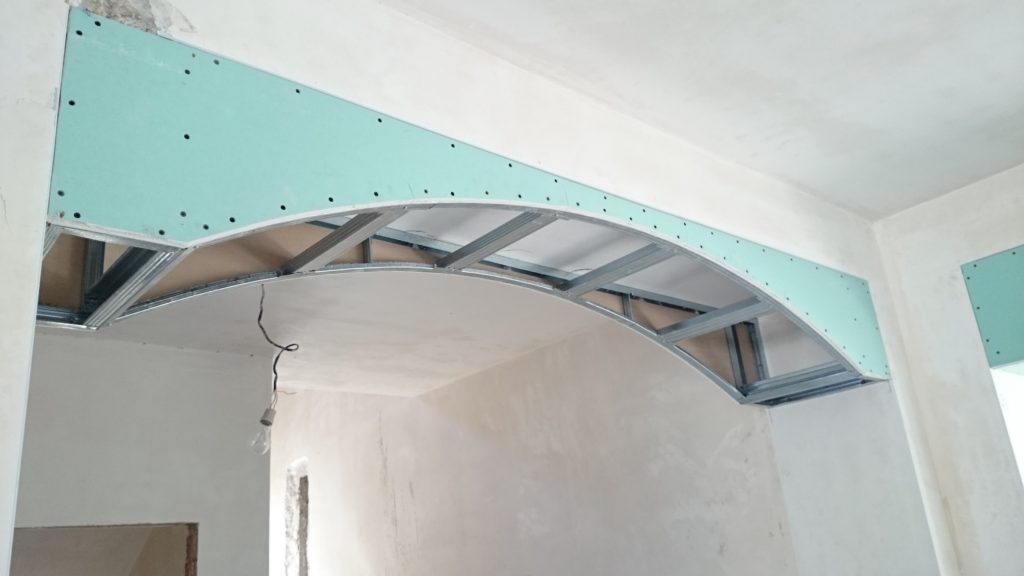
Interior, door / window and / or wall arch-niche is the most effective method zoning space of living quarters. It lends monumentality, prestige and at the same time comfort to housing. The reason is clear - the entrance to the cave, where our ancestors took refuge and survived, is nothing more than a natural arch. With the current living standards, decorating an apartment with an arch is an urgent question. And completely solved independently, there would be a little certain knowledge and the ability to hold an instrument in hands. Another good reason for making an arch with your own hands is its aesthetic connection with interior design. There are many types of ready-made arches and kits for their assembly, prices are reasonable. But the arch is atypical, like the one in fig. below, it will stand out very prominently in the estimate for the overhaul. And in the case of self-production, you can do without capital, and costs are reduced in ... you still will not believe it, if you tell the truth.

Arches in apartments are most often made of plasterboard or wood materials on a frame made of a thin-walled steel profile or wood. The one and the other cladding materials are fully compatible with one or another carrier. It is more expedient to build drywall arches with your own hands for amateurs who do not have separate production areas, they are less laborious and do not require serious special skills. The aesthetic qualities of plasterboard arches are acceptable in any room, and in the interior of modern laconic styles they can be excellent and even outstanding.
Note: drywall for beginner arches is still good for its high technological (not to be confused with mechanical!) plasticity. It suffers from significant flaws in its work and deviations from basic technologies.
The main advantage of arches made of wood materials is that they can be installed in the opening directly over the existing finish. The associated repairs will then be reduced to garbage collection. To make a capital luxurious arch from wood, you will need a carpentry workshop or at least a corner in the garage, and possession of fairly subtle manufacturing techniques, see, for example, at the end. Arches made of wood-based panels can be "super budgetary" if the aesthetics are required not above average, and the durability is up to 10-12 years. A home-made capital wooden arch in terms of labor costs and material costs is comparable to a good drywall one, and a "super-budget" one can be built over the weekend, spending no more than 1000-1200 rubles per circle. Finally, a wooden arch is indispensable for finishing with artificial stone, see sect. about wooden arches. As you know, drywall does not hold its weight. But imitation of a stone arch is a complicated and laborious task. Therefore, further we will focus more on drywall arches (gypsum plasterboard, plasterboard).
Which one to do?
The arch fits into the interior primarily by its shape. Decor is a secondary factor here, i.e. it (and its costs) can be minimized. But in order to make an arch harmonious in the interior, you need to know how it is arranged and what its aesthetic impact is based on. For a start, no special subtleties are required.
Arch elements
The arch of an arch is formed by arcs of curves, the so-called forming the arch of the arch or simply forming the arch. The vault can be smooth-hemmed, i.e. with a continuous coating, or type-setting of parts with gaps / seams between them. A smooth-hemmed vault is not necessarily completely smooth; embossed decor is possible on it. The marginal corners of the vault are often decorated with platbands.
The highest point of the vault is its top. A power and / or decorative element - an arch lock - can be located here. From it to the sides and downward go its wings, the ends of which - the heels - can end with decorative details or lean on the bearing thrust bearings - the legs. The distance between the heels of the arch of the arch is its span, and the vertical height of the arc from the middle of the span to the top is the arrow of the arch.
The arch vault can be hanging, as if going into the walls, or leaning on pilasters or shoulder blades. Pilaster - a half-column, or a 3/4 column (if the pilaster is angular), with a base and a capital. A scapula is a similar projection of a wall into a passage, but without a base and a capital.
The design and decoration below the heels of the vault (pilasters, blades) constitute the portal of the arch. Typically, the decoration of the arch and portal of an arch is uniform, i.e. performed in the same style. There are also portal arches with a straight horizontal vault. But these are the actual openings. One of the main topics of this article - how to bring out the curved arch of an arch with your own hands - is not relevant in this case, so that's enough about the portal arches.
Transom
The framing of the arch from the outer borders of the portal and the vault to the walls and ceiling constitutes the arch transom. In a narrower sense, a transom is considered to be decorated uniformly with a portal or glazed top of an arch with a door, from the top of the door to the top of the vault.
Golden ratio ...
... or harmonic proportion is the ratio of the quantities Φ \u003d (a + b) / b, if b\u003e a. In figures, with an accuracy sufficient for architecture, Φ is observed at 32% a and 68% b, i.e. approximately a \u003d 1 / 3b. The visual effect of the golden ratio is due to the location of the so-called. macula in the retina.
A door arch must meet the Golden Ratio in the sense that its total height is approximately three times the width of the passage. Otherwise, either the portal is somehow zoned in height; say, a shaped door or additional elements on pilasters.
The depth condition is additionally imposed on the arch in the opening with the passage: the length of the passage under it should not be more than 3 of its widths, otherwise, instead of the effect of comfort, the effect of oppression will be obtained. This condition can be circumvented by placing an additional arc (s) with pilasters in the middle of the passage.
Types of arches
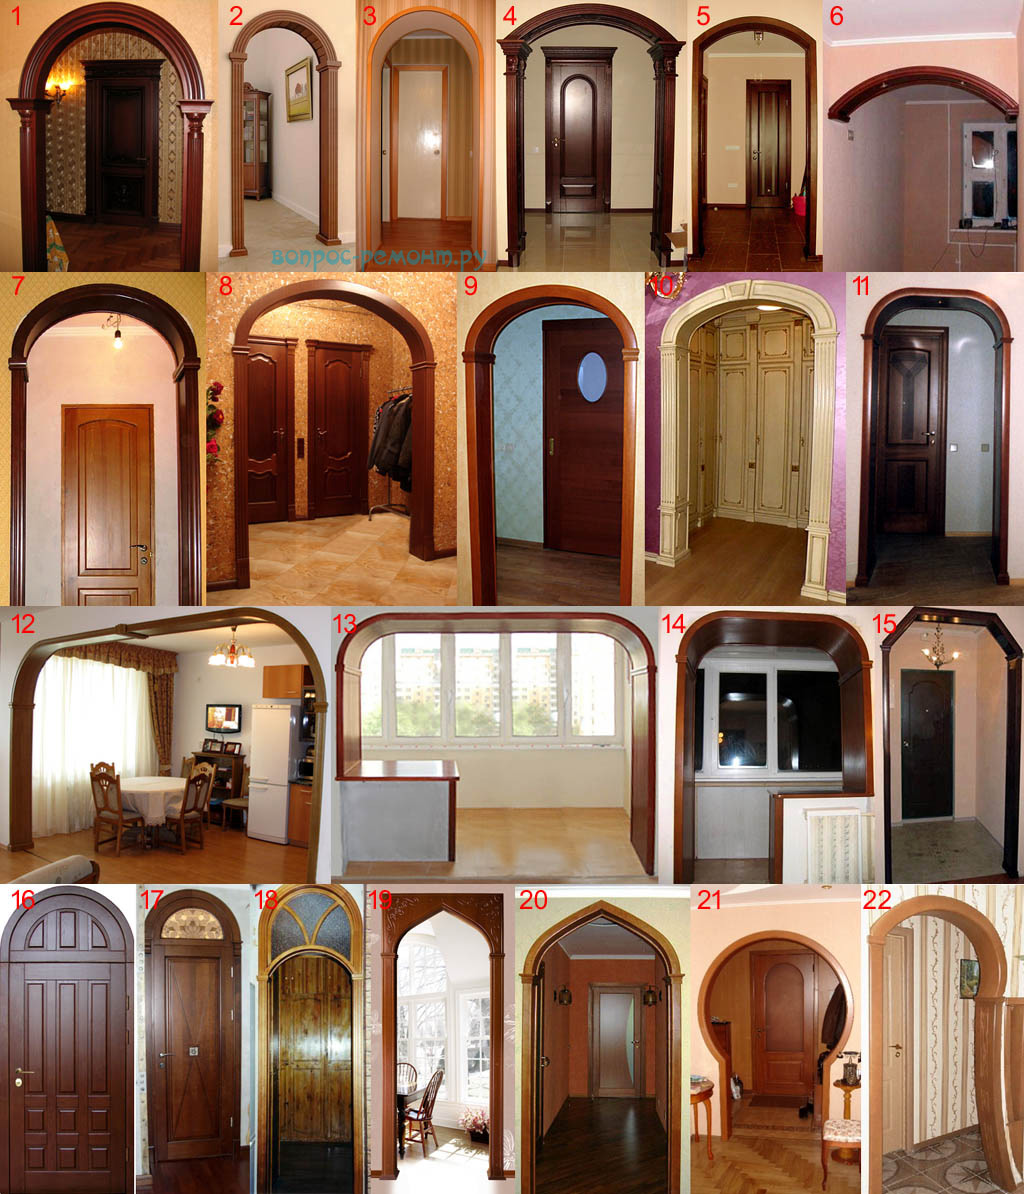
The types of interior arches, technologically available to novice masters, are shown in the photo, see fig. Pos. 1-3 - classic semicircular arches. They are the most monumental, but are suitable only for rooms of sufficient height: if from the top of the arch to the ceiling is less than 1/3 of the arrow of the arch, the visual effect of the semicircular arch is significantly reduced. In addition, without laborious pilasters, the semicircular arch looks liquidish, pos. 3. But on the other hand, the capitals of the pilasters make it possible to adjust the arch to the height of the ceiling at times, cutting its wings in height (by no more than 7-10%) from below, pos. 2.
Note: do not think that these photos are expensive piece goods. Almost all of these arches are sets of ready-made standard elements made of PVC or MDF in an arched opening made of gypsum plasterboard on a steel frame, see below. The modular decor of the arches is put simply on the mounting glue directly on the finish.

Segment arches, pos. 4-6, not so pompous, but suitable for almost any design. The hanging segment arch may well even look, being trimmed with a material that seems to be foreign to the general design. In addition, shelves can be attached to the segment arch without any special design tweaks and almost nothing in aesthetics, see fig. on right.
They almost completely preserve the aesthetics of semicircular arches, but the arch can be only 20-30% high, elliptical arches (pos. 7, 8) and Persian, pos. 9.10. The height rule of 3 aisle widths has little effect in them, therefore these arches are most preferable in an apartment modern home... The difference between them is purely mathematical: the Persian arch is formed by an arc not of an ellipse, but a curve of the 4th order. It is often replaced by a 4-center oval, which is easier to build and draw.
Note: Persian arches are sold as Art Nouveau arches or, sometimes, as Roman ones. In fact, the ancient Romans adopted this arch from the Parthians, descendants of the ancient Persians and predecessors of the Iranians, and called it Persian.
An extreme case of flattening of the vault is an interior arch of the Romance type, pos. 11-14. What is so romantic about them is only known to those who gave the name, but the practicality of the romantic arches is excellent: any ceiling, any decor, the 3/1 height rule is not visible at all, with shelves it is even easier than for segment ones. If you need to arrange a passage to the balcony attached to the room, the romantic arch is ideal, pos. 13, 14.
Note: even under the lowest ceiling, you can squeeze a trapezoidal arch, pos. 15. But its labor intensity in the manufacture of gypsum board is only slightly less than that of curvilinear ones, and the aesthetics is satisfactory at best.
Romance arches often decorate the passage to the kitchen in studio apartments, pos. 12. In a dwelling of the usual type, an arch with a glazed transom, pos. 17-18; for more details on kitchen arches, see below. Arch with a deaf transom, pos. 16 is preferable for the front door, because making an arched door anti-burglary and anti-vandal is more difficult and cost more.
Lancet interior arches so far they are not widespread, although technologically for their construction it is enough to add a ridge beam or beam to the frame. There is a prejudice that a pointed arch will only look in a tall room. However, it is enough to supplement the design of the lancet type arch with a deaf transom in the same style, pos. 19, and the aesthetics will not diminish. And just an arrow, almost rested against the ceiling, of course, does not look good, pos. 20.
Shaped arches (curly, examples at pos. 21 and 22) are innumerable. But in general we can say about them, firstly, that almost all of them can be made from gypsum board according to conventional technologies, see below. Second, the design of the shaped arch is necessarily developed at the same time and in full coordination with the interior design. If you already have something in mind, then it is better to postpone it until the overhaul.
Arches in the kitchen and in the kitchen
The glazed kitchen door is actually the poor man's exit. There are many reasons for the doors to the kitchen to be deaf: kitchen fumes and sounds, a hostess who has not preened herself steamed during cooking, drying clothes. A sufficiently sized kitchen is the best place to install a washing machine: the bathroom does not take up and the likelihood of a malfunction of the washing machine is much less. And if the kitchen is led by a doorway to the common areas, then what pleasure is it for a diner to watch someone enter the toilet and hear how it (the toilet) is used for its intended purpose? Therefore, it is better to decorate the passage to the kitchen with an arch with a glazed transom, enough light on duty will pass through it.
The second case is an arch-niche in the kitchen. In kitchen cabinets, jars are hard to see and can be inconvenient to grop. In a small kitchen, open cabinet doors are a big nuisance. For something that should always be at hand, the ideal place in the kitchen is a niche with shelves. Making it in the form of an arch adjacent to the wall will make the kitchen more attractive. Technologically, the kitchen niche-arch differs from the arch in the aisle in that it is possible to work only from one side. Running a little ahead, we give a video on how to make an arched niche from drywall in the kitchen:
Video: arch-niche with lighting in the kitchen
About markup and geometry
The contour of the semicircular arch is marked when cutting the material, as is known, with a homemade compass from a rail or a piece of profile with self-tapping screws screwed along the edges. But when marking a segmented arch, the radius of the generating circle rapidly increases with a decrease in its arrow, which is especially important at low ceilings. If someone makes a rack compass with a shoulder of 5 or even 15 m, then how to use it? As well as building an elliptical arc or a complex curve of a Persian (modern) arch according to the formulas. For such a case, Fig. given are drawings of families of generatrix curves, segmental (above), elliptical (in the middle) and Persian (below), along which a decorative arch of various depths can be built, i.e. the relative size of the boom: for its 100% the ratio of the span to the boom, equal to 2, is taken, as in a semicircular arch. With a careful transfer along the cells, the construction accuracy of 3 mm per 1 m of length is observed up to a span of 3-4 m.

Note: elliptical and Persian arches can be made partially closed from below (inset in the middle of the figure), because the tangents to their generatrix curves at the heels are vertical.
Another problem - the finishing of segmental arches - arises at the corners when installing platbands: the cuts at the usual 45 degrees along the contour do not coincide, because the tangent to the circle at this location and the vertical are not perpendicular. Sections of the details of the design of the segmental arch must be carried out along the bisector of the angle between them. How to build it without getting bogged down in furious calculations is shown on the next page. rice:

- We take a sheet of paper in an A4 cell (preferably A3), cut out the template of the arch of the arch on a reduced scale from the cardboard. Outline the template on paper while removing. On the outline of the template we build the arrow of the arch a (pos. I); the tangent to it at vertex 1 will be horizontal, pos. II.
- We put the template into the contour and carefully, following the contour, we rotate it until the tip of the template falls on the top of the arc (Fig. B to position III). Now the top of the template coincides with the heel of the arc 1 '. We draw a line on paper parallel to the base of the template, this is the tangent t to the arc at its heel, pos. III.
- From the same heel, which is now the center of construction O, draw a vertical downward (green in pos. IV). Then, with an ordinary compass of arbitrary radius r from point O, we make serifs 2 'and 2' on the tangent t and the vertical, and from them with radius R (it can be the same, but preferably large) - a pair of intersecting serifs, which will give point O '. The O'-O line is the desired bisector s of the 2 ”O2” angle between the vertical and the tangent to the arc.
- Along the bisector, it remains (pos. V) either to draw and cut out a template for cutting (already at a scale of 1: 1), or calculate the angle α of the installation of the rotary table of the miter box - a simple device for manual sawing of long materials at a given angle; available for sale and rent.
How to measure the arch?
The master arch must be able to measure the length of the generatrix of the arch along the inside, i.e. on a concave surface, with breaks, points, sharp angles. The simplest way to measure the generatrix is \u200b\u200bcotton tape. Fresh, only from a roll, it does not fall off the plastered surface, not to mention cardboard, wood and metal, but when peeled off it does not stretch or break. A strip of "rag" tape is carefully applied along the generatrix, then removed and measured.
Plasterboard Techniques
Making an arch from drywall is possible in 2 ways. The first, as the fastest, but requiring skill, is preferred by professionals: time is money. The second is more suitable for inexperienced amateurs. However, both of these technologies have something in common, which we will focus on first.
Bending
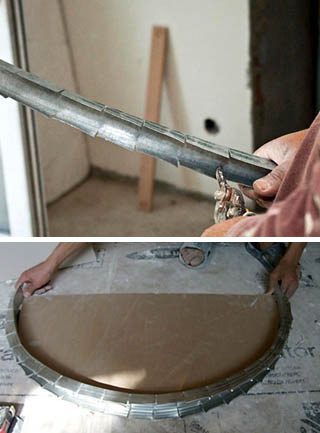
Any technological process for the construction of a gypsum plasterboard arch necessarily contains the bending (bending) of the gypsum board for covering the arch. It is produced by dry or wet methods, see fig. Temporary support-thrust and fixing parts can be any sufficiently rigid and even long-length ones, and the vaults of narrow arches bend without them, see below. In the same place, we'll see which method is preferable in which case.

Dry, not very wide gypsum plasterboard blanks can be bent without a template, along the contour outlined on the underlying surface. The cuts (slots) are made with a mounting knife for 2/3 of the sheet thickness. Putty them after installing the part in place. Dry bending of gypsum board is more laborious and requires skill so that the workpiece does not break, but it is done faster.
Wet (wet) bending requires a drywall needle roller and bending template. For arches with a span of up to 2 m and a depth of up to 1.5 m, a roller is needed with low sparse teeth (see the figure on the right). Wet bending of gypsum plasterboard does not require special skill, but technological breaks are required. It is produced like this:


In this way, it is possible to bend the lining of the arch of the arches with a depth of the entire width of the sheet, on the right in Fig.
Method one
The professional technology of plasterboard arches saves not only time: the transom and / or portal can be sheathed with pieces of gypsum plasterboard up to the trim. The consumption of the metal profile is greater than for the "amateur" version, but since the total waste of materials is small, and the cost of the finished arch is much less. The final structural strength is significantly higher. The step-by-step instructions for making a "professional" arch as a whole are as follows:
- The transom frame is assembled without arch arcs in the usual way for gypsum board, from thin-walled galvanized C- and U-profiles on self-tapping screws;
- If there is a door in the arch, then its frame is assembled separately from a special reinforced door profile and fixed in the door frame. It is impossible to assemble the door frame immediately from the reinforced profile and fasten it tightly in the transom opening, the frame will soon lead and the sheathing will crack;
- A special profile for curved parts is taken on the arcs, pre-cut during manufacture;
- Arcs are bent from it according to the pattern and put them acc. opening of the transom, pos. 1 and 2 in Fig. below;

- Each arc is attached first at the top, and then, trimmed according to a template or, with sufficient experience, by eye, is attached to the main frame at the heels;
- The "curved" special profile plays stronger than the solid one, so the wings of the arches are reinforced with jumpers from the usual profile, at least 1 in the middle of each wing, pos. 3;
- Prepare a strip of gypsum board for covering the arch and bend it dry beforehand, pos. 4, without spline putty. Slotting step approx. 15% of the radius of curvature of the arch at this location. For semicircular arches - approx. 10% of the span; for segmental depths up to 60% - 15-20% of its width. Particular accuracy is not needed here, the purpose of preliminary bending is to shape the gypsum board roughly so that it does not break during installation;
- They put the covering of the arch as usual dry-bent gypsum board, a pair of self-tapping screws on each edge of each lamella (a section of the sheet between adjacent slots);
- The facades of the portal and the transom are clad, except for the faces of the pilasters facing inward;
- Measure the inner edges of the pilasters in place, cut out pieces for their sheathing and mount;
- Putty the grooves between the casing sheets, fastener heads, scratches, small dents, etc. Preferably acrylic putty, it adheres well to any substrate and gives very little water to the drywall;
- The arch is pasted over with plaster mesh. The best glue for the GCR base is silicone. Mounting nitro-glue can fall off over time with a piece of gypsum board;
- Plaster, then finish and apply decor.
Method two
On the facades of the arch "for dummies" you will need 2 solid pieces of gypsum board with a width along the width of the passage and a height along the height of the vault + top to the ceiling. With technological allowances, of course, so that approx. 50% of the material. But the gypsum board is inexpensive, and for an amateur one-time work such an overspending is justified. You will also need a strip of gypsum board with a length along the generatrix and a width in the depth of the arch. If the arch is with a portal, then the material for its sheathing. Step by step the "amateur" arch is displayed as follows, see also fig. below:

Typical mistakes

Some home craftsmen follow the steps in pos. 4-6 fig. omitted. The cavity of the arch is filled with polystyrene, the recesses in the arch are foamed, the excess foam is cut off, then the mesh is glued, plastered, etc. Nothing, it looks like, stands / hangs. Before the first blow, e.g. by a portable ladder or furniture. The edges of the vault, in fact, are free, strongly move, the facade cracks, and its patching is not enough, the entire arch must be redone.
The same result will be if the lintels in the vault are mechanically connected to each other only through drywall, without arcs from the profile. And if they are wooden, as in fig. on the right, then a blow can not be expected: due to the difference in TCR (coefficients of thermal expansion) of the tree and the gypsum board, after a season or two, the screws will climb outward, swelling the finish.
Tree in the arch
A wooden arch, as already mentioned, is the only one suitable as a supporting base for imitating stone arches, see fig. Real stone arches in the premises are built at least during the overhaul, because the defeat in this case will be complete. In addition, the overlap may be overloaded, therefore the construction of a stone arch in an apartment is equivalent to redevelopment: a project, an estimate, a work plan, a lot of permits and approvals, and the building itself is only a licensed contractor. The cost is understandable.


In general, the tree is noble natural material it is better to make a wooden decorative arch in itself, revealing all its advantages. A very beautiful arch made of wood - bent or glued from ready bent lamellas; it looks great even if not finished on a workbench in the workshop, see fig. on the right and the plot below:
Video: do-it-yourself arch made of wood
But the latter will be expensive, and to make the former, you need to be able to bend wood. This is a complex business and requires a lot of experience, a beginner can only be able to bend plywood right away, see the next video. Technologically more affordable for home-made arches from prestressed plywood or type-setting from lumber.
Video: how to bend wood and plywood at home
Plywood
Plywood arches are finished and assembled locally similar to "amateur" drywall arches, but with some differences: their facades are made as shown in Fig; the wall frame for such an arch can be both steel from a profile and wooden. How the vault is sheathed with plywood, let's see further.


Another version of the plywood arch is "super budget". A strip of plywood treated with a water-polymer emulsion is pushed, bent, into the opening (see the figure on the right), attached first at the top, then to the walls. Next, the corners are clogged with foam, foamed, and then - mesh, plaster, decoration. The edge of the arch will take out a blow with a stepladder, but zero is permissible in this design: it will not hold PVC trims either. And she herself will last 5-7 years at most until re-plastering. Pressboard (fiberboard) instead of plywood in this case is a mistake. Although fiberboard bends lighter than plywood, it will soon be driven as a power element simply from air humidity. Fiberboard in the arch can be useful in another case, see below.
Typesetting
Arches on a frame made of wooden beams from 50x50 or boards from 40 mm are made by the pros only from waste in their free time for themselves or just in case for aisles of standard width: the labor intensity is great. But in amateur conditions, the availability of suitable scraps can acquire a decisive importance, and in terms of strength and durability, typesetting arches are not inferior to others.
Schemes of the frames of the facades of inlaid wooden arches with a transom and adjacent to the ceiling are given in Fig. below. The red dotted line shows the places of installation of inter-facade screeds from the same timber. Connections - half-wood with gluing and reinforcement with self-tapping screws. The surfaces of the arcs for the cladding are cut along the contour of the generatrix. When collecting arcs from pieces of timber, it should be borne in mind that the thickness of the arc in any place should be from 30 mm.
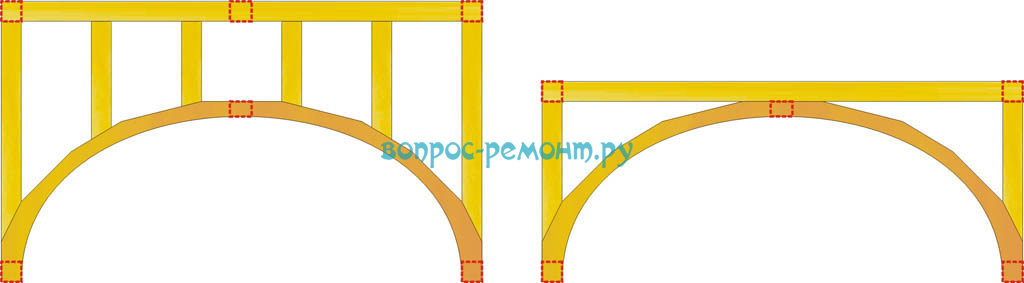
Facade frames are sheathed in wooden house rail, clapboard; vaults - with wooden dies. Stacked cladding can be plastic if appropriate for the overall design. For finishing and overhead decor, it is better to sheathe a wooden arch with plywood from 8 mm. The sheets for covering the arch are notched (slotted) with a hand circular saw, leaving 2 layers of veneer, on the left on the trail. fig. The fibers of the outer layer should be oriented along the generatrix. They put the plywood sheathing with the slots inward (on the right in the figure), and at the end of the installation, the slots are putty with sawdust, thickly mixed with PVA.

Note: so that the covering of the vault does not delaminate and crack during installation, it is necessary, firstly, to cut at least 3 layers, i.e. plywood must be at least 5-ply. Secondly, pre-soak it from 2 sides with a water-polymer emulsion and dry it thoroughly.
About overlays
Overhead decor for arches is available in various radii of curvature, but not any to order. Therefore, if it is supposed to finish the arch with curved platbands, baseboards, etc., you need to choose the overlays according to the curvature of the arch, or vice versa, and check the compliance with the width of the passage.
The best decorative elements for arches - from MDF, they are not affected by temperature changes and they do not fade in the light, like PVC. However, decorative details made of MDF require careful handling and are installed only after all other work has been completed. The texture of their surface is created by a plastic coating, and it is impossible to remove a scratch or pothole.
It is also impossible to sheathe a smooth-hemmed vault with thin MDF, no matter who claims otherwise. MDF does not bend, and bent parts from it are obtained by pressing the original mass during manufacture. This is where fiberboard can help out: the sheet is impregnated from the reverse (corrugated) side with a water-polymer emulsion, and the front side, after installation and putty, is pasted over with self-adhesive to match the platbands and / or the general range. Longitudinal lintels in the vault frame should then be located with a pitch of no more than 15 cm. A fiberboard sheet attached along the contour to the frame and to the lintels with a 15-20 cm step of fastening will give a completely reliable sheathing.
Finally - more about the tree
Look again at fig. with types of arches. It seems diverse, but it is still noticeable that they are typical. Why? Because they are assembled from standard modules. But even such arches, and the most self-made drywall arches, can be given uniqueness if you decorate them with wooden carved elements. Eka bent? Not at all. Artistic woodcarving is available to anyone with even an elementary taste. See, for example, a couple of beginner tutorials below.
Video: wood carving for beginners
How can an arch be made? This question is asked by many who decided to tackle repair work and transform your interior. This design inspires respect and makes you think, because it seems that it is simply impossible to do it on your own.
But all fears and experiences are completely unfounded. If there is a desire, then using step by step instructions, which will be given below, can be refined in an apartment or house. And also figure out which of the materials will be preferable in each case.
First of all, you need to understand what such a construction is. An arch is one of the elements in architecture that is characterized by curvature. The place of creation are through or blind openings and spans. For greater effect, it can be supplemented with various decorative elements.
Exists different kinds arches:
- Classic - characterized by a smooth shape. Has an equilateral rounding.
- Half arch has only one rounded corner. Is an modern solution for newfangled trends in the interior.
- A trapezoid is a complex shape made of curved lines.
Of course, there are many more species.

It will be better if a template is made before starting work. It is very easy to make it from ordinary cardboard or fiberboard. So, you can immediately understand how the object will look, which rounding is preferable.
Working with wood requires the most attention. In this case, no error should be allowed. Suitable for production different breeds, but pine is most often used, as a fairly durable and cheap material.

Need to know! Before working with wood, you need to make sure that it is well dried. Otherwise, no instruction will help, drying and warping will begin. It will be impossible to correct the situation.
Not everyone likes pine as a finishing material, but it's easy to fix. For finishing work, you can use valuable wood species (oak, beech, mahogany) or cheaper veneer.
Manufacturing process
In general, any work with natural wood, if there is no experience, should be entrusted to specialists. When creating an interior opening in a house or apartment, you need to proceed from real possibilities.
There are several design options for this material:


Installation
To install an arched structure, you must adhere to the following rules:
- The installation site is carefully prepared, all unnecessary is removed, the surface is putty.
- Prepare in advance necessary tool - individual in each case.
- Mounting takes place in several stages:
a supporting frame is created;
the elements are laid and connected;
external cladding is made. - After that, they start finishing: they are covered with varnish or paint.
- Deficiencies lead to the formation of empty spaces - they are putty or foamed, but this will be a clear drawback.
This option will be preferable if you want wood to serve as the material, but natural wood use - no way. In addition, a do-it-yourself plywood arch is quite simple to do.

Training
- A detailed sketch is created. For this, all the necessary measurements of the opening are carried out. This allows you to create a visual project, and immediately calculate the required materials and accessories.
- The installation site is also prepared. All unnecessary is removed in advance, if necessary, trimmed.
- Prepare tool:
hacksaw or jigsaw with files;
drill and screwdriver;
sandpaper and a bar;
finishing tool.
You need to understand that plywood is a rather unique material. With it, you can create great designs, it is strong and highly flexible.
The first way to use plywood
The technology is as follows:
- Measure the opening. Immediately note how large the arc should be.
- A strip is cut from a sheet of plywood, the edges are well processed.
- This fragment is slightly moisturized, waiting for a while.
- Now this material will take almost any shape.
- The strip is bent and immediately inserted into the desired opening - fixed, do not forget to install spacers at the corners.

You need to wait until the plywood is completely dry. At this time, it will finally take the form of an arc. Further, they act in two ways:
- Inserts are made from wooden beams. The surface is sheathed with plasterboard.
- Apply polyurethane foam. Open areas just foam. After complete drying, the protruding areas of the swollen material are removed. For the plywood arch to take decorative view - the surface is completely putty and covered with paint or varnish.

The second way is more complicated
It will be similar to working with GCR. Is as follows:
- The distance between opposite sides of the opening is measured. The required arch height is measured.
- All this is transferred to the plywood sheet. It should be of such a size that it can grip the walls by another 10-15 centimeters - two sheets of such will be needed.
- Draw an arc along three points.
- With the help of a jigsaw, the unnecessary is cut out. The first sheet is used as a stencil for the second. The operation is repeated.
- Both segments are installed in a fixed location. They are fixed - jumpers are made between them. The main thing is to install them correctly. In this case, the thickness of the material from which the arc will be made is measured. That is, if the thickness is 6 mm, then the jumpers should be installed from the edge of the arc at the same distance (+ 1-2 mm).
- Choose the material for the arc (gypsum board or plywood) - bend it and install it.
- Finishing work is carried out.

There is another way to create an arch from plywood with your own hands, but it takes time and the availability of tools. Its essence lies in the fact that the inner filling of the arch is made of cut plywood fragments. Namely, filling takes place like a sandwich. But this method allows you to adjust the immersion depth of each subsequent arc. Thus, it is possible to create a wavy (relief) structure.
Drywall arch
How to make a drywall arch with your own hands? This is not difficult. This material is somewhat similar to plywood, but it is easier to work with and significantly cheaper.
It's great when you manage to combine several construction works: wall erection and creation. Then you can carry out the installation with the least finishing work.
There are two ways to use drywall, but it all starts with the preparatory work:
- It is necessary to ensure that the work site is freed from everything unnecessary (door frames, platbands, decorative elements).
- If there are cracks, chips, then they are repaired. Yes, the design of the arch will hide everything, but it is better to avoid unpleasant consequences.
- The necessary tool is being prepared.
- A preliminary project is being created.
Method one - on a metal frame
This is a very quick and rather popular way to solve the problem: how to make a drywall arch in your house or apartment.

A similar principle is done and wooden frame... Only there, more attention should be paid to the jumpers, on which the arc will be attached.
The second way is typesetting
More complex option. The principle is as follows:
- From the corner of the opening, on both sides, begin to fix the sections of the gypsum board. To do this, mix PVA and water.
- Each next piece is smaller than the previous one.
- So, until the smallest segment is fixed.
- Additionally, they are strengthened with self-tapping screws, anchors.

The hardest part comes. Namely, with the help of the putty mixture, a smooth arc is formed. It's not that easy, it's better to prepare templates in advance.
As you can see, there are many ways, you can use different materials and technologies. And then the question will not arise - how to make an arch from drywall, plywood or wood.
Anyone who at least once was engaged in self-finishing of their own apartment, probably faced with the issue of arranging doorways. To replace the bulky brickwork and monolithic forms came new materialallowing you to spend everything assembly work fast and easy. Drywall will perfectly cope with the issue of finishing arched openings, since it has a number of advantages. This material is very often used to create radius structures and other complex shapes. In addition, working with gypsum board is quite simple, which allows you to carry out all the installation work on your own, while saving a lot.
The arch, as part of an architectural form, appeared in the second millennium BC. At that time, in Ancient Mesopotamia, the construction of buildings grew into something more. Houses have already served a person more than just a box that protects from external factors. The wealthier residents tried to stand out from the ordinary townspeople, and began to experiment in creating original forms for some parts of the buildings. The experiment also affected doorways. Since then, technologies have migrated to Ancient Rome, and then to Europe.
The already accustomed rectangular doorways are being replaced by more and more design solutions that differ from each other in a special style and outlines. If you want your room or apartment to look special, you should first decide on the future design of the doorway. If the interior style differs from the design of the arches, then the room will look "absurd". Therefore, first it is better to set a common style for all elements of the room, so that in the end you get an apartment, finished according to your personal taste.
Choosing an arch design
If you decide to make an arched opening according to your own sketch, then we advise you to pay attention to the main types of this architectural structure. All of them appeared in the process of forming the style at different times and in different peoples. Each style took over certain outlines of the previous one. You can often find a mixed style. In any case, the experiments have not been canceled, the future appearance of the arched opening entirely depends on your imagination and skills.

- dome (the classic version of finishing the arched opening. It is a symmetrical semicircle, with minimal finishing with relief elements);
- asymmetric (in this case, the arch is made with an offset of the center of the doorway. It is also a fairly common option, since it does not require complex finishing work);
- gothic (outlines are very similar to the Gothic style of architecture. It has sharper forms, which are achieved by connecting two planes at a slight angle);
- openwork (the arch has through holes that are located along the doorway. Often contains glass elements such as stained glass, mirror and others);
- multi-level (contains several elements located in different planes. The material is most often used drywall, which after finishing painted in different colors. Such arches are often called design arches, since they can be made using several design solutions).

If you decide to mount an original arched opening in your apartment, then it is better to choose several options. If you independently make a sketch of the future arch, then your design will be particularly original. It is better to experiment on paper first, and then select 1-2 suitable options for yourself. Do not forget that the arch can be finished in almost any way: tiles, painting, wallpaper, decorative plaster, drawing, stencil. With a special desire, you can combine several options into one, but it is better to experiment again, since they do not always harmoniously combine with each other.
The choice of material for the arch
Modern market building materials has a huge variety of options for finishing the arched opening. The choice of one or another type is due to the characteristics of your room, as well as its location. The wide variety of fasteners and mixtures allows the arch design to combine several materials without spoiling the overall interior of the room.
To better familiarize yourself with the materials with which you can equip an arched opening, we suggest you pay attention to the following types:

In addition to all of the above methods, materials can be combined in any way you like. There are also prefabricated structures standard size, but most often they still need to be adjusted to the required size. To give the arch a special look, you can mount LED lighting in it. Decide on the design of the future arched opening, select required material... Consider the cost of finishing material, as well as the presence of additional design elements. It is better to first draw a sketch and experiment a little, then you will choose the best option for yourself that will delight you for a long time.
Arched doorway with your own hands. Step-by-step instruction
To make the arch in the doorway yourself, you must first thoroughly prepare. If you decide to mount a corner for an arched opening with your own hands, then it is better to immediately acquire everything you need. Next, consider the method of assembling and installing the arch, using the example of plasterboard covering, using metal frame... We have chosen this particular method because we consider it the most optimal. GKL is easy to finish, besides, it is quite cheap. Anyone who can hold a drill and a level can assemble the "skeleton" of the future opening.

Tools and consumables
If you are going to do everything yourself, then you simply cannot do without an auxiliary tool. We also recommend purchasing the entire consumable, in order to save yourself in the future from unnecessary trips to the hardware store, on which you will spend precious time.
To assemble a drywall doorway arch, use the following set of tools:
- hammer drill, screwdriver, grinder, mixer, jigsaw, stapler;
- screwdriver, hammer, metal scissors, pliers, construction knife;
- spatula, trowel, needle roller, sandpaper holder, bath, buckets, flute brush, maklovitsa;
- as a rule, building level, plumb line, tape measure;
- gloves, overalls, goggles, respirator.
Such a simple set will simplify the assembly and installation process, and will also come in handy for the further decoration of your apartment.

To be fully armed, it is better to immediately purchase all the finishing material. Buy only high-quality fasteners and drywall, then the arch will serve you for a long time.
When installing an arch in a doorway, purchase the following materials:
- drywall (the arched version of the gypsum board with a thickness of 6.5 mm is best suited. Such a sheet is specially designed for radius structures that will not succumb to additional loads);
- metal profile (UD 27, CD 60, UW 50, CW 50 and others, it all depends on the type of structure and the expected load);
- fasteners (suspension P 125, dowel-nail 6x40, self-tapping screw for metal 25x3.5, seeds 9.5 mm, liquid nails), thin nails with a narrow head;
- metal perforated corner, arched PVC corner;
- serpyanka tape (paper or non-woven is also suitable), mortar for sealing seams;
- masking tape, pencil, hardened staples 8-12 mm;
- primer, sandpaper (P 60, P 80, P 100), putty (dry or ready-made acrylic), joint sealant, paint or wallpaper.
Such a set of tools and materials will allow you to qualitatively mount an arched opening without resorting to additional efforts. The list may vary slightly, since it all depends on such parameters as: the material of the finish of the coating, the presence of additional design elements, as well as the location of your arch. Compare all these parameters to find the optimal set. Our list is relevant for the indoor plasterboard arch that we will be painting. This method is the fastest and most inexpensive, and the finished coating is practically not inferior in quality to other materials.
Create an arch radius
Regardless of the material chosen - be it plywood, chipboard or drywall, the radius for curved sections of the structure is created according to the same principle.
To create a radius from a gypsum board, use the following methods:

The choice of how to create a radius element depends entirely on your skill. The first method will be easier if you are working alone, for the second - ask your partner to help you.
Assembling the arch frame
Installation of a reliable foundation for the future structure is an important stage in the arrangement of an arched opening. By choosing the right material to create the "skeleton" of the arch, you will get a quality base that will transform the interior of your apartment. And when the right finish surface, your arch will become unique, becoming the envy of friends and neighbors.

To collect solid foundation for an arch, proceed as follows:

A well-assembled metal frame is the key to a long service life of the arch. By performing the installation with high quality, you will save yourself from the additional difficulties associated with the restoration and alteration of the structure. Take this step very seriously.
Plasterboard installation
When the "skeleton" is installed in the doorway, it is important to properly sheathe it. The more accurately the metal frame was assembled, the less putty you will spend on surface finishing.


Now that we have a finished arch in the doorway, we need to give it a nice look. But before you do this, you need to prepare everything for the finishing.
Arched opening surface finish
Everything is ready for the final stage, so the matter remains small. Consider the method of finishing an arched opening using the example of surface painting.

To paint the arch in the color you like, proceed as follows:

The final surface finish is entirely up to you. It will be wallpaper, or an artificial stone, you choose. The main thing is to properly prepare the base and calculate the expected load on the structure.
As you can see, it is quite easy to assemble and mount an arched opening. It is enough to take into account all the parameters of the future design, to correctly measure. It is also important to choose a suitable finishing material and auxiliary tool. In any case, the end result directly depends on your skill and imagination. Do not be afraid to experiment, then the result will be to your delight.
When equipping a home, a person strives to create a comfortable, original and stylish interior. Insulation of rooms is no longer so popular today, which is why when decorating rooms, they use the technique of a smooth transition from one room to another. This allows you to create a single space without walls.
As an alternative solution, arches in the house act, which are able to simultaneously unite and isolate the space. Choosing an arched structure, you will understand that there are a great many of them today. Finding a suitable option is not difficult, you can certainly fit one of them into your interior.
Varieties of arches by shape
The main difference between the arches is the vault. Its shape allows the design to be attributed to a particular variety, among them:
- classic;
- romance;
- trapezoid;
- portal;
- modern;
- ellipse;
- semi-arch.
The classic solution is the most popular today and is an opening that can fit into any interior. In this case, the portal radius is rounded and equal to half the width of the opening. The romantic style arch has a rectangular vault. This solution can be used when making a wide opening.
The trapezoidal arch speaks for itself, but the portal is made in the form of a rectangle and is the easiest to execute. No additional labor is needed, because the corners do not have to be drawn. The arches in the house are quite often decorated in the Art Nouveau style, which is a cross between a portal and a classic. The roundness of the arch is less pronounced here than in the classic version, but this arch is far from the ideal rectangle.
The ellipse is identical to the previous model, its only difference is the large radius of curvature in the corners. An example of asymmetric solutions is a semi-arch, one part of which repeats the arch-portal, while the other is modern or classic.
Varieties of arches according to the materials used
Arches in the house can be made of different materials, among them:
- a rock;
- wood;
- brick;
- drywall.
The latter material is used quite often for the reason that it is easy to process, and when exposed to moisture, it is capable of applying a variety of forms. As soon as the sheets can be converted, they should be fixed to the installed frame. It is made of metal, and the joints formed can be covered with putty. At the final stage, such an arch is covered with the same materials that are used to decorate the walls. If you have some experience, then working with drywall will be quite simple.

Features of wooden arches
An arch made of wood with your own hands may well be installed. Such designs differ from door ones by wide platbands. The system turns out to be practical, because it is less susceptible to damage compared to drywall counterparts. But with changes in temperature and humidity, cracks can form on the wood; this can be avoided by treating the material with special compounds.
Today, a do-it-yourself wooden arch can be installed from glued lumber. In this case, it will be possible to achieve a reduction in cost, and in terms of quality, such structures hardly differ from wooden ones.

Features of stone and brick arches
The most interesting design solution can be called arches made of stone or brick. Such systems are faced with tiles that imitate natural material. This method is relevant when you need to decorate an existing opening. If you need to change the configuration of the opening, you can refuse to plaster a part of the wall around the arch by laying a stone or brick on the surface.
Arch parameters
They must have certain dimensions, which depend on the characteristics of the room. You can choose the width of the opening yourself, but the height will be limited by the overlap. If the height is 2500 mm or 3200 mm, then the optimal value for the arch height is 2200 mm or 2600 mm, respectively.

Preparing to install a plywood arch: materials and tools
Door arches can be made independently by preparing:
- plywood;
- wooden blocks;
- puncher;
- electric drill;
- jigsaw;
- miter box;
- milling cutter;
- nails;
- grinder;
- self-tapping screws;
- aqualak;
- mastic for grouting joints;
- liquid Nails;
- polyurethane foam;
- twine;
- pencil;
- building level.
When preparing plywood, you must be guided by the following dimensions: sheets should have a thickness of 18 to 21 mm, while their parameters will be 2.44 x 1.22 m. Such sheets will need 5 pieces. With the same dimensions, 3 mm plywood should also be prepared.
Template preparation
You can make arches in a wooden house from any materials, but plywood will be the most optimal. Before starting work, a template should be prepared, it will allow you to properly cut the platbands. To do this, cut a 6-cm strip from the long side of the plywood, the length of which should be 1/3 greater than the width of the doorway.
If plywood of this size is not found, you can connect two strips. At the junction, the elements are connected with nuts or small bolts. As a result, it will be possible to obtain a long workpiece, the width of which will be greater than the width of the opening. This element is applied between the sides of the opening, and the curvature can be selected at will, strengthening it with twine.

Open the platband
Having considered all types of arches in the house, you can choose the most suitable option for yourself. If you plan to make an arched structure, then at the next stage, on a flat surface, you need to place a sheet of thick plywood, attaching a template to it. If one sheet was not enough, then 2 or 3 should be attached.
The template is positioned so that the sides of the plywood are equal. The contours of the lower part of the casing can be marked with a pencil. Upward, the master has to retreat 10 cm, drawing the outline of the casing. The curvature can be cut to size with an electric jigsaw.
You will need two identical blanks, each of which will go to its own side of the arch. It's great if you get an arc from one piece. To obtain such an arch, you will need to dock pieces of different curvature. The router will allow you to cut a groove in one workpiece, while a protrusion in the other, which should form a large segment. The elements are glued together into a single whole, for this you need to pick up a good glue, pressing the blanks with clamps. As soon as the glue hardens, you can proceed to further gluing the arc. The edge of the casing is processed with a mill, and then polished.
Work on vertical platbands
An arch in a panel house can be made according to the technology presented in the article. At the next stage, you will need to cut out the vertical platbands. There should be 4 of them, and thick plywood should be used for manufacturing. The height should be 20 cm more. Now it is the turn of the curved arch. It is made of thick plywood, otherwise the structure will look like a cheap decoration.
The width of the vault will be equal to the width of the wall in which the opening is installed. The most in a simple way for making bent plywood, a longitudinal cut is made. Then the elements should be bent according to the template. The cuts can be made with a router, and the distance between them is 2 cm.
Before bending the arch, you need to practice on unnecessary pieces of thick plywood. You can improve the results by wetting the element with water or steaming it before bending it. In the next step, using a template, you can make a blank with a standard curvature. The grooves are coated with glue before bending.

Arch installation
The home is the most important process. For this, the side parts of the racks are made. On thick plywood, markup should be done by sawing the boards with a jigsaw to a width equal to the arched arch. Prepared parts are ground and adjusted to size. The resulting gaps are filled with special mastic, and the structure itself is reinforced with finishing nails or self-tapping screws, which are then closed with plastic caps.
The details of the arch can be fixed with polyurethane foam. Before it hardens, you should install spacers from the rails. The platband is fixed to the arch. On this we can assume that the structure is ready.
Arches decoration
The house is underway today different materials, however, one of the most popular in recent years is polyurethane. Stucco moldings, gables of houses, elements of trimmings for pilasters, columns and arches are made from it. The cost of this finishing option is much lower compared to stone and wood decor.
Installation is quite simple, liquid nails should be used for this. No additional decor is required, and the surface of the elements can be painted. It is possible to install polyurethane decorative elements only on the end parts or on the outside. At the same time, vertical posts are often made in the form of round or square columns with a bell. Before making an arch in the house, you should think about what material will be used in the final stage.

Stone is a classic in this matter. However, it can only be used on those arches that are located in the openings of monolithic partitions and load-bearing walls... Plasterboard hollow partitions may not withstand such a structure, therefore it is better to use artificial stone or flexible acrylic tiles for them.
Conclusion
Choosing the finishing for the arch, you can pay attention to the materials that occupy a leading position today, among them: travertine, shell rock, slate, marble, and granite. Preferring such a solution, you can choose not only the shade, but also the texture, which is clearly sanded or rough and unfinished.


