One simply cannot do without such a structure as a toilet in the country. And if you decide to build a country toilet with your own hands, then you will have to make some effort and effort. The most difficult stage in construction will be digging a foundation pit. As for the aesthetic side of the building, this is rather a secondary issue, because the main thing is to correctly arrange a cesspool and create a reliable foundation for the aboveground structure. Below we will consider in detail the following points:
| Choosing a place for the construction of a toilet and its structure. | |
| What is needed to build a toilet. | |
| Features of the device cesspool. | |
 |
Construction of a country toilet house. |
 |
Using a dry closet in the country. |
 |
Biological toilet products. |
How to build a country toilet with your own hands: photos, drawings, video
It should be noted right away that it is better to do all the work once and then not return to this question. long years... It is especially important to build a capital structure if you spend a lot of time at your dacha. If you do not want to spoil the design of the site by installing an ordinary toilet, then you can always hide it in the far corner behind the country house or come up with an original design for it that would allow it to harmoniously fit into the landscape.
Choosing a place for placing a toilet and features of its design
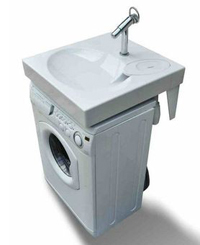
As a rule, the toilet is installed closer to the far border of the land plot, since there will be an unpleasant smell near the room, even if it is insignificant. But sometimes they use another option, making a cesspool not far from the house, and a free corner of the house is taken away to place the toilet, taking sewer pipe into the pit. Basically, this design is used in cases where water was brought into the house and it is planned to install an insulating tank designed to collect waste.
Be that as it may, it is worth adhering to sanitary and epidemiological standards. They must be observed in order to protect yourself and the environment from negative consequences, such as soil contamination or infectious diseases.

If you are planning to install a cesspool, it is important that it is at a distance of at least 30 meters from water sources. Moreover, its depth should not reach groundwater.
If you are going to install a septic tank, then place it no closer than 15 meters from the house.
If you are going to use an insulated container that cleans up as it fills, you can install it almost anywhere as waste will not penetrate the ground.
Also, an insulated container is suitable in cases where groundwater do not go very deep and it is impossible to make a cesspool in the ground.
Most often, the pits of the simplest toilet for a summer residence have an area of \u200b\u200babout 1 m 2. If the pit is round, then its diameter should be approximately 1 meter. Its depth is 1.5-2 meters, depending on how the groundwater is deposited.
Once you decide on the place for the pit, proceed to the choice of the toilet design. First of all, you must take into account the weight of the future structure - the choice of material that you are going to use for construction largely depends on it. Moreover, the house itself should not be made very heavy, because over time, under its weight, the soil may begin to sag and the building will be deformed and damaged.
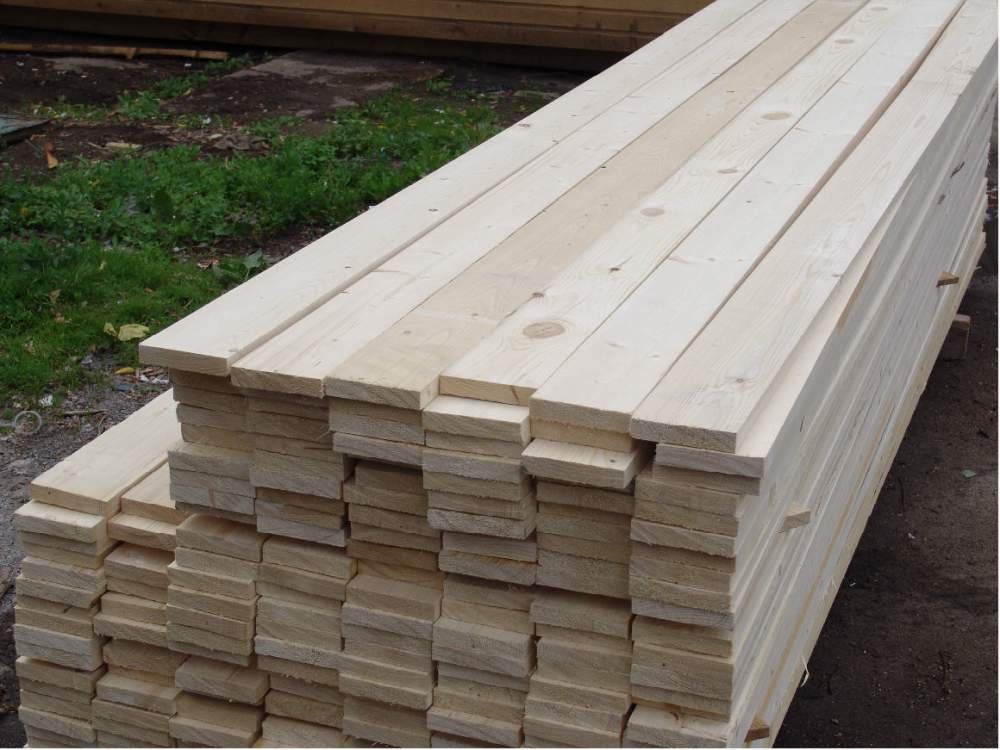
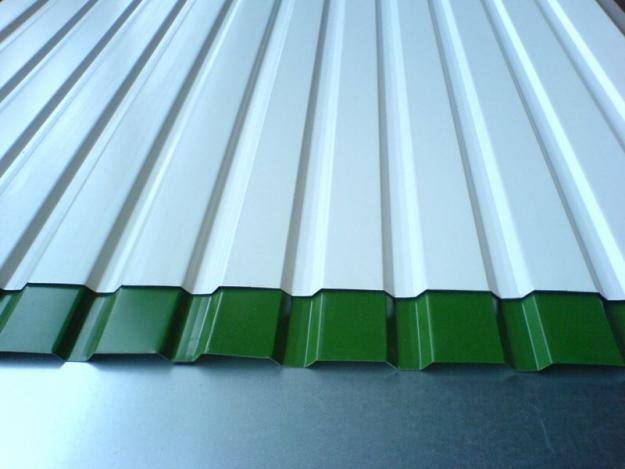
As building materials, wooden boards or bars or thin material - corrugated board and galvanized profiles are excellent.
If you decide to build a toilet booth from bricks or logs, then you should think about high-quality strengthening of the foundation. But there is no point in the construction of such structures, since they will not be warmer than light buildings. Unless you have a need for thermal insulation of a room using insulation that is lightweight, for example, foam. This building will be warm, light, windproof in winter and not too hot in summer.
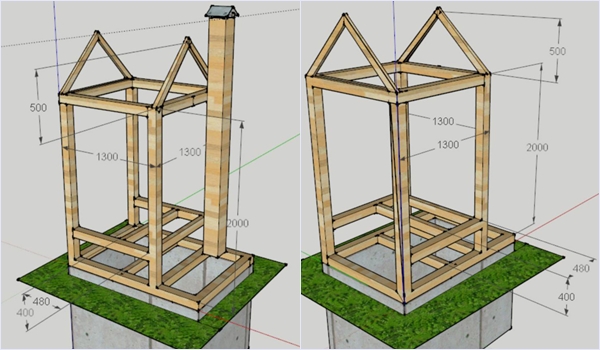
Having decided on the choice of material, you can start choosing the size of the booth. If you decide to build a country toilet with your own hands, then we offer you the following drawings.
As a rule, a standard toilet, as you noticed in the drawings presented above, has a height of 2.3 meters, a width of 1 meter, and a length of 1.3-1.5 meters. But these sizes can vary, and should not be considered a dogma. Be that as it may, the room should be as comfortable as possible for all family members to be in it.
What you need to build a suburban toilet with your own hands
Having chosen the design and dimensions of the toilet, you need to buy construction Materials... You can buy a metal or wooden "house" ready-made. If you decide to build it yourself, then be prepared for the fact that you will need the following materials:
- wooden blocks and boards;
- fasteners - screws and nails;

- metal corners to strengthen the wooden frame;
- roof covering material - corrugated board or slate;
- door handle, latch or hook for closing;
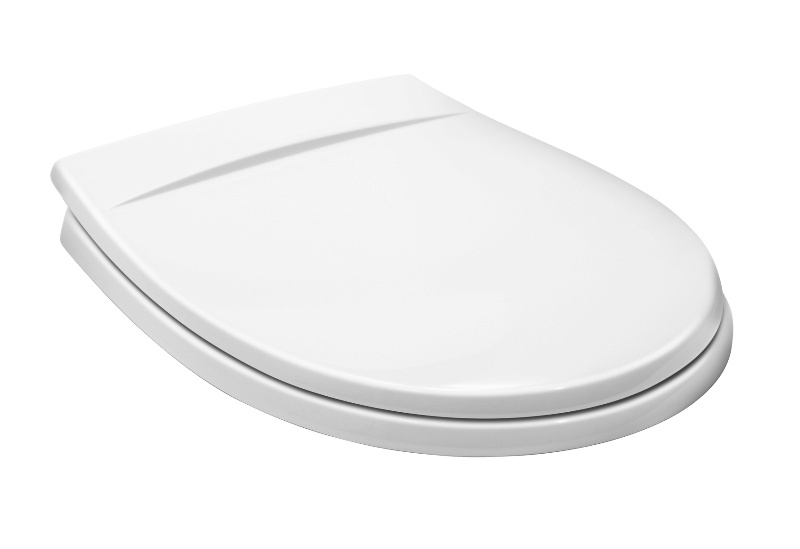
- a wooden or plastic toilet seat with a lid;
- foam for insulation and material for sheathing of insulated walls: thin board, chipboard or plywood (if necessary).

To install a cesspool you will need:
- crushed stone, cement, sand;
- reinforcement for strengthening the foundation structure;
- metal mesh-netting (designed to fit the pit) and metal pins or brackets for attaching it to the ground.
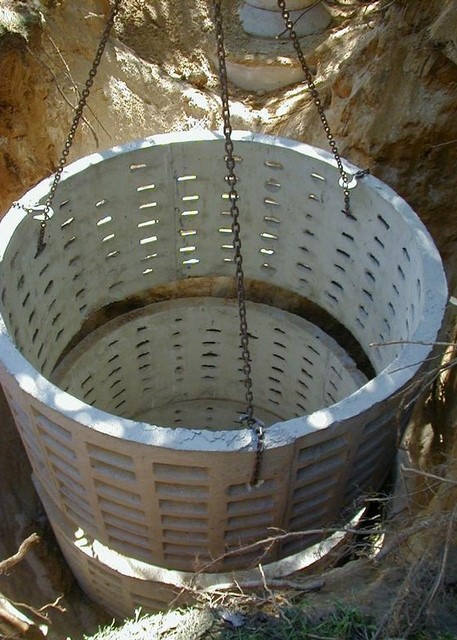
Also, instead of a grid and plastering it with concrete, you can use a brick, which will be lined with the pit walls. Moreover, for the device of the pit is often used concrete ringsthat have holes in the walls. Many summer residents prefer old rubber tires.
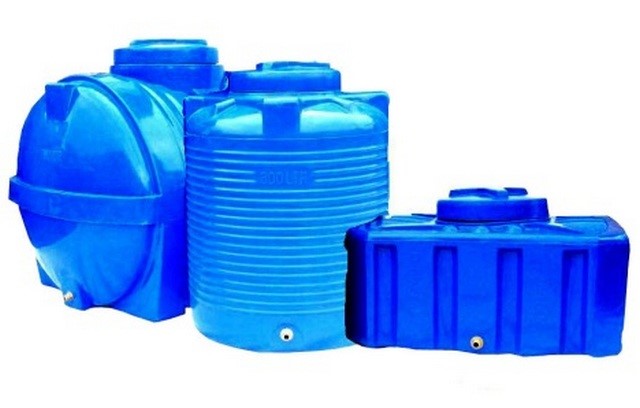
Another good environmentally friendly option would be a ready-made container - a septic tank. You can find them the most different sizes, so you will choose the necessary one, depending on the length of stay outside the city and on the number of family members.
Of course, when building a country toilet with your own hands, you cannot do without special tools, so prepare in advance:
- bayonet or shovel with a short and long handle;
- hand drill, which will help when digging a pit;
- perforator (if there is stony soil on the site);
- screwdriver or hammer;
- grinder - "grinder" with discs for metal and stone;
- jigsaw;
- marking tool - tape measure, ruler, square, pencil, building level or marker.

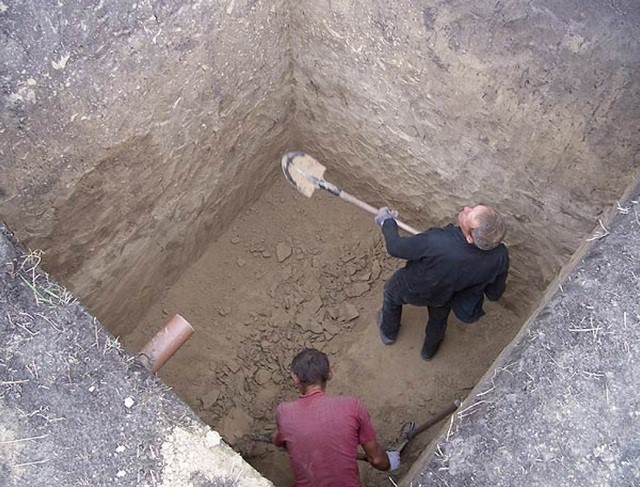
How to make a cesspool with your own hands?
Of course, it is worth starting with marking and digging a hole, which can have a round or square shape (depending on which scheme for the design of the country toilet was chosen).
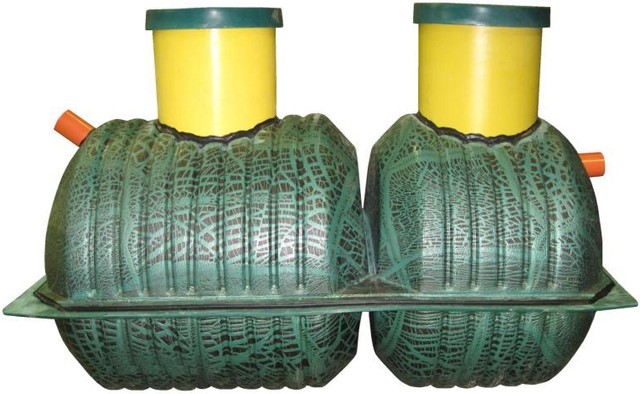
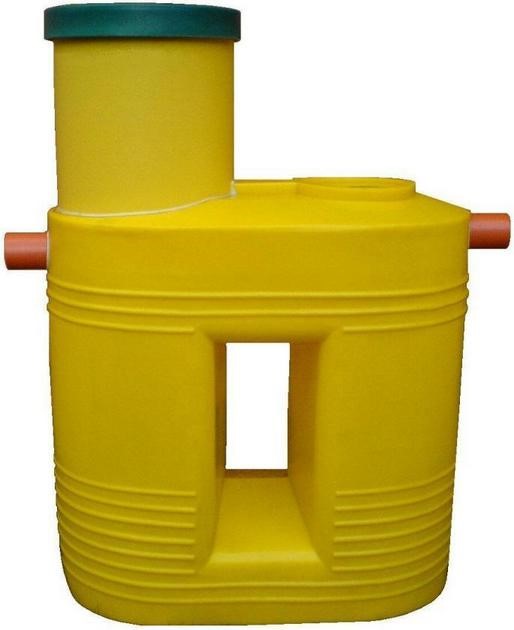
If you plan to install a two-chamber plastic septic tank, then the pit is dug so that the inlet pipe is in the toilet cubicle, since a toilet seat will be installed on it. The neck of the second chamber remains outside the room, as it is required to adjust the pumping of fecal matter.
The tanks can be of different shapes, since the shape and dimensions of the pit depend on this. The size of the pit must be made 20 cm larger than the capacity, since it is necessary to compact the soil around it as best as possible.
If the walls of the pit are finished with brick or concrete, it can be made square or round.
After you dig a hole of the required depth, at the bottom it is necessary to arrange drainage from stones, large rubble, and fragments of bricks.

Then a concrete solution is applied to the walls by the method of throwing. It is left to dry completely. The total layer thickness can be approximately 50-80 mm.
When the first sketched layer is set, the walls are plastered to a perfectly even state with the same concrete mortar... Then wait until the plaster hole dries.
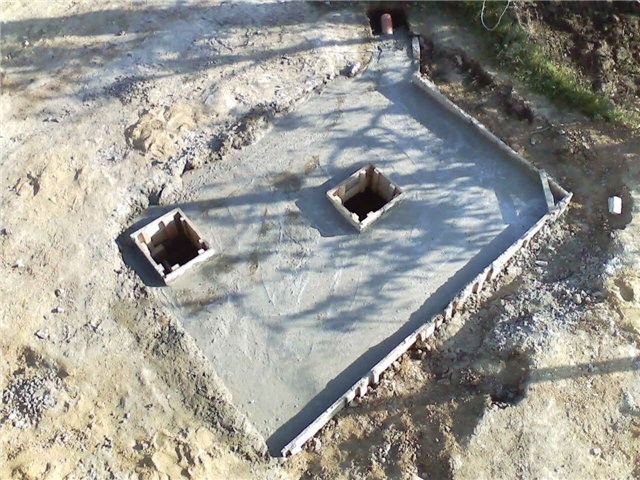
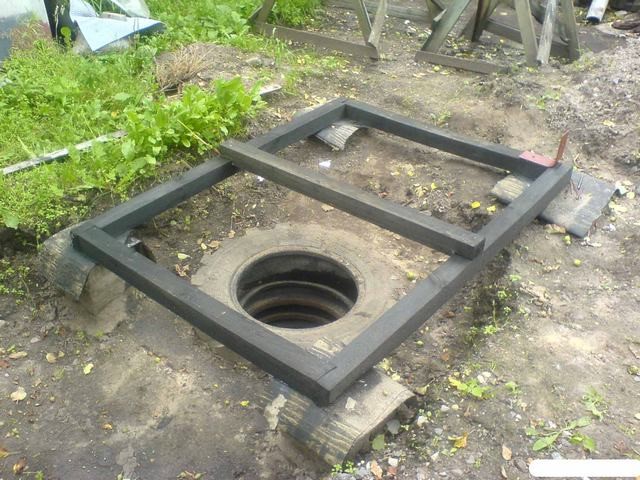
The pit is covered with either a ready-made reinforced concrete slab, or you can make it yourself. It will act as a foundation and a platform around the toilet.
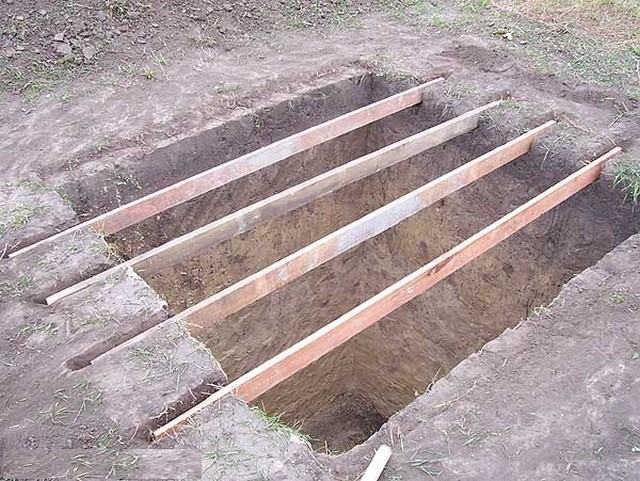
Planks are laid on the pit itself. They should extend beyond its limits by about 700-800 mm and be recessed into the ground to the level with the ground. They are treated with antiseptic agents. It is quite possible to replace such a wooden substrate with concrete posts.
Two holes are left on the surface for the sump hole and the installation of the toilet seat. Formwork is installed around them.
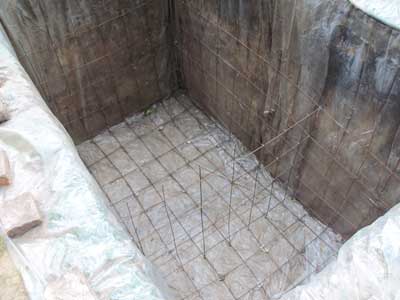
A dense plastic film is spread over the entire area of \u200b\u200bthe foundation.
On top of it, a reinforcing lattice is laid, which along the entire perimeter is enclosed in the formwork of the future foundation.

As for the height of the formwork of the holes, it should be exactly the same as the formwork of the entire foundation structure. When leveling the surface, formwork boards will act as beacons.
The concrete solution is mixed, then poured onto the site, carefully leveled and left to dry. For the strength and durability of the concrete layer after initial setting, you can “iron” the wet surface with dry cement.
After the site has matured, a toilet booth can be installed on it. A hatch will be needed for the hole that is intended for pumping out waste. You can buy it in a store or do it yourself. The hatch cover should be easy to close and open.
Another good option is the round pit shape made from car tires. But do not forget that this type of pits cannot be used for a regular user. Such a toilet can only be operated in a summer cottage, and then, if the owners come sporadically, for example, on weekends, otherwise they will have to resort to pumping out waste very often.
To make a pit, a round pit is pulled out of car tires by 150-200 mm more than the diameter of the tires.
Drainage is laid at the bottom of the pit, having a thickness of 15-20 cm.
Further, exactly in the center of the pit, the tires are laid to the ground surface. As it is laid around the tires, a drainage layer of sand and gravel is poured and well rammed. This process is carried out to the top.
When the tires are stowed, it is recommended to arrange around the pit strip foundation... For this, a trench, about 500 mm deep, is pulled out along the entire perimeter of the future structure, where concrete is poured.
The bottom of the trench is compacted, after which it is covered with 50-70 mm sand. It also needs to be tamped and covered with a layer of rubble of exactly the same thickness.
Waterproofing is laid from dense polyethylene.
Then you can weld a grid from the reinforcement, install it and mount the formwork 100-150 mm above the ground level, and then fill it with concrete. Make a brick foundation, then plaster it with cement.
After the mortar hardens, remove the formwork from the cement foundation, and level the brick from above. Further, roofing material is laid on its surface. He will separate concrete surface from wooden.
Then a ready-made structure of a country toilet is installed on the foundation, or it is built independently.
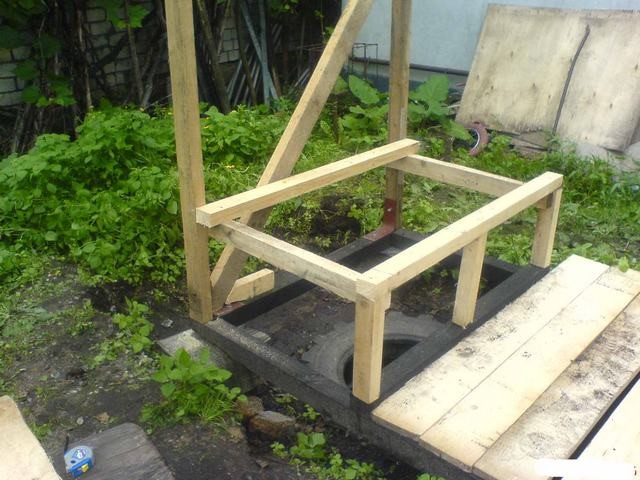
For the convenience of construction, the base-frame is first fixed on the foundation, consisting of powerful bars, and the rest of the structural elements are further mounted on it, depending on the model of the building that you choose.
It is worth noting another option for arranging a cesspool - metal barrels with a cut bottom. They are installed on top of each other and then act in the same way as in the above case. A mixture of sand with crushed stone or gravel mixture is compacted around the pipe.
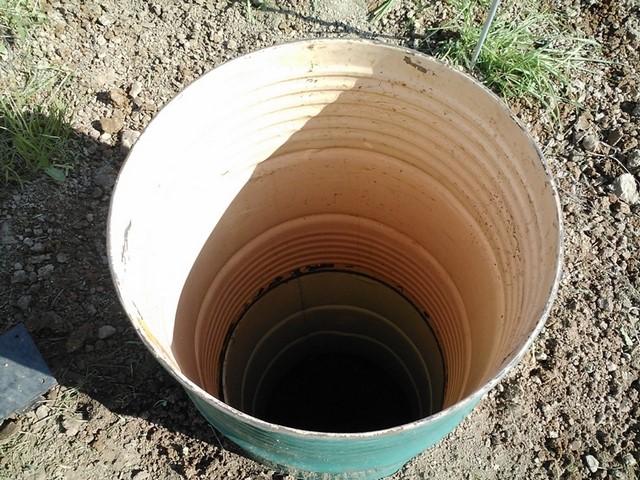
It would seem that this method is not difficult to implement, but it has many more disadvantages than advantages. Metal barrels under a negative impact both from the outside and from the inside will quickly begin to corrode, and this toilet will not last long.
Country toilet do it yourself: building a house, photo
After the pit and the site for installing the toilet are ready, you can proceed with the installation of the house according to the diagram drawn up earlier.
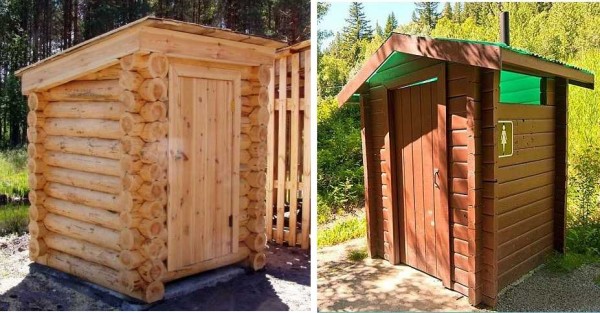
It should be said right away that the houses for the country toilet can have a variety of shapes. Many make them even in the form of a fairytale hut, and those around them may not immediately understand what kind of room fits so harmoniously into the landscape design. Such a structure can be made with your own hands, having an idea of \u200b\u200bthe scheme for its assembly.
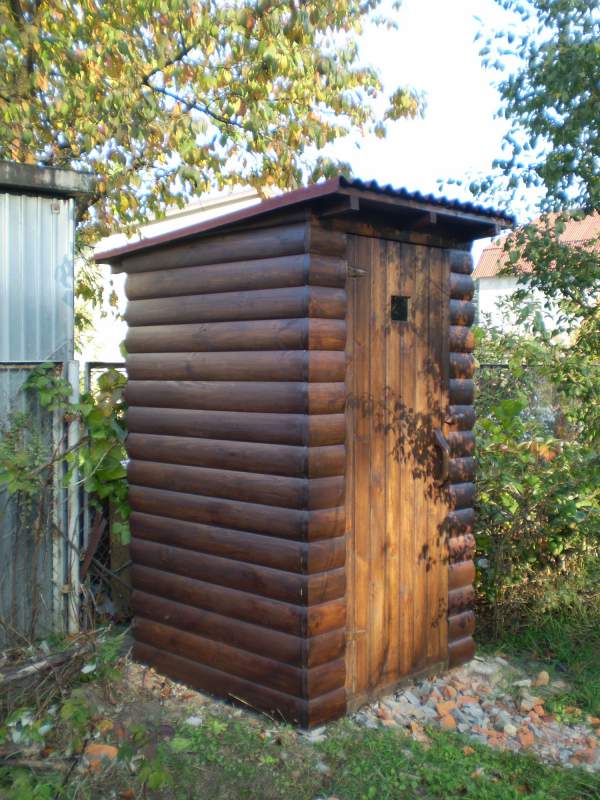
In the photo you will see an option, partially made of logs, which give the structure a decorative effect, masking the purpose of the building.
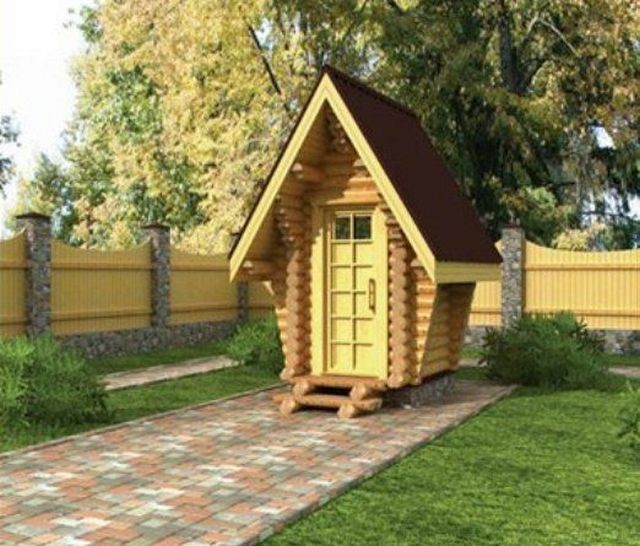
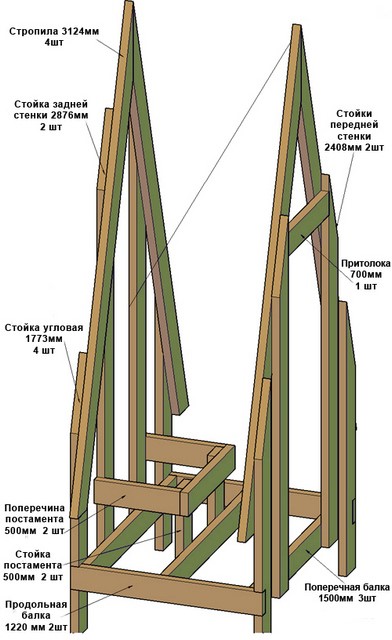
In the diagram, you see the basis for building a house from a log, only boards are used instead of logs. You can clearly see how the walls of the structure are going and the slopes of the roof rise. The interior space is distributed and the location of the toilet seat has been chosen.
The next step will be the roof sheathing, roofing and wall decoration using the selected material (both wood and metal can be used).
The house can be installed on a pit or used as a room for a dry closet.
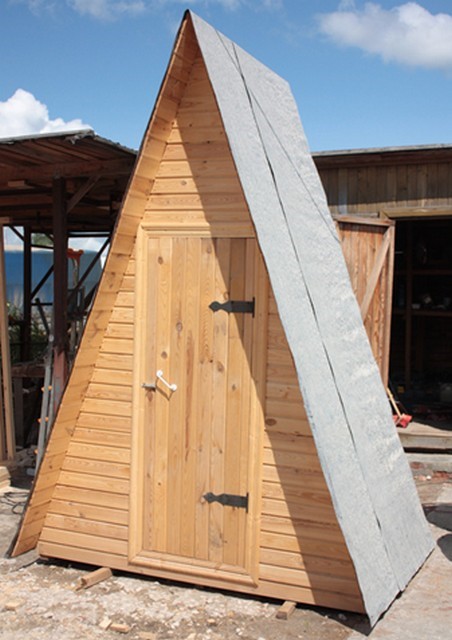
This version of the structure of the toilet was called "hut". In this case, the house is erected in the form of a triangle, and its side walls are the roof. The form is extremely simple, so the construction process will not cause you any difficulties.
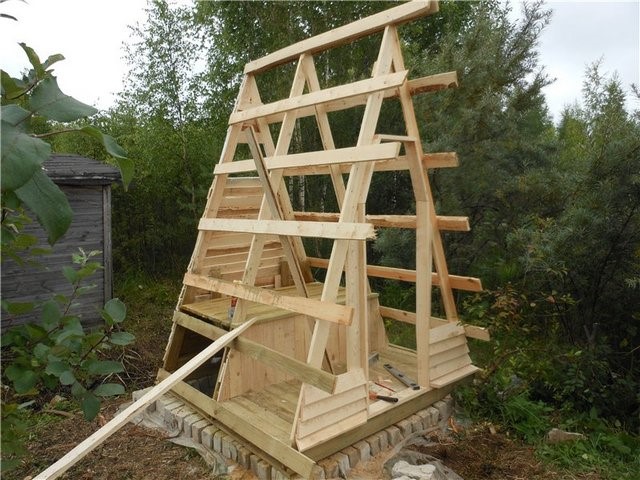
This structure is simple to build, as well as easy to use - it is very stable and spacious enough inside.
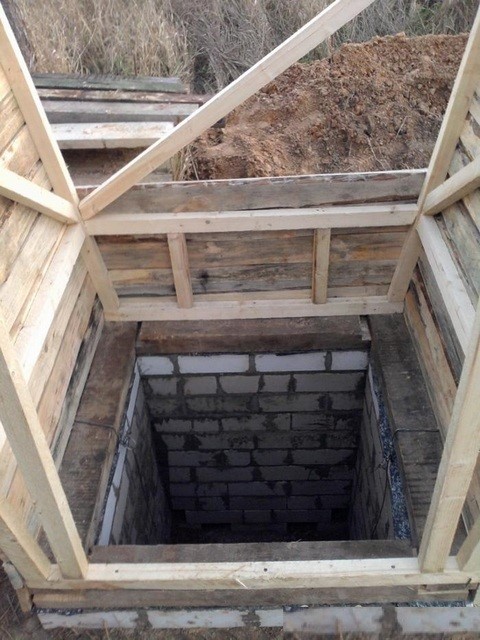
In the photo you will see the entire internal structure, the place of installation of the toilet seat and the lathing of the wall-roof. Finishing of the front and rear wall has begun. You can put the "hut" house on a well-equipped cesspool, as in the above case, or use it as a room for a dry closet.
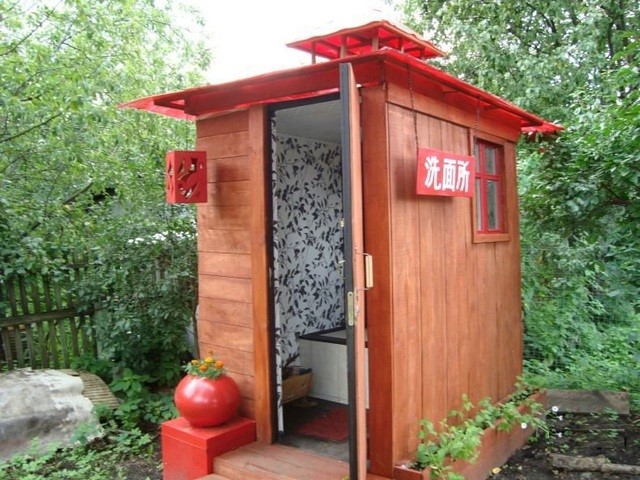
In this photo you see a house for a country toilet of a traditional form, which is found in many areas. However, even such a seemingly uncomplicated design, you can decorate according to your preference. For example, a toilet in this area was made to look like a Japanese house. This is evidenced by the hieroglyphs on the plate, which is suspended on chains, an additional roof and a Japanese lantern at the entrance are arranged. Moreover, the interior space is also designed in the same style.
This attitude to the design suggests that even from such a structure as a toilet, you can make a real work of art if you put in a little more effort.
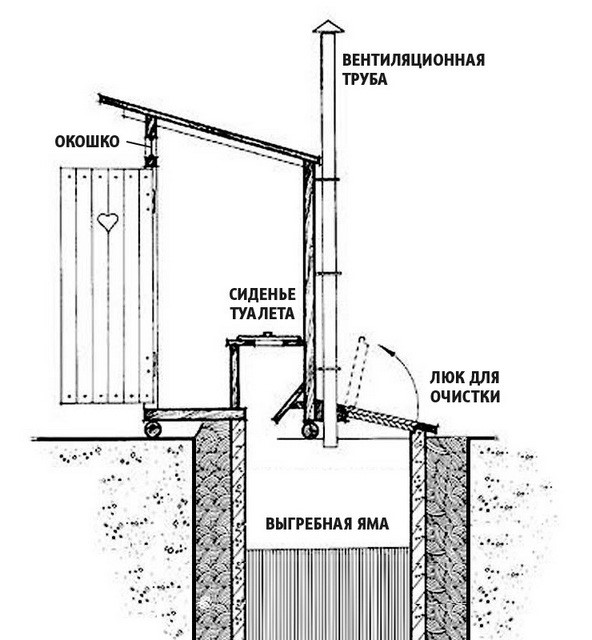
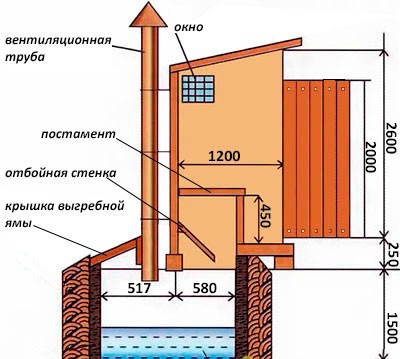
An approximate construction scheme is shown in the photo. It clearly shows the cesspool, the installation of the structure of the toilet and the hatch for cleaning. This design is quite simple in the device and it is not difficult to build it. However, in order for it to be reliable, it is necessary to achieve the rigidity of the ligaments of each of the parts with each other. Inner space arranged above cesspool, during the construction of the walls may look like this. That is, a base of bars is installed directly on the foundation, on which the frame of the structure is subsequently fixed.
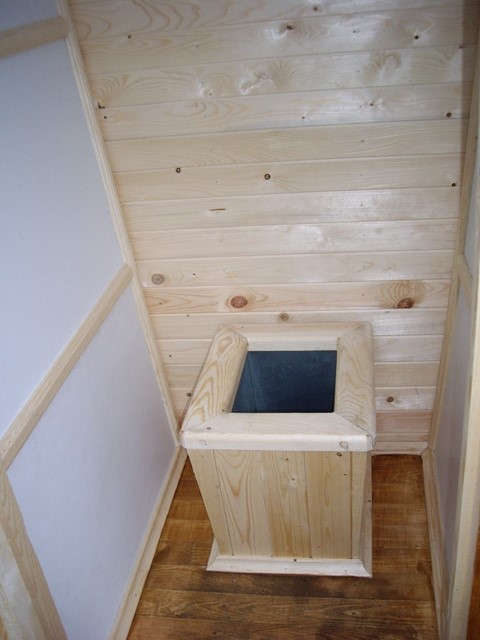
Upon completion of the finishing of the country toilet from the inside, the room will have a cozy and neat look, such as you see in the photo.
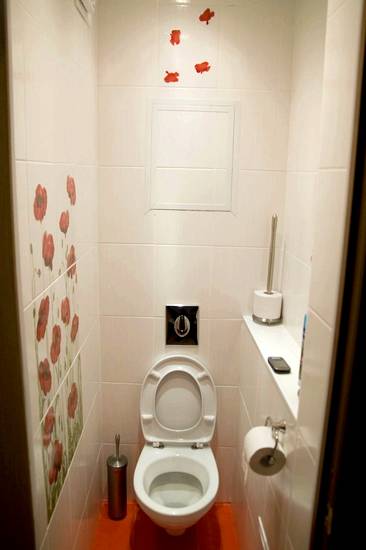
If you wish, you can come up with a different design of the toilet, but perform interior decoration necessary from warm materials... We do not recommend using for decoration ceramic tiles, since it is a cold material, and in winter the tiles will also become slippery.
Dry closet in a suburban area
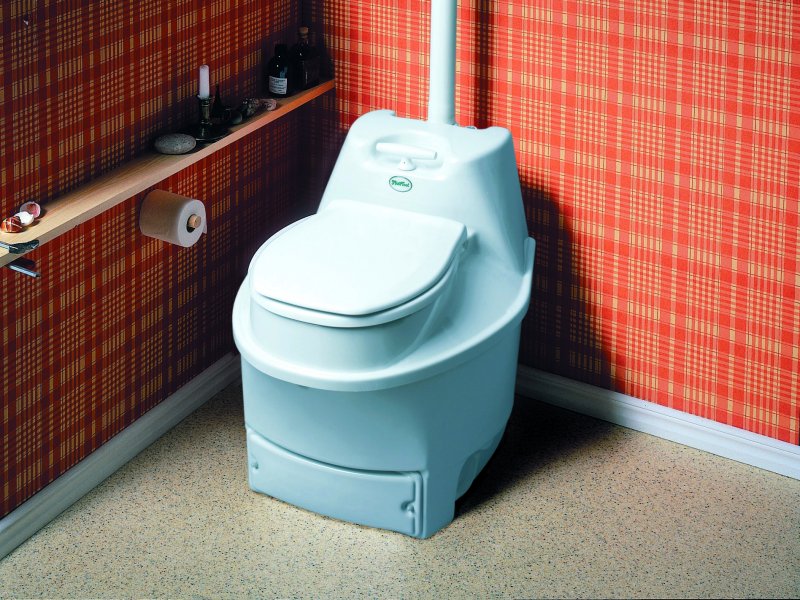
If you cannot build a country toilet with your own hands or you do not have the desire or time to contact construction worksthen use a dry closet. This option will save you the trouble of digging a hole and installing a house.
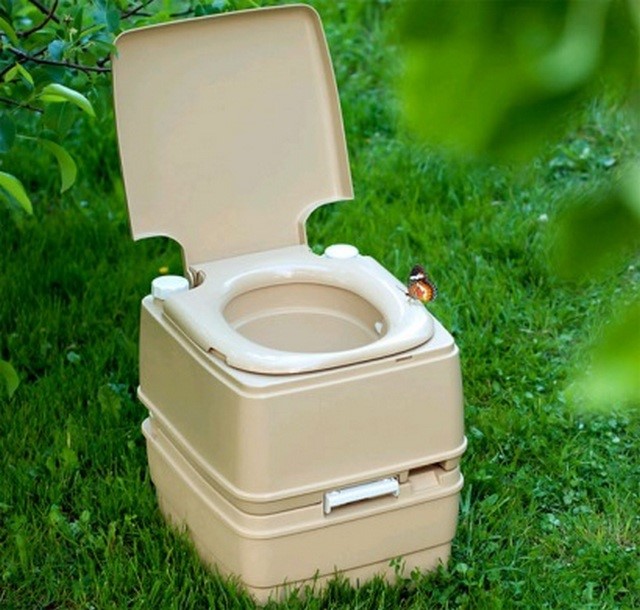
A bio toilet is nothing more than an autonomous toilet, which does not require either connection to drainage lines or a separate room. It consists of two chambers, the upper of which serves as a toilet bowl, and the other is used for biological processing of waste. In the lower chamber there are active substances that decompose feces, turning them into a homogeneous, odorless mass. The action of the bioactive liquid is enough for 10 days, after which the chamber is cleaned, the contents are poured into the soil or the central sewer. The choice of disposal method depends on what substances were used in the dry closet. They are of three types: chemical, composting and microorganic. Each of them is ideal for a specific type of dry closet.
For composting, peat is used as an active substance. It is highly absorbent - 1 kg of peat is capable of absorbing 10 liters of liquid. The odorless compost produced by active processes is perfect for fertilizing a vegetable garden.
As a rule, in the compost with this dry closet there are ventilation pipes, removing unpleasant odors during processing.

The work of a dry closet is based on the use of chemicals. It has an indicator that indicates that the container needs cleaning. Recycled waste is discharged into the sewerage system, and you do not harm the environment. For such models, there are special products with anti-freeze properties.
The third type is a dry closet, in which microorganisms are responsible for the waste recycling process, turning them into compost. The material obtained in this way is environmentally friendly and absolutely safe for animals and soil, so it will not be difficult to dispose of it.
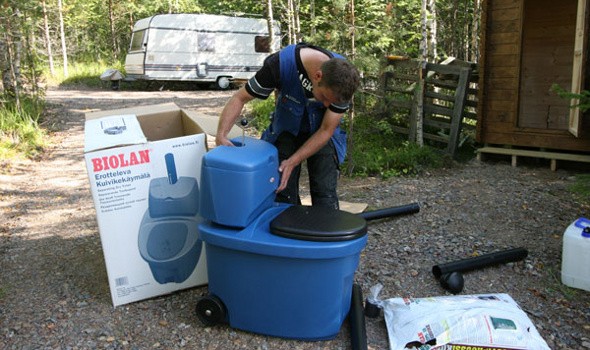
If necessary, you can install a dry closet in an ordinary room in the yard, and in winter bring it into the house, having allocated a convenient place for these needs.
What biological agents are used for toilets
Owners country houseshaving toilets with cesspools on the site, special means are offered (they are similar to those used in dry closets).

They also contain bacterial, peat or chemical concentrates that will rid the toilet of any unpleasant odors and will recycle the contents of septic tanks or cesspools. These formulations are manufactured in different forms Are powders, tablets or liquid solutions.
Before use, you must carefully study the instructions, since the composition is poured or poured in parts. How to use such substances correctly, you will find out on the package, since each of them is dosed in different ways. As a rule, such a substance is used quite sparingly. For example, one can or package of some funds for a cesspool of 3.5-4 tons is enough for a year.
As you can see, there are many ways to solve the problem of a toilet in the country - you can always choose the most suitable option.
One of the extremely important parameters of the layout of the apartment is the minimum size of the bathroom. Despite the seemingly insignificance of this moment - and many people who are very frivolous refer to the area of \u200b\u200bsanitary facilities - the area of \u200b\u200bthe bathroom is extremely important.
And first of all - for the possibility of creating a rational interior in this room.
Bathroom size and apartment layout
So, let's imagine that we have at our disposal a room with a rough finish (or even without it at all). In this case, the first thing we will have to face is the interior layout.
And not the least role in the formation of the final result is played by the bathroom - the size of which will determine:
- How exactly the plumbing fixtures will be placed (bathroom toilet, bidet, washbasin)
- How to lay communications
- What finishing methods will be optimal (is it necessary to hide communications and wiring under the skin)
For example, if the bathroom is small, then it will be possible to gain space by installing a sit-down bath or shower, or - to install a combined toilet with a bidet. In any case, the size and configuration of the room in which the bathroom will be located are very important.
Note! Measuring the dimensions of the bathroom must be carried out at the stage of planning the repair, otherwise there is a great risk that the necessary plumbing fixtures simply will not fit into the room, and if they do, it will be extremely inconvenient to use them.
Regulatory regulation of the size of the bathroom
The minimum area of \u200b\u200bthe bathroom, the configuration of the room, as well as other parameters related to the linear dimensions of the bathrooms, are regulated by a whole list of regulatory documents. For the Russian Federation, this is primarily “ Sanitary standards and rules "(SNiP), which determine both the size of bathrooms in public buildings for various purposes, and the minimum permissible overall dimensions of this type of premises for residential buildings.
That is why, when starting to redevelop your apartment, it is necessary to carefully study the regulatory framework in this area, otherwise there is a great risk that the redevelopment will be recognized as not complying with SNiP and, as a result, illegal.
Note!
For Ukraine, Belarus and other states, SNIP norms regarding the dimensions of bathrooms may differ from those adopted in the Russian Federation.
Also, some differences have the standard dimensions of the bathroom for a number of individual regions and settlements.
The only exception is large-area duplex apartments, but in any case, each must be considered separately.
The only case when the construction can be carried out "without looking back" on the SNIP is the redevelopment of a bathroom in a private house. If you do not connect the bathroom to the sewer and water supply riser, there is no need for strict adherence to the standards. However, they should still be kept in mind - but for purely practical reasons.
Minimum dimensions
As a rule, standard and large bathrooms are not particularly difficult to plan. But the bathroom is small, due to the acute shortage of space, it requires close attention. It is quite difficult to fit all the plumbing necessary for a modern person - and at the same time not violate sanitary standards, not to mention compliance with at least a minimum level of comfort.
So, what should be minimum size bathroom?
The minimum dimensions of a toilet in a residential area are:
- The minimum depth of the bathroom is 1.2 m
- Minimum width bathroom - 0.8 m
- Ceiling height in the bathroom - at least 2.5 m
- Distance from the toilet bowl to the inclined plane of the roof (if the bathroom is located in the attic) - 1.05 - 1.1 m
- Ceiling height in the corridor on the way to the bathroom - not less than 2.1 m.
The last parameter is especially important to take into account for those who plan to arrange a mezzanine in the corridor - and most often the section of the corridor between the kitchen and the toilet is chosen as the most suitable place.
For a combined bathroom, there are no such strict dimensional restrictions, therefore, when redeveloping, common sense and considerations of convenience should be followed.
In addition to dimensions, the placement of the bathroom doors is also important. According to SNiP, the doors of the bathroom should only open outward. The entrance to the bathroom should never be located in the living area or in the kitchen - only in the hallway!
Restrictions on plumbing placement
Separate dimensional restrictions relate to the placement of plumbing fixtures in the bathroom.
And if in the previous sections we mentioned limitations that you could only encounter if you have very small bathroom, then you need to be attentive to everyone here:
- The distance between the toilet and bidet is at least 0.25 m (this does not apply to combined models)
- In front of the bathroom or shower - at least 0.7m of free space (preferably 1 - 1.2m)
- In front of the toilet - at least 0.6 m of free space
- On each side of the toilet - at least 0.25 m
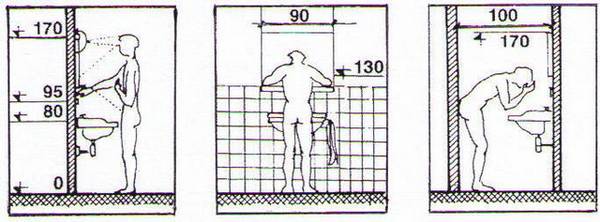
- In front of the washbasin, at least 0.7 m, and if the washbasin does not protrude from the wall, but is recessed into a niche - 0.9 m.
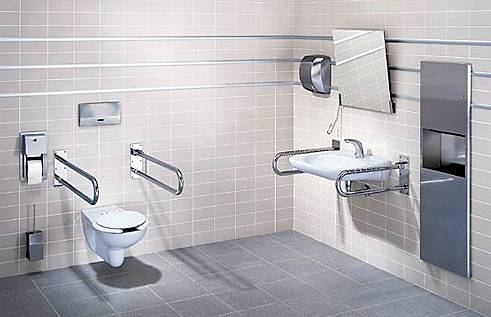
Bathrooms for persons with disabilities
Having mentioned the existence of standards that separately regulate the overall dimensions of sanitary facilities in public buildings, one cannot fail to mention that special requirements are put forward for bathrooms for disabled people.
So, according to clause 4.36 of SNiP 2.08.02-89 "Public buildings" in each toilet of public buildings there must be at least one bathroom for the disabled - the size of this bathroom must be within the following limits:
- The minimum cabin width is 1.65 m
- Minimum depth - 1.8 m
The doors of the booths of such a specialized bathroom should only open outward. Additional equipment for the convenience of using the bathroom by persons with special needs is not regulated by SNiP, but its installation is highly desirable.
Naturally, such a bathroom should be located in places that are as convenient as possible for access of people with limited mobility, primarily wheelchair users.
As for residential buildings, they are characterized by the following requirements:
- Bathroom with an installed washbasin - at least 1.6x2.2 m
- Combined bathroom - 2.2x2.2, m
As you can see, in relation to the overall dimensions of the bathroom, there are a significant number of restrictions, not only on the part of SNiP, but also on the part of ease of use. And before starting construction, redevelopment or major repairs (especially if you have a small bathroom), you need to carefully study all these restrictions. Then there will be no problems with legalization, and it will be comfortable to use the bathroom.
If you already have a clear idea of \u200b\u200bthe boundaries of the bathroom and you know all of its parameters and dimensions, you can proceed to the arrangement of plumbing. First you need to make a list of all the plumbing fixtures that you want to place. Moreover, regardless of whether you have a combined bathroom or separate bath and toilet, the list will be approximately the same.
Toilet
The toilet can be floor-standing or suspended, monoblock or under the installation system. A wall-hung toilet is easier to clean, but requires special fixtures. The installation system takes up less space than a candy bar, and it will be easier to place the rest of the plumbing.
- Medium monoblock 60-70cm deep and 36-40cm wide, but there may be 5-20cm left behind the toilet, depending on how the drain pipe fits.
- Average installation system size 60cmx22-25cmxh800-1200. There are corner models that give more options when placing plumbing in the bathroom.
- Toilet bowl size without cistern 52-55 cm x 36-40 cm, but thanks to the installation system, the supply pipe does not take up the useful area, and accordingly the maximum depth of the toilet bowl with the installation system will be 80 cm.
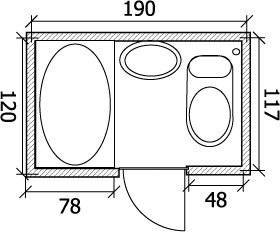
- Minimum size of toilet cubicle 80x120cm, and for comfortable use, the center of the toilet should be no closer than 40cm from the wall.
Minimum sizes of washrooms with and without washbasin.
When planning a place for a toilet, consider location of the fan pipe... Bends should be avoided; a maximum of one turn is allowed. If the toilet lags behind the riser by more than 50 cm, it is necessary to observe the slope of the pipe for normal flow, namely 2 cm of height per 1 meter of length - this is the minimum slope. At the same time, the diameter of the fan pipe is quite large and it cannot be removed into the wall, and accordingly, be prepared for the appearance of small boxes along the walls, which can affect the placement of other plumbing.
Ergonomic requirements to the placement of the toilet, bidet and paper holder you will find.
Bidet / bidet cover / bidet shower
- Bidet - takes up a lot of space and is only suitable for very spacious bathrooms. Medium bidet sizes 60x36cm
- The bidet cover is placed directly on the toilet; installation requires not only water supply, but also electricity.
- Hygienic shower completely replaces trouble and allows you to conveniently collect water in a bucket for cleaning floors. A hygienic shower should be taken with a thermostat and thought in advance on which side to hang it for greater convenience.
Sink
With a separate bathroom, the sink can be installed both in the bathtub and in the toilet, if its size allows. The sink can be single or double, freestanding or built into furniture ("washbasin"), rectangular, round or corner. Corner models in some cases can significantly simplify the placement of the remaining plumbing in the bathroom or toilet.
- Minimum sink size - 30x40cm, you can find even less, but even just washing your hands in such a sink will be very inconvenient.
- For daily use Convenient shells are 50-60 cm wide and 45-50 cm deep.
Ergonomic requirements to the placement of the sink and shelves above it, you can find.
Bath / shower
For whirlpool baths and showers with a steam generator and / or lighting, an electrical connection is required. The bathtub takes up a lot more space than the shower, but provides complete relaxation. The bath is also indispensable in families with small children.
- Minimum bath dimensions - 120x70cm (sitz bath), with an average height, a person needs a bath with dimensions of 170-180x70cm.
A ready-made shower cabin can be with a steam generator, massage nozzles and built-in radio, or you can make a cabin yourself using a tray and glass doors. You can arrange a shower drain directly in the floor, but this will require a qualified specialist, since such a system is quite problematic to repair after installation.
- Minimum shower stall / tray size 70x70cm, for a person of average build it will be comfortable in the cabin 80x80cm.
Various options for placing plumbing in the presence of a shower or bath.
When considering a plan for placing plumbing, do not forget about the passages, corner models of shower cabins can significantly increase the usable area of \u200b\u200bthe bathroom.
Washing machine
The sizes of washing machines are different, the most common are 60x60xh850, 60x45xh850, but there are also very compact washing machines with dimensions 51x44xh70, some of them can be placed under the sink. If you can't place a washing machine in the bathroom at all, then you can try to find a place for it in the kitchen (built-in model) or in the corridor.
Heated towel rail.
The standard coil can most often be replaced with a beautiful and convenient water heated towel rail. There is a huge range of models on the market with a large size grid. You can find models with a shelf for dry towels or with additional hooks. Domestic models are cheaper and better suited for our water, especially the Sunerzha factory, which offers heated towel rails only 30 cm wide.
A place for storing household chemicals, bath accessories and cosmetics.
There may be several such places. If you have installed an installation system, then you can place a water heater and several shelves for supplies above it. toilet paper and plumbing care products. Makeup can be placed in a flat mirrored cabinet above the sink, or a larger cabinet can be hung above the washing machine. And do not forget about gels and shampoos, they should be located near the bathroom or shower.
Also in the bathroom there should be a basket for dirty linen (it can be built into the "washbasin") and necessarily hooks or holders for towels at the sink and for bathrobes at the bath or shower.
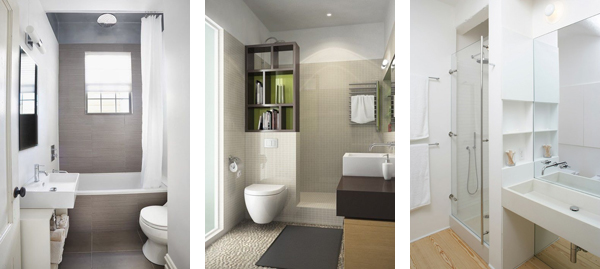
An example of the arrangement of plumbing in a separate and combined bathroom
Knowing what kind of plumbing will be in your bathroom, it will be much easier to place it with maximum comfort for use. Below, using the example of one bathroom, four options for the arrangement of plumbing equipment are shown.
In accordance with the requirements of the Sanitary Norms and Rules (SNiP), the following minimum sizes of bathrooms in public buildings (in mm) are established:
| Parameter | School | Manger | Other public institutions |
|
Dimensions of the public bathroom cabin: |
|||
| - a cabin with a door opening outward | - | - | 85x120 |
| - a cabin without a door | 80x100 | - | - |
| Dimensions of the private bathroom cabin | - | ||
| Height of partitions-screens between toilets | 175 | - | 180 |
|
Aisle width between car and opposite wall or partition: |
|||
|
Cab doors open outward: Without urinals With urinals |
|||
|
Without doors: Without urinals With urinals |
|||
|
Aisle width between two cab fronts: Cab doors open outward No doors |
|||
| The width of the passage between the row of urinals and the wall | 100 | - | 100 |
| Width of passage between two rows of urinals | 120 | - | 120 |
| Distance between the axes of urinals | 70 | 70 | 70 |
| Distance between the axis of the urinal and the side wall or partition | 35 | 35 | 35 |
| The width of the passage between the row of sinks and the wall or partition | 110 | 110 | 110 |
| Width of passage between two rows of washbasins | 160 | - | 160 |
| Distance between taps of individual washbasins | 60 | 60 | 65 |
| Distance between taps of a common washbasin | 55 | - | 60 |
| Distances from the tap of the individual washbasin to the side wall | 35 | 35 | 35 |
Disabled toilet dimensions
According to SNiP, the following size of a bathroom for disabled people is established:
- Width - 1.6 m,
- Length - over 2.2 m
If the bathroom is combined, then both of these parameters should exceed 2, 2 m.
1 . The smallest sizes of a toilet stall for people with disabilities:
- depth - 1.8 m;
- width - 1.65 m.
The door must necessarily open outward. It must be equipped with a closer, and from the inside -
additional handle over the entire width of the door leaf.
2. Support handrails must be at least 75 cm at the toilet. The handrail on the landing side should be folded back.
3. Toilet bowl height from 45 to 60 cm. To do this, you can install a standard toilet (40 cm) on a stand.
When planning an apartment, an important element is a bathroom, which must have a minimum size. Most do not pay attention to this point and take it lightly. The size of the bathroom plays an important role.
Bathroom size and apartment layout
Let's imagine that we have a room with a rough finish, or even without it at all. The first thing to do is to plan the interior.
The bathroom plays an important role in this matter, since it is he who determines:
- How will plumbing fixtures be arranged (washbasin, bidet, bathroom, toilet);
- How the communication will be laid;
- How best to spend finishing work (hide communication and wiring or leave it in plain sight).
Let's say the bathroom is small, you can free up additional space by installing a booth or a sit-down bath. Or install a combined toilet with a bidet. Be that as it may, the parameters of the room play an important role in the layout.
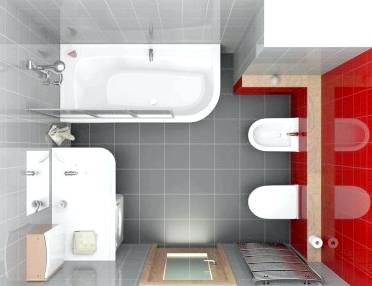
Bathroom layout example
Note! Measure the dimensions of the bathroom at the planning stage, otherwise the plumbing will not fit or it will be inconvenient to use it.
Regulatory regulation of the size of the bathroom
The dimensions of the room, its minimum area and other parameters related to the bathrooms are enshrined in the list of regulatory documents. For the Russian Federation, this is SNIP ("Sanitary Norms and Rules"). They determine the minimum permissible size of bathrooms in apartments and conventional establishments.
Note!
SNIM norms of Belarus, Ukraine and other states may differ from the norms of the Russian Federation.
In addition, for a number of settlements and regions, the established norms also differ.
The exception is duplex apartments with a large area, however, each case requires individual consideration.
Private houses are an exception. Redevelopment in such buildings may not be carried out according to the norms of SNIP. If the bathroom will not be connected to the water supply and sewerage riser, these standards do not apply to it. But for practical reasons, you need to be aware of the general rules.
Minimum dimensions
Bathrooms in large or medium-sized premises do not require close attention, unlike small ones. Since the area is small, you need to distribute it rationally. Small bathrooms do not allow you to acquire all necessary plumbing without violating accepted norms. What can we say about the discomfort of such rooms.
What is the minimum bathroom size?
In a residential area, such dimensions are equal to the following parameters:
- Ceiling height not less than 250 cm;
- Width - 80 cm;
- Depth - 120 cm;
- Ceiling height of the corridor in front of the bathroom - 210 cm;
- The distance from the inclined plane of the roof to the toilet (if the bathroom is located in the attic) is 105-110 cm.
The height of the corridor ceiling is important for those people who are going to acquire mezzanines. The most convenient place is the gap in the corridor between the toilet and the kitchen.
If the bathroom is combined, the dimensions may differ. Assume that you need maximum convenience.
In addition to the size of the bathroom, doors play an important role. They should open outward and not otherwise. The door to the bathroom should be located in the hallway, but not in the kitchen or living area!
Restrictions on plumbing placement
Plumbing fixtures also have some placement restrictions.
If earlier we were talking about the restrictions regarding small-sized bathrooms, here they apply to all types:
- The gap between the bidet and the toilet must be at least 25 cm (combined models do not count);
- Free space in front of the shower or bathtub is at least 75 cm (preferably 100-120 cm);
- In front of the toilet - 60 cm;
- On each side of the toilet - 25 cm;
- In front of the sink, at least 70 cm, if not protruding from the wall, then 90 cm.
Bathrooms for persons with disabilities
Having mentioned all types of standard sizes of the bathroom and the placement of plumbing, special attention should be paid to bathrooms for people with disabilities (disabled people).
Clause 4.36 of SNIP 2.08.02-89 entitled "Public buildings" states that each restroom public building must be equipped with a bathroom (at least one).
The dimensions should be as follows:
- Depth - at least 180 cm;
- The width of the booth is 165 cm.
Doors should only open outward. SNIP does not talk about installation additional equipmentalthough installing it would be desirable.
Of course, a bathroom of this type should be located in a place convenient for disabled people (first of all, wheelchair users).
In residential buildings, the dimensions are different:
- A bathroom with a washbasin (not less than 160 * 220 cm);
- Combined bathroom - 220 * 220 cm.
After reading the article, you can understand that restrictions on the bathroom are imposed not only by SNIP, but also due to convenient use. Before going to make repairs, carefully study all the rules and regulations for redevelopment and the minimum allowable size. Then you will remain as satisfied as possible and will be deprived of problems from the side of the law.


