To begin with, you already have the main sewer line. It does not matter whether you live in an apartment or in a private house, you need to drain drainage water and other sewage, for this there is a sewage system in the bathroom.
Under the main highway in this article, we mean the main sewer pipe connected to your home, from which we will continue to do the wiring. Read about how to lay the main sewer with your own hands in our other articles.
Plastic sewerage.
The bathroom is the place where the plastic sewage system will have the largest number of taps, since in addition to connecting the bathroom to it, we also need to install a toilet bowl and a sink, and sometimes a washing machine.
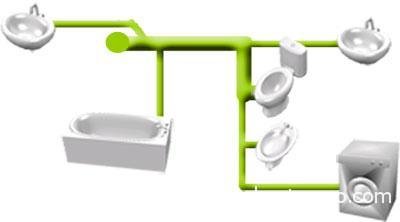
Like all other work, laying a sewer in a bathroom should begin with planning, which is a technical drawing or just a sketch (sketch). As the saying goes: we will "dance" from the toilet, since the outlet pipe from it is large in diameter (110 mm) and it should be located in the immediate vicinity of the central highway.
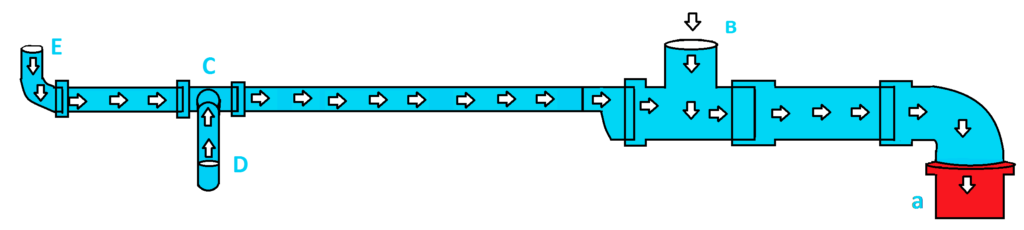
We look at our conditional sketch. This is how the bathroom drain will look like in our example. You can distribute and plan everything in your own way, it does not depend on anything. The size of the bathroom is also conditional, so fantasize. For us, the main thing is to show clearly by example the principle of wiring and laying plastic sewer in the bathroom.
Remember the main thing:
Rule # 1: The toilet is the closest point to the central sewer line.
Let's go back to our drawing.
Points A, B, C, D, and E are connection points (connections of sewer branches).
- A - entrance to the central highway.
- B - toilet connection.
- C - wiring node.
- D - sink connection.
- E - bath connection.
It is not necessary that all your sewer connections are located at right angles and strictly perpendicular to each other, but remember:
After we have planned everything on paper, we will proceed to clarify the dimensions and selection of materials. As we said above, the size of your bathroom can be any, so the distances between points A, B, C, D, and E will be conditional.
A - B: 50 cm.
B - C: 100 cm.
C - D: 200 cm.
C - E: 150 cm.
Even if our bathroom is not very well-planned, do not forget that this is just an example.
Sewerage material.
Nowadays, mainly PVC sewer pipes are used as pipes for laying sewage in the bathroom.
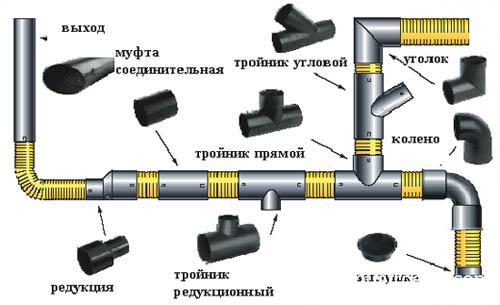
Also, there are many fittings for such pipes: elbow, tee, adapter, etc.
Note that all pipes and fittings on one or more sides have a socket bulge, which is equipped with a rubber sealing ring and serves to connect the parts of the sewerage system with each other. Details about sewer pipesah read on our pages.
Now let's decide on the size of pipes for our plastic sewage system in the bathroom, the number of bends and tees and the method of laying the sewage system.
Let's talk briefly about the bookmarking method in this article. There are only three methods:
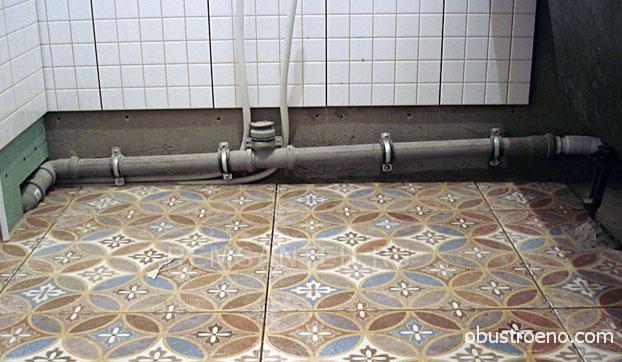
1- laying of sewage in the walls. Sewer pipes are built into the walls.
2- outdoor sewerage... Sewerage laid on the surface of walls and floors.
3- laying the sewer in the floor. Sewer pipes are filled with concrete screed or hidden under the floor.
Sizes of pipes and selection of fittings for installing sewage in the bathroom.
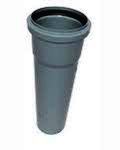
It is believed that the main line should be at least 100mm in diameter. This is usually the case, therefore, to connect the toilet, we take a pipe of this diameter. (It is also sometimes called the 110th in outer diameter). Therefore, the length of such a pipe according to our drawing will be 50 cm.
(segment A-B). Now we need to connect this pipe to the main line. To do this, we acquire a swivel elbow at 90 degrees.
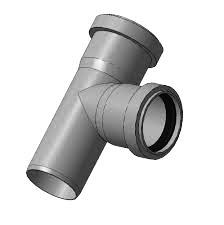
To connect the toilet (the most difficult in this project), a more complex configuration will be required, since we need to switch to a thinner pipe in the future. So, we take a tee in the shape of the letter "T" with a diameter of 100mm.
We buy an eccentric transition to it for transition from a diameter of 100mm. by 50mm.
Now, having connected all this together, we should get a structure similar to the one in the diagram below:
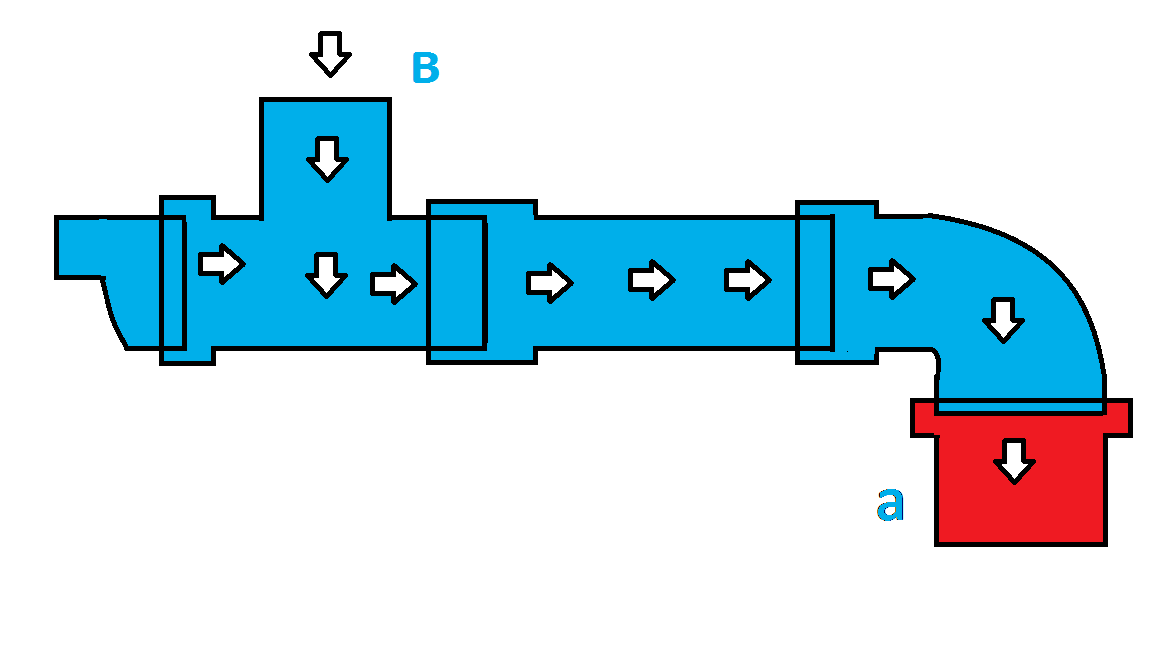
Please note that:
Rule # 3: Everything is connected upstream. This is done so that the water flow does not have excess resistance formed by the transition between the pipes.
The transitional eccentric must be installed exactly like this: with the smallest diameter upwards, which will also avoid the ingress of dense masses into the small diameter pipe.
Then you can connect the toilet to point "B" using a special corrugated connecting pipe. 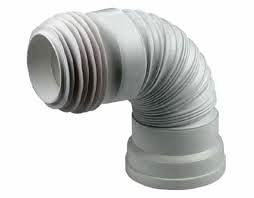
Now we need a 50mm sewer pipe. length 100cm. (from point "B" to point "C").
We attach it to our structure from the side of the transitional eccentric, and to the other end we attach a tee, which will serve as a junction point for our sewer. Point "C".
Here's what we got:
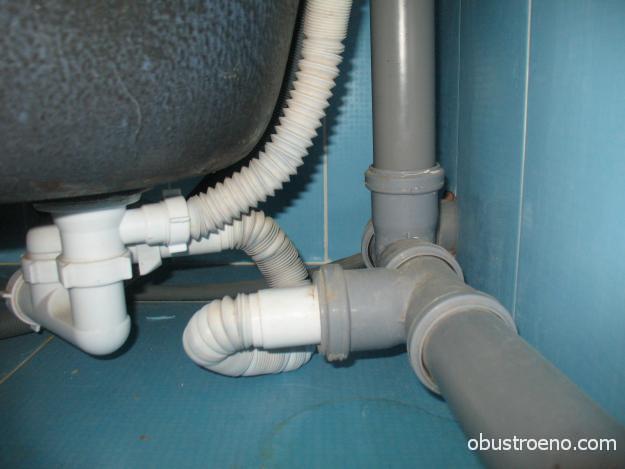
Now you can start connecting the bath and sink. They must be connected using the same pvc sewer pipes, but you can also use a corrugated hose. True, this is a completely different story, which we will tell about in another article.
We have come to the end, but there are still a couple of tips that you will read below about what a plastic drain in a bathroom is.
Outcomes:
We ended up learning about three basic rules:
Rule # 1: The toilet is the closest point to the central sewer line.
Rule number 2: the more straight pipe sections, the easier it is to clear the resulting blockages in the pipes later.
Rule # 3: Everything is connected upstream. This is done so that the water flow does not have unnecessary resistance formed by the transition between the pipes.
More tips:
In terms of load, we can say that the slope, although minimal, is nevertheless welcomed to avoid stagnant water. The slope is made towards the central highway and it should not exceed 1 cm per meter.
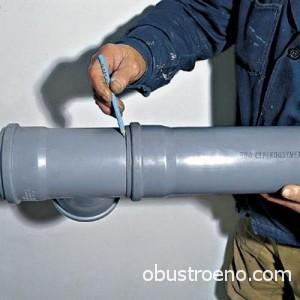
You can cut the sewer pipe with an ordinary hacksaw for metal or with a small hacksaw for wood, but it is better to clean the edges of the cut.
On long sections of the sewer pipe, it is advisable to install taps for cleaning in case of blockage, which are easily closed with special plugs with plugs.
To connect the washing machine, a special tap with a thin diameter is used.
The sewerage system is an integral part of the bathroom. It's hard to imagine comfortable life without a normally equipped drainage system. In this article, you will learn how to design and install a bathroom drain yourself. Find out where you can hire a professional for this job and the prices for services.
At the initial stage of creating the sewer system, marking work is carried out. A diagram of the location of all plumbing, which is connected to the sewer, is drawn on paper. The location of the pipe is determined and the material requirement is calculated.
In the course of performing measurements and calculations, the following features must be taken into account:
- The pipes are connected using tees with different outlets or funnel-shaped adapters.
- Of particular difficulty will be the laying of pipes under the bathroom. In order not to waste time removing the bath, the pipes are connected from several elements.
- If you plan to connect the sink and bath at the same time, then the sewer wiring is performed using a tee. The third outlet can be tilted 45º or 90º from the pipe axis.
- To connect the siphon to the sewer pipe, a branch pipe with a rotation angle of 90º is used.
If the installation of some kind of plumbing, which requires draining, is planned in the future, then a branch for it is necessarily created. It is easier to close the pipe with a temporary plug (although this is not attractive) than to re-install the sewer system.
Classification of plastic pipes
Nowadays, plastic pipes are used for the sewage system. Compared to metal products, they differ:
- light weight;
- a solid operational period (over 50 years);
- ease of installation (easy to cut and connect by hand).
There are such varieties plastic pipes:
- polyvinyl chloride;
- polyethylene;
- polypropylene.
The first two types of pipes are practically not used to create a sewer system. The most suitable for sewage are polypropylene pipesthat can withstand high temperatures.
According to the international standard ISO 3633, plastic pipes are marked "A" and "B". Pipes marked "A" have thin walls and are used to create a ventilation system. For the sewerage device, plastic pipes are suitable, which are marked "B". They have thicker walls that can withstand hot water.
Pipe selection criteria
The main technical characteristic of plastic pipes is their diameter. It should be noted right away that in most cases, manufacturers mark pipes based on the size of the outer diameter.
For sewage the main parameter is the inner diameter. The purchase of pipes of a certain diameter is carried out depending on the type of plumbing. In particular, the minimum pipe diameter is:
- for washing machine and dishwasher - 25 mm;
- for bidets and sinks - 32 mm;
- for a shower stall or bath - 50 mm;
- for several devices connected to one outlet - 70 mm;
- for the toilet and the main riser in the apartment - 100 mm.
The second parameter, which is taken into account when purchasing sewer pipes in the bathroom, is the length of the products... Pipes are commercially available from 1 to 6 m in length.It is most convenient to work with material that is 2 or 3 m long
When calculating the required footage of plastic pipes, you also need to take into account that they are equipped with sockets with sealing rubber bands, which are designed to tightly connect adjacent elements.
Preparatory work
In addition to calculating pipes, an accurate calculation of the number of fittings is carried out. If there are curves in the system, it is not recommended to create right angles. Better to use two fittings that are mounted at a 45º angle. This is the best preventive method to prevent pipe blockages.
To save a little money, one pipe can be laid in the bathroom, which technical parameters suitable for all plumbing. Bath, sink, washing machine are connected to a common pipe that goes to the main riser. The only exception Is a toilet bowl. It should be directly connected to the riser.
A hacksaw for metal is used to cut sewer pipes. To make a straight cut, the pipe is drawn in a circle. Hold the hacksaw at a right angle. The trimmed pipe ends are cleaned using sandpaper.
When cutting pipes, the dimensions of the fittings are taken into account. It is recommended to cut pipes immediately before laying them. This makes it easier to determine the location and length of the pipes to be laid.
The nuances of laying plastic pipes
The connection of two adjacent pipes takes place using a fitting. To be more precise, the pipe is sealed in the rubber band of the fitting. The pipe must be inserted all the way. It is very important that the fitting and pipes are clean. Otherwise, over time, the sealing of the connection will be disrupted. To improve the tightness of the joints, the ends of the pipes are treated with soapy water.
The most difficult process is the installation of the riser. Therefore, it is from this site that the installation of the sewer system begins. First, the tee is installed. For this, a rubber cuff, which is pre-lubricated with a sealant, is placed in the lower socket and connected to a tee. Clamps are used to fix the pipes and riser to the wall.
After assembling the riser, the pipes are led to the places where the plumbing fixtures will be located. Immediately you need to provide for the presence of a slope towards the riser. It should be within 2 cm per 1 m of pipe. If the laying of sewer pipes is carried out in the grooves of the walls, then clamps are used to securely fix them.
After the installation works all connections are carefully checked. The plumbing drain elements are connected with pipes. This procedure is not complicated. The only difficulty can be caused by connecting the bath to the sewer.
Connecting the bath to the sewer
To connect the bath to the pipes, it is better to use a siphon with an overflow. Its installation provides for compliance with two requirements:
- Creation of an optimal height difference between the outlet and the drain pipe. The specific size of the differential depends on the height of the siphon outlet.
- Providing access to the siphon, which is necessary for periodic cleaning of the spillway assembly.
As for the pipe that will connect the bathtub to the sewer, then the best option Are rigid plastic products. They should have two bends to ensure optimal rotation of the elements. If it is not possible to connect the drainage units with rigid pipes, then corrugated pipes are used. When joining pipes of different diameters, adapters are used.
Connecting the bath to the sewer consists of the following sequential actions:
- all rubber pads fit into place;
- the siphon is assembled and the overflow pipe is connected to the bath;
- fasteners are screwed in;
- using a pipe and a pipe, the siphon is connected to the drain hole;
- the joints are sealed at the points of contact of the bath with the wall.
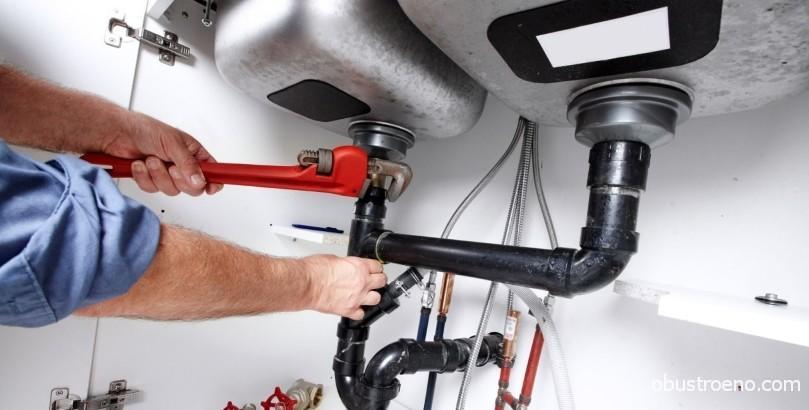
The connection of all plastic elements takes place without the use of open-end or gas keys. The work is done manually. Otherwise, there is a risk of damage to the plastic threads.
After the completion of the installation work, preliminary testing of the sewer system is carried out. It is necessary to turn on all plumbing fixtures and stock up on 2-3 buckets of water. When the plumbing starts to drain the waste water into the system, buckets of water are poured into the sink, tub, and toilet. If there are leaks, it will be necessary to redo the fastening of the sewage elements in such places.
Problems with the construction of the sewer system
Old pipes
During the work on the sewerage device, you can encounter a number of problems. For example, at the stage of dismantling work, you may come across old pipes, "tightly" fixed to the wall. This is especially true for residents of old apartment buildings. In this case, you need to carefully remove old finishso as not to damage the elements of the common sewage system.
Correct slope
When laying new pipes, the slope that we have already mentioned must be respected. But the fact is that during installation work, the created structure is subject to slight displacement. To prevent this process, you should use clamps-suspensions with latches.
Leaks
Another issue is continuous leakage from testing and reconnecting the pipe to the fitting. In this case, an adhesive-based sealant is used. It is applied to the joints. A pipe with a rubber band is inserted into the fitting. After drying, the sewer system is tested again.
Smell
A fairly common problem in a bathroom is an unpleasant smell. It can be caused by various reasons:
- lack of water in the water seal;
- damage to the sewer pipe;
- deterioration of the tightness of pipe and drain connections;
- accumulation of debris at the bottom of the siphon.
Lack of water in the water seal
The first reason for the lack of water in the water seal may be a poorly installed pipe in the siphon. The branch pipe simply does not reach the water, and the smell passes by it. This problem is solved by lowering the pipe 2-3 cm into the water.
Sagging of the corrugated pipe.
This defect could occur if the pipe is not secured with spacers or tape.
Long-term non-use of the bathroom is also one of the factors contributing to the unpleasant smell. The water in the siphon just evaporated. To remove unpleasant odors, open water and ventilate the room.
Damage, deterioration of tightness and blockage.
When a crack forms in the pipe, the dirty water gets onto the floor and wall. This results in stains and mildew, which lead to unpleasant odors. The crack is sealed with a sealant, and the pipe is wrapped with tape. The sealant is also used to restore the tightness of the drain and pipe connections.
Cleaning the siphon from debris accumulated at the bottom is done by unscrewing the bottom of the siphon and washing it. For preventive purposes, chemical agents are periodically used to clean the sewage system.
Home sewage is one of the most important communication systems. Thanks to her, residents feel comfortable. The withdrawal of all drains is its main purpose. If your repair plan includes the installation of a bathroom plumbing with your own hands, then here you need to resolve the issue with the sewage system. This is a very serious moment, since installing the sewer correctly is to lay the foundation for all the rest of the repair. Before the beginning renovation works decide what plumbing fixtures you need. With a combined bathroom, this can be a bath or shower, a sink with hot and cold water, a toilet and a washing machine. No installation of a sewage system is complete without plastic pipes. They do not have much pressure, so they are thinner than tap water. The greatest advantage of plastic pipes is their durability, ease of installation, they do not rust. Plastic pipes are divided into two classes:
- Class A - thin-walled. They are more suitable for a ventilation system.
- Class B - durable and reliable, they are necessary when replacing the sewer system in the bathroom. But their price is an order of magnitude higher than in class A.
In addition to plastic pipes, you must purchase:
- Adjustable wrench.
- Shut-off valves.
- Impact type electric drill.
- Soldering iron with special tips.
- Pipes of the required length (with a diameter of 50 mm for a washbasin, bath, etc. except for a toilet and 100 mm for a toilet drain.)
- Grinder for cutting metal.
- Fasteners and fittings.
- Precision cutter.
- Technical vaseline and tape.
- Cement mortar.
- Silicone sealant.
Dismantling old pipes
This operation usually goes smoothly, unless there are pipe parts in the bathroom that are embedded in the wall. The grinder is the main tool in this process. Open all piping and sewerage piping that is closed. Be careful when dismantling the riser, as this part of the sewer system is connected to other apartments, and improper actions can cause trouble for you and your neighbors. During dismantling, take care of your health and wear a respirator and goggles to protect yourself from dust. So dismantling:
- Turn off the water on the riser of your apartment.
- Using a grinder, cut off old pipes, stopcocks, cut threads and screw on new ones.
- Close new taps, turn on water.
- To prevent water in the pipes from interfering, drain it.
- The washing machine, mixers must be disconnected.
 bathroom connection and piping for plumbing
 Do-it-yourself installation of a plastic sewer begins with the installation of a filter and a meter. Counters should be set so that later it is convenient to read the readings. Make sure they are installed in the direction of the arrows that indicate the direction of the water flow. The meter body can be placed in any position.
The first step is to install a riser, because problems with the sewage system exist at this moment not only for you, but also for your neighbors. They are unlikely to like it. All work on the installation of the sewage system should be carried out after leveling the floor and walls, which will make it possible to correctly determine the level of installation of pipes at each site:
- Insert a cross or tee into the bottom flare. Use a rubber sleeve or silicone sealant.
- Attach the riser to the wall using special clamps.
- After installing the riser, engage in wiring. Now you do not inconvenience your neighbors.
- When replacing pipes, the sockets are placed in the direction of water movement, the pipes are changed from bottom to top.
- Pipes must be installed with a slope of 2 cm per meter of pipe length so that the sewer does not clog.
- When the installation of the sewage system in the bathroom is finished, be sure to check the system and make sure that there is no leakage.
 sewerage pipe assembly process
 Bathroom installation is not particularly difficult, but there are certain nuances:
- Use a siphon with two outlets for connection to the drain and overflow.
- When connecting the bath to the sewerage system, it is necessary to use a siphon made of smooth plastic pipes. Do not use corrugated pipes, as they have an uneven surface inside, in the recesses of which dirt accumulates and the siphon becomes clogged.
- There should be a slight difference in height between the drain hole and the pipe so that the water in the bathroom does not stagnate.
- Use a plastic adapter of the correct size to connect the siphon. If the pipes are plastic, then the adapter must be plastic, if the pipes are cast iron - rubber. The joints must be sealed, otherwise there will be a sewer smell in the bathroom.
- Tighten the nuts on the siphon by hand, the keys can damage the siphon and it can crack.
- When the siphon is assembled, connect the bathtub to the sewer, i.e. insert part of the pipe into the socket.
Use a soldering iron to connect pipe fragments in the bathroom, but remember that the soldered points should be easily accessible. After soldering the parts of the pipe, wait 15 seconds for the plastic to harden. Due to the fact that hot water will flow through the plastic pipes, do not fix them rigidly to the wall. Use plastic clips here. They will be indispensable for fixing sewer pipes. Check the presence of sealing gaskets in the places where the drain from the bath, sink or shower stall is assembled. Lubrication with petroleum jelly is necessary for the connection and on the thread. If it becomes necessary to untwist the thread, it will be quite easy to do this.
Toilet installation
If you decide to do the installation of the bathroom sewerage system with your own hands, then installing the toilet will not be particularly difficult either. To do this, you need to follow these steps:
- Plug the previously cleaned part of the pipe with a plastic bottle.
- Put the corrugated pipe on the outlet. Place the toilet bowl back.
- Place a specific shim under the landing heel.
- Slide the toilet bowl carefully against the wall.
- Use a black marker to mark the anchor points on the floor.
- Use a diamond drill to drill the mounting holes.
- Insert the dowels into the holes.
- Attach the gasket and fit.
- Install the washers and screws into the marked holes. Twist them into the dowels carefully and in no case should they be driven in.
- The edges of the pipe must be sealed. Remove the plastic bottle from the pipe and connect the toilet to the drain.
- Secure the cistern with anti-corrosion screws.
- When installing the flexible water hose, tighten the nuts by hand and then tighten with a wrench.
- Drain the water, make sure there is no leakage.
Remember that you cannot use the toilet for 6 hours, as the silicone must harden. Do not feel sorry for the sealant. There is never too much of it. But there should be no silicone inside the pipe. To test the entire system, pour 2 buckets of water into each plumbing fixture and make sure there is no moisture or puddles.
 sewerage pipe layout for plumbing in the bathroom
 DIY bathroom sink installation
- Start with a mixer. It must be attached using union nuts through rubber gaskets.
- Connect the siphon. Insert the corrugated siphon hose into the socket. Use either a standard gasket or cuffs for sealing. The siphon comes with a corrugation, it all depends on its diameter.
- Do not forget to check everything for leaks or make sure there are no leaks.
Features of connecting a shower cabin to the bathroom drain
A shower cabin is not a luxury, but a convenient, reliable and practical assistant for a modern person. It is not difficult to install it yourself. If you decide to save on plumbing and do the installation yourself, then you need to know this:
- The connection is made according to the principle of connecting a bathroom. The drain should be located higher than the pipe level.
- Usually, the drainage system of shower cabins consists of corrugated pipes, so you can install a shower cabin in any convenient place.
- Before installing the booth, you should carefully read the instructions, because manufacturers offer different models, and there are nuances that must be taken into account.
Competent connection of the washing machine to the sewage system
Dirty water can be drained from the washing machine into a bathtub or toilet, or into the sewer. The first method is inconvenient in that the machine hose is lowered into a bathtub or toilet bowl, and the water goes down the drain. At this moment, you cannot take a bath or shower, you cannot use the toilet, after dirty water you need to constantly wash the bath. In addition, the hose can jump off and flood the floor with water, and at the same time the neighbors below.
It is possible and necessary to organize a drain for the washing machine directly in the drain pipe that leads to the riser or to the sink siphon. It all depends on the location of the washing machine. The polyethylene drain hose comes with the machine and has a special tip. This hose is attached to the rear wall with special clamps. The hose should be at a height of 80 cm to make the pump easier to operate.
 piping for connecting a washing machine in the bathroom
 How to eliminate an unpleasant sewer smell in the bathroom
If the bathroom has old rusty pipes, they can create an unpleasant odor. However, there are more reasons for its appearance:
- The problem with water traps. This is a layer of water that is located in the curved part of the pipe. Water does not allow sewer gases to pass outside. But if there is no fan pipe, the water seal threatens to break. Full filling of pipes with water also leads to its failure.
- Lack of proper ventilation affects the pressure level in the system. As a result, it rises, and gas from the sewer enters the room.
What to do in case of poor functioning of the water seals:
- Do not use pipes smaller in diameter than the building rules advise you.
- Clean the system systematically, do not allow deposits to build up on the walls.
- Sometimes a clogged siphon will cause unpleasant odors. Clean it at least once every six months.
What to do with minor leaks
If the leak is serious, you will notice it immediately. Small leaks are not visible, they do not form puddles on the floor, and you will not immediately notice spots from dampness: you need to look for them on purpose by looking under the bathtub or behind the toilet. However, even small leaks can "spoil the air" in the bathroom. If you smell an unpleasant sewer smell, carefully examine the entire bathroom sewage system, find and eliminate "sore" spots.
The sewage system in the bathroom is a complex mechanism that consists of plumbing elements, piping and siphons. If you want to do the installation of the bathroom sewer with your own hands, then you must correctly plan and skillfully design your work. By following the above methods, you can easily assemble a durable and high-quality sewer system that will not cause problems for many years. The main thing: to approach each stage with all responsibility and not forget about regular checking of the sewage system.
7 July, 2016
Specialization: Capital construction works (foundation laying, wall construction, roof construction, etc.). Internal construction work (laying of internal communications, rough and final finishing). Hobbies: mobile communications, high technology, computer technology, programming.
Last Tuesday I was approached by a man asking me to help him remake drain pipes in sanitary facilities. Well, as with a request. Actually, as you know, I am professionally engaged in apartment renovation and have laid more than one kilometer of utilities.
Therefore, installing the sewage system in the bathroom with your own hands is not a problem for me. And for those who want to do everything on their own and feel like a real man, having made repairs in the house, I will detail all the nuances and features of the process.
I will warn you right away that I have not graduated from institutes, so I can get confused with terms. But everything below is based on personal experience and practice. Therefore, you can not doubt the reliability for a single gram.
Measurements and drawing up a work plan
As one said a famous person, I do not remember the name, even the worst architect differs from the best bee in that he draws up a plan before starting work. I do not consider myself to be a bad specialist, therefore I do not neglect this stage. Yes, and I do not advise you.
Let's start drawing up a diagram. I haven’t told you yet, but the apartment where I was asked to make the sewer was undergoing general repairs. Therefore, I did not have to decide how to bring the sewerage system to the already existing plumbing fixtures, as well as how to transfer the sewerage system from the kitchen to the room.
But I have not always met such ideal conditions. Yes, and you will probably be different. Therefore, when drawing up a diagram, you need to mark all connected equipment on it. It is advisable to do this on a scale in order to immediately calculate the length and diameter of the pipes.
The client's apartment was supposed to connect the following equipment:
- shower cabin;
- toilet with bidet;
- dishwasher and washing machine;
- sink in the kitchen and bathroom.
I can't give you a diagram, since we marked everything with markers right on the walls (there was no decorative coating on them yet). Do everything on a piece of paper. I have a small instruction, exactly following which you will not face problems in the future.
- Remember that it is difficult to lay drain pipes under an already installed bathtub. If you are not going to dismantle it, provide a drain gasket from several parts. But at the same time, do not forget to take care of the tightness of the joints, otherwise Niagara Falls will spill on the neighbors from above, which they will not be happy with.
- The bathtub must be connected through a siphon - a special branch that rotates 90 degrees. If the bathtub and sink are located next to each other, I would advise making your job easier by using a tee.
- If the total length of the sewer pipes is long, do not forget to install pipe cleaning revisions, as I did. Otherwise, you will then be remembered with a kindly quiet word, if the sewage system gets clogged, but it will not work to clean it.
Therefore, they need to be connected to pipes of a larger diameter. For example, 100 mm. For everything else, half the parts are suitable.
When planning a sewer scheme, remember that as you move towards the main vertical drain, pipes should increase in diameter, not decrease.
Otherwise, over time, a plug of accumulated debris will certainly appear at the junction.
As for the length, it will not work out exactly here. In the store, sewer pipes are sold in pieces of different lengths. It is advisable to select and calculate everything so that there is less waste. This will turn out to be both more economical and more reliable (I mean the possibility of the appearance of Niagara Falls).
Sewerage installation process
Selection and purchase of materials
Not a single installation of sewer pipes in the bathroom was complete without pipes. (joked well, huh?). I think you will need them too. Therefore, I will tell you how to choose them correctly so that you do not have to redo all the work in the future.
I must say right away that outdated metal and cast iron pipes will not suit you. Moreover, the client said that he would bring all the materials by his own car. And even though he has a jeep, he is unlikely to pull the cast-iron pipes. Yes and specifications they leave much to be desired.
So I suggested using plastic ones. Remember that sometimes very hot water gets into the drain (for example, when you are straining pasta or draining the washing machine).
Therefore, the plastic must remain intact at temperatures up to + 95 degrees Celsius. Otherwise, not just Niagara Falls will fall on the neighbors, but a hot spring. Moreover, it is far from healing.
Now the store has several types of pipes for arranging a drain system in the bathroom:
- PVC... They have thin walls and are not well tolerated high temperature... They can be used for sewage, but I would advise you to pay attention to the second option.
- Polypropylene... Excellent for transporting boiling water, but greatly increase in size when heated. We bought just such pipes for the client. And I will tell you how to avoid warping from high temperatures when I talk about installation.
- Polyethylene... They are often used for the installation of main sewer systems. You've probably seen workers bring them in when they repair a break in the yard (black pipes with colored stripes on the side).
When choosing, please note that there are very thin plastic pipes that are used for channeling. Do not buy them for sewers.
Pipes are not all that we need for work. Therefore, with a clear conscience, I loaded a bunch of other goods into my client's new jeep, without which there can be no question of high-quality sewage:
- plastic fittings - tees, revisions, bends, elbows and much more (you will not need an exact list, since it all depends on the configuration, length and complexity of the sewage system);
- compensator;
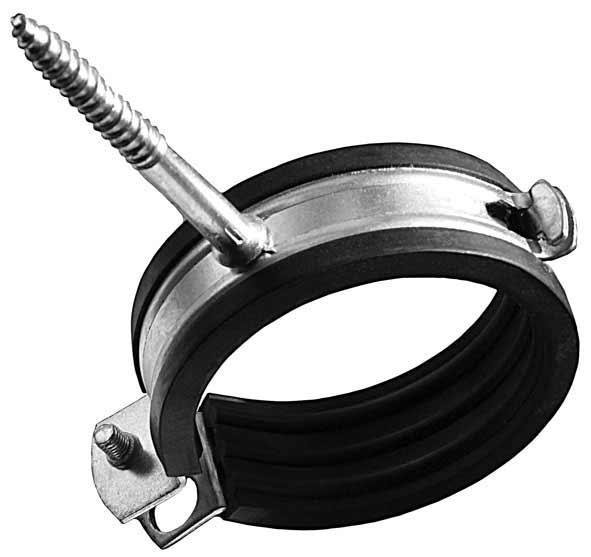
- clamps for fixing pipes to walls (take with special shock-absorbing gaskets so that later the noise of the drained water in the pipes does not wake you up at night);
- revision for the riser (it will be needed if the vertical riser that connects all apartments and removes sewage into the central sewer is clogged);
- silicone sealant (they are lubricated o-rings in the sockets of pipes to ensure complete tightness of the joints);
- cement (what if it comes in handy, you never know).
Dismantling
As I said, I had to put the drain system in new apartment... However, if you take on a sewer system in a bathroom in an old house, you cannot do without dismantling the old pipes.
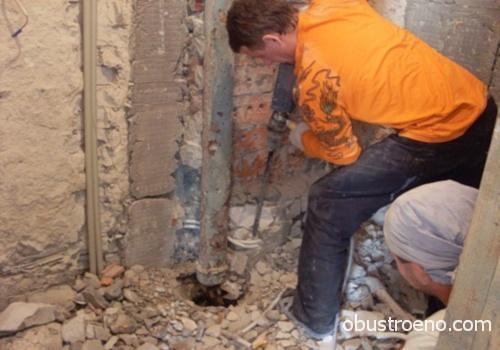
There is nothing difficult in this operation if all pipes are laid openly and are not embedded in the wall. Otherwise, you will have to work pretty hard with a puncher, chisel and hammer. Believe me, I have chipped off more than one meter of old cast-iron pipes, so I know what I'm doing.
In order not to get trapped, I want to give you one piece of advice. Disconnecting the pipes from the central riser (or completely dismantling it), you must act so as not to damage engineering system from neighbors. Therefore, it is not necessary to thresh with all valiant daring cast iron pipe... This material is fragile and can crack easily.
To prevent this from happening, you need to gently turn the joint with a screwdriver (there is usually a tow, mixed with), and then also gently disconnect the pipes that you are going to change with a rotary movement.
Preparatory operations
We have almost come to the description of the installation process. However, before assembly, you need to spend a few more minutes (or hours) preparation.
I would advise using a marker to draw on the walls or floor where the pipes should be laid. Then take the purchased parts and lay them out in those places where they will be placed. I cut right away, however, so as not to make a mistake later, you'd better cut the pipes before joining them to each other.
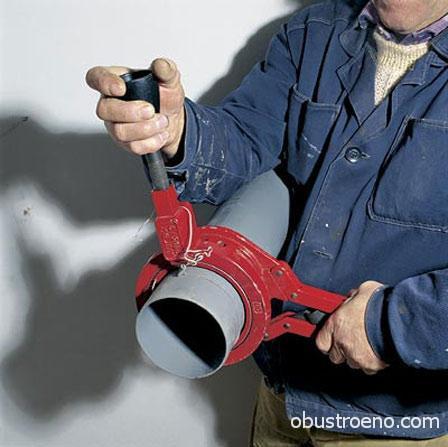
For cutting, you can use an ordinary hacksaw with small teeth, but it is better to buy or rent a special pipe cutter. The difference between them is that after using the pipe cutter, no burrs remain at the end, and a chamfer is formed simultaneously with cutting. This saves time and makes assembly tidier.
When cutting pipes, make sure the end face is exactly 90 degrees to the pipe axis.
Also, in advance, lay out the brackets in the necessary places for securing the sewer pipes. They must hold every fitting in the system. If the pipes are long, the distance between adjacent fasteners should not be more than 40 cm.
When drawing a diagram on the walls, do not forget that the pipes should be located at a slope of about 2 cm for each meter. If it is less, blockages are possible and the liquid will not flow to the drain. If more, the pipes will overgrow with debris, since the flow passing too fast will not have time to wash everything away.
Installation of pipes
If you did everything that I said above correctly, the assembly itself will not take much time. Everything is done simply, as in a children's designer.
Pipes are connected without any glue and welding, using a socket system. The scheme of work is as follows:
- It is necessary to measure the desired piece of pipe and cut it off with a pipe cutter or a hacksaw.
- If a hacksaw was used, the end must be cleaned sandpaperand then remove the chamfer with a file. If this is not done, then when the smooth part is inserted into the socket, the part will crush the rubber O-ring and the neighbors, again, will not be very happy, having received a shower from the sewer on their heads.

- Then all pipes are assembled into one system (simply by hand, no lubrication). Work starts from the central riser and ends with consumers (or those points where plumbing fixtures will be placed). At this stage, you once again check all the calculations, correct the identified shortcomings and mark the places where the holes for the brackets will be drilled.
- After that, holes are drilled into which dowels are inserted and screws are screwed in to hold the lower parts of the brackets.
- Then the final assembly of the system takes place.
Socket connections are made as follows:
- the ends of the parts are thoroughly cleaned of dust and dirt (in this case, you need to make sure that they are completely dry);
- then the pipe is inserted into the socket until it stops and a risk is made on the smooth part with a marker;
- after that, the pipe is pulled out, and the sealing gum is carefully coated with a sealant (this makes the rubber more elastic, and the connection itself is durable and completely sealed);
- then the pipe is again inserted into the socket until it stops, after which it is removed from there by one centimeter (this is why the risk on the pipe is needed).
The last action is performed in order to compensate thermal expansion pipes when heated.
If you don't, sewer system can warp, lose tightness and spew out tens of liters of not only hot, but also dirty water from its bowels.
- The penultimate stage is to fix the pipes on the brackets. As I said, I always buy fasteners with special shock-absorbing pads that dampen vibrations when fluid passes through the pipes. It is not necessary to tighten the fasteners too hard. The pipe must move freely along its axis, otherwise warping during thermal expansion cannot be avoided.
- The last one is connecting consumers. However, this is done after the end decorative finishing and I was not invited to this stage. If you do everything yourself, there should be no problem. The main thing is to monitor the tightness of all joints.
System testing
I almost forgot about one important point. After completing the assembly of the drain system, it is imperative to check it for leaks and functionality. To do this, you need to open all the taps and turn on all household appliances that drain water into the sewer. That is, to arrange the so-called "peak load".
For example, I do this. I collect clean water in a bucket and pour it into the sink or bathroom. If you've done everything right, the joints shouldn't leak.
However, they still need to be investigated using a flashlight and toilet paper (water droplets are immediately visible on it). If a Niagara Falls embryo (leak) is found, this assembly must be reassembled.
If in some place, despite all your efforts, a small leak appears, you can use special glue.
It is applied in the same way as conventional sealant without removing the O-ring.
After drying, the leak test is repeated again; dripping from such a glued joint should not be.
Conclusion
Summing up what has been said, I can give you one very useful advice. You need to change the sewage system as soon as possible.
Especially if the apartment is not new, but residential. Otherwise, you yourself understand, you will not end up with problems, you will have to run on big and small business to the nearest shopping center, to a gas station or to the forest. Now you can watch the video in this article, which highlights various aspects of apartment renovations.


