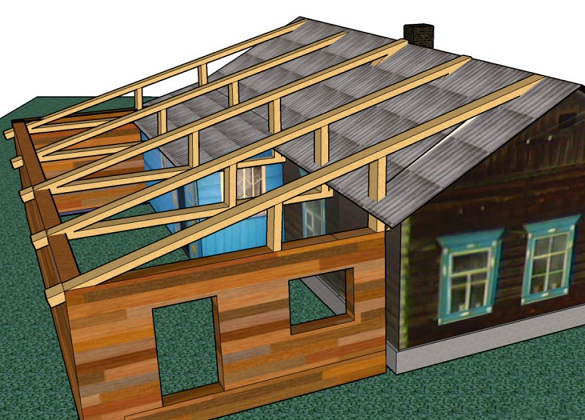
Rafter system shed roof has a number of advantages that make it a good choice for installation in auxiliary buildings, garages, annexes to the main building.
Advantages of a pitched roof
Shed roof device on buildings different types profitable due to a number of factors:
- low weight of the structure;
- low cost of construction;
- simple installation technology;
- the possibility of using a wide range of construction and roofing materials;
- ease of installation drainage system, chimney.
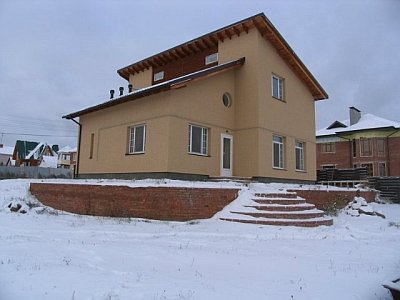
The roof structure with one slope can be used in the construction of a house to implement original design ideas. In addition, this is a favorite option for the roof frame of outbuildings, garages, baths, sheds and verandas.
When building a detached brick garage with a base for installation roofing material can be concrete slabs or metal structures. But no less often a rafter system is erected from wooden elements. Calculation of rafters for small buildings can be done independently, in difficult cases it is recommended to contact professionals.
Rafters: design calculation and material preparation
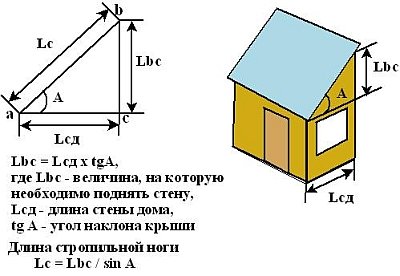
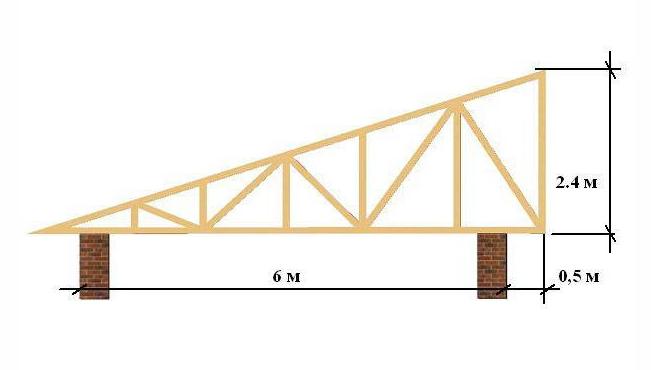
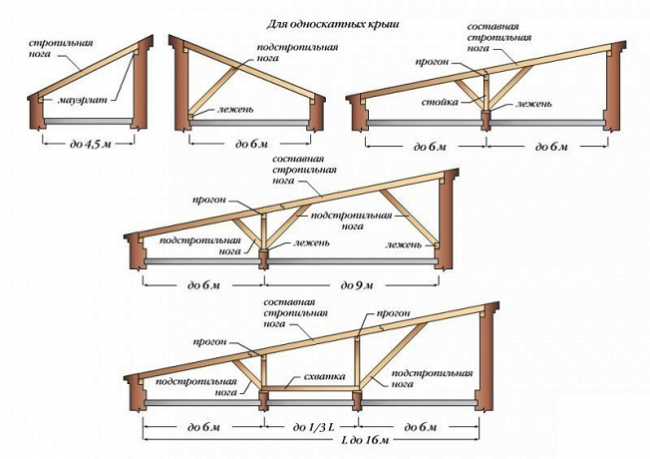
The construction scheme for a pitched roof is extremely simple: the rafters cover the span between the end walls of the building. The slope of the slope is determined by the difference in the height of the walls. Two methods can be applied to provide this height difference.:
- masonry of one of the opposite load-bearing walls, is performed at a great height;
- on one of the walls, special supports are mounted, on which the girder is laid to support the upper ends of the rafters.
The first option is most suitable for the construction of a structure made of piece materials. The second method allows you to save building materials from which the walls are erected.
A roof structure with one slope should have a slope of no more than 50-60 °. The optimal value is considered to be an angle of 18-35 °, but specific parameters should be selected taking into account various factors. The rafter system must withstand its own weight and high external loads - wind and snow. The intensity of the loads directly depends on the angle of the slopes. In addition, you should pay attention to the values \u200b\u200bat which installation of the selected roofing material is possible.
The rafter pitch also affects the reliability of the roof. The smaller the step, the higher the calculated load that the roof can withstand. But if the step of installing the rafter legs is unreasonably small, this leads to an increase in the weight of the structure, and, accordingly, the load on the walls and foundation of the building. Too large a rafter pitch will not allow you to create a roof that is resistant to external influences.
The calculation of the structure can be done manually, but it is more convenient to do this using a special program. The developed project should reflect not only the step, dimensions and sections of the elements, but also the schemes for the execution of the nodes of the roof frame.
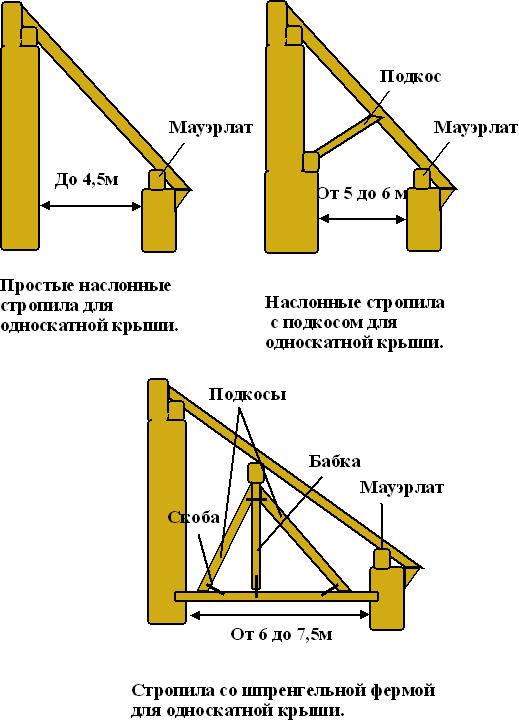
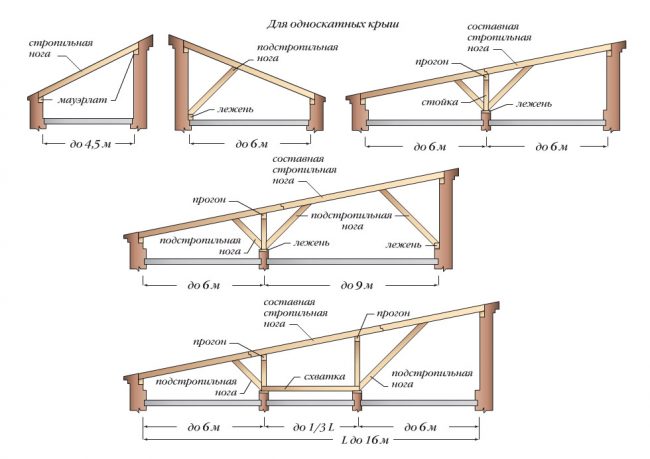
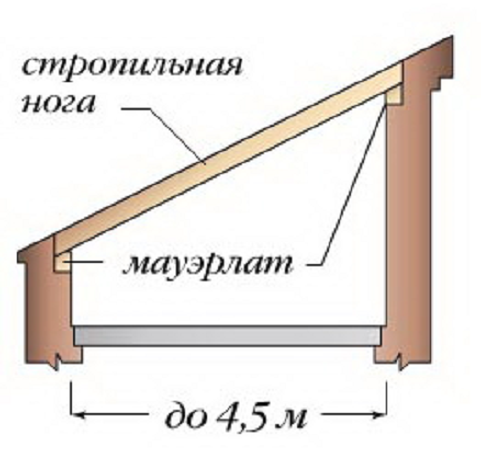
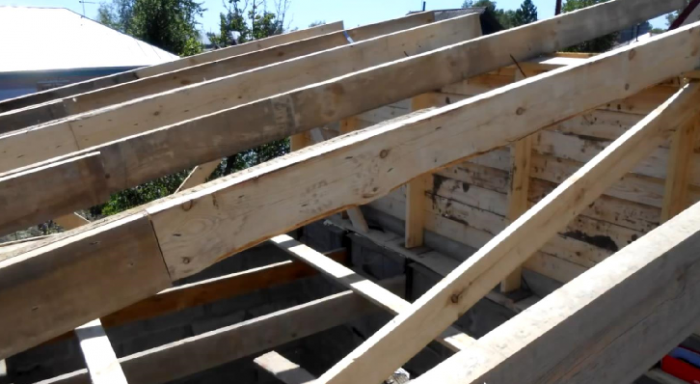
Shed roof rafters for small spans are made from boards or beams. If the span is more than 4.5 meters, an extension of the rafter legs may be needed.
Beams and boards for manufacturing rafter system garage or other structure must be well dried and not have any damage affecting the strength characteristics. Before installation, prepared wooden elements must be treated with a fire-retardant compound to protect the frame from accidental fire and extend its service life.
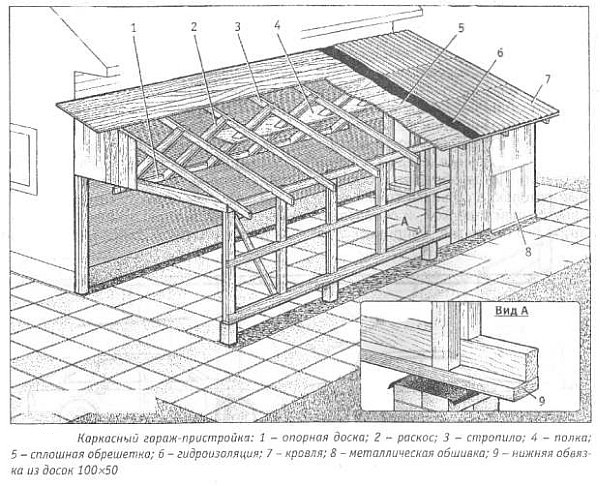
Installation diagram of the roof rafters of the garage
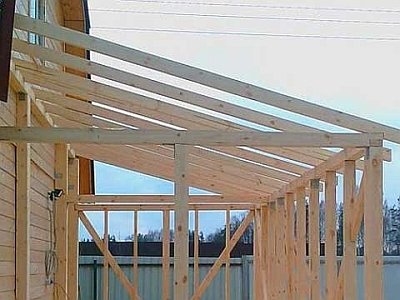
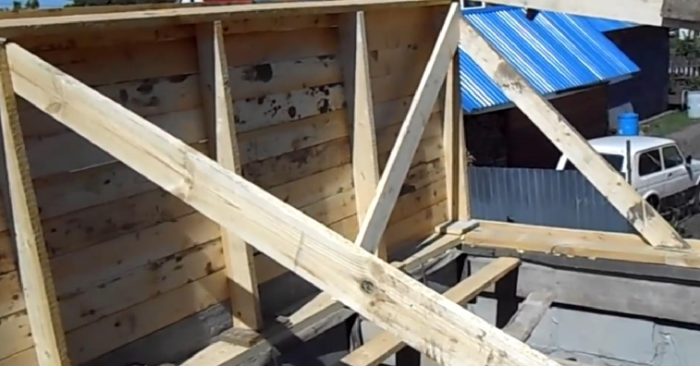
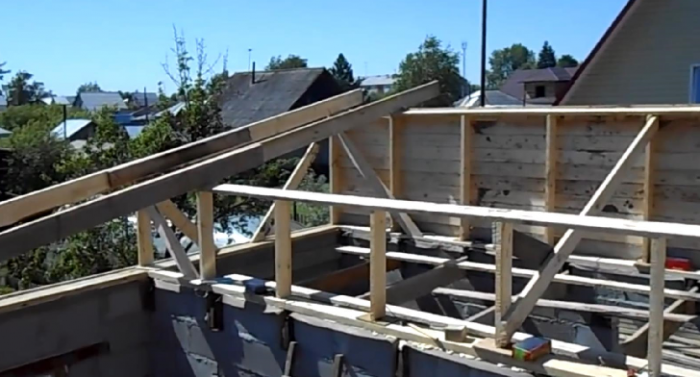
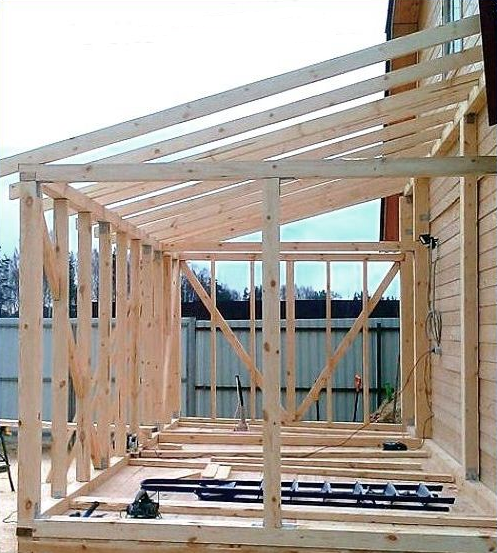
The roof rafter system of the garage during the construction of a shed structure may differ depending on the characteristics of the building. On a small structure, it is enough to simply lay the rafters, resting them on the top of the opposite walls, lined with bricks or blocks. If the construction of a garage with an attic is envisaged, then in this case, beams must be laid across the span (step - 1-1.5 m), which will serve as the basis for the floor. The rafters, as in the first case, are attached to opposite walls, but at the same time they are additionally reinforced with struts - this allows providing the necessary rigidity of the garage roof frame.

If the box of the structure is constructed of bricks, the ends of the beams and rafter legs of the single-pitched roof of the garage can be laid in special slots provided in the walls. In this case, the beams are fastened to the long walls, and the rafters to the end walls. The high wall should be a wall with a garage door. The nests are pre-laid with waterproofing made of rolled bitumen-containing material.
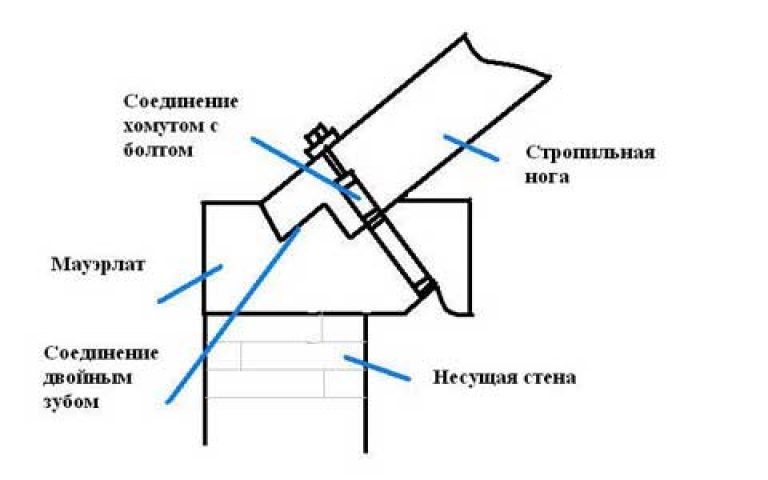
Wooden rafters for a pitched roof can be mounted directly on the walls of the structure, if a small span is overlapped, and the rafter pitch is sufficient to sufficiently evenly receive and distribute the load. In other cases, the rafter legs are attached to the Mauerlat.
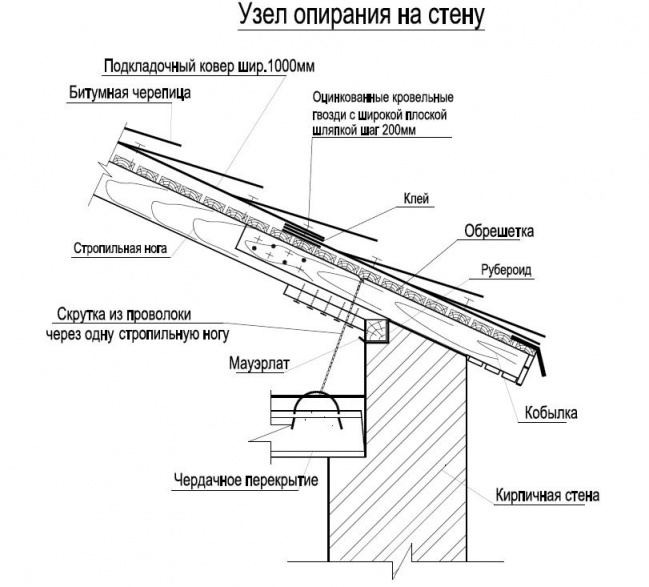
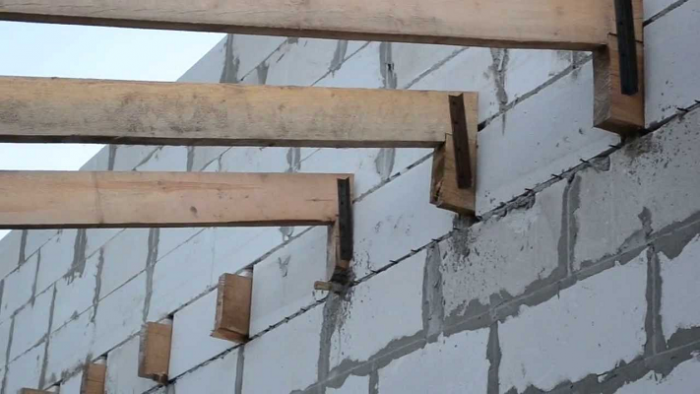
The requirements for the Mauerlat are quite simple: it must be strong, durable, firmly fixed on a wall erected from piece building materials... Theoretically, the rafters should be fastened to the Mauerlat, mounted on a reinforced wall belt. But since the garage belongs to buildings with low loads, the support beam for the rafters can be laid directly on the upper edge of the wall and fixed with anchors and rolled wire embedded in the masonry. Mauerlat needs reliable waterproofingmade of roll materials.

Armopoyas wall under a pitched roof is made of reinforced concrete. To equip it, you should perform a plank formwork, fix the reinforcement in it and install the studs. The height of the embedded fasteners should subsequently allow laying a Mauerlat bar with pre-drilled holes for the studs over the monolithic beam and fastening with nuts equipped with wide washers.
If a garage or other building is built from a bar or log, the Mauerlat function is performed top rail log house. The step of installing the rafter legs on a shed roof is most often 60-70cm - this parameter makes it possible to use almost any piece or roll material for the roof, provided that the sheathing of the corresponding type is installed.
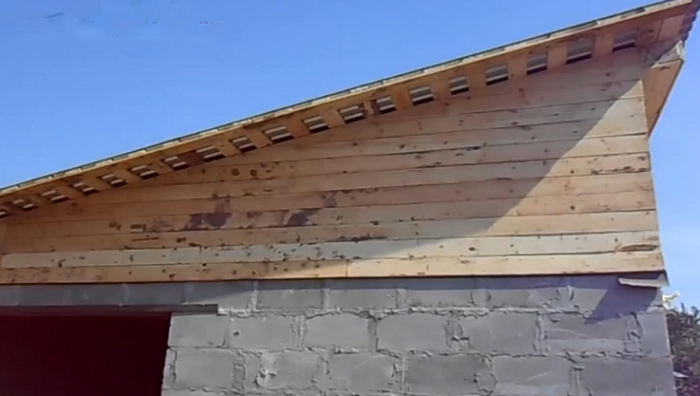
So that the rafter system allows you to equip a roof that can protect building construction from the effects of precipitation, the rafter legs should protrude 30-40 cm beyond the edge of the wall, forming an overhang.
Extension roof installation
A residential or utility outbuilding is a structure adjacent to the main building. Most often, a pitched roof is erected above it, adjacent to the wall of the main building or its roof. The fastening of the rafters of the shed roof of the extension is somewhat different from the installation of the roof frame on a free-standing structure. The main difference concerns the installation of the upper part of the rafters - the lower ends of the rafter legs are attached to the Mauerlat or a special support using standard methods.
Before erecting a lean-to roof of an extension, it is important to determine the required slope of the slope. In accordance with the obtained value of the required difference between the front wall of the extension and the rear wall, it is mounted wooden structure from a bar with a cross section of at least 150 × 150 mm. Particular attention must be paid to the connection of the frame for the rafters with the wall of the main building.
It is not recommended to use a rigid fastening, since adjoining buildings may have different shrinkage rates, which will eventually lead to the formation of cracks in the walls. The arrangement of such a bundle usually involves the use of an elastic interlayer between the rafter support beam and the wall. The beam can be laid on columnar supports or a frame made of timber. The gap of 2-3 cm between the beam and the wall (expansion joint) should be filled with polyurethane foam or other elastic material with low thermal conductivity. It is allowed to fasten the beam to the wall by means of anchors.
If it is required that the roof of the extension is adjacent not to the wall, but to the roof of the main building, it is advisable to think in advance about the technology used for the installation of the rafter system. To maximize the reliability of the new shed roof, it is recommended to completely dismantle the adjoining roof slope of the main building in order to install new rafter legs from the ridge of the main roof to the Mauerlat of the extension. It is necessary to provide for the release of the rafters beyond the plane of the wall of the extension for the device of the cornice. Another option involves connecting the rafters of the extension to the rafter legs of the main roof at a certain distance from its ridge. In this case, the device for abutting the roofs requires dismantling only part of the main roof slope.

When choosing the angle of inclination of the roof of the extension, you should pay attention to the following points:
- the greater the angle of inclination of the rafters, the less the risk of accumulation of rain water or snow mass, "slid" from the main roof;
- the rafters of an extension located on the south side may have a lower slope than a similar structure on the north side, because the sun promotes intensive evaporation of moisture.
Wooden rafters for a pitched roof are sensitive to moisture. The places where the rafter legs meet the wall or the main roof should be carefully sealed - for this purpose, the roof apron is installed.
The thematic video allows you to get acquainted with how to properly fasten the nodes when erecting a pitched roof.
The shed roof rafter system is a simple structure. It attracts with its reliability and economical material consumption. The construction of a pitched roof is permissible on our own and is carried out in a short time.
It is popular for garages, outbuildings and carports. Residential buildings are less often covered with a roof with one slope, but such options are found in the embodiment of the original architectural ideas of building a building. With all the simplicity of the structure, work on the creation of the roof is a very crucial stage and requires adherence to technology.
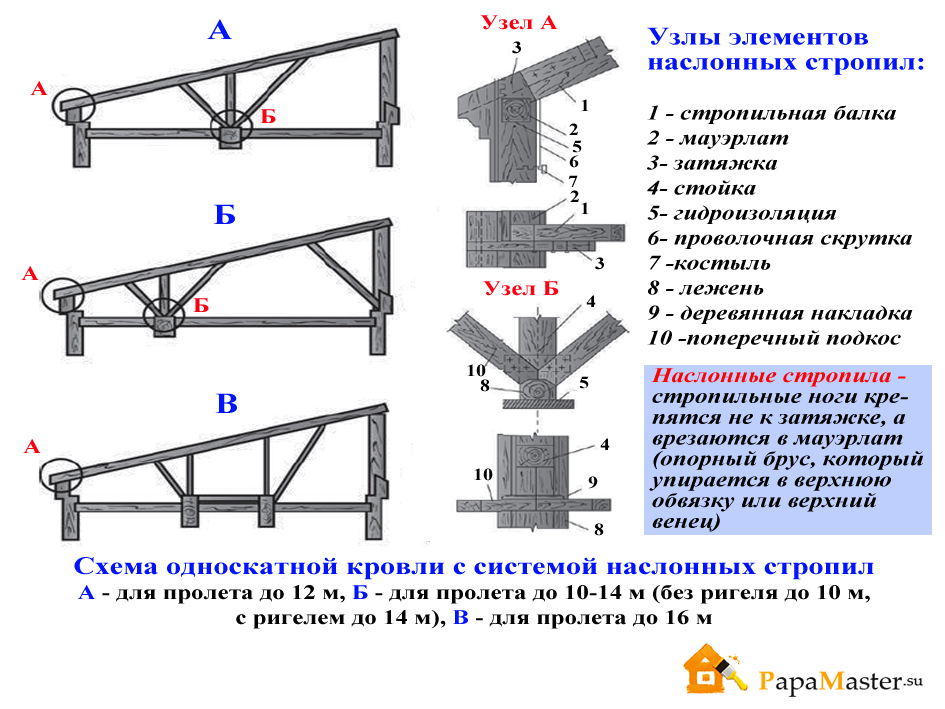
The scheme of the rafter system for a small building is quite simple: inclined rafters laid on the Mauerlat block the distance between the end walls. The span of the building in this case is no more than 4.5 m. The slope of the slope forms the difference in the height of the opposite walls. It can be provided in two ways:
install special props on one of the walls under the upper edges of the rafters;
when laying load-bearing structures perform one above the other.
When orienting the slope, the low part of the roof is directed towards the constant winds, this will ensure the stability of the frame against high loads.
The function of the rafter frame is to redistribute constant and emerging loads on the roof between the load-bearing walls. Its constituent elements are:
- mauerlat - a bar at the base of the structure, connecting it to the walls of the structure;
rafters - a board or timber that forms the basis of the frame; - struts, racks, benches - elements that reinforce the structure with a span of 6 to 9 m;
- lathing - slats, stuffed at a certain distance, are the basis for the roofing and strengthen the rafter system.
The single-pitched design is characterized by less windage than systems with big amount skates, but when designing it, it is necessary to take into account the weight of the snow cover. This is especially true for roofs with a small slope angle of 8-10 degrees. When creating drawings, the location and size of all elements of the rafter system, as well as the installation diagrams of the frame nodes, are noted.
The distance between the rafters of a pitched roof is recommended in the range of 60-80 cm, this allows you to ensure sufficient strength for any coating used. The presence of overhangs 25-40 cm long on each side of the building guarantees the drainage of rainwater from its walls, excluding their erosion.
Advantages of a pitched roof
- Lumber consumption is significantly reduced compared to more complex structures.
- The cost of construction is reduced.
- Large selection of roofing materials as a topcoat.
- Installation of the rafter system can be done independently, within a short time.
How is the angle of inclination determined?
The slope of the slope is one of the main parameters of the roof. The intensity of the load on the rafters directly depends on this indicator. Main selection criteria:
- The amount of precipitation in the region.
- Roofing type.
A large angle contributes to the smooth flow of snow, but leads to additional material consumption. A slight slope reduces wind exposure, but requires frequent snow removal from the roof. The optimal angle is also associated with the type of roofing; for each material there is a recommended parameter in degrees:
- metal tile - 25;
- slate, ondulin - 20;
- roofing material and other roll materials - from 5 to 10;
- corrugated board - 20;
- natural tiles - 35.
Preparation of lumber before installation
The operating time and reliability of the roof depends on the quality of the lumber used in the construction of the frame. It is recommended to use dry timber from conifers... The wood should be free from knots and damage. Before installation, it undergoes mandatory treatment with an antiseptic and fire retardant, these compounds protect against rotting and fire. The size of the bar depends on several factors:
- span length;
- the amount of load on the roof (snow, wind, etc.);
- slope angle.
The cross-section of boards for rafters is 50 × 150 mm, 60 × 180 mm, a bar for a Mauerlat is 150 × 150 mm, for a battening is 50 × 50 mm. 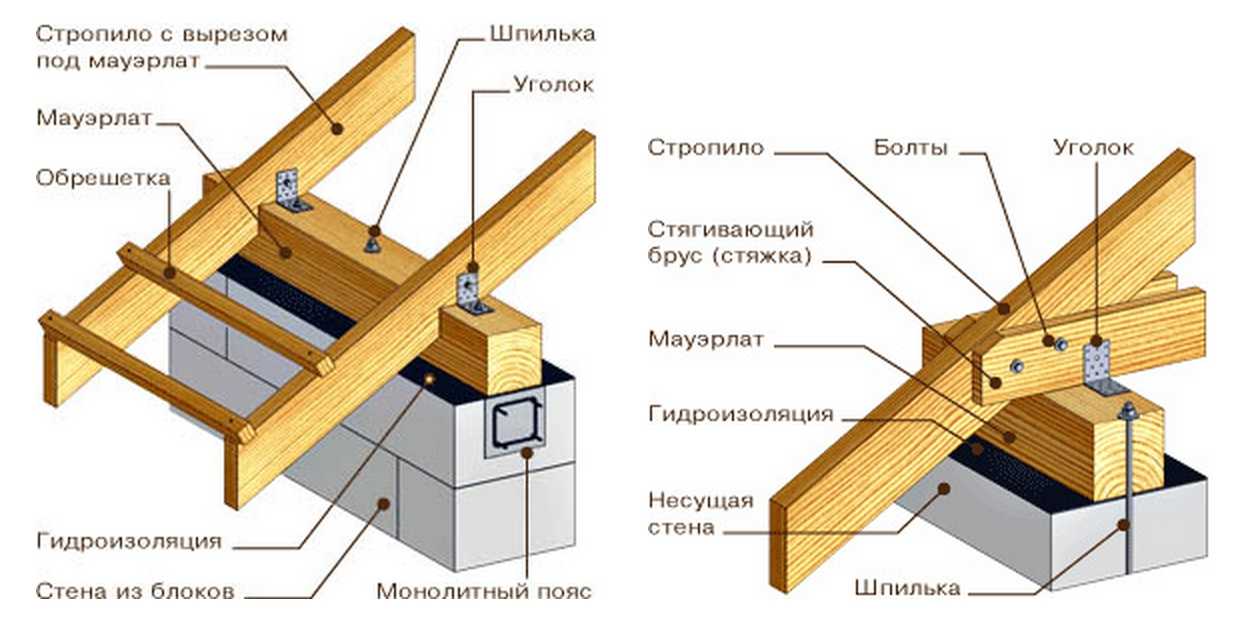
Stages of installing the rafter system
The construction of the frame begins with the installation of the Mauerlat. Before installation on the walls, the timber is wrapped with roofing material for waterproofing. The base is attached to the studs laid down during the laying or by means of anchor bolts.
Installation of rafters is carried out on a fixed Mauerlat. For a solid fixation, it is necessary to make cuts on the boards. To ensure that all inserts have the same size, they are made according to a template. The upper part is cut with a bevel, which allows the rafters to bend. The bottom notch serves as a solid support for the Mauerlat.
The roof rafters are fastened with nails and corners screwed in with self-tapping screws. It is possible to simplify the installation of the frame by installing the extreme rafters and stretching a rope between them that defines the plane.
With a run length of more than 4.5 m, a brace is installed at an angle of 45 degrees, one edge of it rests against the rafter, and the second against the Mauerlat.
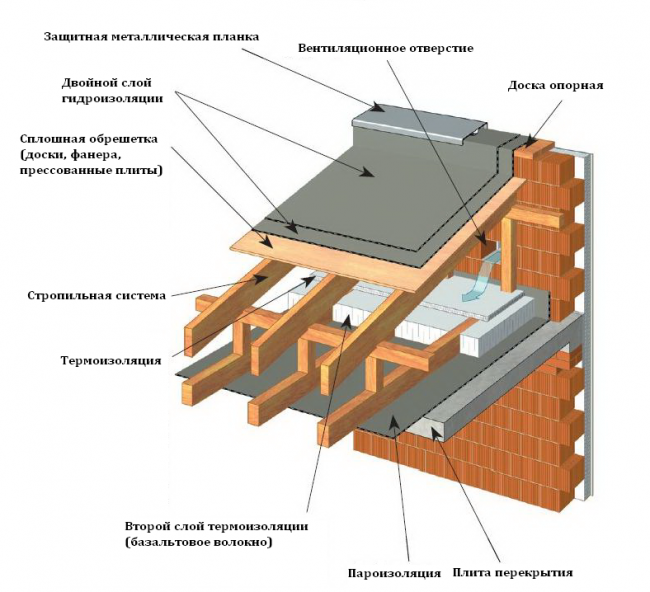
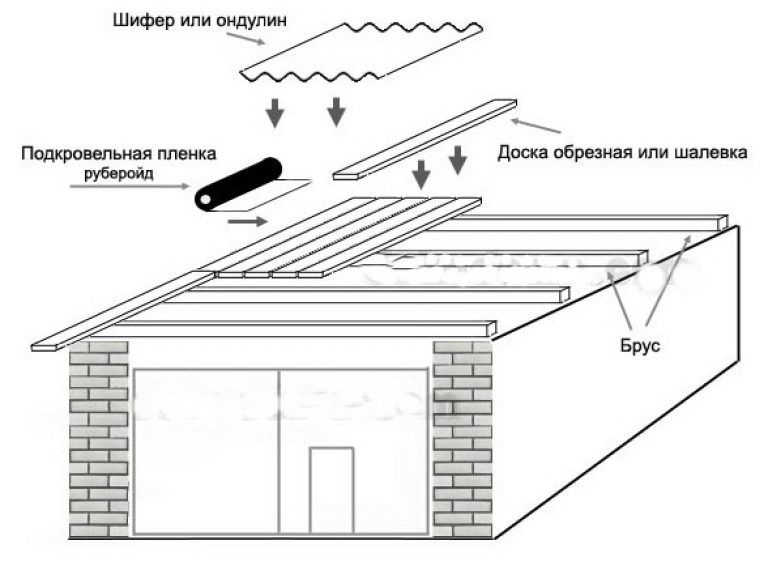
The end of the installation will be filling the crate. Its bars are located perpendicular to the frame, the fastening step depends on the finish. A continuous crate is made for rolled material. For covering, moisture resistant plywood or OSB boards are used.
After installing the rafter system, a waterproofing sheet is laid and the roof is insulated. The final stage of work is the installation of the roof covering.
December 27, 2016
How to properly attach the rafters to a pitched roof?
The construction of a roof is planned, simple construction with good strength and reliability characteristics? In this case, a single-pitched roof would be an excellent option. It will make your house, garage, extension or other structure original in its own way. In addition, it is easy to install. It can be done without building experience.
The roof structure of 1 slope has the following advantages:
- When building on a pitched roof, you can use any kind of roofing material. Because the angle of inclination can be the smallest, it is possible to build practically.
- The sailing capacity of such a design is much less than that of a gable. This option can be used in areas with strong winds.
- Ease of installation and operation. You can build it yourself.
- Low weight compared to other types of roofing.
- For a pitched roof, slopes can be built in several floors. This solution will add design to your home.
- Shed roof construction is the most economical and does not take much time.
- In this design, the water rolls down only to one side.
- The roof is suitable for any type of building.
Like any other design, a pitched roof has several disadvantages:
- At a small angle of inclination, the area attic space is minimal.
- Has a less attractive appearance. What can be fixed if there is a designer's imagination.
Structural calculation
The shed roof rafter system, in fact, consists of layered rafter legs. You need to fasten the rafters parallel to each other. The rafters, in turn, are supported by two points. Basically, they are the bearing walls of the building.
Create a ramp angle
The required slope angle of the slope is achieved in some ways:
- When developing a building project, one of the walls on which the rafter legs will lie is made slightly higher. This method is common, as it greatly simplifies the design of the rafters. But in this case, more material will go to the construction of the walls. The side walls parallel to the rafters are trapezoidal.
- This method is a variety 1. Also, when planning, the frame racks are taken into account. In this version, the extreme posts on one side are higher, and on the other they are lower by a certain height.
- With the same height of the walls, vertical posts of the required height are installed on one of the walls. At first glance, this design is unstable, since the rafter triangles have free play to the right and left. But this fragility of the structure is eliminated when installing the frame lathing and sheathing the front of the roof with wood.
- Single-pitch farms can be used. This method is good enough in that you can build one truss, adjust it to the desired dimensions and use it as a template. And using the template, you can build the rest of the farms on the ground. There are ready-made roof trusses. They are ideally suited to any type of roof. For them, it is enough only to install and fasten to the Mauerlat. Next, you can freely sheathe a pitched roof with a crate.
- When building an extension near the house, this method is used. In this case, on one side of the extension, racks or a wall can be planned, and on the other, we already have the main wall of the finished building. Attachment to it can be done using a well-fixed horizontal girder or separate fasteners, also horizontally aligned. All fixings on the wall of the building are made above the posts or the wall of the opposite side.
Determine the side of the roof slope
Often the question arises, in which direction to determine the roof slope? In the case of an extension to the house, there are no special options. The slope is made in the direction from the building to ensure free flow of water in case of heavy rain.
If a separate building is planned, then here you can choose a side. Basically, the location of the ramp is done on the back of the building. Although there are times when the slope is produced on the front side. In such a situation, the choice is based on the design style of the building, the territorial features of the site, from which side it is more convenient to lay the communications system, and the like.
But in this case, you should also not overlook some of the nuances:
- The location of the pitched roof in the windy direction will be more correct. Thus, the impact of wind is minimized. After all, the wind directed into the roof with a small angle has practically no effect on it.
- For a rectangular building, you can choose the location of the slope along or across. But here you need to remember that the rafters of a pitched roof cannot have unlimited length. For some distance, they need to be strengthened. According to the rules, the free size of the rafters is 4.5 meters. When installing a rafter system up to 6 meters, a rafter leg is required. It is placed at an angle of 45 degrees on a support bar.
The steepness of the slopes
If we are talking about a pitched roof, then in most cases the angle is not chosen up to 30 degrees. This choice is explained by the fact that the roof is highly vulnerable with front side buildings to wind load. Although they try to build the slope of the slope from the windy side, this does not exclude the presence of wind from the side of the facade. Therefore, a steep angle of inclination creates a high lifting force. In strong winds, a high load falls on the roof structure.
A slope below 10 degrees is also unacceptable, as the load on the rafter system immediately increases during snowfall. With the beginning of the thaw, an ice crust appears at the edge of the roof, preventing the free flow of melt water.
The material of the roof covering is important for determining the slope angle. After all, for different materials also indicated by the manufacturer its angle of the slope.
Depending on the material, some standard values \u200b\u200bfor the slope angle can be distinguished:
- Up to 2 degrees - practically flat roof... It requires at least 4 layers of coiled bitumen coating. It must be applied using hot technology. It also requires a gravel dressing embedded in the mastic.
- 3-5 degrees - assumes three layers of roll coating. You don't need to use gravel powder.
- 9-15 degrees - 2 layers will be enough for roll material. You can also use some types of corrugated board or metal tiles.
- 10-17 degrees - you can lay corrugated slate with a reinforced profile.
- 11-20 degrees - soft bituminous shingles.
- 14-25 degrees - asbestos-cement slate, at 25 degrees, the corrugated board and metal tiles lie practically without restrictions.
- 27-50 degrees - ceramic, cement tiles.
Mounting
When building a shed roof with your own hands, for a correct and reliable installation, you need to use drawings and detailed instructionswhere all sizes and quantities will be indicated the right material... You can create a schematic drawing yourself or find a ready-made sample on the Internet. You can also order it from construction professionals.
Before starting construction, you need to choose a ventilated or non-ventilated type of roof. The first one is perfect for living quarters, as ventilation provides a comfortable microclimate inside the building. All this is achieved by using gaps between waterproofing materials. The second type is suitable for the construction of a terrace or storage room.
Construction of rafters with a pitched roof
The rafter system of a single-pitched roof involves a couple of popular methods for its installation:
- Fastening to load-bearing walls. In this case, the roof will be more economical and less lumber will be used for it. The load-bearing wall must be at the same height as the roof. Since the upper part of the rafter rests against it.
- A triangular truss is constructed, which includes beams and racks. She will unite the structure of the rafters. With this method, you do not have to build a load-bearing wall to the height of the roof, but more wood will go. This method is convenient because you can mount all the farms below using a template.
When erecting rafters, additional supports and struts will be needed. The number of such complementary elements depends on:
- Slope of the slope.
- Weights of the rafters.
- The length of the junction points between the roof and the wall.
- Roof material.
- Insulating layer materials.
Rafter step
The distance between the rafters can be determined by the box on which the roof is being erected. So that the distance between the rafters is the same, the slopes on which the rafter legs rest are divided into equal parts. Depending on the materials to be installed, some values \u200b\u200bcan be distinguished:
- For timber rafters, the step is from 1.5-2 meters.
- When using paired boards, the distance between the rafters is 1-1.75 meters.
- The use of single boards relies on a pitch of 0.6-1.2 meters.
Also, the type of insulation affects the distance between the rafters. It is recommended that the thermal insulation layer is rigidly installed between the rafters. After installing the rafter system, you can go to the Mauerlat. It will help distribute the load on the walls.
The nuances of mounting a Mauerlat
Mauerlat is a complementary element to any roof. The lower edge of the rafter is installed on it. It is fastened to the load-bearing wall or between the beams of the rafter system. To fasten the Mauerlat, it is necessary to use reinforcement, if the walls of the house are made of porous material, burned wire, if the walls are brick, anchor bolts for a wooden house.
To extend the life of the Mauerlat, you need to install it on a waterproofing layer.
Floor beams, their installation
In addition to the Mauerlat, for some designs of pitched roofs, the installation of floor beams is implied. The rafter legs rest on them. Such beams are mounted with a step similar to the rafter system. Fastening the rafters to the Mauerlat is always done with a saw. The gap between the rafters and the Mauerlat is kept to a minimum.
With a rafter system of more than 4.5 meters, rafter legs are installed. They give strength and eliminate the deflection of the rafter beam. The installation location depends on the width of the spans. A pitched roof of a huge area, without exception, should include rafter legs. Otherwise, it threatens to break or collapse.
It must be remembered when increasing the step between the rafters, you will have to reduce the step of the crate or make it solid.
When installing a pitched roof, do not forget about some of the nuances:
- You need to position the slope on the windy side. To prevent the roof from being blown off by the wind.
- When calculating the rafter system, you need to take into account the climatic conditions. This is the amount of snowfall, heavy rains, wind strength. The even distribution of the load on the rafters will increase the service life.
- Consider overlap when calculating materials.
- The smaller one allows the higher load to be carried.
An example of the construction of a shed garage
The walls are built of foam blocks. The first step is to install the Mauerlat. With a pitched roof, these are 2 beams laid on walls of different heights.
A phased scheme for the construction of a rafter system consists of:
- On the inner sides of both walls, we install a beam of 100x150 mm. We install it on waterproofing material roofing material. This will be our Mauerlat. Mauerlat fasteners are made using reinforced corners 90x90. For this we use dowels with a diameter of 14 mm.
- We take a board of 50x200 mm and install it on the Mauerlat with a margin of 50-60 cm. The stock should exceed the planned dimensions of the cornice. After that, everything unnecessary is cut off.
- We mark further cuts on the board, the depth of which should not be more than 1/3 of the board width.
- We mark the walls so that the last rafters do not touch them. The recommended distance is 4-5 cm.
- Using the template, we produce the rest of the rafters. We fix it with staples or corners.
- Given the width of the overhang, we produce filly. We mount all the elements of the cornice so that there is a layer of waterproofing between the tree and the wall.
- We cut off all the surplus and fasten the 25x100 mm wind board.
The simplest design of the garage is completed. The next steps will be to install the sheathing and decking of the roofing material.
The high popularity of this type of roofing is due to a simpler design compared to other types. This factor is especially important for novice builders, as well as for those who want to cope with such a task completely independently without resorting to hired crews. Most often it is used to overlap outbuildings on the site (garages, barns or baths), but it can just as well be erected on any residential building without any loss in terms of constructive use.
Options for rafter system schemes and types of rafters
1. Forced variety.
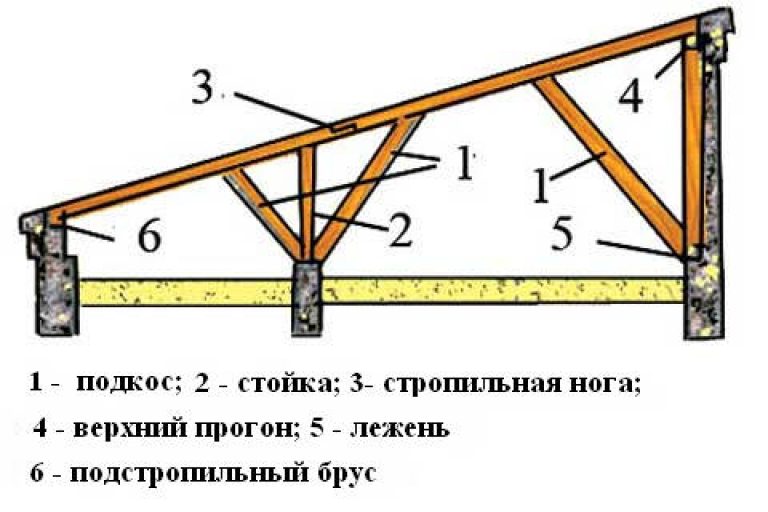
In this embodiment, ordinary or composite rafter legs rest on the load-bearing walls of the structure. To reduce the load with large spans (more than 4.5 m), intermediate supports are arranged (the middle of the leg is propped up with a rafter leg, one end of it is placed directly under the main leg, and the other rests against the rack). The roof structure with a layered type of rafters is most often used, including on pitched roofs (on simple extensions, sheds, country houses, etc.). The main points and joints of rafters for single-pitched roofs are shown in Figure 1.
2. Hanging variety.
In this embodiment, the main legs rest on their own tightening, the excess load is weakened by the introduction of inclined supports and stands. Such a structure is not assembled immediately in the designated place, but on a plane, after which it rises and is installed in place. If the distance between the retaining walls is too large without the presence of intermediate objects between them that could be used as supports, this is the only option for installing the roof, i.e. they are mainly applicable on gable roofs in buildings without internal load-bearing walls. There are a number of special metal fittings on the market for hanging rafters and making them easier to assemble. Features of this design and the main units are shown in Figure 2.
 single-pitched roof rafters (fig. 1)
 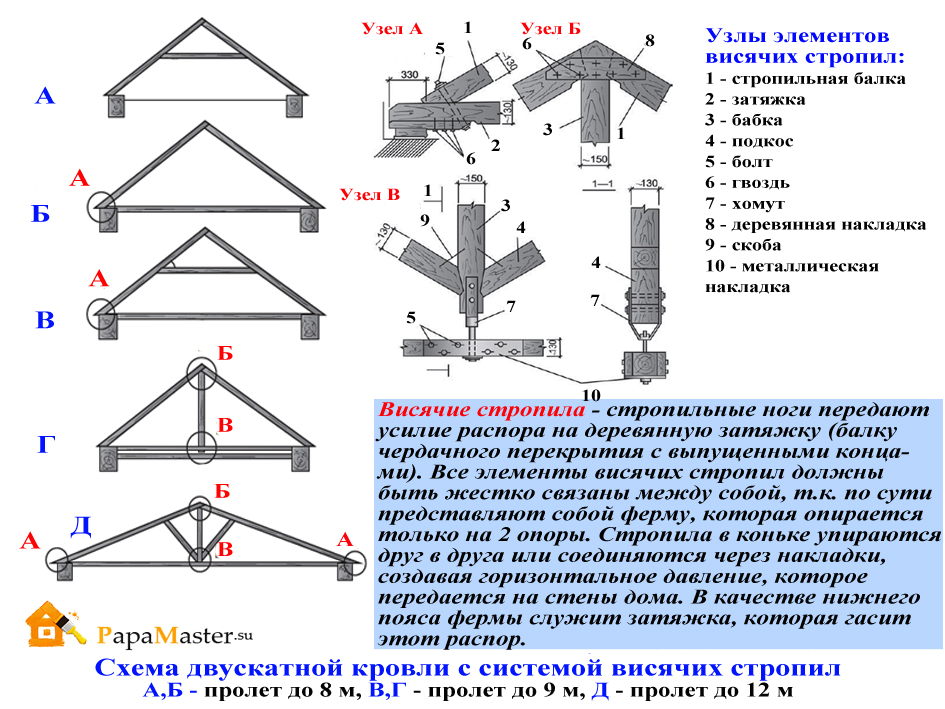 hanging rafters (fig. 2)
3. Sliding variety.
In this embodiment, the main legs rest against one of their ends on the log in the ridge of the future roof, and with the other they rest against the supporting walls. Docking with walls is not carried out directly, but through the use of special sliding joints (Figure 3). This method of installation is used mainly only in wooden buildings to compensate for its shrinkage. If the connections are not mobile, then when the supports are displaced, the entire system can be destroyed. However, it should be noted that such connections are rarely used.
Rafter system: advantages and disadvantages.
Advantages and rules for installing a shed roof truss system with diagrams
The benefits include:
- simple installation, relative to other types of roofing systems,
- lower material costs,
- structural reliability,
- an unusual design, if used for residential buildings, since this design is mainly used in summer cottages, utility rooms, etc.
 sliding mounts (fig. 3)
 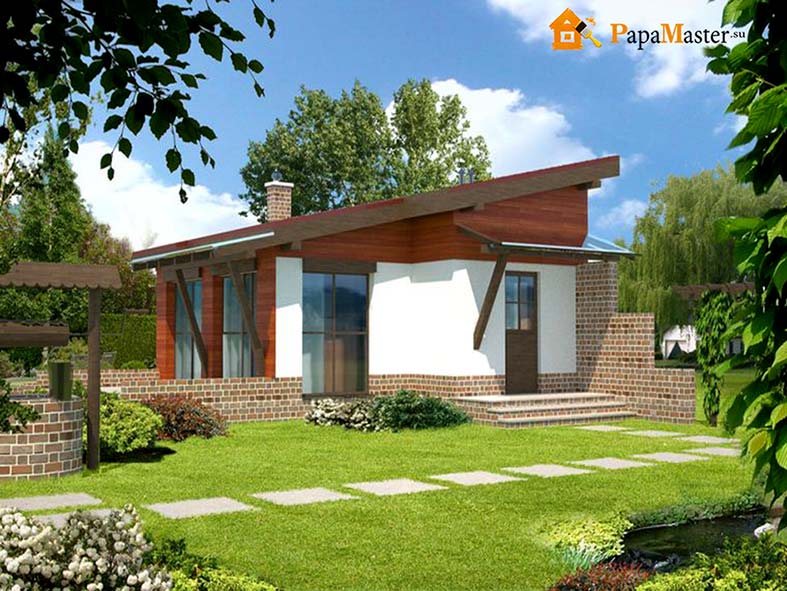 country house with a pitched roof (fig. 4)
  fig. five
  a simplified diagram of the rafter system of a pitched roof (Fig. 6)
For residential buildings the lack of such a roof there will be a lack of a full-fledged attic or attic, installation of additional waterproofing to prevent possible leaks at a small angle of inclination of the roof, for non-ventilated options with a small angle of inclination, the need to care for the roof during the snowy period is also referred to negative points. Examples of country houses, which have one slope, are shown in Figures 4-5.
The complexity and grandeur of a multi-gable roof.
A shed roof rafter system is being developed taking into account the following indicators:
1. Distance and location relative to each other of those walls that were selected as supports, ie. span length.
2. General design, purpose and shape of the building that will overlap.
3. The amount of precipitation in the region and wind loads.
4. The presence of intermediate walls, the arrangement of the attic floor.
5. The total weight of the roof, including the rafter system, battens and roof covering.
The diagrams of the shed roof rafter system will differ from each other depending on the design project, taking into account all of the above factors. Some circuit options are shown in Figure 6-7.
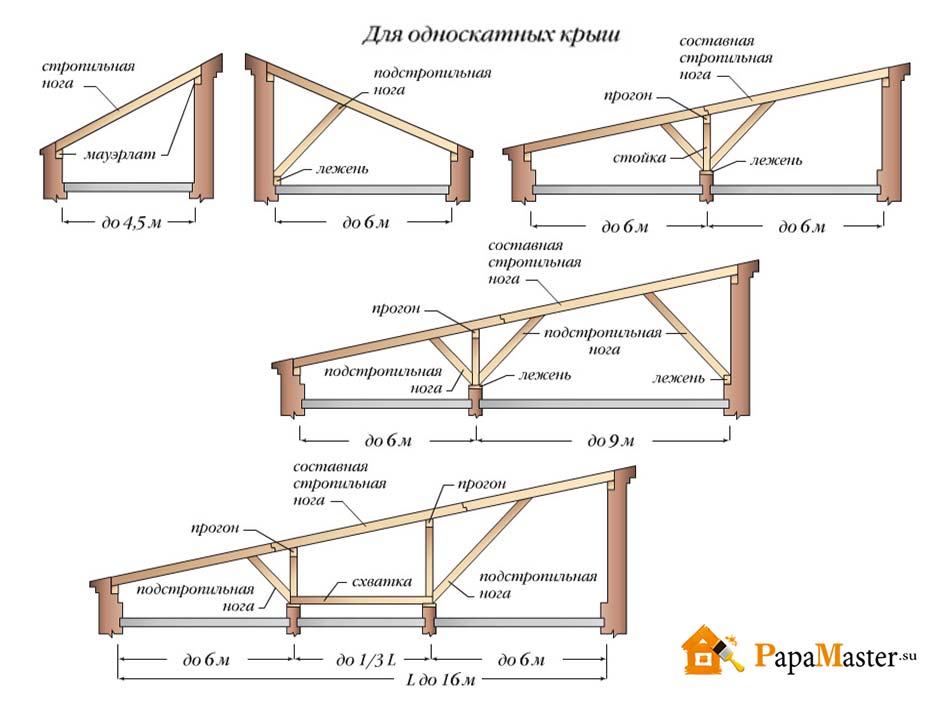 rafter system depending on the length of the spans (fig. 7)
 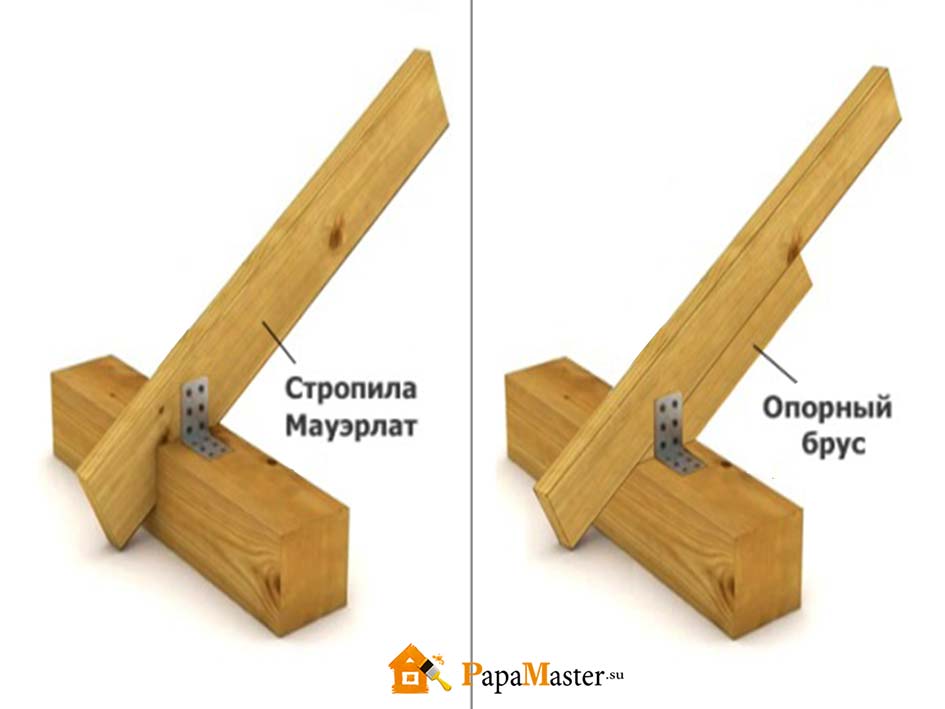 an example of a rafter connection with a Mauerlat (Fig. 8)
The final diagram of the shed roof truss system should reflect the following:
1. Tilt angle. The first step is to calculate the angle of inclination of the roof.
2. The material of the rafter system. Most often it is a tree (boards, poles or timber). Section and diameter depends on bearing capacity all elements of the frame. Most often, a board of 50x150mm is used for the legs. Racks, struts and puffs are selected with a cross-section commensurate with the cross-section of the rafters (at least 120 mm). All structural parts must be made only of dry wood, which has been additionally treated with antiseptics
3. Roofing material. The choice of material for the roof is also carried out at the very beginning, since the calculation of the angle of inclination of the plane also depends on it. The heavier the weight of the shelter material, the greater the angle of inclination. The roof covering must be reliable, durable, resistant to atmospheric precipitation. Also, the appearance of the building and the total cost depends on the choice of coverage. roofing works.
4. Lathing. The frequency of the battens is determined by the weight of the roofing to be installed (and the features of its installation) with the addition of the estimated weight of winter precipitation. Allocate solid and frame crate. The first option is made in the form of a wooden plank flooring. The second option is suitable for tiled and metal roof, consists of bars (50x50 mm) with a step of at least 50 cm.
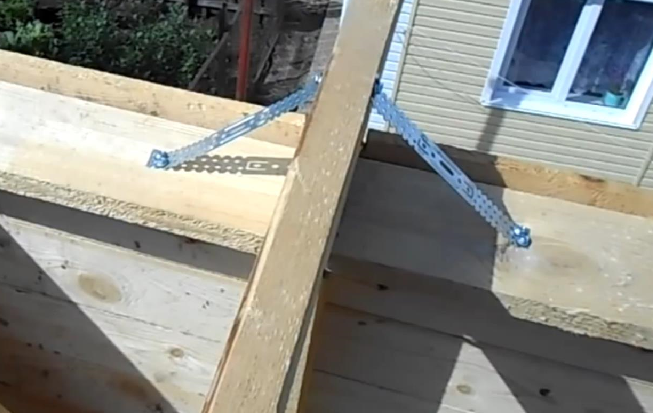
5. Connections and fixings. Durability and reliability is determined not only by correct calculations, but also by the strength of all joints. An example of attaching the rafter legs to the Mauerlat can be seen in Figure 8.
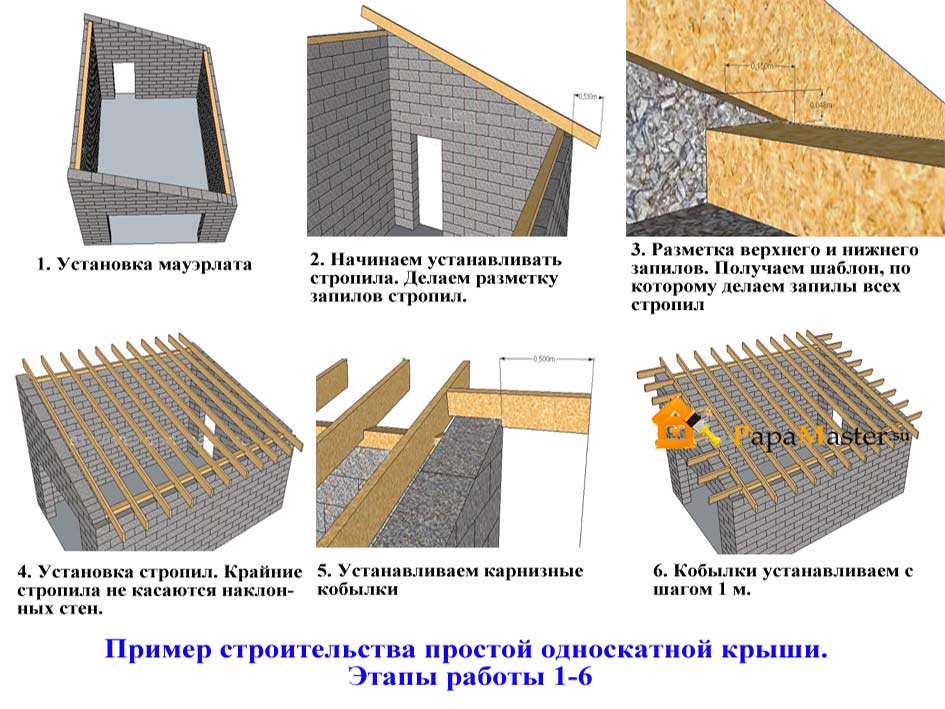 an example of the construction of a simple pitched roof, stages 1-6 (Fig. 9)
 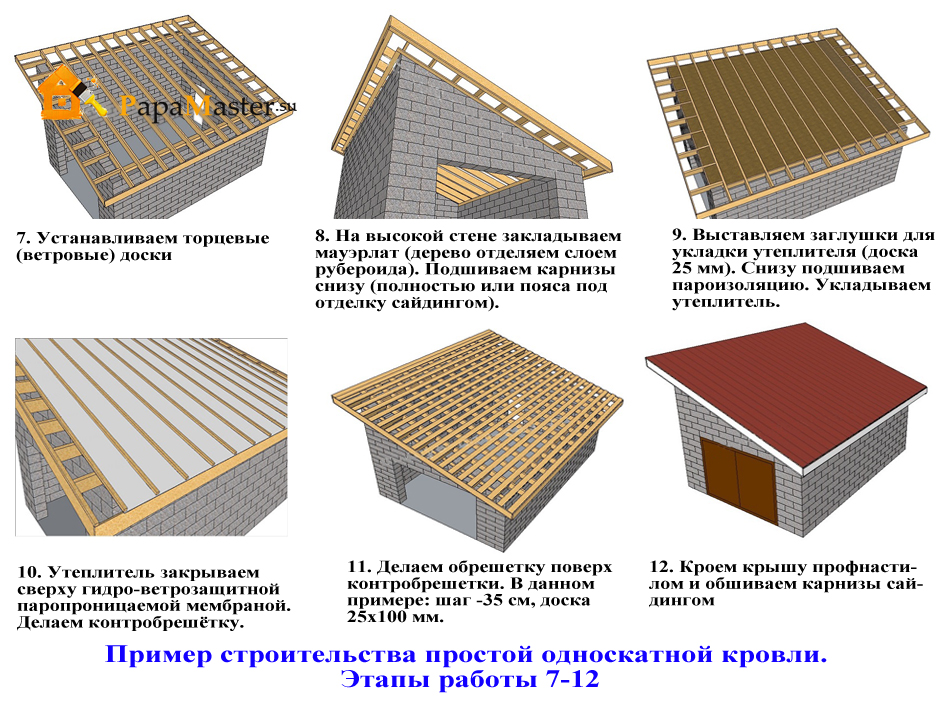 stages 7-12 (fig. 10)
Installation takes place in the following order:
1. First, the seismic belt is installed, on which the main beams are then laid.
2. After that, the main rafter legs, legs and stands, contractions are mounted.
3. Then proceed to the arrangement of the lathing. The distance between the elements is dictated by the selected roofing material.
4. The final stages are the laying of the roofing material and the insulation of the structure.
The listed main stages can be seen on the example of building a garage roof in Figures 9-10.
This design allows you to significantly save consumable, in comparison with other options, it can take almost three times less wood. Due to the lack of a high angle, the room under the roof turns out to be smaller in size and it is much easier to heat it, which means that it can be used not only as a storage room. Buildings erected in open and wind-blown areas are best covered in this way in order to avoid a heavy load on the roof plane.
Unlike the gable version, the gable roof is used in the construction of residential buildings much less often, one might even say reluctantly. First of all, because of the external angularity and excessive simplicity. A residential building under such a roof does not look very attractive. An exception may be the author's design projects for cottages with several multi-level single-pitched roofs, they look very beautiful, but they are quite complicated and require considerable effort in practical implementation.
What is the peculiarity of a shed roof
Such a system is easier and more affordable to make with your own hands, it is quite simple to assemble it for a garage or warehouse. Often, a pitched roof is the simplest and most effective solution for arranging simple auxiliary or utility rooms, for example, for making a roof on a brick extension to a house.
The advantages of a gable roof include the following positions:
- The weight from the rafters and power trusses in the roof frame does not create bursting forces, as is the case with gable options;
- Shed roof rafters even with large size roof spans do not require the use of massive and thick beams, as for more complex two and four-slope options. The main part of the load is transferred by the rafter system to the floor beams and the walls of the building using struts, racks or load-bearing support trusses made of a conventional 50th board;
- The use of a pitched roof is often the only possible option if you need to add an extension to the main wall of the house, as in the photo, or even make a roof over the balcony.
Note! In some cases, problems associated with asymmetry and significant side load on the roof caused by strong winds from the high gable can be avoided. To do this, it is enough to install a small, 60-70 cm inclined canopy on the leeward side.
Due to the minimum requirements for the quality and size of lumber, from which the shed roof rafter system is built, the simple installation of rafters and a roofing package, this method of arranging the roof is almost indispensable for the construction of any auxiliary buildings.
Features of the use of a shed roof
In addition to the listed advantages and simplicity of the device, the single-pitched rafter system has its own specifics, which should be taken into account when planning the roof parameters:
Advice! The most preferred way of arranging a pitched roof would be the option of an extension to the main wall of the finished building.
Shed roof rafters
There are three main ways to install roof rafters. According to the configuration of the construction of the rafters, they have a lot in common, the main difference is in the way of compensating for the vertical loads on the rafter.
Installation of a rafter system from short beams
With a span not exceeding 4.5 m, the rafters can be made of a bar or board with a section of 50x100 mm and installed with support on the upper and lower row of the Mauerlat. If the Mauerlat is laid in a niche below the upper edge of the wall, then the upper edge of the rafters is cut vertically, and the supporting surface of the board is cut with an angle for support on the Mauerlat bar. In this case, the joint between the end of the rafter and the wall surface must be closed with an overhead cornice element.
If the rafter rests on a Mauerlat laid on the upper plane of the wall, in this case, the edge of the rafter beam is also sawn under the support on the beam, but the vertical cut of the end is made under the plane of the wall. After leveling the roof rafters, the vertical plane of the cut is covered with a film and sewn up with a board. In both cases, the rafter beams are sewn with staples or steel tape directly to the Mauerlat board.

The lower edge of the rafter can be installed with an emphasis on masonry walls. To equip the overhang, "filly" can be sewn to the rafters, and the beam itself is abutted against the corner of the Mauerlat and fixed with a wire loop on the inner surface of the walls or ceiling board. Typically, this option is used for roofing from corrugated board or bituminous shinglesas in the picture.
Roof device made of long rafters
A more complex option for assembling a shed roof is a system with a long span. With a ceiling length of up to 6 meters, it is enough to support the rafter beams with additional supports. The rafter leg is attached to the rafter board with a steel plate and self-tapping screws without a tie-in.
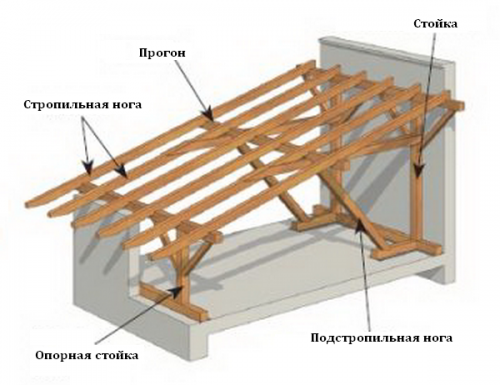
For spans longer than six meters, at least one intermediate support is required on the inner wall or a reinforced beam in the ceiling. With a large span, there may be two or three intermediate posts. In this case, in the transverse direction to the roof slope under the rafters, an additional run beam is laid, leveling the roof plane. Each run is installed on a vertical stand and reinforced with rafter legs and grappling.
Installation of a simple truss system on transverse truss frames
The most common scheme for constructing a frame from prefabricated rafters can be called the option with the support of rafter beams on prefabricated trusses. In previous versions, the installation and fastening of the shed roof rafters was carried out on the basis of two walls of different heights. This gave certain advantages. Due to the high rigidity and strength of the brick walls, there were no problems associated with the occurrence of shear lateral forces when arranging the roof; therefore, the shed roof structure was configured only for vertical loads.
In practice, such ideal conditions arise only when an extension to the finished brick wall capital building. Much more often it is required to assemble a pitched roof on a brick or cinder block box of a garage or bath with the same height of all walls. In this case, the roof rafter system will be more vulnerable to shear force from wind load.
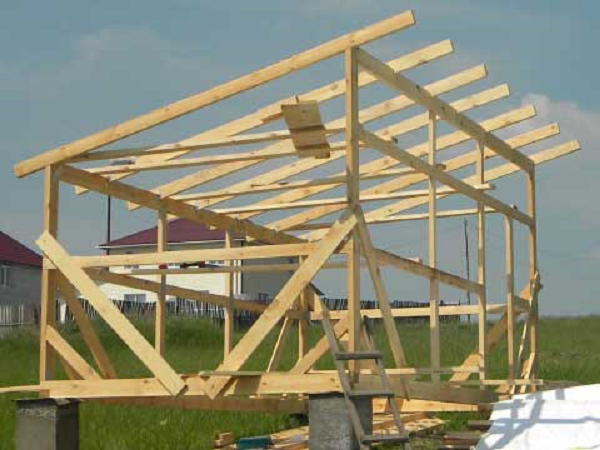
In this version, for the assembly of the roof frame, layered rafter beams are used, laid on two prefabricated trusses or frames. One of them is combined with the main pediment of the building, the second truss is installed in the middle, on the main inner wall building. The entire roof structure is installed on a 50 mm board laid with a harness that acts as a Mauerlat. The board is attached to the brick of the wall with wire, steel tape and fence dowels. The result is a strong and flexible enough mount.
First, the first support frame is made. The first truss is assembled from vertical racks fixed to the base of the Mauerlat with spacer metal corners. This is the most laborious and crucial moment of work, it is required to align the upper support bar of the frame strictly horizontally, it depends on how smooth the roof slope turns out.
Before proceeding with the assembly of the second frame, it is necessary to assemble two reference rafter beams on the ground. As usual, long rafters are made by splicing two short ones with padding over the halves of the third piece. Both rafters are laid out along the edges, with one end on the first truss, with the other end on the Mauerlat board from the opposite side, and carefully adjust the angle of inclination of both rafters.
Further, focusing on the height of the installed reference rafters, a second support frame-frame is assembled, located in the central part of the box. At the next stage, the pediment of the first frame is sewn up with a board, spacer beams and wind boards are installed, as in the photo. This will ensure that both frames are highly rigid, even in strong frontal winds. This is the specificity of creating a roof on frames of increased rigidity.
The rafters are attached to the harness board with steel brackets and wire loops. If desired, you can use a bolted connection as a fastener for the rafter system. One of the advantages of layered rafters is easy way splicing them from two shorter boards. Most often, the two parts of the rafter beam are laid on the load-bearing truss-frames, after which the two halves are simply knocked together with nails. Each of the rafters is carefully aligned at two points - the middle support frame and the lowest point of support on the harness. Next, it remains to hammer in 100 mm nails, the laid and adjusted rafter beams.
Before the lathing, the side gables of the roof are sewn up with a board. This gives the entire structure the necessary rigidity and strength. Some of the rafters are made in the form of lower and upper overhangs. The end surfaces of the rafter boards are knocked out with a cornice board and the lower part of the cornice is sewn up with clapboard. At the next stage, it is necessary to tie the rafters with sheathing boards, they are laid on the beams and nailed in a checkerboard pattern. It remains to lay the ceiling and roofing material.
Various assembly options for mounting rafters on a pitched roof
In addition to the above variant of assembling the frame for a pitched roof, in practice, simpler and more affordable ways of attaching the rafter system are often used.
For example, when assembling garden house from a bar, it is enough just to lay the rafter beams with a certain step on the pediment and the upper beam back wall house. In this case, the rafters, in addition to the supporting structure for the roof, play the role of a stiffening element for the whole house.
It is quite simple to assemble the construction of a shed roof for a wooden extension to a house from a bar. The upper edge of the slope is installed on a beam that rests on vertical posts nailed to the wall of the house. It can be seen from the photo that the lower support beam for the roof rafters is installed on vertical posts, the whole structure is made in the form of a frame with additional frontal stiffeners. Each of the rafters has a cut under the supporting surface of the bearing beams.
In some cases, for example, when attaching a garage to a main wall, you can use the ends of the ceiling beams to attach the rafters, as in the photo. In this case, the rafter is rigidly attached with a pair of steel corners to the protruding end of the beam.
Conclusion
Installing rafters for a pitched roof is no more difficult than assembling a frame for a gable roof. If you have experience working with spatial structures made of wood, like a garden house or a barn of your own construction, even a novice carpenter can make a roof for an extension to a house.

