Laying slate is not so difficult process if you receive instructions in advance on the technical aspects of the work, prepare the necessary tools and fasteners.
The roofing of your home is as important as the foundation and walls.
Thanks to it, the premises are protected from precipitation.
The main question after the completion of the construction of the house is what type of roof covering to choose.
It is not so easy to choose the right option from the huge amount of modern building materials. But slate is still preferred.
Slate is by far the most demanded material for roofing.
The newest equipment and modern technologies used for the production of this material have incomparably improved its appearance and made it more durable and stronger.
Pros of using wave slate:
- resistant to moisture;
- resistant to frost;
- resistant to sun exposure;
- lasting;
- incombustible;
- easy to install;
- small price;
- long service life.
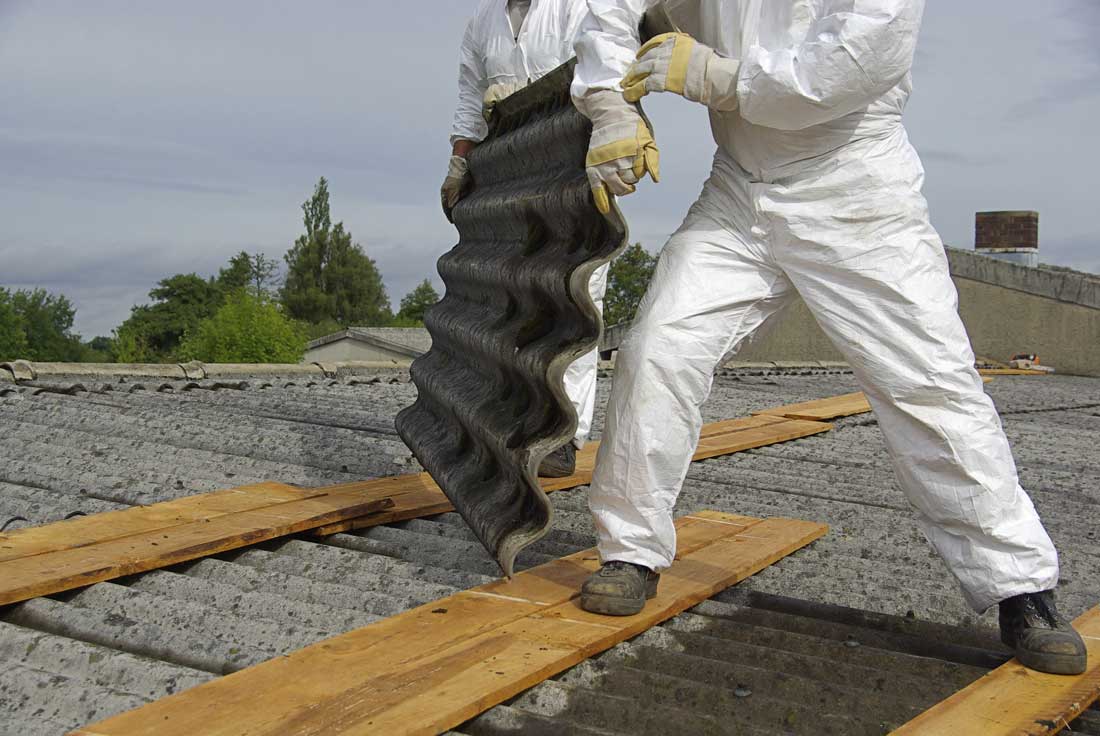
It is worth noting that slate, compared to other building materials, is very convenient to work with, installing slate with your own hands does not require the involvement of a paid labor force, and covering the roof is not difficult.
This is another advantage of this material, for which it is still chosen by a large number of people.
Also, the low price and high quality make it one of the best roofing materials.
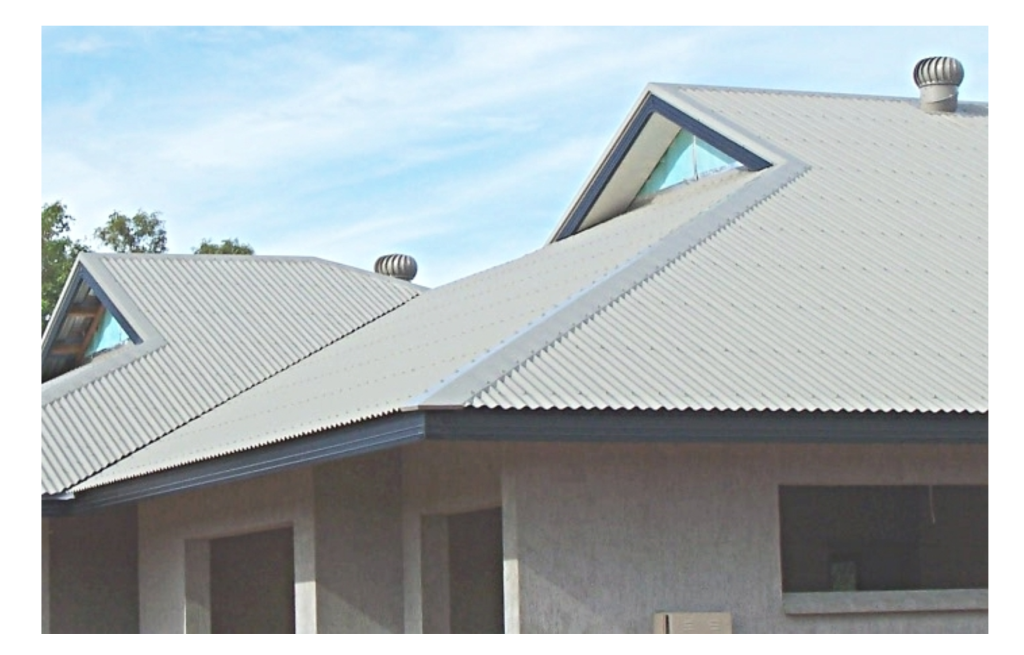
With asbestos-cement sheets, you can install any roof - single-pitched, gable, hipped or four-pitched.
Nevertheless, it is better to install wave slate on roofs with a slope of up to 20 degrees or more than 35 degrees, this will reduce the likelihood of snow accumulation.
Before starting the installation of the roof, in order for its service to become long-term, and you do not have any problems and questions, you need to familiarize yourself with the basic nuances of how to cover the roof with slate.
Making slate is a simple process. It is made from a mixture of cement and asbestos.
Asbestos, when mixed with cement, creates a rigid reinforcing mesh.
There is also a euro-slate, consisting of cellulose and fiberglass, it is impregnated with bitumen, and the third type is metal slate.
The most used type for roofing is asbestos-cement.
It has a relatively low cost, and the roof covering will last 35-40 years.
Slate sheet can be:
- six-wave;
- seven-wave;
- eight-wave.
The wider the wave pitch, the more material will be spent on the overlap. It is necessary to select the type and method of installation, taking into account the size and slope of the roof.
Preparing for installation
Like anyone construction process, laying slate on the roof with your own hands is done in several stages:
- Preparatory work begins with calculating the roof area, the required amount expendable building material, procurement and delivery;
- Installation of the lathing for the future covering;
- Laying the waterproofing layer;
- Installation of slate sheets.
The last stage should be taken as seriously as possible. The durability of your roof depends on the quality of the installation.
To correctly determine the required number of slate sheets, there is such a concept as a useful area, it differs from the actual area.
If the real area is about 2 meters, then taking into account all kinds of overlaps, it will decrease by 35–40 cm.
So, when purchasing slate, this indicator must be taken into account.
There will also be a waste left during cutting, it is also important to anticipate a marriage, sheets may break if used improperly, so when ordering material, increase it.
It will be cheaper if you have 1-2 sheets left than they are not enough, and you will have to arrange a second delivery.
Required tools
For installation work we need:
- drill or screwdriver;
- roulette;
- grinder or hacksaw;
- level;
- pencil;
- hammer;
- twine.
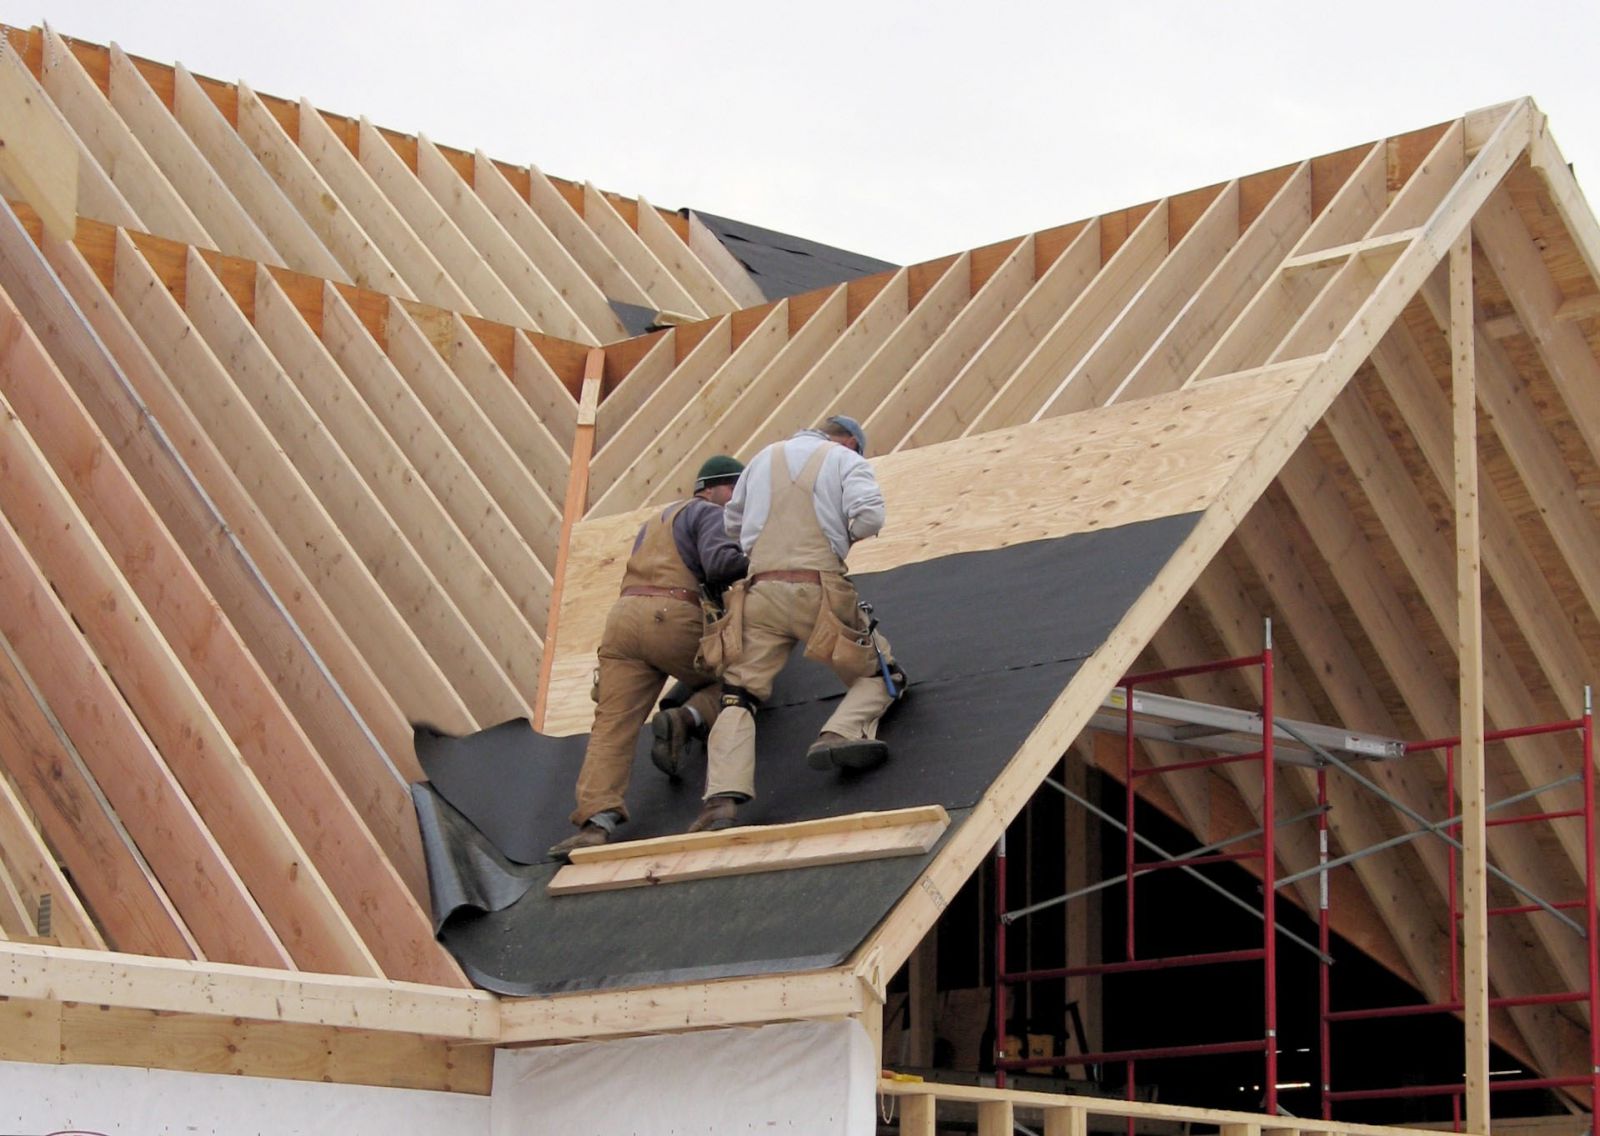
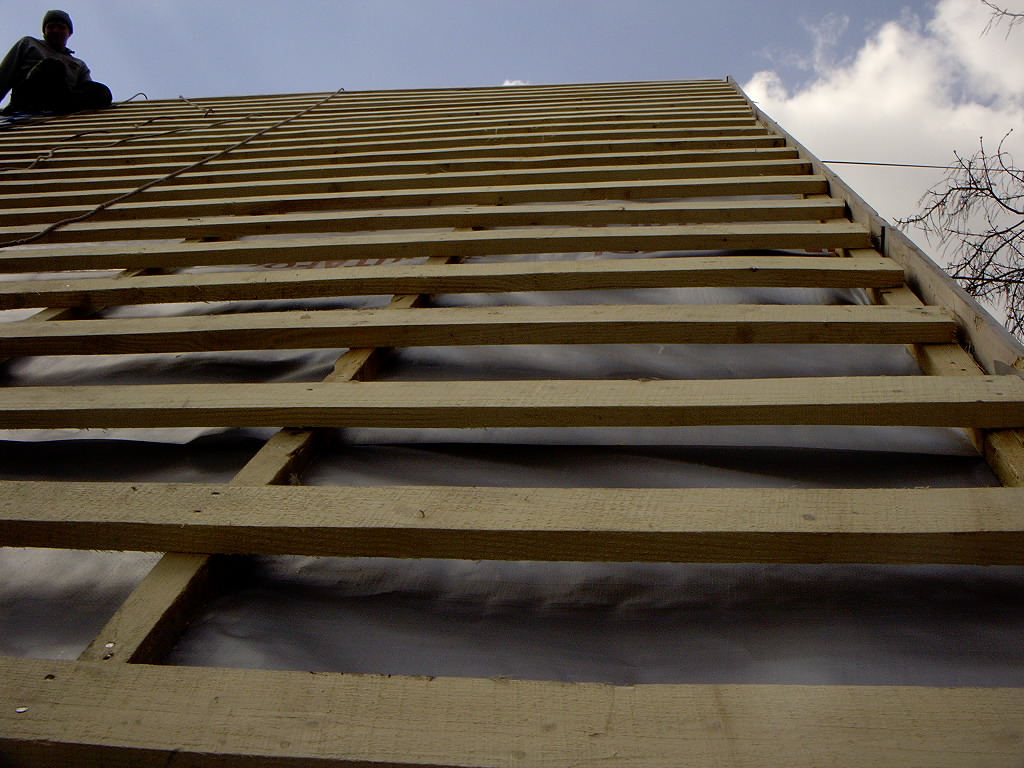
We mount the crate
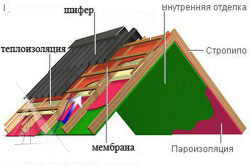
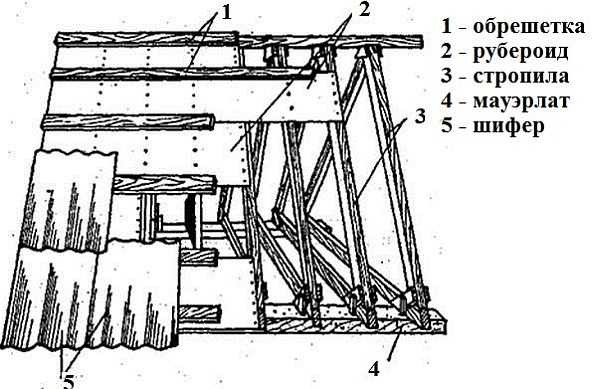
Before covering the roof with slate, it is necessary to install the rafters, they fit waterproofing material - it will not allow moisture and condensation to get under the slate and penetrate into the attic.

Previously, roofing material was used for this purpose, but modern technologies and manufacturers offer a huge selection of insulating materials with high technological data.
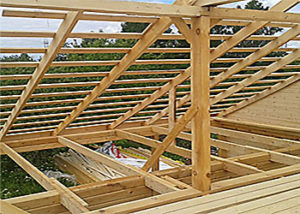
The lathing is installed from high quality wood, it is necessary to use only well-dried material, without a large number of knots - they will not be able to withstand a heavy load, for example, snow.
The step of the lathing from the bar should take into account the fact that each sheet of slate is designed for a support of at least three jumpers.
Installation work
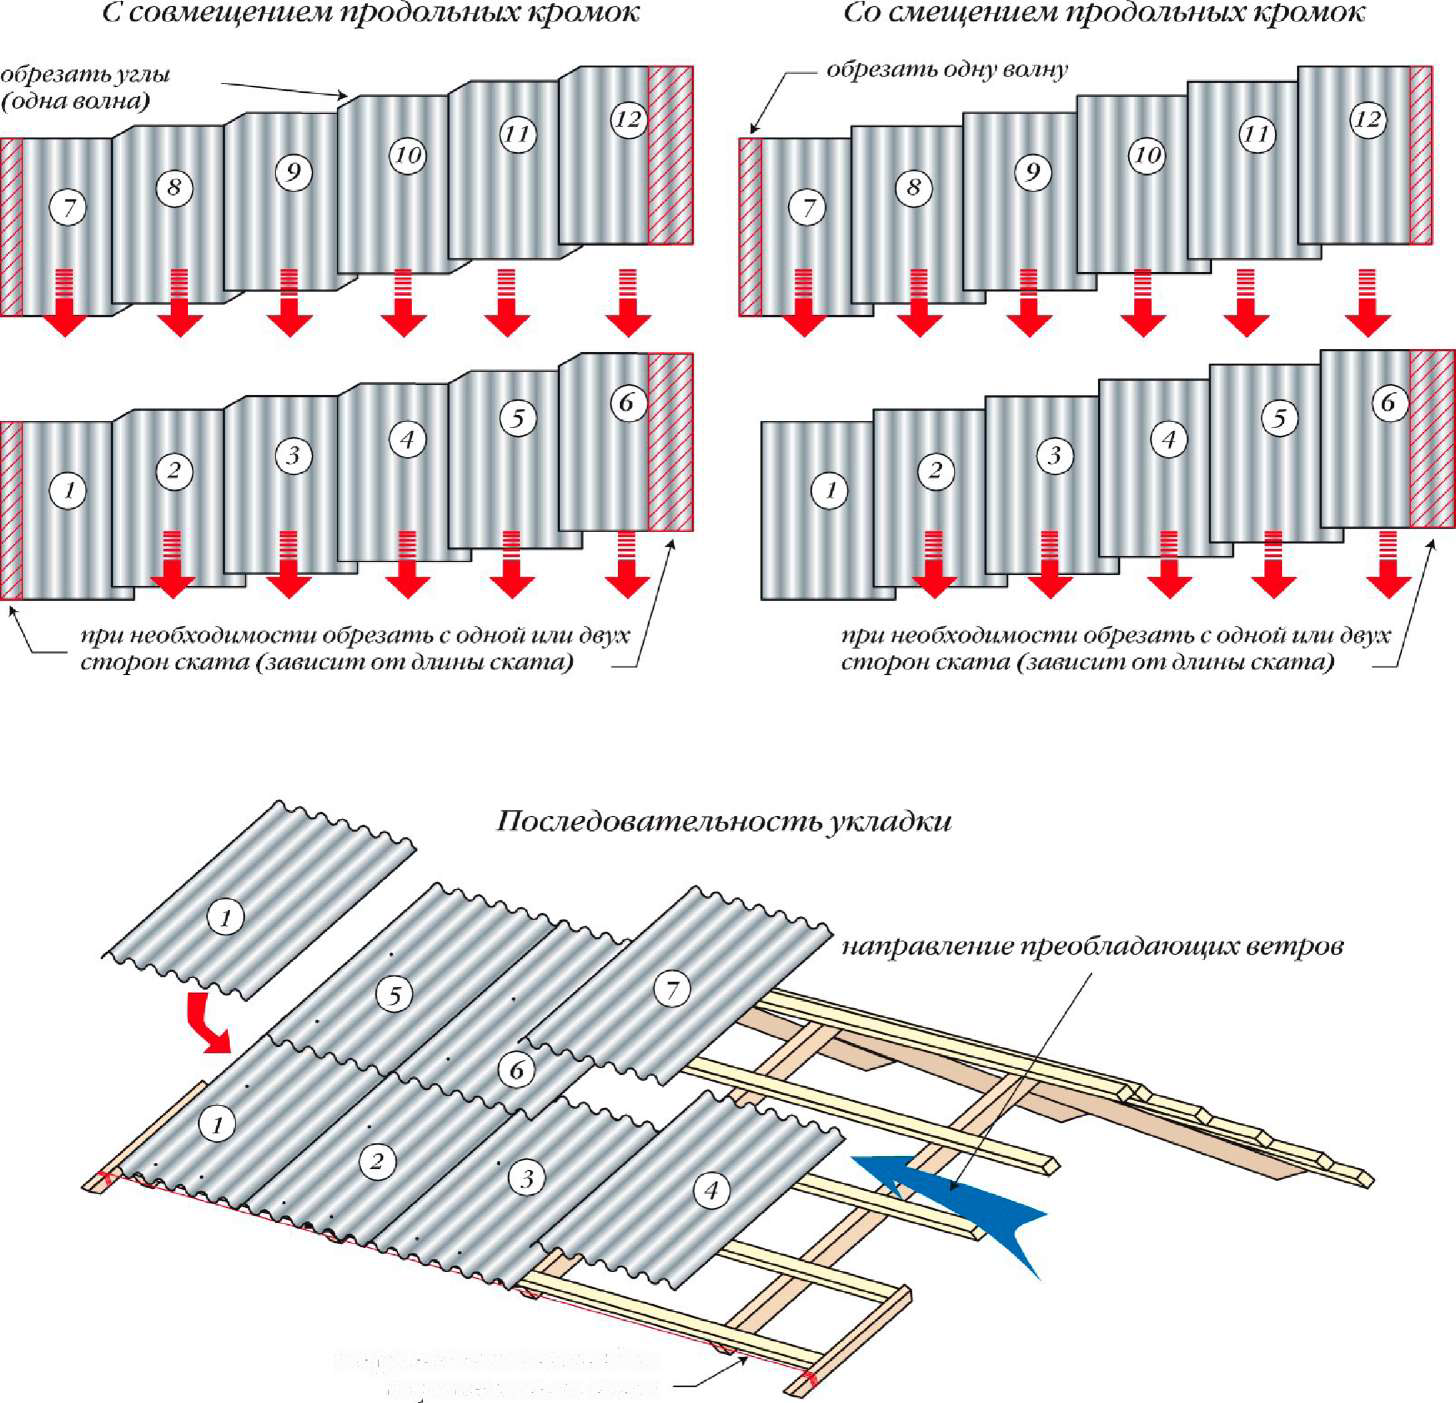
Slate laying technology takes into account the main direction of the wind and the laying of sheets so that the overlap is laid on the leeward side.
If the installation of slate is a new experience for you, then you need to know that this type of material allows you to install no more than 2 layers at one point, this must also be taken into account when calculating the purchase of material, usually a checkerboard installation method is used, it is the simplest and most effective ...
How to lay slate correctly
To cut off the unnecessary part, you must use a grinder or a hacksaw. It is also important to avoid breaking off corners.
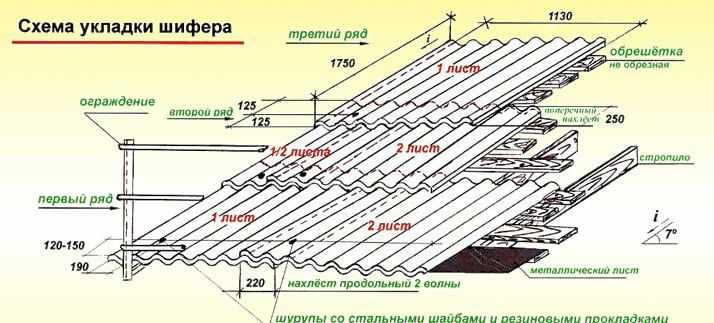
Lay the first row correctly along a pre-stretched string so that the overhang is even.
In horizontal rows, the slate must be overlapped, the overlap of the vertical rows should be about 20-25 centimeters.
The easiest and most convenient way to cover: you need to shift each new row by 4 waves of the longitudinal edge. Thus, the sheets will be staggered.
To do this, in every second row, you need to cut sheets of 4 waves in length. The four-wave sheet is stacked first, then whole sheets are laid.
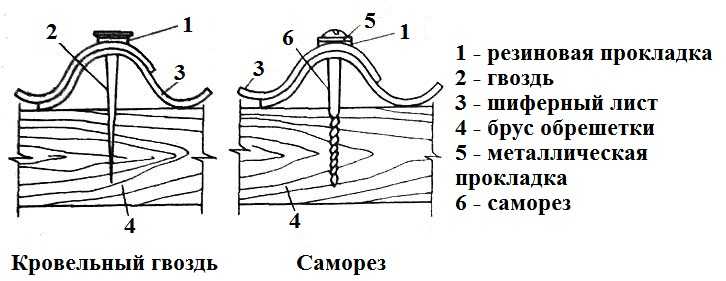
To fix the slate in it, you need to drill holes with your own hands and install special nails, screws or screws in them.
The hole should be a couple of millimeters wider than the diameter of the nail. In no case should you drive in nails without making a hole in the sheet - this will lead to breakage.
Fastening materials must have a rubber gasket, they must firmly fix the sheet to the crate, but not go all the way.
If you use eight-wave slate, then you need to fix it in the second and sixth waves, seven-wave - in the second and fifth.
The pitch between the nails is about 10 centimeters. As you can see, laying slate is a simple process that you can do yourself.
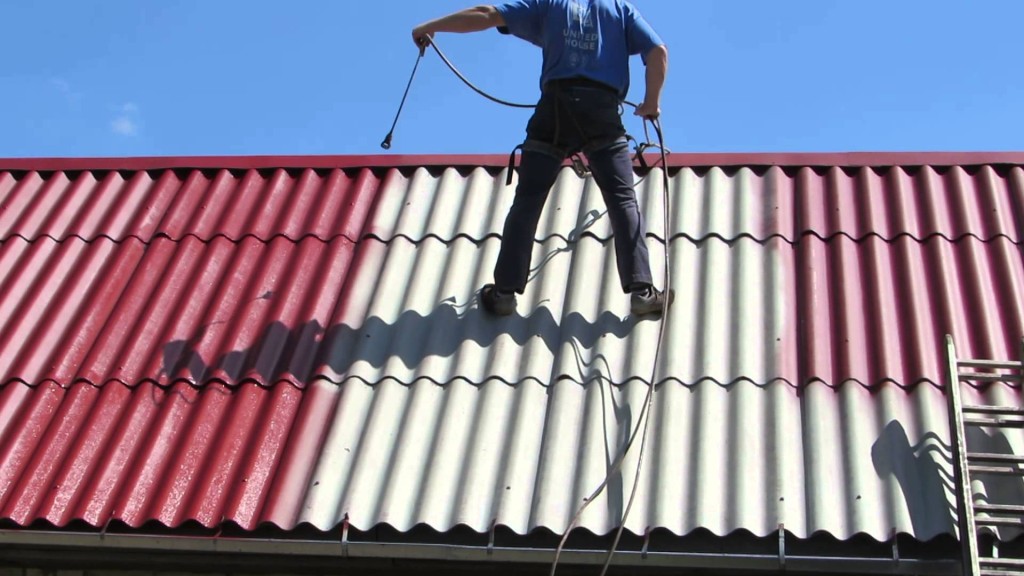
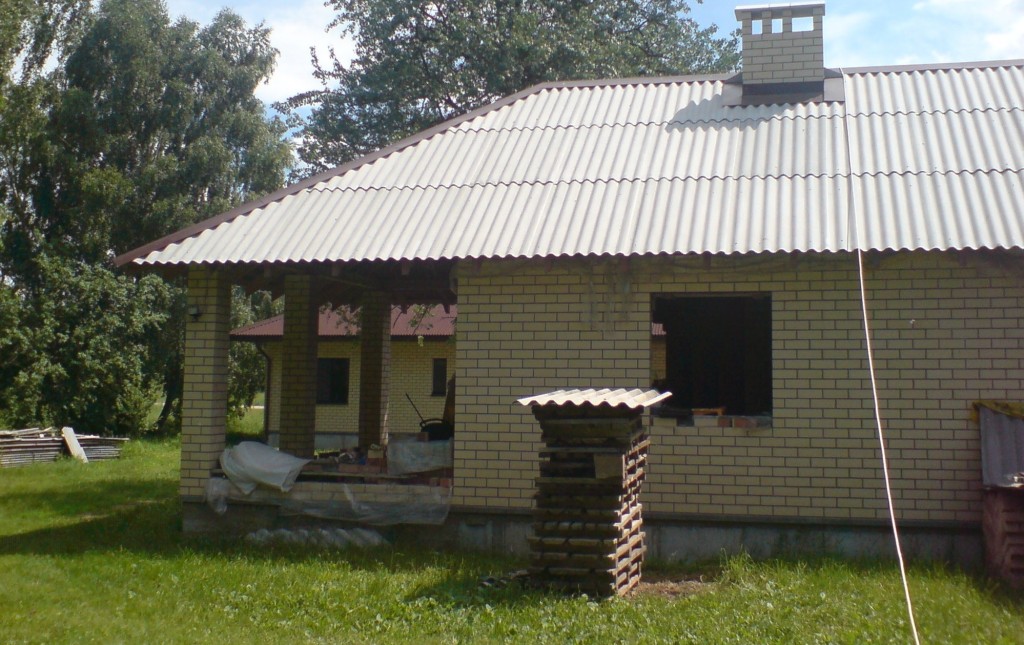
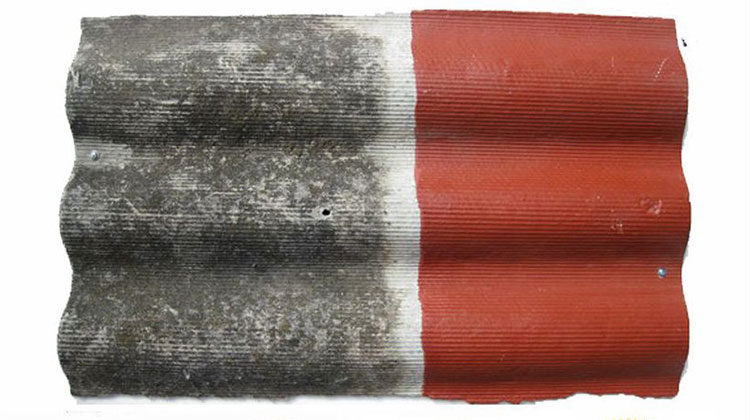
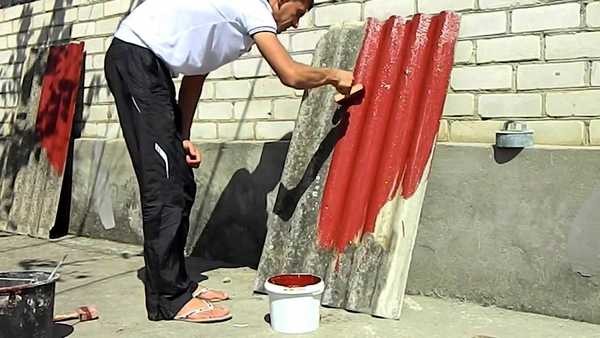
Upon completion of the installation work on laying the slate tiles, it is recommended to paint it, this will give an aesthetic appearance and serve as protection against the appearance of moss.
For painting slate tiles, there are now special paints and varnishes based on acrylic used for tile coverings and concrete.
They are resistant to external weather factors, not afraid of frost, sun, rain and snow.
The first stage is the application of a primer layer, for which it is better to use deep penetration compounds. This will ensure maximum surface strengthening.
On such a surface, paint will be easier to apply, and its consumption will be reduced. The second stage will be followed by painting in two layers, one layer will not be enough for uniform coloring.
You need to paint from top to bottom. After that, you can additionally cover the surface with a layer of water-repellent varnish.
A brush or spray gun is suitable for painting, if you are painting flat slate tiles, then use a roller.
Flat slate
Unlike wave slate, which is used mainly for roofing, there is also a flat one.
The price of flat slate tiles is almost the same as wave slate, it is also suitable for installation on the roof, the technology of flooring does not differ, but its scope is much wider.
It is used for cladding interior and exterior walls, as fences, various buildings, and also as a dry screed for laying tiles.
High indicators of quality and availability of flat slate tiles have found great demand and a wide range of applications for this material.
So, with your own hands you can use it to equip suburban areas, starting from the fence, and ending with small buildings such as showers, toilets.
What type of slate to choose for roofing with your own hands, you choose, flat or wave - its quality will not disappoint you.
As a roof covering for modern technologies it is not inferior to more expensive building materials.
All video instructions and photographic materials are provided to help you, follow them, and your roof will be strong and durable.
Slate roof the house must be reliable and durable - this is the guarantee of a warm and comfortable home in which you can feel safe. To provide yourself with decent housing, you need to take care of it in advance.
Slate roofs began to recede into oblivion, but in vain. The slate fits perfectly on roofs with an inclination angle of 10-25 degrees. Many began to choose modern materials, but do not forget about the good old slate, which has such technical properties, as durability (service life - from 10 to 15 years), fire resistance and strength (roof, slate of which perfectly withstands the pressure of the snow cover), accessibility, resistance to weather conditions and minimal thermal conductivity.
A leaky roof must be replaced. You can do it yourself with your own hands. First, let's decide on the amount of roofing material. Its calculation is carried out by dividing the total by the area of \u200b\u200bthe slate sheet. When buying slate sheets, pay attention to the period and how it is packed: there must be a polyethylene layer between the sheets. Remember, slate is fragile and cannot be thrown or walked on.
Preparatory stage
Gradually, sheet by sheet, get close to the skate. The ridge is insulated with a metal sheet, thus closing the ends of the slate so that moisture does not get there. Finish the roof installation by installing water drains. Secure them under the eaves too. Do-it-yourself slate roofing will reliably protect your home for a long time.
22.01.2017 1 CommentAny roof serves to protect the building from the effects of precipitation and a properly installed roof can serve a sufficiently long operational period. The most common and quite often used roofing material is slate, which has a wavy profile and is made of asbestos cement. The standard eight wave sheet size is 1750 × 1125 millimeters, the coverage area excluding overlap is about two square meters.
The question often arises; how to properly cover the roof with slate with your own hands without the involvement of expensive specialists. A few practical tips and a consistent course of work performed will help beginners in arranging a roof.
In contact with
Classmates
Types of roofs and the device of the rafter frame
 Roofs with one slope are most often used for utility rooms, sheds, various outbuildings and entrance groups. Two pitched and hip roofs are mainly used to cover residential and administrative buildings... When installing the frame for covering with slate, it is necessary to take into account the size of the sheet so that it has three points of support, taking into account the overlap of 200 millimeters of the sheet per sheet. The lathing device starts from the eaves to the ridge of the roof, observing the vertical and horizontal.
The scaffold should have a low moisture content, which will exclude deformation of the frame after installation during operation. The batten must be free of large knots. With a rafter pitch up to 1200mm, a 50 × 50mm bar is used, and with a rafter pitch up to 1500mm, it is recommended to use a 50x60mm bar. The timber is fastened to the rafters with 80-100mm screws. Using a screwdriver will greatly facilitate and speed up the assembly process. The final step will be to check the plane of the slope using a taut twine, the permissible error should not exceed 2mm.
Roofing tool
Any master without the necessary tool, not a master. Before proceeding with roofing work, it is necessary to revise the existing tool and purchase the missing, but extremely necessary one. The minimum list of the necessary tools for roofing slate:
- Ax;
- hammer;
- nail puller;
- pliers;
- chisel;
- chisel;
- set of screwdrivers;
- mallet;
- scissors for metal;
- saw on wood;
- saw for metal;
- electric drill;
- drill;
- electric screwdriver;
- hand circular saw.
All tools must be in working order, the cutting tool must be sharpened, the hammer and the ax must be firmly seated on the handles to avoid injury during operation. It is necessary to strictly observe safety precautions and actively use personal protective equipment.
Installation of slate sheets: order and technology of work
 In practice, there are two ways to install sheets:
- Displacement of the next row by several waves.
- No row offset with sheet corner trimming.
This use prevents the sheets from overlapping four times, which contributes to the formation of gaps. Any of these methods will allow you to properly cover the roof of the house with slate. It should be noted that one wave of the leaf is below the opposite extreme wave, and it is colored with a strip of black paint. Installation of slate sheets starts from the eaves, it is very important to correctly set the first sheet using a building level and a plumb line. For marking, a twine is pulled, horizontal parallel to the cornice, which serves as a reference point for the lower edges of the first row. The vertical twine is pulled from the corner of the roof to the ridge, thus avoiding the curvature of subsequent rows of slate. Be sure to take into account the direction of the main winds in the area. The joint of the vertical slab should be located in the direction of the wind, which will exclude the possibility of breaking the slate sheets in case of strong gusts of wind. Sheets can be installed both from left to right and from right to left.
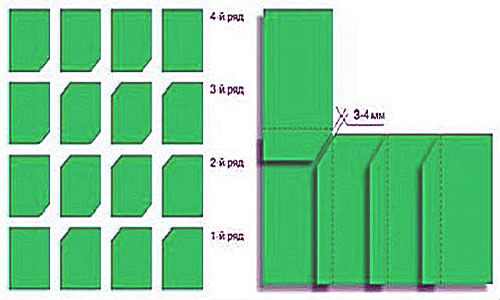
The most in a simple way slate laying is a technology of row displacement of sheets, which excludes trimming corners. The first sheet of the second row is cut longitudinally by one or several waves, and then whole sheets are laid, longitudinal trimming may be subject to last page.
Scheme of stacking slate sheets with an offset.
Laying slate without offset
When laying slate without displacement, the corners of adjacent sheets are trimmed to ensure a tighter fit. The first and last sheet is installed without cutting, the rest must be preparatory work. A prerequisite, the cuts of the corners during installation must have a thermal gap of two to four millimeters and not in any case touch each other. For complete clarity, there is a slate installation scheme with cutting corners:
Layout of slate sheets without offset.
To cut corners, you can use an old wood saw or an electric hand-held circular saw with a stone blade.
In order to trim correctly, we recommend watching the video below, as a professional does.
Fastening work
The fastening of the slate to the lathing is carried out with screws with a silicone gasket located on the inner side of the head, it is extremely undesirable to use nails, since during operation they do not hold well in the wood, loosen and rise, which leads to disruption of the adhesion of the sheets to the lathing. Each slate sheet of the first row is fixed with two screws in the lower part and one screw in the middle part of the sheet, through holes drilled in the upper wave with a diameter of 1-2 mm greater than the screw thickness. In no case should you punch holes, as you can damage the slate or get a hole much larger than the screw head. The upper part of the sheets of the first row will be fixed when the second row is installed, while the mounting holes are drilled through two sheets laid with an overlap, which, according to the technology, should be at least 200 mm when tilted at 25 degrees and at least 150 mm when tilted over 30 degrees.
![]()
Options for fixing slate sheets.
The device of the valley
Sometimes in the form of a roof there are internal corners, then in this case, the arrangement of the valley is required, which is made before covering with slate. The basis is a flooring made of boards on which a waterproofing material is attached, which in turn is covered with galvanized sheet metal. When covering with slate, the sheets are adjusted in such a way that the gap between them has minimum distance... From the outside, the slate joint is overlapped with a curved strip of galvanized roofing metal.
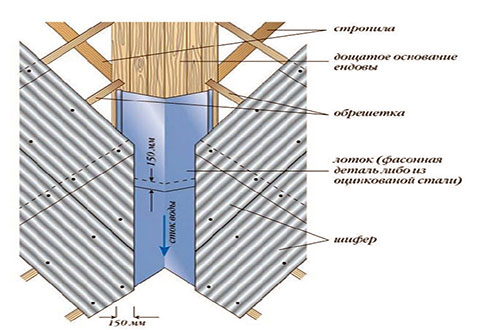
Scheme of the device of the valley under the slate.
Adjacent to chimneys and ventilation pipes
Depending on the location of the pipe, the slope of the slope and other nuances, there may be a sufficient number of options, so we will consider the main basic option. A roofing sheet with a pipe opening is positioned so that the top edge is under the top slate and the bottom edge is released onto the underlying slate. Asbestos is laid around the pipe, and on top it is covered with a second sheet with a hole for the pipe, but of a larger size. Often, an outflow from a cement mortar is additionally arranged.
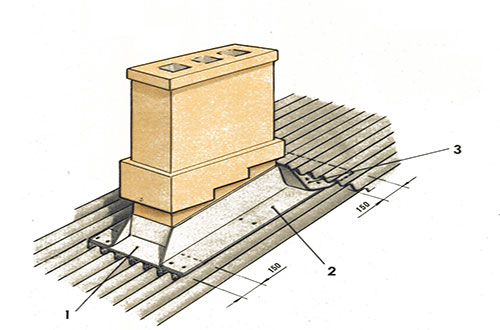
Diagram of the device for junction with smoke and ventilation pipes: 1 - front corner; 2 - side corner; 3 - annular corner.
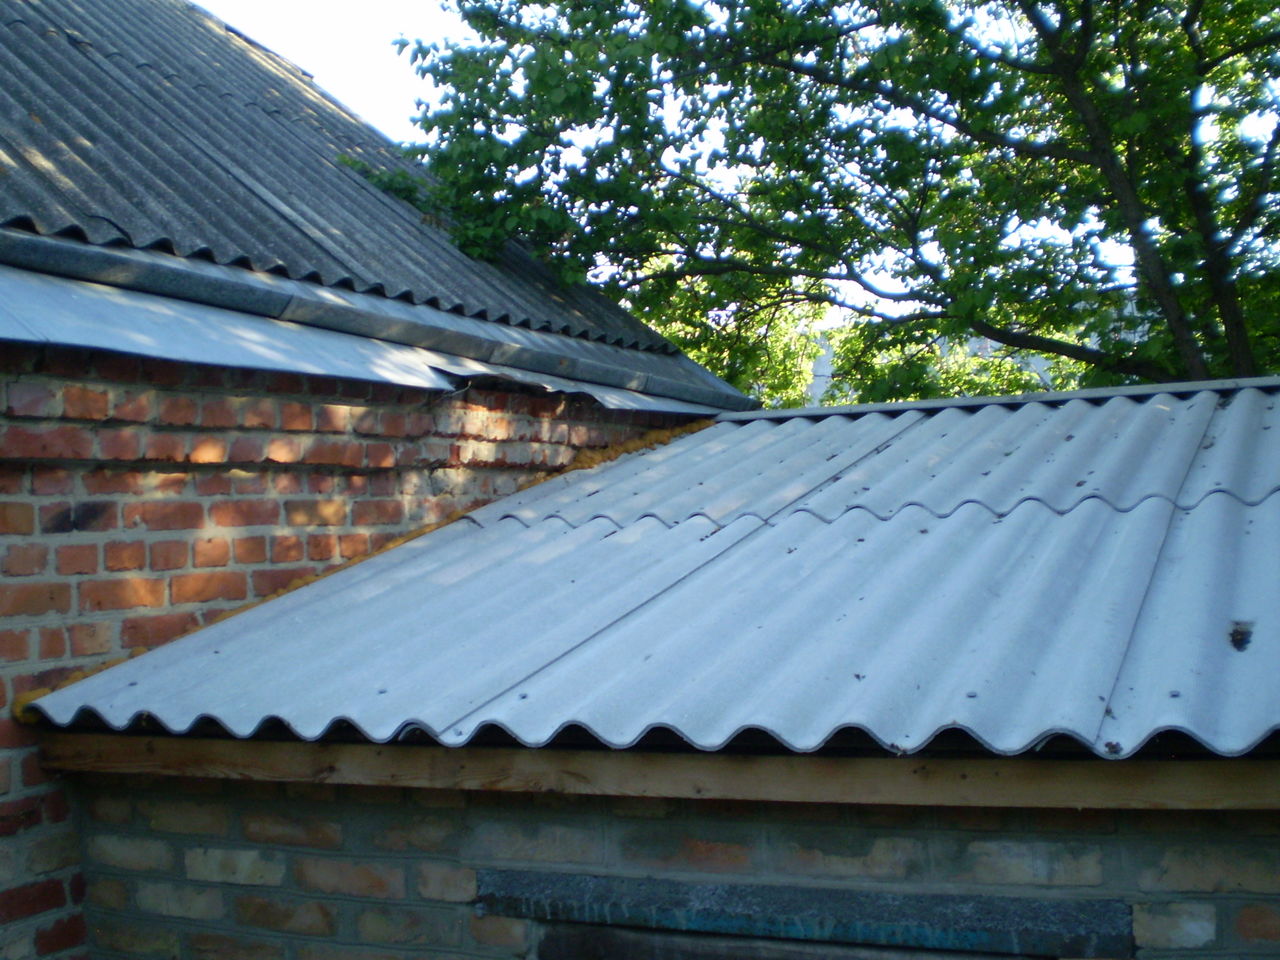
Adjoining the slate roof to the wall
In some cases, it becomes necessary to install a roof when the upper edge of the slope is adjacent to the building wall. To prevent the ingress of atmospheric precipitation into the gap between the wall and the slate, especially in the winter-spring period, an ebb is installed made of a strip of roofing iron 400 mm wide with a longitudinal bend corresponding to the slope angle of the slope. One edge of the low tide is fastened to the wall with dowels, and the second overlaps the slate sheets from above and is fixed through the upper wave with screws to the crate. This type of roof is often used on entrance groups and all kinds of extensions to existing buildings, usually they have no more than two slopes.

Diagram of the device for joining the slate roof to the wall: 1 - ridge; 2 - slate; 3 - corner; 4 - screw.
Skate installation
The final stage of roofing work is traditionally the installation of the ridge. Various ready-made ridge elements for a ridge device can be purchased without any problems in any construction market, but if you wish, you can make it yourself from a strip of galvanized sheet metal 400 mm wide using a metal corner and a mallet. The ridge elements are attached to the lathing through the upper slate wave with screws. At the end of the roofing work, it will not be superfluous to go up to the attic on a sunny day and carefully examine the creation of your own hands, and if cheerful sun bunnies are seen in the twilight, then somewhere, something went wrong as we would like. Small cracks and through holes can be easily removed with any silicone sealant.
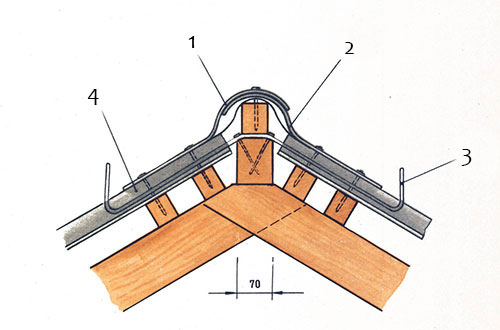
Skate device diagram: 1-2 - skate; 3 - bracket for fastening the navigation bridges; 4 - slate sheet.
Hip roof slate
Classic hip roof has four slopes, two triangular and two trapezoidal, which are larger than triangular in area. Slate laying technology is practically no different from lean-to and gable roofs except for additional trimming of the outer sheets of each slope. In order not to be mistaken with the cutting angle and not to bother with calculations, a template is made from three thin slats to the height of a slate sheet in the form of a right-angled triangle in which the right angle is fixed rigidly, and the hypotenuse is attached at the place of installation of the first sheet. The presence of a template will allow much faster marking and trimming of the outer sheets on two opposite slopes. It should be noted that the trapezoidal angle differs from the angle of the triangular slope and therefore a second template will be required. Trimming slate sheets must be done on the ground; for installation on the roof, feed the finished workpiece.
In contact with
Slate is an excellent alternative to expensive roofing materials. Due to the reliability and long service life of the slate sheet, more and more people prefer this particular material. It is used for the roof of both expensive country mansions and small rural outbuildings. A fairly clear and simple installation technology allows you to do everything yourself. Installing the roof with slate with your own hand will save on labor, and will also be a useful experience for anyone. In order for the process to go smoothly, in compliance with all the necessary technologies, and the coating has served the entire allotted time, it is necessary to consider all the nuances, then the work will be pleasant, and you will be satisfied with the result.
Slate sheet, like any other roofing material, has its own characteristics and characteristics. To begin with, you should carefully study the properties and distinctive features of the material from which the slate is made. It will not be a burden to choose the necessary roofing material if you carefully disassemble all the nuances.
Slate varieties
Before choosing the type of slate sheet you need, you need to understand in detail all the varieties. With the advent of new technologies and materials, the production of roof slate has reached a new level, allowing everyone to choose one or another option.
For arranging the roof, the following types of slate are used.
Wave type flexible sheet is produced using vegetable and mineral fibers. Under the influence of high pressure and temperature, it is impregnated with bitumen. Such impregnation increases the service life of the coating, increases wear resistance, and also has an excellent effect on its water-repellent characteristics. In addition, the flexible sheet can be painted in any color you like, which additionally protects the coating from exposure to ultraviolet rays.
In turn, flexible slate can be divided into the following types:
- ondulin - the leaf contains various mineral components, cellulose fibers, bitumen, rubber and dyes. Since it belongs to lightweight roofing materials, installation can be done alone;
- nulin - the composition is the same as ondulin, only the number of components changes, designed to increase the service life and strength indicators. Such a sheet is much heavier;
- gutta - this type of flexible slate is made using reinforced organic fibers. The top layer is strengthened using a special impregnation, which makes it possible to use this type on radius and curved surfaces. Gutta coating has a low cost and is more often used in the roof of industrial buildings.
A metal sheet made of galvanized steel. To give additional strength, the sheet is rolled through a special machine, giving it a waveform. Due to the polymers contained in the material, the metal sheet has high refractory and noise insulation characteristics. Some of its main advantages are: low weight and low price. 
Metal slate is also divided according to the type of profile:
- arched;
- transversely bent.
Asbestos-cement slate is the most popular type due to its low cost. For the production of such slate, water, asbestos, cement and other impurities are used, which have a fairly low cost compared to other components, for example, included in flexible slate. For the reinforcement of the coating, asbestos-containing fibers are used to increase the impact resistance of the sheet. The thickness of such a sheet varies between 5-8 mm, and a rather large weight (21 kg) will allow your roof to withstand strong gusts of wind.
Based on the size of the sheet, asbestos-cement slate is distinguished by the following types:
- rectangular (it includes additional roof elements);
- reinforced (has the best bending strength);
- unified (sheet size is much larger).
Professional advice: by covering the asbestos-cement slate with a special paint, you will increase the strength, frost resistance and water resistance, and the roof painted in your favorite color will become a pleasant addition to your home.
Useful information: Use corrugated slate for roofing. Unlike smooth slate, which is used for arranging floors, fences and building cladding, wavy slate accumulates and directs excess moisture into gutter system, protecting the roof from leaks.
Advantages and disadvantages of slate
Choosing slate as the main roof covering for your house will be the right decision. Slate sheet has many advantages, having considered which, you will give preference to this particular type of roof.
The main advantages of a roof made of slate sheet are:
- long service life (30-50 years);
- resistance to ultraviolet rays;
- high noise insulation;
- incombustibility;
- impact resistance;
- slate does not rot, does not attract harmful insects;
- has excellent anti-corrosion properties;
- ease of installation;
- low cost.
All of the above advantages allow slate to become one of the most demanded and popular roofing materials. However, do not forget about the disadvantages of such material. They are not so significant, but it is still worth paying attention to them.
The disadvantages of slate roofing include:
- under the influence of open fire, the sheet bursts;
- due to the large mass of the sheet, a reinforced lathing and rafter system is required;
- fragility (be careful when transporting and lifting to the roof).
Pro tip: For long-lasting protection of slate from moss and lichen, use special antiseptics, then the roof will serve you even longer.
If you do not pay attention to the minor flaws inherent in the slate coating, then such material can be safely called universal. Widespread use, availability and low pricing policy make slate one of the most popular materials on the roofing market.
Installation methods
To obtain a high-quality roof covering, a single principle of laying a slate sheet is used. The slate is fixed in horizontal rows on the lathing, while moving from the bottom from the eaves to the top of the roof. Each sheet is laid with an overlap of 12-20 cm. When moving to the next row, the sheets are superimposed on each other for a width of 1-2 waves. The installation principle is the same for all installation methods. We will try to analyze each method in more detail.
When working with slate, the following layout methods are used:
- Staggering - a stepped docking line is inherent in this method. When laying the next horizontal row, the sheets are overlapped, shifting at a distance of 1-4 waves. It is customary to use this layout when the roof slope is narrow along the slope, but wide enough horizontally.
- No offset - used when the slope has a wide slope, but narrow in the transverse direction. In this case, the sheets are laid in the same even rows, which form one line. Mounting the slate in this way, at the joints, the sheet is trimmed at an angle of 30 ° -60 °, without using an overlapping joint. The joints are subsequently coated with liquid bitumen.
The staggered installation method is the most popular because it is less time consuming. This is due to the fact that the sheets do not need to be constantly cut at the joints. Laying slate without offset is less popular, but more economical, since there are fewer cuttings left.
Preparatory work
The quality of laying slate sheets directly depends on the correct execution preparatory work... If you adhere to certain rules and instructions, then the installation of slate will seem like a mere trifle to you. Armed with the right tool, you will get the best results.
Required tool
Roofing work related to the arrangement of the roof always requires special attention and responsibility. Work is performed at an unsafe height, which can complicate the installation process. In order for the installation to take place safely, quickly, and most importantly in compliance with all technologies, it is better to immediately arm yourself with all the necessary tools.
For high-quality roofing with a slate sheet, we need the following tools:
- hammer;
- drill or screwdriver;
- bulgarian;
- hacksaw for metal;
- stepladder and ladder ladder;
- ropes and metal hooks required to lift the sheet to the roof;
- cutting discs for stone, slate nails, self-tapping screws, bitumen mastic, paint, antiseptic.
Such a simple set of tools can be found in everyone in the house, allowing you to get the job done without much effort and additional investment.
Material calculation
An important point, before starting roofing work on laying slate, will be the calculation of the material. If you have entrusted the installation rafter system other people, then it is better to do the roofing with slate with your own hands. Taking advantage of the help of strangers involved in calculating the required number of slate sheets and fasteners, you will only spend extra money. It is not so difficult to make all the necessary calculations, so it is better to do everything yourself.
The required number of slate sheets directly depends on the roof area of \u200b\u200byour house. To correctly make all the necessary calculations, it is necessary to divide the roof area by the area of \u200b\u200bone slate sheet. It is worth considering undercutting, eaves and overlaps when laying slate. To do this, it is better to add 15% to the result obtained.
Slate sheet processing
If you want to increase the lifespan of your slate roof, then you should take care of this in advance. The best tool would be the processing and painting of slate sheets. Processing already laid slate, you will not achieve the maximum result, moreover, you will be forced to constantly climb to the roof. All preparatory processes are best done on the surface of the earth.
Before installation, slate is processed in the following order:
- Place 2-3 beams evenly on a flat surface.
- Place the slate over the beams. Then clean the outside with a broom to remove any debris and debris that has accumulated in the waves of the leaf.
- Using a wide brush, apply perchlorovinyl primer paint on the surface and leave to dry for 2-3 hours.
- Apply impregnation to the outer surface of the sheet, moving from one edge to the other. After letting the sheet dry, repeat the process again, moving perpendicular to the first direction.
- When the impregnation is completely dry, the sheet can be painted over using acrylic or alkyd paint of the color you like.
Such rather simple manipulations will take some time, but you should take it seriously. Additional treatment will increase the service life of the coating, besides, in winter, snow will roll off a smooth surface much easier.
Slate tends to deform, depending on the temperature regime of the environment. Most often, cracks appear in the places where the slate contacts the fasteners. To avoid this, drill holes for a larger diameter roofing nail. When expanding, the nail will not rest against the asbestos-cement sheet, leaving it intact.
DIY slate roofing: instructions
In this part of the article we will try to outline all the nuances, as well as find out the main technological points necessary for the high-quality performance of roofing work in your home. By paying attention to all aspects, you will achieve the best result.
Installation of battens
To make a slate roof last longer, pay special attention to the preparation of the base. Correctly executed lathing will help to achieve the best result. To choose the type of lathing, you need to pay attention to the thickness of the slate sheet. For example, for a thin sheet, a solid crate is suitable. It uses plywood, OSB or boards as flooring.
If you use slate that meets all the necessary quality standards, a sparse type of lathing is suitable for you. This type is intended for heavier sheets and is most often used in roofing.
For the installation of a sparse lathing, a 60x60 bar or a 15-25 mm thick board is used. This type of lathing is characterized by a cross section of 40-70 mm, and a pitch of 0.2-1 m. It is worth considering that each sheet requires a support consisting of at least three horizontal bridges. To strengthen the ridge part, a 60x120 bar or a 60x150 board is perfect.
Pro tip: choose only dry wood for your battens. Be sure to treat it with special fire-bio-protection. The impregnation will increase the service life and protect the wood from harmful insects. Please note that when warping or increased accumulations of precipitation, too thin beams can burst, and too thick ones can cause cracks in the sheet.

To fix the battens on the rafters at an angle of 90 °, use screws or nails. The slate is strong enough, so three support bars for each sheet will be enough. With a standard slate sheet length of 1750 mm, a lathing pitch of 700-750 mm will be sufficient.
If a chimney will pass through your roof, then it is better to make a crate for it before installing the slate. The beam is fixed around the chimney at a distance of at least 13 cm. This requirement must be met for fire safety purposes. It is the same for any type of roof slope.
Laying slate sheets
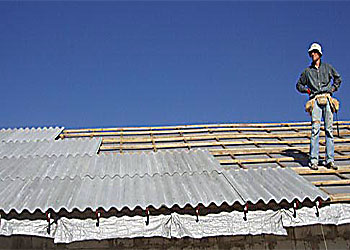
Before you start laying a slate sheet, the same problem always arises: how to lift a heavy and fragile sheet onto the roof? To solve this problem, we need a simple set of rope and several hooks that everyone can find. The ropes are tied to hooks, which hook onto the sheet from both sides and pull it to the roof.
Important information: start laying on the side of the roof that is least exposed to constant winds. Starting to mount the slate from the right side, you will get rid of the constant ingress of snow and rain into the overlap.
Do not forget about the roof overhang. Pull the cord along the eaves at the required distance from the end of the ramp. It will become a guideline when leveling the slate rows.
When starting to lay the roof, pay special attention to the sequence of actions and the choice of layout for each of the roof sections. To do the job efficiently and in compliance with technology, we will consider algorithms for each of the cases.
Algorithm of work for a staggered layout:
- Moving from the end of the roof slope up to the ridge, the slate is laid in horizontal rows. When arranging the first row, only whole sheets are used. They are overlapped, while overlapping 1-2 waves of the previous sheet. For fastening, self-tapping screws with a rubber gasket are used (so as not to push through the slate) or roofing nails.
- Starting the laying of the second row, the first sheet is cut to the desired number of waves in order to achieve the required distance. The following sheets are mounted whole, while overlapping the bottom row with an overlap of 15-20 cm, depending on the slope angle of the slope.
- The first sheet of the next row is cut so that the number of cut waves is doubled more quantity cut off at the first leaf in the row below. It is best to initially cut the slate in the second row in half. This will reduce material consumption by laying all odd rows in solid sheets.
- The ridge row is mounted last. In this case, the sheets are cut across.
For a more understandable layout technology without offset, consider the option when the slate is mounted from left to right.
Algorithm for nesting without offset:
- First, pull the cord necessary to set the plane of the roof. The entire first sheet is laid along the cord and attached to the crate. For all subsequent sheets in a row, the upper left corner is cut off at an angle of 30 ° - 60 ° (depending on the required pattern of the roof pattern).
- The first sheet of the second row is attached to the crate, having previously set it along the cord, and cutting off the lower right corner. To achieve a tighter connection of the sheets, the cut angle should be the same in all cases.
- All subsequent sheets of the second row, except for the last one, are cut in the lower right and upper left corners. Only the upper left corner of the last sheet is cut.
- In the sheets of the upper row, the corners are cut in the lower right part, after which they are cut off in fact.
Roofing with slate, using the method without displacement, will become slightly more profitable due to the economical consumption of material. But it is worth considering that this method is more labor-intensive and time-consuming. Therefore, we advise you to use a staggered layout, by choosing which you will perform the installation quickly and efficiently.
We hope in this article we helped you learn how to cover the roof with slate with your own hands. Any roofing require special attention to themselves, since they are performed at a height. Observing the algorithm and using only high-quality materials, you will achieve the best result, and the roof of the roof with asbestos-cement slate will pass quickly and imperceptibly.
To find out how best to cover the roof with slate, the following video will help:
In the recent past, slate roofing was practically the only competitor to roofing material. There were almost no other roofing materials. Today the market offers a wide range of choices, but slate is still quite widespread. This is due to its very low price, easy installation, and long service life.
On the roof, more often material based on asbestos and cement is laid. There is also polymer, metal, bituminous, euro-slate, but in our country they are used very rarely. For some reason, these novelties did not take root well.
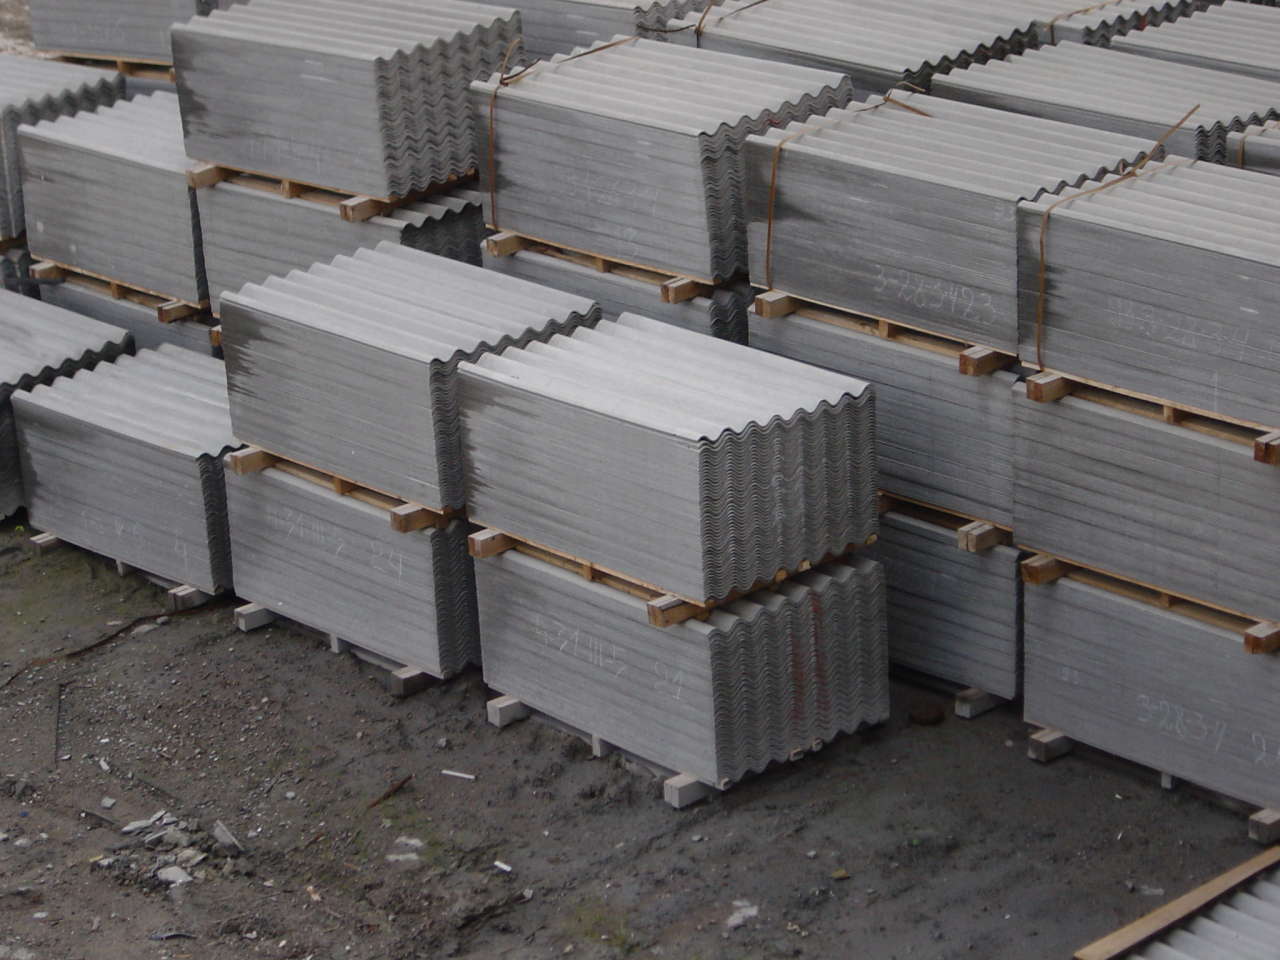
Asbestos slate can be flat or wave. Fences are often made of flat ones, and wave fences are laid on the roof. Traditionally, six, seven and eight wave materials are made. Moreover, the seven-wave is the smallest in size.
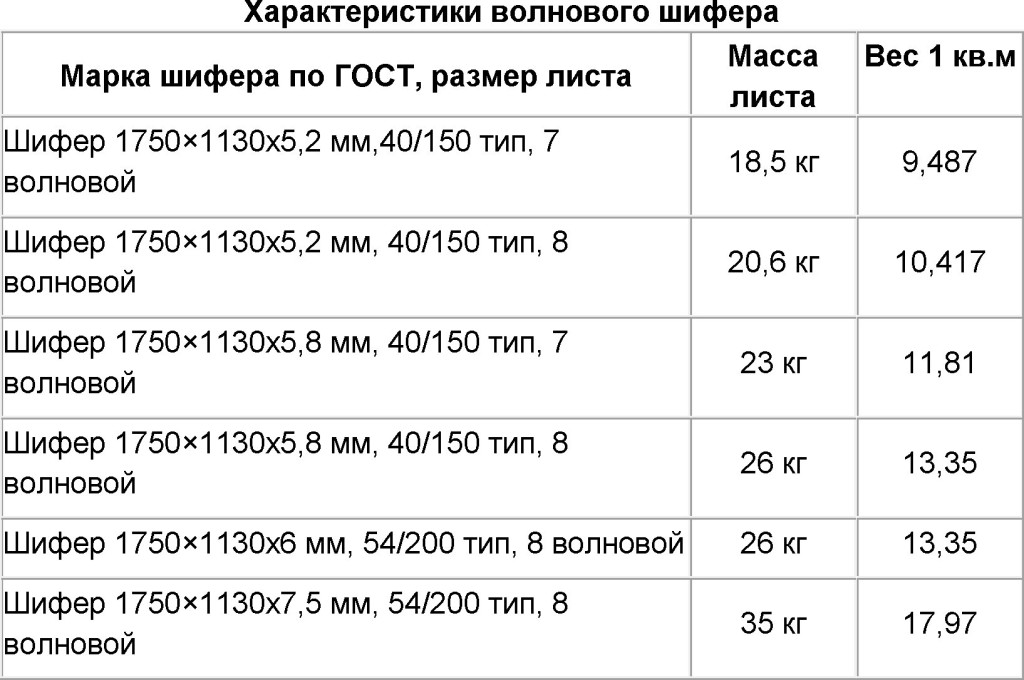
Sizes and price of 7-wave slate:
- wave step 15 cm;
- length - 1750 mm;
- width - 980 mm;
- thickness - 5.2 mm or 5.8 mm;
- weight - 18.5 kg or 23.0 kg;
- the price is 120-150 rubles per sheet.
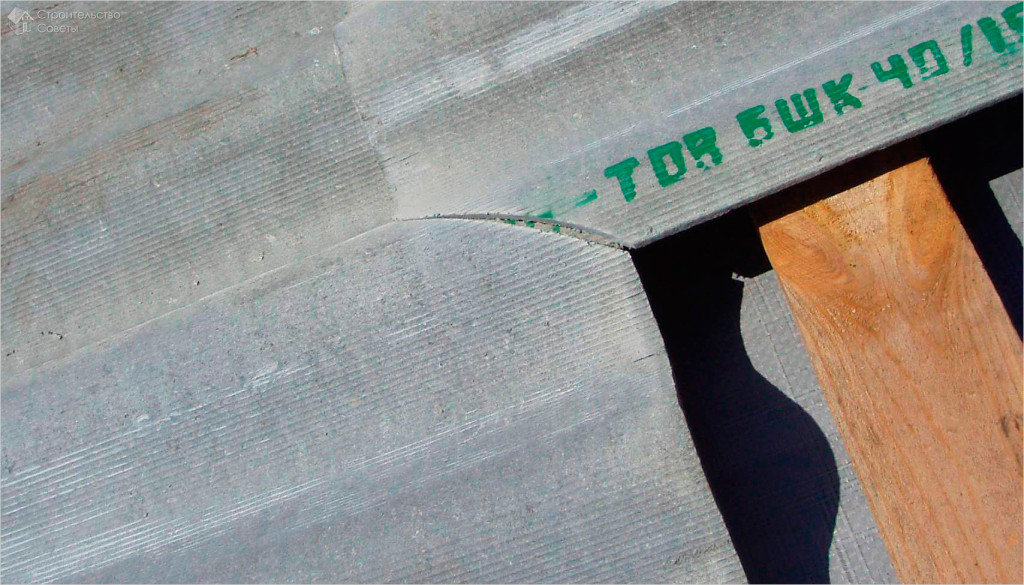
8-wave slate is standardized by GOST 30340-95. Its dimensions:
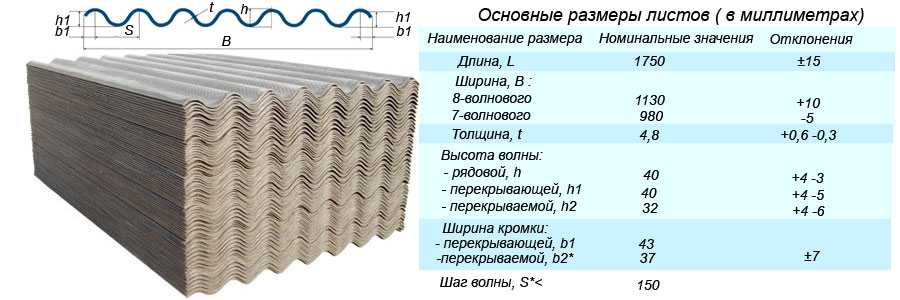
The 6-wave slate has the following dimensions:
- length - 1750 mm;
- width - 1125 mm;
- wave step - 20 cm;
- wave height - 5.4 cm;
- sheet thickness –6 mm or 75 mm;
- the price for a sheet of slate is about 200 rubles.
When choosing, pay attention to the thickness of the sheet. The more rainfall in your area, the thicker the sheets are required. The thickness also depends on the slope angle. On non-steep slopes, precipitation lingers longer, which means that the thickness of the material should also be greater.
If you will be working on your own, do not seek to buy the largest sheets. They are more difficult to work with and usually more waste. For the roof of a small bath optimal size has a 7-wave slate.
When calculating the amount, they do not take the total area of \u200b\u200bthe sheet, but the useful one - without taking into account those areas that are overlapped by those nearby
When calculating the number of sheets, it is not the total area of \u200b\u200bthe sheet that is considered, but the useful one - minus those parts that will overlap. It is less than the total by about 15-20% (depending on the method of installation and the slope of the roof).
There are three standard sheet types:
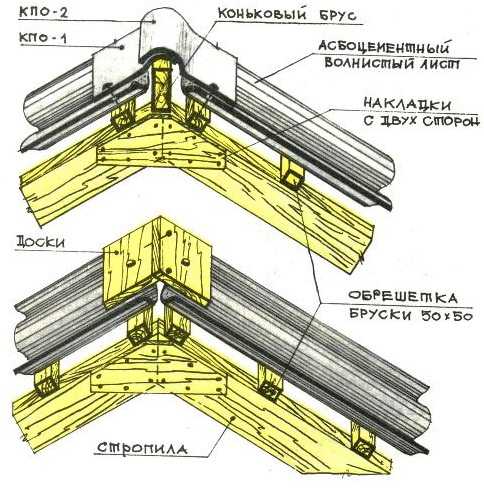
- VO - standard profile and size. This is the material commonly used for roofs of houses or baths. Also produced in this series additional elements: for the design of the ridge KPO-1 and KPO-2, for the design of valleys, pipes, trays or corners U-90 and U-120 are produced.
- UV - larger sheets. Their use makes it possible to reduce the number of joints, but due to their large dimensions, there are more questions during transportation.
- VU - reinforced profiles. They are used more often on the roofs of industrial enterprises. It makes sense to use on roofs with low slopes in regions with abundant snow.
There is also asbestos and asbestos-free slate. In the second version, cellulose fibers are used as reinforcing elements, and acrylates are added to the strength of the material. According to their characteristics, they almost do not differ, but the second option does not contain asbestos harmful to health. If you are not held back by the "healthy" composition of this material, then you can use slate without asbestos.
Life time
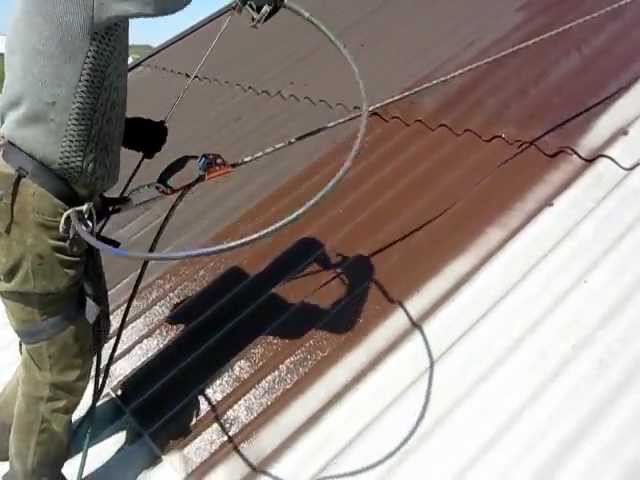
The number of freeze / thaw cycles that the material must withstand is about 25-30. Since there are 2-3 cycles per year, or even more, the service life will be about 7-9 years. Not a very impressive figure. But it can be easily increased. For this, all you need is to paint the slate. This can be done either before installation, or paint an already installed roof. If you have a spray gun, it is more convenient to paint a large surface, if you work with a brush, it is easier to do it on the ground.
Mainly two types of paint are used for painting:
- Acrylic water-dispersion. They create a water-repellent film on the surface and fill the slightest cracks. As a result, both water and snow melt faster. The disadvantage of these paints is that they fade quickly enough.
- Alkyd paints. They retain their color for a long time, create a smoother surface, as they are thicker than other formulations.
Choose those properties that are more important for your case. Painting increases service life slate roof 1.5-2 times. In addition, the look is already completely different, more stylish and modern. The disadvantages include the need to renew the paint layer: it will have to be painted once every 3-5 years.
Roof device
Slate roofs are made mainly single or gable. First, a rafter system is erected, then transverse sheathing bars are stuffed onto it. Since the weight of the sheets is quite decent ( square meter weighs about 14-16 kg), you need to use bars with an average section of 40 * 40 mm or 50 * 50 mm - depending on the thickness (and weight) of the sheets and the amount of snow falling in winter.
Before installation, all lumber must be treated with antiseptics and fire-fighting impregnations. In the very simple version antiseptic - hot drying oil, which needs to be walked over all the bars and planks at least twice.
If the roof is cold (for a bath - a very unfortunate choice), after installing the rafter system, you can just start installing the battens. But it is highly desirable to use at least roofing material for better heat and waterproofing. It is laid across the log, nailed or stapled from a construction stippler. One strip overlaps the other by 15-20 cm, the joint is glued with tape. They begin to roll out from the bottom, moving up. A crate is mounted on a fixed roofing material.
Instead of roofing material, it is recommended to use waterproofing membranes or films that are rolled out and fixed in the same way. And carry out roof insulation from the side attic spaceby fixing the insulation mats between the joists. Mineral wool mats are often used as insulation. A vapor barrier film is pulled over them. It is pressed with a counter crate - the planks here need a small thickness, since they only need to hold lightweight insulation. Top can be stuffed finishingif provided.
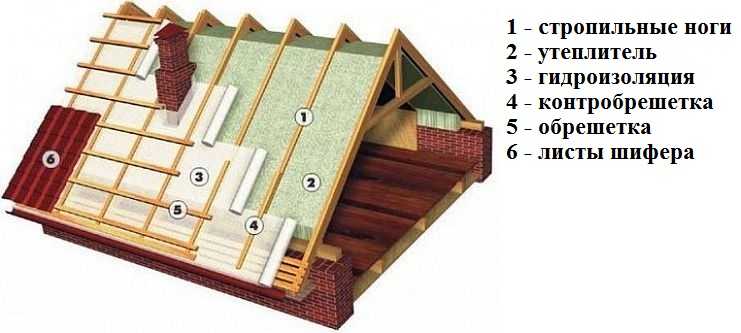
Under the crate when using sheets standard profile (IN) take a bar of 50 * 50 mm, under the reinforced 75 * 75 mm. The pitch of the lathing is from 50 to 75 cm. It is chosen so that it is convenient to fasten the sheets: each of them must have at least two crossbars.
All planks in the crate must be filled strictly horizontally. To do this, set exactly the lower bar along the roof overhang. Then cut off a piece of bar that is the same length as the selected step. And with it you check all the distances.
Nail the battens to the rafters with long roofing nails. Two for each connection. Around the pipe and in the valley, the crate is made solid.
Slate laying
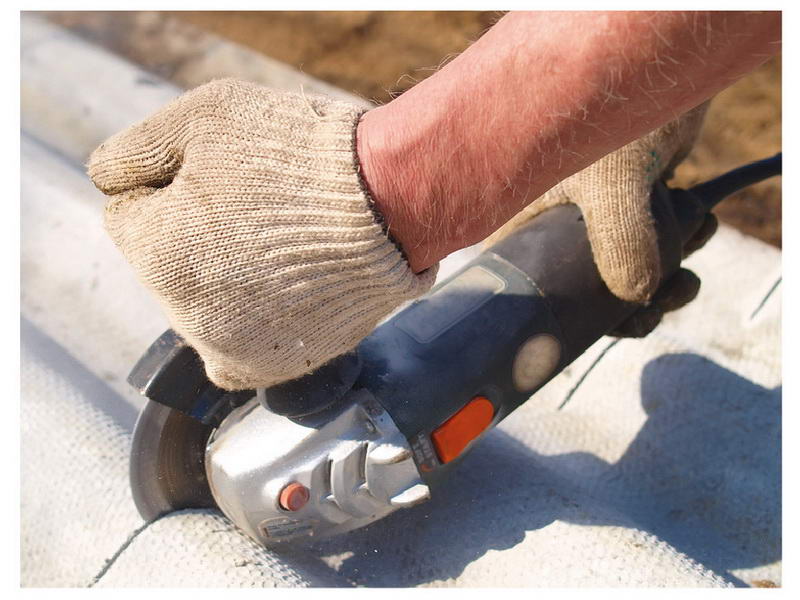
There are two laying patterns: with and without offset seams. When stacked without displacement, it turns out that four sheets converge in one place. In this case, they will not normally fit. Therefore, two of them must be trimmed. For two obliquely lying sheets, cut off the corners so that the distance between them is no more than 3 mm. If there is a grinder, this is not difficult to implement. How - see the video.
When stacking with an offset, you do not need to trim the corners, you will need to trim the first and last sheet. Cut lengthwise to the full length. A strip of two or three waves will be "unnecessary" - the seam will shift to such a distance.
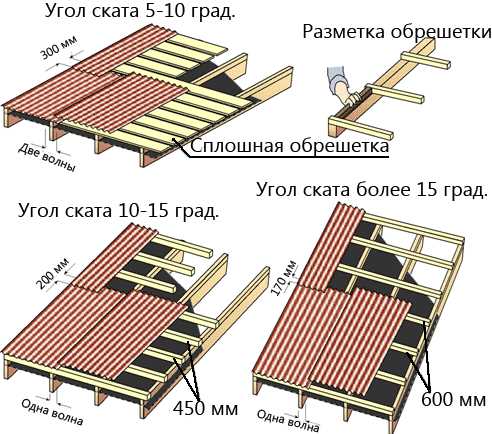
When laying, one slate sheet overlaps the other by one or two waves. An overlap is required for two waves at small slope angles - up to 20 °. On steeper roofs, it is sufficient to block one wave.
When laying the second and subsequent rows, they are also superimposed on top of the underlying row. Here, on steep slopes, 10 cm is enough, on more gentle slopes - 20 cm.
Before starting the installation of the slate, it is necessary to install the gutter. Then the lower edge of the sheets is leveled so that the sediments fall directly into the groove.
To make it easier to expose the sheets of the lower row, two nails are hammered into the extreme rafters, between which the cord is pulled. The lower edge is leveled along it.
After laying all the sheets on the roof plane, it remains to close the ridge. This can be done using special shaped elements - KPO-1 and KPO-2, or two antiseptic-treated and painted boards, which are assembled as in the figure.
Difficulties may also arise when bypassing the chimney. If it is a brick pipe, there are special corners made of the same asbestos cement. First, they are nailed to the crate, then slate cut to size is laid.
If the pipe is round, you will need a special cap. It can be made in the old fashioned way from galvanized steel. There are modern multiflexes on sale, with which the passage sealing will not make a pipe. About,
How and how to fix
For fastening, galvanized roofing nails with a large head or self-tapping screws are used. Self-tapping screws need to be taken with a thread that starts not from the cap itself, but below - so there will be less chance of a sheet breaking.
It is recommended to put metal washers or rubber gaskets under the fasteners. Rubber - the best waysince it seals the hole better. You can cut gaskets from two layers of roofing material, but it is better not to make square ones - it looks very unsightly at such a roof.
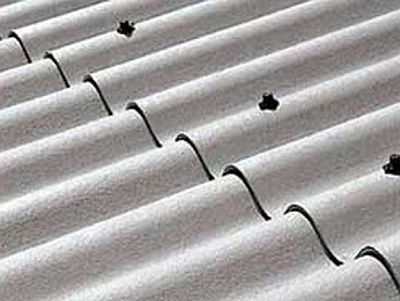
You need to fasten it to the crest of the wave - with a self-tapping screw or a nail - it's not so important
Each sheet should have at least four nails or screws. But the more snow falls, or the stronger the wind, the more fasteners you will need. There can be six or eight. Nailed in different ways: one above the other or staggered. As it seems more reliable to you, do so.
When installing slate, there is an important rule: it must be fixed in the crest of the ox, in its most protruding part. So that the water rolls down and does not flow into the hole.
It is recommended to drill a hole for each fastener. It should be a couple of millimeters larger than the diameter of the fastener. With this approach, the slate can move slightly, which is useful when the building shrinks or during heating / cooling and its size changes from this. With this fastening, the sheets very rarely burst.
Sometimes slate has to be cut not only longitudinally, but also across: not always all sheets are completely on the roof. Halves are needed. A problem with this may arise: it is very inconvenient to cut waves across. How to do this quickly and without problems, see the video. It is advisable to moisten the cut line only before work - there will be less dust. If it is dust with asbestos, then it is very harmful to health.
Maintenance and repair of slate roofs
You need to check the condition of the roof twice a year: before the start of the rainy season - in early autumn and after its end - in late spring.
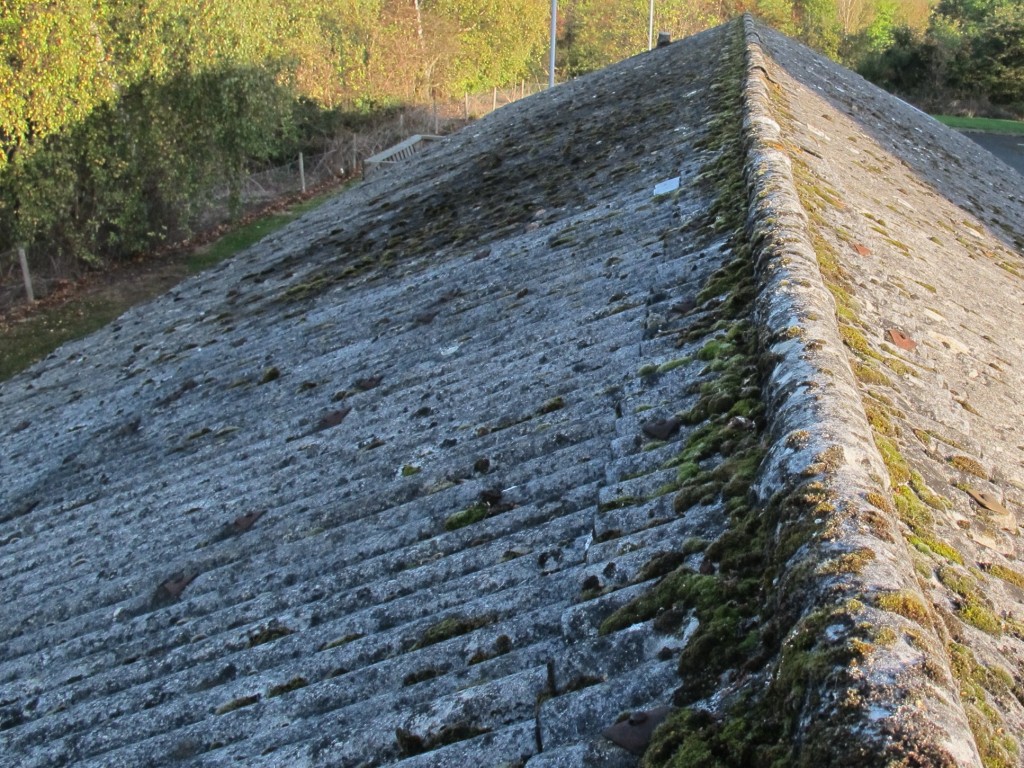
It is necessary to clean off debris, plants and moss. Most actively it is necessary to fight against mosses: they release an acidic liquid, which quickly destroys the slate.
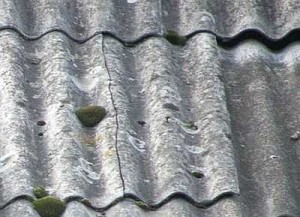
Sometimes the sheets crack or form small holes. They can be repaired with putty. You can cook it yourself. You will need:
- 1 part of cement grade M-300;
- 3 parts of asbestos fibers;
- pVA glue;
- water.
First, asbestos and cement are mixed dry. In a separate bowl, dilute PVA with water in a ratio of 1 * 1.
The area to be repaired is cleaned about dirt, washed with water, then allowed to dry. Then coated with PVA diluted in water. After drying, an aqueous solution of PVA is gradually added to the mixture of cement and asbestos until a pasty consistency is obtained.
This mass is used to cover up the damage. The layer must be at least 2 mm. After the putty dries, the place of repair is painted over. It is better to work with PVA on a cloudy day - on a heated roof, everything is seized instantly, you will not have time to properly level it.
There are two more methods for sealing gaps. With the help of molten tar and with the use of a welded roof. There are no questions about the effectiveness. If done correctly, there will be no leak. There are questions about the appearance: on the light gray roof, black patches are very visible. Unless to glue a piece of slate on top, overlapping the patch in size. In general, see the video for two more ways to repair slate.


