6 901
A hip roof differs from a conventional gable roof by the presence of additional inclined surfaces that partially or completely cover the end parts of the roof.
The varieties of the hip are half-hip, hip, or consisting of many rays sloping roof complex design. The hips themselves are triangular slopes, the presence of which was the reason for such an unusual name.
Let's analyze do-it-yourself hip roof construction features on the classic example.
Hip roof design features
- The basis of the structure, to which the load-bearing elements of the roof are attached, is the ridge beam, located in the center of the roof in the uppermost part of it.
- From the ends of the ridge to the opposite walls at an angle of 90 degrees, 6 central rafters extend, resting on a mauerlat beam laid along the perimeter of the walls.
- Diagonal (hip) rafters connect the corners of the roof with a ridge beam, forming a triangle - a hip. They lean against the wall and the end of the ridge.
- Intermediate rafters form the roof between the center rafters of the longitudinal side of the building. They rely on a ridge bar and a Mauerlat.
- Distinctive features of the construction of a hip roof - this is the presence of short rafters supported by diagonal ones. Due to this technique, triangular roof sections are formed on the roof.
Attention! When erecting a roof, it is necessary to take into account the removal of rafters by 30-50 cm outside the Mauerlat to form a canopy.

Features of marking when building a hip roof with your own hands
The strength characteristics of the roof being erected and its resistance to wind loads largely depend on how accurately it was carried out. Therefore, the work process is performed in a specific sequence.
- Taking the rectangle formed by the Mauerlat as the basis, we divide its end sides in half and draw an axial line on which the ridge bar will be installed.
- We make a measuring bar from the material at hand. And we put on it a mark corresponding to half the width of the rectangle. The second mark will show the amount of roof removal beyond the perimeter of the walls (rafter overhang).
- From the corners along the longitudinal side of the Mauerlat wall trim, place a measuring bar and transfer the mark to the timber. As a result, we get four identical squares at the ends of the building and a rectangle in its central part. This gives us an important element hip roof markings - the length of the ridge bar, equal in size to the width of the formed rectangle.
- On both sides of the building, along the narrow side of the rectangle, we make markings on the Mauerlat for fastening intermediate rafters, spaced from each other at a distance of 800 - 1000 mm. We transfer similar marks to the center line to determine the places where the rafters are attached to the ridge.
Note! If the marking is carried out correctly, then the size of all hip rafters will be equal to each other. The same applies to the central and intermediate rafters.

Installation features rafter system when building a hip roof
- Work begins with the installation of a ridge bar raised to the required height equal to the height of the roof. The ridge rests on vertical struts, additionally connected by a strut for strength.
- Six central rafters of equal length are supported on the ends of the ridge (three on each side). The second end of the rafters rests on the Mauerlat, taking into account the size of the rafter overhang - one rafter is mounted in the center of the end walls and two on the longitudinal side of the building at an angle of 90 degrees to it.
- An important part installation of the rafter system when building a hip roof- installation of diagonal rafters, which are the basis of the formed hip. There are four such rafters and they pass from the end of the ridge beam through the corners formed by the strapping beam of the walls. The support of the hip rafters is carried out on a specially trimmed heel for easy attachment to the ridge and Mauerlat. These rafters are also equipped with an overhang.
- The next step of the work is the installation of intermediate rafters, carried out according to the marking: the rafter is attached to the ridge and the Mauerlat, leaving the lower end freely hanging to form a roof canopy over the wall.
- The result installation of the rafter system of the hip roof is the installation of short rafters. They rest on diagonal rafters and a mauerlat, located parallel to the central rafter in the end part of the roof at a distance of 800 - 1000 mm from each other.
Note! All elements of the rafter system must have the same cross-section. To provide maximum strength it is recommended to use a beam of 150 x 50 mm for the roof being erected.
A hip roof is a structure consisting of four roof slopes: two trapezoidal slopes on the sides and two triangular slopes at the ends of the roof. These slopes are called hips, hence the name of the entire roof. This decision is due to design and architectural taste rather than construction necessity. Hip roofs have long gained popularity in Europe, eventually migrating to us. Any do-it-yourself hip roof, the drawings of which you will find here or in other sources, looks very aesthetically pleasing due to the slopes of all the slopes. This same feature helps to reduce wind resistance from all directions, which means. A roof with hips will become more reliable, and it will last longer without repair.
A hip roof can be built without the help of professionals, even with the most primitive building skills. The only difficulty is that you cannot do this alone, you will need 2-3 assistants.
Roof device with hips
Hip roof scheme. Which is the leader among developers, has four slopes, two of them are triangular. These hips are attached at the ends of the roof of the house to connect the cornice and the ridge beam. The front and rear hips are built in the form of a trapezoid (truncated triangle), they have a larger area and an increased slope. Trapezoidal hips hold the ridge and cornice together on the remaining sides.

Also schemes, and they are called Dutch. Half-hips are when the eaves of the side slopes are higher than the front and rear slopes. The Dutch roof is most often erected when equipping a living room in the attic.
The usual hip roof consists of nodes and elements that are assembled into a single structure in one way, and serve as a frame for more complex structures. In the diagram below, the hip structure consists of the following elements:
- The corner rafter (position no. 1) is always installed at a lower slope than the intermediate rafters. For intermediate and corner rafters on the sides of the roof, use a board measuring 50x 15 cm;
- Short rafter beams (item # 2) are installed on the corner rafters. The angle of inclination must be the same as that of the intermediate rafters;
- The cross-section of the ridge (position No. 3) should be the same as that of the rafters themselves;
- Central intermediate rafters (position No. 4) are attached to the corners of the ridge beam on three sides;
- Intermediate rafters (position # 5) are beams that connect the ridge girder and the strapping boards laid across the top of the roof. The strapping boards form the cornice.

A more detailed diagram of a roof device with hip elements is in the figure below:
- The ridge is supported by a stand (position No. 1), which is attached at the junction of the opposite pair of rafters and the ridge beam. Racks are not always present in the roof scheme, but their counterparts must be present in the scheme;
- Tightening (ceiling beam, position No. 2) - a beam for fastening the rafters together;
- The filly (position No. 3) serves to extend the overhang, the filly beam is attached to the rafters. An overhang is needed to protect the walls of the house from rain and snow;
- The wind beam (position # 4) reinforces the rafters on the windward side of the house. This beam can be installed from several sides;
- Narodnik (short rafter, position number 5) attaches the rafter to the corner rafter;
- Mauerlat (position No. 6) - a powerful wooden beam that serves as the basis for any roof;
- Sprengel (position no. 7) reinforces the roof structure and reduces stress on the walls. Fastened diagonally between the corners of the house on the Mauerlat;
- The braces (item # 8) can be attached to the rafters at different angles. Their number and angle of attachment depend on the presence or absence of an attic;
- Diagonal (side rafters, position No. 9) are installed from one or both ends of the roof;
- The run (position No. 10) is the step of fastening the rafters.

How to mount a hip structure
A roof with hips must be assembled in a specific sequence:
- The first stage is the development of the scheme;
- According to the scheme, the parameters of the roof are calculated - all its dimensions will depend on the width of the dimensions of the external and internal load-bearing walls of the house;
- Tools and materials are being prepared;
- Laying a layer of waterproofing on the walls for the installation of rafters;
- The points of attachment of the rafters on the Mauerlat are marked;
- Installation of rafters and other roof elements according to the scheme;
- Roof decking.

For each project of the house, its own, original scheme of the hip roof is developed. Its complexity depends not only on the architecture of the building, but also on the capabilities of the homeowner. A complex scheme will require additional time and financial costs.

What you need to calculate
- Know the degree of reliability of the foundation and load-bearing walls of the house (strength of building materials);
- What will the rafter system be - layered or hinged;
- Cross-section of rafter legs and timber;
- The slope of the slopes and the step between the girders;
- Dimensions of all structures on the roof - chimney, ventilation, window and attic opening.

In the formulas for calculating the dimensions of hip roof elements, the following generally accepted designations are used:
- S - all rays;
- h is the height of the structure from the ceiling to the ridge beam;
- d - the length of the legs on the sides of the slopes;
- e is the length of the intermediate beams;
- a - step between the beams along the long side;
- α is the slope of each slope;
- b - step between the rafter beams on the end side.

The formulas themselves:
- To determine the height to which the ridge beam should rise: h \u003d b tan α / 2;
- To calculate the length of the frontal intermediate rafter legs: e \u003d b / 2 cos α;
- To calculate the length of the rafters at the ends of the slopes of the hip roof: d \u003d √ h 2 + (√ (b \\ 2) 2) 2 \u003d √ h 2 + b 2/2;
- To calculate the total area of \u200b\u200ball slopes: S \u003d 4 x eb / 2 + 2 (a - b) x e \u003d 2e (b + a - b) \u003d 2ea;

Building materials:
The rafter system according to the hip pattern is built from well-dried and high-quality, defect-free wood. To fasten all elements of the circuit, metal hardware is used - bolted and anchor connections, nails and screws, steel corners and plates, sliding fasteners and staples.
- To create a Mauerlat frame, you will need a beam of 10 x 15 cm;
- For the manufacture of rafters and ridge girders, you will need a bar of 5 x 15 cm;
- For a set of battens, boards of 2.5 x 15 mm are needed.
Parameters of lumber for hip construction - in the table:
| Wood grade | Section of a bar or beam | Step between rafter beams (mm) | |||||
| mm | 300 | 400 | 600 | 300 | 400 | 600 | 1.0 kPa | 1.5 kPa |
| Higher | 38 × 89 | 3,2 | 2,92 | 2,5 | 2,8 | 2,5 | 2,22 |
| 38 × 140 | 5,05 | 4,60 | 4.01 | 4,4 | 4,01 | 3,53 | |
| 38 × 184 | 6,64 | 6,05 | 5.27 | 5,8 | 5,27 | 4,6 | |
| 38 × 235 | 8,5 | 7,72 | 6.73 | 7,4 | 6,73 | 5,9 | |
| 38 × 286 | 10,33 | 9,40 | 8.2 | 9,02 | 8,2 | 7,16 | |
| I and II | 38 × 89 | 3,1 | 2,82 | 2.46 | 2,7 | 2,46 | 2,15 |
| 38 × 140 | 4.9 | 4,4 | 3,9 | 4,3 | 3,9 | 3,4 | |
| 38 × 184 | 6,4 | 5,8 | 5,1 | 5,6 | 5,1 | 4,1 | |
| 38 × 235 | 8,2 | 7,5 | 6,4 | 7,4 | 6,5 | 5,4 | |
| 38 × 286 | 10,01 | 9,01 | 7,4 | 8,75 | 7,74 | 6,26 | |
| III | 38 × 89 | 3,05 | 2,8 | 2,3 | 2,7 | 3,4 | 1,94 |
| 38 × 140 | 4,67 | 4,04 | 3,3 | 3,9 | 3,4 | 2,8 | |
| 38 × 184 | 5,7 | 4,9 | 4,01 | 4,8 | 4,1 | 3,4 | |
| 38 × 235 | 7,01 | 6,01 | 4,9 | 5,9 | 5,1 | 4,1 | |
| 38 × 286 | 8,1 | 7,01 | 6,7 | 6,8 | 5,9 | 4,8 | 2.0 kPa | 2.5 kPa |
| Higher | 38 × 89 | 4,02 | 3,65 | 3,19 | 3,73 | 3,39 | 2,96 |
| 38 × 140 | 5,28 | 4,80 | 4,19 | 4,90 | 4,45 | 3,89 | |
| 38 × 184 | 6,74 | 6,13 | 5,35 | 6,26 | 5,69 | 4,97 | |
| 38 × 235 | 8,21 | 7,46 | 6,52 | 7,62 | 6,92 | 5,9 | |
| 38 × 286 | 2,47 | 2,24 | 1,96 | 3,73 | 2,08 | 1,82 | |
| I and II | 38 × 89 | 3,89 | 3,53 | 3,08 | 4,90 | 3,28 | 2,86 |
| 38 × 140 | 5,11 | 4,64 | 3,89 | 2,29 | 4,31 | 3,52 | |
| 38 × 184 | 6,52 | 5,82 | 4,75 | 3,61 | 5,27 | 4,3 | |
| 38 × 235 | 7,80 | 6,76 | 5,52 | 4,74 | 6,11 | 4,99 | |
| 38 × 286 | 2,43 | 2,11 | 1,72 | 6,06 | 1,91 | 1,56 | |
| III | 38 × 89 | 3,48 | 3,01 | 2,46 | 7,06 | 2,73 | 2,23 |
| 38 × 140 | 4,23 | 3,67 | 2,99 | 2,21 | 3,32 | 2,71 | |
| 38 × 184 | 5,18 | 4,48 | 3,66 | 3,15 | 4,06 | 3,31 | |
| 38 × 235 | 6,01 | 5,20 | 4,25 | 3,83 | 4,71 | 3,84 | |
| 38 × 286 | 6,52 | 5,82 | 4,75 | 4,68 | 5,27 | 4,30 | |

You will also need material for arranging the roof (it is preferable to choose a soft roof), a heat insulator and a vapor barrier film under the sheathing boards. If a soft roof is to be laid, then instead of boards for lathing, it is better to use plywood. All wood should be impregnated with an antiseptic before construction. Some units and individual structural parts will have to be fastened not with bolts or anchors, but with soft steel wire, so you will need to stock up on this material as well.

After processing the lumber and drying them, you can begin to mount the roof - fix the Mauerlat beams on load-bearing walls houses. Mauerlat is laid on the waterproofing, then the points of installation and fastening of the rafter beams are marked on it. Mauerlat beams are laid on the upper surface of the walls or on a beam, which is pre-fixed slightly below the walls.

The racks are attached to the floor beam, in the upper part to the ridge. Also, central rafters are attached to the ridge beam at the ends of the roof. Markings are made for the installation of intermediate beams along the front and rear slopes of the roof, after which the rafters are attached, connecting the corners of the house and the ridge diagonally. It may be necessary to install reinforcing racks in this place.

On these rafters, short rafter beams or rafters are attached with the same pitch as the intermediate beams. In this roof fragment, trusses, a wind beam, filly and struts can be used for reinforcement (depending on the roof scheme).
The roof is laid in the following sequence:
- A vapor barrier is attached to the rafters;
- A crate is attached to the vapor barrier;
- Insulation is placed in the space between the laths and covered with a film from the wind;
- The counter grill is attached.
Hip roof drawings updated: April 1, 2017 by the author: kranch0
The main thing is to understand that in the hip rafter system and the erection of its structures, the main thing is correct calculation and accurate marking.
That is, as always, the whole thing rests on the same principle, which is the main one for a good builder: Measure seven times, but only cut one off.
Types and types of roof structures
To begin with, let's figure out the shapes of roofs, their structure and the most common structures, so that you can understand the conversation about the hip roof more clearly. Actually, you yourself will quickly figure it out if you look at this schematic drawing with designations (you can enlarge).
What are the roofs - structures, shapes and device
In the photo in numbers:
DOUBLE ROOF SCHEME
- Braces
- Tightening
- Inclined rafter leg
- Mauerlat
- Overlapping the top floor
- Filly
BROKEN ROOF SCHEME
- Truss upper chord rafters
- Tightening the upper belt
- Rack
- Bottom chord beam
Types of pitched roofs:
a - shed; b - gable; c - broken line (attic); g - hip; d - multi-pliers
Measure from the bottom.
In accordance with the proposed method, all measurements should be taken along the lower edge of the rafters. I will not dwell on how I came to this conclusion. It's just that after I began to measure in this way, and not along some theoretical middle line, everything fell into place. Making a markup along the lower edge of the rafters, I measure exactly to the very point from which you need to cut. At the same time, the number of working stages is reduced, which means that the likelihood that gross mistakes will be made decreases.
Another advantage of the proposed technique is that you do not have to think about how much to lower the corner rafters, since it is supposed to use lumber of the same section for the entire supporting structure.
For example, for the roofs considered in this article, I cut out both corner (short) and intermediate rafters from a board with a section of 50 × 150 mm. Due to this, the upper ribs of the short rafters were slightly higher than the corner rafter, and, as a result, a gap formed between the latter and the roof deck, allowing air to seep up to the ventilation opening in the roof ridge.
The calculations are not difficult to carry out, since the location of each rafter can be depicted using right-angled triangles, and therefore calculated using the Pythagorean theorem.
In this article, the entire technology is shown on the example of a small rectangular building. Since its roof is small in size and the entire frame is erected from sawn timber with a section of 50 × 150 mm, there is no need to make adjustments for more powerful ridge beams and corner rafters.
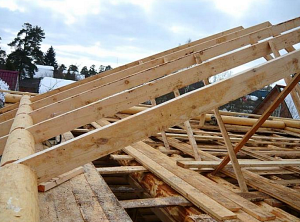
Photo 1: The structure of the hip hip roof

The corner rafter always has a shallower slope than the intermediate rafters. For a given roof with a slope of 6:12, the slope of the corner rafter is 6:17. All rafters mounted on this building (including corner ones) are cut from boards with a section of 50x 150 mm.
The short rafters do not fit to the ridge beam, but to the corner rafter, and have the same slope as the intermediate rafters.
The ridge beam for this building is cut from the same lumber as the rafters.
Central intermediate rafters. At the ends of the ridge beam, three intermediate rafters are joined, which are called central intermediate rafters.
Intermediate rafters. These rafters are supported by the top rail and the ridge beam.
Measured staff and table of coefficients.
The first thing I do is get acquainted with the design and figure out how the elements will be connected to each other. Then I make a measuring rail from a strip of plywood 50 mm wide. I put it on the upper trim of the end wall and mark the location (horizontal projection) of the intermediate rafter, the wall thickness (for undercutting the supporting part) and the overhang of the roof (Fig. 1).
Drawing. 1. Marking of the central intermediate rafters.

The diagram shows that the central intermediate rafters and walls form squares (painted pink) at the corners of the building.
The corner rafter divides each square diagonally, forming two right-angled triangles.
Intermediate rafters.
These rafters are supported by the top rail and the ridge beam.
It is very convenient to use a measuring stick, since all the required measurements can be taken immediately on it, without wasting time running back and forth.
Another help in my work is a table of coefficients, which presents the relationship between the length and position of the rafters for different slopes of the roof slope (Fig. 2). In one of its columns, the coefficients for the intermediate ones are presented, and in the other - for the corner rafter legs. To get the length of the rafter, it is enough to multiply the laying by the coefficient. I always keep this table in my notebook.
Coefficient table for calculation |
||
Roof slope | Coefficient for intermediate rafters | Coefficient for corner rafters |
| 3:12 | 1,031 | 1,016 |
| 4:12 | 1,054 | 1,027 |
| 5:12 | 1,083 | 1,043 |
| 6:12 | 1,118 | 1,061 |
| 7:12 | 1,158 | 1.082 |
| 8:12 | 1,202 | 1,106 |
| 9:12 | 1,25 | 1,131 |
| 10:12 | 1,302 | 1,161 |
| 11:12 | 1,357 | 1,192 |
| 12:12 | 1,414 | 1,225 |
If you have to build a roof frame, the data on which are not in the table (for non-standard slopes of the slopes), then in this case you can turn to the Pythagorean theorem.

Drawing. 2. Determination of the length of the intermediate rafter.
There are many ways to find the length of the rafter. However, in all cases, you need to take the laying (horizontal projection) of the rafter and convert it to length. This is done using the Pythagorean theorem. You can also use the odds table. In this case, you should know the location and slope of the roof slope.
1. Measure the position of the intermediate rafter using a measuring stick. Find in the table the coefficient that corresponds to the slope of the roof slope. To obtain the length of the rafter, multiply the laying by this factor.
If the slope of the roof slope is between the values \u200b\u200bthat are in the table (for example, 6.5: 12), then it is better to use the Pythagorean theorem. Read off the position value from the measuring stick. Multiply this number by the decimal slope of the roof slope (for example, 6.5: 12 \u003d 0.54) to get the slope. To determine the length of the rafter, use the Pythagorean theorem: a 2 + b 2 \u003d c 2, where a is the rise (vertical projection); b - location (horizontal projection); c-length.
2. Measure the length of the rafter along the bottom rib. In accordance with this technique, the length of the rafter is the distance from the undercut for the ridge beam to the undercut for the supporting part.
3. To obtain the length of the rafter overhang, multiply its position (horizontal projection) by a factor.
Take a look at the plan view of the roof.
When marking corner rafters, the 3D image is not as clear as the 2D drawing. If you look at the plan view of the roof, you can see that the location of the corner rafter is the hypotenuse of an isosceles right-angled triangle (Fig. 3).
Figure: 3. Determination of the length of the corner rafter.

The corner rafter differs from the intermediate one in that it has a shallower slope, a double bevel undercut for a ridge bar, a longer foundation and, as a rule, a longer undercut for the support part. You can determine the length of the corner rafter by multiplying its position by the coefficient (from the coefficient table above), or calculated using the Pythagorean theorem.
1. Determine the position of the corner rafter on the top harness. At point A, the marking line of the corner rafter intersects the inner contour of the upper trim. Measure the distance to the nearest center intermediate rafter. Calculate the placement of the corner rafter using the Pythagorean theorem.
2.Calculate the length of the corner rafter by multiplying its position by a factor (from the table of factors).
3. You can calculate the overhang of the corner rafter in two steps. First, a right-angled triangle is solved, the hypotenuse and leg of which are the horizontal projections of the overhang of the corner and intermediate rafters, respectively. Then, using the table of coefficients (or the Pythagorean theorem), calculate the length of the overhang of the corner rafter.
The marking of the corner rafter on the upper strapping can be done as follows.
Determine the starting point (A) where the scout line meets the inner edge of the top rail, and then measure the distance from that point to the scout line of the nearest center intermediate rafter. This measurement allows you to calculate the laying, and then the length of the corner rafter.
After you get the length of the corner rafter, mentally return to the 3D image.
The calculated rafter length is a line segment drawn along the bottom edge of the board from the double bevel top undercut to the bottom undercut for the supporting part. Thus, it remains to draw cuts from the obtained points, execute them, and the rafter is ready.
To simplify the marking and maintain equal center-to-center distances, it is advisable to precisely transfer the marking from the side walls to the end walls.
A measuring stick should also be used here.
This will allow each pair of short rafters to dock at the same point on the corner rafter.
If you look at the diagram of the supporting structure of the roof in plan, it is easy to make sure that the distance from the undercut for the supporting part of the corner rafter I (point A) to the marking line of the short rafter is the laying of the short rafter.
Figure: 4. Determination of the length of the short rafter.

1. Mark short rafters on the top rail. It is advisable to mount them in alignment with the side wall posts, and not to make new markings. Determine the placement of the short rafter by measuring from point A to the marking line of the short rafter.
2. To obtain the length of the short rafter (from double bevel to undercut for the support piece), multiply the placement of the short rafter by the factor for the intermediate rafter. The overhang of the short rafter is trimmed in the same way as the overhang of the intermediate rafters.
After you have completed the markup, you can start trimming the rafters. For ease of use, make a template from a piece of plywood that has a factory-made right angle. For example, for a 6:12 ramp slope, mark 12 inches (300 mm) on one side (rise) and 24 inches (600 mm) on the other (lay). Connect these marks and get a triangle. After trimming the plywood, attach a 25 × 50 mm block to the long side of the triangle. After completing the production of the template, write down the coefficient on it in red.
Drawing. 5. Use the template to mark and trim the rafters.

For reference, a few tips for installing a hip rafter structure:
- To keep errors to a minimum, use a measuring stick rather than a tape measure.
- Mark the center line on the top trim of the end wall. Then measure half the thickness of the ridge bar and mark the line for the first of the center intermediate rafters.
- Align the end of the measuring stick with the placement line of the center intermediate rafter you just marked out. On the other end of the measuring stick, draw the line of the inner contour of the side wall. This is the laying of the intermediate rafter. Then transfer the line of the outer contour of this wall and the roof overhang to the batten. Later, this will be needed to calculate the length of the rafter overhang.
- To determine the placement of the second of the central intermediate rafters, move the measuring rod to the side wall and transfer the rafter placement to it from the inner corner of the top rail.
- Repeat these steps in the remaining corners. By doing this, you will find the location of the ends of the ridge bar and all the center intermediate rafters.
- How to make a roof hatch ...
- We apologize to you ...
- You have repeatedly requested such requests ...
- How to make a canopy over the porch If ...
It is difficult to imagine a house without walls, but it is simply impossible to imagine it without a roof. The roof protects indoor spaces from cold, rain and snow, thanks to her, the dwelling acquires an attractive, complete look. Not the least among the variety of options is the hip roof, the robust construction of which guarantees long operation and safety.
Designers make full use of all the possibilities of the hip roof, using it in, bay windows, dormer windows, balconies. Modern roofing materials make it possible to harmoniously fit it into any architectural style. The hip roof looks great on a small gazebo, garden house or a presentable cottage. And what it consists of and how to build it, we will tell you in our article.
Appearance
The hip roof belongs to the hip roof, as it is formed by the articulation of four slopes. Unlike gable varieties with gables, she does not have them, hips are located in this place. Hip ramps, also called end slopes, are formed by special elements of the rafter system - slant rafter legs and have a triangular shape. The other two slopes in the form of a trapezoid are called facade.
The structure of the hip roof consists of the following components:

The design consists of such a geometric figure as a triangle, which has the greatest rigidity and reliability.
Design advantages
Architects and designers actively use the hip roof construction, as it has the following advantages:
- Beveled hip slopes improve the aerodynamic properties of the roof, reducing the sailing effect. Therefore, it can be used even in areas with extremely strong wind gusts.
- A wide range of slope angles allows you to choose the one suitable for the climatic zone of the construction. Steeper slopes are used where there is a high snow load and a large amount of precipitation. Gentle slopes are recommended in windy areas, where there is a possibility of the roof being torn off by strong enough gusts.
- Hip roofs make it possible to use the under-roof space as a living space due to sufficiently high ceilings.
- Affordable, inexpensive materials make the construction price suitable for even more than a modest budget.
- The design of the hip roof is quite simple to install, therefore it is suitable for DIY construction. Moreover, even inexperienced performers can cope with this work, with the help of a competent consultant.
- The hip-type roof looks really stylish and presentable. Therefore, there is no better option for country cottages and for high-tech town houses.


Cons of construction
Despite the above advantages, this type of roof has some features that must be considered before starting construction:
- The absence of gables does not allow organizing vertical lighting, since there is no possibility to install ordinary windows. Instead of them, attic ones are installed, which are more expensive and difficult to install.
- The increase in the angles of inclination of the hip roof slopes increases the consumption of building material, which makes construction more costly.
- The complexity of the structure of the rafter system makes you turn to professional design firms, whose services are not cheap.
- The design, consisting of many elements, has a significant weight, which only a reliable one can withstand, capital foundation, the device of which is expensive.
As you have noticed, the disadvantages of a hip roof mostly relate to financial side question. Therefore, it is important to draw up a project and estimate in order to plan and control costs.


Types of hip roofs
The hip roof has many variations that distinguish the appearance and internal structure:


Calculation of structural elements
The device of hip roofs begins with calculations and creating a project. Fortunately, this task is facilitated by computers with special software that independently perform calculations and even draw up a drawing. The program calculates the following parameters:


If the slope angle of the slopes exceeds 60 degrees, then the value of the snow load can be neglected in the calculations, since a hip roof with such a steep slope does not accumulate snow on the surface, allowing it to slide off on its own.
Roof system device
The hip roof rests on a rafter system, a set of elements that distribute its weight and maintain its shape. It includes:


Slant rafter legs are more stressed than ordinary ones and, as a rule, exceed them in length. Therefore, for their manufacture, two boards are spliced, used for ordinary rafters, or lumber is purchased twice as thick. By the way, the size of some elements of the rafter system exceeds 6 meters, the standard length of boards and beams. Therefore, it is necessary to use inlaid rafters obtained by joining two or more parts, or glued.
Materials used
The hip roof is good in that the simplest, generally available materials are used for its construction. It simplifies assembly work and does not go broke on construction. For the manufacture of the rafter system, use:

Despite the disadvantages, wood is a more popular material. Since using correct handling it can be made practically invulnerable to external influences. It is enough just to treat the wooden elements with an antiseptic composition and a fire retardant to protect against fire.
Competently calculated and built in accordance with building codes, a hip-type roof will protect the inhabitants of the house from bad weather, maintain a comfortable temperature regime and decorate its appearance.
Video instruction
Hip roof - one of the most difficult and most durable roofs. It is a four-slope design with two triangular and two trapezoidal slopes. Its other name is Dutch.
There is also a version of this type of roof - half-hip. Its distinctive feature is the presence of truncated triangular slopes. They are located above the trapezoidal ones.
The device of the hip roof is much more difficult than the device of the gable, however, its functional qualities are much higher. In addition, the exterior of the building with a four-pitched roof looks very attractive.
Types of hip roofs
The small slopes located on the roof ends are called hips. Depending on the shape of the hip, structures of this type are divided into several types.
Why do professionals love to work with soft roof katepal in the informational material on our.
Half hip roof... Its distinctive feature is that the hips do not cover the entire pediment, but only part of it. Therefore, they are small in size.
Half hip mansard roof is a construction of a mansard roof with a broken slope. Its creation is appropriate in cases where it is not possible to inscribe the area of \u200b\u200bthe required room in a triangular shape. A roof of this type allows you to get a free area quite big size for use in a wide variety of purposes.
Among the shortcomings of half-hip-type structures, one can name the consumption of a large amount of material, since to cover the roof sections adjacent to the sloping ribs, the material must be cut along an oblique line.
When using large sheet material, cut gussets should be used to cover opposite roof slopes.
A broken roof is the most difficult for self-erection. Stingrays can be of different shapes and sizes. Both their preliminary calculation and implementation in practice are not easy.
Hipped roof... Its peculiarity is that the base of this type of roof must be square. The design consists of four slopes in the form of equilateral triangles, the vertices of which converge at a single center. When installing a hipped roof, the principle of symmetry must be strictly observed. In shape, the structure resembles a tent, which is where its name comes from.
There is also a Danish hip roof, which is a kind of four-slope structure with gables located in the upper part of the shortened slopes. Vertical windows can be built into the Danish type roof.
Advantages of a hip-type roof
This design has several advantages.
- Correctly designed and erected hip roof has a high level of resistance to air flows as a result of the absence of vertically located end walls (tongues or gables). It perfectly withstands strong gusts of wind and is minimally exposed to the risk of roof collapse in places of eaves overhangs.
- The hip roof is a rigid structure that is not subject to deformation, which is achieved due to the corner ribs converging to the support ridge beam.
- The four-pitched roof makes it possible to create large overhangs on all sides of the building. They protect the house from precipitation.
- The roof of this type of house with an attic makes the building visually lower, which is very important if it is necessary to integrate it into an already erected one-story building without disturbing the harmonious appearance and nature of the existing structure.
- The hip roof has an aesthetically pleasing appearance.
disadvantages
- The biggest disadvantage of this type of roof is the complexity of its construction and the high cost of materials that will need to be purchased much more than, for example, when installing gable roofand ongoing work.
- Another drawback: slopes take away some of the under-roof space, which is important if an attic is planned.
Roof markings
 Typically, the rafter system is assembled from identical rafter legs resting on a ridge beam. But for a hip roof, this option is not suitable: the lengths of its rafters are different, since the side slopes are smaller and rest on diagonally located structural elements.
Before starting work, you need to prepare necessary materials and make the markup of the main nodes.
These include:
- Skate. This element is a bar necessary for fastening other wooden parts... It should be located exactly in the center. Since the ends of all rafters will rest in the ridge beam, it must be very strong;
- Corner rafters, which are also called overhead rafters. They are fixed to the ridge beam, and the other end of the rafter should go beyond the boundaries of the building. As a rule, in the manufacture of these rafters, they use the same timber as for the ridge;
- The central rafters rest on the Mauerlat and the ridge and form the side slopes of the roof. On the hips, one rafter of this type is used or no rafters are used at all;
- The intermediate rafters are attached to the ridge. They walk down the slopes;
- Short rafters come in different lengths, depending on the location. They rely on the Mauerlat and corner rafters.
Before marking, it is necessary to make accurate calculations, on the basis of which a drawing of the future structure is created. First, the center line is marked, which runs along the top of the walls. Then the thickness of the ridge bar is calculated and the exact location of the parts of the rafter system in relation to each other is noted.
When creating a rafter system from identical planks (for example, 15x5 cm), the resulting structure has a small air gap between the rafters and roofing material... It is obtained as a result of a higher arrangement of the upper parts of the rafter elements in relation to the corner ones.
Hip roof installation
 The top trim of the roof is made of a bar (photo on the right), the thickness of which should be half the thickness of the ridge bar. Then the gauge rod is applied with one end to the pre-marked line, while the other end is located along the side wall, and this allows you to get a place for installing an intermediate rafter.
The length of the rafter overhang is calculated very simply. First, the rail is installed so that one of its ends is located on the outer contour of the wall. The other end is located at the resulting overhang.
Then the measuring rod is transferred to the side wall, on which the rafters are also marked. Similar actions are performed at all other corners to obtain the locations of the central rafters and the ends of the ridge.
After determining the location points of all roofing elements in the horizontal section of this structure, the calculation will not be difficult. In this case, it is necessary to use the Pythagorean theorem, which is applied to right-angled triangles formed by the rafters and the normal from the point of their attachment to the floor of the attic room - in other words, the height above the mauerlat.
Measuring rod application
Measuring rod - a home-made measuring device necessary when installing a hip roof. It can be made from thin plywood or planks no more than 5 cm thick.
Since the rail should be quite long, a thick workpiece is not suitable for its manufacture, since in this case the weight of the tool will be significant and it will become inconvenient to work with the rail.
The width of the device should be sufficient so that you can see the markings on it from a great distance.
In the course of work, all measurements measured for the installation of roofing parts are applied to the rail, and therefore the tape measure will be needed only a few times. Identical distances are further laid down with the help of a rail. There is a ready-made table of ratios for the ratio of the length of the rafters and their location, which should be followed when performing such work.
Leg length roof truss should be equal to the product of a specific coefficient and the projection of the leg. With knowledge of this formula, all operations are performed much faster.
As an example, you can use the following calculations:
- to begin with, measure the value of the horizontal projection of the rafter, after which the required angle of inclination of the structural part is selected from the table, which is multiplied by the value obtained during the measurement;
- after that, the length of the rafter is calculated from the sample at the attachment point to the sample on the ridge;
- then calculate the length of the overhang, which is equal to the product of the projection (horizontal) of this element by the correction factor.
You can also use the Pythagorean theorem: in it, the lengths of the legs are horizontal and vertical projections.
Mounting elements (photo)

After the completion of the previous stage, it is necessary to start marking the position of the corner attachment elements and intermediate rafters.
On one side, the rafters have an oblique cut, which allows them to be securely fixed to the ridge. The beam also has a double undercut, which is intended for the installation of corner elements.
The calculation of the slant rafter is carried out in two stages. First, the length of the part is measured from the corner of the building, after which, using the Pythagorean theorem, the required value is obtained, which should be multiplied by the correction factor.
Specificity of the device of the hip roof
In the process of creating a hip roof, it must be borne in mind that layered rafters and a ridge should be made from the same board or timber. They must have the same cross-section, since the difference in cross-section will complicate the design.
When choosing the thickness of the remaining rafters, you also need to consider this moment... Otherwise, the risk of skewing increases. load-bearing structures in the future, which means that even in excellent condition roofing cake there will be a need for major repairs.
Short rafters are attached not to the ridge beam, but to the nesting ones. This also distinguishes hip roofs from conventional ones.
It is necessary to observe certain angles of inclination of all parts. For inclined rafters of the hip roof model, this indicator is the same as for other types of roofs. The difference is that the hip roof cannot be low.
When erecting a low hip roof, additional supporting elementswhose function is to support heavy structural parts. In all likelihood, you will need to use additional materials. In addition, the volume of work will increase.
The next important point is the need to use exclusively dry wood. conifers trees when creating the base of the hip roof.
To increase the lifespan of the roof, the material must be treated with antipyretics and antibiotics. The first ones protect the structure from fire (under its influence the material only charred, but does not burn), the second ones - from decay, mold growth, microorganisms.
Installation of the rafter system
 The most common is the type of hip roof with 4 slopes, two of which are trapezoidal, and the other two are triangles.
The first stage in the construction of a roof is the installation of roof trusses.
Diagonal rafters and a ridge are made from the board from which the rest are made, but they must be paired. The reason for the use of paired rafters is that these elements are significantly more stressed than conventional rafters, for which reinforcement is required.
The use of one material in the manufacture of all parts greatly simplifies installation work.
Under the long rafter legs, a support representing a brace or a rack made of timber is installed.
It is also possible to use double paired planks resting directly on the floor layer. A wooden lining must be installed under such a rack, and also do not forget about a layer of waterproofing material.
The brace is installed at an angle of 45-55 degrees.
One part of the brace rests against the bed, and the second holds the rafter structure.
We must remember the need to support the rafter in the place where the maximum load is concentrated.
Fastening the rafters
In most cases, the connection of structural elements is made using nails, bolts, pins, special linings. Their exact number and location must be carefully calculated, otherwise the structure will not have a sufficient level of strength and may collapse under the pressure of a heavy snow cover or from a strong wind load.
The rafters are attached to the Mauerlat using a support bar or a special cut that holds the element in place.
Mauerlat mount
 Firmly and correctly fixed rafters will guarantee the durability of the roof only if the Mauerlat is properly fixed.
Mauerlat is a timber beam, the function of which is to evenly distribute the load created by the roof over the upper sector of the walls of the building and prevent the destructive action of the spacer forces created by the rafters.
The type of Mauerlat is determined by the type of building.
When wooden frame this role is played by the upper crown. In other cases, the Mauerlat is a bar with a section of 100x150, 150x150. It can also be connected boards 50x150 in size.
Before installing this element, it is necessary to lay waterproofing. Roofing material can be used as a material, which is laid in several layers.
Another important point is the solid mount for the Mauerlat. It can be achieved in several ways.
- A few rows before the installation site of the Mauerlat, wooden blocks are mounted in the masonry. Their number is determined by the perimeter of the roof and the potential load that the Mauerlat will have to withstand. These parts are connected to the base - a bar - with staples and form a strong fastener.
- At the last stage of the erection of the walls, studs are mounted into the masonry, the diameter of which should be up to 15 mm. They act as Mauerlat retainers. A distance of 1.5 m should be maintained between the studs. The depth of their laying is equal to several rows of masonry.
- You can also install steel wire into the wall. Its ends are further tied around the Mauerlat. The number of these tabs should correspond to the number of rafter legs.
- In buildings made of foam concrete or gas silicate blocks the best choice is the construction of a reinforced concrete armored belt. During its installation, threaded studs are also installed.
CONCLUSIONS
- Hip roof is one of the most complex and durable structures.
- There are several types of hip roofs: hip hip, half hip, hip roof, broken, Danish.
- The main advantage of a hip roof is a high level of resistance to wind and snow loads.
- Among the disadvantages, it should be noted the complexity of the construction and the high cost.
- Before starting work, you need to make calculations and markup.
- When installing, you must have a measuring rod.
- The rafter system of the hip roof has its own characteristics.
- The rafters must be firmly attached to the Mauerlat.
- Correct fastening of rafters and Mauerlat is a guarantee of the durability of the hip roof.
You can see how a hip roof looks like in the video.


