To carry out the laying brick oven with your own hands, you should know how to properly order a brick oven, which brick and mortar to choose for this, as well as what mistakes should not be made. Next, we will try to consider the technology of laying a brick oven in as much detail as possible, and if you do not dare to carry out this event on your own, the knowledge gained will allow you to follow how correctly the hired stove-maker does it!
- Article
- Video
Materials and tools for laying a stove
We draw your attention to the fact that there are many different schemes brickwork, so if you first decided to lay a brick, we recommend that you choose a simpler drawing. This will not change the efficiency of the sauna stove too much, but for that the probability of successful creation of the stove will be higher!
So, for laying a brick oven with your own hands, you will need the following materials:
- Fireclay brick (for laying the firebox)
- Red refractory brick either (for laying a stove and chimney)
- Clay and coarse sand (to create mortar)
- Furnace casting (fireplace grate, ashtray and furnace door, views, chimney cleaning wells, cast iron stove, grate, etc.)
- Asbestos cord
- Water heating tank
- Galvanized wire
- Steel corner
- Waterproofing material (roofing material)
- Steel tape
From the above materials, you can make a simple brick stove for a bath, but in order to make a more functional unit, you will need additional elementsindicated in the drawing.
DIY tools for laying a brick oven:
- Grinder with a circle for metal and a diamond wheel (in order to cut a brick)
- Electric drill with mixer attachment
- Solution container (10 liter bucket is best)
- Master OK
- Building level
- Plumb line
- Wooden mallet
- Roulette and marker
These are the most important DIY tools for laying a stove, but the list can be even larger depending on the complexity of the project.
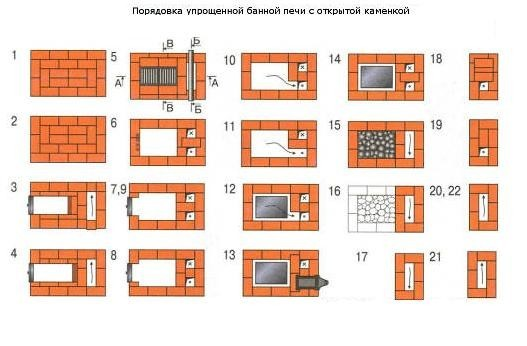
Drawings, projects and diagrams of laying a brick oven for a bath
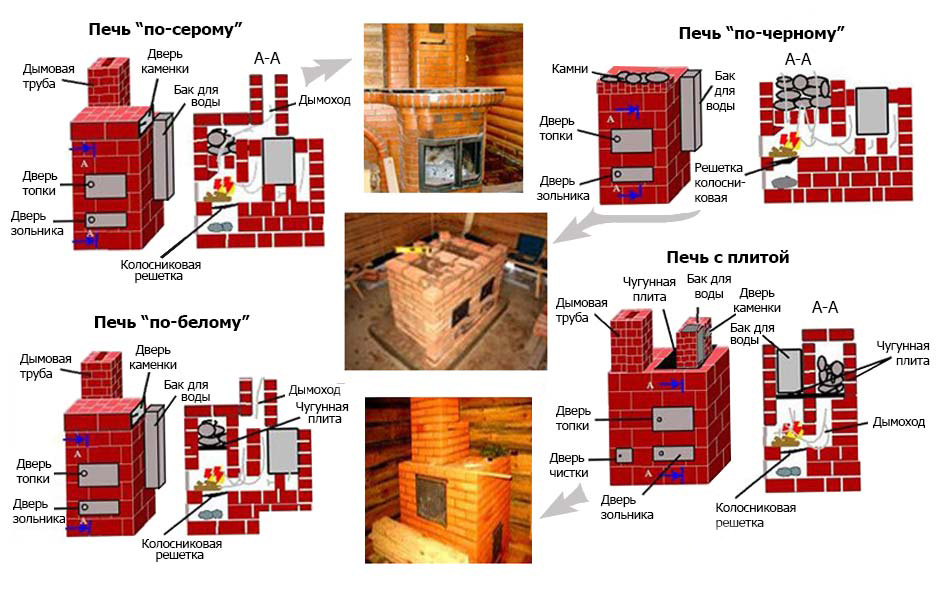
We present to your attention the most popular schemes for laying brick sauna stove:
Having familiarized ourselves with the schemes of laying a brick oven, as well as the sequence and features of the ordering, we proceed to the main process!
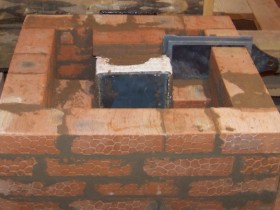
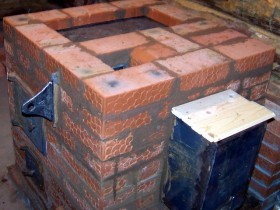
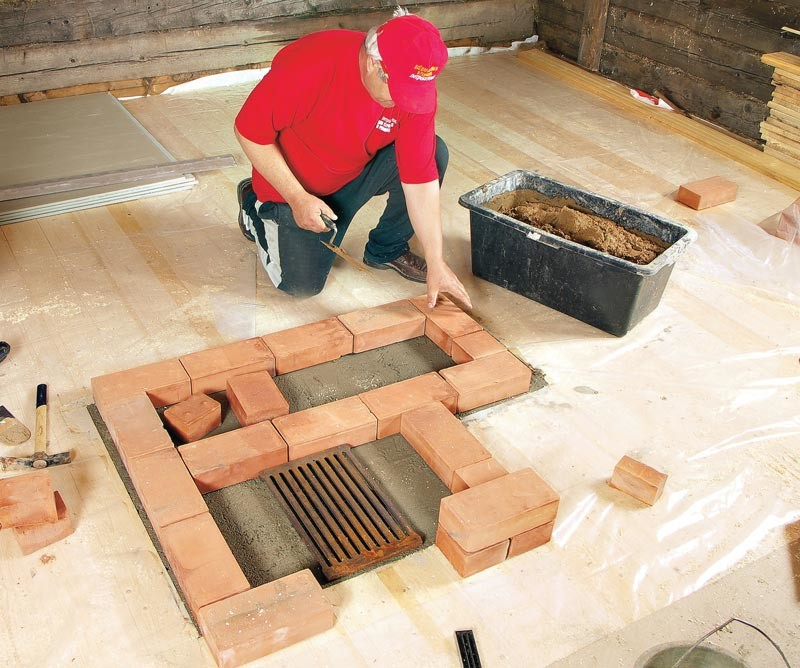
Photo master class in laying a brick oven
The technology of laying a brick stove is very difficult to explain in words, so we bring to your attention the process of laying a brick bath stove based on the so-called photo steps:


Tips for self-laying a brick oven for a bath
Many novice stove-makers make seemingly simple mistakes regarding the laying of a brick oven. The result of these errors is the destruction of the stove, the smoke of the entire bath room and, worst of all, the outbreak of a fire!
So, when laying a brick oven for your own hands, use the following guidelines:

That's all we wanted to tell you about how to properly lay a brick oven for a bath with your own hands! We hope that from this article you have learned a lot of new things for yourself and self-laying of the stove will become an easier event for you!
The laying of the sauna stove must be done on a separate foundation, taking into account special technical requirements.
The design of the stoves differs from the buildings of home brick stoves used for heating a room in cold weather and cooking.
The bath brick oven can be operated at any time of the year, regardless of weather conditions.
Its purpose is to uniformly heat the bath space and maintain a special indoor climate.
Correctly executed ordering of the stove allows the stove to function according to a well-thought-out scheme - first the stove itself warms up, then the stones and subsequently the sauna steam room.
Information and video materials of this article will allow you to choose the right building material and fold the stove for a sauna with your own hands.
Today, among the masters of the bath business, several technologies for laying ovens for a bath are known.
Some types of stoves are more common, others are practically forgotten, as they are not entirely comfortable to use.
If desired, you can fold any of the following designs with your own hands: white, gray, black, with a stove.
With and without a smoker, with a tank located above the stove or a water tank placed at the bottom of the stove.
The main thing is to choose the most suitable option for your needs.
The stove for heating the sauna "white" absolutely does not throw soot into the room, which is why more than all other types of stoves for the sauna comply with environmental standards.
The stones are heated by means of an iron part arranged in the structure. That is why it takes more than 12 hours to warm up the room.
But such a long warm-up period justifies itself by a long period of heat retention.
The "gray" masonry of the stove is erected with a straight chimney, due to which the direct flow is considered the most economical.
The "gray" construction of the steam room of the bath heats up in a short time, but in order to take advantage of its purpose, you have to wait for the complete combustion of the fuel, since soot settles on the stones.
The laying of the "black" stove is done without a chimney. It was this design that was widespread in Russian villages, and today, as it turns out, this masonry technology has not been forgotten.
The only disadvantage of using a sauna stove is that it is necessary to wait until the fuel burns out, but it is blocked by the receipt of a plus - aromatic high-quality steam.
The masonry of the stove with a stove is a structure equipped with a fireplace and a tank, which are mounted on cast-iron ceilings and are heated due to them.
The tank is surrounded by a brick casing with their own hands, which allows you to maintain the desired water temperature for a long time.
More information about the methods of laying stoves for a bath in the video material in the article.
How to choose the right brick for your heater?
For laying a sauna stove, it is better to purchase expensive high-quality materials, but if the budget does not allow, you can build a stove from inexpensive red brick.
The main thing is to choose products with the correct geometric shape, without any deformations.
When buying bricks from the category of low-budget material, you need to take into account that some products may have dimensions slightly different from the standard.
As a result, when laying a stove for a bath, the joints will differ up to 10 mm.
This masonry technology is allowed for the construction of walls of buildings, but not for the construction of a heater.
The negative point will not be in appearance, but in the release of heat to the outside, which is unacceptable for sauna stoves.

A well-made brick product, with a slight tap with a hammer on its surface, should emit a sonorous sound.
If, upon impact, a dull sound is heard, then the product was burned without observing the technology.
Production and testing of masonry mixture for viscosity
This approach will allow you to get the same coefficient thermal expansion seams and bricks, due to which the life of the bath stove will be increased.
At the same time, do not forget about the rules for laying a stove for a bath: you can fold a high-quality stove with your own hands if the seams of the brick structure are made as thin as possible.
The most suitable joint thickness is 5 mm, if possible, the mortar can be applied even thinner.
The solution should be made using washed river sand; even traces of silt are unacceptable in this component of the mixture.
In this case, a sand fraction from 1 mm to 1.5 mm can be used.
It is not difficult to prepare the solution yourself, the main thing is to follow the technology below.
In addition, to strengthen your knowledge on this topic, you can watch a useful video material.
Preparation of the masonry mixture and methods for checking its quality:
- The clay is placed in a prepared container, crushed with your own hands and a little water is added. After thoroughly mixing the soaked clay, add more water, mix again. The output should be a homogeneous mass without lumps with the consistency of thick sour cream. In this state, it is left to stand for a day;
- After the specified time has elapsed, the water rises above the clay level, after which the excess water is drained. The not yet fully prepared solution is rubbed through a sieve to finally remove lumps;
- As soon as the clay mass at the expense of water acquires the necessary uniformity, sand is added to it with your own hands. Its amount is determined based on the fat content of the clay mass.
The quality of the prepared mixture is determined in two ways:
- A ball is formed from the mortar composition with their own hands, with a diameter of about 50 mm. Then they put it on a wooden plank, press the sample from above with another plank, press it until cracks begin to form on the splashed product. If the ball crumbles before cracking appears, then the solution has poor viscosity. If cracks began to form on a third of the diameter of the product, then the solution can be considered normal. Cracks that appear in the middle of the product indicate the need to add a little more sand to the mixture;
- With their own hands, they make two round samples of 50 mm in diameter. A cake is made from one ball, the products are left to dry in the shade for 2 days. If during this time cracks appear on the samples, then it is necessary to add more sand to the mixture, since the clay is oily. If the ball is dropped onto a wooden board, and after that it remains intact, it means that the solution turned out to be good.
Features of the masonry oven for the bath
To fold a full-fledged stove for a bath, a foundation with waterproofing is first made for it. Installation of the base is carried out below the flooring, using a cement mixture.
At the level of the floor surface, at the location of the oven door, an iron sheet is arranged.
First, each row of brickwork must be folded without using mortar, in order to select bricks with the same parameters and determine the thickness of the future seam.
At the same time, do not forget that each row of masonry must be started with a corner brick.
Then you need to collect water in any container, and immediately before laying the brick, lower the brick into it for a couple of seconds.
The presence of water is necessary so that the drying process of the erected structure takes place evenly, and the dry brick cannot pick up moisture from the solution.
For each row of brickwork, its own scheme is developed, it is also called ordering. The different ordering of the sauna stove in its own way affects the ability of the brickwork to give off heat.
Any ordering scheme proposed below will be able to provide a different appearance and size of the oven for the bath.
The orderly laying of a sauna stove can be carried out as follows:
- Using a trowel, a certain amount of clay mixture is laid out and leveled over working area - in the place of laying the first row of brick blocks. The blocks are alternately removed from the water (soaked for no more than 20 seconds), then set on the solution;
- During laying, the brick is compacted with a trowel, making sure that the thickness of the mortar joint does not exceed 5 mm. Excess clay mixture is removed with a trowel;
- After laying the first brick, the end of the next one is treated with a solution and attached to the end of the first, already laid. Thus, using a clay composition and applying the stage of compaction of products with a trowel, the first row is laid. All subsequent rows of oven masonry are laid according to the same principle;
- When the first 3-4 rows of blocks are laid, the resulting facade is wiped with a damp cloth in order to improve the visual perception of the order and it is easier to control the subsequent process of ordering;
- The next row of blocks is laid in the same way as the first one. In this case, the vertical alignment of the seams must not be allowed. Vertical seams of one row should be overlapped by the middle of the body of the bricks of the second row.
In the process of work, it is not allowed to use quarters of products for laying with a chip inside the stove or chimney - under the influence of high temperatures, the chipped blocks will gradually collapse.
Tips for laying the combustion chamber and installing stove appliances
The chamber for the heating of the sauna stove is built only of fireclay bricks; a combination of products made using different technologies is unacceptable.
If we compare refractory and simple bricks, then both materials have different degrees of thermal expansion. When laying fireclay bricks, only fireclay clay should be used.
If you look closely at the video, you will notice that brick blocks are laid on the edge during the construction of the sauna stove.
At the same time, gaps of at least 50 cm are left between the inner walls of the furnace and the walls of the combustion chamber.
Since stove appliances (doors, grates) are made of cast iron, it is recommended to mount them with a gap, otherwise the heated metal will tear the masonry.
The grate is equipped without mortar; on occasion, the grate should be easily removed.
All kinds of oven doors of the bath are fixed to the structure due to the special holes available in them and the use of soft wire, which is fixed in the masonry seams.
When fastening, the devices are also installed on the mortar mixture.
The stove is the heart and soul of a real Russian bath. For many centuries, our ancestors laid out red brick fireboxes. Despite the huge amount of modern materials that have appeared, brick is still very popular among lovers of "do it yourself". Many summer residents prefer metal aggregates made of heat-resistant cast iron, in most cases, due to the long warm-up time of the room. But unlike metal stoves, a stone stove does not create so-called "cold zones" in the steam room, evenly heats the entire space and creates a soft, warm and comfortable steam that does not burn the body and respiratory tract.
But laying a stone oven is a rather laborious process. Without certain knowledge and skills, this will be very problematic. But the experience of numerous home craftsmen proves that it is quite within the power of anyone to build a stone furnace for a bath with their own hands, it is only important to know some of the rules and subtleties, which you can read about below.
Advantages and disadvantages
It is not for nothing that brick stoves are so popular, but at the same time they have their own advantages and disadvantages, here are some of them:
- A do-it-yourself oven fits perfectly with almost any interior of the bath, be it wood, aerated concrete or brick;
- When heated, a thick and gentle steam is created, which has a positive effect on the health and general well-being of a person, because in the bath you relax not only with your body, but also with your soul;
- Outwardly, the brick looks quite elegant, therefore, in additional finishing works (plaster or cladding) no need;
- Absolute environmental friendliness of the material - when heated to high temperatures, no hazardous chemicals are released into the air;
- The oven, with proper care, will serve you long years;
- The brick that is used in their construction is a kind of heat accumulator, since it is able to maintain a high temperature inside the steam room for a long time;
- There is no condensation in brick ovens, since this material plays the role of a moisture regulator;
- If technological errors were made during the laying process, the stove may heat up for too long and hold the temperature poorly, and more firewood or other fuel will have to be used. Remember that when constructing experimental variations, it is best to consult a specialist;
- For heating a bath, you can use raw materials that are easy to find on the construction market or collect yourself (branches, sticks, dry moss, and so on);
- The whole structure (including the chimney) is quite cumbersome. Therefore, if you are the owner of a small bathhouse, you will either have to sacrifice expensive square meters, or buy a smaller metal counterpart;
- Unlike a metal firebox, a stone chimney does not require monthly cleaning (with frequent use).
Varieties of brick ovens
There are four distinctive types of stone stoves. Each has its own characteristics, advantages and disadvantages, each requires an individual approach, both in the masonry process and in maintenance:
- in black;
- in gray;
- in white;
- with a stove;
In the process of laying the stove in a black way, the chimney is not provided, so all the smoke comes out through the steam room itself. They began to build fireboxes in a black way several centuries ago, since they provide the highest heating rate. The most serious drawback is that before starting the procedures in the bath, you must wait until all the fuel has completely burned out. But in the bathhouse for a few more hours an extraordinary aroma will hover in the air. Also recommended interior walls treat all rooms with special agents that will prevent the appearance of soot residues.
Gray-style furnaces, unlike the previous type, have a chimney, however, due to the soot remaining on the stones, you will again have to wait for the fuel to burn completely. The steam room heats up quickly and leaves less waste.
White ovens are the most environmentally friendly option, but also more expensive. In it, the process of heating stones occurs from the stove, it takes up to half a day, while a large amount of fuel is spent. But you can steam as much as you like, constantly maintaining the fire in the furnace.
In the last version of the furnaces, the stones and the water tank are heated from two cast-iron stoves, one directly above the furnace, the second above the chimney. To increase the efficiency (efficiency) of the furnace, the slabs are fenced with brickwork on 3 sides. If desired, the location of the water tank and stones can be reversed.
How to choose a material?
In order for the stove in the bath to serve you for many years and not cause unnecessary trouble, you must be able to choose the right material of high quality. An ordinary brick is not suitable for the firebox, from which, for example, the walls of residential buildings are built. It is necessary to use a special refractory brick, also known as fireclay, because of the name of the clay from which it is made "fireclay".

This brick is 70% refractory clay. He is a cut above the characteristics of his "brothers", but also costs several times more. True, such material cools down quickly, it is not intended to accumulate heat, but only to withstand high temperatures, so they only lay out the space around the firebox itself, and the remaining parts are reported from hollow or silicate types of bricks. Sometimes they use a special decorative brick, which is fired only from 3 sides, it is laid so that the fourth facet looks towards the room.
Standard sizes oven bricks 125x250x65 mm, but very often material of the same type from different manufacturers or even from different batches may have a difference in dimensions. For the construction of a furnace, this is impermissible, because in addition to the fact that the firebox may simply collapse sooner or later, the resulting cracks will let heat through, and it will be almost impossible to heat the room, so carefully examine each brick individually.

It is recommended to use a brick grade M with a number from 75 to 150, and the frost resistance index should not exceed 25 cycles. You can find out by looking at special transport documents, or, if you buy at a construction supermarket, ask a consultant, because the chance that you will be told a lie in a store with a reputation is very small.
Naturally, the brick should not have various defects, cracks and chips. Choose a material with a perfectly symmetrical shape, smooth sides and even corners. Do not buy bricks that are highly porous or interspersed with anything. Fireclay bricks are usually light yellow or white color, and unburned - a dull, faded shade.

When purchasing, the quality of raw materials can be checked by sound. To do this, knock on a brick with some solid object, if it is deaf - the party does not fit. Ideally, the sound should be ringing and “metallic”. Also, to check the quality, you can throw one brick, if it breaks into large pieces when it falls - you can take it, if small - you should not buy it.
Preparation of mortar and instruments
In order to build a high-quality stove for a bath, in addition to knowledge of brick laying technologies, special tools and materials will be required:
- construction square;
- pick;
- oven hammer;
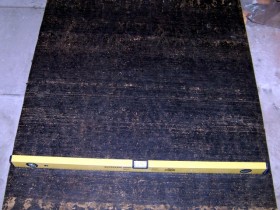
- building level;
- master OK;
- regular ruler and pencil for marking;
- plumb line;
- pliers;
- grinder and abrasive wheel;
- refractory brick;
- red ceramic brick;
- water;
- sand;
- fire-clay;
- container for solution;
- waterproofing material;

Ordinary cement-sand mortar is not suitable for bonding furnace elements, therefore a special composition of sand and clay is used. For refractory bricks, it is recommended to use a special fireclay mortar, which hardens at high temperatures, turning into a monolith. Outside, there is simply no temperature of 700-800 degrees Celsius, so such a solution quickly loses its properties and begins to crumble. It can be purchased from any construction department.
For the rest of the structure, a mortar of sand and refractory clay in a ratio of 1/2 is used. For this purpose, quarry sand, mountainous, as well as river sand, is used, which subsequently must be sieved through a sieve with fine cells (1-2 mm) in order to prevent the ingress of unnecessarily large grains and so that the future mixture has a more homogeneous mass.

Clay is suitable mined in quarries from a depth of at least two meters.
The clay is soaked in clean water and left for a day or two. After it, it must be thoroughly filtered through a sieve with fine cells, mixed. This process will be repeated if necessary. As a result, you should get a mixture of a viscous consistency, reminiscent of sour cream.
After that, the clay solution must be thoroughly mixed with a construction mixer until a homogeneous thicker mass is obtained, with the addition of small portions of water.
![]()
Upon completion of mixing, sand diluted with water is added to the solution. The amount of sand added depends on how greasy the clay is.
To check the quality of the prepared composition, you need to dip a wooden stick into it. If the mixture is prepared correctly, a layer of two millimeters will form. If the thickness is less, add clay, more - sand. Learn that this solution must be used immediately after preparation, as it very quickly loses its operational properties, so the mixture must be prepared in small quantities in order to use it as soon as possible.
First stage: design and foundation
As with the construction of any building, in front of directly construction works it is necessary to draw up a drawing project for the future furnace. In it, it is necessary to indicate all the features, starting from the appearance, ending with the location of each brick, the service life directly depends on this. There are a huge number of traditional masonry variations, and, after consulting with a professional, you can make changes and adjustments to them.
Regardless of which masonry method you choose, the basic elements remain the same:
- Firebrick lined with refractory bricks;
- Chimney, which must be made of red ceramic or hollow (silicate) bricks;
- An ash pan, which usually includes a cast-iron stove, a firebox, a stove, where bath accessories and some other elements are stored.
Very often you can hear that if the bath is built on monolithic foundation, then a separate one is not needed for the stove. But in the northern latitudes of our country, frequent temperature drops can be observed, which is why even carefully compacted soil can shift.
Since demolishing the bearing beams, sawing logs and changing the location rafter system for arranging a chimney is extremely problematic and costly, it is better to choose a place for the stove at the stage of design and construction of the bath itself.
Since the difference in temperature between the base of the building itself and the base of the furnace is large, it is recommended to provide a distance between them of more than 0.5 m.
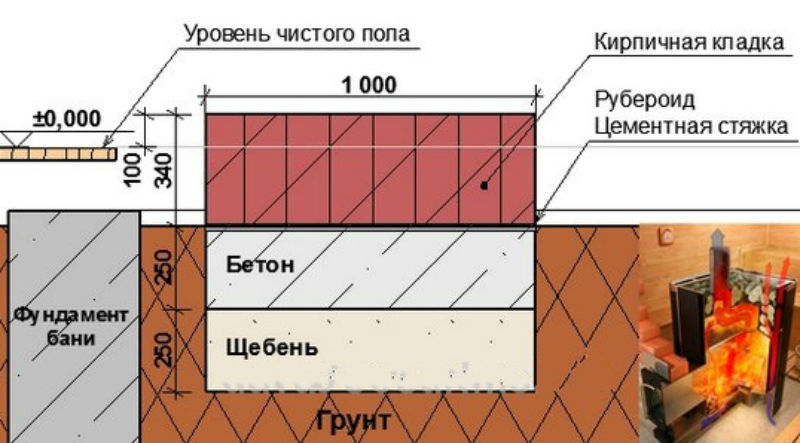
- First, you need to dig a pit, the depth of which depends on how loose the soil under the bath is, on average there is enough soil freezing (0.5 - 1.0 m). The width of the hole at the bottom must be made wider by the width of one brick than the width of the upper recess. This is necessary to increase the stability of the entire structure and to prevent the formation of chips and cracks during thermal expansion of the soil. The overall dimensions of the foundation should exceed the dimensions of the furnace itself by one hundred millimeters. Also note that for complete fire safety, it is necessary to leave a gap between the wall and the back wall of the furnace: wooden bath - 10-15 cm, in brick or concrete - 5-7 cm.
- After that, we fill the bottom with a layer of cleaned and sifted sand (10-15 cm) and fill it with water.
- Broken stone or brick is laid on a layer of wet sand, so that its layer height reaches 15-20 cm.
- A layer of crushed stone (10-15 cm) is poured over the stone and compacted tightly.
- Then a formwork is installed from wooden planks, which are knocked down by hand with a hammer. The formwork must be rigid in order to ensure a reliable laying of the stove. It is also installed there metal carcass from reinforced rods.
- At this stage, the foundation is poured into the container so that the distance from it to the floor surface is the height of two bricks (approximately 10-15 cm).
* The cement mortar can be made by yourself, using cement grade M200 or higher in a ratio of 1x3x5, purified quartz or river sand and crushed stone with a screening of 30-50 mm.
- After the solution has completely hardened, it takes on average from two days to a week, the formwork is dismantled and a layer of tar is applied on the sides, and sand, crushed stone or gravel are poured into the formed seams and tamped tightly.
- On top of the finished foundation, a layer of waterproofing (roofing material) is placed in two or three layers. Its dimensions should be slightly larger than the area of \u200b\u200bthe base itself. Excess, protruding pieces can be easily cut off.
Less often, the foundation is built from a large building stone of irregular geometric shape, called butom, which is laid on a layer (10-15 cm) of cement, and insulated from above with roofing material.
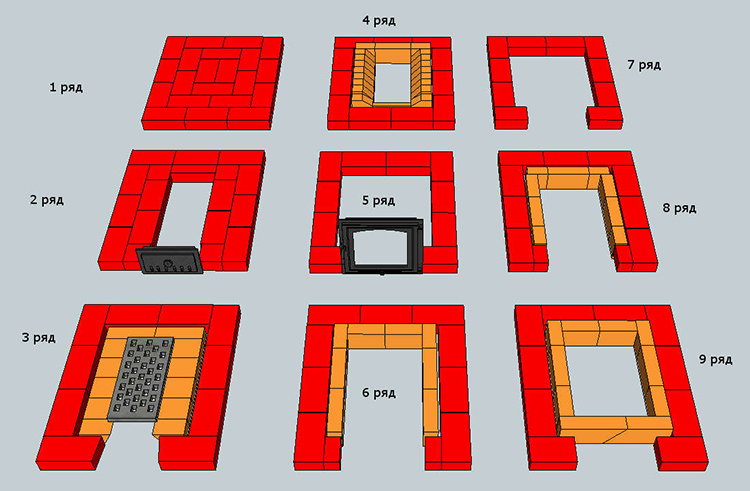
Second stage: laying the "body" of the furnace
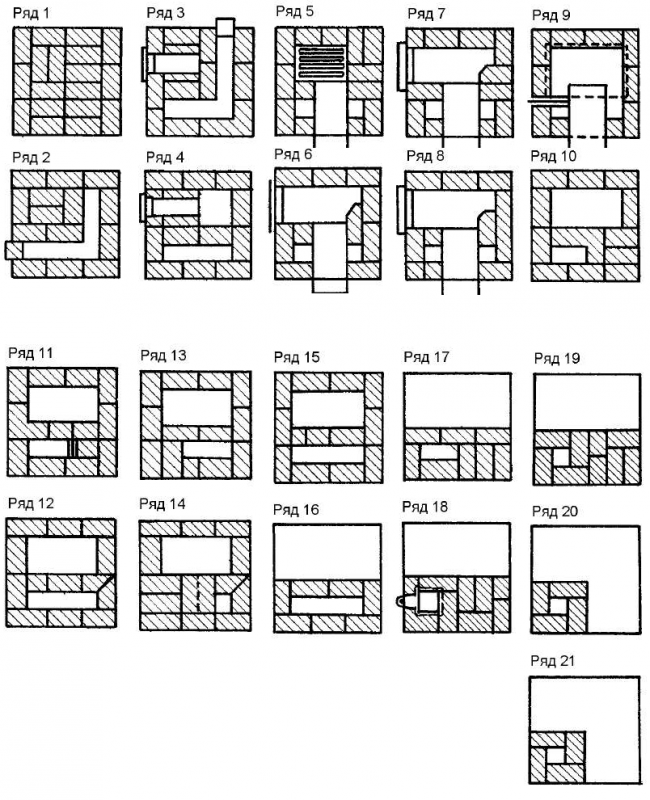
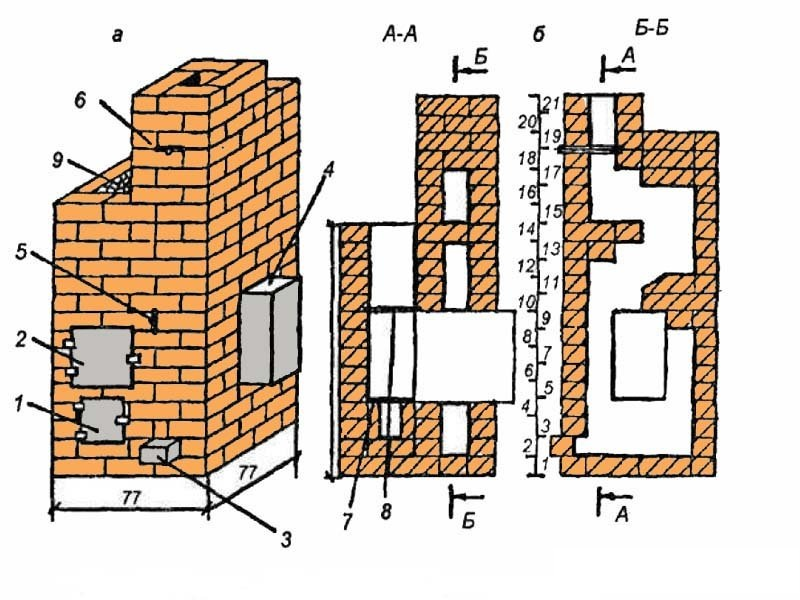
Bricklaying a brick oven is a very time consuming and complex process that requires certain skills and knowledge that come with experience. Therefore, for inexperienced builders, schemes were created, called "order", on which the location of each brick is shown in detail and in pictures step by step.
All schemes start from the zero row, this is necessary in order to level the foundation and bring it to the level of the bath floor. It is also recommended to first build the oven dry, that is, without mortar, in order to avoid inaccuracies in the future.
Since there are a huge number of variations in masonry, below will be presented only the basic steps used in almost any case, as well as some rules and tips.

Before you start building a furnace, each brick must first be soaked in water so that all air bubbles come out of the pores and to prevent dehydration of the solution. Fireclay bricks cannot be immersed in liquid for a long time; a few seconds will be enough to remove a layer of dust. Laying starts from the corner. Lay the first row on a dry foundation, without using a mixture.
Step-by-step instruction:
- Using a trowel, dial required amount sand-clay composition and cover the masonry place with it and level.
- Install a brick on top, tapping with a rubber hammer or the same trowel, tamp it. The mortar layer between the rows should not exceed five millimeters, and between the elements of one row not more than 2 mm. The smaller the seam, the stronger and more stable the structure itself will be. In addition to the edge of the brick, which it is attached to, its butt part is also lubricated.


* You can use a trick: first lay out the entire row without mortar, to make sure that everything is going according to plan and nothing extra sticks out, number each brick, and then proceed with the final laying.
- In order to prevent the appearance of large gaps in the future, it is necessary to prepare halves and quarters. Remember that the seams of one row should not coincide with the seams of the previous one, that is, each brick should move 40-50%. It is better to cut a brick if necessary using a diamond-coated grinder.
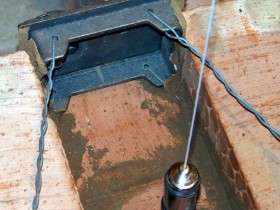
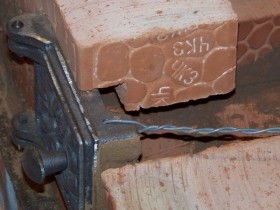
- The blower door is installed immediately after the first row. Since it is not possible to fasten with metal elements, they use rigid galvanized wire with a thickness of about 3 mm. It is screwed into the corners of the door. For more reliable fastening small holes are pre-cut in the bricks where the wire is inserted; it can also be fired to increase its elasticity. In places where the door touches the stove, use asbestos insulation.

Fastening the door, both the ash pan and the firebox, is carried out using galvanized wire
* You can leave a small space above the ash pan door in order to later pass the corrugated metal hose through it. Passing through it, the water will be heated, thus eliminating the need to install a heating tank. This option is especially useful for baths with very small dimensions.
- Each row is checked with a level so that the oven is not built at an angle.
- The subsequent rows are stacked similarly.
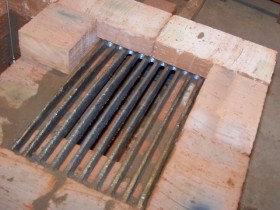
- To build a more reliable and durable stove, it is necessary to reinforce the aisle of bricks every four rows, fireboxes - every row. The thickness of the metal grate reaches an average of three millimeters.
- A cast-iron plate is mounted on top of the combustion chamber, on which special bath stones are subsequently placed. Their weight is about fifty kilograms, while in the sauna the total weight does not exceed thirty.
- The firebox door is attached in the same way as the ash pan, but with one only difference - since the size of the door is different, the fastening needs to be more rigid and durable, therefore they use not one wire at each corner, but three or more, twisting into one piece.
- Wipe every four rows with a damp cloth.
- We check with the masonry scheme. If everything is correct, we cross to the chimney equipment.
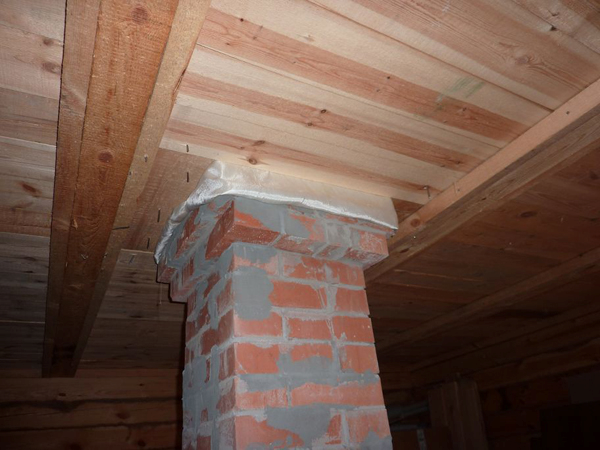
Stage three: chimney equipment
Since with thermal expansion by metal pipe condensation may remain, it is recommended to equip the chimney, too, of brick, the walls of which must be even, otherwise soot will collect in the irregularities and the mine will quickly clog.
The system of passages connecting the firebox and the chimney shaft is called high. Its width is, on average, three quarters of the width of a brick. In no case should you build chimney walls with less than one brick, and also narrow the cross-sectional area.

The chimney shaft must consist entirely of integral elements, the use of halves and quarters is prohibited. If its height is too small, then the smoke will not have time to cool down and under high temperature will go outside, so the recommended height of the part of the pipe that goes out is half a meter.
Don't forget about fire safety! It is better to seal the place where the roof and the chimney are connected with another layer of brick, and then revet it with thermal insulation or a layer of galvanized steel. From the outside, the chimney can be covered with a layer of limestone mixture. Due to this, if the integrity of the structure is damaged, it will be easy to notice the place of smoke leakage, on which a layer of soot will remain.
Let's summarize
Before you start using a brick oven, it is necessary for the solution to dry out, and the "body" and the chimney become a single whole, this will take about two weeks. After that, it is necessary to carry out a test kindling. Using the tips and recommendations presented in this article, the construction of the stove will turn into an easy job, and the brazier itself will delight the owners, warm the body and soul for many years.
Brick stoves are much less common in baths than metal boilers.
This is due to the complexity of the masonry, higher prices for materials and the duration of the construction process.
However, there are attractive sides to this option. This is a smooth heating without oxygen burnout and a longer service life.
The surface of the stove is not as hot as that of the boiler, therefore it is not as dangerous. Moreover, if there is a large room, with several rooms, a second floor, etc., only a brick oven for a bath can heat it. You can make a small structure for a medium-sized steam room with your own hands. The instructions are given below.
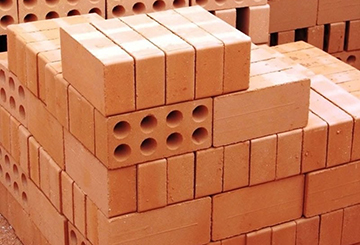
Brick
A special oven brick, a red ceramic refractory grade, is used. Its standard dimensions are 25 x 12.5 x 6.5 cm.
It should be an evenly fired, high-quality bar with precise edges, full-bodied.
The firebox and areas subject to strong heating are laid with Ш5 fireclay bricks.
On the diagrams, it is indicated by details more light color... This kind of ceramics does not accumulate heat, but withstands large heating. Therefore, the main parts of the furnace are not put out of it.
You can check by throwing one brick from a height of human growth. If the product has fallen apart into many fragments, the material is not suitable. It's good if you get a few large pieces.
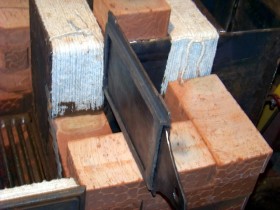
 Roll 2 sausages, 30 cm long and one finger thick.
The sausages are wrapped around the shank of a shovel. If the clay good quality, its surface will crack a little, and there will be shallow cracks.
Too greasy solution will not crack at all. If the sausage breaks, deep cracks appear - breaks, this clay is skinny.
The fat content increases by the tedious process of grouting. You can go the other way: buy a small amount of good quality clay and mix with the existing solution. Sand is simply added to the oily clay and the experiment is repeated until a good result is achieved.
 A metal stove has many advantages - it does not damp, is easy to transport, and you can also build it yourself. - design options, installation and painting.
Read about how to install a sandwich pipe for a chimney with your own hands.
Furnace models and variants long burning for a wood-fired home are presented in this review:. Buleryan, Breneran, Butakov ovens and other options.
Sand
Sand needs quarry (the use of river is also permissible), sifted and washed from organic matter.
Water
Soft water is preferred for masonry. Previously, the owner could collect moisture from the rains ahead of time. Today, artesian is used with a hardness of no more than 10 German degrees.
Solution
 A solution is prepared from clay, sand and water.
1 part greasy clay to 5 parts sand is an average ratio that should be adjusted depending on the properties of the clay.
Usually they start a small amount, and then conduct a series of experiments that will show what changes to make to the recipe.
Chamotte elements are placed on a white clay solution or special compositions for fireclay bricks sold in stores.
Tools
- Devices used by stove-makers:
- Veselko - a paddle made in the form of an oar for mixing mortar.
- Firing pin - a single portion of clay is laid on this board made of boards for convenience.
- Pickaxe hammer - for breaking off parts of bricks.
- A trowel, or a trowel, is the main working tool. They perform the application, leveling of the solution and the removal of excess.
- Level, rule and plumb lines - will help to display even edges and corners.
- Roulette.
- Bulgarian.
It is advisable to knead the solution by hand, since high-speed mechanical stirring can lead to the formation of gaps, which dry out over time. And the oven needs an absolutely homogeneous mixture.
The foundation for the brickwork of the furnace
An average stove-stove weighs more than 1 ton, so the basis for it is a concrete slab:
- The pit is dug 10 cm wider than the future foundation.
- The first layer at the bottom is sand. It is poured with water and when the water comes off, they add more, and then again.
- A layer of gravel or broken brick. Again filling with water, tamping and also adding gravel.
- At a distance of 10 cm from the sides of the pit, a plank formwork is made, reinforcement is laid. Flooded concrete base, if possible, at a time. Particular attention is paid to the last layer - it must be strictly horizontal (adjusted to the level).
- When the concrete sets, the formwork is removed, and the side voids are covered with gravel or sand.
- Then comes a layer of waterproofing (roofing material 2-3 layers).
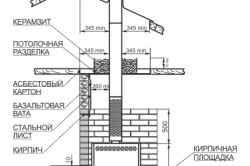
- The foundation of the stove is made of 2 rows of bricks, a sheet of mineral cardboard, as a heat insulator (previously asbestos was used).

The foundation for the oven in the bath
The last row of the base, lined with bricks, should end flush with the floor. Before proceeding with the construction of the furnace, the foundation must be allowed to dry.
Construction diagram
There are a lot of stove options. They can be very small, about 12 rows to the tank, or massive, located in two rooms. The stove of some is open and is located in a metal casing, while in others the stones are poured into the chamotte brick compartment.
Having chosen a suitable order, it is advised to print it out and keep it with you during construction. As the rows are erected, they are crossed out on the plan.
Before laying on the mortar, it is advised to lay out several rows. This will help you to visually see what should turn out, adjust the details and avoid mistakes.
Drawing of a brick oven for a bath
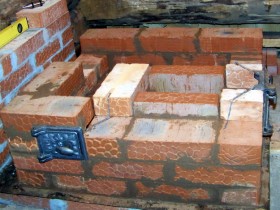
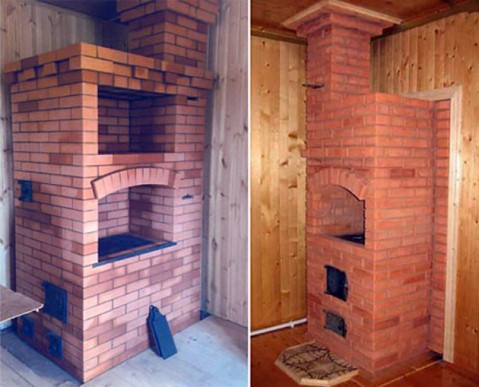
Do-it-yourself brick oven for a bath
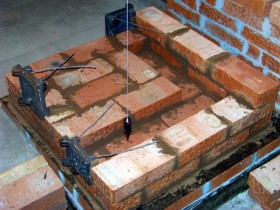
Exactly following the order, the furnace body is erected row by row. Each row is checked by level and there should always be beacons and plumb lines that will not let the wall go sideways.
The seams for the main masonry - no more than 5 mm, for the laying of fireclay bricks are thinner - about 3 mm.
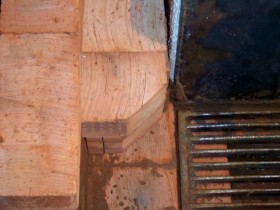
The construction will need shaped bricks - halves, quarters, etc. Usually they are pricked, but sawing off is still more practical.
The ash pan door is installed on the first rows. Then there will be a heavier furnace door. To keep them well, it is important to lay the brick close to the door frames.
For a very long time, the technology of planting on wire embedded in the seams of the masonry has been used. A 2 to 3 mm steel wire is suitable. It is inserted into the holes on the door and the two ends are twisted.

Brick stove-heater
It is important that the wire itself is flat and that no loops form after twisting. In the upper edge of the brick for the wire, grooves are made, bent and fastened with masonry.
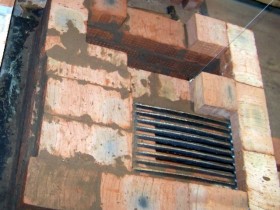
For the grate, a small depression is made - grooves in those bricks on which it rests.
An obligatory attribute of a sauna stove is a heater. It can be open or closed. To make the stones warm up faster, they are placed on a metal sheet.
The pipe lies in half a brick. It must be of sufficient height to provide good traction.
Do not lay bricks with the cut or chipped side inside the chimney or fuel chamber! They are either turned outward or hidden in masonry.
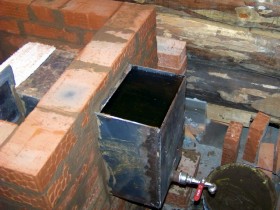
Water tank
 It is clear that this structural element will be made of metal. The tank can be purchased separately (galvanized or stainless, 10 - 40 liters), or welded on your own.
It is advised not to use thick metal on the bottom, otherwise the water will be reluctant to heat up and you will have to burn it heavily.
Some models do not allow for the installation of the tank on the stove, or its volume is so large that it will become too large a load. Then there is the option of a remote tank.
A heat exchanger pipe is embedded in the furnace, and the ends are connected to the tank. For good circulation, the pipe must be sloped.
Some subtleties of laying sauna stoves
The fireclay brick firebox should not be connected to the main massif. AND stove foundation do not associate with the foundation of the house.
For greater heat transfer and heating speed, a wide pipe or cylinder from a cylinder is sometimes embedded in the furnace.
The surface inside the chimney is rubbed with a wet cloth by hand. This will provide better passage of gases, soot will linger on the walls less.
What to do to prevent leaks on the metal roof next to the chimney. When the pipe already approaches the level of the roof, using a plumb line, a rectangle is projected onto the roof (you can mark the corners with a nail).
Having stepped back 7 cm, another, smaller rectangle is drawn inside. And then, their corners are connected, and a cut is made along the inner lines (in the same way as holes for sockets are cut when gluing wallpaper).
Substituting a wooden block, the resulting metal strips are bent so that they remain slightly non-vertical. And the unprotected corners are sealed, top and bottom, with cement mortar.
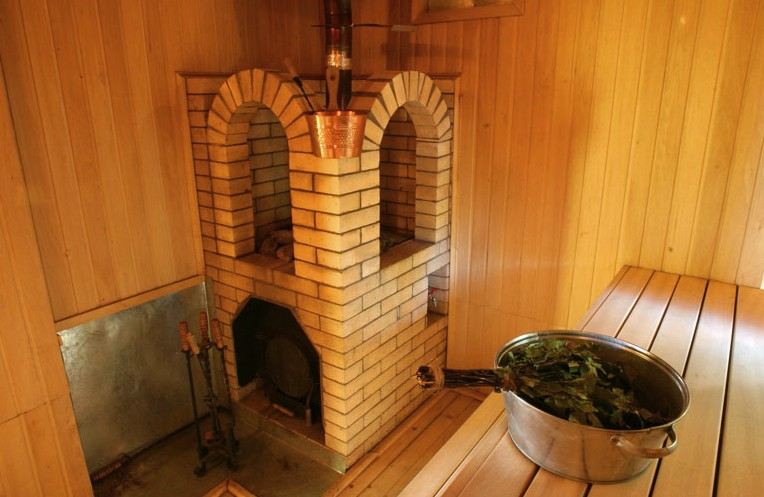
And finally. It is much more convenient to use the stove if its firebox goes into the dressing room, and the main array in the steam room. If the wall is wooden, the gap between the tree and the stone should be at least 25 centimeters. It is also covered with brick or other non-combustible material.
 If a country house remains inhabited even in the off-season, you need to think about heating it. - an effective and economical option.
We will analyze how the thermostat for a heating boiler works. Classification and features of the choice of the device.
Video on the topic
The modern construction market provides an opportunity to simplify the construction of a bath, using, instead of the traditional, its electrical modification or made of metal. However, no species can replace brickwork, since only this material will be able to warm up the room well and also long time keep it warm. In addition to the fact that a brick stove is the best source of dry steam, it is she who gives the true meaning to the bath room and allows you to completely cleanse not only the body, but also the soul.
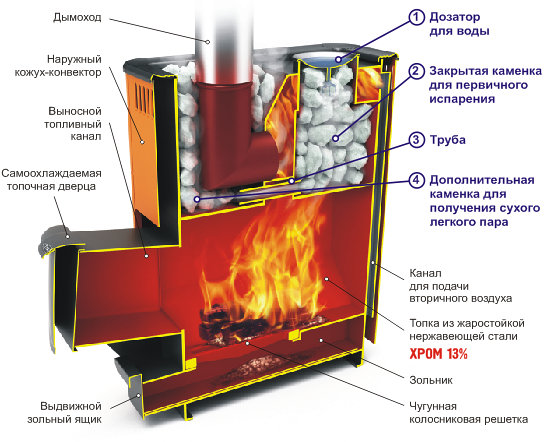
Diagram of a stone oven for a bath.
Putting a brick oven in a bath is a very difficult task. And before starting it, you must have some knowledge and some experience of such work. Then putting a brick oven will become a real opportunity. Moreover, it does not need facing work and a too complex masonry tool will not be needed.
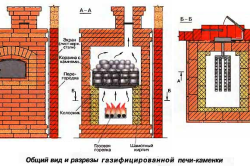
Diagram of a gas oven made of bricks.
Finished heating structure to the sauna must meet the following requirements:
- the air temperature in the bath should not be lower than 45 ° C;
- when watering stones with water, there must be a sufficient amount of steam;
- no smoke or gas should be emitted during the combustion process;
- the device of the furnace should economically consume heating material.
Preparatory stage
Any construction begins with measurements and drawing up a diagram. The device of the stove in the bath is no exception in this case.
To draw up the drawings, you need to pick up a photo with the stove shape you like and, in accordance with the image, start developing a design diagram.
After that, decide on the size, location and draw up a brick ordering scheme.
In this case, correctly drawn up drawings will help not only to correctly lay out the walls of the furnace, but also to determine the amount required building material: mortar, brick and other components.
The shrinking layer is covered with 10 cm crushed stone and compacted. Further, inside the pit, you will need to make a formwork with a reinforced frame. In this case, a 10 cm gap must be left between the formwork and the sides of the pit. All this is poured with concrete and dries well. Then the formwork is removed, 2-3 layers of melted tar are applied to the sides, and the gap is filled with coarse sand or fine gravel.
Further, the surface of the finished foundation is covered with roofing material, which serves waterproofing material for a sauna stove. Since when moisture gets on a brick, its properties deteriorate, this leads to its rapid destruction.
Technology
Installation diagram of the stove in the bath.
First of all, we will prepare the masonry mortar. This will require clay and sand in a 1: 2 ratio. In the container, the clay is kneaded well and filled with water. Everything mixes well. To speed up this process, it is recommended to use a rotary hammer with a mixer. The consistency of the mixture is this stage should resemble thick sour cream. Next, slightly moistened sand is gradually introduced and also thoroughly mixed. The solution is considered to be properly prepared if, by pulling the stick out of the container, you can see the remaining clay mixture on it in a few mm. If the layer thickness is less than 1 mm, it is necessary to add clay, and more than 3 mm - sand.
Brickwork at the bottom of the oven

Scheme of a brick sauna stove.
- The first two rows of bricks are usually laid out in a solid, and this place is called the stove pillow. For this, a cement mortar is used, since the temperature in this part is minimal, and the strength of the masonry must be high.
- After you get an even base, the third row begins to lay out according to the scheme. At this level, as a rule, a blower door is installed, grate and equip an ash chamber. The installation of the blower door is carried out using galvanized wire. We install a door in the middle of the wall, and its lower fasteners are laid out on the surface of the brick. To prevent the wire from interfering with the process, grooves are made on the brick, into which the wire is laid. In the same way, the upper part of the blower door will be fixed on the sixth row.
- Before laying the next row, we carefully check the corners and then lay out four rows around the entire perimeter, since the installation of the grate and ash well begins, the functions of which include cleaning the firebox from ash and drawing out combustion products. And the wrong angle of inclination can cause smoke to enter the steam room. On the sixth row, we finish attaching the blower door.
- On the seventh row, we install the grate and furnace door... To keep the lattice on the same level with the masonry, a cut is made on the brick, where the lattice is laid. The grate is fixed due to the solution laid out on the sections, after which it must be pressed and tapped with a trowel. Under no circumstances should the oven walls come into contact with the grate. Since when heated, it will increase in size and press on the masonry. And this can violate the integrity of the structure. Therefore, if the grill does not match the size, it must be cut with a special tool for metal. The firebox door is installed in the same way as the blower door.
- At the same stage, in the front of the furnace, we equip an opening for a metal tank with water. The container should be located on the side walls of the masonry. In places of contact with the brick, the tank is wrapped in two layers with an asbestos cord.
- We continue to lay out the brick rows. The eighth row of masonry is made with a partition where the chimney will begin.
- We put the tank in the ninth row and mount the stove. We determine the exact dimensions of the slab and cut it off in such a way that it fits onto the brick by at least 25 mm.
- Brick laying is carried out before the end of the firebox and then chimneys are installed according to the scheme.
Knowing and observing the basic principles for a bath, you can make a reliable and good design with your own hands, as well as significantly save money.


