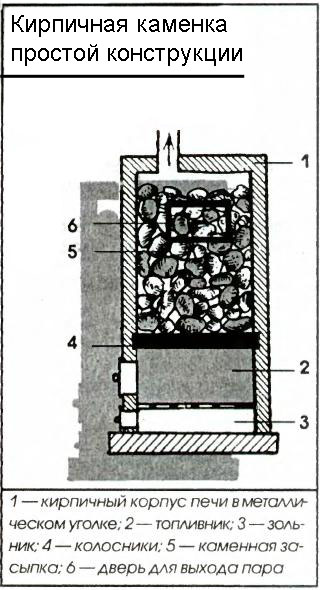
Self-erection sauna stove - not the simplest, but quite feasible event that requires thorough preparation and a thoughtful approach. By reading the information below, you will learn about important nuances designing a sauna stove, and also consider the key stages of building a brick structure.
The sauna stove can have different dimensions, selected mainly in accordance with the area of \u200b\u200bthe serviced room. Most often, furnaces are erected with a base measuring 890x1020 mm (3.5x4 bricks) or 1020x1290 mm (4x5 bricks) and a height excluding the chimney of 168 cm or 210 cm, respectively. The second option is better suited for steam rooms with increased ceiling heights.
Most preferred option brick oven for a bath is a model with a water circuit (a tank for heating water). It makes no sense to bring many projects - they are almost identical, only the location of the tank for heating water changes. The most popular options are a brick oven with a lower tank location and a brick oven for a bath with an upper tank installation.
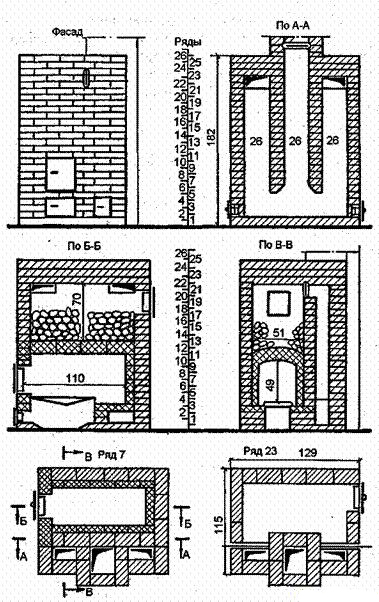
The following images show diagrams of a brick oven with a bottom placement of a water tank.
Schemes of a brick oven with a bottom placement of a water tank
Schemes of a brick oven with a bottom placement of a water tank (ordering)
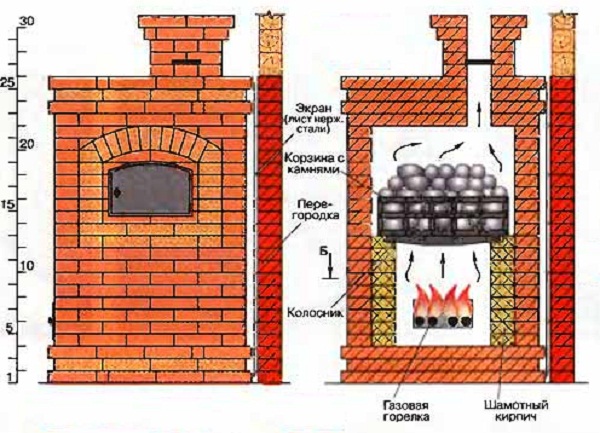
The following images clearly demonstrate the design of a brick oven for a bath with the location of the tank at the top.
Making the project safe: the basics
Before proceeding with the study of further information on the arrangement of the sauna stove, you need to consider and remember the key provisions of safety measures, the violation of which can lead to extremely unfavorable consequences.
Traditionally, the stove is erected near the wall opposite to the shelves in the steam room. The design of the furnace must be created so that a minimum distance of 30-40 centimeters is observed between the heating parts of the finished unit and everything that supports combustion. If special protection is provided, for example, made of asbestos cardboard, this indicator can be reduced to 15-20 cm.
What to build a furnace from?
A set for self-erection of a brick sauna stove includes the following items:
- brick;
- clay for preparing masonry mortar (sand is also needed);
- container for solution preparation;
- tools for marking (pencil, rope, square, tape measure, etc.) and masonry (trowel, pickaxe, mallet, etc.);
- insulation materials (roofing material, asbestos);
- elements for the manufacture of a water tank and a chimney (if they are planned to be assembled independently, but it is much more profitable in terms of time and labor costs to purchase ready-made units).
The issue of choosing a brick for masonry deserves special attention. The strength of this material, first of all, should be higher than that of ordinary white or red bricks. The ideal option is fireclay bricks with the highest refractory properties.
In places warming up to more modest indicators, it is advisable to use a solid red brick, designed to perform the work under consideration.
For example, from such a brick you can lay out external walls, smoke flows, various decorative elements etc.
Important! A solid ceramic brick can be distinguished by marking in the form of the letter "M" and accompanying numbers indicating the value of the maximum load per 1 cm2. For laying a brick oven, a material grade of at least M-150 should be used.
You can distinguish a real high-quality oven brick by 3 key features.

Video - Choosing a brick for laying a furnace
What mortar should be used for masonry?
The laying of brick sauna stoves is traditionally carried out on clay mortar. It is best if a type of clay is used for its preparation, which is the basis of the brick used, i.e. red or fireclay. In this case, brick and masonry will give the same temperature expansion during heating, which will ensure the longest possible period of the finished building.
Helpful advice! It has been found that the thinner the masonry joint is made, the higher the resulting oven quality is. However, consideration of this issue must also be approached reasonably: the ideal masonry is obtained with a joint thickness of 0.5 cm. A decrease in the value below this indicator will contribute to a noticeable decrease in the life of the furnace.
In addition to clay, sand is included in the solution. First, it must be sieved so that the material with grains of sand no more than 1-1.5 mm in size goes into the solution. Millimeter is most preferred. It is also important that the sand is free from silt and has a uniform color. For sieving, use sieves of the appropriate size.
Separate requirements apply to water also used in the process of preparing masonry mortar. First of all, it must be clean, contain the minimum possible amount of mineral inclusions, and not have a musty smell. The laying of 100 bricks takes about 15-20 liters of water.
Before preparing the solution, the clay must be placed in any suitable container (for example, a large basin), crushed and filled with clean water in such an amount that the result is the most homogeneous mass, not too thick and not very liquid. Mix the solution thoroughly, kneading the resulting lumps. Leave the mixture of clay and water for a day, then strain, and rub the resulting lumps through a sieve.
Sand is added to the prepared solution last. On average, a liter can of sand is added to a bucket of water, but this moment must be carefully controlled, because the amount of river sand in the solution directly affects the fat content of the latter. Besides, required amount sand can vary depending on the original fat content of the clay. If the masonry mixture is too greasy, the stove can simply collapse during operation. A thin (non-greasy) solution will not allow achieving the desired quality of adhesion of bricks, as a result of which the scenario already considered will be repeated.
It is possible to determine the fat content of clay in artisanal conditions in several simple ways.
Take 500 g of clay and mix it with water. It is best to knead by hand, until a mixture is obtained that has a uniform consistency and does not stick to hands.
Important! For laying a sauna stove, you can use only a medium fat solution.
Roll out the previously prepared mixture into a ball the size of a small apple. Place the molded product on any flat, hard surface and gently press down on it with a plank. Press down slowly enough to stop cracking.
If the clay ball has disintegrated without cracking, the clay is not greasy. The appearance of a crack of half the diameter indicates that the clay is too fat. In the case of a normal fat solution, the crack will take about 0.2 times the diameter of a clay ball.
Furnace solution preparation - tips
Video - Preparation of mortar for laying a furnace
The sequence of the construction of a sauna stove
Regardless of the chosen configuration of a brick sauna stove, the order of its construction remains the same for all situations: from the foundation to the arrangement of the chimney and finishing. In the following table, you can find important information about each step of the activity in question.
Table. The procedure for building a sauna stove
| Stage of work | Description |
|---|---|
| There are several types of foundations for a sauna stove. The most optimal and popular option is offered to you. Do the following: - mark the site for the future foundation by driving in pegs in the corners and around the perimeter of the base to be equipped, and pulling a rope between them to make it easier to navigate. Select the site dimensions in accordance with the design dimensions of the furnace base; - dig a pit about 60 cm deep. In this case, expand the lower 10-15 cm in relation to the main part of the pit by 5-10 cm in each direction. After concreting, a similar platform from below will provide a higher resistance of the entire structure to ground movements; - fill the lower expanded part of the pit with sand and tamp, spilling it with water for better compaction; - pour a 10 cm layer of gravel or broken brick on top of the sand and tamp it as well; - fit the formwork along the contours of the pit. Use wooden planks and screws to assemble it; - lay a reinforcing mesh into the pit. For its assembly, it is optimal to use steel rods with a diameter of 1-1.2 cm. The rods are tied into a mesh with cells of 15x15 cm. At the intersections, the reinforcement is fastened with knitting wire or special modern clamps, which is more convenient. Between the walls of the pit and reinforcing mesh a clearance of approximately 5 cm is maintained. A similar gap must be maintained between the bottom of the pit and the reinforcing mesh. The most convenient way to do this is with the help of special clamps-stands; - pour into the pit concrete mortar, prepared from 1 share of cement (from M400), 3 shares of pure sand, 4-5 shares of gravel and water in an amount corresponding to about half the mass of cement. The concrete is poured in a uniform layer to such a height that the pouring does not reach the ground surface on the site by about 150 mm. Be sure to level the "top" of the fill; - let the casting settle for 3-5 days (preferably 7-10) to gain strength and dismantle the formwork. Fill the resulting voids with tamped fine gravel; - Cover the hardened concrete platform with molten bitumen and lay a layer of roofing material on top, carefully leveling it and pressing it against the binder. Then repeat the procedure again. The resulting two-layer waterproofing will provide reliable protection brick oven from ground moisture. The previously mentioned 15 cm gap between the top face of the foundation and the ground surface will be leveled by means of a starting solid row of bricks. |
|
| Detailed recommendations for carrying out this stage were given earlier. | |
| The laying of the sauna stove is carried out in accordance with a previously prepared order - the main component of the project of the unit in question. The step-by-step procedure for building a brick kiln will be discussed later in the corresponding section. Arrangement of additional elements (in this case, it is a chimney, since it will be proposed to make a built-in water tank) depends on the characteristics of a particular project and in each case is considered individually. |
|
| A fully lined oven cannot be put into permanent operation immediately: the device must be allowed time to dry. During the drying period, the doors and windows in the room must be open - the oven will dry faster. 4-5 days after the completion of the oven laying, you can start heating it with small chips for a maximum of 10-15 minutes daily. The firebox is performed once a day. Escaping condensation indicates that the unit is not completely dry yet. |
|
| At the request of the owner, it can be performed finishing... There are a lot of options. The most popular are the following: - facing with tiles (clinker, majolica, terracotta or marble). One of the more popular options. Differs in relatively low cost and ease of implementation; - brick cladding; - stone decoration. Porcelain stoneware, granite, marble or serpentine are well suited; - plastering. The original Russian method, which is also the most elementary and budgetary; - facing with tiles. A laborious finishing method that allows for truly unique design compositions. |
Video - Construction of a sauna stove
Sauna stove project: step by step ordering
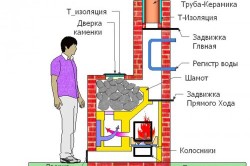
As an example, the procedure for erecting a furnace equipped with a built-in water tank will be considered. The dimensions of the structure at the base are quite impressive - 1020x1290 mm (corresponds to the laying of 4x5 bricks), the height is 2100 mm. If desired, the owner can change the dimensions in accordance with the conditions and characteristics of the equipped steam room. The design image of the structure under construction is presented below.
The furnace with the indicated design dimensions will allow providing temperature indicators in a space of up to 10-14 m2 at a level of about 45-50 degrees during washing and up to 100 degrees and higher during vaping. One firebox of such a stove will be enough for up to 10-12 visitors to comfortably steam and thoroughly wash in the bath. The volume of the built-in tank (in the above diagram is visible on the edge on the right) is about 180 liters.
To improve the quality of heating and the placement of stones above the fuel chamber of the furnace, pipes in the amount of 6 pieces (visible next to the water tank) with a diameter of 50 mm are laid. The length of pipes to be laid specifically for this project is 1050 mm. The assembled pipes become very hot during the operation of the furnace and continue to transfer thermal energy for some time even after the end of the furnace.
It is impossible to imagine a traditional Russian bathhouse without a well-heated blazing stove. Still would! After all, a brick stove for a bath is its main driving mechanism, and without it, no bath procession can simply take place.
In general about ovens and time
Brick stoves are considered traditional Russian sauna stoves. Modern ovens electric or gas type cannot be compared with the primordial Russian stone stoves.
Of course, such modernized stoves are less capricious, practical, take up a minimum of space, however, in terms of their healing effect, they simply cannot be compared with a stove-heater. Such an oven can long time keep warm, the steam from such a stove is soft, it is evenly able to warm up the body, which undoubtedly provides a special positive effect on the entire human body in general.
Types of stone ovens
Depending on the operating mode. distinguish between continuous and batch furnaces. The first of them are characterized by a small wall thickness and a small volume of stones. The stones are heated to 300-350 degrees.
They are heated solid fuelas well as electricity and gas. The second type is furnaces with a significant volume of stones and massive brickwork. It protects the outer wall from severe overheating and allows maximum heat retention. This gives a longer lasting heat effect.
Features of a brick oven
The process of laying a stove is a rather laborious task, requiring utmost care and accuracy. Such a stove will take up considerable space, but the heating area will be maximum at the same time, and the heat after complete kindling can last up to nine hours in a row.
The kindling takes 3.5-5 hours. Due to the fact that furnaces of this type are quite heavy, it is necessary to prepare a well-deepened foundation in advance. Such stone stoves, in comparison with electric or gas ones, are considered much safer in terms of the possibility of a fire.
Material selection
So let's go in order. First you need to decide on the choice of brick. As you know, the usual building brick withstands temperatures up to 800 degrees. However, when burning wood, the temperature in the oven reaches 900 degrees and above.
Conclusion: no other brick except specialized oven bricks, for the device of a stone sauna stove, will not work. Over time, the structure will simply fall apart. Second. Clay is required for brickwork. No cement mortar for holding the bricks together will be appropriate here either. Clay can be purchased at hardware stores.
Before use, it must be imperatively soaked in water for several days. We also need sand for the sauna stove. It must be thoroughly cleaned and sieved.
Making oven solution
The exact mathematical proportions and calculations will have to be postponed, because the consistency of the solution will depend only on the fat content of the clay. Therefore, we take a small amount of clay and sand in a ratio of about 1: 2. We divide this mass into 5 parts. We leave one part in its original form, in the second we pour another quarter of the sand.
In the third part we pour half the sand, in the fourth one whole part of it. The remaining fifth part - 1.5 parts of sand. Of the five options, we make cakes, which we leave to dry. After they dry out, we determine the cake, which is not cracked or deformed. It is the cake of this proportion that is an indicator of the correctness of the prepared solution. Such a furnace composition will be considered reliable and durable.
Let's get down to business!
The location of the oven will be very individual. The best option will be its placement with the expectation that its front part heats the steam room, and the back - the dressing room. The foundation must be solid.
Its width and length should be 10 cm larger than the dimensions of the furnace. First, you need to dig a pit 0.7 m deep, the bottom is covered with 15 cm sand, filled with water, and covered with rubble or broken brick. Then a reinforced frame is built and formwork is placed.
Then the formwork is poured with concrete and dismantled. The sides are equipped with tar. On top of the foundation, 2 pieces of roofing material are placed for the purpose of waterproofing. To reduce the risk of fire situations, you can also lay a protective brick wall in several rows.
Brickwork
 The first two rows of the stove are also called "stove cushion". They are laid out all over the place. Here you can use ordinary mortar, because the temperature in this area is not too high. On the third row, it is necessary to install hatches for cleaning the chimney and the blower door.
These parts are secured with mortar and braces made of copper or soft steel wire. The ash compartment, or channel for blowing air, is erected with bricks. The grates are laid on the surface and fixed at the edges with the next brick row.
The firebox door is mounted at the level of the grate with a height of two brick rows, but the rows can be increased by 1-2. This will allow the flame to burn better.
Water heating tank
In order to always have hot water at hand, a metal tank is mounted in the stove, so that one wall of it is used as the wall of the firebox. Its thickness should be at least 3-5mm.
It is recommended to make a bypass gate or a damper in front of the tank wall so that the water does not boil and evaporate. The best option would be to install a tank at the beginning of the chimney with branching dampers and wells. This will make it possible to regulate the entire heating process.
We continue to put the oven
 In the area of \u200b\u200bhorizontal partitions, brickwork should be supported with metal rods or strips. It is necessary to lay bricks on them. If the dimensions of the stove are small, then in the area of \u200b\u200bthe second and third chimney wells the stove wall is lightened, this will reduce the consumption of material and make it possible to more evenly heat the entire structure area.
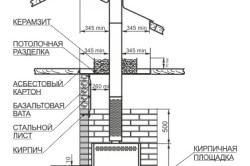
In this case, in no case should you lighten the wall of the chimney. This wall should be as thick as possible, at least half a brick, it can be insulated in the attic area. Where the pipe goes through wooden floors, it is better to seal the pipe wall to one brick. You should also leave thermal gaps and fill them with fire-resistant heat-insulating material.
Schemes
Below are the simple schemes and drawings of the sauna stove
Scheme 1. Scheme 2.
We fire the oven
Usually it takes 8-10 days to build a sauna stove. Then, over the next 2 days, such an oven should dry. Kindling should be started at low temperatures. First use wood chips and straw as fuel. In subsequent times, you can safely turn on the sauna stove and steam for health.
Security measures
When installing a brick oven, you must adhere to the following rules. If there are objects near the furnace that can catch fire, the distance between them should be at least half a meter.
Slots and gaps between the roof and the chimney should be covered with galvanized steel sheet.
A distance of at least 10 cm must be maintained between the chimney and the wooden roof.
If the floor in the bath is wooden, then it is necessary to put an iron sheet in front of the stove, which will be able to hold the falling coals, and will not allow the wooden boards to ignite.
The laying of the sauna stove must be done on a separate foundation, taking into account special technical requirements.
The design of the stoves differs from the buildings of home brick stoves used for heating a room in cold weather and cooking.
The bath brick oven can be operated at any time of the year, regardless of weather conditions.
Its purpose is to uniformly heat the bath space and maintain a special indoor climate.
Correctly executed ordering of the stove allows the stove to function according to a well-thought-out scheme - first the stove itself warms up, then the stones and subsequently the steam room.
The information and video materials of this article will allow you to choose the right building material and fold the stove for the sauna with your own hands.
To date, among the masters of the bathing business, several technologies for laying stoves for a bath are known.
Some types of stoves are more common, others are practically forgotten, as they are not entirely comfortable to use.
If desired, you can fold any of the following designs with your own hands: white, gray, black, with a stove.
With and without a smoker, with a tank located above the stove or a water tank placed at the bottom of the stove.
The main thing is to choose the most suitable option for your needs.
The stove for heating a bathhouse "white" absolutely does not throw soot into the room, which is why more than all other types of stoves for a bathhouse meet environmental standards.
The stones are heated by means of an iron part arranged in the structure. That is why it takes more than 12 hours to warm up the room.
But such a long warm-up period justifies itself by a long period of heat retention.
The "gray" masonry of the stove is erected with a straight chimney, due to which the direct flow is considered the most economical.
The "gray" construction of the steam room of the bath heats up in a short time, but in order to take advantage of its purpose, you have to wait for the complete combustion of the fuel, since soot settles on the stones.
The laying of the "black" stove is done without a chimney. It was this design that was common in Russian villages, and today, as it turns out, this masonry technology has not been forgotten.
The only disadvantage of using a sauna stove is that it is necessary to wait until the fuel burns out, but it is blocked by the receipt of a plus - aromatic high-quality steam.
The masonry of the stove with a stove is a structure equipped with a fireplace and a tank, which are mounted on cast-iron ceilings and are heated due to them.
The tank is surrounded by a brick casing with their own hands, which allows maintaining the desired water temperature for a long time.
More information about the methods of laying stoves for a bath in the video material in the article.
How to choose the right brick for your heater?
For laying a sauna stove, it is better to purchase expensive high-quality materials, but if the budget does not allow, you can build a stove from inexpensive red brick.
The main thing is to choose products with the correct geometric shape, without any deformations.
When buying a brick from the category of low-budget material, you need to take into account that some products may have dimensions slightly different from the standard.
As a result, when laying a stove for a bath, the joints will differ up to 10 mm.
This masonry technology is allowed for the construction of walls of buildings, but not for the construction of a heater.
The negative point will not be in appearance, but in the release of heat outside, which is unacceptable for bath stoves.
A well-made brick product, with a slight tap with a hammer on its surface, should emit a sonorous sound.
If, upon impact, a dull sound is heard, then the product was burnt without observing the technology.
Making and checking the masonry mixture for viscosity
This approach will allow you to get the same coefficient thermal expansion seams and bricks, due to which the life of the bath furnace will be increased.
At the same time, do not forget about the rules for laying a stove for a bath: you can fold a high-quality stove with your own hands if the seams of the brick structure are made as thin as possible.
The most suitable joint thickness is 5 mm, if possible, the mortar can be applied even thinner.
The solution should be made using washed river sand; even traces of silt are unacceptable in this component of the mixture.
In this case, a sand fraction from 1 mm to 1.5 mm can be used.
It is not difficult to prepare the solution yourself, the main thing is to follow the technology below.
In addition, to strengthen your knowledge on this topic, you can watch a useful video material.
Preparation of the masonry mixture and methods of checking its quality:
- The clay is placed in a prepared container, crushed with your own hands and a little water is added. After thoroughly mixing the soaked clay, add more water, mix again. The output should be a homogeneous mass without lumps with the consistency of thick sour cream. In this state, it is left to stand for a day;
- After the specified time, the water rises above the clay level, after which the excess water is drained. The not yet fully prepared solution is rubbed through a sieve to finally remove lumps;
- As soon as the clay mass at the expense of water acquires the necessary uniformity, sand is added to it with your own hands. Its amount is determined based on the fat content of the clay mass.
The quality of the prepared mixture is determined in two ways:
- A ball is formed from the mortar composition with their own hands, with a diameter of about 50 mm. Then they put it on a wooden plank, press the sample from above with another plank, press it until cracks begin to form on the spilled product. If the ball crumbles even before cracking appears, then the solution has poor viscosity. If cracks began to form on a third of the diameter of the product, then the solution can be considered normal. Cracks that appear in the middle of the product indicate the need to add a little more sand to the mixture;
- With their own hands, they make two round samples of 50 mm in diameter. A cake is made from one ball, the products are left to dry in the shade for 2 days. If cracks appear on the samples during this time, then it is necessary to add more sand to the mixture, since the clay is oily. If the ball is dropped onto a wooden board, and after that it remains intact, then the solution turned out to be good.
Features of masonry oven for a bath
To fold a full-fledged stove for a bath, a foundation with waterproofing is first made for it. Installation of the base is carried out below the flooring, using a cement mixture.
At the level of the floor surface, at the location of the oven door, an iron sheet is arranged.
At first, each row of brickwork must be folded without using mortar, in order to select bricks with the same parameters and determine the thickness of the future seam.
At the same time, do not forget that each row of masonry must be started with a corner brick.
Then you need to collect water in any container, and immediately before laying the brick, lower the brick into it for a couple of seconds.
The presence of water is necessary so that the drying process of the erected structure proceeds evenly, and the dry brick cannot take moisture from the solution.
For each row of brickwork, its own scheme is developed, it is also called ordering. The different ordering of the sauna stove in its own way affects the ability of the brickwork to give off heat.
Any ordering scheme proposed below can provide a different appearance and size of the oven for the bath.
The orderly laying of a sauna stove can be performed as follows:
- Using a trowel, a certain amount of clay mixture is laid out and leveled over working area - at the place of laying the first row of brick blocks. The blocks are taken one by one out of the water (soaked for no more than 20 seconds), then set on the solution;
- When laying, the brick is compacted with a trowel, making sure that the thickness of the mortar joint does not exceed 5 mm. Excess clay mixture is removed with a trowel;
- After laying the first brick, the end of the next one is treated with a solution and attached to the end of the first, already laid. Thus, using the clay composition and applying the step of compacting the products with a trowel, the first row is laid. All subsequent rows of oven masonry are laid according to the same principle;
- When the first 3-4 rows of blocks are laid, the resulting facade is wiped with a damp cloth in order to improve the visual perception of the order and it is easier to control the subsequent process of ordering;
- The next row of blocks is laid in the same way as the first one. In this case, the vertical alignment of the seams must not be allowed. Vertical seams of one row should be overlapped by the middle of the body of the bricks of the second row.
In the process of work, it is not allowed to use quarters of products for laying with a chip inside the stove or chimney - under the influence of high temperatures, the chipped blocks will gradually collapse.
Tips for laying the combustion chamber and installing stove appliances
The chamber for the heating of the sauna stove is built only of fireclay bricks; a combination of products made using different technologies is unacceptable.
If we compare refractory and simple bricks, then both materials have different degrees of thermal expansion. When laying fireclay bricks, only fireclay clay should be used.
If you watch the video carefully, you will notice that brick blocks are laid on the edge during the construction of the sauna stove.
At the same time, gaps of at least 50 cm are left between the inner walls of the furnace and the walls of the combustion chamber.
Since stove appliances (doors, grates) are made of cast iron, it is recommended to mount them with a gap, otherwise the heated metal will tear the masonry.
The grate is equipped without mortar; on occasion, the grate should be easily removed.
All kinds of oven doors are fixed to the structure due to the special holes in them and the use of soft wire, which is fixed in the masonry seams.
When fastening, the devices are also installed on the mortar mixture.
Many people dream of building a real Russian bathhouse in a private house or in the country. It is not only a pleasure, but also a healing procedure. In the article we will answer the question of how the brick oven is laid for a brick bath.
The positive effect of visiting the bath comes from a combination of very high temperature and humidity. In a real bath, the humidity should be at least 60–65%. This result is achieved with a constant supply of hot steam. To get this effect, the steam room must have a reliable and good stove. It will be much cheaper to make this design yourself.
Advantages and disadvantages of a brick oven
Everyone, starting to think about building a furnace, is faced with a choice: which one to put, metal or brick? For the right choice you need to know all the characteristics of this design. The pluses include:
- low thermal conductivity;
- such an oven is fireproof.
There are also disadvantages:
- the complexity of the masonry;
- laborious work;
- high cost of construction.
Preparatory work
The laying of a sauna stove begins with the preparation of a drawing, which must comply with fire safety standards. Also, the oven must meet other requirements:
- Air heating in the steam room should be at least 45 degrees.
- Providing sufficient steam when watering stones.
- Gas and smoke should not be emitted.
- Economical.
When the drawing is ready, you can proceed to the selection of materials. To do this, you need to know its characteristics: coefficient of expansion when heated, fire resistance, corrosion resistance and strength. Based on this, you can decide what specific material is suitable for you for the construction of the conceived furnace.
Clay
Clay is the main material in the manufacture of the oven. Baths are laid using clay. With high plasticity of clay, it is worth adding sand to it. If the viscosity is low, the fillers are removed, "elutriated".
Attention: do not forget that when soaked, the volume of clay increases. When dry, it decreases. When masonry is made in conditions of high humidity, or at temperatures below 0 *, the clay tends to swell. Such masonry will be unusable.
Clay solution is not used:
- When constructing chimney heads.
- In the construction of ventilation ducts and external walls of the chimney.
- When making a foundation for a furnace.
- In the manufacture of indigenous chimneys.
Clay is actively used for waterproofing. In this work, her qualities are suitable, such as: when she completely absorbs water, then she is no longer able to let it pass through herself. There are three types of clay:
- Refractory clay - over 1580 *.
- With refractoriness 1350-1580 *.
- The clay is fusible, below 1350 *.
Consider these parameters before starting construction.
Brick
Nowadays, there are many types and brands of bricks. He has different shape, many colors and shades. During production, bricks go through the stage of burning and there are three types:
- Red well burnt, having smooth edges and walls, when tapped on its surface, a "metallic" sound is heard.
- Pink, unburned brick, a dull sound is heard when tapped. Used when laying less important areas of the furnace.
- Dark brown burnt brick... Used in the manufacture of the foundation.
General masonry scheme
The scheme of laying a stove for a bath is as follows (see DIY brick oven for a bath). Here we look at the stages of the work ahead.
- The location depends not only on the desire, you should also follow the fire safety rules. The oven must not be removed less than 30 cm from the wall of the bath.
Attention: The distance can be reduced by gluing on wooden structures sheets of asbokarton. This will reduce the distance and will not violate fire safety rules.
- Only high-quality and durable brick is used in the work. Do not use hollow, silicate and slot bricks. They have a low quality of heating and do not warm up the premises, they quickly collapse. If there is good old brick, it should be cleaned and can be used.
- After complete preparation, a clay-sand mortar should be made, on which the oven for the bath will be laid.
- Select a brick of the same size so that the seams are the same height.
Attention: To determine the correct location of the structure, lay the first row of bricks on a dry one, then lay the first row of the chimney, then check the alignment of the angles of the structures with a plumb line (you will need this when making the chimney). Do not neglect this detail. If you do not make a perpendicular, there will be great difficulties in the removal of the exhaust gases.

- The brick should be wetted before laying. Apply the required volume of mortar to the desired place using a trowel. Next, with a trowel and hands, you need to seat the brick until the joints are completely filled. All excess solution is removed.
- During the masonry process, you should periodically check the corners with a plumb line or rail.
- The smoothness factor of the inner walls is very important. Do not forget to ensure that there are no chips of material and mortar residues on the inner surfaces.
- Do not rub the inner surface with clay. After drying, it begins to flake off and this clogs the chimney.
- Start laying the next row only after the first one is completely finished, checking the correctness of laying with a level.
- Additional elements stoves are installed directly during masonry.
- The doors to the stove are mounted using annealed wire, diameter 3 mm... A seal is made along the edge of the door with an asbestos cord. This will avoid the expansion coefficient of the metal surface.
- The finished oven needs to be dried with open doors and windows for about 3 days.
Instrument should be prepared:

- Level.
- Roulette.
- Trowel.
- Hammer with rubber attachment.
- Bulgarian.
- Brick hammer.
- Buckets for water and cement.
Preparing clay mortar
Brick lining of the sauna stove is made using clay-sand mortar. The quality of the design and the aesthetic appearance will depend on the correctness of its preparation. The most optimal ratio of sand to clay is 2: 1. For every two parts of sand, put one part of clay.

- It is worth sifting all the components for preparing the solution through a sieve, this is done to remove debris and small pebbles. Better to take fine river sand. The sieve must have openings up to 5 mm.
- We put the resulting components into a box for preparing a solution. Fill with water in a ratio of 1: 4 from the volume of the dry mixture and leave. It is best to make a clay solution in the evening and let it brew. She'll be ready in the morning. Stove-makers say "the mixture will turn sour". This will allow any lumps to mix more fully.
- The solution is very thoroughly mixed until a homogeneous mass is obtained (it takes the form of sour cream). To facilitate this process, you can use an electric drill mixer. The drill should be used at least 1200W.
Start of work on the sauna stove, masonry
When the necessary tool is prepared and the drawing is ready, materials are available, you can start the main work.
Foundation
The foundation is the foundation of the structure. It must withstand the weight of the building, not crack and shrink.
- We mark the place for the foundation with a cord... It must exceed the size of the structure of the order 20 cm.
- We dig a hole of about 50 cm and fill it with grade 100 concrete... Or fill it with rubble and fill it with a solution of river sand and cement grade 400, prepared in a 2: 1 ratio. The mixture is brought to a liquid state.
- Let it dry. This takes about 3 days. We make a platform out of bricks in one row along the perimeter of the foundation... This will be the basis for masonry. The site should be made with special precision. Be sure to check with a level the parallelism of the ground axis.
Masonry
To start work, you will need two pieces of roofing material, the size of the prepared foundation.
Attention: Make sure that the edges of the grates do not rest against the walls of the brick. There should be a gap. When heated, the metal will expand and exert pressure on the walls. This cannot be allowed.


Attention: Do not lay bricks of the 10th row when the slab is lying down. As the brick is tapped, the mortar will be squeezed onto the surface of the slab. In this case, the plate will be rigidly fixed. This should not be allowed.
- Install the top with stones. It is better to buy ready-made and hermetically secured.
Ovens do not react well to temperature changes. The masonry is displaced, resulting in destruction. To prevent this, a frame is made from a corner. When installing the frame, the service life of the furnace increases to 10 years.
Exhaust gas discharge
After finishing the installation of the stove, you should think about the chimney. There are two types of ducts suitable for chimneys in a bath. A single-turn or multi-turn duct system facilitates the unimpeded discharge of exhaust gases.
- Single turn - in which the gas makes one full revolution, as well as one lowering, before completely leaving the smoke channel. The downstream channel can be one or several. To reduce the output resistance, the channels can be arranged in parallel. In this case, the oven will warm up evenly.
This system is convenient and simple, but only suitable for small ovens. In a large oven, with a single-turn system, only the upper part will warm up.
- Multi-turn- heats up all parts of the furnace, increases the resistance of gases at the exit. Channels can be placed horizontally or vertically. But the walls are heated unevenly, this leads to cracking of brick surfaces.
There is also a channelless system. There are no channels in it, but there is one camera. In such a design, the resistance of gases is not great, but there is one very significant drawback - strong heating of the upper part of the structure. The gases after passing through the channels exit through the chimney. They move along it due to different densities and temperatures in the upper and lower parts of the structure. With a smooth surface that does not have defects, the thrust is increased. When installing the structure, special attention should be paid to the quality of the masonry, since even minor defects impair traction. Preheat the oven for at least one hour for the first time, remember to fill the tank with water. Place stones in the heater up to the upper level. Remember, the extra ones do not warm up to the temperature of normal steam formation.
Fire safety requirements
The lining of the stove in the bath must be carried out in compliance with fire safety standards. Installation of furnaces and installation of chimneys is carried out in accordance with SNiP 41-01-2003. The distance from the structure to flammable materials should be:
- To the sides and back - 50 cm.
- Forward - 125 cm.
- Up - 120 cm.
- These distances can be reduced by a factor of 4. The brickwork must be higher than the top of the kiln by 50 cm.
- Different screens should be used for safety.
- The distance from the unprotected ceiling to the fire door must be at least 125 cm.
- The distance between the ceiling and the top of the stove must be at least 120 cm.
- When installing an extended combustion channel, it should be separated by brickwork from flammable surfaces or use a special protective screen at a distance of at least 26 cm.
When assembling the chimney, consider the possibility of free admission to cleaning the structure.
The modern construction market provides an opportunity to simplify the construction of a bath, using instead of its traditional electrical modification or made of metal. However, no species can replace brickwork, because only this material will be able to warm up the room well and keep it warm for a long time. In addition to the fact that a brick stove is the best source of dry steam, it is she who gives the true meaning to the bath room and allows you to completely cleanse not only the body, but also the soul.

Diagram of a stone oven for a bath.
Putting a brick oven in a bath is a very difficult task. And before starting it, you must have some knowledge and some experience of such work. Then putting a brick oven will become a real opportunity. Moreover, it does not need facing work and a too complex masonry tool will not be needed.
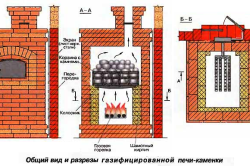
Diagram of a brick gas oven.
Finished heating structure the sauna must meet the following requirements:
- the air temperature in the bath should not be lower than 45 ° C;
- when watering stones with water, there must be a sufficient amount of steam;
- no smoke or gas should be emitted during the combustion process;
- the device of the furnace should economically consume heating material.
Preparatory stage
Any construction begins with measurements and drawing up a diagram. The device of the oven in the bath is no exception in this case.
To draw up drawings, you need to pick up a photo with the stove shape you like and, in accordance with the image, start developing a design diagram.
After that, decide on the size, location and draw up a brick ordering scheme.
In this case, correctly drawn up drawings will help not only to correctly lay out the walls of the stove, but also to determine the amount required building material: mortar, brick and other components.
The shrunken layer is covered with 10 cm crushed stone and compacted. Further, inside the pit, you will need to make a formwork with a reinforced frame. In this case, a 10-cm gap must be left between the formwork and the sides of the pit. All this is poured with concrete and dries well. Then the formwork is removed, 2-3 layers of melted tar are applied to the sides, and the gap is filled with coarse sand or fine gravel.
Further, the surface of the finished foundation is covered with roofing material, which serves waterproofing material for a sauna stove. Since when moisture gets on a brick, its properties deteriorate, this leads to its rapid destruction.
Technology
Installation diagram of the oven in the bath.
First of all, we will prepare the masonry solution. This will require clay and sand in a 1: 2 ratio. In the container, the clay is kneaded well and filled with water. Everything mixes well. To speed up this process, it is recommended to use a hammer drill with a mixer. The consistency of the mixture is this stage should resemble thick sour cream. Further, slightly moistened sand is gradually introduced and also thoroughly mixed. The solution is considered properly prepared if, by pulling the stick out of the container, you can see the remaining clay mixture on it in a few mm. If the layer thickness is less than 1 mm, it is necessary to add clay, and more than 3 mm - sand.
Brickwork at the bottom of the oven
Scheme of a brick sauna stove.
- The first two rows of bricks are usually laid out in a solid, and this place is called the stove pillow. For this, a cement mortar is used, since the temperature in this part is minimal, and the strength of the masonry must be high.
- After an even base is obtained, the third row begins to be laid out according to the scheme. At this level, as a rule, a blower door is installed, grate and equip an ash chamber. The installation of the blower door is carried out using galvanized wire. We install a door in the middle of the wall, and its lower fasteners are laid out on the surface of the brick. To prevent the wire from interfering with the process, grooves are made on the brick, into which the wire is laid. In the same way, the upper part of the blower door will be fixed on the sixth row.
- Before laying the next row, we carefully check the corners and then lay out four rows around the entire perimeter, since the installation of the grate and the ash well begins, the functions of which include cleaning the firebox from ash and drawing out combustion products. And the wrong angle of inclination can cause smoke to enter the steam room. On the sixth row, we finish attaching the blower door.
- On the seventh row, we install the grate and furnace door... To keep the lattice on the same level with the masonry, a cut is made on the brick, where the lattice is laid. The grate is fixed due to the solution laid out on the sections, after which it must be pressed and tapped with a trowel. Under no circumstances should the oven walls come into contact with the grate. Since when heated, it will increase in size and press on the masonry. This can compromise the integrity of the structure. Therefore, if the grating does not match the size, it must be cut with a special tool for metal. The firebox door is installed in the same way as the blower door.
- At the same stage, in the front of the furnace, we equip an opening for a metal tank with water. The container should be located on the side walls of the masonry. In places of contact with the brick, the tank is wrapped in two layers with an asbestos cord.
- We continue to lay out the brick rows. The eighth row of masonry is made with a partition where the chimney will begin.
- We lay the tank in the ninth row and mount the stove. We determine the exact dimensions of the slab and cut it off so that it fits onto the brick by at least 25 mm.
- Brick laying is carried out before the end of the furnace and then chimneys are installed according to the scheme.
Knowing and observing the basic principles for a bath, you can make a reliable and good design with your own hands, as well as significantly save money.


