The next summer season begins, and many owners of private estates or summer cottages want to build a comfortable, high-quality outdoor shower for their summer cottages. Usually, you can always find construction material for the construction of such a structure, for example, use the remains of a recently made repair or any construction.
Building materials that could not be obtained (details of the frame, a suitable container for warm water etc.), must be purchased in advance in specialized stores or markets. Any man can build a summer shower with his own hands. The basic skills and knowledge in the field of construction, as well as the ability to use the right tool, will be enough.
Many options for building a summer shower have been developed. Consider one of the acceptable methods that will allow you to build a good outdoor shower in a couple of days at the most.
The most important structural elements of a summer shower for a summer residence
The most simple, uncomplicated design of a summer shower is a cabin rectangular... The length of its sides is determined by the characteristics of the complexion of people who are expected to use the product.
Important! The interior space of the booth should not be made too cramped. It is imperative to provide an auxiliary space, reliably isolated and protected from splashing water. In it you can have hygiene items, as well as personal items!
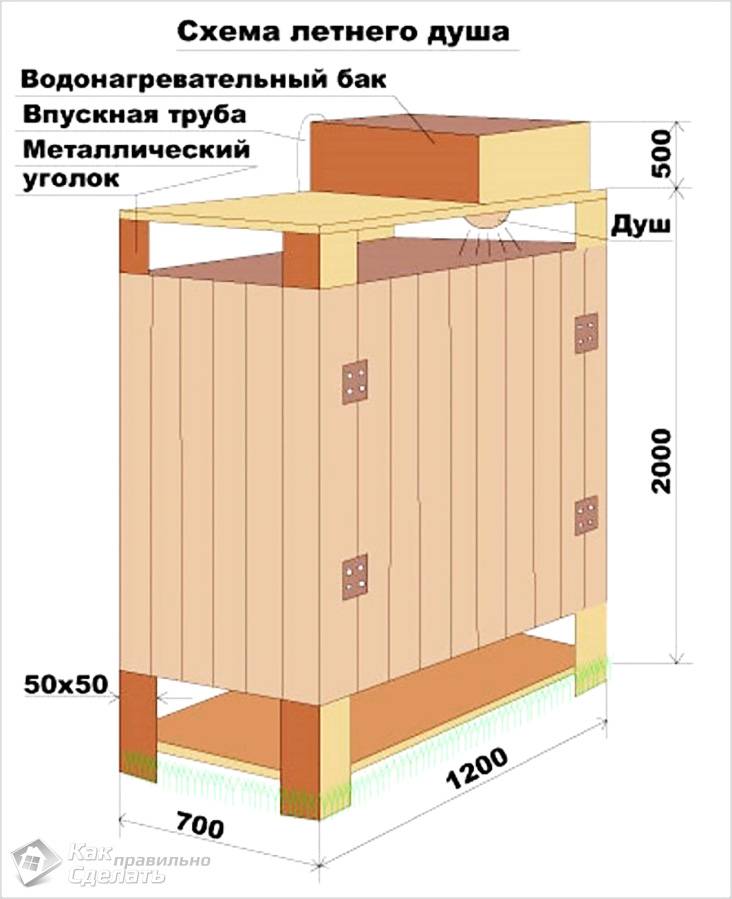
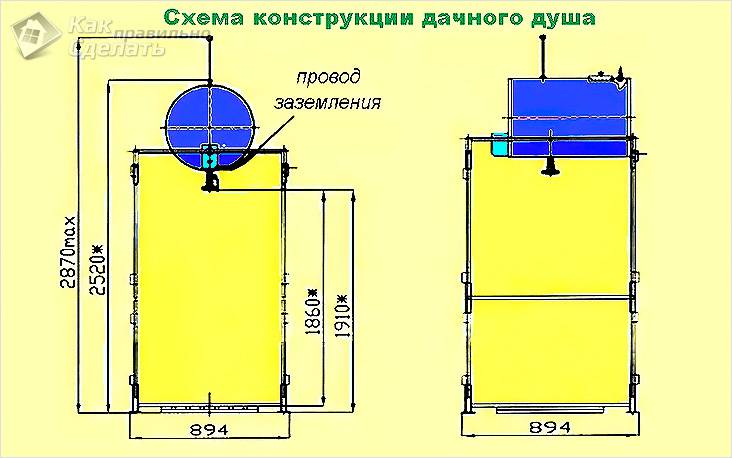
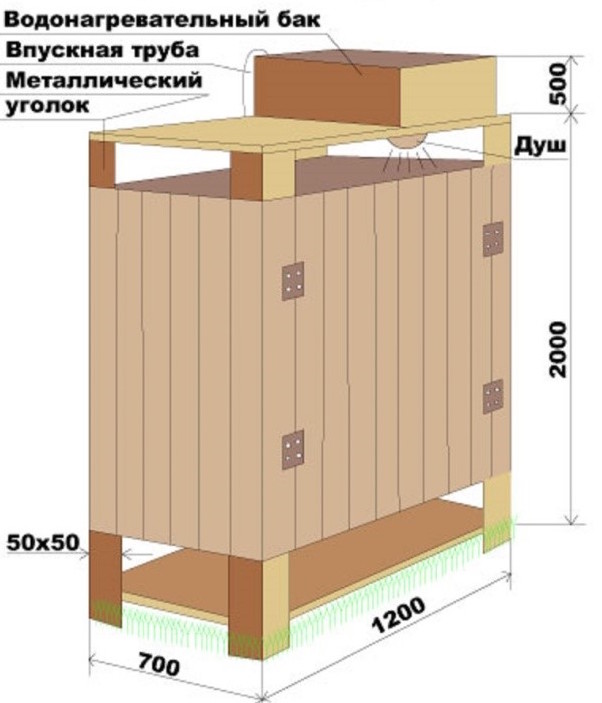
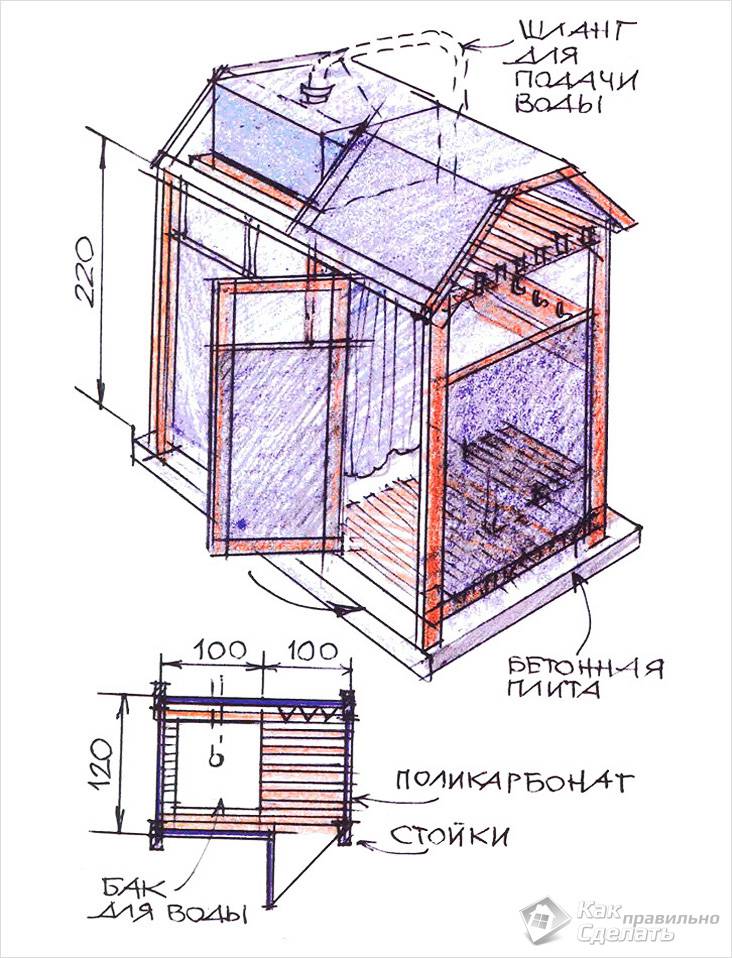
 The following optimal dimensions have been determined for the shower stall:
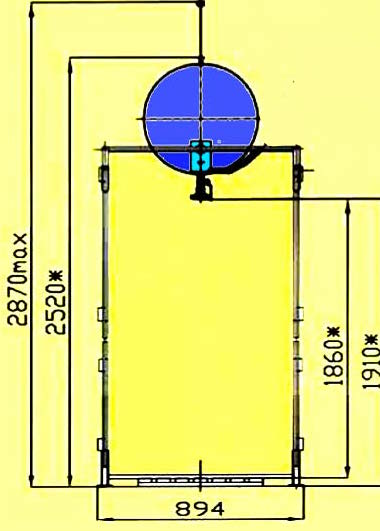
- height to the shower head - 1915.0 or 1855.0 mm;
- wall length - 895.0 mm;
- the height of the structure (taking into account the tank on the roof) - 2875.0 or 2525 mm.
Advice! If there is free space on the site, the length and width of the structure can be increased by 110.0 mm to expand the total and usable area of \u200b\u200bthe booth!
We give the structure the proper stability
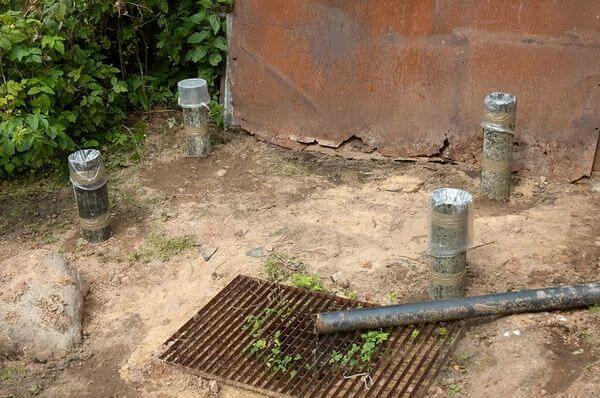
For the stability of a frame built from a wooden beam, it is necessary to build a pile-type foundation under it. To do this, you should get a garden drill and dig channel holes in the ground with it to a depth of 1.15-1.45 meters. Then pipes are lowered into the prepared pits so that their ends protrude 26.0-31.0 cm above the ground. Asbestos-cement pipes (diameter 100.0 mm) or metal products similar in diameter (regular or shaped pipes) can act as support piles.
Read also: DIY brick garage construction
 Recommendation! So that the skeleton does not collapse from the load (water in the tank), it is necessary to take a beam of at least 100.0x100.0 mm for its construction, and to extend the operational life, the tree can be impregnated with various protective compounds (fungicides, water repellent, etc.)!
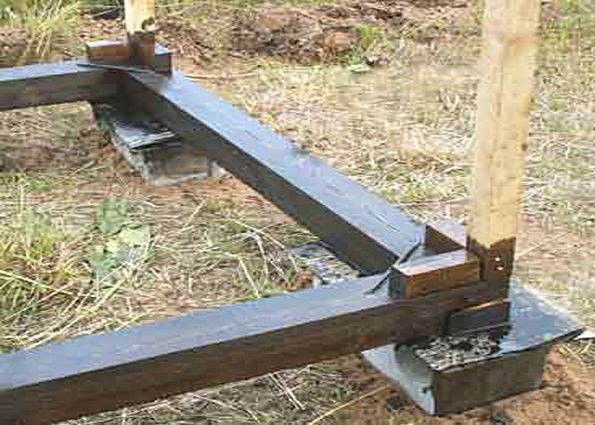
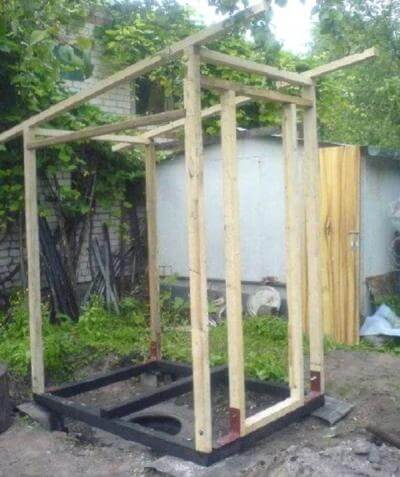
A well-hewn timber is installed on the foundation and the binding of the posts from top to bottom begins. Of course, the frame must first be assembled on the ground, and then, with the help of long bolts, fixed on the posts. In this case, the lower dressing plays the role of a lag for arranging the floor in a summer cottage shower under construction.
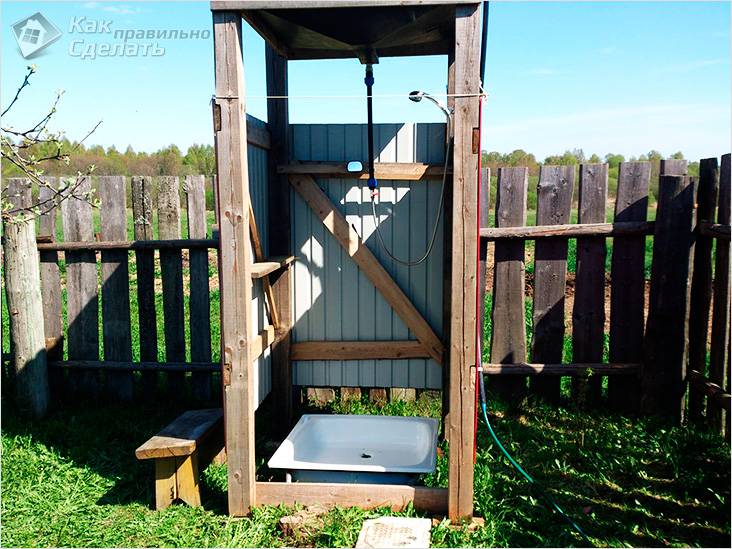
 Previously, there was only one way to install the floor - in the summer shower, it was made of wooden planks with the formation of wide slots for the drainage of washed water. Now, along with this method, a metal tray is installed (as in a home shower) with a drain hole. Through it, the waste water is discharged through a pipe to the side, for example, into a drainage ditch or grass thickets. Neighboring pillars are connected by rigid slopes - special elements that are not mounted overlapping.
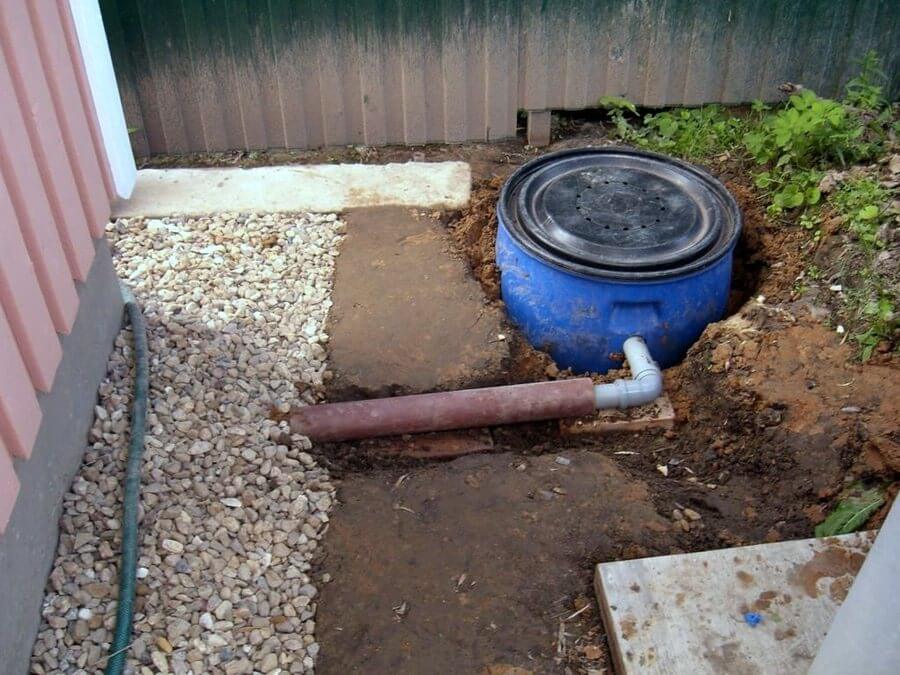
We make a septic tank for the accumulation of drains
When developing a project for a summer cottage shower with a special septic tank for collecting drains, you need to remember the method and place of its placement. It is unacceptable to install a septic tank directly under the booth. If you ignore this recommendation, then a specific (putrid-stale) smell will quickly appear in the shower stall.
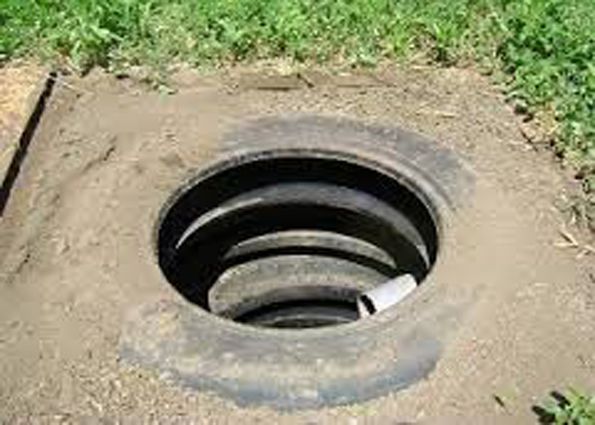 In addition, more significant problems may arise - the destruction of the foundation and soil. That is why the septic tank must be placed a couple of meters from the mounted country shower stall. You need to withdraw to the septic tank drain pipe or, as an option, a gutter lined with a waterproof material (hydroglass, PVC foil, roofing material).
Read also: Sectional doors (photo): application, advantages and disadvantages, types, stages of installation
Summer shower finishing materials
The most budget solution is to cover the frame with opaque polyethylene, however, such a structure will not last more than a year.
 As a rule, the frame of the shower is sheathed with the following materials:
- lacquered clapboard;
- moisture resistant plywood;
- siding;
- slate sheets (flat or wave);
- professional sheet;
- Fiberboard, etc.
An important nuance! In order to preserve the unity of the general style and harmony in the design of a household allotment or a summer residence, design experts advise covering an outdoor shower with materials used in the decoration of nearby structures or buildings!
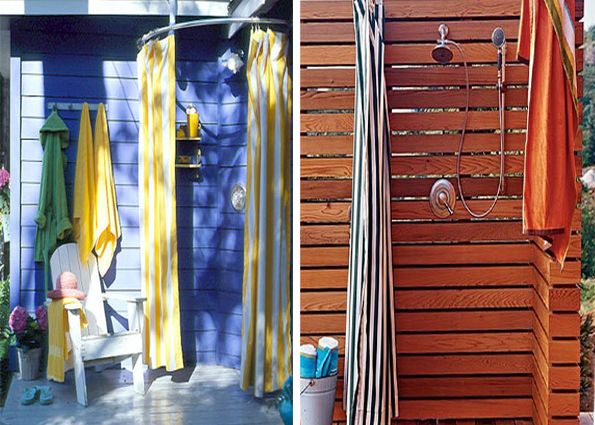
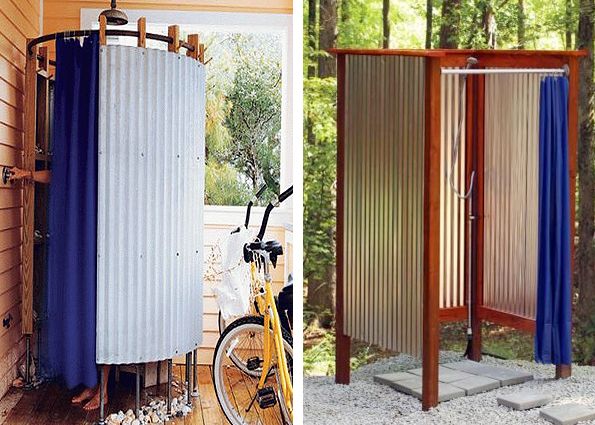
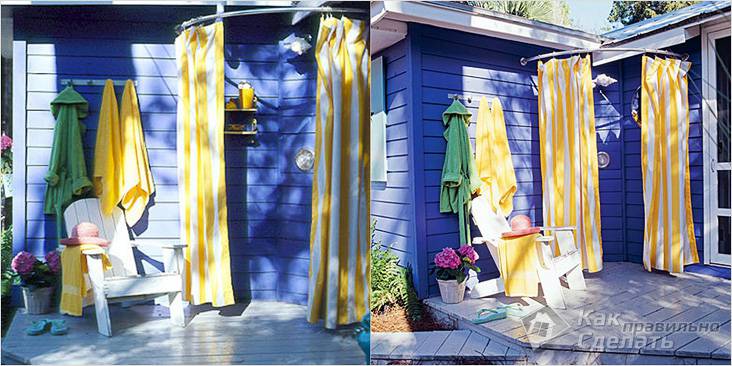
 A waterproof curtain can be used as a covering (fencing) element. It can be easily and simply moved in any direction after the completion of water-hygienic procedures. A wooden door will look more aesthetically pleasing and reliable, closing which you can not be afraid of the invasion of "random guests".
Principles of attaching a watering can
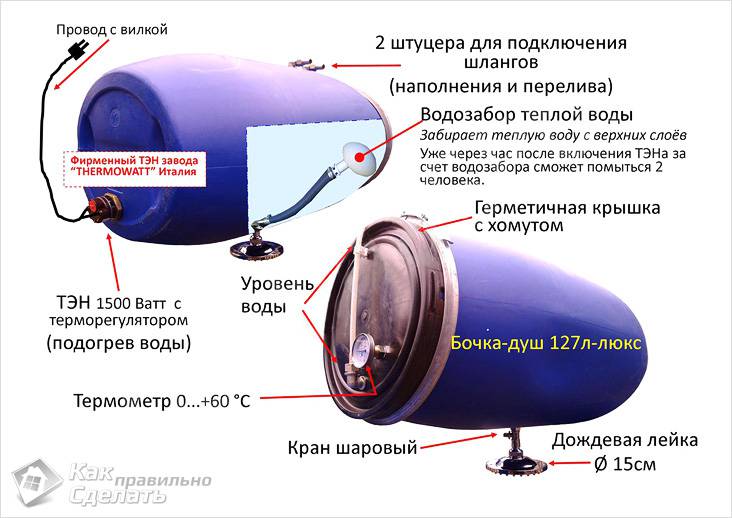
A plastic container or water barrel is mounted at the top (roof) of the summer shower structure. Faster and more optimal heating of water by solar heat will ensure the coloring of the reservoir surface in an intense black or deep brown color. Water can be drawn into the installed container using an electric pump or by hand with buckets. If a pump is installed, then it must be equipped with a special plumbing valve that allows you to stop the water supply after filling the volume of the barrel.
The price for a ready-made outdoor shower depends on its comfort (the material from which the shower walls are made, the assembly method and the presence of a water heater). The advantages of a country shower cannot be overstated. You need to choose which outdoor shower in the country with your own hands you want to build:
- Temporary - construction for 1 season
- Capital - a perennial building that can be left for the winter.
Let's take a closer look at how to make a country shower yourself.
Choosing a place for a country showerTo begin with, you must decide exactly where the shower will be located and you need to know some more points: 1. Where exactly the water you use will flow;
2. In what way will the reservoir that is located on top be filled with water;
3. If you do not have an automatic water heater, then you need to choose a sunny place in your area so that the water is heated from the sun's rays.
2. Shower drain.
If you have a drainage ditch on your site, then it is better of course to connect the drain to it. But if you do not have a ditch, then you need to dig a not deep hole into which the used water will drain. It is better to make the depth of the pit so that it does not have time to overflow. The drain can be led out with a pipe so that the water can flow to where you need it, for example to moisten the soil.
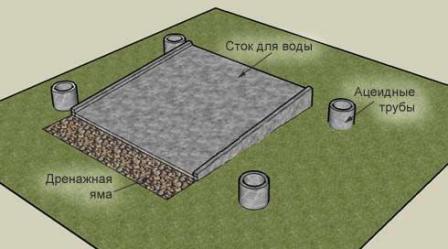
Under no circumstances should a drainage hole be made under the shower itself, because the soil under the shower will erode and this can lead to the destruction of the structure. therefore drain pit best done a few meters from the shower itself. The outflow of water can be done using the most common waterproof materials. You can use PVC film, roofing material, hydroglass, while laying them on an inclined embankment. A more reliable and high-quality version of the water drain is with the help of a gutter made of concrete screed using a metal reinforced mesh. It is not recommended to make a drain of water from clay and materials that, with frequent use of the shower, will quickly get wet and washed out with water.
3. Shower frame.
Any available materials can be suitable for the frame. For the walls, you can use film, ordinary boards, or even slate.
For the frame, it is best to use four metal pipes, you can of course use wooden posts, but they are less reliable than metal ones. To make the frame strong, dig four holes in the ground for each pillar and insert them into the holes, then zebet the whole thing. For concreting, you can use cement mortar, throwing fragments of bricks into it. After the mixture has completely dried, you can start decorating the walls of the shower.
Summer is the time when it's time to go to the country house and do gardening to the fullest. Shower is an irreplaceable device for summer cottage, in it you can cool down after working in the garden, as well as cleanse yourself of dust and dirt. Imagine taking a shower at sunset after some hard gardening work.
Before installing an outdoor shower, you need to take into account many nuances if you want it to bring pleasure and serve you for more than one season. Of course, you can contact the experts and not watch the training videos and articles, but this material is for those who are determined to build an outdoor shower for their summer cottage with their own hands.
Showers can be made from almost all materials
Before construction
Before you start building a shower frame in the country, you need to carefully study the territory of your site in order to avoid inconveniences in the future. As a rule, the cab is located next to the main building in a well-lit area.
- Drafts and deciduous trees should be avoided, the branches of which can hang over the open structure, which can lead to contamination and clogging of the drain elements.
- Also, we must not forget about the drain, you need to create optimal conditions for the withdrawal of used water, otherwise you risk stumbling upon unpleasant consequences: the smell of stagnant water, the appearance of midges and mosquitoes, softening of the soil. We must not forget about the soil, too wet and soft soil will contribute to the deformation and destruction of the booth.
For the future design of the shower stall, the following rules should be followed:
- Choosing a design is the second step in creating a do-it-yourself summer shower. First of all, you need to figure out what materials you will use, whether they are leftover from repairs or specially purchased in the store, and then sketch out the drawings.
- It is necessary to take into account the weight of the tank with water and the strength of the structure and, on this basis, select materials, otherwise the cabin will not stand for a long time, which is even worse, the use of such a shower can be dangerous to human health.
- An outdoor shower is best designed according to the proportions of the user. It should not be too low and narrow so as not to impede movement. Optimal dimensions shower in length - 1900 mm (calculation without water tank), and in width - 900 mm.
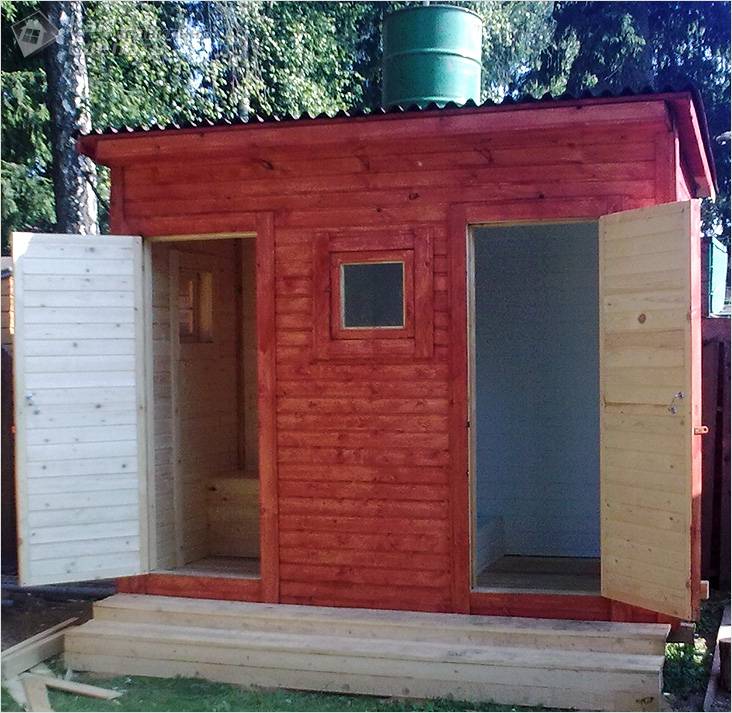
- The structure must be well ventilated so that residual water can evaporate. For convenience, you can attach a dressing room where you can put things and bath accessories, this part should be well protected from water by a curtain or fence.
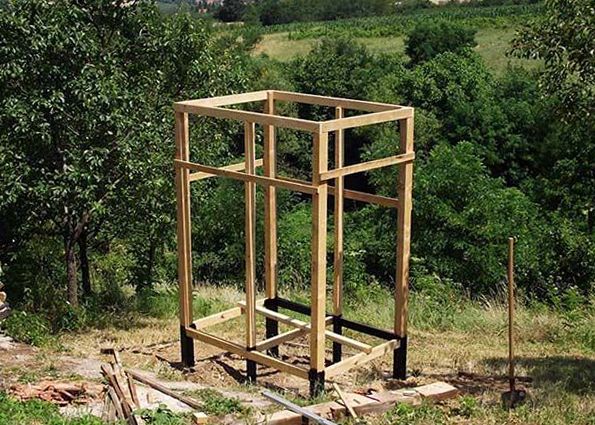
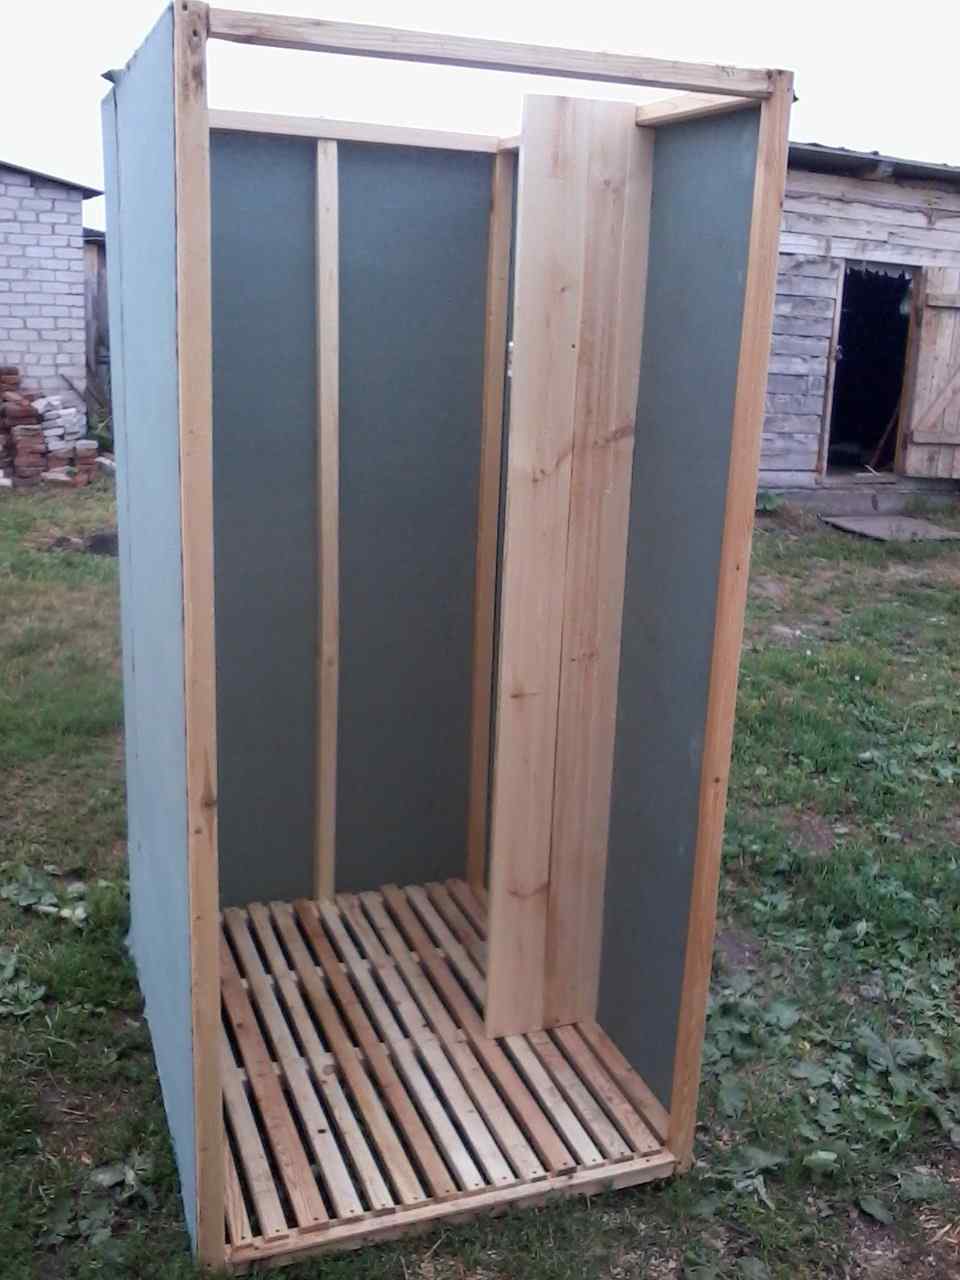
Shower cabin example
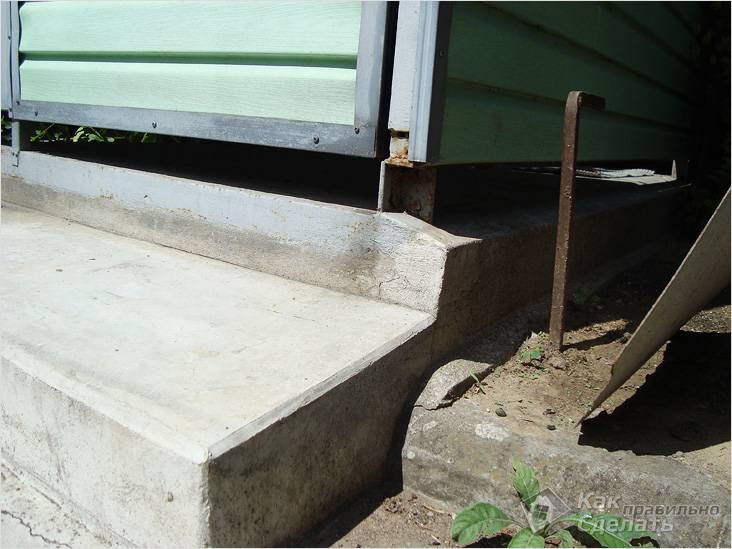
It is not necessary to build a foundation, but if the means and opportunities allow, then it is better to make a solid foundation, then the structure will last much longer, and there will be more comfort from using the shower, an alternative can be brick flooring with your own hands, on top of which you can put wooden pallets.
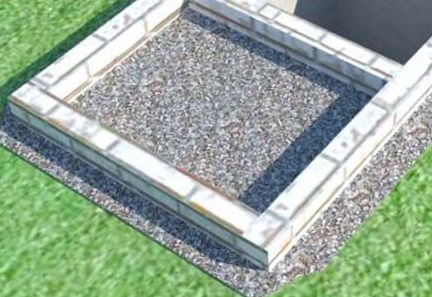
Future foundation
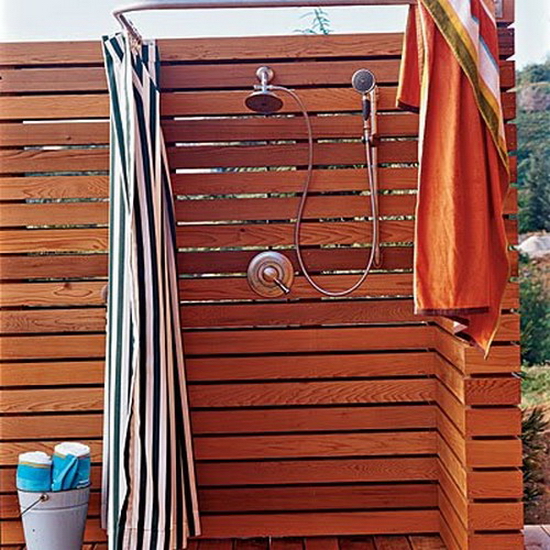
Usually, the frame for the shower in the country is built of metal or plastic construction, less often wood is used because it is not durable, most often wood is used for an open summer shower, reminiscent of an ordinary fence, moisture from such a structure will evaporate faster.
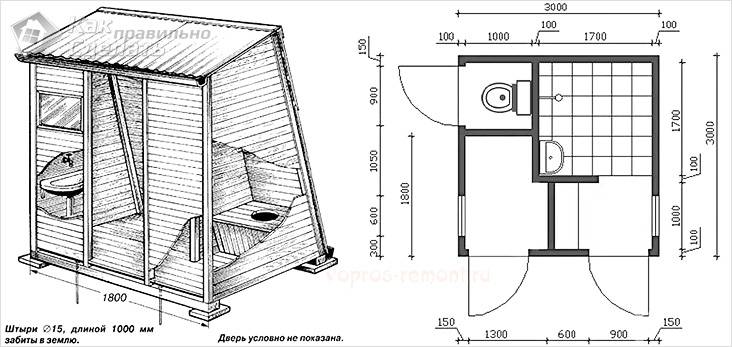
To swim not only in summer, you can build a shower in the country with your own hands with heating. A toilet with a shower at a summer cottage is an important element of a comfortable pastime.
Types of shower cabins
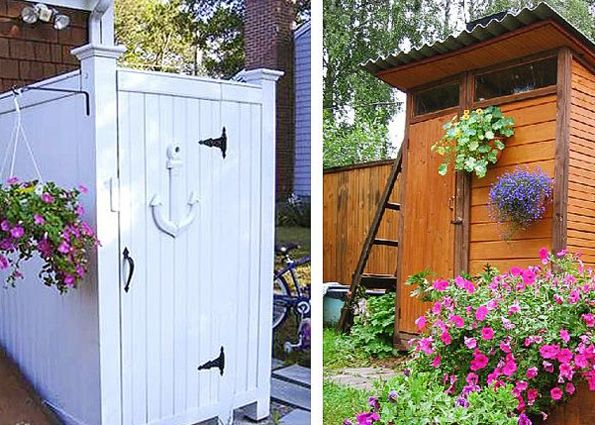
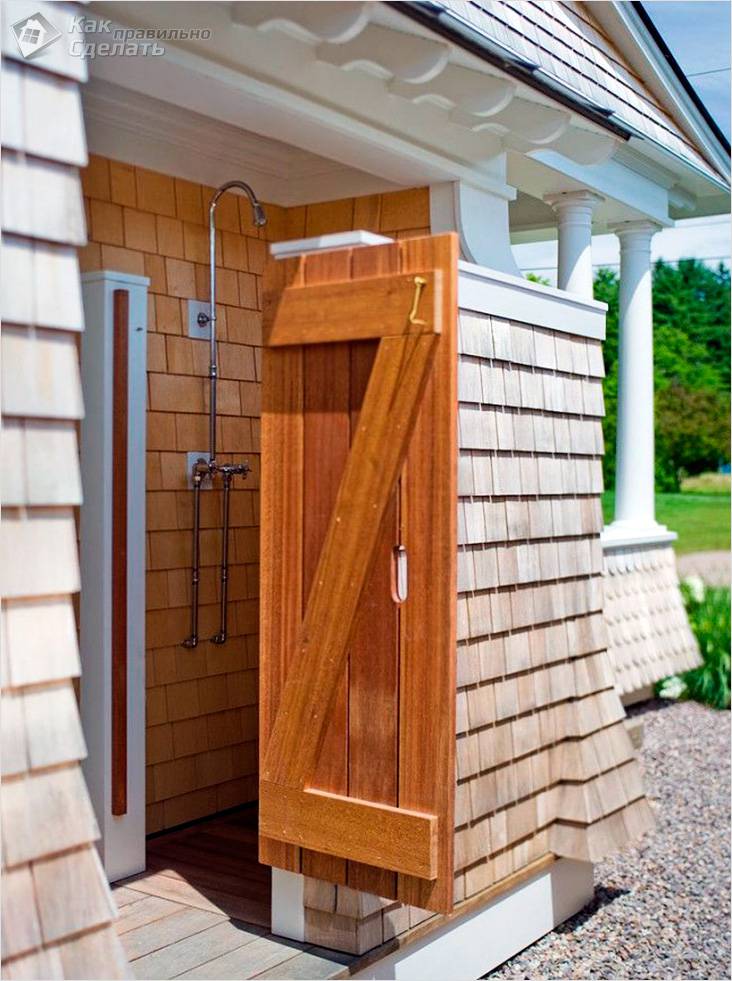
Made of wood
From wood (photo)
If you decide to make a wooden shower for a summer cottage with your own hands, you need to know that the tree will begin to rot and become moldy if it is not handled and looked after properly.
If a polycarbonate shower is installed for a summer cottage, it should be remembered that wooden doors are deformed from moisture and eventually stop closing.
In such structures, it is better to use a curtain or a plastic door made of polycarbonate, but if you still decide to put a wooden one, you can leave a gap between the door and the wall, then if the tree begins to deform, the door can be closed. The floor can be made from pallets.
Despite all the nuances, wood is the most profitable and attractive material, boards and beams can be found on every site, and the price in the store is relatively lower than analogues. If treated correctly, wood will serve you no less than plastic or metal.
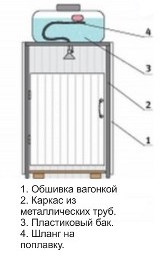
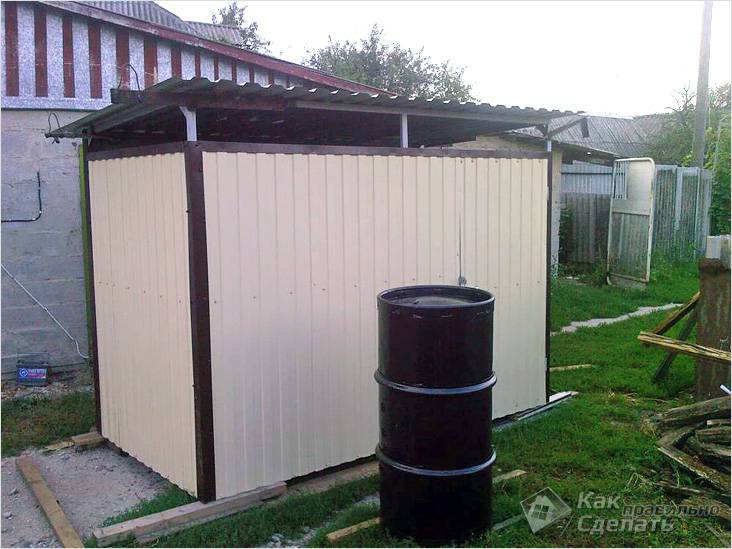
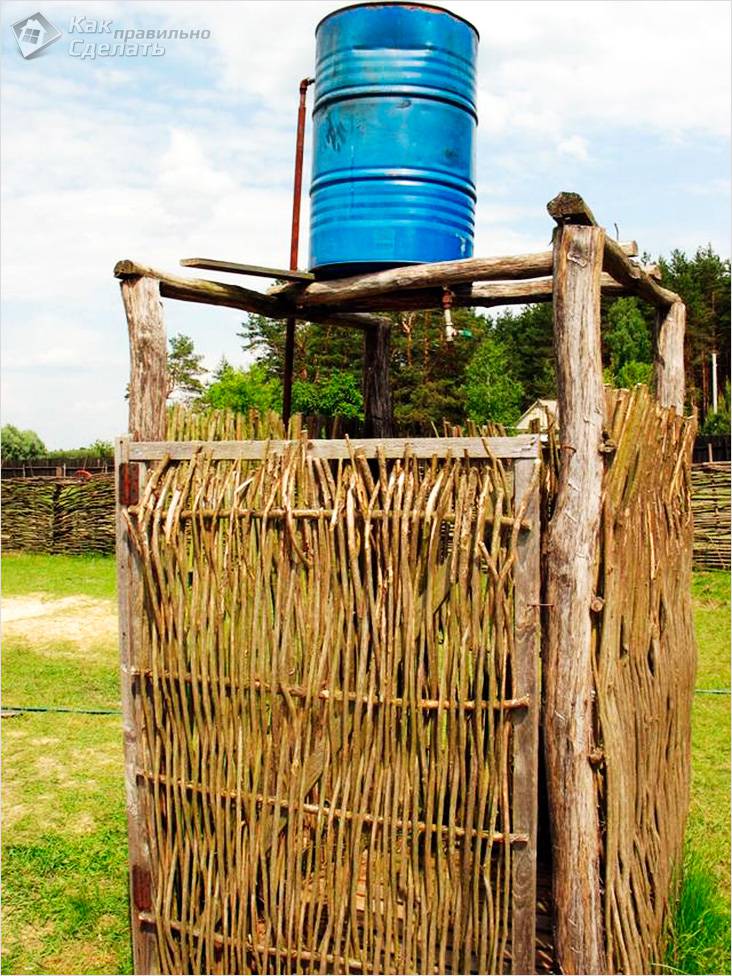
From the barrel
You decided to make a garden shower for your summer cottage with your own hands, but there are no communication means to the site? Remember if you have barrels lying around in the country, because the easiest option for you is to make a shower from a barrel.
The barrel will serve as an excellent water reservoir. The volume is sufficient for 100 or 200 liters. Such structures should be located on the sunny side so that the water has time to heat up.
It is best for the sun to fall on the barrel in the afternoon, then the water will not have time to cool down by your arrival from the garden. The barrel can be installed on absolutely any cabin, since it has little weight.
A tank from a barrel will save you money at times, but you need to remember that it is best to install a metal barrel, since plastic does not withstand frost.
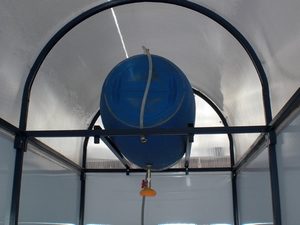
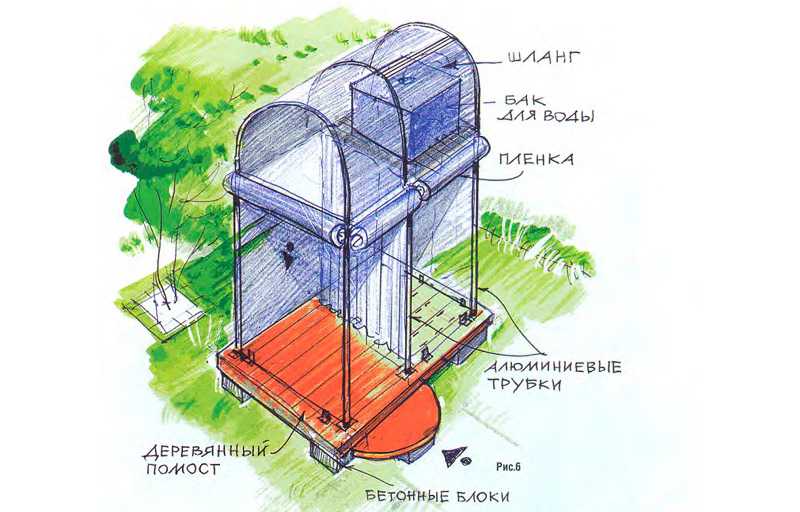
Barrel shower scheme
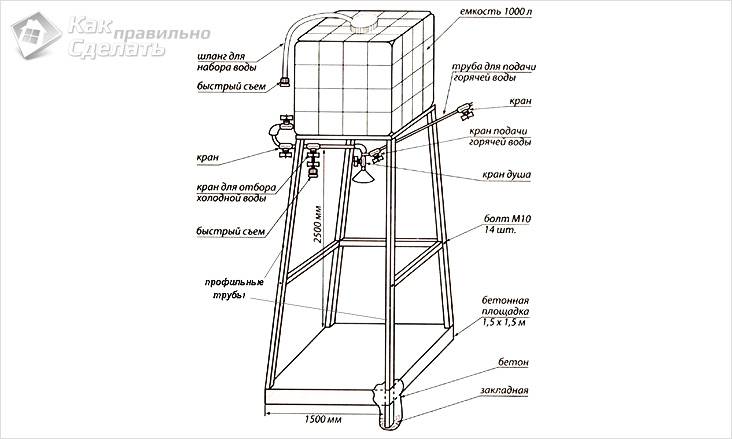
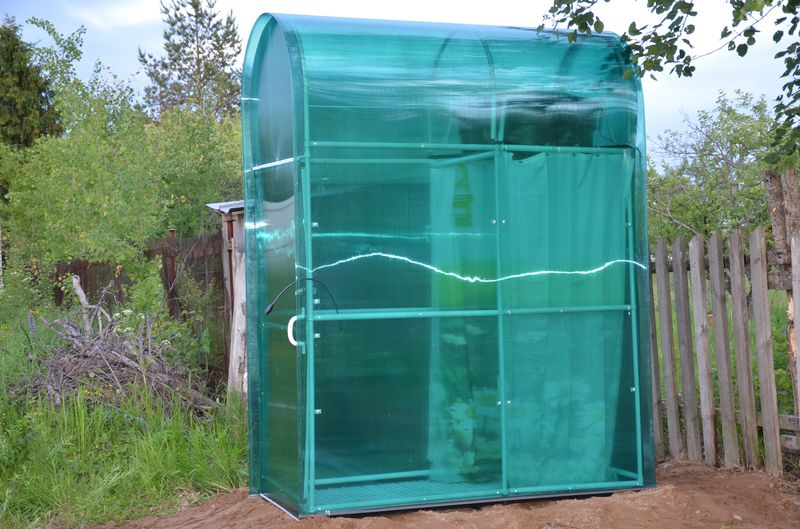
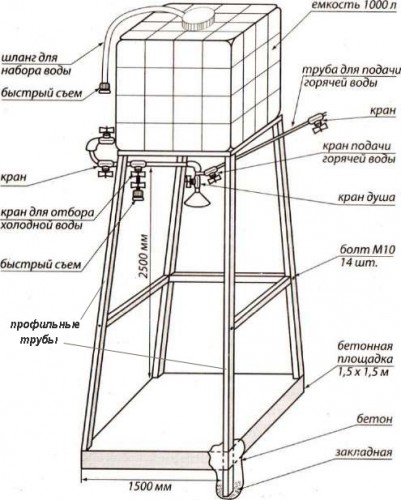
From Eurocube
Eurocube is almost the same as a shower from a barrel. The main differences are volume and shape. The Eurocube has a metal frame and a plastic cube barrel, such a structure is easy enough to insulate for the winter, the metal frame will hold the insulation
Since the volume of the eurocube is about 1000 liters, the structure must be reliable and durable, and the foundation must be concrete or brick. It is best to make the frame to order.
The water in such a tank will heat up longer due to the volume, but if you paint the surface of the eurocube with black paint, the water will heat up faster. If the use of the shower is not frequent, then the water in the eurocube can bloom and stagnate, which will lead to a blockage. See what a do-it-yourself outdoor shower looks like in the photo:
Approximate view of a shower from a eurocube
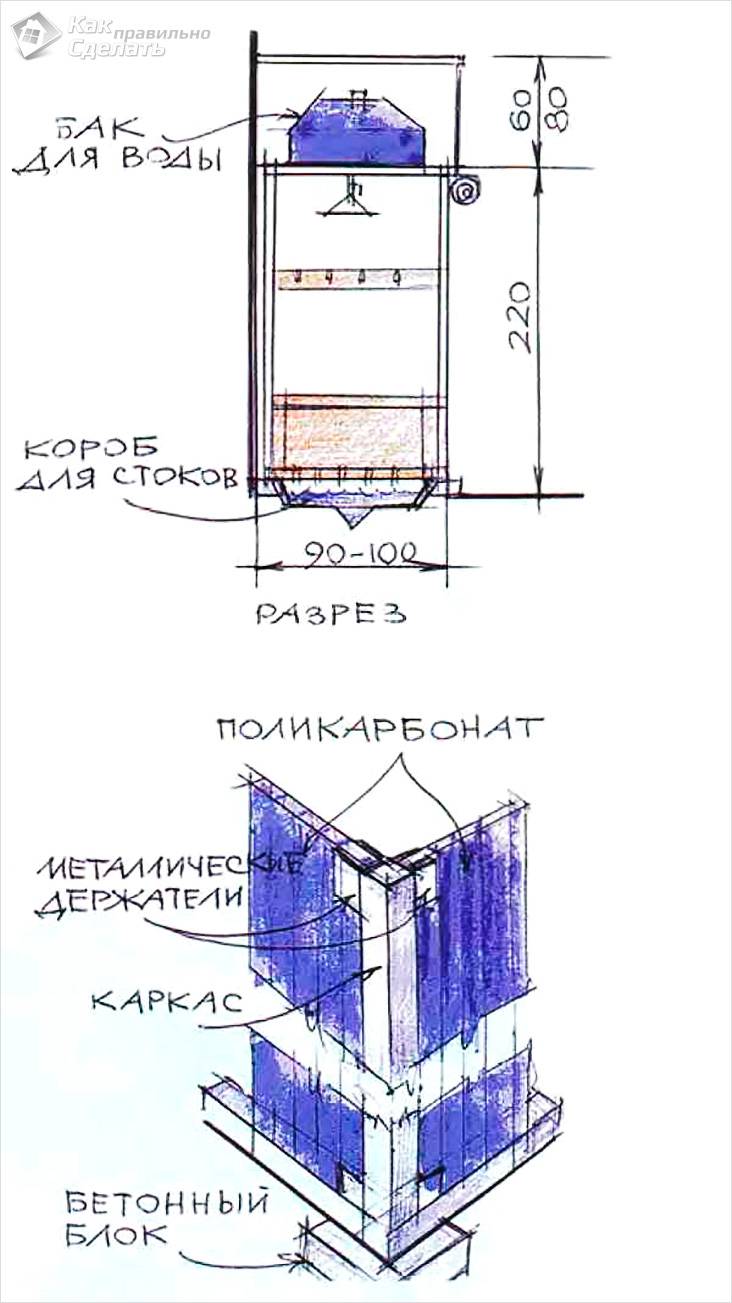
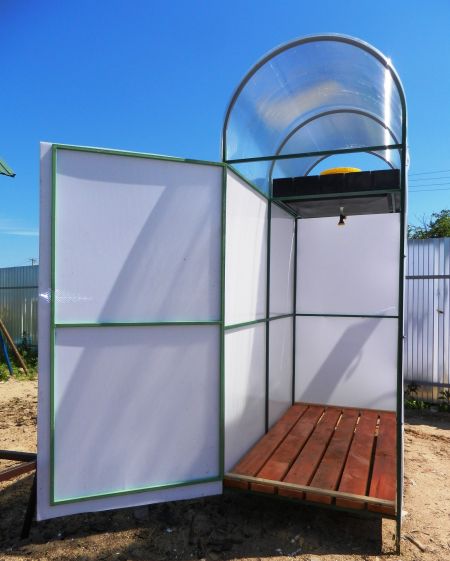
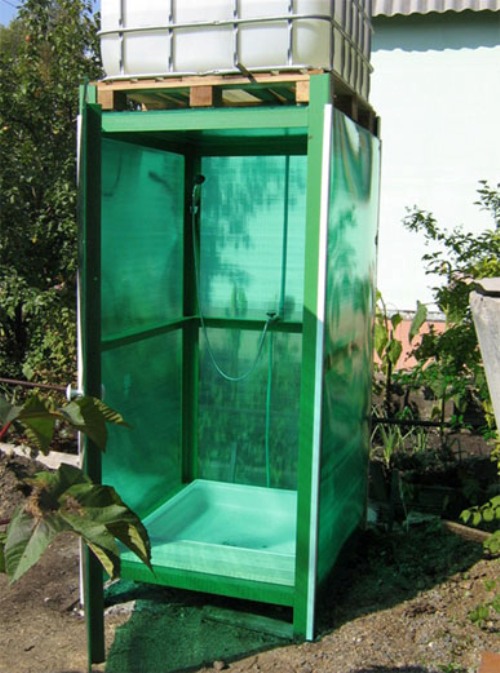
Polycarbonate
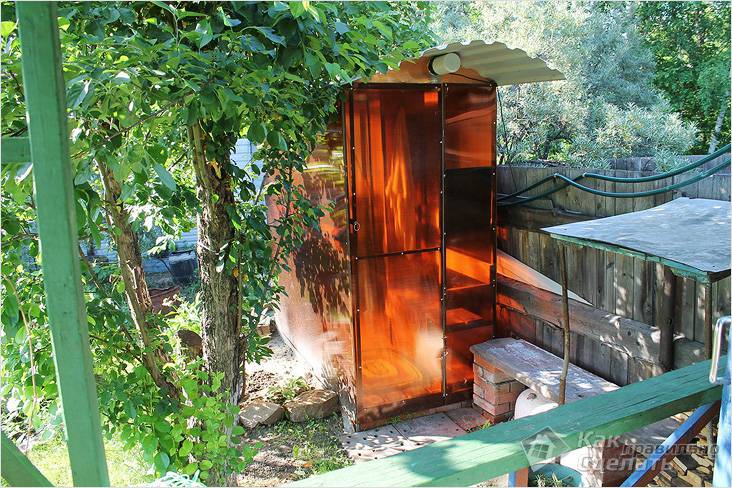
If you are thinking about how to make a shower in the country with your own hands quickly and easily long years, but do not know which material to choose, then we advise you to opt for polycarbonate.
Polycarbonate is the highest quality and most comfortable option. It can be used not only in summer but also in autumn. This design insulates sound and can withstand temperatures from +120 to -40, it is flexible and shockproof, it is easy to install and create complex structures.
Polycarbonate itself looks much better than other cladding materials and requires almost no maintenance, it is much easier to insulate it and it is not afraid of water.
It looks like a summer shower for a summer residence with your own hands, here is a photo:
Polycarbonate shower
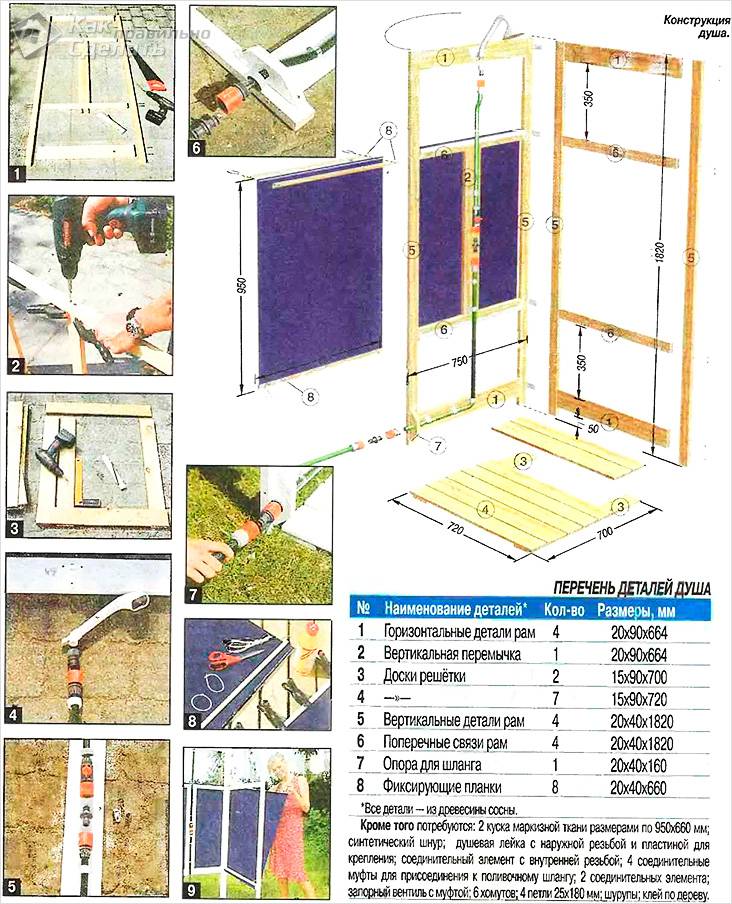
In order to assemble a shower for a summer residence with your own hands, you will need step-by-step instruction.
Wooden shower
- Foundation. We make markings and dig out the ground 40 cm deep. We fill the hole with gravel and sand, fill it with cement. The concrete should stand for 1-2 days depending on the weather. When the color becomes light gray, you can proceed to the second point.
- Cabin. We install 4 support pillars, connect them with horizontal beams using bolts. We install the door, remember that wooden doors have the peculiarity of deforming, so we leave the gap between the door and the wall.
- Floor... We make the slatted floor and drain. The drain is made at an angle so that the water can drain quickly, and the rack bottom allows the cabin to dry quickly.
- Water accumulator. If necessary, we install a water tank, it is important that it is fixed firmly. A hole is made on the side for a hose through which the barrel is filled.
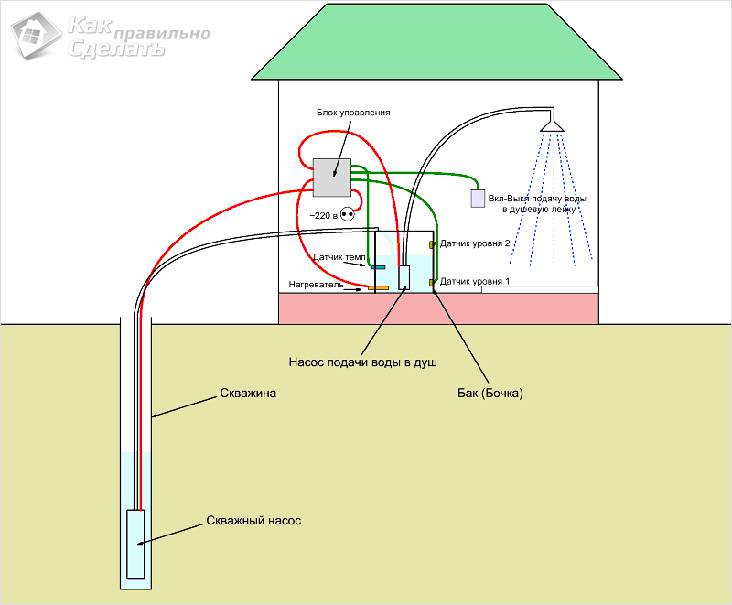
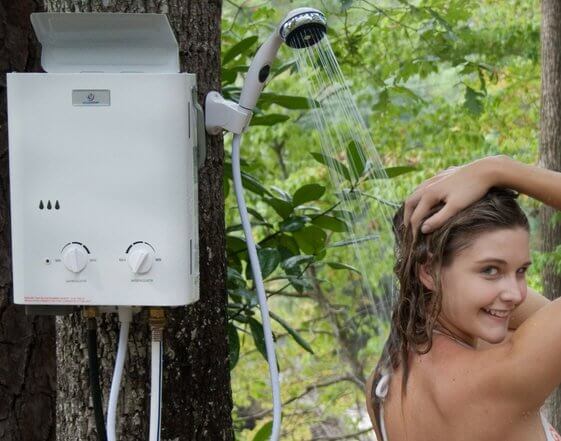
- Heating... Do you want to swim in spring and autumn and wonder how to make a shower in the country with your own hands with heated water? You will need a heating element and insulation. Usually, a column or an electric boiler is used to heat water, and special boilers are also installed.
- Warming.So that it is not cold in autumn and spring, the booth can be sheathed with clapboard, fiberboard or even film. As you already understood, making a warm shower in the country with your own hands is quite simple, but in this case you need to think over everything more precisely, because the installation additional equipment requires investment.
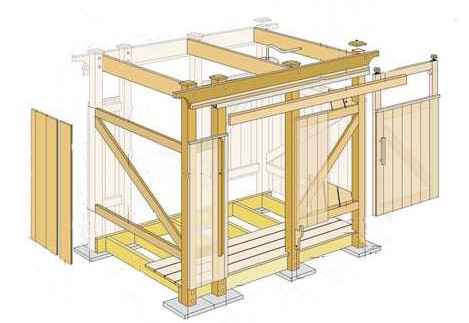
The scheme of a shower cabin made of wood
Summer shower in the country from a barrel
- Foundation. If the volume of the barrel is less than 300 liters, concrete may not be poured. Laying bricks on your own will save you on the foundation; empty space can be covered with sand or gravel.
- Cabin. Using metal bars, we weld a metal box, make cross beams that will hold the barrel, do not forget to leave a hole for the door
- Floor. We install the drain and the slatted floor.
- Water accumulator. We install the barrel on the roof of the booth.
- Sheathing. You can sheathe the cabin with any material; for a hot summer, an oilcloth for a shower is also suitable.

Barrel shower example
Shower from Eurocube
- Foundation. The larger the volume of the tank, the stronger the structure must be. Be sure to build a shower on a concrete foundation so that the surface does not settle and the structure does not tilt.
- Water storage... We install the eurocube.
- Sheathing... We sheathe the frame, install the drain and the slatted floor.
- We connect the hose to the eurocube, install the shower.
- Cover the upper side of the tank with black paint if necessary.
- In cold weather, you will have to insulate the surface of the eurocube so that the plastic does not crack. For such purposes, any insulation covered with film is suitable.
Installation scheme from Eurocube
Polycarbonate shower
- Foundation. Choose a location, mark up and install columnar foundation, fill up the soil.
- Cabin. We begin to create the structure, do not forget about the horizontal slats for holding the tank, install the transverse slats, do not forget to leave room for the door.
- Floor. We set the bottom at the level of 15-20 cm above the ground level.
- After the welding work is over, install the door
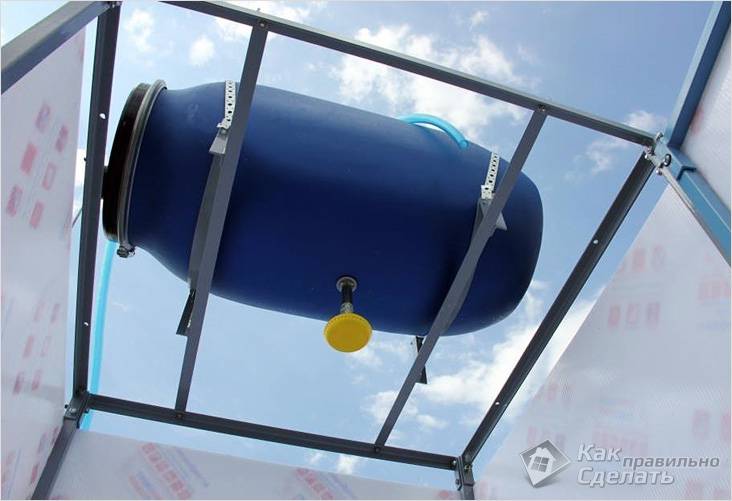
- Water accumulator. The water tank is installed last in the roof opening, it is important that it is securely fastened. A hole is made on the side for a hose through which the barrel is filled. During frosts, a plastic tank with water can be insulated by wrapping the barrel with foam rubber, crushing polycarbonate will not allow moisture to pass through, so you should not wrap the foam rubber with a water-repellent film.
- The installation is completely completed, it remains to equip the space inside the cabin. It is advisable to install the shelves on suction cups, since drilling holes in plastic hi to the penetration of cold in frosty times.
Schematic sketch of a polycarbonate shower
The shower is one of the most useful and enjoyable inventions of civilization. It is difficult for city dwellers, spoiled by the comfortable conditions of the apartment, to spend even a few days in the country without a shower. Therefore, an outdoor shower in the country has become an integral part of any suburban area... With its help it is easy to remain “civilized” even in a very “wild” dacha.

Of course, most owners of large country houses and cottages can afford to equip a private bathroom with a shower or bath. But what about the owners of small houses who want to save money or in the absence of running water and electricity on the site? An excellent solution would be a summer shower in the country, which will allow you to cool off on a hot day.
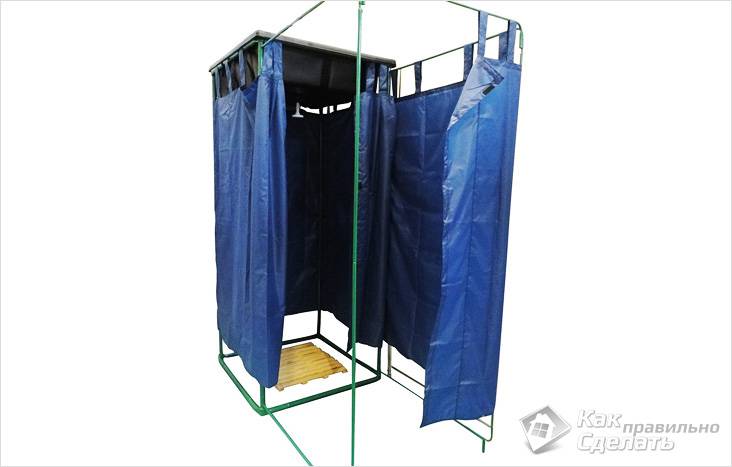
Today in stores you can find a wide variety of ready-made summer shower cabins for summer cottages.Usually they have a similar design - a metal frame covered with tarpaulin or polyethylene and a water tank on the roof. Some models may have an adjoining changing room, automatic water heating, etc. On average, prices for simple models start at 10,000 rubles. Perhaps this is the easiest way to bring a piece of civilization to your summer cottage.
If you want to save money or realize your creative ideas, then build do-it-yourself summer shower in the country. Depending on your wishes and possibilities, you can build both simple and complex shower options. For the most basic shower, you will need to build a fenced area. For example, digging several wedges into the ground and covering them with an opaque film, tarpaulin or cloth.
The water source will be a tank with a built-in watering can.The water tank can be hung on any horizontal bar or tree branch, the main thing is to correctly calculate the load. Water is supplied independently by adding hot or cold water to the tank. However, in summer, water tanks themselves heat up well in the sun. If it is not possible to hang the tank from the bar, purchase a small pump. Today you can buy shower pumps with the telling names "Step", "Toptun", which work and pump water from the tank while you stomp them.

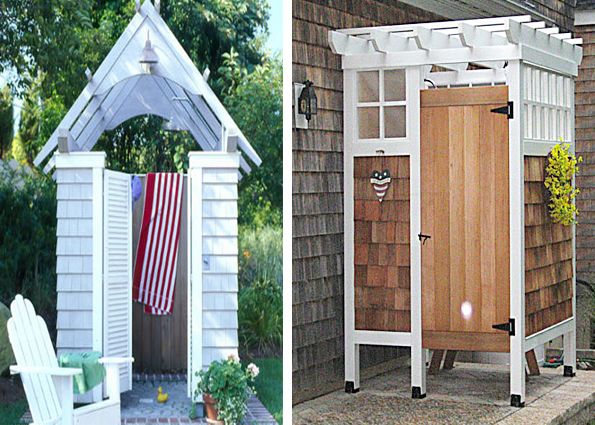
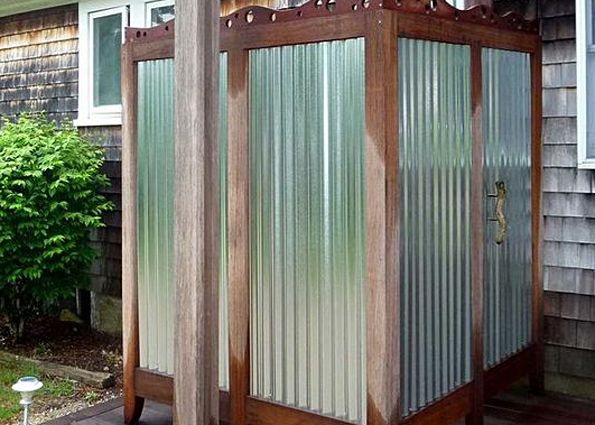
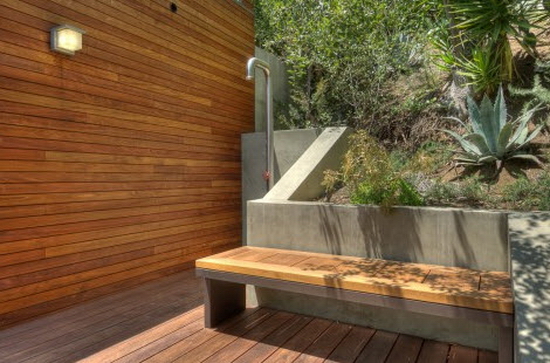
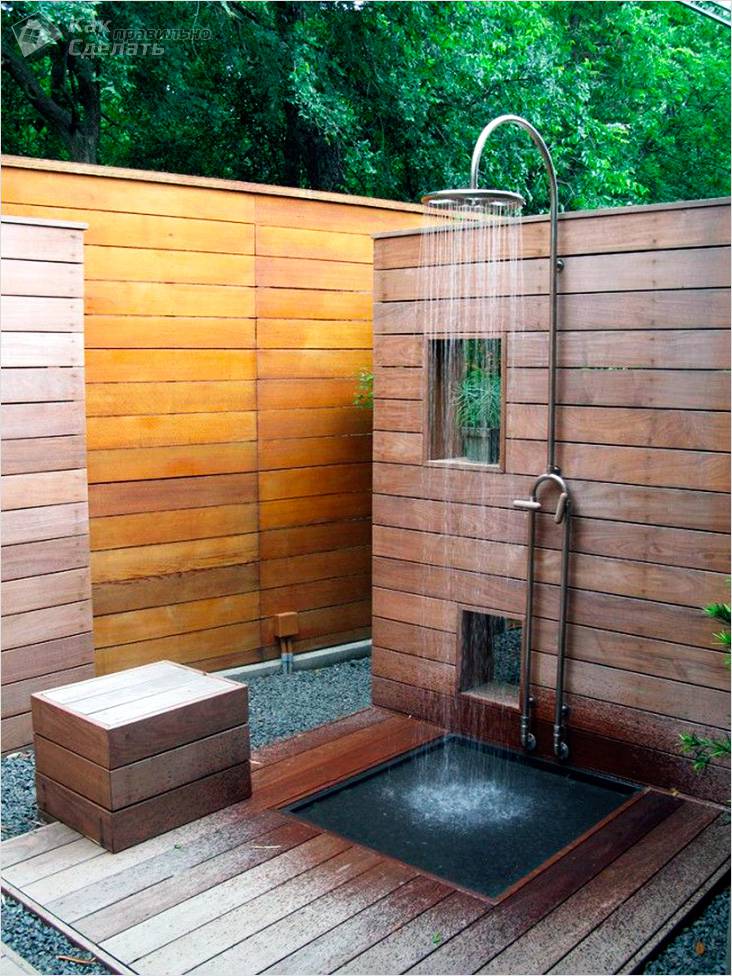
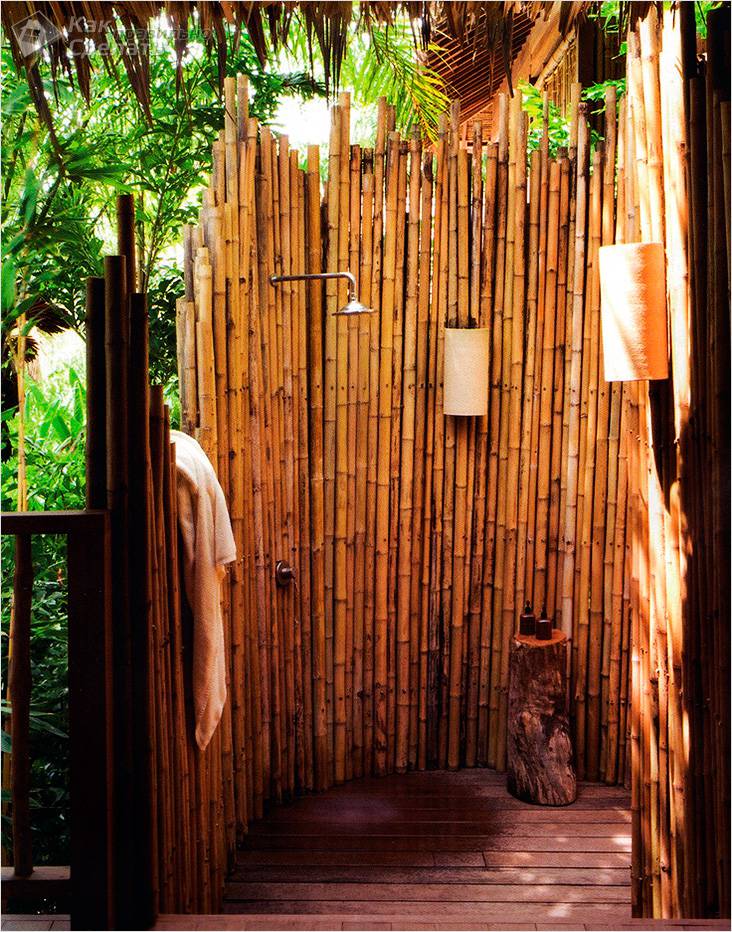
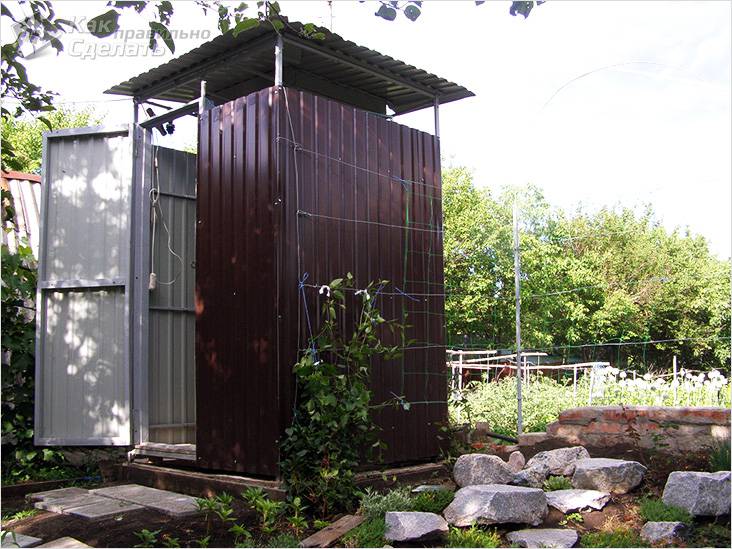
If you want to build a more beautiful and durable outdoor shower in the country, then you can make shower stall made of wood.Usually, a homemade wooden shower is superior to purchased ones in many ways. They are sheathed with a board or clapboard and are highly durable. They can also be insulated, which makes it possible to use the shower in cool weather.
How to build an outdoor shower in the country
The construction of a summer wooden shower in the country should be approached more thoroughly.
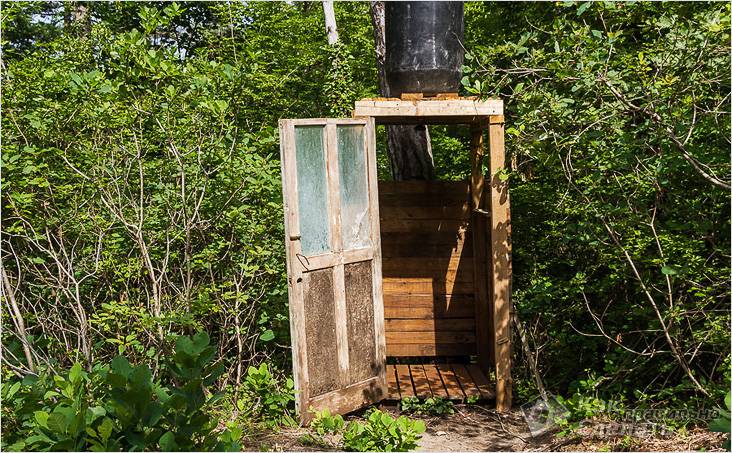
- First, choose a location.It is best to place it away from home, as it is a humid zone that will attract flies and insects. If you plan to heat water in the sun, choose an open, sunny area. Consider the water supply and drainage system. Usually, the drain is organized into a ditch outside the site.
- First, a small depression is dug, which is lined with roofing material or film, or concreted. It turns out a kind of shower tray, which should have a gutter for draining the water.
- Then the frame is installed and the bandage is made of timber, after which it is sheathed with wooden boards treated with linseed oil to protect it from decay. A window is made in the wall for ventilation and lighting.
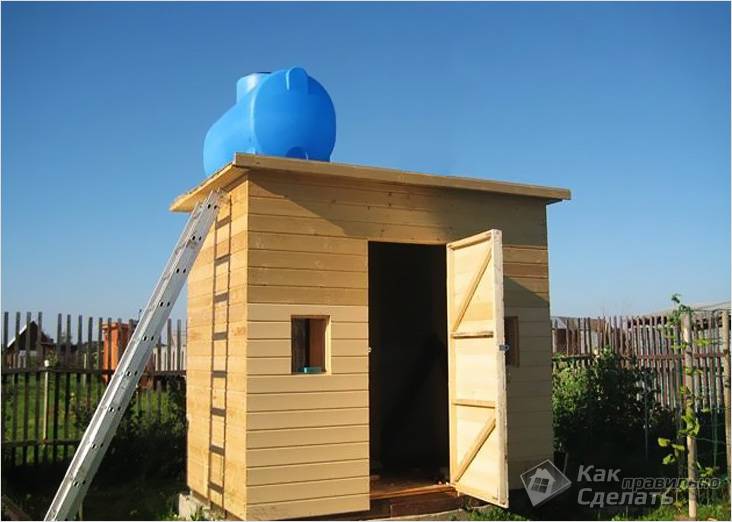
- A black-painted barrel is installed on the roof of the summer shower for quick heating of the water by the sun. The tank is equipped with a pipe, a watering can and a valve.
You can build an outdoor shower in the country from almost any available materials: slate, plywood, wood, tarpaulin, opaque plastic or film, metal pipes... It all depends on your imagination and wishes.
Perhaps all summer residents know that it is simply impossible to do without a shower on the site. This is especially true in the summer, when after a day of work in the beds, it is necessary to take water procedures simply for reasons of hygiene.
It is easy to assemble an outdoor shower, and there are a great many manufacturing options. Some aspects of the work will be discussed further.
Screen
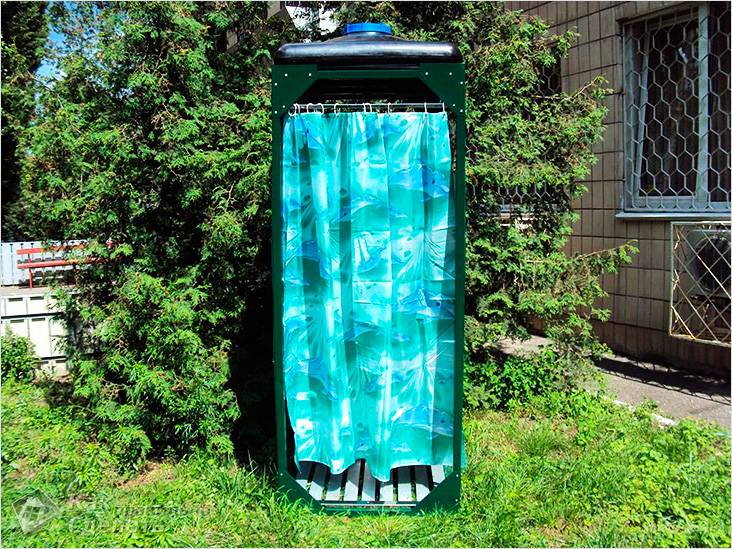
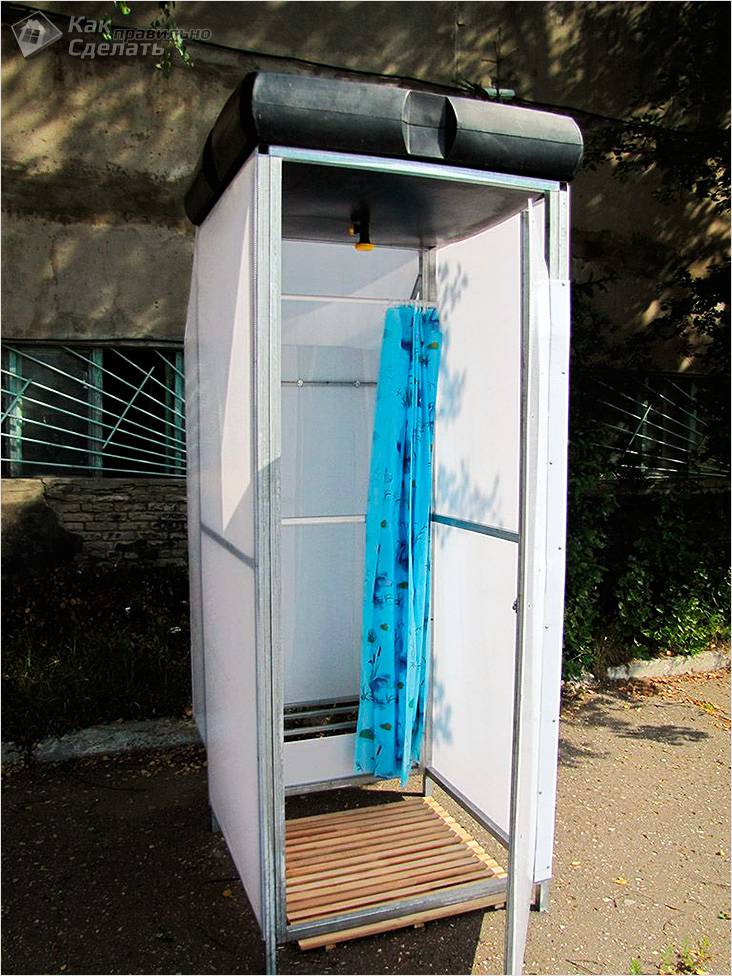
As a temporary solution, you can make a simple shower: fix a metal or plastic tank, preferably dark in color, with a tap and a mixer at a certain elevation, make a screen. Everything about everything will take a minimum amount of materials, time and labor, so that such a structure can be erected in a few minutes.
Polycarbonate shower
Stages of work:
- First, align the place where the construction is supposed to be.
- Then you need to mark the place. A wooden peg is driven into the ground. Then, at a distance of about two meters from it, the next one is driven in and a cord is pulled between them.
- In the same way, two more pegs are driven in and connected, so that a square is obtained. To check the correctness of the markings, the diagonals are compared, they must match.
- In the places of the marking corners, it is necessary to dig holes about 1 meter deep.
- Wooden or metal posts are installed in these pits. It is important to remember that that part of the pillar that will be below ground level must be treated with waterproofing materials, for example, wrapped with roofing material. As a sealant necessary to firmly hold the post in the ground, you can use brick fight or concrete, if we are talking about metal frame.
- Then you need to crate the structure At a distance of about a meter from each other, boards are nailed or screwed with self-tapping screws or metal-profile pipes are welded. Such lathing must be made over the entire area of \u200b\u200bthe walls. Where there will be a door, they do not make a crate.
- Then polycarbonate sheets are mounted on the walls. The sheet is cut to size and screwed on with self-tapping screws.
- The next stage of construction is the installation of the roof. As roofing material you can use, for example, plain slate. Several horizontal bars are pre-laid and fixed, which will perform the functions rafter system... Slate sheets are laid and fixed on them. It should be borne in mind that on one of the sides, small blocks should be placed under the supporting beam in order to ensure the angle of inclination required for precipitation to drain.
- Next, a water tank is installed. In the place of its installation, it is necessary to additionally strengthen the overlap. The tank can be made, in principle, of any material, but plastic should be preferred. Such a tank will be much lighter than a metal one, which is important.
- And finally, the final step is the installation of the door: suitable in size wooden frame sheathed in polycarbonate and mounted on hinges.
As a floor, you can use a simple pallet, which is a lattice made of wooden beams.
Shower cabin on a metal frame
For the manufacture of a shower stall, you can use a metal corner.
- First, the frame is welded. Its dimensions are chosen arbitrarily, but the height of the building must be at least 2 meters.
- After the frame is made and installed, a water tank is mounted upstairs, and some opaque film stretched between the supports will serve as the walls.
It takes at least 20 liters of water to shower for one person, which means that even the smallest water tank should have a capacity of about 50 liters. It follows that the installation site of this tank must be well reinforced.
Video: building a summer shower on a metal frame with a 220 l barrel
Among the materials, we can also mention the metal profile that has become familiar. As in the previous case, the building frame is assembled, and then sheathed with this material. In principle, this option deserves attention, but from a practical point of view, metal is not the best choice.
There will be constant contact with water in the shower, which means that no matter how well the profile sheet is covered with protective compounds, corrosion will begin quickly enough.
Again, as a temporary measure in a hurry, you can solve the issue like this. In the presence of all the materials necessary for the construction, such a structure is assembled in just a few hours. But, perhaps, this is one of its few advantages.
Video: construction of a summer shower from a metal profile
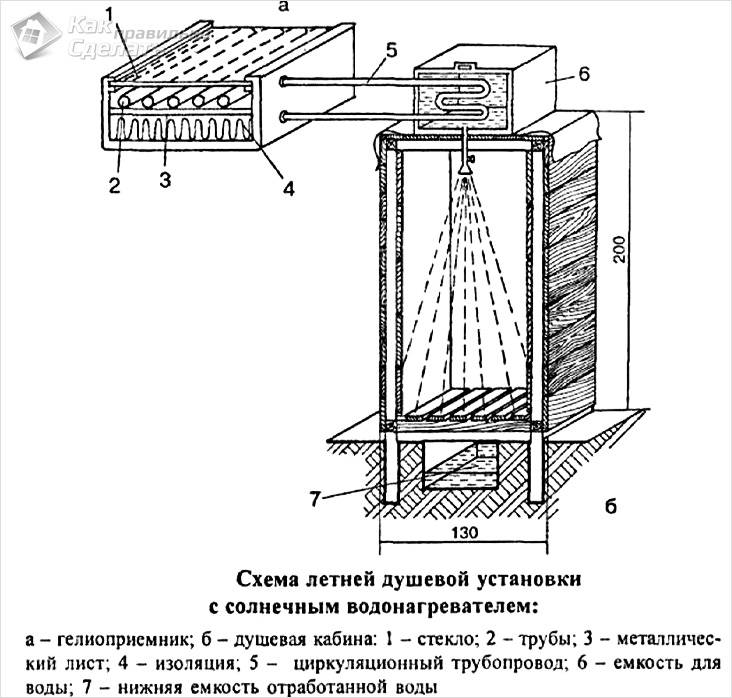
Heated
This option is good in all respects, as it allows you to use the shower in any weather, however, its device is somewhat more complicated and requires a lot of knowledge and skills.

It can be added that one of the most important conditions for the operation of such a shower is a reliable thermal insulation device. Expanded polystyrene can be called the most suitable material for this. It is resistant to moisture and easy to install. And if you also cover it with a dense film, you get an almost sealed room that will be relatively warm in itself.
To speed up the heating of the water in the tank, it can be painted black.
If a heated system is used, then it can be additionally equipped with an automatic set of water, which makes life even easier for yourself, but all these technical devices will entail additional financial investments.
A photo


![]()
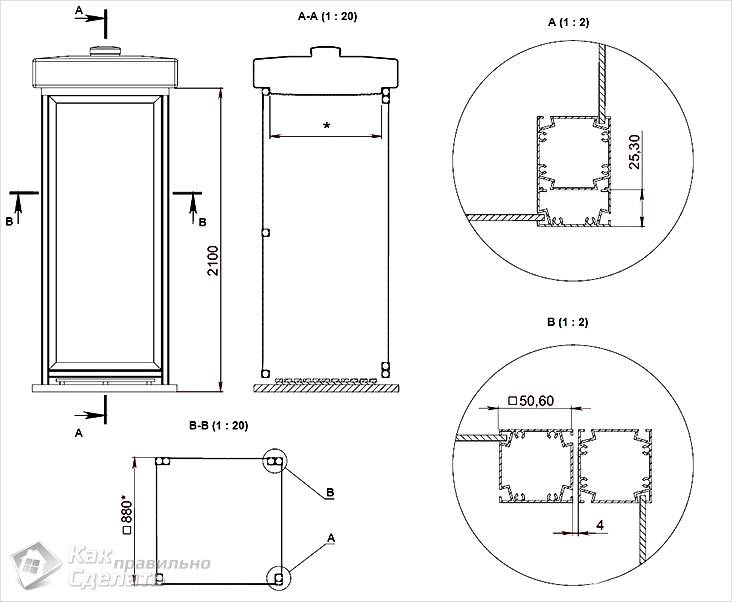
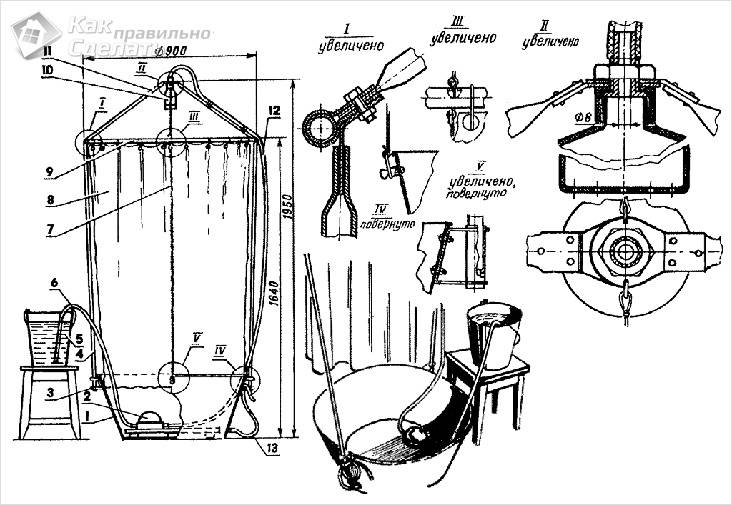
Blueprints