In order for the laminate or linoleum to lay perfectly evenly, the base for them should be made as smooth as possible, for which you need to study how the finishing floor screed is made with your own hands, the construction instructions for which are detailed below. Why it is preferable to do it yourself is pretty obvious. After all, this will mean considerable savings (which otherwise would have been spent on paying for the work of the masters) and the acquisition of a fair amount of experience.
1 Do-it-yourself floor screed - where to start?
The first thing to do before you start work is to prepare everything necessary tools, as well as inventory, the presence of which is required by the technology of the floor screed device in the apartment.
By priority of application, you will need: a hydro level, a pencil, a chopping thread, a tape measure. Also, make sure you have a cord, knitting wire, a utility knife, wire cutters, a hammer drill and screwdriver, usually a trowel and a grater, and a shovel. Some of the work will be easier to do by wearing rubber boots, which should be considered in advance.
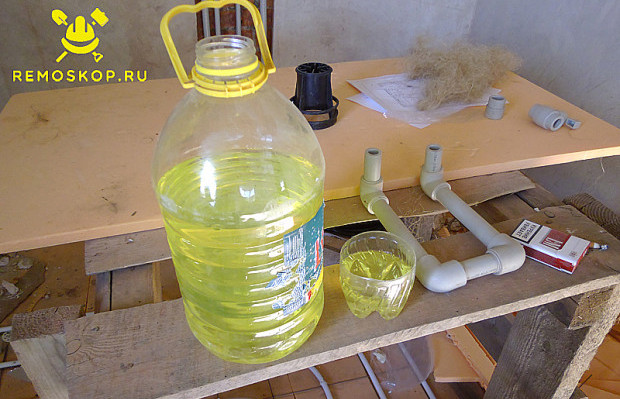
It is logical that, without building materials, a screed can only be made dry, poured out of clay using the old-fashioned method, which can be dug behind the house, and then covered with shields. However, this is not the best way out, so we stock up on the necessary amount of cement and sand. We calculate the consumption of the mixture by multiplying a square meter (in centimeters) by the height of the pour, according to the standard volume formula. One share of this figure is cement, 50 kilograms of which will require 15 liters of water, and another 4 parts - sand. For elasticity, as a plasticizer for, add 100-150 grams of liquid soap.
And finally, the process itself. The role of the screed is not only to level the floor, it is necessary both to hide the pipes of the warm floor, and to create an additional layer of insulation or sound insulation in combination with a hydro-barrier. They are different, and if you want to get a heat source by hiding pipes in the thickness of the cement, in this case a floating one will be used. Simply put, it will not lie on the hard base of the floor, but on a rather soft layer of thermal insulation (we take polystyrene foam plates that have sufficient hardness), on top of which the pipes will be located.
The site masters have prepared a special calculator for you. You can easily calculate required amount cement.
2 How to make a floor screed - sequence of actions
The first and main process is the measurement of the premises, not the purchase building materials, because while you do not know the scope of work, you do not know how much cement or sand is needed. There are many stages of work ahead, and only after taking the first step, you will know with what numbers to go for the screed components.
Master class floor screed - step by step diagram
Step 1: define the horizon and fill level
When the preparation for the floor screed is completed, using the hydro level, we find the horizon at a height of 1.5 meters, and with a chopping thread covered with chalk, we make marking lines.

Then we measure the distance to the base with a tape measure and find the point farthest from it and the closest to it, thereby determining the difference in levels in the room 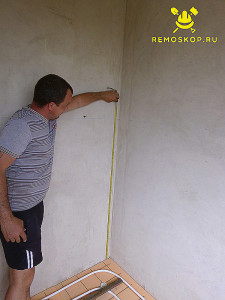
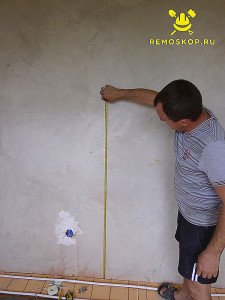
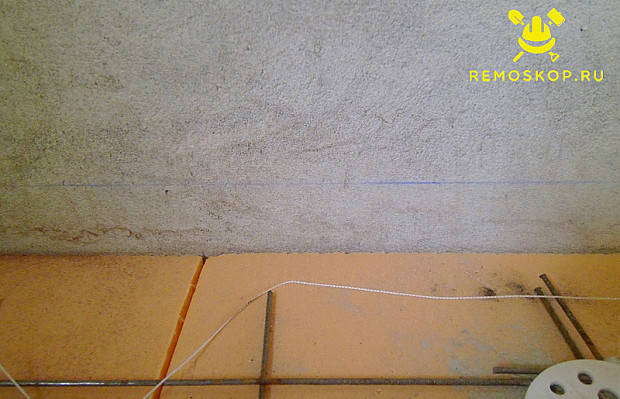
Based on the measurements, you can calculate how to properly fill the floor screed, as well as the amount of materials that will be required for it. is 40 millimeters. We complete the marking work by moving the markers down in the corners to the fill level and by threading new lines along which the new base surface will pass.
Step 2: preparation of the base
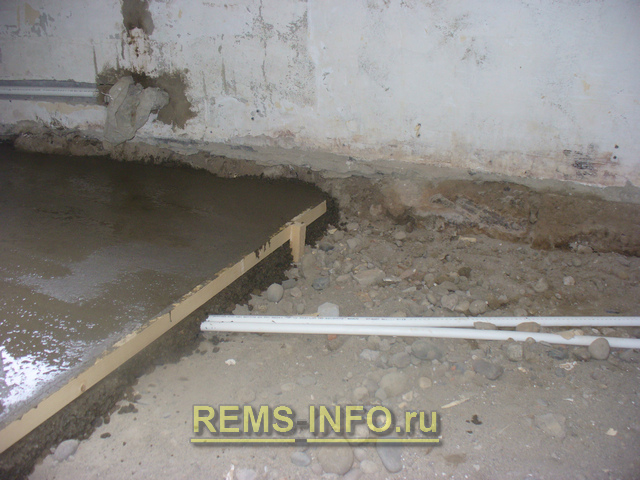
The next stage is the preparation of the floor under the screed, it will not require special labor costs if it is planned to make a heating system in the room under the finish coating.

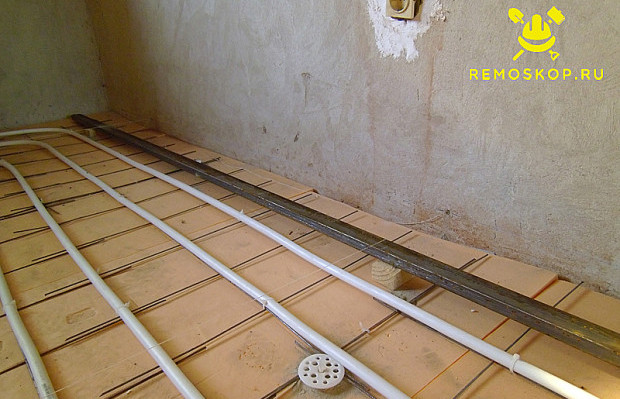
The role of the substrate in this case will be assigned to the insulation, separated from the floor slab by film waterproofing. A reinforcing mesh is laid on top, and on it - metal-plastic or propylene pipes bent according to a certain pattern (snake or spiral), fixed with special fasteners. If the pouring of the underfloor heating screed for a film electric heater is planned directly on the floor, it must be thoroughly cleaned and even washed.
Step 3: Leveling beacons
Having achieved an acceptable state of the base or substrate made of insulation with heating elements, it is time to move on to installing beacons, without which it is impossible to install a screed under a warm floor. To do this, we drive dowels into two opposing walls along the line of the future screed through 1-1.5 meters, to which we tie a cord (it can be nylon).

Exactly along the strings stretched in one plane, raising and lowering with the help of wooden wedges, we place parallel beacons from a metal profile of 20x40 millimeters at equal intervals (two at a distance of half a meter from the walls).
They are necessary so that subsequently the screed under the warm floor is equal to them.

Step 4: Securing the beacons and installing the thermal seam
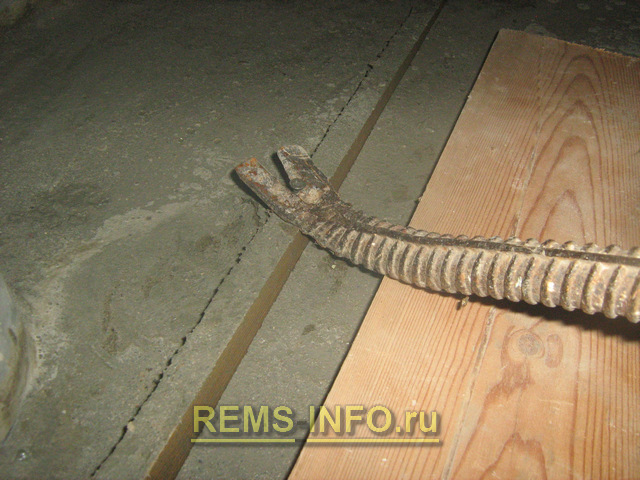
Since in the process of laying the solution, the beacons can move and change their position in space, they should be carefully fixed. Holes are drilled in the overlap, into which a pair of screws are screwed on both sides of the profile, at a short distance from each end of the pipe and in the middle.
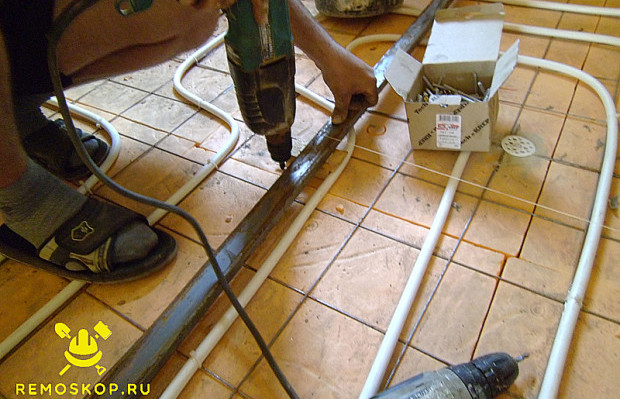
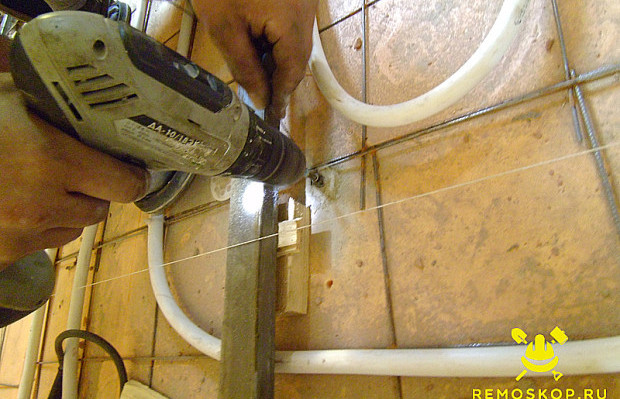
Then a knitting wire is wound around the screws, so that the beacon is firmly fixed in place.

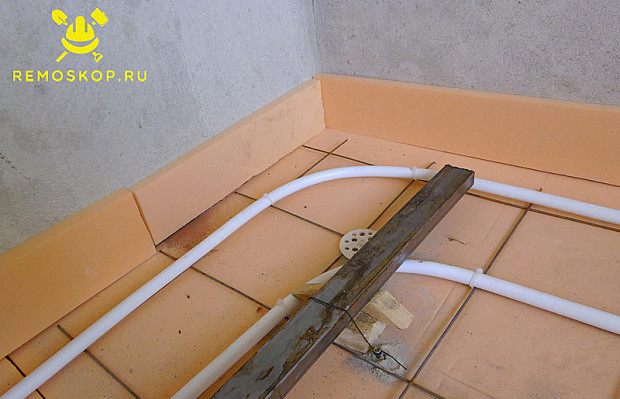
It remains only to make a thermal seal around the perimeter of the room, securing a belt from the remains of insulation along the lower edge of the walls with liquid nails.
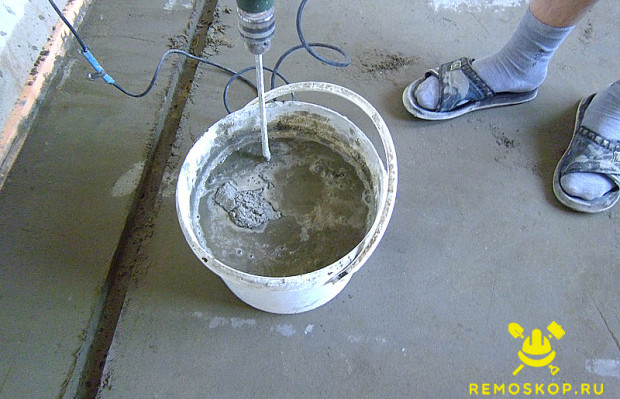
Step 5: mixing the solution
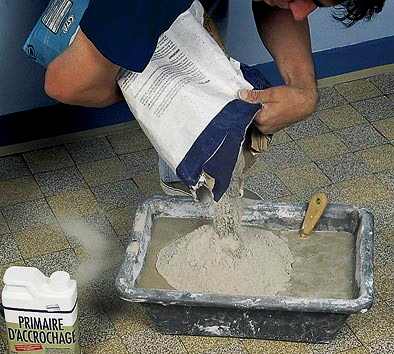
So, beacons are placed around the room, the thermos are securely fixed, it's time to start making the floor screed. For the solution, we take 50-kilogram bags of grade 400 cement, no less, the sand is sold by weight or in cubic meters, for work it will need 4 times more... Accordingly, in a large container, which can be an old bathtub (it is better to use a compact mobile concrete mixer), we mix cement with sand in proportions of 1: 4; when the composition becomes homogeneous, add water. The consistency should be like thick sour cream.
When adding a plasticizer, care should be taken, overdose leads to a slowdown in the hardening process of the composition.
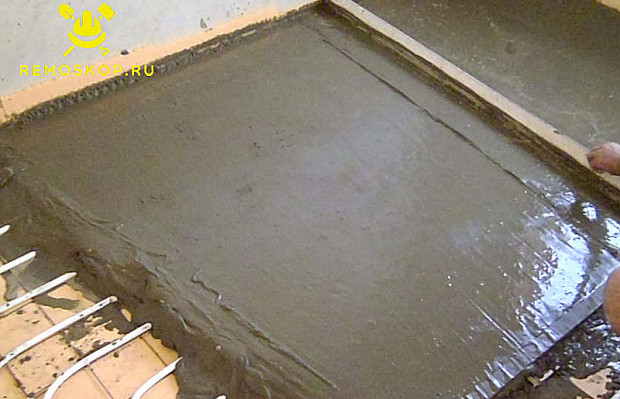
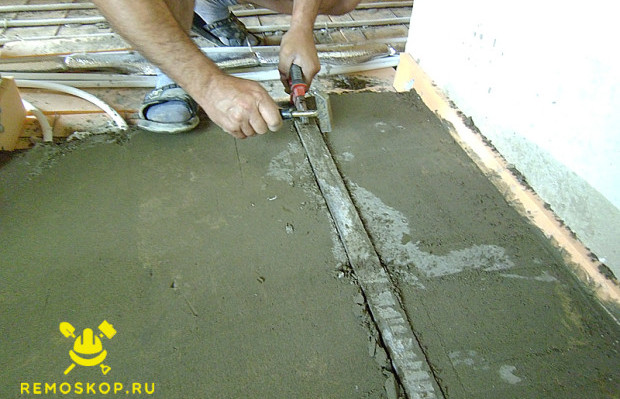
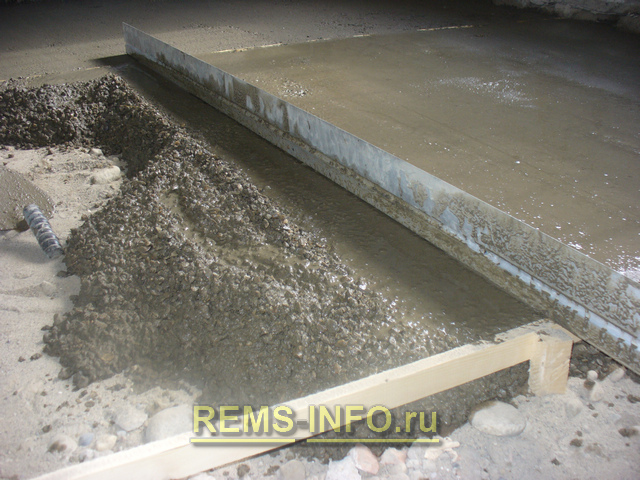
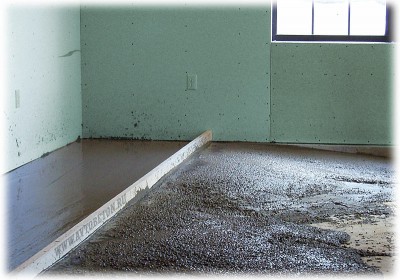
Step 6: fill and level with the rule
If you have prepared a water heating system in the form of pipes laid on a heater, laying a warm floor in a screed does not require any special technologies.

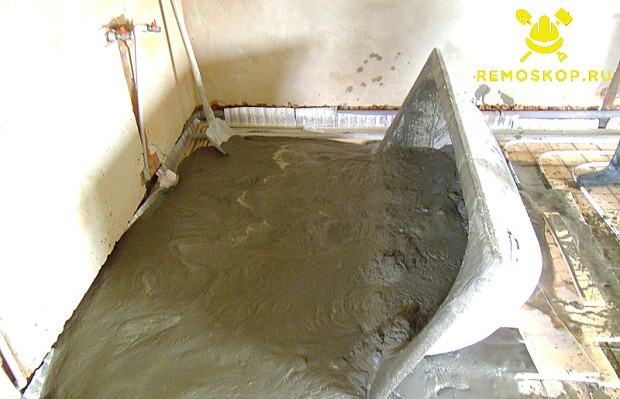
We are convinced that a small portion of the solution, laid on a flat place, slightly floats, but does not spread with slurry, that is, it corresponds to the proper degree of density. Then we simply fill the area between the wall opposite the door with the mixture and the second beacon from it (the first should hide under the mortar).

We level the solution with a shovel.

We level the solution
Using the rule, we finally bring the mixture to the level of beacons.
Step 7: nuances of aligning and removing voids
For those who are not confident in their abilities, it is advisable to look in advance in the training video how to correctly make a rough floor screed with your own hands, the video will tell you an easy way to achieve desired result without flaws.
For example, few beginners know that when working with the rule, it is advisable to level the solution so that it is slightly higher than the beacons, then after shrinkage it will become level with them. If there is a heating system, it is possible to extremely simple method - it is enough to slightly tug on the reinforcing mesh so that the mixture envelops it and pipes from all sides.

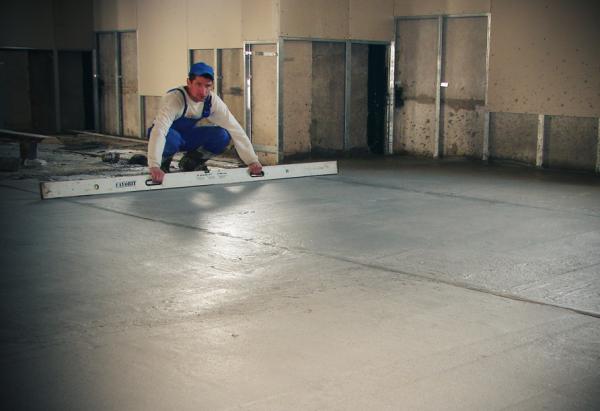
Step 8: Rule alignment after hardening
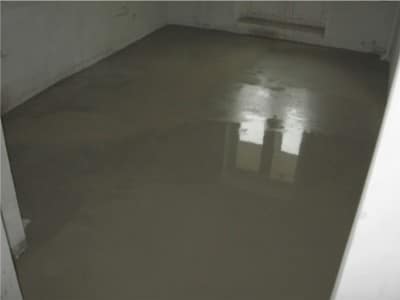
When the cement mortar covers the entire area of \u200b\u200bthe room, you have to work as a rule, walking directly on the liquid mixture, for which, in fact, you need to prepare rubber boots before putting the screed on the floor.

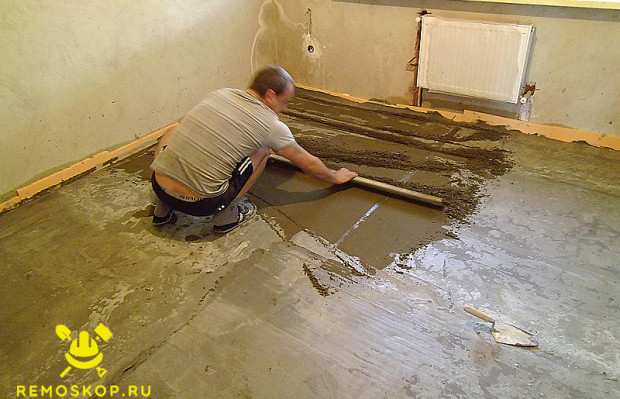
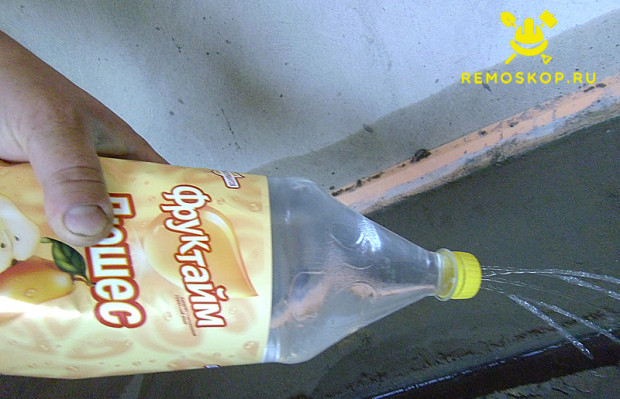
Then you just have to wait until the fill hardens enough so that you can move along it. As a rule, the drying time of the floor screed takes at least two weeks, during which it is necessary to regularly moisten the surface with water every other day. After the cement has hardened, you should take the rule and scrape off the top layer to the lighthouses, collecting the excess in a bucket.
Step 9: Removing beacons from cured cement
How the floor screed device is completed, the video will tell you the best, but there is nothing complicated about this, and often only instructions are enough. After the surface has become smoother, and the beacons appeared from under the layer of mortar, we take a spatula and carefully cut through the thickness of the fill on both sides of the profiles.
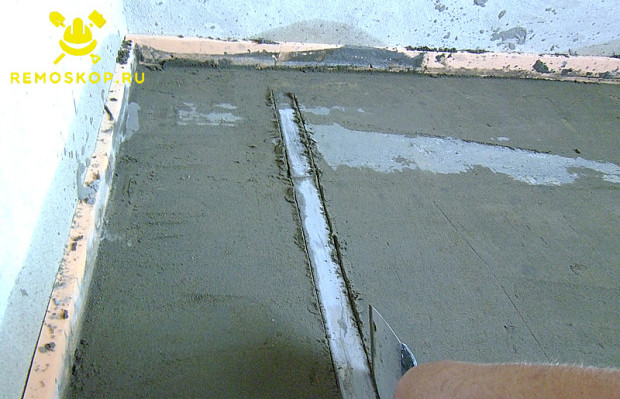
Then we cut through the knitting wire with pliers and remove the pipes, tapping them with a hammer in the process in order to avoid lifting the stuck layers.
Moisten the remaining voids with water.
Step 10: cement filling the lighthouse voids
Since the surface has become rather uneven due to the removal of the lighthouses, the installation of the floor screed must be brought to an ideal state.

To do this, add a little fresh cement and water to the scraped mortar, which is placed in a bucket, mix thoroughly and fill the grooves from the profile pipes with the mixture made.
We continue to equalize the screed surface
When the remains of the cement-sand mixture are removed, we are left with only grouting the floor screed.
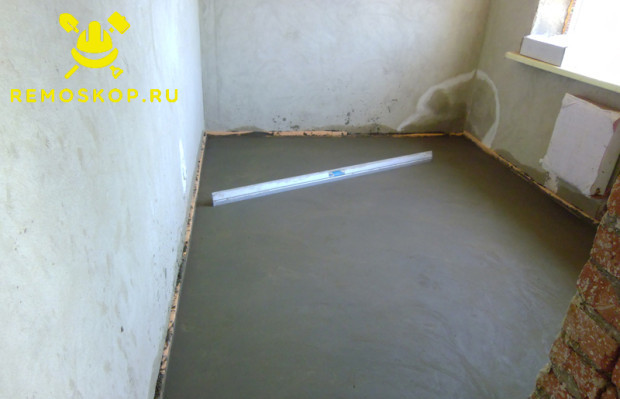
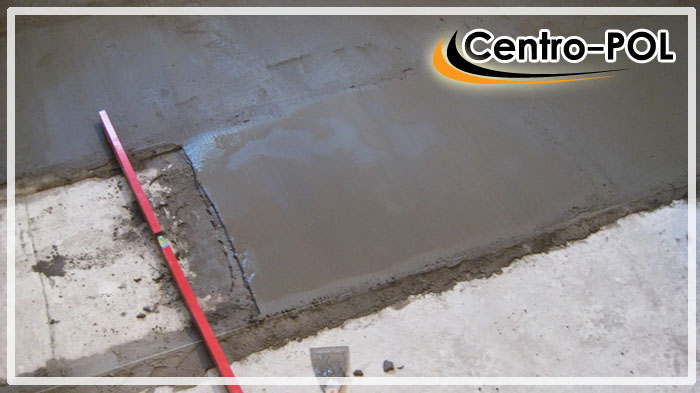
It is done with a grater and water. We start from the far corner of the room, slightly wetting the fill with water and carefully smoothing the surface with a float.

After finishing the "polishing", when the base takes on the proper form, which you were trying to achieve, with a clerical knife we \u200b\u200bcut off the excess thermal seam flush with the surface, the rest will later be hidden under the baseboards. Now the work has been successfully completed, and you can proceed to the next room.
Do-it-yourself floor screed is a task that may arise before you if you decide to make major repairs in an apartment or a private house. It can be finished and rough, for wet and dry rooms, rigid and floating, dry, semi-dry and traditional wet. A rough screed is understood as a leveling layer of cement-sand mortar over the floor slab, slight irregularities are allowed, since it implies additional leveling in the next step.
The finishing screed is the finishing layer of the floor finish, must be perfectly flat and can serve as an independent coating, or as a basis for laying floor coverings (linoleum, laminate, carpet, etc.), as a rule, self-leveling mixtures are used to create it. The main functions of screeds are leveling the surface, if necessary, creating slopes, giving the surface strength and rigidity, as well as heat and sound insulating properties. In this article we will tell you how to make a floor screed correctly and what are its features for premises for various purposes.
Types of screeds
Screeds are classified depending on the base material that makes up their composition. Do-it-yourself floor screed can be concrete, magnesite, anhydrite, asphalt, mosaic, based on gypsum and epoxy resins. Currently, there are many different types ready-made dry mixes with which you can make a floor screed with your own hands.
Screed for wet rooms
For wet rooms, the composition of the screed will be slightly different. Let's take a look at how to make a bathroom floor screed. A prerequisite is the creation of waterproofing. It is recommended to use a modern material - euroruberoid as a waterproofing layer. This roll material is laid dry in 2 layers with overlapping joints.
Important! Place the edges of the waterproofing on the wall to a height of 5-7 cm. This will protect the joints of the walls and floor from leaking.
After that, beacons made of metal profiles are laid on a concrete solution strictly according to the level. The mortar for wet rooms is made from three components: sand, cement and a dry waterproofing mixture, which is sold in bags. (for example, the manufacturer Ceresit). The video shows in detail the process of making a concrete screed in a bathroom:
Screed for underfloor heating
For the installation of a warm floor, a cable or pipes (in the case of a water heated floor) are laid on the surface, and after that they are poured with a cement-sand mortar 1: 3 with the addition of reinforcing additives.
The video shows how to properly make a floor screed for water heating:
Floating screed
This type takes place if the floor slab needs additional heat and sound insulation. The mortar is placed on top of thermal insulation and sound insulation on a special layer (you can use a polyethylene film 0.1-0.15 mm thick). The layer performs the function of separating the solution and insulation. For a floating screed, a cement-sand or calcium-sulfate solution is used.

It is recommended to use a damper tape, which is glued at the junction of the walls and floor along the entire perimeter of the room, taking into account the projections and columns. It protects the surface from cracking during concrete shrinkage, and also increases the sound insulation of the room. The height of the overlap of the tape on the wall is taken in accordance with the total thickness of all layers of the future floor.
Video. Floating floor. Types of solutions, filling methods, nuances, subtleties:
Dry and semi-dry screeds
In the case when it is required to carry out repairs in an accelerated time and there is no time for the full drying of a traditional wet screed, you can perform a rough screed using a semi-dry method. For this in cement-sand mixture add a small amount of water, sufficient to obtain a loose concrete mass after mixing. It is also necessary to perform reinforcement with the addition of fiberglass to the solution. After that, the mixture is applied to the base with alignment with the rule of beacons, and then the surface is polished. The fastest and highest quality this technology performed by a mechanized method.
A dry screed is a filling of dry filler - quartz sand or expanded clay, on top of which plywood is mounted, or chipboard, gypsum fiber board. This technology provides good sound insulation, light weight of the structure, no wet work in the room, and therefore no dirt and no risk of fluid leakage from the solution into the ceiling. This type of screed is easy to do with your own hands, because it is easy to manufacture, does not require machine mechanisms, special equipment and special care, however, he is afraid of moisture, and if it gets into the structure, the floor can swell, deformation of the surface and the formation of irregularities.
Video. Dry floor screed technology. This method is suitable if you need to meet a tight deadline and there is no desire to mess with the liquid solution:
Finishing screeds
For the device of a finishing screed, self-leveling finishing mixtures of factory production are often used. They are cement and polymer based. Self-leveling floors are easy to clean, they form a durable, even and smooth surface that is easy to clean. Self-leveling floors are divided into types depending on the binder used in their composition. There are methyl methacrylic (MMA), polyurethane, polyurethane-cement, acrylic-cement and epoxy compounds.
Advice! The strength grade of the topcoat should not be higher than the grade of the rough screed solution on which it is laid. Otherwise, deformation and delamination will occur over time.
Video. Finishing screed device using self-leveling mixture:
Screed laying technology
Let us consider in more detail the device of a traditional wet screed using the example of a concrete one. Do-it-yourself floor screed is performed using the following tools:
- building level;
- rule;
- beacons (guides);
- drill with a nozzle for mixing the solution;
- putty knife.

Depending on the purpose of the room and the materials used, the technology will vary. Consider the stages of this process:
- preparation of the base, priming;
- thermal insulation (if necessary);
- waterproofing (if necessary);
- reinforcement (if necessary);
- placement of beacons (guides) with leveling;
- mixing the solution;
- fill;
- care of the finished surface.
The first stage is the preparation of the base. It must be dust-free, remove debris, if there is dirt and oil stains, bitumen, they must be removed. If there is an old dilapidated screed, it must be dismantled. After that, you need to treat the surface of the floor slab with a primer using a roller or brush and let it dry for 5 hours. If the room has plumbing and sewer pipes, then you need to lay them on the floor.
For thermal insulation of the room, you can use expanded clay or expanded polystyrene, the main thing is that the surface of the insulation is rigid. If the do-it-yourself floor screed is done on soil base, then first you need to lay a layer of expanded clay, and then - a layer of sand, with the obligatory compaction of each layer. For greater effect, it is recommended to wet with water.
Waterproofing is usually carried out in wet areas (where there are water and sewerage systems). To protect against moisture, waterproofing is also sometimes arranged in the premises of the first floor, basements.
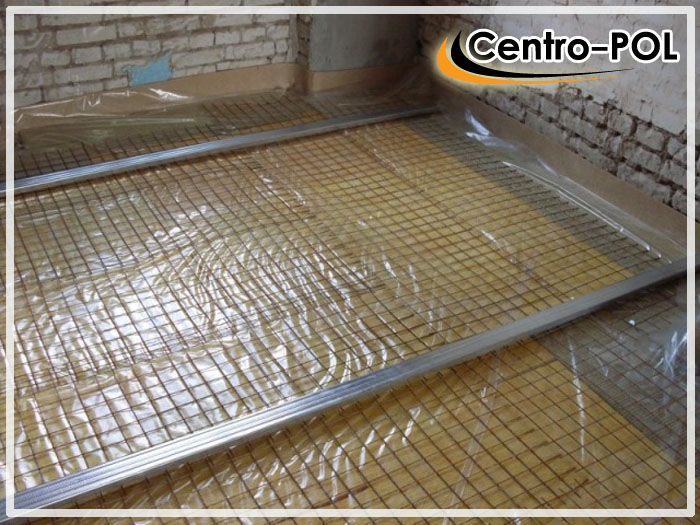
After that, reinforcement is performed. It is used if the surface is planned to be subjected to heavy loads. To do this, use reinforcing bars, the cross-section of which is selected depending on the planned load (the diameter is in the range from 8 to 20 mm), or reinforcement mesh (rod diameter 6 mm). Sometimes, instead of metal, plastic reinforcing meshes are used. Reinforcement meshes will also help to avoid deformation of the concrete layer and cracking in the event of building shrinkage. Concrete is a brittle material and does not work well for bending and tension; reinforcement allows you to eliminate these deficiencies and protect the surface from cracks.
After that, the placement of beacons (guides) is performed. They should be displayed clearly in accordance with the building level, because the subsequent flatness of the surface depends on this.
The next step is to fill the solution. When the screed is ready, it is left for a while until it dries completely. Do not forget to take care of the screed during this time, periodically spraying it with water. Concrete slowly gains its strength (within 27 days), it should harden gradually. It can crack if it dries too quickly. Therefore, as a care, you need to moisten the finished screed with water 2 times a day for a week, and then cover it with plastic wrap and leave it for 2 weeks.
When deciding to renovate your old floor, you will definitely have to face such type of work as preparation of the base, which includes the creation of a leveling concrete screed. How to make a floor screed with your own hands, as well as what nuances await you at the same time - this article will tell you.
The floor screed is a concrete rough coating, the layer of which is determined depending on the conditions of further use, as well as on the degree of unevenness of the base. The reason for the floor screed device can be:
- creating a solid foundation;
- leveling the surface;
- raising the floor level, etc.
Above we mentioned the word "concrete" - therefore, this material is the main one. Depending on the purpose of the screed, the recipe for the preparation of concrete may vary. The standard set of means for its preparation is water, sand and cement. The ratio of ingredients is usually 1: 2 or 1: 3, where the first number is the number of parts of the cement and the second is the amount of sand.
A small explanation for those who have not figured it out: at a ratio of 1: 2, 1 bucket of cement is taken and mixed with 2 of the same buckets of sand. The amount of water is determined by eye. In order for this so-called eye not to be mistaken, one should understand a simple "thing": just enough water is needed for the mixed solution to acquire a thick plastic consistency. The main thing is to keep a balance: your concrete should not be too dry, and at the same time you should not bring it to a state of spreading. If mixing is carried out in a concrete mixer, watch how the concrete falls on its walls. If it does not stick and at the same time rolls in an even wave - this is ideal!
But all the tricks associated with concrete do not end there. Cement and sand are different, so it's important to know what you need. Most often, cement on sale is of the M400 and M500 brands. Better, of course, the latter, but if it so happened that you bought the M400, you should not be disappointed. All that is required of you is to increase the concentration of cement in the mixture. If initially you made a concrete screed with a ratio of 1: 3, with M400, you should do 1: 2, etc.
Sand, depending on the purpose of the screed, can be sown river or with a large filler in the form of stones. The first option is acceptable for screeds of small thickness, the second is used in the opposite case, since the presence of stones in the mixture reduces its consumption.
It would seem that everything, we figured out the basis and are ready to start work, but no, there is another interesting "moment" that is often forgotten - specialized additives to the concrete mix for screed floors. More precisely, we are talking about a plasticizer.
From the name it is not difficult to guess the purpose of this "diva". Concrete, to which a plasticizer has been added, gains its strength faster, later on it is less susceptible to cracks, etc., which is extremely important for floor screed. The appearance of the plasticizer is a black oily liquid. At the cost, such an additive will not hit the wallet, but it will make a tangible contribution. A full medium-sized concrete mixer will need about 70g of substance.
It is possible to make a concrete screed for the floor with your own hands, and to prove this, we will describe all the stages of work step by step, and then you yourself will check and see everything in practice. But first, let's get acquainted with the tool and materials that we need.
Necessary tools and materials for creating a concrete floor screed with your own hands:
- Water hose and splash guard;
- Aluminum or wooden beacons (we will tell you a little later what it is and why you need it);
- Self-tapping screws for wood (if wooden beacons are used);
- Screwdriver (if self-tapping screws are not used - a screwdriver, respectively);
- Nail puller (in case the screws are still useful to you due to the installation of wooden beacons);
- Level (preferably 1m long or more);
- Master OK;
- Rule.
In some, private, cases, this set of tools may change.
How to make a floor screed, step-by-step description
The description will be carried out using the example of a screed for a warm floor.
Stage 1. Preparation of the base
We remove dust and dirt from the floor surface as much as possible. We prime the surface. If this is impossible, as in our case, we wet the surface with plain water. For this, it is more convenient to use a hose and a splash guard. We carry out wetting abundantly, not sparing water! The main thing is not to water the entire surface at once. It will be inconvenient to work in a swamp.
Stage 2. Installation of beacons
Previously, two types of lighthouses were mentioned: aluminum and wooden. We will not talk about the features of each of them in detail within the framework of this article. The main thing to know is the following, if you use wooden ones, they will need to be removed from the screed afterwards. You won't have to do this with aluminum, in addition, it is easier to achieve a flat plane with them, which cannot be said about wood. However, the installation of aluminum rails involves placing and fixing them in concrete, thrown by a mound.
In our case, a wooden beacon is used, which stands on the surface on wooden supports. The name of this element is not accidental. Thanks to it, the plane of the entire floor screed is controlled. For this reason, it is extremely important to place the beacon correctly. It is better to place them at a distance of 1m from each other. So it is easier in the future to drag the solution between them. Be sure to use a spirit level when attaching the rail. The rail must be rigidly fixed so that it does not move during the leveling of the mixture.
Stage 3. Preparation of the solution
We mix the concrete solution. We have already written about all the "subtleties" above. With the resulting mixture, fill the space between the lighthouse rails. We try to distribute the excess solution evenly using a trowel.
Stage 4. Dragging the solution
The concrete that we placed between the beacons needs to be leveled. Let's use the rule for this. We put it on the slats. In this case, pay attention to the fact that the rule is in close contact with the lighthouse and at the same time it is not interfered with by various stones, random drops of solution, etc. We pull the rule onto ourselves in such a way that the concrete mixture lies at the same level as the previously installed guide rails. In places where the so-called shells are formed, concrete should be added and again tightened with the rule.

The screed was made on the ground as a base for the future water-heated floor. The use of wooden guides in this case is due to the quick installation of the latter at the desired level and without problematic removal after the mixture has set.

In this case, there was no goal to achieve a perfectly even coverage, since a water heated floor was planned from above.
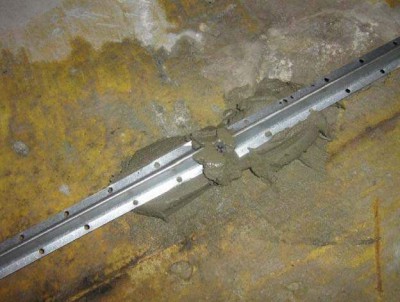
Stage 5. Removing the beacons after the concrete has set
This stage not relevant for those who have used aluminum beacons. Using a screwdriver, we screw several screws into a wooden rail. After, picking it up with a nail puller, we remove the beacon from the screed. The resulting cavity is immediately filled with concrete.

We remove the guide beacons from the screed a few hours after the concrete has set. We put a board under the nailer next to the removable guide. To move on a fresh screed, you should also carefully put a couple of wide boards.
Stage 6. Final
We leave the screed to dry completely. It is advisable to let the screed dry for 2-3 weeks before starting subsequent work.
From all of the above, we conclude: the question of how to make a floor screed with your own hands today is a frequent occurrence. Since you don't want to spend extra money on the services of craftsmen, it is wise to do everything yourself. It can be seen from the article that all stages are simple and have no hidden difficulties. There are, of course, tricks, as in any business, but we have just described them all for you, which means that it is time to cast aside all doubts and start a long-planned work - creating a floor screed.
Screed is a time-consuming procedure, so most people prefer to be invited to perform it. But still, for some, do-it-yourself floor screed is the preferred option.
To begin with, we suggest that you familiarize yourself with the key stages of the work, study a little theory.
Observance of two things is required: correct preparation of the solution, ingenuity and dexterity when installing beacons.
The functional purpose of the screed
If we take the construction of apartment buildings, then floor slabs are used to separate one floor from another, simultaneously serving as the ceiling for the lower apartment, and for the upper one, respectively, as the floor.
DIY floor screed
For their further full-fledged operation, expensive finishing is required. In the case of the ceiling, the situation is simple, the modern market for ceiling finishes offers a lot of available options, in the case of the floor, everything is somewhat difficult.
A huge number of floor coverings are produced, but on an ordinary slab there is no parquet, no tile, no laminate, no linoleum, no other floor material you will not put it.
The main function of screeds is to level the base. They must be strong enough to withstand heavy loads.
Regardless of the production method, the screed is one of the main elements of the floor cake and is intended for:
- for alignment;
- ensuring rigidity and enhancing the strength characteristics of the surface;
- to increase heat absorption;
- for making slopes on ceilings, in the process of laying the finishing flooring.
Types and characteristics
Choosing the right material
Features of a certain type largely depend on the material from which it is made. Screeds used in residential premises are:
- concrete;
- cement-sand.
As supplies lightweight and lightweight concrete (cellular, expanded clay, etc.) are used. In some cases, reinforcing substances are added to them - polypropylene fibers.
The following types are also distinguished:
- magnesite (xylene);
- dry (plaster);
- epoxy;
- anhydrite;
- asphalt (cast asphalt);
- mosaic (terrazzo).
In this area, the innovative technology of self-leveling floors has recently become widespread, and more precisely, we are talking about a screed based on ready-made packaged mixtures created according to unique recipes. All of them contain - sand, cement, plasticizers, aggregates.
In certain cases, in order to correctly do the work, a combination of mixtures is allowed. That is, when applying the lower, underlying layer, a mixture with a larger aggregate is used, and the upper leveling layer - with a fine one.
Important! When choosing a mixture, in order to avoid acquiring a fake, it is necessary to study the material well. A high-quality mixture is distinguished by a pure gray color without reddishness, and the presence of lumps in it is also unacceptable.
The concrete screed can be laid directly on the slab itself, or over heat-insulating or sound-insulating material (their combination is also allowed). In the first case, it is called "rigid", and in the second - "floating". The owner of the apartment decides what type to give preference to. Experts will advise, if there are neighbors below, then you need to use sound-insulating material, and if the basement is below, then a heat insulator.
Our step-by-step instruction intended to illustrate the main points.
Initially, it is necessary to prepare the base. The surface is thoroughly cleaned of debris, it is worth getting rid of peeling pieces of concrete or dust. Then priming works are carried out and all existing cracks and cracks are sealed with a thick cement mortar.
In the room where the work will be carried out, the temperature must be within -10 + 25 0 C. In addition, drafts must be avoided, therefore, doors and windows must be kept closed.
If the plans include the organization of waterproofing or thermal insulation, then it's time to lay the appropriate materials on the primed surface. At the same time, it is necessary to take care of temporary waterproofing of walls and partitions, in order to avoid them absorbing moisture from the screed. To perform such a manipulation, a strip of roofing material is quite suitable, which is glued along the lower edge of the enclosing structures so that its upper edge is 15-20 centimeters above the top of the screed being created.
We beat off the zero level
It is he who will serve as a starting point for the implementation of all subsequent work. This stage requires the utmost concentration of attention and accuracy, since the evenness of the floor surface depends on its correctness, as well as the amount of materials that will ultimately be spent.

It is best to use a laser level to facilitate the process. This tool is highly accurate compared to the outdated hydraulic level. After the first mark is made, scores are made on the other walls of the room, which are ultimately connected with a building block. The result is a line around the perimeter of the entire room, its accuracy is characterized by its relation to the horizon line, and not to the base of the floors.
Using a tape measure, the distance from the outlined line to the floor is measured and its highest point is found. All subsequent calculations will be based on the parameters of this point and, as a result, beacons will be installed.
The thickness of the screed must be at least 3 centimeters (otherwise it will crack). With this in mind, you can now calculate the cubic capacity of the solution by the formula: layer thickness multiplied by the width and length of the room (in meters).
Monolithic filler (wet) screed
Before starting the laying process itself, it is necessary to install beacons, which are guides installed along the horizon. Today, ready-made beacon profiles made of metal can be purchased very inexpensively, they are the most optimal option.
Installing beacons correctly
It is better to plant the beacons on plaster cast, this will allow you to perform this important, but routine work as soon as possible. And the correctness of their installation should be controlled using a bubble level.
Ideally, use a small concrete mixer to mix the mortar. It has been proven by practical experience that the resulting mixture will be of much better quality than when kneading by hand. If there is none, then the batch is done in a 30-40 liter container by hand. Especially for beginners, it is necessary to remember that in order for the screed to be truly high-quality, the prepared solution must be consumed within 1.5-2 hours. It is during this time period that concrete is characterized by the best technological qualities.
There are two sub-floor types to choose from:
- concrete, characterized by the use of coarse-fraction components (stones, small pebbles, large crushed stone) as a filler;
- a cement-sand variety, which is caused by the preparation of a dry mixture of cement, quartz sand in a ratio of 1: 4 first. In this case, the use of Portland cement M 400 is shown. Water should be poured in such an amount that the resulting solution is of a pasty consistency, that is, does not spread.
It is always necessary to start filling from the far corner of the room. To level the poured solution, an aluminum rule is applied, which is carefully stretched between two adjacent rows of beacons. It is necessary to ensure that the rule is pressed tightly and removed the excess solution exclusively along the upper edge of the beacons.
You need to start from the far corner
The first strip is placed along the wall near the zero level, while it is necessary to take into account the minimum thickness and a gap of 2-3 centimeters from it. The remaining rows are sequentially superimposed one after another, and the step is determined in the process of work. Ultimately, such sequential actions will lead to the fact that the sub-floor will be flooded.
During the first 7-10 days, the flooded surface is wetted with water. This is necessary for the correct passage of the crystallization process of the molecular lattice of the formed concrete stone. In addition, in no case should you forcefully accelerate the hardening process of the solution, since this will negatively affect its strength.
Complete hardening of the cement-binder-based mixture occurs no earlier than after 28 days. It is not recommended to apply the topcoat before this period.
Assessment of the quality of the completed screed
An experienced professional will determine the quality of the work done, what is called "by eye". If theoretical knowledge and practical skills in this matter are lacking, then it is necessary to perform the following activities:
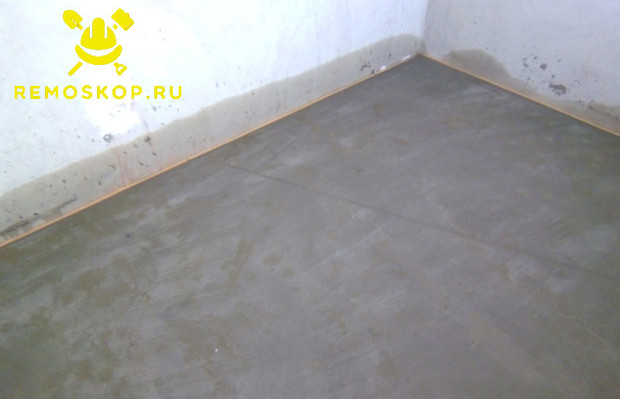
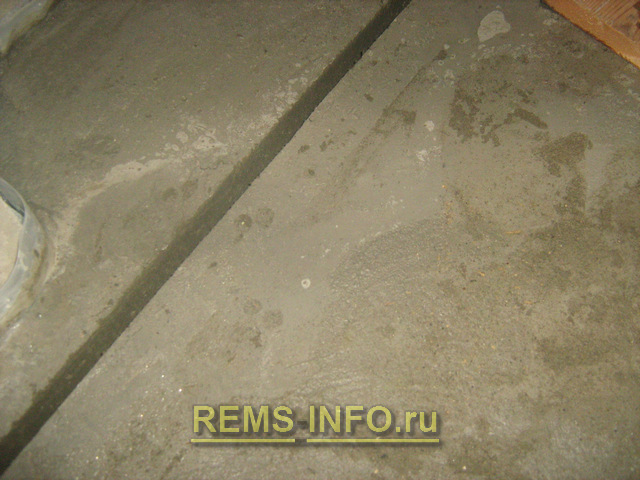
- Visual inspection - the screed should look uniform and even grey colour.
- We apply the rule (about 2 meters long) to identify gaps. In the event that the size does not exceed 4 millimeters, then you can be firmly sure that everything is done correctly.
- We check the hardness. A series of blows are applied tangentially with a hammer, if everything is done efficiently, then the trace from such a mechanical effect will be almost invisible.
We correctly determine the consumption of materials
In order to check the correctness of your own calculations regarding the consumption of materials, you should consult the opinion of specialists. In their unanimous opinion, to complete the screed, it is necessary to take material at the rate of 10 bags of the ready-made mixture for 7-8 square meters area. As for the tools, they are all characterized by general construction purposes and require very little investment.
Correctly made do-it-yourself screed
Is it possible to save money?
There is no secret here. When making a subfloor on the ground, less expensive materials are used. But to give the surface an ideal look, a more expensive finishing mixture is used. Also, the amount of costs depends on whether the reinforcement was performed. Although it is worth recalling that the use of a metal mesh in the production process multiplies the strength characteristics and durability.
Screed device: video tutorials
Important parameters affecting the cost of work is the type of screed being performed. For example, in wooden houses or baths are not allowed to fill concrete mortar directly on wooden beams, they must first be replaced with metal ones, and the base must be reinforced. As a more economical option, a foam concrete screed is used, but it never fits on the ground, and besides, its surface is on final stage it is imperative to cover with a protective layer.
Floor screed is the beginning of any repair. In this article, we will describe in detail how to do it yourself cement-sand screed in an apartment or house. At the end of the article, you will also find visual videos.
Even if there is an absolutely flat and smooth concrete slab in the room, on the floors, it is necessary to make a screed. In general, all the tasks that the floor screed is designed to solve can be divided into two categories: visible and tangible.
The area of \u200b\u200bvisible tasks includes leveling the floor relative to the horizon and creating a perfectly smooth surface. The fact is that during construction it is allowed to lay floor slabs with a slope of up to 20%. But this is necessary for builders, but it is better for residents to get rid of such tolerances. After all, laying any hard floor covering must be performed on an absolutely flat surface.
But tangible tasks include reduction of heat loss... Even a thick-skinned person will feel that after organizing the floor screed, the apartment has become warmer. And here the role is played not even by increasing the thickness, but by adding a new layer. No matter how well it fits, but these are dissimilar layers. And the transfer of heat in dissimilar layers requires additional energy and takes more time.
To all this, it should be added that the floor screed with your own hands can be easily poured without the involvement of masters. Of course, you need a certain set of tools and materials. But more on that below.
Concrete floor screed device
Before work, need to prepare tools and materials... In particular:
- Laser level;
- Rule (not less than 1.5 m);
- Construction square;
- Concrete mixer;
- Flat spatula (20-30 cm);
- Galvanized beacon profile (10 mm);
- Deep penetration primer;
- Construction gypsum 5 kg.
- Cement;
- Sand;
- Polypropylene fiber;
- Liquid glass.
Explanations are required here. A concrete mixer is quite an expensive piece, and there is no point in buying it. But in any city, such equipment can be rented. Average price for a concrete mixer with a tank volume of 150-200 liters, about 500 rubles / day... And it will really facilitate the work, and at the same time the quality of the solution will not be an example higher.
The number of beacon profiles is calculated based on the size of the working room. For example, in a 4x5 m room, it is better to install beacons along the long side. First and last stripes, should be 20 cm from the walls. And between them two more beacons are placed, at an equidistant distance. As a result, the following scheme is obtained: 0.2 → 1.2 → 1.2 → 1.2. This means only 4 profiles of 5 m. The distance between the beacons is 1.2 m, which makes the work easier. An experienced specialist can use a two-meter rule to work with three beacons for the whole room, but the first time we will not chase records. Quality is our goal.
IMPORTANT: be sure to use a galvanized profile. It can be left in the floor screed without removing it.

Plaster of paris is used to install beacons.
Try to buy cement М500.
The sand is needed only river and washed... The fact is that river grains of sand have a slightly rounded shape, and they have fewer sharp edges. They are much better enveloped with cement, and hold more reliably. And washed sand does not contain any admixtures of clay, dust, silt. These ingredients, destroying the integrity of the cement-sand bond, drastically reduce the quality of the mortar.
We will discuss the volumes separately. The weight of the floor screed, with an area of \u200b\u200b1 m2 and a thickness of 1 cm, is approximately 16 kg. Including:
- Cement - 3.5 kg;
- Sand - 10.5 kg;
- Water - 2 liters.
Based on these indicators, you can calculate the material requirements for any room. But first, you need to decide on the thickness.
The minimum thickness of the screed should be 3 cm. But this is for the highest angle in the room, and for the lowest, you will need to add the height difference. IMPORTANT: in any case, the volume of material must be calculated for the maximum thickness of the screed in the room. This rule will not allow you to make mistakes in the calculations. Even if there is a small surplus, it is better than a lack of material at the most crucial moment.
Liquid glass added to the solution significantly increases waterproofing properties screeds and improves its strength characteristics.

Polypropylene fiber is added at the rate of 0.8 kg / cubic meter for dispersed reinforcement. Such a floor screed will not be much better in terms of its performance characteristics. Increases resistance to shock loads, resistance to fracture. And most importantly, a perfectly smooth, silky surface is formed.
Floor preparation and installation of beacons
Everything is taken out of the room. The floor covering is removed. Tile we also recommend deleting. The base is thoroughly swept and then primed. A brush is preferable because it allows you to work well in corners and the smallest cavities. The drying time of the soil is 1-1.5 hours.
Before installing beacons, you need to find the highest corner in the room. Work will start from this point.
Set the laser level to a height of 20 cm in the middle of the room, and turn it to find the highest point in the room (almost always located in the corner). To do this, measure the distance from the floor to the laser beam in each corner with a square. Where the reading is smallest is the highest point. Subtract 3 cm from this value, and the resulting difference must be maintained when installing beacons. For example, in a room there are four corners with the following readings: A - 17.5 cm; B - 17 cm; C - 16 cm; D - 15.5 cm.The highest angle is D. This means that 15.5-3 \u003d 12.5 cm.Thus, from the upper edge of the lighthouse, to the level of the laser beam, there should be 12.5 cm. Please note that at the same time, the minimum thickness of the floor screed will be 3 cm, and the maximum 17.5-12.5 \u003d 5 cm. But! As a result of the work, the floors will be perfectly aligned horizontally.
![]()
Having determined the level, you can set beacons. With a marker, mark the line for installing the profile. Dissolve 1 kg of gypsum, until the thickness of the rustic sour cream, and lay it out in small piles along one line of the marking, every 20-25 cm... Immediately attach a beacon profile to these tubercles, and carefully align it along the entire length so that the readings are the same from the upper edge to the beam. All beacons are displayed in the same way.
Gypsum sets very quickly, and nevertheless, it needs an hour of exposure.
After half an hour, treat the plaster stops with a deep penetration primer.
Cement-sand mixture - preparing the solution
To obtain a solution of the M200 brand, it is necessary to mix the M500 cement with sand in a ratio of 1: 3. It is more convenient and practical to do this in a rented concrete mixer. The sequence is as follows. In the included concrete mixer, pre-prepared components are poured in small portions (in a bucket). Mixing takes place dry. Having filled up the entire volume, add fiber. The calculation is as follows, 1 m 3 - 0.8 kg. The volume of the mixer, for example, is 200 liters, which means that the fiber will be required 5 times less.

And only after that, water is added to the mixture. For every 10 liters of water, add 0.5 liters of liquid glass. Do not make the solution too thin. For 50 kg of cement, about 30-35 liters of water is required.
The duration of the batch is 15-17 minutes. After that, the solution is poured in buckets onto the prepared surface, between two beacons. As soon as the concrete mixer is emptied, the next batch must be kneaded. Therefore, it will be much more convenient to work with a partner.
Leveling the screed and working with the rule
The solution loses its plasticity within 1.5-2 hours. The poured mixture is pre-leveled with a spatula, and then the rule is used. It is applied to the two nearest lighthouses, and in undulating movements along the profiles, with a small amplitude left-right ( 5-10 cm) level the floor screed with their own hands.
The work is performed without fanaticism, so as not to tear off the profile. The transition between two fills should be smooth. In this case, each subsequent portion of the solution is poured in such a way that it adjoins the previous pour on all sides.

Working together and using a concrete mixer with a volume of 150 liters, a room with an area of \u200b\u200b20 m 2 is poured with a screed 4 cm thick for 2.5-3 hours.
One day after the work, surface can be ironed... For this, the floors are slightly moistened and powdered with cement. Then, with the help of grout, it is carefully rubbed into the surface.
The need for this procedure is due to the flow of cement milk into the lower layers of the solution. Thus, the relationship between the components is violated on the surface. And after ironing, you can even ride a tank on the floor - the strength will be beyond praise.
Floor screed - drying time
The screed drying process is not just physical evaporation of water, but a long-term chemical reaction of cement hydration. At the same time, there are some nuances that must be taken into account in order to obtain a high-quality floor.

On the surface, the water evaporates quickly enough to disrupt the hydration process. If you miss this moment, then the top layer will be fragile, free-flowing. And on all thicker, delamination will begin. To prevent such excesses, throughout the entire period of strength gain, the floor screed must be moistened a couple of times a day.
You can make the task easier if you cover the surface with burlap ( canvas), moisten it, and then cover it all with a covering film. In such a "greenhouse", the humidity regime will be maintained at an acceptable level for 3-4 days.
The maturation rate of the cement is calculated based on the thickness of the screed: 1 cm - 1 week. But too thick fillings, more than 4 cm, require an additional 3 days per 1 cm. For example, a layer of 6 cm will ripen (4 cm x 7 days) + 2 cm x (7 days + 3 days) \u003d 48 days. The term is quite decent. But technology requires it.
Readiness can be judged by the residual moisture. It should be in the range of 4-7%. But devices are not available to everyone. Therefore, we will offer a "popular" method.
A piece of polyethylene meter by meter, glue it to the floor around the perimeter with tape. It is important not to leave gaps. After a day, check the screed under the film. If moisture has appeared there, or the shade has changed, then the time to install the flooring has not yet come. Must wait.
What to do with the beacon profile
In general, removing the lighthouse from the screed leads to very negative consequences. The fact is that the poured solution, immediately after setting, forms monolithic structure. Removing the beacon leads to a breach of integrity of this conglomerate. The expected strength and reliability will no longer exist. To illustrate this, try picking the raisins out of a bun and placing the dough back. Will you get something decent? Not! Hope the analogy is clear.


