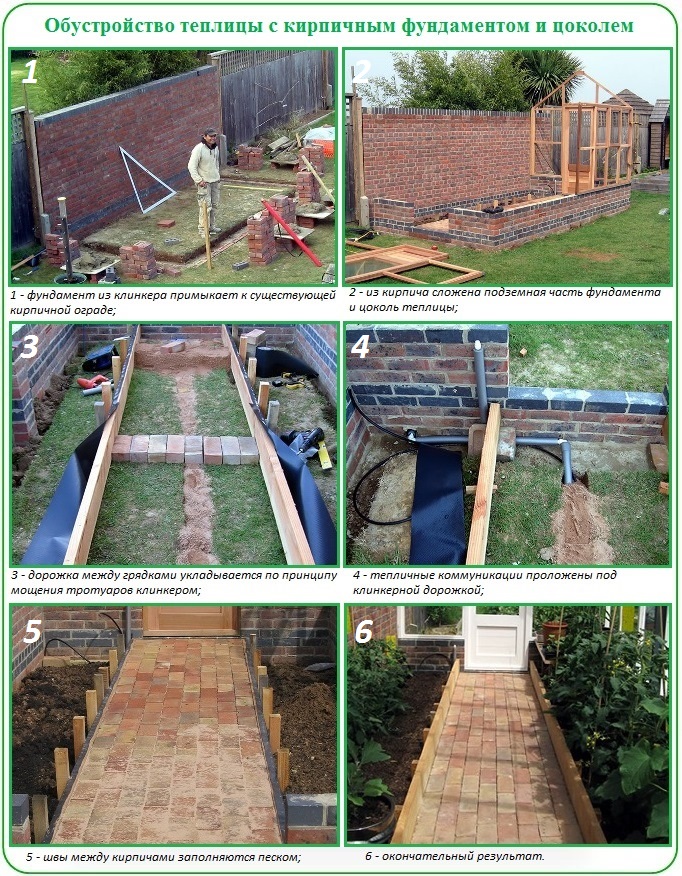
The foundation for the greenhouse is the foundation that will ensure the stability, integrity, strength of the building. Whether you build with your own hands or it is possible to buy a ready-made structure and perform independent installation on the site, the site must be equipped in accordance with the specifics of the structure.
In the article we will tell you why you need a base, what is the best foundation for a greenhouse made of polycarbonate, glass, with a frame made of timber, for metal structures, lightweight buildings made of boards, film, old window frames, etc. And we will give detailed step by step instructionshow to make a foundation for a polycarbonate greenhouse with your own hands.

Why does a greenhouse need a foundation
The foundation ensures the reliability, safety and stationarity of the building. But light structures on the site are temporary, so the question naturally arises: in general, in principle, is a foundation for a greenhouse made of polycarbonate or other materials needed and why? The answer is unequivocal - it is needed, it is a base that performs a number of important tasks:
- fixes the greenhouse frame, holds it in case of gusts of wind, heavy rainfall, flooding of the site and other atmospheric surprises;
- insulates the structure from contact with the ground, protects materials from the harmful effects of the soil, significantly extends the service life of the building;
- helps to keep up to 10% of heat inside, contributes to a favorable microclimate and saves on heating;
- prevents fog and cold air flows from entering the greenhouse;
- helps to protect the structure and crop from harmful insects and rodents.
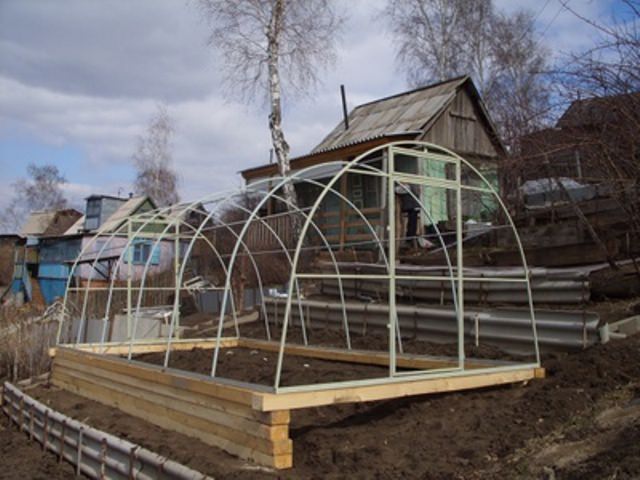
How to make a foundation for a greenhouse with your own hands, a photo of a light structure on a tape
Types of foundations for greenhouses
There are 4 types of foundations in total, and each of them can be equipped as a greenhouse:
- tape;
- columnar;
- pile;
- slab.
The choice of the base depends on the specifics of the soil on the site, its relief features, the scale of the building, climatic conditions in the region, and many others. etc. Next, let's talk in detail about each type of foundation for a greenhouse and materials for its construction.
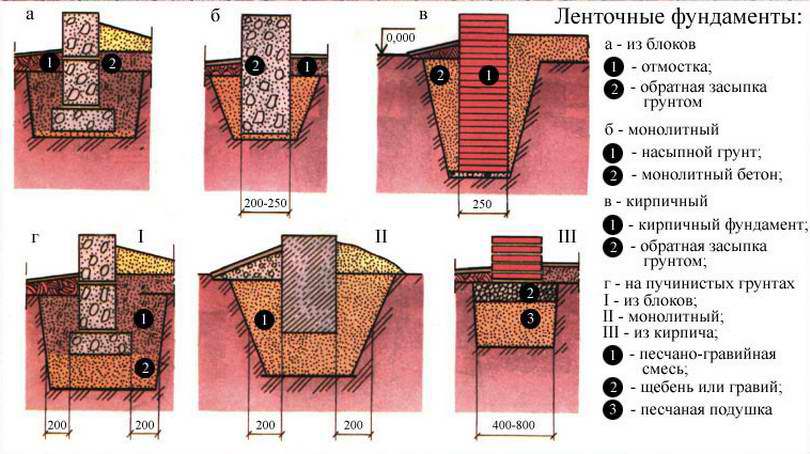
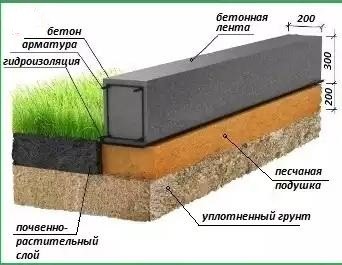
Tape
The strip foundation is the most demanded base for almost all types of buildings. According to the construction principle, it can be:
- not buried - lying on solid ground, it is enough to remove the upper, fertile layer, usually serves as a grillage for pile foundations;
- shallow - fits into a trench 700-800 mm deep, on a specially prepared pillow, such a device is not desirable if the area has high groundwater;
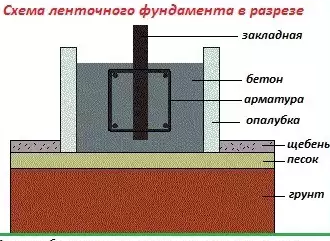
- buried - it is sunk 200-400 mm below the level of soil freezing, this parameter is individual, depends on the region, the average is 1200-1400 mm, the exact information can be found in the table.
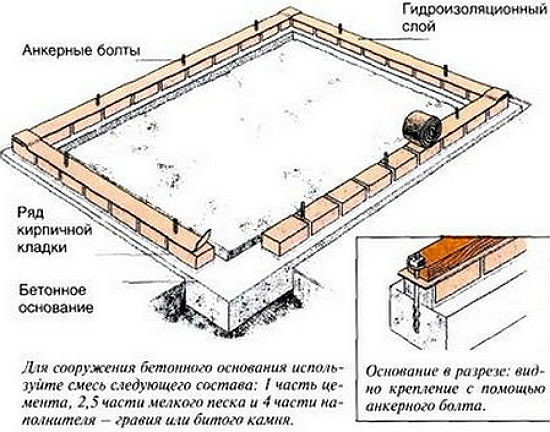
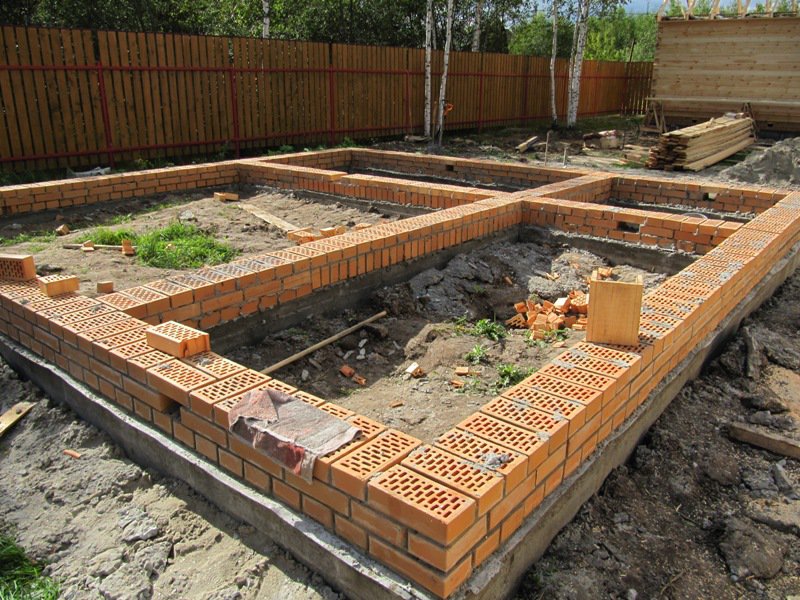
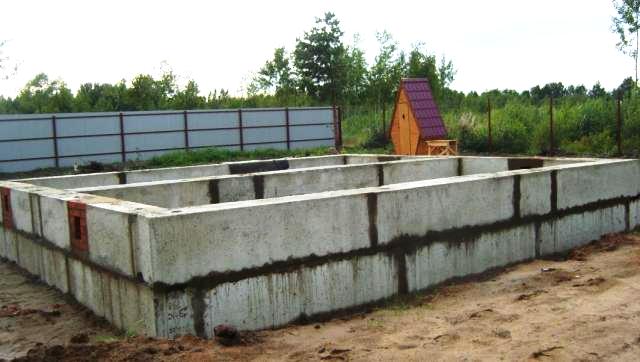
The foundation for a brick greenhouse, a diagram of the correct foundation
Optimal ratio, depth and height: 700: 300-400 mm. Before making a foundation for a greenhouse, you need to decide on the materials for the tape:
- Monolithic concrete, consisting of a reinforcing frame and filled with mortar.
- The base is made of special ready-made concrete blocks connected by reinforcement.
- A rubble structure made of stones and clay.
- A tape made of bricks, foam blocks, it is still advisable to fill in a monolithic concrete base, build a basement on it.
- Construction from scrap materials: thick timber, bottles, logs, etc.
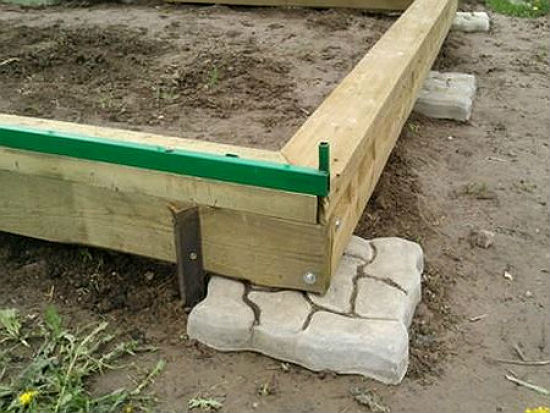
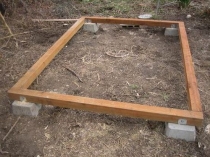
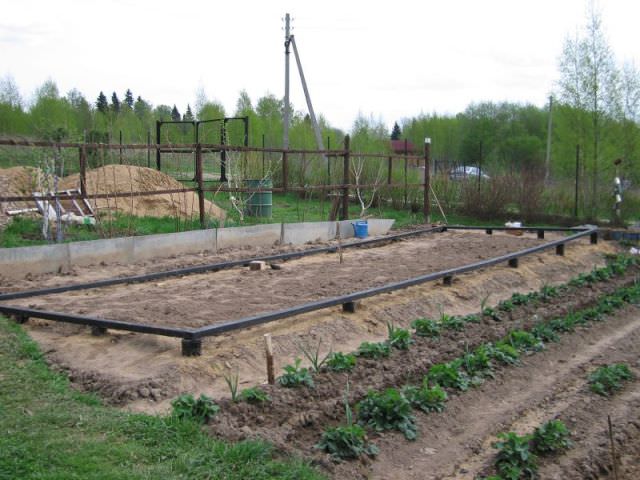
Shallow foundation for a greenhouse made of polycarbonate, from a bar on concrete supports
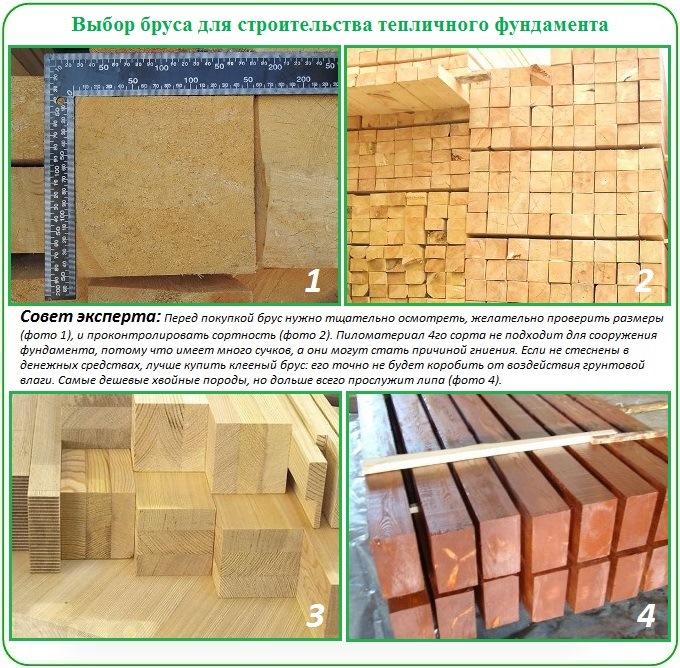
Good to know: It is faster and cheaper to make a foundation for a greenhouse from a bar with your own hands. But the tree does not tolerate physicochemical and biological influences, it is saturated with moisture in the soil, a fungus appears, signs of decay. To extend the service life, it is better to arrange the foundation for a greenhouse from a bar of hard wood, for example, larch, the frame must be impregnated protective compounds, cover with bitumen mastic, machine oil, paste over with roofing material.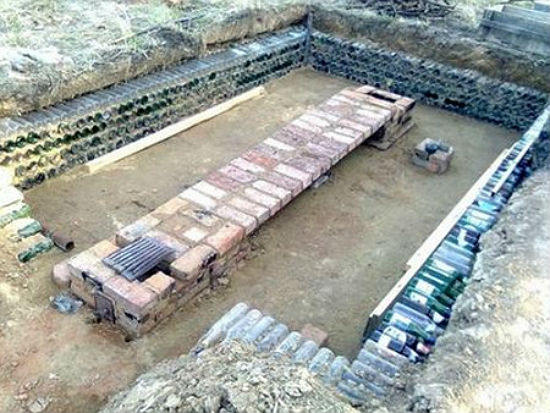
One of the inexpensive ways to put a polycarbonate greenhouse on
Platen
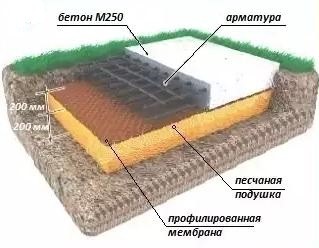
Slab foundation - solid, solid foundation for construction in areas with high groundwater and unstable ground, the pyramids in the sand have just such a base. The greenhouse can be installed on a stove of two types:
- Floating - the concrete platform lies almost on the surface.
- The base with stiffeners is a combined structure made of concrete strips, from above it is tied to them monolithic slab... If strip foundation must necessarily be closed along the contour, then in the case of a plate, this requirement is absent.
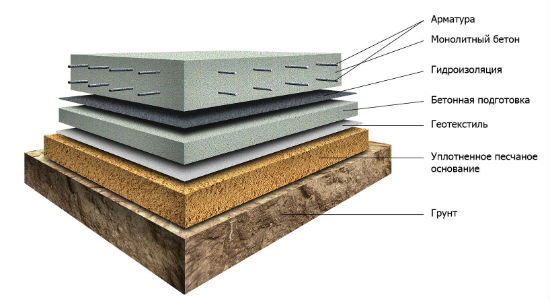
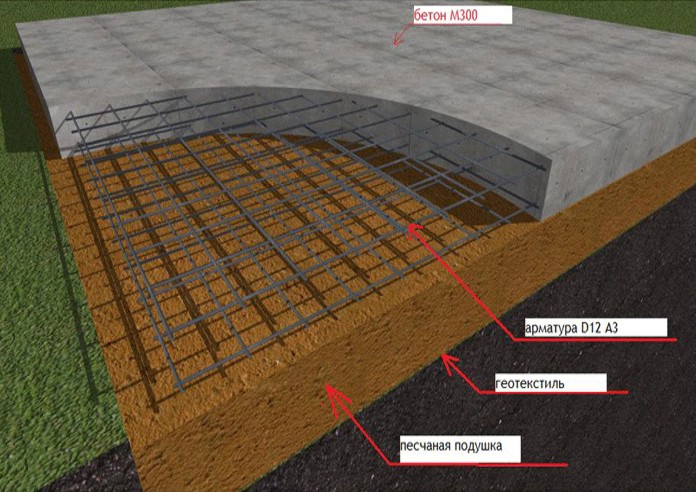
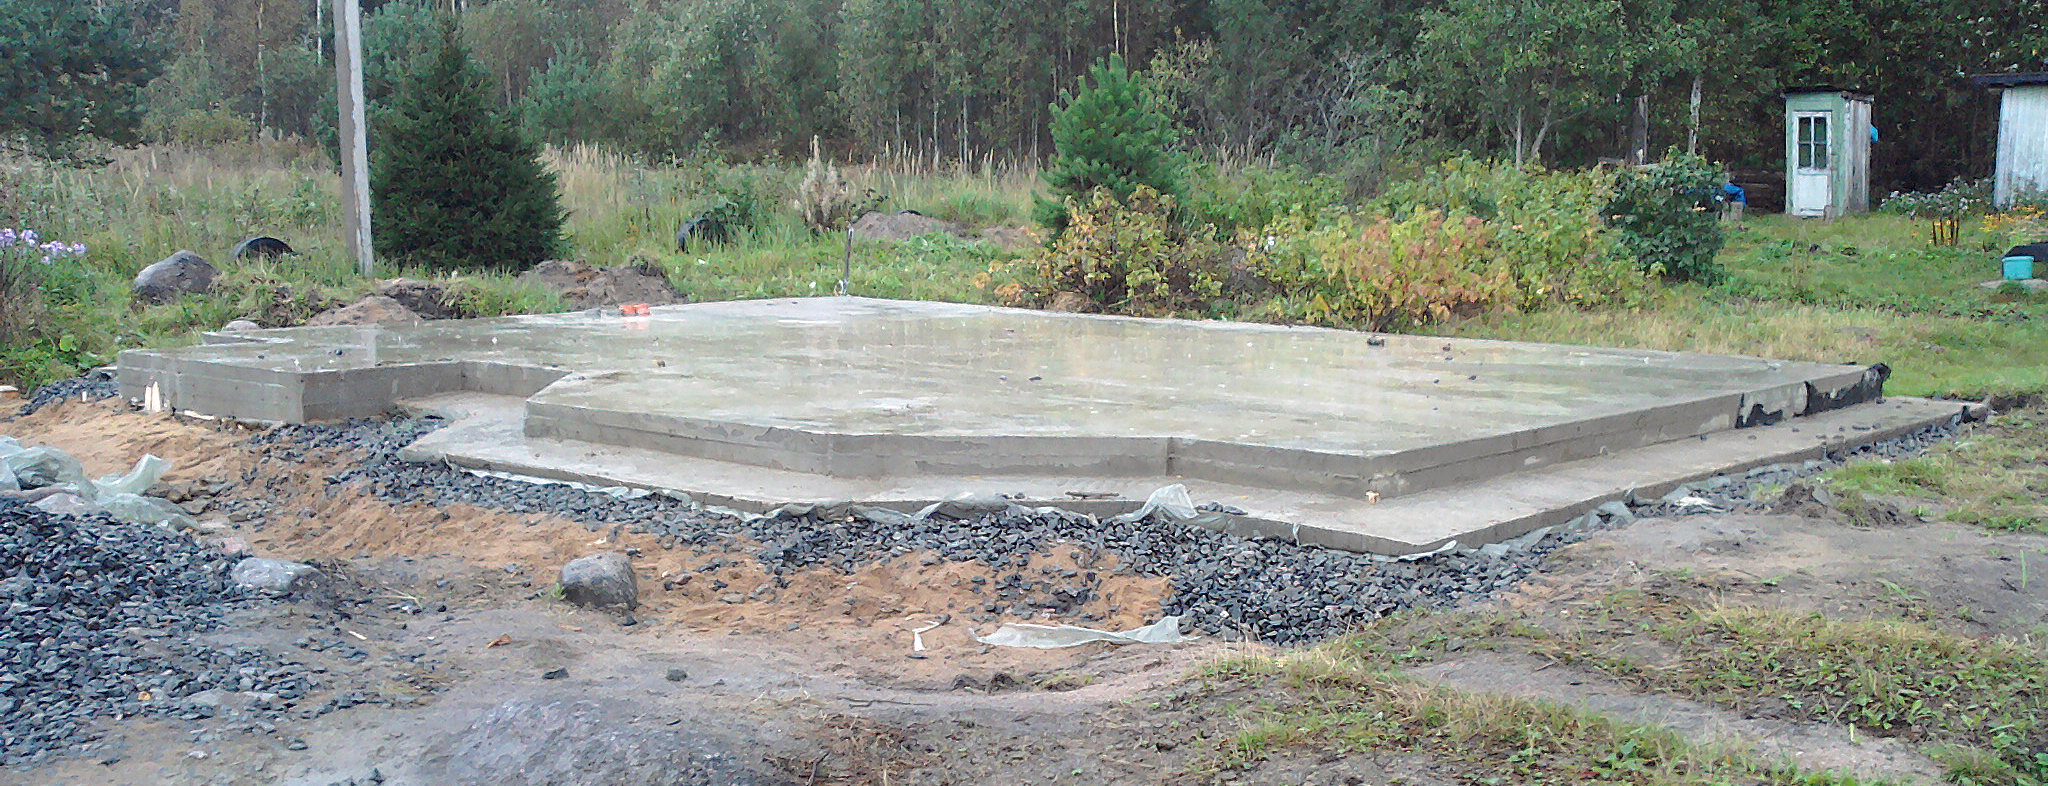
To organize the slab, a pit is dug with a depth of 300-700 mm, a sand-crushed stone pillow is laid on the bottom, covered with geotextiles, roofing felt, this helps to avoid silting. The optimal thickness of the foundation depends on the expected loads: for outbuildings and light greenhouses - 100 mm, for large stationary greenhouses, designed for the winter period, 200-250 mm.
Typically do slab foundation under a greenhouse made of concrete, but tires filled with earth and other materials at hand can be used.
Scheme of arrangement of slab base
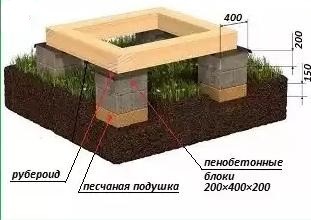
Columnar
A column foundation is a simple, inexpensive, quick way to set up a foundation. The pillars are deepened by 700-800 mm, for small buildings it may not be recessed into the ground. The optimal distance between the posts is 1.5-2.0 m.
A columnar foundation for a greenhouse can be made of materials:
- Bricklaying, rubble stone.
- Use ready-made T-shaped concrete pillars.
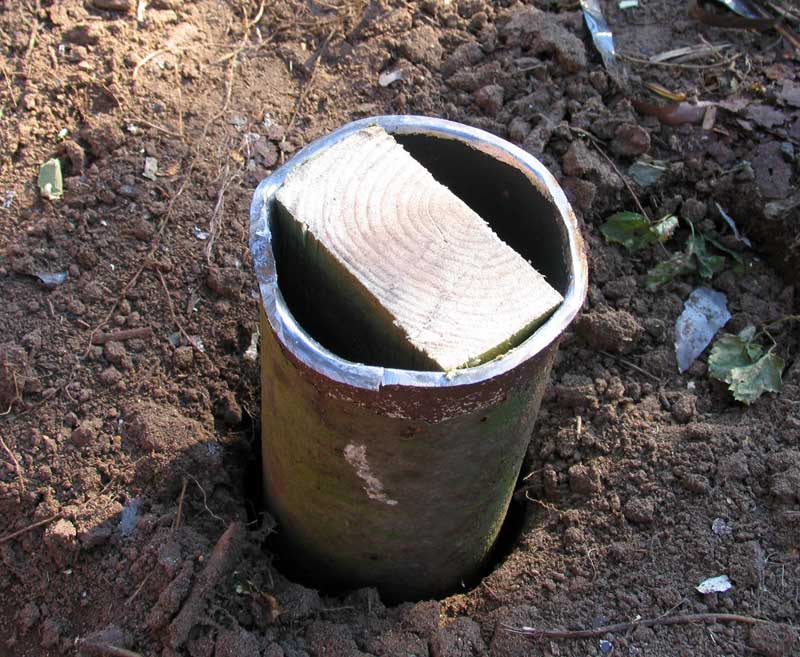
- Install, reinforce and fill with mortar metal, asbestos, roofing felt pipes.
- For the organization of an unburied columnar foundation, foam blocks, flat rubble stones, even wooden stumps are suitable.

Pole arrangement diagram
A significant drawback of a columnar foundation for a greenhouse is the gap between the ground level and the base of the building, through which cold gets inside. Such conditions contradict the functionality of the building, so the perimeter should be insulated: make a brick strapping, sewn up with boards, etc.
The foundation for the greenhouse is made of foam blocks, the high base will protect the timber from harmful influences
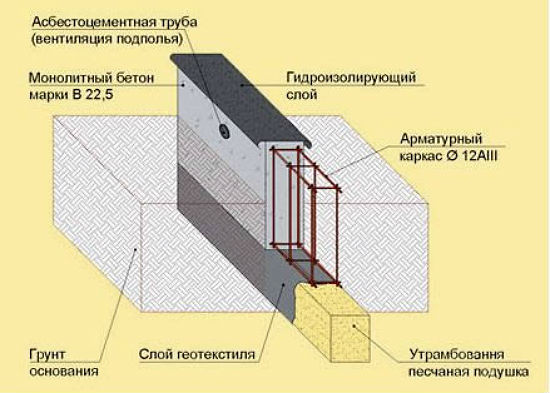
Pile
Pile foundation - perfect solution for the construction of a greenhouse in a swampy or uneven area. It settles down below the level of soil freezing by 200-300 mm. There are 2 types of piles:
- driven - pipes, sleepers, channel;
- screw - pillars equipped with blades, which are immersed in the ground in a circular motion using a drill or special equipment.
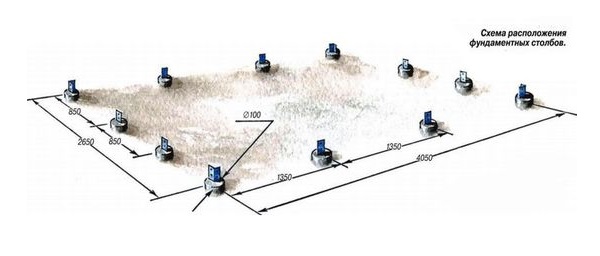
The optimal installation of piles is 1.5 - 2.0 m from each other. After installation, the upper heads are sawn off to size and tied with a grillage, which ensures the integrity and strength of the structure. The grillage can be made of timber, sleepers or monolithic concrete.
Organization pile foundation for a greenhouse with a monolithic concrete grillage
Let's sum up
If you choose bases for glass structures, film structures, a base for structures made of old window frames, ready-made prefabricated metal structures, a foundation for a greenhouse made of polycarbonate, which is better to say with some certainty. You should rely on geodetic studies, soil quality, dimensions and materials, the weight of the building, climatic conditions depend on them.
For capital warm buildings, it is recommended to make a strip foundation - this option is suitable for almost all conditions. Temporary and light greenhouses, in an effort to save money, can be safely installed on a point columnar base.
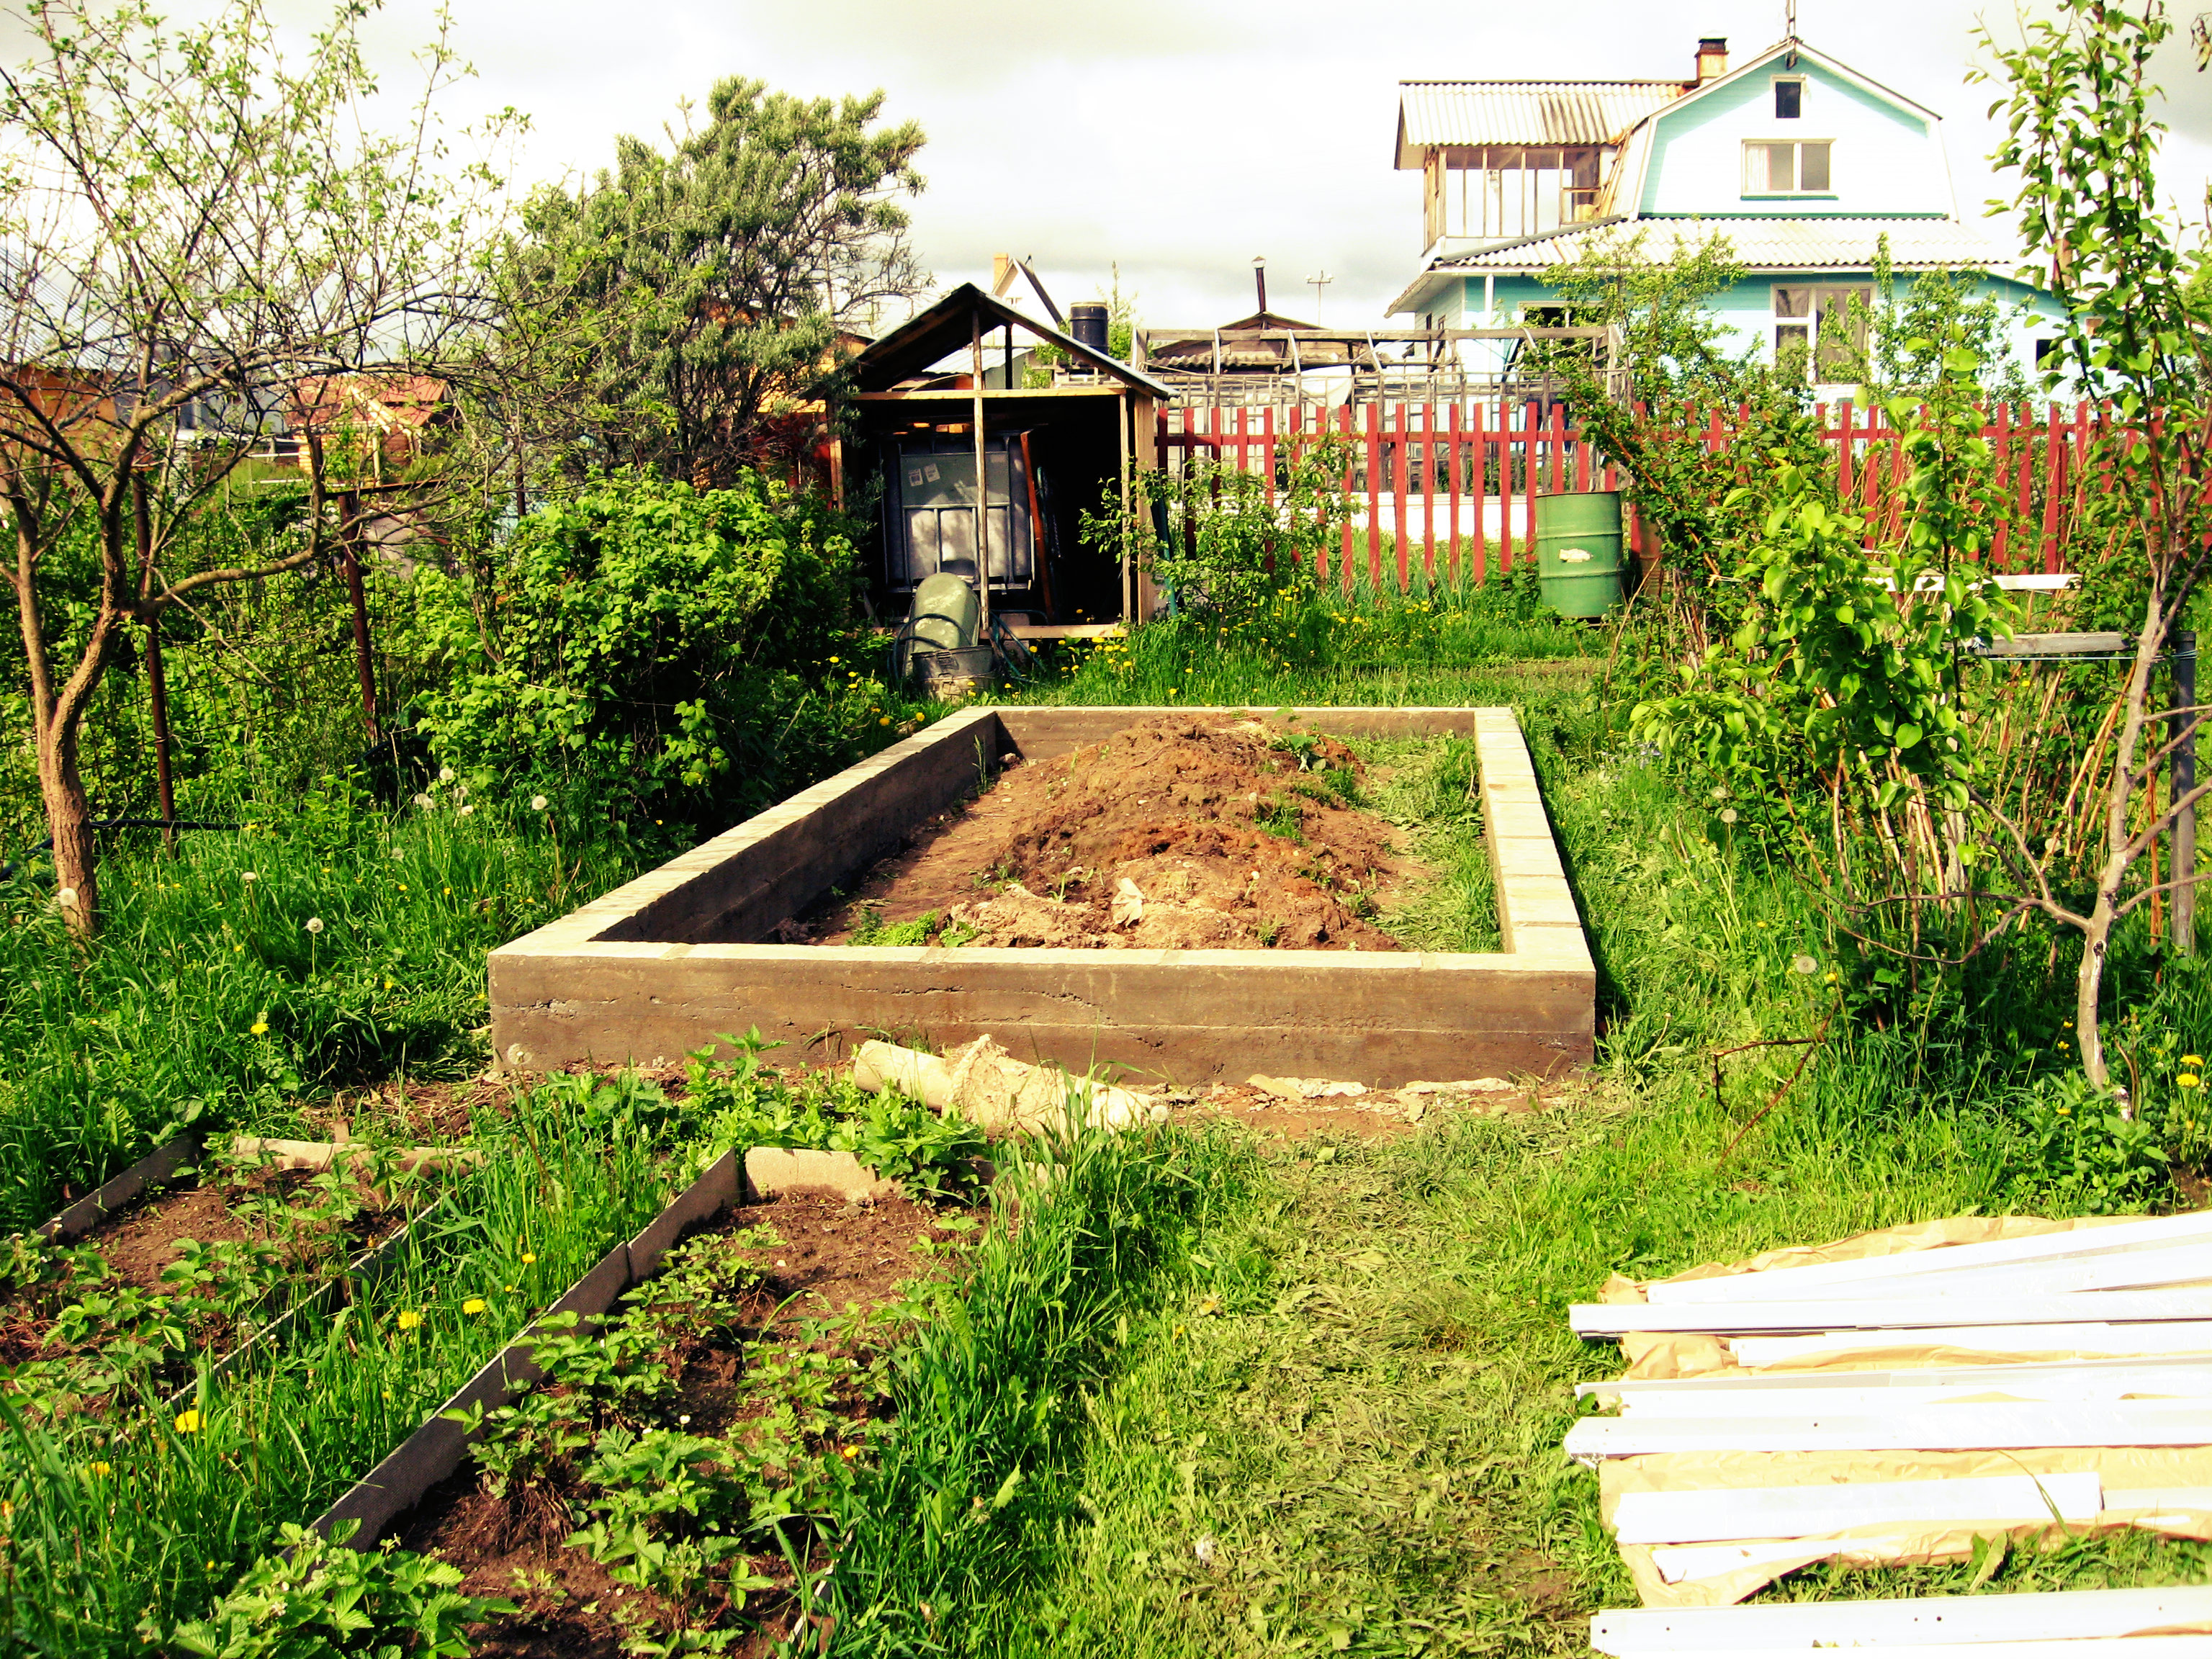
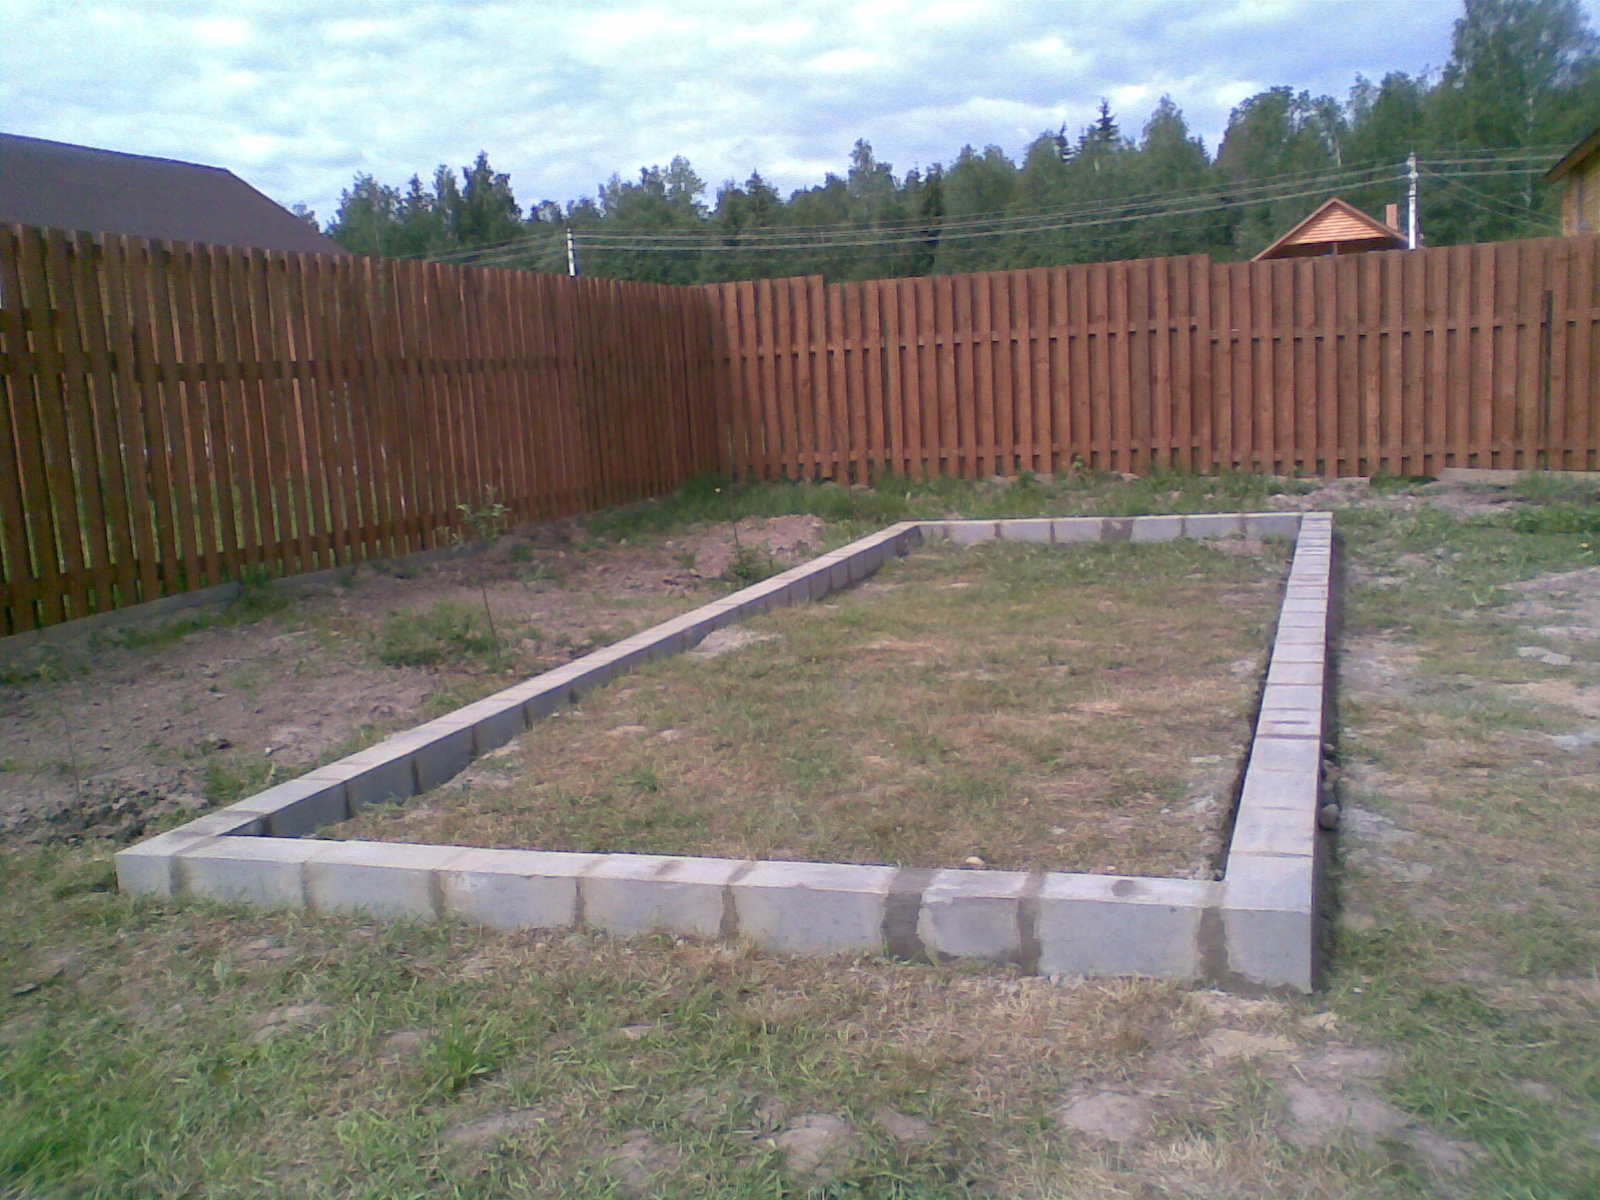
The interior of the tape base for the greenhouse
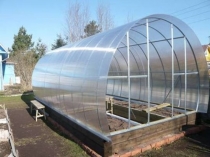
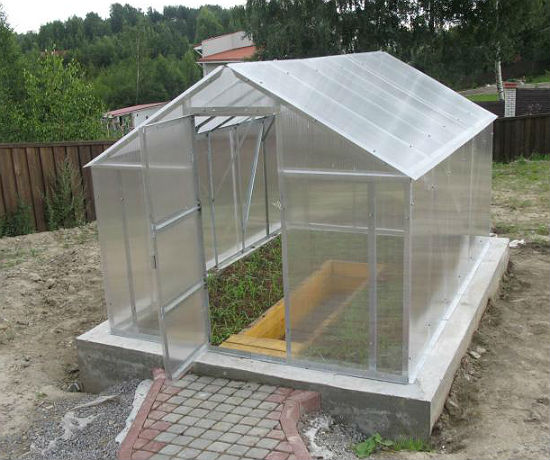
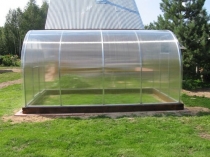
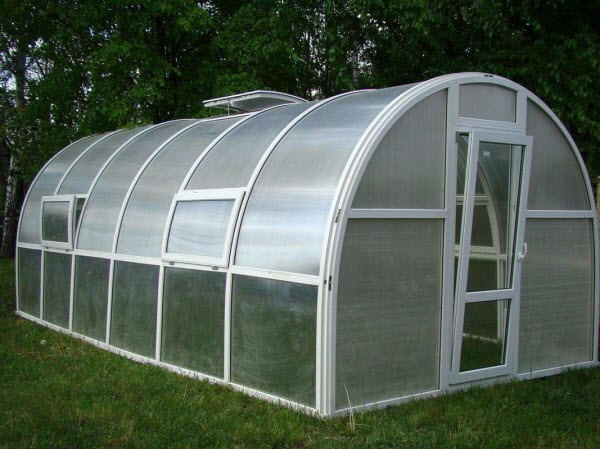
Polycarbonate greenhouse foundation - photo and step-by-step instructions
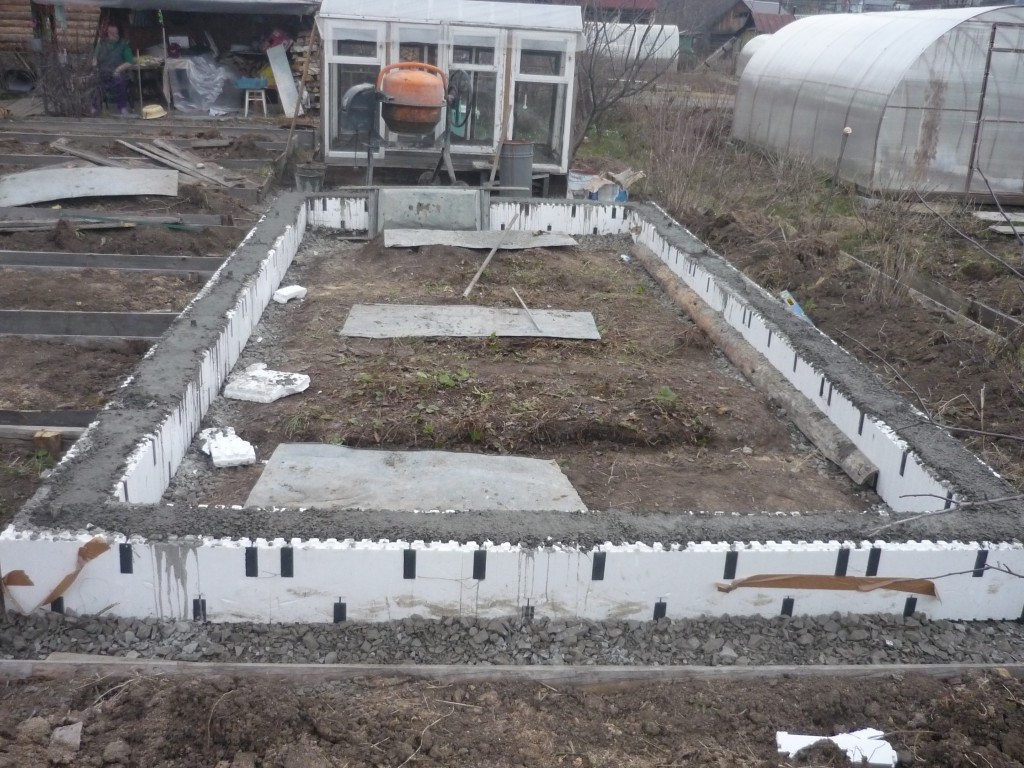
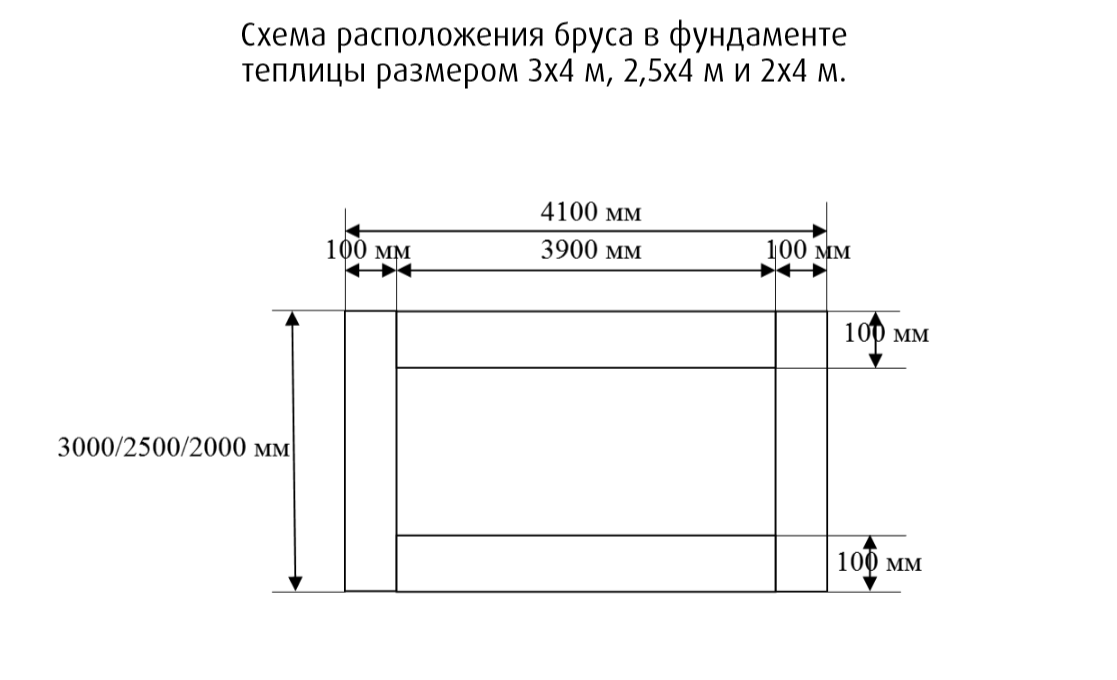
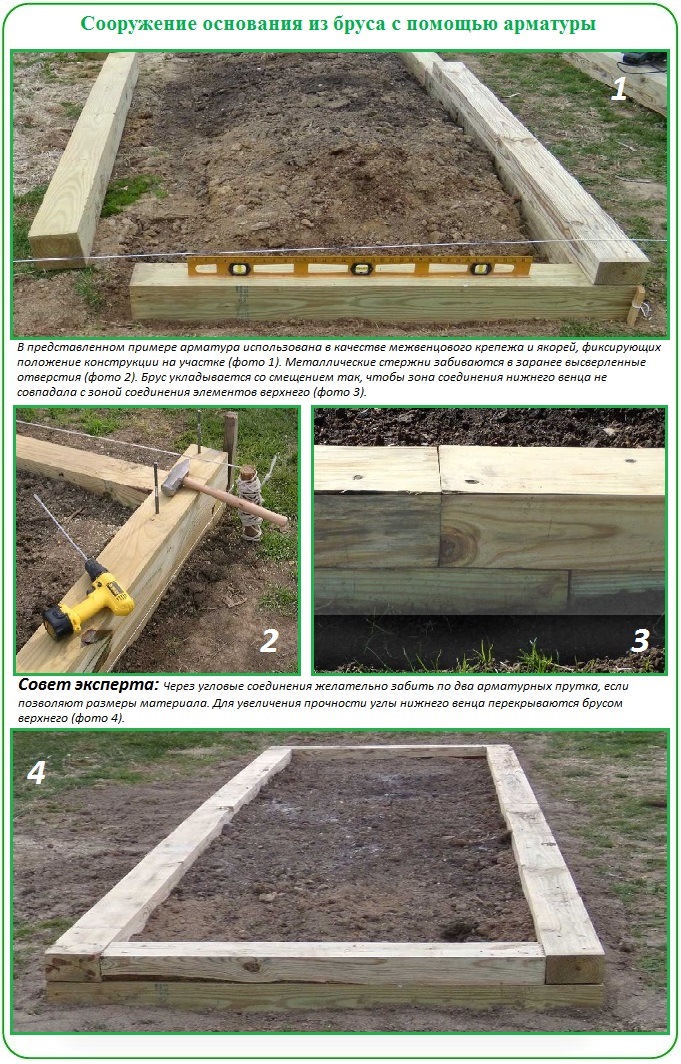
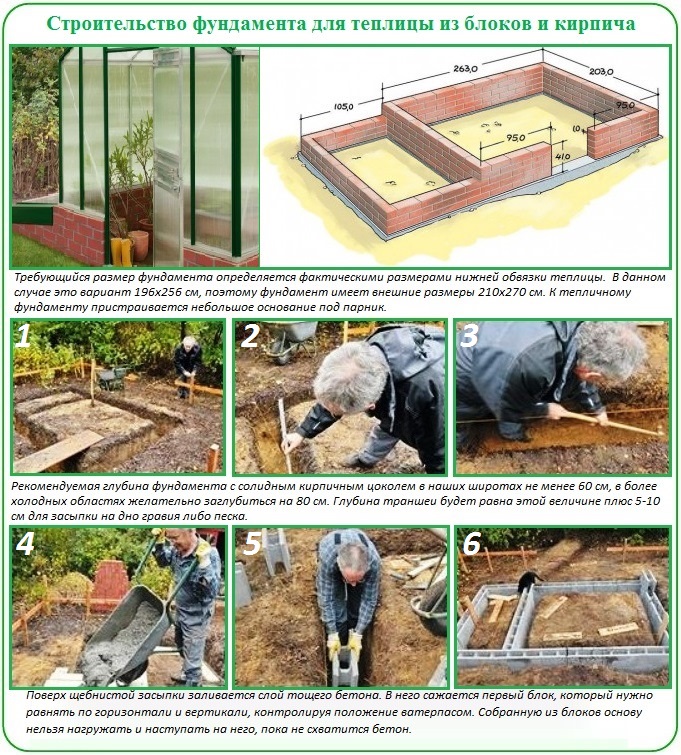
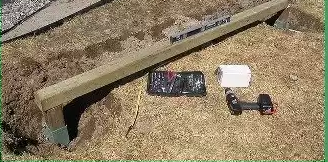
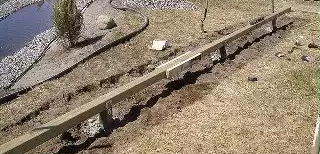
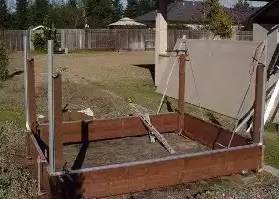
We will arrange a strip foundation for a greenhouse, size 3 * 6 m, with a high brick base and insulation around the perimeter.
Making a drawing
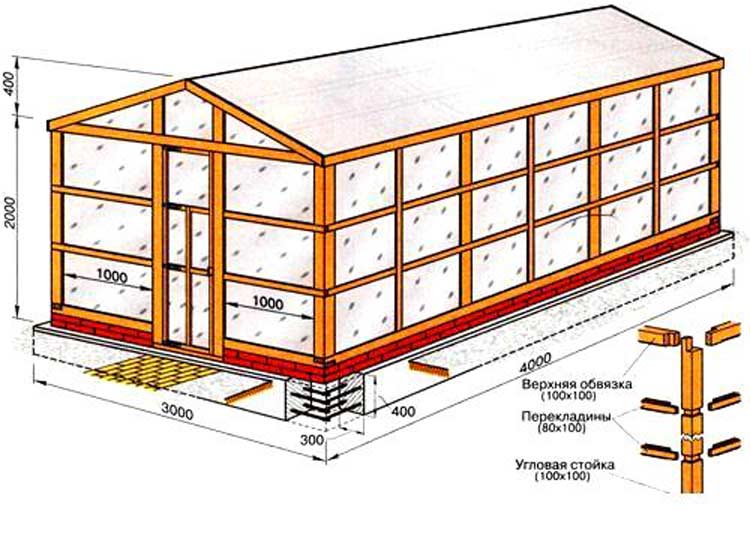
Before building a greenhouse, you should choose a project or make a drawing with your own hands, indicating the dimensions and main structural units. The materials, their quantity, the main stages of work are also determined here. It is better to use a typical project and adapt it to your own conditions.
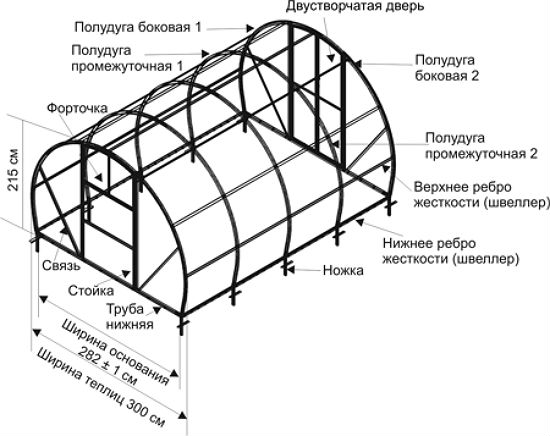
Typical Ergonomic Greenhouse Design
Choosing a place
The choice of location depends on the individual characteristics of the site. It is better to build a greenhouse from the southern and maximum windless side, behind the house. We clear the site from debris, tree roots, weeds. We fence off the perimeter with pegs, pull the rope, check the geometry. The diagonals must be equal. Remove the upper, soft layer of soil.
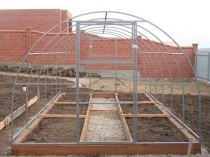
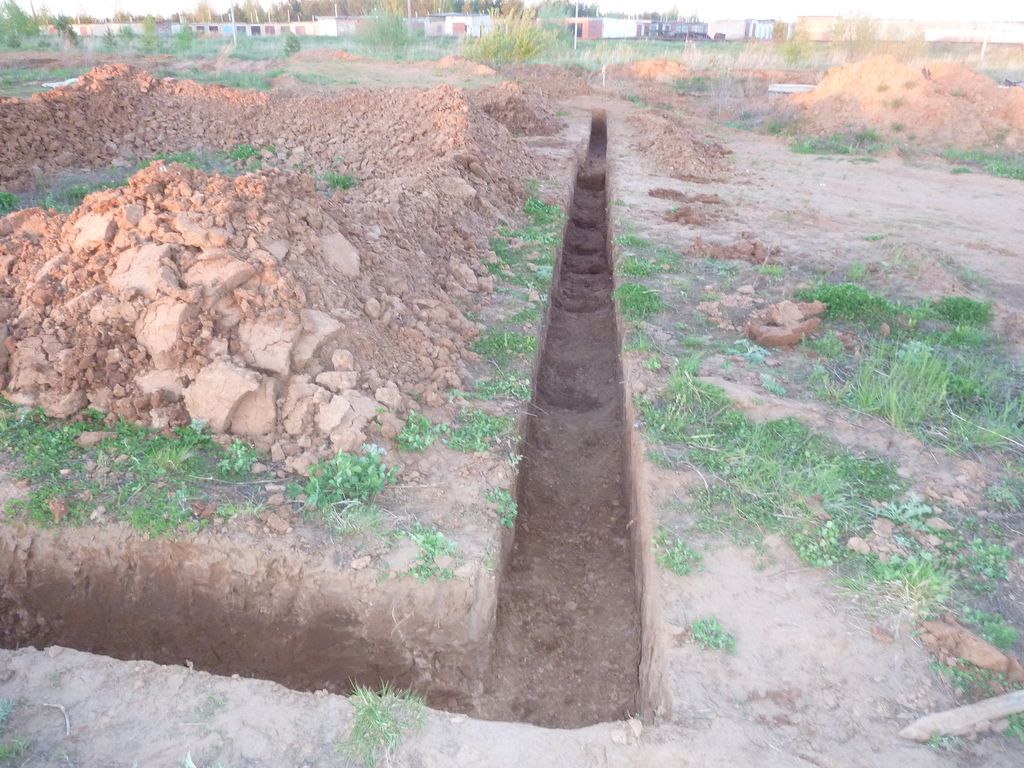
Foundation device
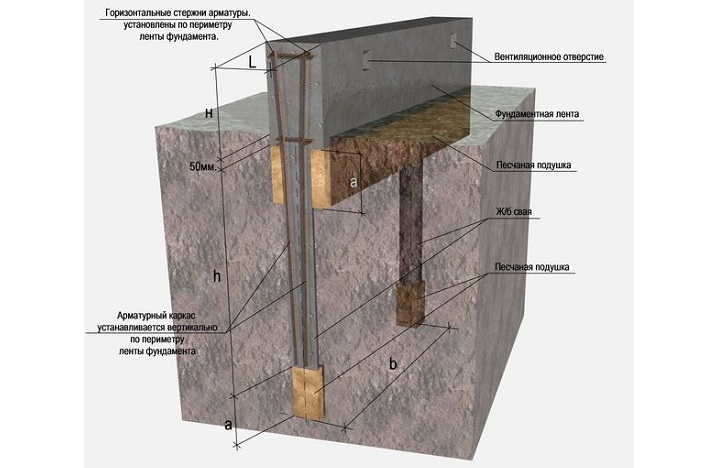
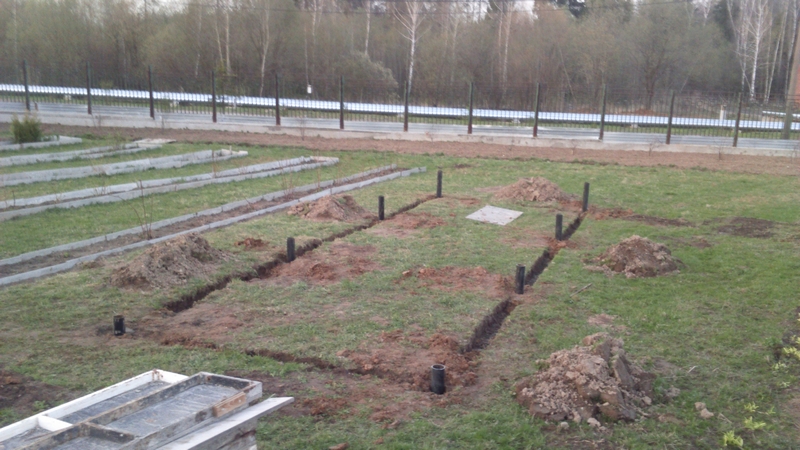
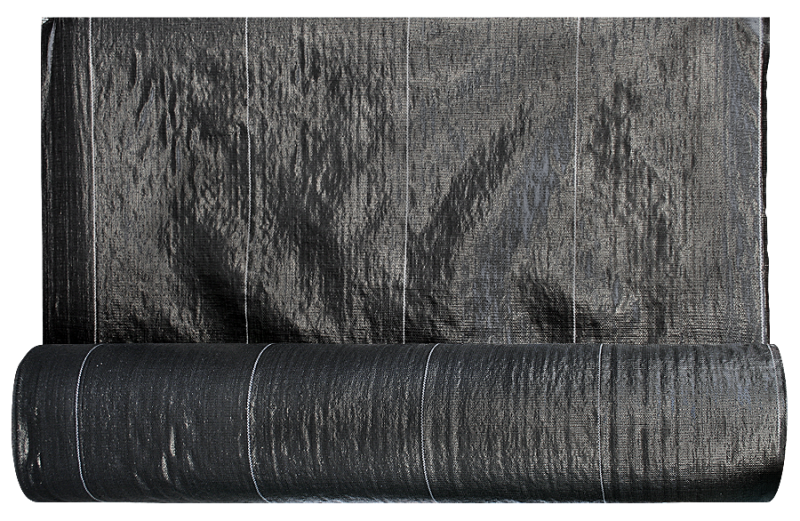
We dig a trench 800 mm deep around the perimeter. Align the bottom. We cover with roofing material for 2 layers, you can lay geotextiles. We fill in crushed stone, sandstone, layers of 100-200 mm, ram the pillow.
We install the reinforcing frame. There will be two horizontal belts, two parallel rods in each, vertical bundles every 300-500 mm. The reinforcement is corrugated, with a cross section of 8-12 mm. We put pebbles, 50 mm high, or stands on the bottom.
We put 2 lower horizontal rods, the distance between them is 200 mm, we lay smooth thin rods perpendicular to better preserve the shape of the frame. At the corners, we bend the reinforcement to the adjacent side, we go in 500 mm or more. Also, on the other hand, a double overlap is obtained to strengthen the structure. We drive in vertical rods, we connect the parts with wire. We mount the upper horizontal belt in the same way.
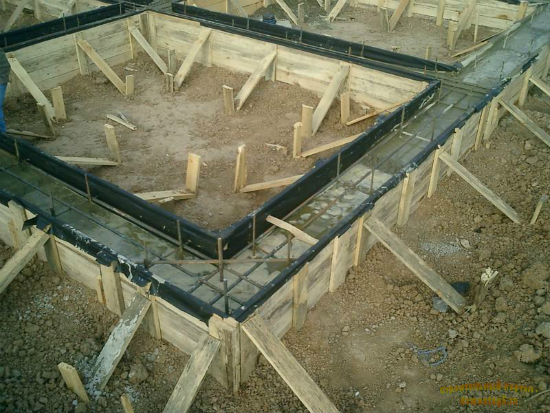
How to knit reinforcement correctly
The distance between the horizontal belts depends on the height of the greenhouse foundation. If the tape is 400 mm high, then there should be a distance of 300 mm between the upper and lower rods, +50 mm per concrete layer on each side. The width is calculated in the same way, if the overall dimension is 300 mm, then the frame is 200 mm. Remember, the height must be greater than the width of the tape.
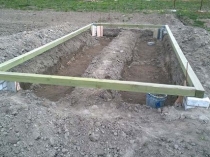
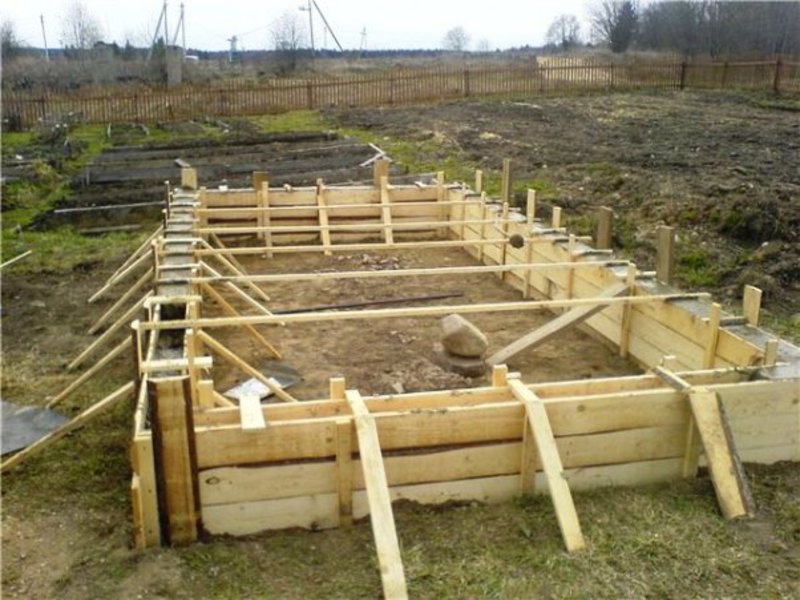
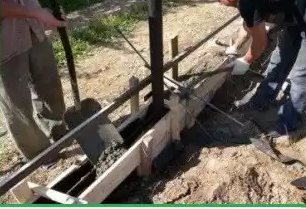
We install the formwork in the trench, it can be knocked-down boards from a board, moisture-resistant plywood, plastic durable panels. For the correct geometry, we make a bundle along the top of the sheathing with bars, and on the outside we install spacers, they will hold the structure when pouring concrete.
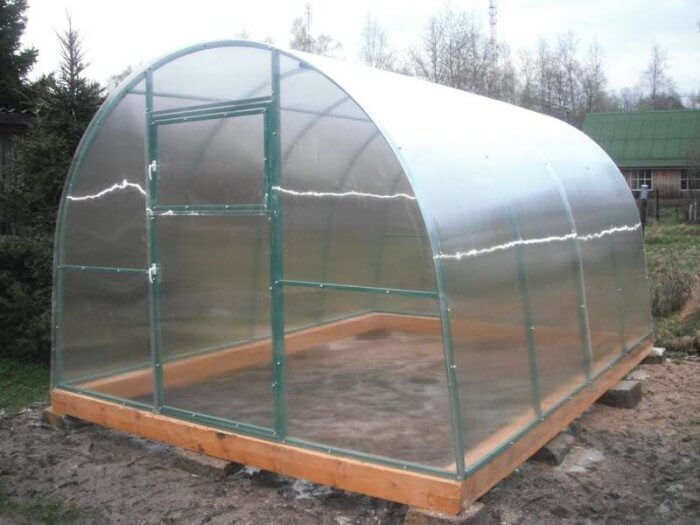
Note: In order to preserve heat in the greenhouse as much as possible, to protect the structure from harmful effects, the height of the foundation should be calculated in such a way that it rises 1/3 above ground level.The tape should be poured simultaneously, so that seams and cold bridges do not form. The proportions of the solution for the foundation for the greenhouse: cement (binder) - 1 part, sand - 3 parts, crushed stone, fraction up to 40 mm (preferably 10-20 mm) 4-5 parts, water 4-5 parts, until the consistency of thick sour cream. First, dry components are thoroughly mixed, then water is added.
In the photo, how to properly fill the base for a polycarbonate greenhouse with your own hands
Pour the mixture into the crate, ram it, remove the air. Bubbles in the hardened concrete will break. The solution must be hardened, until it is fully formed - 4 weeks, only then the foundation must be loaded.
We remove the formwork, glue the sides with roofing material or coat it with bitumen mastic for 2 layers, attach foam sheets on top, you can order insulation - PPU dusting. Cover the top with 2 layers of roofing material, overlap seams of 100-200 mm, seal with tape, weld with a blowtorch. Backfilling the soil. For horizontal waterproofing roofing material is laid on top of the foundation under the greenhouse.
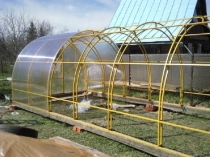
How to install a polycarbonate greenhouse on a foundation
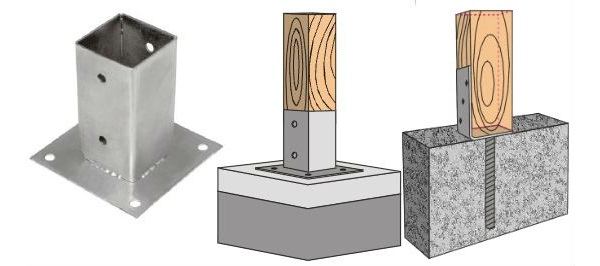
On fresh concrete in the center of the tape, in the corners and every meter, it is recommended to install and release reinforcement for metal structures or special corners with welded anchors to the outside, for fixing the bars, the greenhouse frame will be attached to them. If the embeds were not provided during the pouring of the foundation for the greenhouse, then the frame can be fixed with anchor bolts.
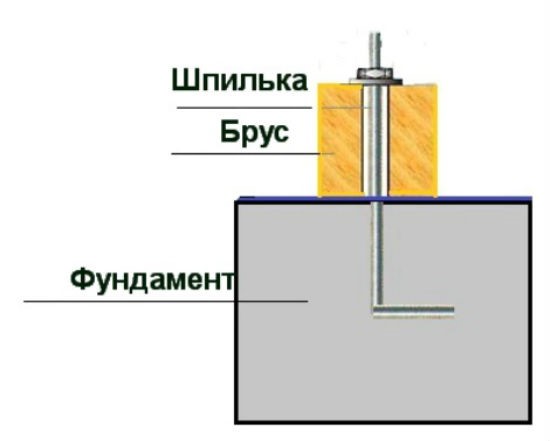
Method of fastening the frame to the foundation
The installation of a polycarbonate greenhouse on the foundation has another important stage: in order to avoid drafts, ice, freezing, the gap formed when the base of the greenhouse adjoins the foundation is sealed with elastic sealants, a gasket with rubber edges is placed in the gap. This is especially important if the structure is insulated and it is planned to grow crops in it. all year round... When equipping a winter greenhouse, do not forget about additional lighting and heating.

Although a greenhouse is a lightweight construction, it requires a reliable and solid foundation. Indeed, in the absence of a good foundation, there is a risk that it will "walk" around the site, and young plants may die from frost and wind. So, what kind of foundation is needed for a greenhouse and how to build it correctly?
Greenhouse foundation: functions and features
The foundation for the greenhouse is a reliable foundation for the structure, which prolongs its service life, as well as protects the plantings from negative factors. Many summer residents have a question: is it possible to build a greenhouse without a foundation for the sake of saving money and time?
Of course, this is possible, but arranging the base for a greenhouse has a number of advantages:
- the foundation firmly anchors the greenhouse to the ground, so that even the strongest winds will not be afraid of it;
- the structure will be located above ground level - this will save about 10% of the heat inside;
- insects, moles and other pests will not be able to reach the plantings;
- plants will be protected from frost, precipitation and other adverse factors.
Some of the most important characteristics that a greenhouse foundation must have are strength, resistance to the environment and conformity to design features.
- Reliability... The stability of the base plays a special role during the end of winter, as melted snow and water can destroy the entire structure.
- Resistance to negative factors... For the sake of economy, some summer residents build a foundation from improper tools for these purposes (for example, plastic bottles or old tires) or low-quality material, which can be a big mistake due to the influence groundwater and temperature changes, such a base can quickly collapse.
- Compliance with the size, shape and material of the greenhouse... If the technical features of the structure differ significantly from the features of the foundation, the greenhouse will quickly deform and may even collapse.
Summing up, we can say that not only the appearance and functionality, but also the "health" of the plantings and the future harvest depend on the correct choice of the type and material of the base of the greenhouse.
The basis for the greenhouse is selected depending on the material from which the structure is made (for example, silicate glass requires a more rigid base than), financial and time costs, as well as the climatic conditions of the region. The types of foundations that are used to equip greenhouses include strip and surface (shallow or not buried). The principles of their construction are almost identical with the only difference that a deeper pit will be needed for the tape base.
As for building materials, in this case you can take wood (timber), brick, concrete mix, as well as ready-made concrete slabs or blocks. Each of the options has its own advantages and disadvantages that must be considered when choosing a foundation.
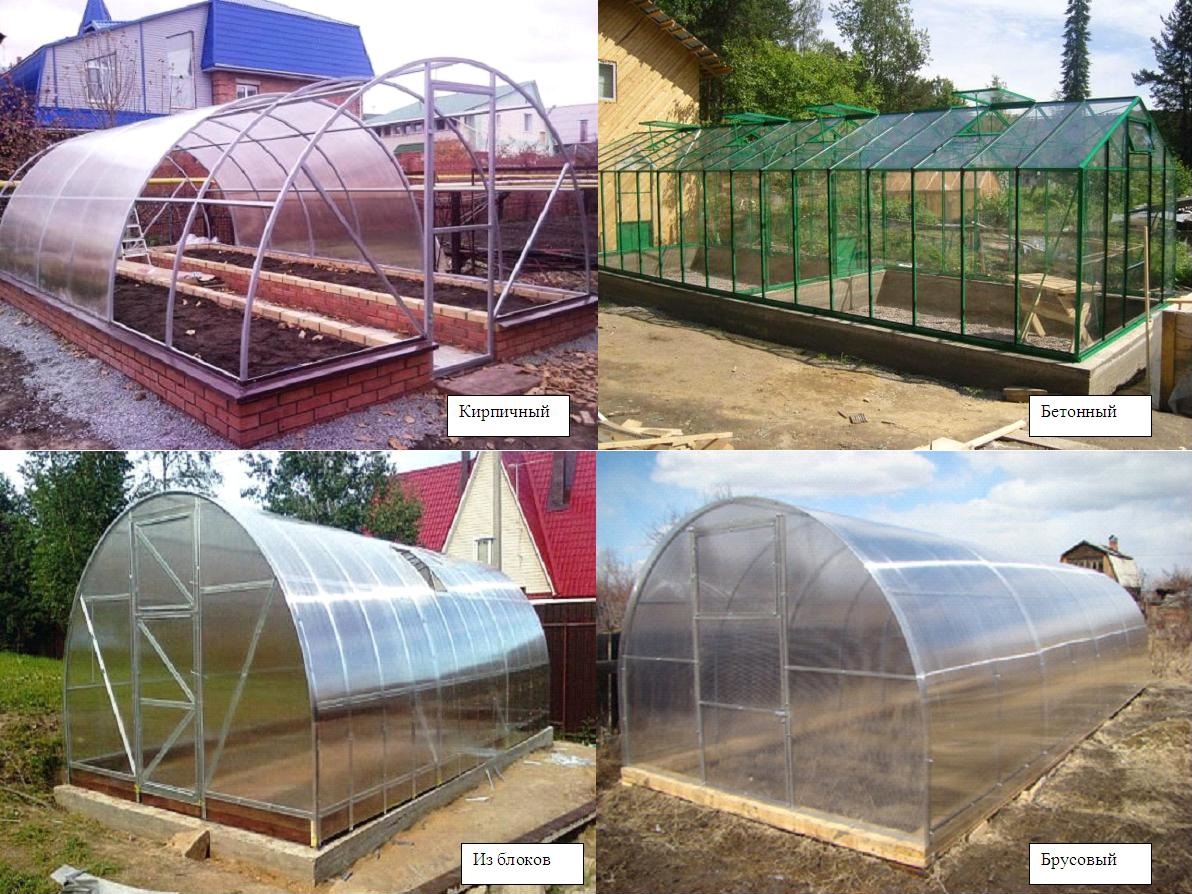
Table. Advantages and disadvantages of different types of foundations.
| Foundation type | pros | Minuses |
|---|---|---|
| Wood | Cheap, lightweight and easy to operate and operate (the structure can be easily moved to another place). Good thermal insulation characteristics. | Low strength, therefore suitable for polycarbonate greenhouses and other lightweight structures. Short service life compared to other materials, and in conditions of high humidity, it will rot even after processing with special compounds. |
| Concrete-brick | It is lightweight, easy to set up, resists stress and deformation well, therefore it is suitable for heated greenhouses. | The material has the ability to accumulate moisture and quickly deteriorate. In low temperatures requires additional insulation. |
| Concrete tape | Reliable, durable, well resists high humidity and other negative factors. | It requires considerable investment, has low thermal insulation properties and a large mass. Difficult enough to arrange. |
| Blocky | Easy to install, relatively inexpensive, resistant to environmental influences. | Poor heat retention and low strength. |
| Columnar | Reliable, durable, durable, and relatively cheap. | The structural features of the foundation require additional work - rigid piping and insulation of the basement. |
| Pile | The design is extremely easy to install, if necessary, it can be easily transferred to another place. Work can be carried out in any weather, suitable for moving soil and areas with difficult terrain. | Disadvantages are similar to those possessed by columnar foundation... In addition, the metal piles from which the frame is made are prone to corrosion. |
| Platen | Durable and strong, provides rigid fixation and stability of the structure on any soil. It well insulates the inner space of the greenhouse from negative factors and pests. | Expensive to install, has a lot of weight and requires additional insulation. Since the plantings will be isolated from ordinary soil, it will be necessary to equip drainage in the greenhouse and carefully monitor the microclimate. |
To choose the right base structure for a greenhouse, the following rules must be observed.
Important! Another important point is that the reliability and strength of both the foundation and the entire greenhouse depend on strict adherence to the construction instructions and the correct execution of all work.
Step-by-step instructions for laying a foundation for a greenhouse
Each type of foundation has its own characteristics of the laying, but in any case, you must first make the appropriate calculations (depending on the dimensions and design of the room). After that, the site is cleared of debris, trees and bushes, and, if necessary, leveled.
Tools and materials
Materials for arranging the foundation are selected in advance, it can be a wooden beam, concrete mix, blocks, etc.
In addition, the following tools will be needed to complete the work:
- rope or fishing line;
- wooden stakes;
- building level;
- roulette;
- hacksaw;
- hammer;
- nails;
- shovel and bayonet;
- anchors for fixing the main structure.
It should be noted that this is not full list tools and materials at hand necessary for arranging the foundation. Depending on the type of base chosen, you will need to add a hand drill (for a pile foundation), boards for formwork (for laying strip base) etc.
A polycarbonate greenhouse, like any other structure, requires regular maintenance and sometimes repair. ABOUT proper care behind the greenhouse, as well as techniques and methods of repair will tell you.
Laying a foundation from a bar
A timber foundation is the best option for economical summer residents who plan to use the greenhouse exclusively in the warm season.
![]()
The timber should be clean and dry (humidity no more than 20-22%), without signs of rotting or damage by pests, and the section depends on the size of the greenhouse - for a large-sized structure, logs with a large section will be needed. The best option is a larch material that has been previously treated with antiseptic compounds (otherwise you will have to do it yourself, since the foundation will quickly rot or be damaged by pests).
A base from a bar can be made in several ways, and the simplest one consists of the following steps.
Step 1. Mark the selected area with wooden stakes and ropes, and make sure that each angle is 90 degrees.

Step 2. Remove the top layer of soil (later it can be used for the beds).
Step 3. Around the perimeter of the marking, dig a trench, the depth of which is determined depending on the section of the timber (for example, for a material with a section of 100x100 mm, a trench 150 mm deep will be enough), and the width should be 70-80 mm more than the thickness of the logs.
Step 4. Lay out the bottom and walls of the trench with roofing material, which will play the role of a waterproofing material. The material should be laid with an overlap - so that the timber is in a kind of "envelope".
Step 5. Lay the timber on roofing material and fasten the corners together in any way that is used for construction wooden houses (for example, "in the paw" or "in half a tree").
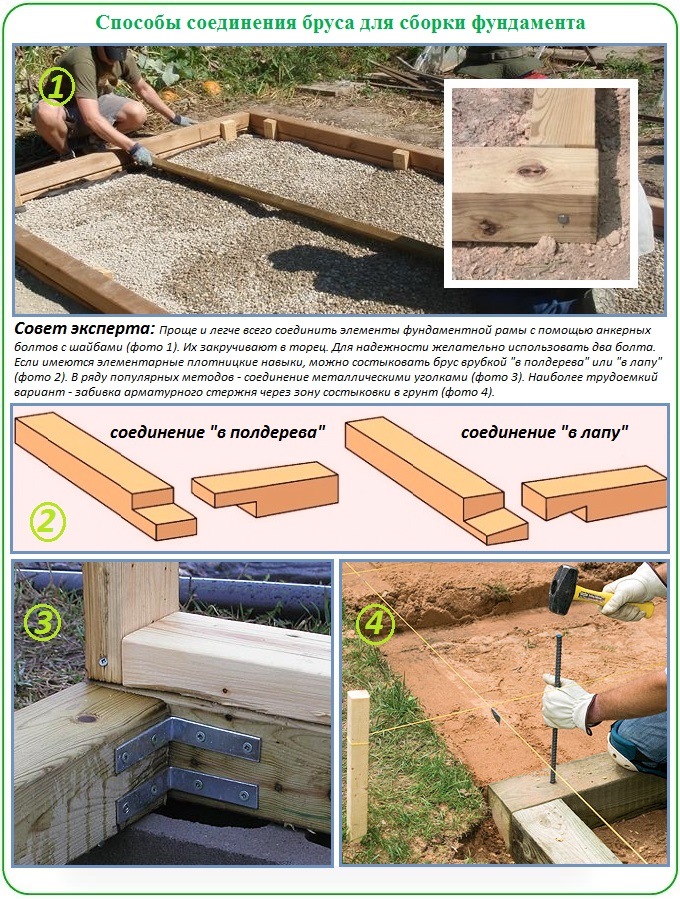
Step 6. Fasten the structure with metal corners, which have holes for nails or screws.
Step 7. Align the base to the spirit level using wooden wedges or scraps. Minor deviations are eliminated by adding sand or gravel.
This solution is suitable for areas with simple terrain and low groundwater levels. On damp soils or areas with difficult terrain, it is recommended to install the frame on low point supports. The frame for such a foundation is made as described above, but does not fit into the trench, but is installed on rods previously driven into the ground - one support on the inside of each corner and every 1-1.5 m along the perimeter of the future greenhouse. As a building material, you can use cuttings of reinforcement, screw supports or wooden stakes (length no more than 70 cm). A timber frame is nailed or screwed to the supports.
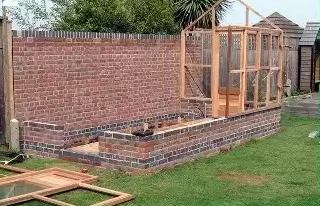
Laying brick foundations
A brick foundation is much more reliable and durable than a lumber foundation, but its installation will require more time and labor, since the frame is installed on a special cushion made of concrete and gravel. This pillow protects the foundation from deformation due to heaving of the soil, due to which the structure will be reliable and durable. It is better to use not silicate, but ordinary red brick, since it is less susceptible to destruction due to the influence of negative factors. Stacking algorithm brick foundation as follows.
![]()
Step 1. Make markings at the site of the future greenhouse.
Step 2. Remove the top layer of soil to a depth of 20-25 cm.
Step 3. At the bottom of the resulting trench, fill in well-washed gravel and tamp it thoroughly, and the layer should be at least 5 cm.When building a brick foundation on a pillow, you can do without gravel, making the base only of concrete, but gravel will give the structure more rigidity and stability.
Step 4. Prepare a concrete mixture of cement, gravel and sand, recommended proportions: one part cement, three parts sand and five parts gravel.
Step 5. Pour the prepared mixture into the trench, then wait at least two weeks for the concrete to harden completely.
Step 6. To waterproof the foundation, lay a layer of roofing material on the pillow.
Step 7. Lay bricks, and the number of rows depends on the size of the greenhouse - for a small structure, one row will be enough. Strengthen the anchors between the bricks, which will serve as fasteners for the future greenhouse, focusing on its design features. The bricks should be laid as evenly as possible, using the building level for checking, and the space between them should be well filled with mortar to avoid cold air entering the inner space of the greenhouse.
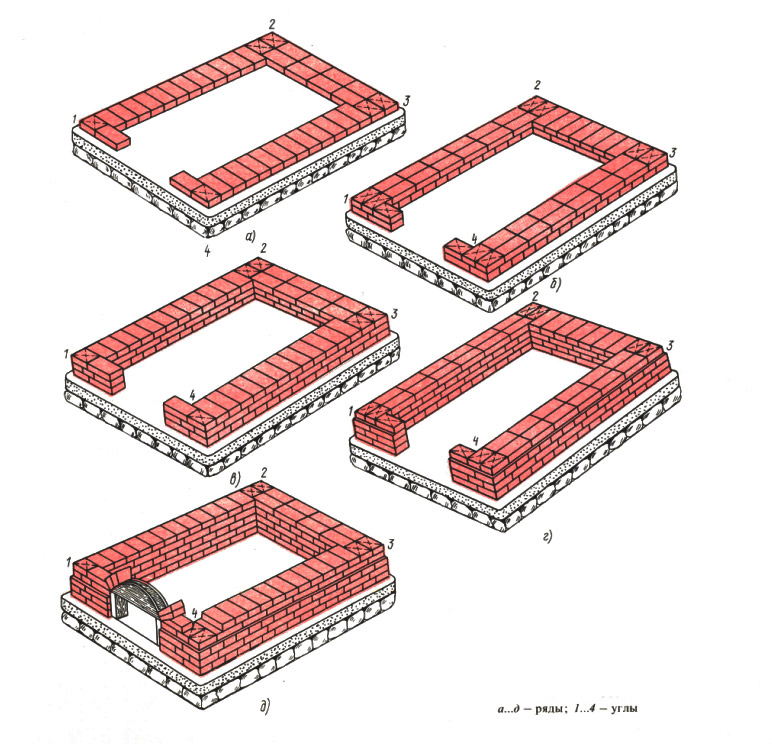
After the solution hardens, you can proceed to the construction of a greenhouse, which is attached to the anchors fixed in the foundation.
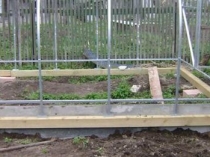
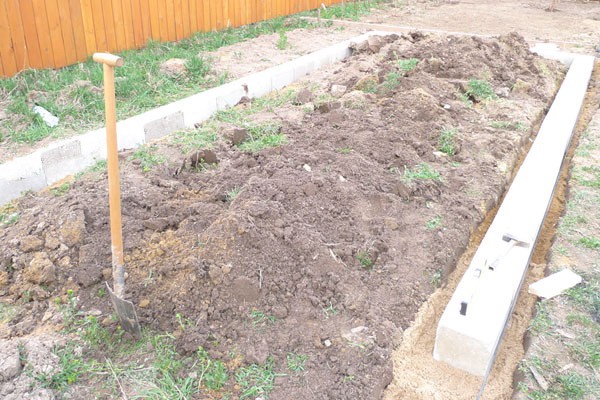
Laying strip foundation
A strip foundation is the simplest, but at the same time the cheapest and most reliable version of the foundation for a greenhouse, which will provide the structure with all the necessary characteristics and protect the plantings from the influence of negative factors. it optimal solution for polycarbonate structures, which today is one of the most popular materials for the construction of greenhouses and greenhouses. The principle of laying such a foundation is similar to laying a brick foundation.
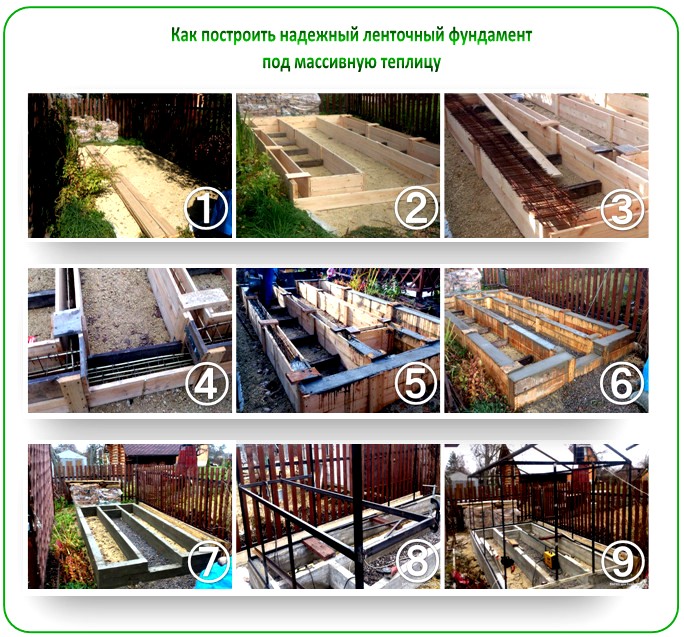
Step 1. At the site of the future foundation, according to the markings, dig a trench 30-50 cm deep and 15-20 cm wide.If the greenhouse is planned to be used in winter, the trench must be dug deeper - approximately to the depth of freezing of the soil.
Step 2. Build a formwork (can be made from old boards), if necessary, strengthen it with supports and ties.
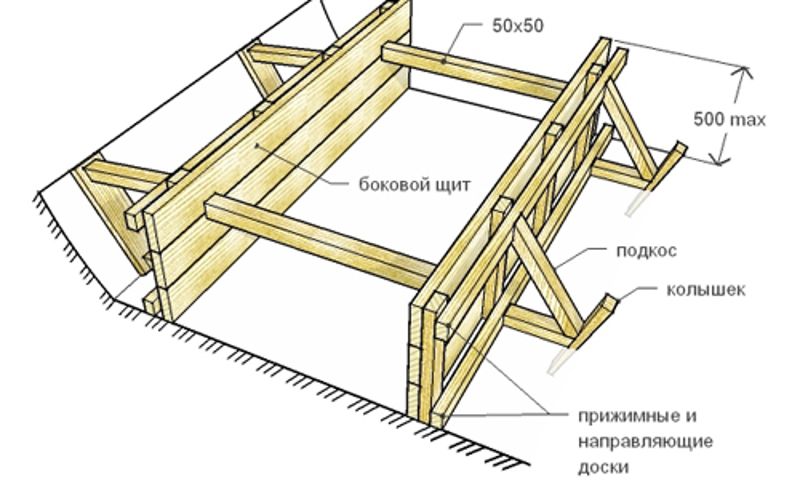
Formwork scheme for pouring (example for large greenhouses)
Step 3. Cover the bottom with sand (layer about 20 cm) or gravel (at least 5-10 cm), and then tamp.
Step 4. Prepare a concrete solution (proportions: one part of cement, three parts of fine gravel, three parts of well-washed river sand) and pour it over. It is better to do this in one go, otherwise the concrete will harden unevenly, and cracks will appear in the foundation in the future.
It will take at least 20 days for the mixture to completely solidify, after which you can start building the main structure.
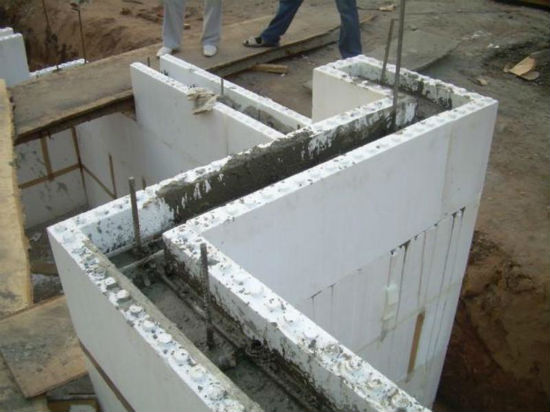
Laying a block foundation
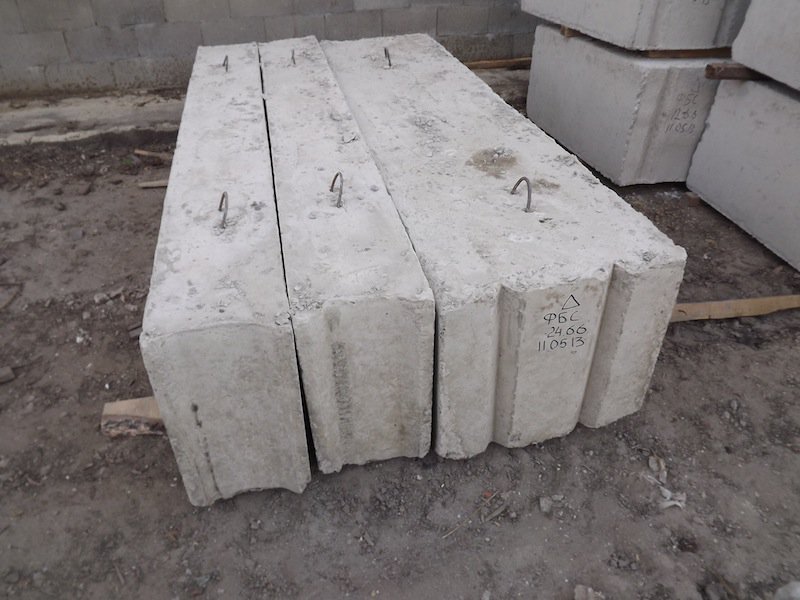
Of all types of foundations, the block has one of the highest strength indicators and good waterproofing properties, therefore, it is recommended to equip it in places with high humidity and in low-lying areas. For the foundation, you can use FBS blocks, which are reinforced concrete reinforced structures, or hollow foam concrete blocks.
Step 1. Using a rope and wooden stakes, make markings on the site of the future greenhouse.
Step 2. Dig a trench so that the rope runs in the middle. The width should be approximately 25 cm, and the depth is determined depending on the depth of soil freezing.
Step 3. Pour gravel at the bottom of the trench in a layer 10 cm thick and compact well.
Step 4. Prepare a concrete solution and pour it over the prepared trench bottom.

Step 5. While the solution has not frozen, press the blocks in the corners of the future structure and align them horizontally and vertically. The masonry surface should be approximately level with the ground.
Step 6. Lay blocks in the same way around the entire perimeter of the trench.
Step 7. It is good to fill all the voids between the blocks with a solution, and to compact the masonry on the sides, adding earth. Smooth the surface with a trowel so that it becomes as smooth as possible.
Important! To make the structure as reliable as possible, several rows of bricks can be laid on top of the foundation, having previously laid waterproofing material, then give the whole masonry a good "grab".
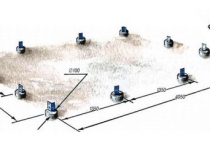
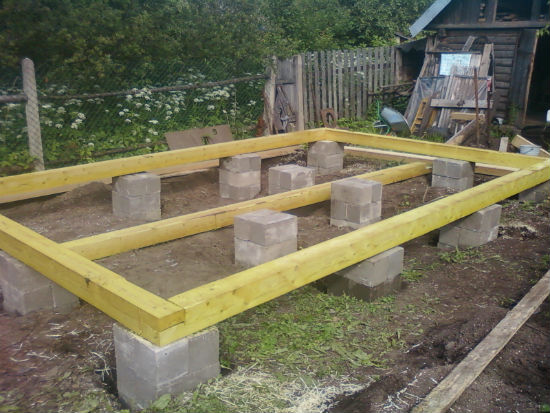
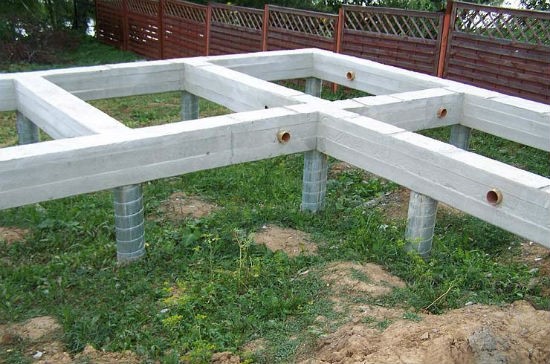
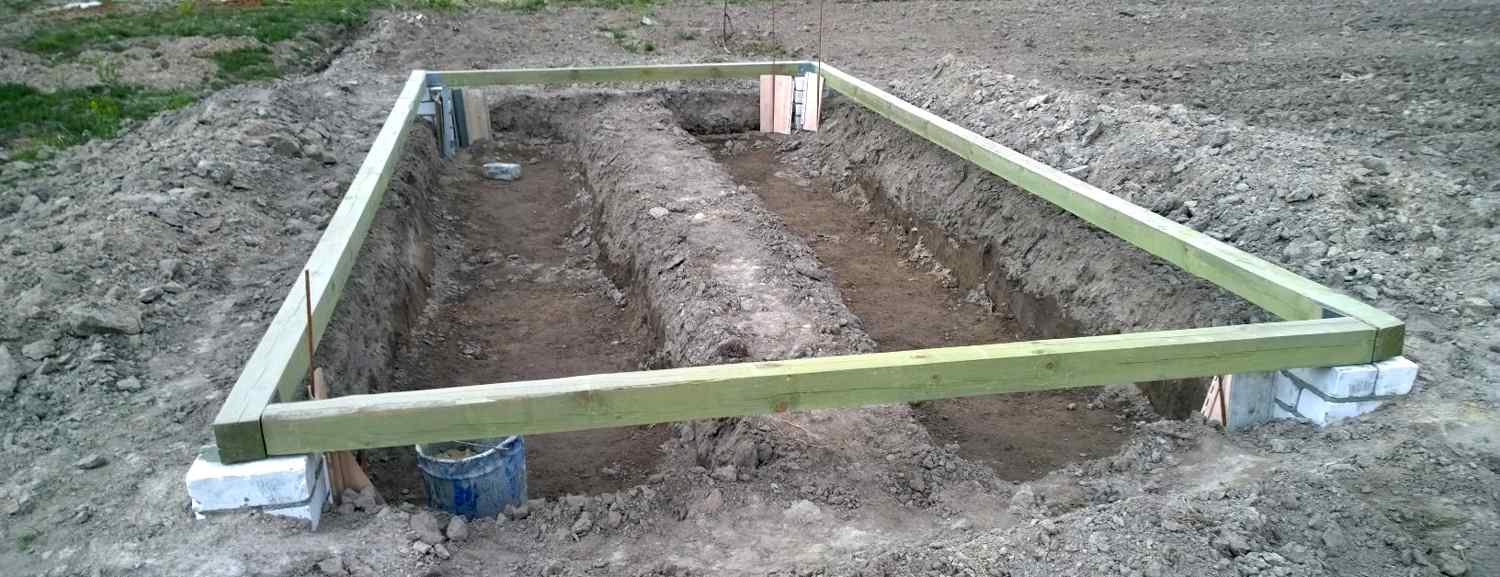
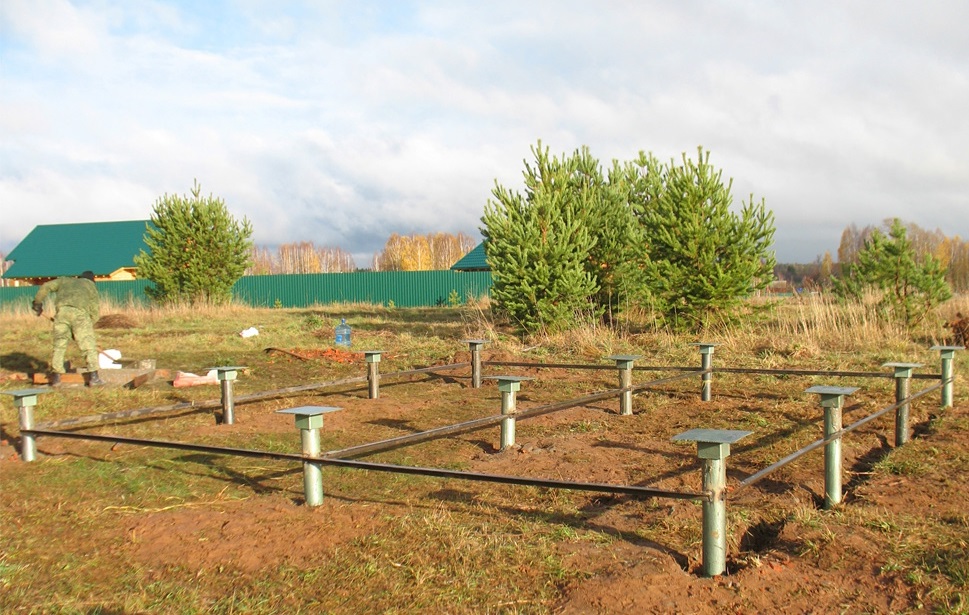
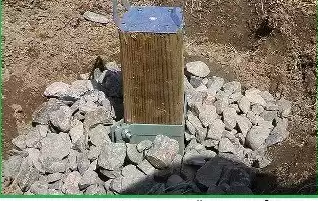
Laying a columnar (pile) foundation
The columnar base is an inexpensive and simple solution for light greenhouses that are planned to be used during the warmer months.
For large-sized heavy structures, such a basis is not the best option due to the insufficient level of rigidity, therefore it is recommended to additionally make a strong strapping. To build a columnar base structure, small concrete or wooden posts will be required - usually 6-8 supports are enough for a medium-sized greenhouse.
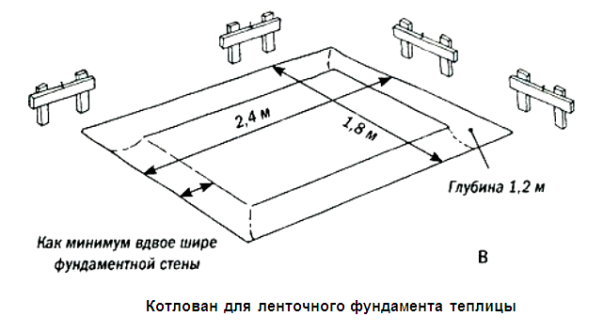
Step 1. Mark out the future foundation, install pillars at the corners of the greenhouse and along the perimeter with an interval of 70-90 cm. On peat soils, the supports must be driven into the soil until they reach denser layers and are securely fixed.
Step 2. With a garden drill, make a trench about a meter deep between the supports (it is desirable that its bottom is approximately at the level of the soil freezing depth).
Step 3. Lay roofing material on the bottom of the well, which will play the role of formwork and protect the foundation from moisture.
Step 4. To give rigidity to the base, you need to make a frame - tie 2-3 reinforcing pins together, and then lay them too.
Step 5. Lay around each pile wooden formworkotherwise, after pouring with concrete, they may change their position or skew (it is not required to remove it after the concrete has dried).
Step 6. Prepare a concrete mixture, pour it into the well.
In a similar way, you can equip the foundation from special screw piles; Compared to concrete supports, they have a number of advantages:
The most important point in the arrangement screw foundation lies in the fact that the piles must stand at the same level strictly vertically, therefore they must be installed using the building level.
Laying slab foundation
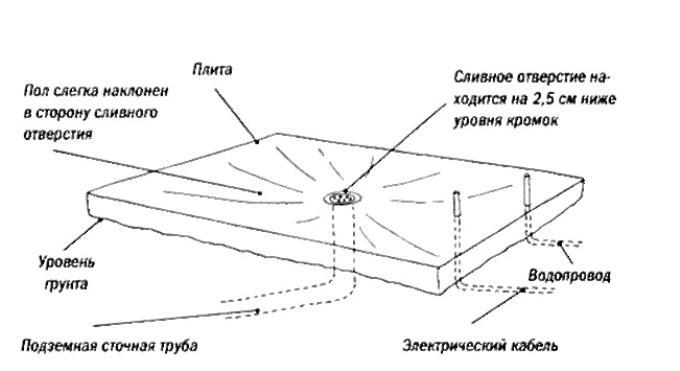
Slab foundation is the most laborious and expensive, but at the same time functional and durable construction... Perfect for "difficult" soils and non-separable greenhouses, which are planned to be used in winter. This framework protects interior room from frost and pest penetration, and also allows you to quickly remove excess moisture from the greenhouse. In addition to the concrete mixture, for arranging such a foundation, you will need a reinforcing mesh and a pipe for the drainage system.
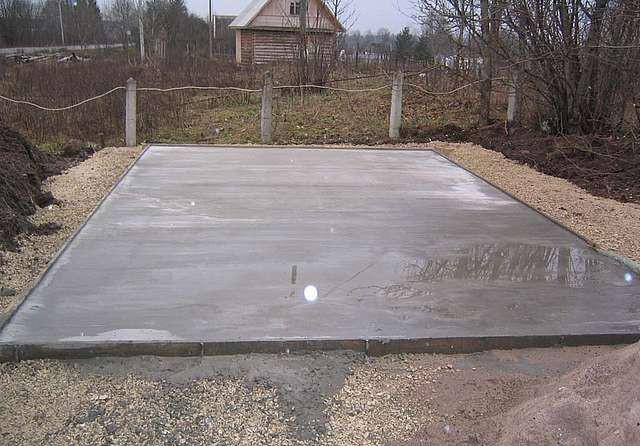
Step 1. In the marked area, dig a pit 7-10 cm wider than the size of the future greenhouse, the depth is about 30 cm.
Step 3. Install the formwork along the edges of the pit, which should rise above the soil surface by about 20 cm, with both sides at the same height.
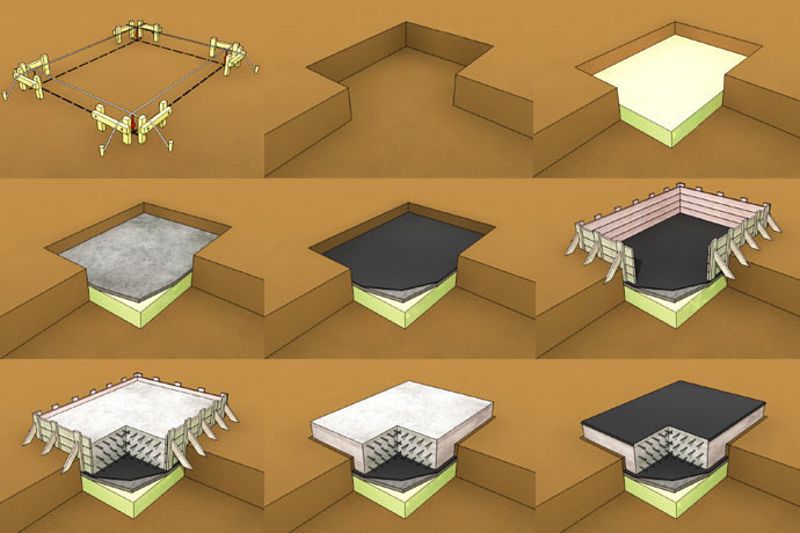
Step 4. Install a pipe in the center of the future foundation, but this must be done very carefully so as not to touch the formwork. First, a corner pipe is installed (for this, the center point of the greenhouse is determined using a cord and a plumb line), after which a drainage system with a drain hole is mounted from suitable pipe sections. All its elements must be glued with special cement, and the drain hole must be temporarily closed with tape to prevent clogging.
Step 5. After the formwork and drainage pipe have been installed, pour sand (about 10 cm) on the bottom of the pit, compact it well, and on top - a layer of gravel (about 5 cm).
Step 6. Lay a reinforcing mesh on the gravel, and you need to do this so that its cells do not touch the formwork, otherwise these foundation elements will rust over time.
![]()
Step 7. Pour the prepared foundation pit with concrete, smoothing and leveling the surface well.
Step 8. When the concrete slightly "seizes", but remains plastic (after about an hour), it is necessary to free and bring out the drainage hole of the drainage system and insert into the slab anchor bolts for fixing the main structure.
As soon as all the work is completed, you should carefully round off the edges of the slab so that later they do not form chips, and cover it with plastic wrap or wet burlap. It usually takes about a week for the concrete to harden. In three to four weeks, the strength gain reaches almost 100%.
Video - Polycarbonate greenhouse foundation
Installation only pays off for seasonal use. Its main disadvantage is that it loses 10% of the heat, so it is not suitable for those owners who want to grow plants in a greenhouse all year round. But on the other hand, for seasonal use, it does not need to be equipped with heaters, because solar heat is perfectly accumulated in a greenhouse covered with sheet polycarbonate. Metal structures for the frame of such a greenhouse can be bought in a store and assembled right on the site with your own hands. So let's talk about how to install a polycarbonate greenhouse.
If the summer resident is going to operate the greenhouse only from May to September, it is better for him to abandon the foundation arrangement. In addition to tangible cost savings, this will also save time - after all, you can assemble a light polycarbonate greenhouse in just a couple of days with your own hands, perhaps with one assistant. If necessary, it can be moved to another place, and at the end of the summer cottage, simply disassembled, so as not to come in winter specifically to remove snow from its roof.
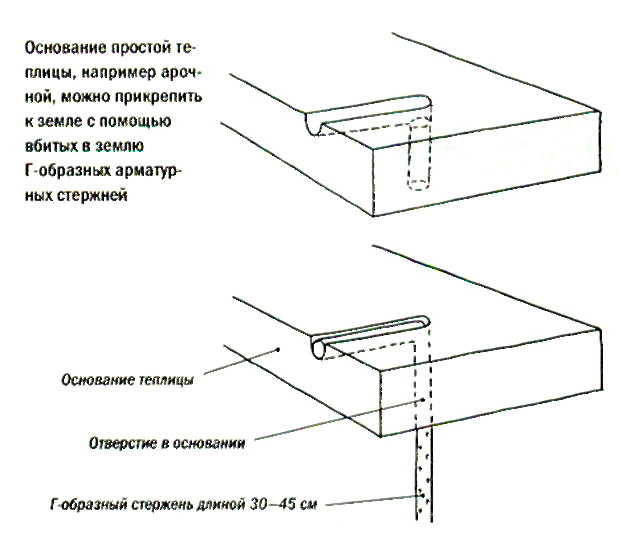
So that a strong gust of wind does not damage the economy, a light greenhouse is fixed in the ground with metal or wooden T-shaped fasteners. You can make the lower harness from a wooden bar for weighting, you can bury such a bar or log in the ground and attach the base of the greenhouse to it - but this will already turn out to be such a foundation that will deprive it of mobility and increase the consumption of time and money. Installation should be carried out in the fall after the end of all agricultural work, or in early spring, in order to calmly move around the site without fear of trampling the plants. The air temperature must be at least 10 degrees, otherwise the polycarbonate will not be plastic.
Choosing a fertile place

It is very important to choose the right place for the greenhouse. The plot should be flat, not shaded, there should be no buildings or large trees at a distance of 3 meters. Trees create not only shade, their root system will interfere with the development of plants in the greenhouse, and nearby buildings contribute to the appearance of drafts.
The greenhouse must be oriented to the cardinal points. The correct location will be from east to west in length, then one wide side will always face south, and this will provide the greatest amount of sunlight.
Another advantage of a mobile greenhouse is that if you have chosen a wrong place, then this is only for one year, next year you will not repeat this mistake.
What to do with the soil
When choosing a place, you need to investigate the ground. To do this, it is recommended to dig a special hole with dimensions of 70 cm by 70 cm and a depth of 1 meter 20 cm. Now you need to determine the type of soil. This is easy to do if you take a handful of it and try to make a ball. It turned out to roll a ball or sausage - there is a lot of clay, but it did not work out - sandy soil. Sand is a very good basis for greenhouse soil: it allows water to pass through, its excess will not allow the roots to rot. If the soil is clayey, it will have to be replaced.
To replace the soil under the greenhouse, you need to dig a pit at least 70 cm deep and fill it with 40 centimeters of sand, and leave the upper 30 cm to fill with a fertile mixture. In addition, it would be good to know the depth of the groundwater. If they are found higher in the pit, you will have to make drainage grooves to drain excess water.
Installation instructions
If a place for the greenhouse has already been chosen, all the elements of the frame are made by hand or bought ready-made and brought to the site, you can proceed with the installation. You need to start by preparing the site. At the selected place with prepared soil, it is recommended to mark the site of the required size. This is done with wooden pegs and rope. Further, the site is leveled, the sod and protruding mounds and bumps are removed. It is advisable to check the horizontal position using a building spirit level. There should be no differences in height more than 5 cm. Particular attention is paid to the half-meter strip along the perimeter. The rest can be aligned later.
To determine the outer edge of the trench, measure 30 cm from the indicated line, draw a line with a shovel or pin on the ground. We dig a trench 30 cm wide and a depth that depends on the length of the greenhouse legs. We calculate so that the lower frame of the frame rises 10 cm above the ground. If we are going to install the greenhouse on a timber, then the depth and width of the trench depends on the size of the timber. The bottom of the trench needs to be tamped a little and check its horizontality, so that later the frame does not warp.
It's time to start protecting the greenhouse from weeds and pests. To do this, you need to overlay the outer wall of the trench with some solid material, for example, slate or roofing material. They say that after 3-4 years wheatgrass will still overcome such an obstacle. So, if the greenhouse remains in the same place, the protection will have to be updated.
Video "Greenhouse Installation Instructions"
Phased assembly of the frame
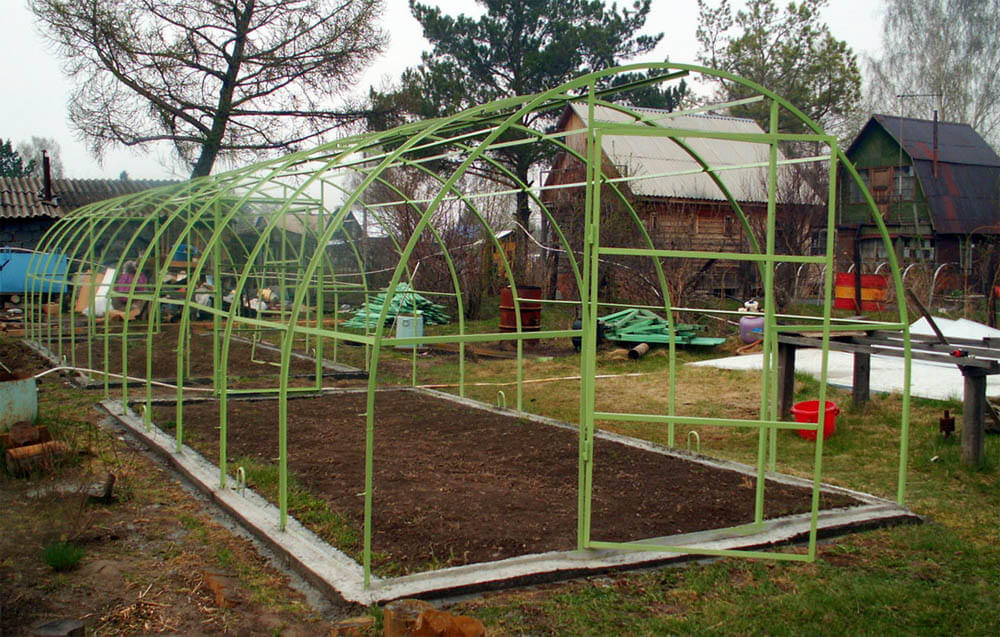
Anyone who is determined to assemble will need a screwdriver and a wrench. If you bought a ready-made greenhouse, then the kit must include all the necessary fasteners and an assembly diagram. If you are able to weld all the frame elements with your own hands, it means that you have already made a drawing, calculated and bought the elements necessary for installation.
It is correct to start assembling the frame from the ends. Door and window frames are attached to the end arcs, reinforcing strips. Then the parts of the lower harness are fastened and the T-shaped legs are attached to it. The harness with supports is installed in the trench, and the harness should be 10 cm above the ground. Now you need to check the horizontal position of the installation, correct it if necessary and proceed to further assembly.
If the greenhouse is mounted on a timber, then the frame profiles must be attached to the timber with steel corners. And lay the roofing material not just on the side, but also under the beam itself. This will provide moisture insulation. In addition, all structural elements that will be placed in the ground must be treated with bitumen - this will protect them from corrosion and pests.
Then the rest of the frame arcs are attached to the harness, and polycarbonate is installed on the top. It is necessary to carefully consider and attach it so that the light-protective film is on the outside, it will need to be removed before installation or immediately after it. Otherwise, ultraviolet light will enhance the effect of the glue. The installation of polycarbonate also starts from the ends (before that, you need to remove the door and window frames). It is more convenient to attach a rectangular sheet entirely, without cutting it out in shape, but to cut out the already attached one with a hacksaw, bypass the outline of the frame on the outside and cut out the holes for doors and vents in the same way. The removed frames must be closed and secured in place with polycarbonate.
When installing polycarbonate on the rest of the frame, the sheets must be laid across and without overlap. Design the joints with a special connecting profile. Usually it is attached to each arch in several places, but you can do it differently. Overlap the entire greenhouse with long narrow strips of aluminum and tighten them with the screw with the required density.
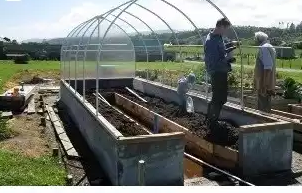
It remains only to lay the ground around the perimeter 5 cm above the base, this will also be a barrier to the movement of insects. But for a greenhouse without a foundation, you can make an additional strapping from a bar. The timber treated with drying oil or bitumen will become an excellent barrier to pests. In addition, a greenhouse weighted with a bar will definitely not suffer from gusts of wind. The greenhouse, which remains assembled for the winter, will have to be cleared of snow, otherwise the polycarbonate may crack. And it is advisable to leave the doors open and let the ground freeze.
Today, a greenhouse or greenhouse can be found in almost any summer cottage and personal plot, and these are no longer homemade products from window frames, but quite worthy products from manufacturers, made of polycarbonate.
Most often, such structures are advised to be installed on the foundation, which causes some bewilderment among summer residents. Why is this needed? Isn't it easier to just build a greenhouse on bare ground without bothering yourself with extra work? Still, in order to make a foundation for a greenhouse with your own hands, you will have to spend some time and money.
Is it necessary to make a foundation for a greenhouse?
How to make a frame from a wooden bar?
Before installing the foundation for the greenhouse with your own hands, you must carefully level the surface of the site under the polycarbonate. To do this, remove the top layer of soil, level the site and cut a small ditch around the perimeter 10 cm deep and 20 cm wide.It's good if the greenhouse has already been purchased and you know its dimensions, otherwise it's time to decide on the type of greenhouse.
A crushed stone pillow is poured at the bottom of the trench, which will drain excess water, or a layer of waterproofing is laid. The frame is hammered out of the timber, be sure to check the perpendicularity of the corners and the horizontalness of the surface. The corners are reinforced with a building corner.
The made frame is treated with an antiseptic and lowered into a trench, the free space is covered with soil. 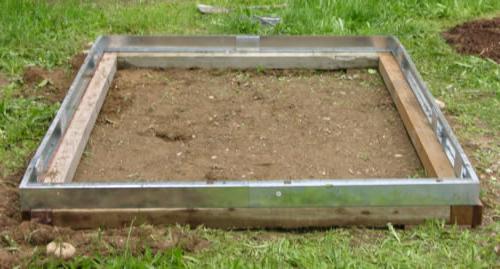
A similar foundation for a greenhouse from a bar with your own hands can be made from a smaller material, for example, 50x50 mm bars or 50x150 mm boards, if the structure is not particularly large in size.
Concrete block base
This type of foundation is more solid and provides good waterproofing structures, which is very important for maintaining optimal humidity in the greenhouse.
Therefore, the most good option will make such a foundation for a greenhouse with his own hands on damp plots of land, on peat or swampy soils. 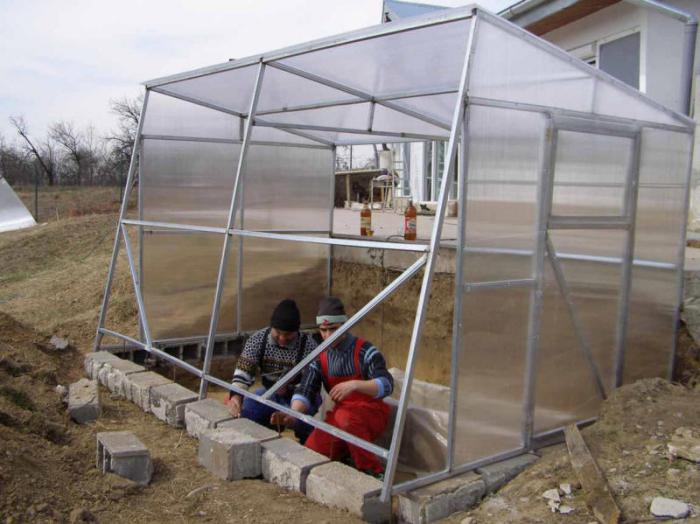
First of all, it is necessary to mark the plot of land on which the greenhouse will be installed. To do this, we level the selected area and mark the perimeter of the structure with pegs and a rope.
Installing blocks
After marking, it is necessary to dig a ditch 25 cm wide and 30-40 cm deep under the future foundation in such a way that the marking cord runs exactly in the middle. At the bottom of the trench, a drainage backfill of crushed stone and sand 10 cm high is laid, which is carefully rammed. To do this, the top layer of sand is spilled with water, and the ramming takes place in a natural way.
A concrete solution is brought in and half poured into a ditch. Concrete blocks are laid around the perimeter, which must be leveled. Separate blocks are placed strictly in the corners. The remaining concrete is poured on top and smoothed with a spatula.
It is quite possible to make such a strip foundation for a greenhouse with your own hands in a few hours, and you can install a greenhouse in 2-3 days.
Concrete strip base
Another option for how to make a foundation for a greenhouse with your own hands in the form of a tape is to make it out of concrete. At the same time, to strengthen the structure during pouring, reinforcement is laid in the form of metal rods. 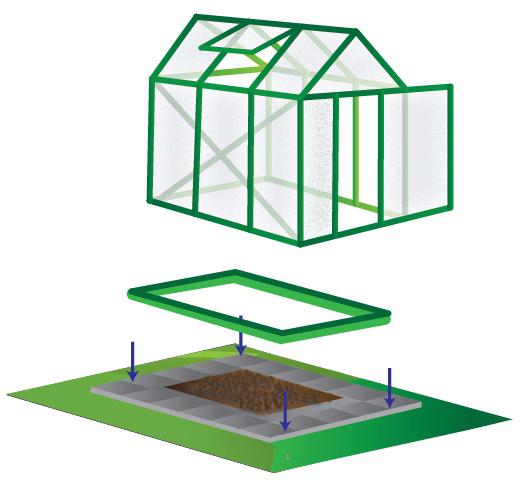
If the soil is dense and not prone to crumbling, the concrete solution can be poured directly into the ditch. In the case of loose and loose soil in the prepared trench, it is necessary to install board formwork. It is not difficult to assemble the device, the main thing is to observe the verticality of the walls. The size of the formwork depends on the height of the planned foundation: if it is planned to be raised above the ground, then the walls of the formwork must also be mounted at this height.
Concrete is poured into the formwork. If the prepared solution is not enough for one-step pouring, it is poured in layers. In doing so, try to lay the concrete as evenly as possible, as this will extend the life of the foundation. The last layer must be leveled with a spatula.
Concrete-brick foundation
With proper manufacturing, this type of foundation is second only to a reinforced concrete foundation in terms of strength characteristics. At the same time, brick has the same properties as wood, it absorbs moisture well, and this guarantees an optimal microclimate for plants.
On the other hand, this material is quite expensive and it is advisable to make a foundation from fired brick only if there is an opportunity to purchase such products inexpensively. 
For this, a concrete tape is made flush with the ground, as discussed above. When pouring, anchors or pieces of metal reinforcement are placed around the entire perimeter and wait for the concrete to set. After about a week, brick can be laid on the tape, while the reinforcement should be inside the masonry seams.
Monolithic foundation
Another type of base can be poured from concrete, which is usually used to install large greenhouses, glass greenhouses, or if the soil on the site has increased heaving. This option is used only in exceptional cases, since making a foundation for a greenhouse from polycarbonate with your own hands in the form of a monolithic base is a rather costly event, both in time and in money. 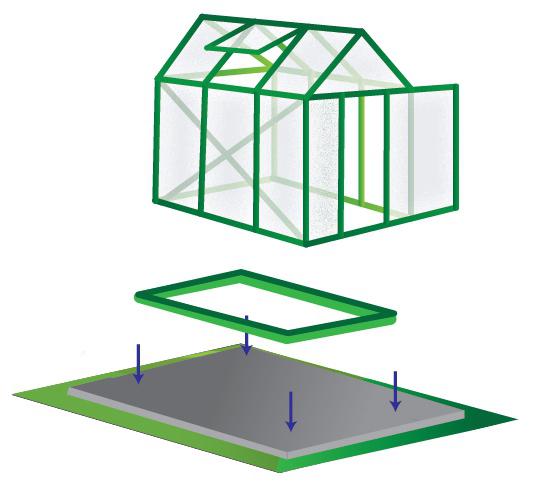
Preparing the area for pouring is the same as for any other base. It is cleared of the upper fertile soil layer, after which a foundation pit is dug under the foundation 30-40 cm deep, which is covered with geotextiles or any other waterproofing. If the soil contains a lot of water, you can make a small drainage system from trenches covered with pieces of roofing material, or lay drainage pipes.
Pouring concrete
Formwork is made of boards and a layer of crushed stone and sand with a total height of 10 cm is poured into the pit with a mandatory pouring for tamping. A reinforcing sheaf is placed in the formwork and poured with concrete. If necessary, insert reinforcing bars or anchors to secure the frame to the base.
It is possible to install a greenhouse on such a foundation only after the concrete has completely dried, which can last 21-28 days. At the same time, all the time, while the solution is setting, its surface must be periodically moistened in order to avoid the appearance of cracks and violation of the integrity of the base.
Although such a foundation requires a lot of labor and considerable cash costs, its service life, which is about 50 years, more than compensates for everything.
In addition to these basic types of foundations, several other types of foundations are used, for example, from a metal profile or on screw piles... Some craftsmen combine the above installation methods, and especially inventive individuals can make a foundation for a greenhouse with their own hands from improvised material, for example, from glass bottles.
What foundation to use for a glass greenhouse?
We should also mention a glass greenhouse, which is also often used on summer cottages... Due to its characteristics, this structure is much more demanding both in terms of stability and protection from damage. Therefore, the foundation for a glass greenhouse with their own hands is made mainly in the form of a concrete monolithic or tape base. Unlike the basement for a polycarbonate greenhouse, the base for a glass structure must be buried to the level of freezing of the ground. 
If the greenhouse is small, it is permissible to use a metal or point foundation. However, such a foundation will not provide sufficient thermal insulation, therefore, the heat consumption in the greenhouse will increase. At the same time, it is not worthwhile to make a base from a wooden bar, and even more so boards, for a greenhouse from glass, since wood will not provide sufficient immobility of the structure.
From all of the above, we can conclude: from how much right choice you make the foundation for your greenhouse, it depends on how long it will last.
If you intend to acquire a polycarbonate greenhouse with a foundation, you can create it yourself or purchase a complete set. Whichever method you choose, the materials for the erection, the structure needs to be installed and fixed in the desired area.
In some cases it is done temporary installation... T-shaped legs are used here. But if you need to arrange a greenhouse for a long time, then the foundation must be strong and reliable.
Categories of foundations for greenhouses almost identical to the categories of foundations for residential buildings with 1-2 floors... Only here you do not need to dig below the freezing mark. For regions from the middle lane, such a mark is in the range of 100 - 130 cm.And the maximum depth of laying the foundation for greenhouses is as follows: 20 - 30 cm.
Types of foundations for polycarbonate greenhouses
For a light greenhouse, a strong foundation is not needed, since the weight of even the most dimensional modification is 100 - 120 kg. This weight is freely distributed on modest foundations. Such bases structurally fit into traditional building codes:
Example with piles: 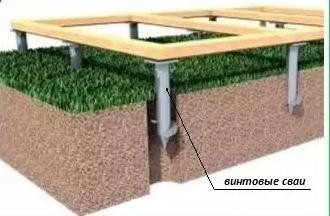
Materials
The usual list of materials for greenhouse foundations is as follows:
- wood,
- concrete,
- brick,
- steel.
You can use only one material, or a combination of several materials, to create a strip or point look. So, on concrete, metal or brick, a wooden grillage should be laid.
A tiled foundation for a greenhouse is rarely used. First, it involves high costs. Secondly, it completely and permanently blocks the fertile layer, which will disrupt the root system of any plant.
The monolithic base is especially common abroad. There, in the greenhouse, racks are arranged with 2 or 3 tiers, or they are placed on concrete floor, which has artificial heating, boxes with soil composition.
Popular options
In Russia, mainly greenhouses are erected on a strip or point base. This choice is no longer determined by personal ambition, but by geological conditions. So, a low tape base is laid when low groundwater level... It is also applicable in soils that do not heave.
 Ideal belt options are sands and gravels with good filtration.
If the type of soil in the construction zone is clayey, then it is simply replaced with a layer of rubble or sand.
The point base for the greenhouse is very similar to the pile base for low-rise buildings. She, with frequent use of a wooden grillage, is placed in areas with high humidity. There, after rains, puddles persist for a long time, especially if there is no drainage system in this area.
Also, massive heavy greenhouses are usually erected on a point foundation. Such a foundation is also optimal if the soil is in working area subject to slight swelling.
The monolith is also applicable for huge massive greenhouses. It is used when the soil on the site is extremely unstable and highly susceptible to heaving. These are sandy loam, peat, clay, unknown technogenic deposits. When the soil swells there, the monolith dampens these disturbances.
What is more profitable
In terms of economy, it is most profitable to create wooden base ... The most expensive foundation can be laid from rubble stone... The "middle peasant" option is concrete.
Costs can be significantly reduced by using concrete, brick and timber only to create point support supports.
When choosing a foundation, the time in which you plan to complete the construction is also important. In this regard, the best option is wood. The easiest way to work with it. Also, work moves faster when using blocks. They are large and fill the workspace faster.
The longest construction is obtained with concrete pouring. It hardens thoroughly only after 1-2 weeks... The fastest construction comes out using screw supports of a wooden grillage. But such a combination requires impressive expenses.
When you are going to independently make one of the specified foundations, taking into account the specifics of the soil, your financial potential and the goals of construction, you will definitely need to study the principles of creating foundations for polycarbonate greenhouses.
Principles and fundamentals
Before purchasing the material for the foundation, make a rough draft, at least in the form of a sketch. Draw the structure of the foundation, calculate the parameters, the number of supports, the distance between the embedded components that are embedded in the concrete mix when pouring. Such a project will help you better calculate the required volumes of materials, the number of fasteners and other nuances of construction. Example: 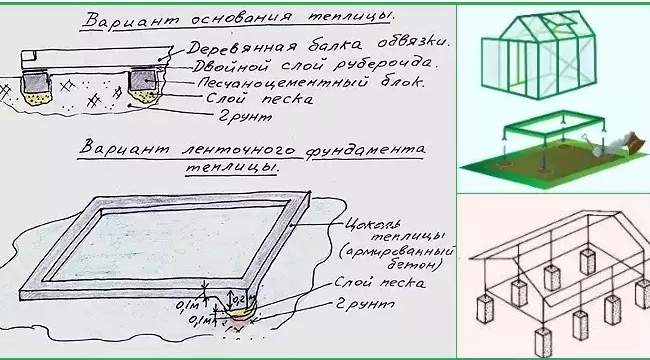
The complexity of the work and their dynamics depend on the specifics of the material used. The simplest solution is to work with wood. This material is easy to work with, lightweight and affordable and allows you to implement many design ideas.
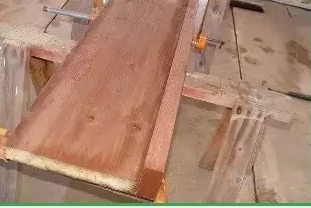
Natural material
Beams, logs, planks and sometimes sleepers go to the creation of a tape of varying complexity. The beam is more used in the organization of grillages of point bases. Planks become decking in greenhouses with floors. They also finish off the upper planes of concrete and brick foundations.
You can also create intricate structures from wood and connect lumber of impressive length.
Tape base made of wood - This is a massive frame, assembled for the parameters of the lower piping of the greenhouse structure. It can be created in one day. And after that, you can immediately attach a greenhouse frame to it.
If you are fluent in carpentry tools and have a wealth of experience with wood, then you can build a high-quality wooden point foundation. In addition, in this situation, you will save your finances well. The main thing is to strictly follow the algorithm for creating a point base using a bar:
- The site is marked... The installation of wooden supports is taken into account here.
- Formwork is made for each timber. The area of \u200b\u200bits installation is covered with rubble. Then it is poured with concrete. Example:
- A wooden grillage is placed. It is necessary to monitor the horizontalness of its parts. This needs a watermark. Example:
- The adjacent elements of the grillage are connected. Fastener type - first-hole. Example:
- If in the docking area the timber has no support on the pillar, then this connection is fastened with pieces of board. Example:
- The elements of the indicated grillage are connected. Fasteners - perforated corners. Example:
It is important to know! Supports in such a foundation can also be made of foam concrete. Then you do not have to make a formwork for each post and pour concrete. This significantly speeds up construction.
And then the work proceeds according to the following method:
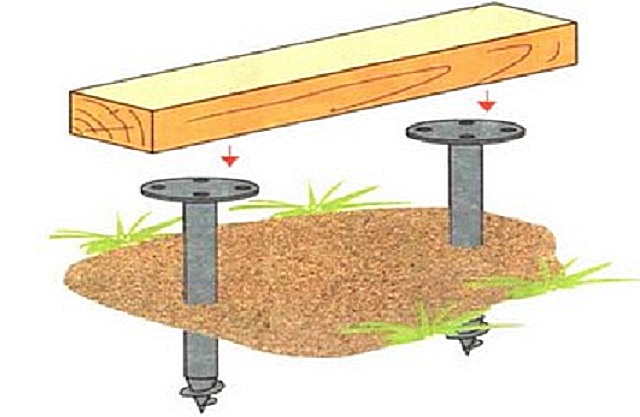
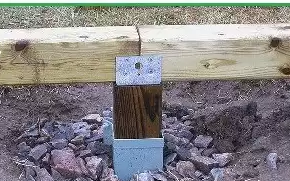
- Foam blocks are buried in the four corners in the marked area, about half. Their shape is a truncated cone. They are buried in pits. The bottom is compacted there. The element of the window sill lays down on the foam block. It is carefully treated with an antiseptic in advance. Example:
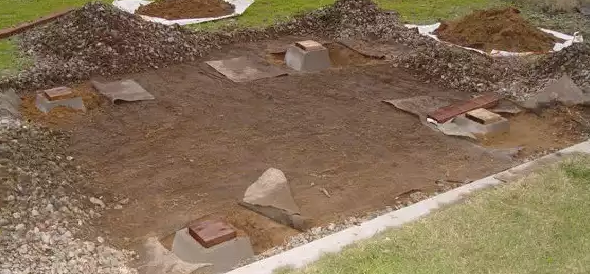
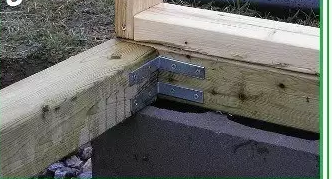
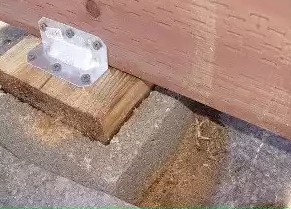
- Anchor bolts are introduced into the boards for the grillage. The frame will be attached to them. Example:
- Attachment of grillages to supports. Fasteners - metal corners. Example:
- The upper surface of the grillage is sheathed with an aluminum profile. Example:
- The frame must be strengthened. For this, racks from a bar are placed in the corners. The beam itself is screwed to the boards.
As can be seen from example 1, the work uses foam concrete in the truncated cone format. If such forms cannot be found, ordinary ones can be used. wall blocks with parameters: 20 x 30 x 60 cm. And in order to ensure excellent stability, you need to strengthen the bottom of the recess intended for the support. The recess itself should be higher in height than the block being laid in it. Its walls should recede from the contour of the intended support on all sides by about 5 cm. Its depth is about 45 cm. This is two-thirds of the foam block and 5 cm for strengthening. If the position of the block is on its side, then the depth of the notch will be 20 cm.
After that, you can put a support on the bottom. The voids between the support and the walls of the recess are filled with sand or crushed stone.
Note! The degree of penetration of foam blocks is exclusively a master's business. However, the higher the supports are obtained, the steeper the position of the grillage and the entrance to the greenhouse. This is not always comfortable.
Concrete foundations. Type - monolith
Concrete is very popular construction material... Supports can be made from its composition various shapes... And in about a month, it transforms into fake diamond increased strength. However, working with him is quite troublesome. Although, if you are thinking of building a solid greenhouse of impressive dimensions, a concrete foundation is what you need.
As a rule, the tape is filled with concrete. And here the following algorithm of operations is indicated:
These elements are mixed into a dry mixture. Then water is added: 1/5 of the dry mixture. All elements are shuffled. The required consistency is analogous to thick dough.
For reference. Monoliths and concrete pillars are erected using the same technique. Formwork of the required parameters is also created.
Brick foundation
Here, as a rule, it is involved. Tape or columnar bases are made from it. In the second, the posts have a modest height.
Laying is carried out using rods and preliminary creation castoffs.
Such a foundation may not be buried if it was formed in advance sand pillow or thin concrete was poured into a 5-7 cm trench.
Stages and nuances of creating this foundation:
This type of foundation is quite durable, but it implies a decent cost.
Large panel base
Here construction equipment is introduced for work. All work is done very quickly. But digging a deep trench for such panels is very problematic. And if they are placed at a shallow depth, then very high walls are formed, allowing the cold to pass through.
The foundation is created according to the already familiar principle: the territory is designated, a trench is being dug, the formwork is made and poured. In some cases, the formwork is the soil itself. Panels are inserted into it. There should be a space of 5-10 cm between the panels and the walls of the recess (on all sides of the panel). It is filled with concrete.
And the greenhouse itself is already being built in this order:
When the owner intends to erect polycarbonate greenhouse on one of these foundations, he makes projects, calculations, etc. But his main concern is economic aspects. And below is a table with data that will help you navigate the selection and volume of material / materials for the foundation.
The table shows prices from the central regions of Russia.
Household savings on material for the foundation
To put a greenhouse in the garden, in the country - this does not always mean the destruction of the soil. In some cases, when there is free time, thrifty owners make the basis from improvised means. Going into work:
- Glass (empty bottles);
- Plastic (food packaging);
- Broken brick and slate;
- Scrap metal.
Note. The foundation of glass bottles is made like a tape, replacing the brick with the most durable material - glass.
The framework for the foundation from improvised means takes place only in areas protected from the winds. And not suitable for a heavy greenhouse model. Often they try to do without cement mortar at all, replacing it with a mixture of clay and horse manure. Of course, these methods do not guarantee the durability of the structure, but they save the fertile layer that belongs to you.
Foundation errors
In the video below, the owners of the finished greenhouse, 10 years after the start of operation, share an overview of the mistakes they made when laying the foundation.


