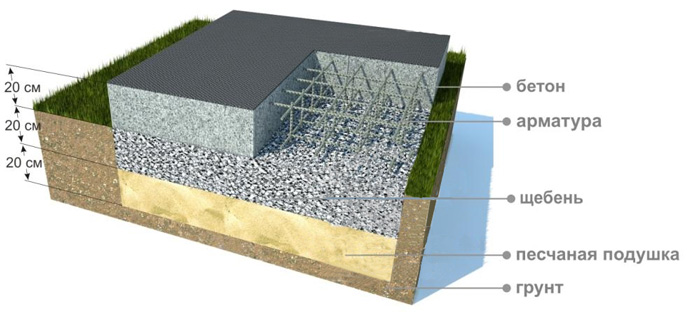
Monolithic foundation is one of the most expensive types of foundation for a house. But on some soils, it is the only viable option. It is also made during construction. multi-storey buildingswhen an especially strong base is required. The article will discuss all aspects of pouring a monolithic foundation.
Advantages and disadvantages of a monolithic foundation
Reliability and high bearing capacity make it possible to install it in any type of construction. Specifications are fundamental when choosing for the construction of a monolithic slab foundation. Below are the most significant benefits.

- No seams. It is their absence in the design of the slab that is considered the main advantage. This parameter provides a monolithic foundation with high strength even when the ground moves.
- Installation speed. Since it is performed in a single area, time is significantly saved on the formwork device. And in the presence of construction equipment - an excavator, a mixer and a vibrating plate, the work is carried out in a couple of days. The longest process will be the knitting of reinforcement, which will require much more than with other types of foundations.
- Arbitrary configuration. Therefore, it will be an excellent option when the house has non-standard shapes, for example, decorated with bay windows.

- Waterproofing... Due to the integrity of the structure, water will not penetrate into the basement and will not destroy the base of the house. A monolithic slab is recommended to be poured in wetlands or at a very high level groundwater.
The disadvantages include the high cost of pouring a monolithic foundation. In turn, it consists of a number of parameters:
- a large amount of concrete is required, and it must be poured at a time. This means that you will have to order several mixers with a solution at a time;
- you cannot do without hiring construction equipment or renting expensive construction tools;
- another point is associated with low thermal insulation properties. The foundation itself consists of concrete and metal wire, which only give off heat, not keeping it long. This is corrected with the help of slab thermal insulation materials laid over the entire area of \u200b\u200bthe base;
- the inability to equip the basement. The only exception will be a house with several floors, in this case the slab will become the floor in the basement, and the basement will be allocated for the basement.
Types and application of monolithic foundations
There are three types of monolithic foundations.
- Tape... It is a reinforced concrete tape, equipped around the perimeter of the building and under the load-bearing walls. Suitable for building on soils with medium bearing capacity.
- Platen... Unlike the first type, it is poured in the form of a pita, under the entire area of \u200b\u200bthe building. They are used in earthquake-prone places and on soft ground, which can move when the seasons change.

- Pile-grillage... It looks like concrete pillars buried below the freezing level and connected along the perimeter with a reinforced concrete grillage.
By the depth of penetration into the ground, they are divided into:
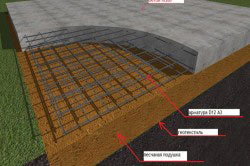
- shallow monolithic foundation... In this case, the tiles are installed no deeper than 500 mm. It must be borne in mind that the ground underneath freezes, so you need to make a thick sand cushion;
- to the depth of freezing... It is made in the construction of multi-storey buildings. The slab is poured below the freezing level, which is at least 1500mm for central Russia. This will require lengthy and costly earthworksbut the result would be solid foundation with the possibility of arranging a basement.
The cost of a monolithic slab foundation
When calculating the cost, you must rely on objective prices building materials in every region. Let's take the following values \u200b\u200binto account for example:
- pouring a monolithic foundation 30 cm thick;
- ordering a mixer with concrete, the price per cubic meter of solution is 3500 rubles;
- fittings for knitting. It differs in diameter, but on average the price goes per ton and is about 25 thousand rubles. Cell size 20x20 cm;
- all work on pouring the foundation is carried out independently, without hiring workers.
Thus, the prime cost of a 10x10m slab will be 120 thousand rubles.
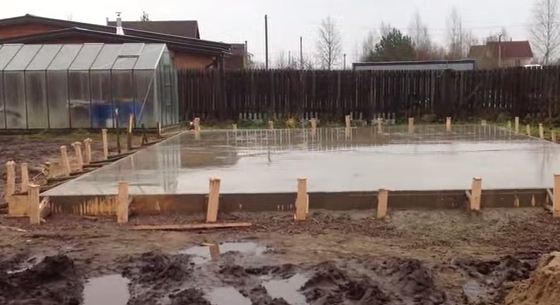
Pouring a monolithic foundation photo
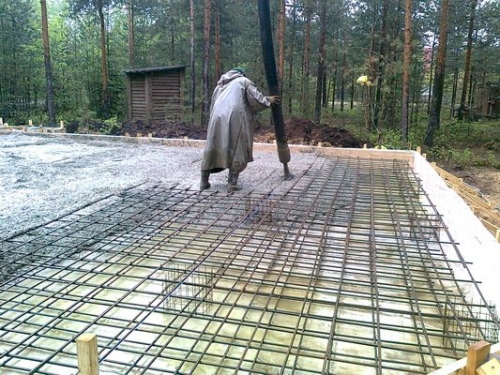
Preparation before pouring a monolithic foundation slab
Due to the fact that this type of foundation is used in difficult conditions on moving soils, increased requirements are imposed on it. Therefore, if you want to save money on the construction team and do all the work yourself, you must not only study the correct technology, but also observe it at every stage.
- Before the construction of a monolithic reinforced concrete foundation, a site is prepared for it. The territory is being completely cleared, the entrances for large equipment are being prepared.
- Then they mark the future base and remove a layer of soil with vegetation over the entire area. At this stage, you can carry out preparatory work and on the arrangement of the blind area.
- Then comes one of the most laborious and responsible processes - digging a foundation pit. Depending on the type of foundation, the depth of the foundation will vary from 500 to 1500 mm, and the width is 1 - 1.5 m more than the foundation itself. Despite the fact that the concrete mixture is plastic and will level out in the horizontal plane on its own, the bottom of the pit should be as flat as possible. This significantly affects the quality and reliability of the foundation. Here you cannot do without the services of an excavator. It is desirable that it has a smooth bucket without teeth, which will allow you to make an even cut without mixing different layers of soil with each other and without loosening the surface.
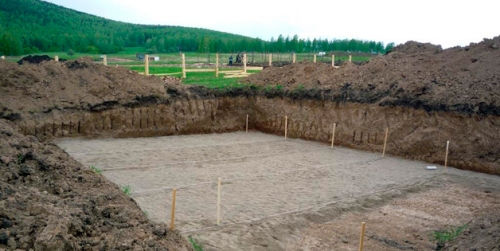
Advice: in order to determine the depth of the excavation, it is recommended to carry out preliminary geological exploration. Best of all, if the soil is sandy, then strong deepening is not required. The most unstable and mobile soil is clay. Ideally, it is recommended to select it completely and dig below the freezing level.
Monolithic foundation pouring technology
- Now it's time to make a multi-level pillow for a monolithic foundation. For this, the first layer is laid by geotextile material, the higher its density, the better. It acts as an interlayer between gravel and sand (or ASG), preventing the latter from sinking into the ground. If the layer thickness does not exceed 20-30 cm, then sand can be laid on top, if the monolithic foundation is deeply buried, then you can save money and start an ASG. After that, everything is rammed with a vibrating plate until a person can walk on the surface and not fall through.
Advice: at the stage of arranging the pillows, communications such as sewerage and water supply should already be provided and laid. So that in the future it would not be difficult to bring them into the house.
- Next comes another layer of geotextile, on top of which, this time, crushed stone with a fraction of 30-40 mm and a thickness of 20-30 cm is poured. It is also compacted and rammed.
Tip: on this stage it is important that the level of the surface is strictly in the horizontal plane. This can be done using an optical level. And the corners are conveniently checked with a laser level.
- It was the turn of waterproofing. It is best to use roll waterproofing material, which unfolds over the entire surface with small overlaps of strips on top of each other.
- Then comes the thermal insulation material. Here you should stop your choice on penoplex, since it has a higher density than foam, has better characteristics, does not crumble and, most importantly, mice do not gnaw it. In order to exclude possible cold bridges, it is better to lay the material in two layers in a checkerboard pattern, in this case it is necessary to buy plates with a thickness of 50 mm.
- If the bottom layer is laid over the area of \u200b\u200bthe entire pit, that is, by insulating them with the protrusions of 1.5 meters, then the top layer is laid strictly according to the size of the foundation. This step allows you to ensure that the blind area will be insulated without gaps.
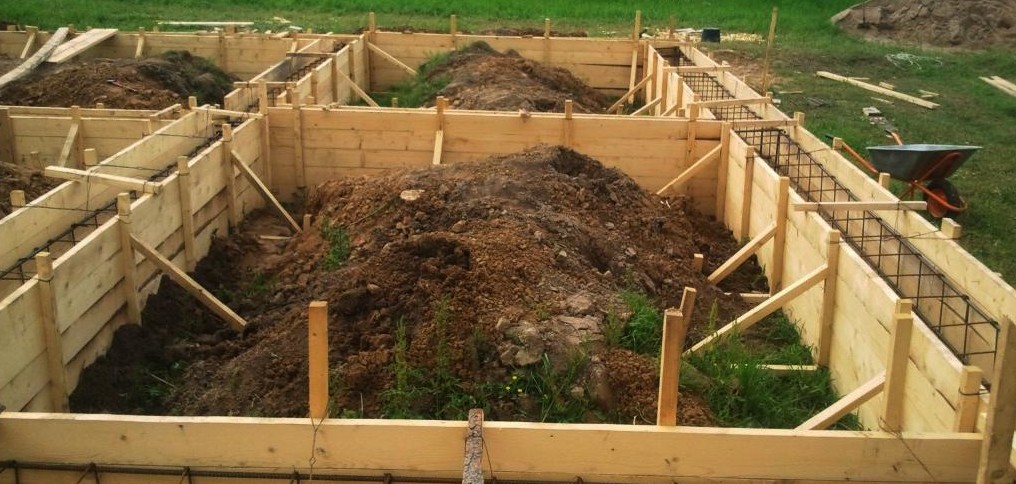
- It was the turn of the formwork. You should not buy a low-grade board, the material must be dried, without rot and wane (later it can be disassembled and used during construction). The thickness of the board directly depends on the foundation, so, for a shallow one, a thickness of 25-30 mm is enough, for deeper ones, 50 mm will be required.

- From the prepared material, shields are knocked together or fastened with self-tapping screws. To strengthen them, vertical bars are screwed every 50-60 cm. Then they are mounted along the perimeter of the future slab, thereby creating the formwork. At the end of the work, you need to check the diagonals and angles again. After making sure that everything is done correctly, the formwork is fixed with pegs with a step of 50-80 cm, the corners are fixed and spacers are placed on the outside, allowing you to better hold the structure when pouring concrete.
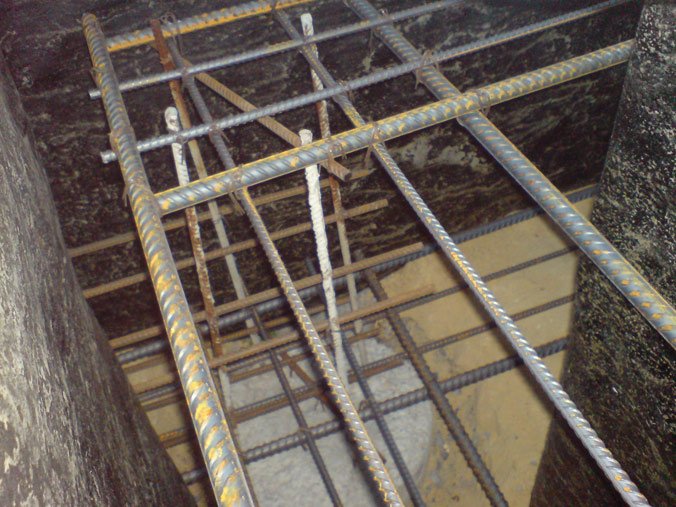
- Next, the reinforcement of the monolithic foundation is done. This laborious and crucial moment will affect not only the reliability of the foundation itself, but also the strength of the future home. The type of fittings depends on the building, so it is suitable for small one-story houses or garages reinforcement mesh with a cell of 10 cm. When building a heavy brick or two-story house, it is optimal to use reinforcement with a diameter of 15-20 mm. It is desirable that it has ribs for better adhesion to the concrete mix.
- But there is a nuance here. Obviously, the thicker the reinforcement, the more reliable the base will be and the greater the load it can withstand. But given that it fits and fits in several rows, it will take up a lot of space and, therefore, less concrete will fit.
- For example, consider reinforcement with 16 mm rods and with a cell size of 20x20 cm.Before starting work, it is necessary to organize a gap between the base and the first row of reinforcement, which should be at least 5 cm.To do this, there are special stands on sale.
- It will be possible to achieve the required strength only when knitting; it is impossible to cook the reinforcement. For this, there are special devices from inexpensive household appliances to serious professional ones.

- Best of all, when the reinforcement is laid in one piece, without cutting. That is, for standard size a reinforcing rod of 11.7 m, laid in a foundation 10 m long, the extra 1.7 meters are cut off. But this is not always possible, for example, when the width of the house is larger or the material was brought in by car and was shorter in length. In this case, the reinforcement is knitted with an overlap of 10 cm.
- With the first layer connected and assembled, it was the turn of the next. Distance allowed between them is 20-30 cm.The distance between the reinforcement and the formwork varies within 3-6 cm.
Pouring the foundation with concrete
- When the sand cushion is made, the formwork is assembled and the reinforcement is mounted, it is the turn of pouring the slab with concrete.
- At this point, the required amount of solution and its brand should already be calculated. It is also necessary to take care of the access routes, since a full loaded mixer weighs a lot, and it will need to drive up close to the formwork.
Advice: when pouring a large volume of mortar, it is preferable to order a machine equipped with a concrete pump. With a shallow foundation, do not big size an auto mixer with a conventional pull-out tray is fine.
- Concrete is chosen based on its grade, which is responsible for the strength of the composition during solidification. This is due to the fact that the higher the grade of the mixture, the more cement it contains. Based on SNiP, this parameter for concreting the foundation should not be lower than M-250.
- As mentioned above, it is best if concreting is done at a time. If you take a break, the previous fill will harden and a seam will form at the joint. In the future, a crack will appear in its place.
- When pouring, air bubbles form, which adversely affect the final result. To remove them, the base, if possible, needs to be vibrated. Then the foundation is covered with a film.
- It is possible to disassemble the formwork no earlier than after 7 days, and start construction even later. Only after 2 weeks does concrete gain its strength.
Casting a monolithic foundation video
What foundation you build, so much the house will stand. Therefore, take your choice seriously in order to guarantee a long life of the structure. A monolithic foundation is suitable for construction on problem soils, since there are no weak joints in the structure, as in prefabricated foundations.
There are 3 types of base from monolithic concrete... The choice depends on the weight of the structure, the type of soil and your budget. Pouring a monolithic foundation with your own hands is not so difficult, especially a shallow tape and slab.
1. Tape.
A tape of concrete is made under all the bearing walls of the future structure. It can be shallow (30 ‒70 cm) and deep (1 m or more). With a high level of groundwater on clay soils, it is imperative to deepen the foundation below the soil freezing line, strengthen and isolate it from water. This is the best option for the foundation of a house with a basement.

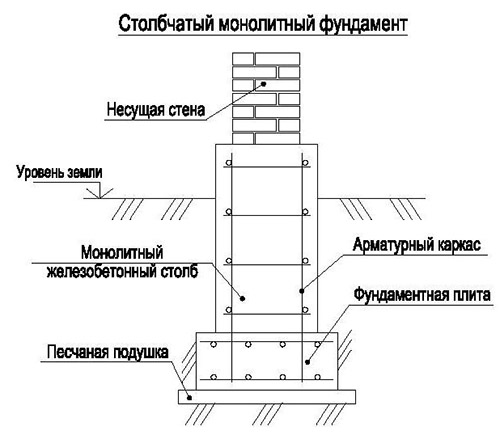
2. Columnar.
The most inexpensive, the entire foundation - pillars at a distance of 1‒2 m. Suitable only for one-story light buildings on fixed soils. Sometimes this technology is combined with tape to create a small subfloor.
3. Plate.
The foundation slab is easy to calculate and fill. Just like the tape, such a foundation is shallow and deep. The first option allows you to significantly save on the amount of land work, but does not allow you to equip the premises under the house. But you will immediately have a rough floor ready. The second type is suitable for a heavy structure, in addition, a basement can be made there. But the cost of such a stove is high.
When is it appropriate to use:
- Problem soils.
- For houses made of heavy materials (concrete, brick, stone).
- For buildings on level ground.

Step-by-step instruction
Let's say you have already done all the necessary calculations, having completed the soil examination and calculated the weight of the house, and drew a diagram of the future foundation. The technology of a monolithic slab foundation is simple, so if you wish, you can simply fill it yourself.
1. Let's mark the area of \u200b\u200bthe future house according to the scheme.
2. Remove the soil and level the surface. The optimum thickness of a monolithic slab is 20‒40 cm, depending on the soil and the total weight of the structure.
3. We fill up the sand, tamp it well. To do this, it is better to moisten it, if possible, use a vibrating plate for ramming. Then we fill in the crushed stone, the thickness of each layer is 10‒15 cm, depending on the availability concrete preparation and soil characteristics.
5. We will build a concrete preparation. Lay the film on the surface so that the liquid does not go into the sand, Usually they use M50 ‒ M100 grades. Thickness - 5‒10 cm.
4. We install the necessary parts of the water supply and sewerage system. It is better to install boxes above the pipes, this will protect the structure from destruction.

6. We put materials for waterproofing. Their size should slightly exceed the area of \u200b\u200bthe future foundation slab, and all the seams must be soldered.
7. We will lay a layer of thermal insulation.
8. We mount the fittings.
9. Install the formwork.
10. Pour concrete and compact. It is more convenient to use a vibrating compactor to distribute the concrete evenly and quickly throughout the formwork.
11. Cover with a protective diaper. We are waiting for 3-4 weeks until the concrete gains sufficient strength for further work.
1. Why do you need stiffeners?
The slab is not always flat. For heavy structures and problem soils under load-bearing walls stiffeners are installed. Most often they are rectangular or decrease towards the bottom. This design increases strength. The ribs placed above the slab allow you to create a small technical basement, which will simplify the conduct of communications into the house. But then the surface of the monolithic foundation slab will no longer be a rough floor.
2. How to waterproof?
Polyethylene film with a thickness of 200 microns or roofing felt. There are special materials for concrete such as Delta MC. It perfectly insulates from water, and if the groundwater level is small, it can play the role of concrete preparation. Geotextiles are also used for this purpose.


3. Is it necessary to insulate a monolithic structure?
Yes. Concrete conducts heat well, and a large amount of reinforcement creates cold bridges. Common heaters are expanded polystyrene and foam sheets.
4. Do I need to drain?
Definitely needed if there is a high GWL on the site. It is important to observe the slopes of the pipes, provide for a place for drainage of water, make wells so that in case of siltation of the pipes, they can be cleaned. Drainage is usually laid in geotextiles on a sand and gravel bed.

5. How and from what to build the formwork?
We recommend using film faced plywood. Removing this formwork will be easy. If you are making it from regular planks, shave them off where they will touch the concrete. There should be no cracks in the formwork, and its strength is checked by hitting it with a foot. There are many mixtures with which the formwork is lubricated to make it easier to remove it; for the same purpose, you can fix the film on it. It is better to fasten the formwork with self-tapping screws, and not nails.
6. How to properly reinforce?
For a 20 - 40 cm slab, 2 layers of reinforcement are sufficient. The horizontal distance should not exceed 20‒30 cm. The distance to the boundaries of the concrete slab is 15‒20 cm. For fastening, the reinforcement is tied with wire. Monolithic reinforced concrete foundation will withstand the load of a two- or three-storey house made of concrete, brick, stone. For reinforcement, rods with a diameter of 10‒16 mm are suitable, depending on the weight of the house.

7. How can you save money?
If you plan to equip a large porch or terrace, make there strip foundationso as not to waste concrete, since the load on this part will be several times less.
Major mistakes during construction
1. Improper care. According to the instructions, concrete needs 28 days to gain brand strength. The first days are especially important if the weather is dry and sunny, cover the concrete with an awning and water it. The optimum temperature for hardening is + 15-20 degrees.
2. Low grade. For the construction of a monolithic foundation, concrete is required above M200, and if the soil is problematic, above M300.
3. Weak formwork. A fragile structure will expand under the pressure of the mixture, because of this, there will not be enough concrete. Such a mistake cannot be corrected, the base will have to be demolished and rebuilt, since it is imperative to fill everything in one go. If you decide to build on your own, it is better to show the formwork to a specialist.
4. Insufficient heat and waterproofing. A high grade and strong reinforcement will not save you from cracks, especially for the foundation in heated areas, and heating costs will negate the savings on thermal insulation.
5. Improper reinforcement. It is necessary to tie the rods so that they overlap each other by 10‒20 cm, depending on the diameter. In a monolithic reinforced concrete structure reinforcement prevents tension, and concrete prevents compression, so strength is achieved by a harmonious combination of components.
6. Porch. It happens that developers forget about the porch. But it is better to do it right away so that when it shrinks into the soil, the house and the porch do not part.
If you decide to build on your own, do the calculations in advance and draw a diagram to select the correct type. There is no universal monolithic constructionsuitable for any occasion. Follow the foundation construction technology step by step so as not to correct your mistakes.
At the stage of building design, it is necessary to carefully consider the base option. In this case, you need to rely on the features of the soil on construction site and on the total mass of the structure, which will eventually create a static load on the frame.
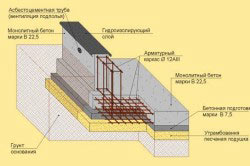
Often, as a basis for a house, they erect slab foundation based on tape. At first, such a frame has the form of a closed loop made of reinforced mortar poured into the formwork. Most often, the parameters for the strip foundation are taken at the rate of 300x350x400 mm. After that, the solution is also poured into the remaining space along the entire perimeter in the form using reinforcement technology. Such a foundation is also called floating, since it is located at a shallow depth and, depending on the movement of the soil layers under the house, makes identical movements. Thus, such a slab foundation preserves the integrity of the entire house, relieving it of the tensile or compressive load.
Important: before proceeding with the installation of the floating base, it is necessary to carry out detailed and scrupulous calculations. Making the slightest mistake threatens with the subsequent destruction of the very foundation and then the building.
Advantages and features of the slab base
When deciding to mount a strip-type foundation with a monolithic slab, it is necessary to clearly understand what positive and negative sides both the masters and the owners of the future house will have to face. The main advantages of the tape-type monolithic basis are:
- High foundation strength. The technology of reinforcing a concrete cushion-slab increases the ability of the foundation to withstand increased loads.
- The ability to erect a building both on simple soils and on soils with unsuitable features for construction (peat, clay, loam, high groundwater levels, etc.).
- Long service life of the foundation, calculated in tens and hundreds of years.
- The ability to build on this basis houses of any number of storeys and purposes.
- Reducing the cost of arranging the floor on the ground floor, since the cast-in-place slab is already the floor.
But with all its positive aspects, the strip-type slab foundation also has some disadvantages. These are:
- The need for more accurate and thorough complex calculations;
- Excessive consumption of building materials;
- The need to attract additional workers or a large expenditure of time and effort for the construction of such a foundation-slab;
- The laboriousness of the process when preparing a pit for pouring a monolithic slab inside strip base;
- The relatively high cost of work, in contrast to the device of a standard strip foundation.
Load calculation
To build a strong and reliable tape-type foundation with a monolithic slab inside it, it is necessary to correctly calculate all the parameters of the future house and the basis for it. It is unlikely that it will be possible to independently make such calculations without having an engineering education. Therefore, it is best to entrust this stage of work to a professional architect.
As a rule, design work is carried out taking into account the following parameters:
- Features of the soil (by taking it for analysis);
- Building size according to the house plan;
- Calculation of the possible tilt of the building during its operation;
- Calculations for possible compression of the foundation and its punching;
- Calculation according to the deformation scheme.
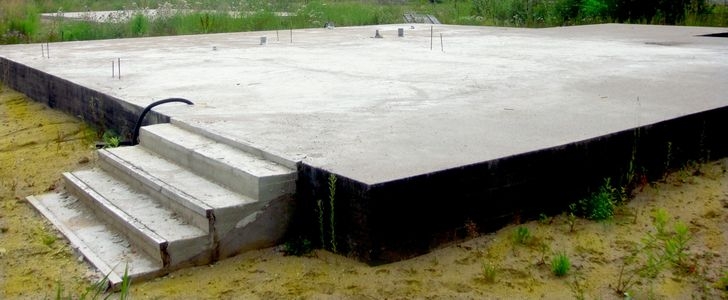
Start of work on the floating base
![]()
First of all, according to the plan of the house, the tape contour is poured. Under it, it is necessary to prepare a trench of the given parameters, on the bottom of which a sand cushion is laid.
The next layer will be a waterproofing material, and then the process of formwork and grouting will begin. However, it is worth knowing that the strip foundation is of two types:
- Monolithic - filled from the prepared solution;
- Prefabricated - assembled from ready-made reinforced concrete blocks.
For the second version of the base device, the involvement of special equipment and a greater expense of funds will be required. In addition, it is always worth remembering that the strip foundation is also distinguished by the type of load on such options:
- Shallow... It is used in the event that the building will have one floor and is erected from light materials (foam blocks, timber, sandwich panels or bricks). The depth of the concrete blocks or the pouring of the mortar is in this case from 50 to 70 cm. Moreover, this type of base is suitable for weak or non-powdery soils.
- Recessed foundation the tape type is used for high-rise buildings and from heavy materials on slightly loose soils. The depth of the location of such a basis should be 20-30 cm higher than the depth of soil freezing in the area.
Important: it is possible to arrange a monolithic foundation slab inside the strip base only after it has completely dried out and some shrinkage. This may take about a month.
Requirements for floating slab device
The scheme of the slab device inside the strip base is quite simple, but subject to certain requirements. So, in order for the internal monolithic floating cushion to meet all technological requirements and reduce the load on the finished building, you need:
- Pour the solution along the entire free perimeter inside the tape frame;
- Observe the structure of the fill, the proportions of the solution, the thickness and other parameters of the monolithic base;
- After the mortar has dried, it is necessary to waterproof the cushion on all sides and heat insulation on the floor side.
Important: you can waterproof a monolithic slab inside the strip base from below before pouring the solution into the formwork.
Waterproofing is first carried out using roll materials on top of an arranged sand-gravel cushion. The joints must be overlapped, processing the edges with a gas burner to melt them and securely adhere to each other. It is also important to leave overlaps here to protect the end sides of the slab from moisture. The upper part of the internal floating slab is waterproofed with bitumen mastic or spraying or coating materials.
The solution is prepared on the basis of M300 cement.
Slab pouring technology

The installation diagram of a monolithic base inside the strip frame looks like this:
- First, along the entire perimeter of the closed loop, a layer of soil is removed to a depth of about 30 cm. At the same time, it is not yet necessary to take the land away from the site.
- The bottom of the prepared pit is covered with geotextile in such a way that the edges overlap, and the walls of the pit are also protected with material.
- The next layer of the cake is sand and gravel, a total of 20 cm thick. Loose ones should be slightly moistened and tamped well.
- Further, according to the project of the building, they make the wiring of all plumbing communications, leaving the protrusions of the pipes above the level of the future slab. The pipes can be well insulated.
Important: before pouring the mortar into the formwork, it is necessary to charmingly check the operability of all mounted communications. Otherwise it will be too late later.
- Formwork is made from wooden panels for pouring mortar.
- The next step is to reinforce the structure.
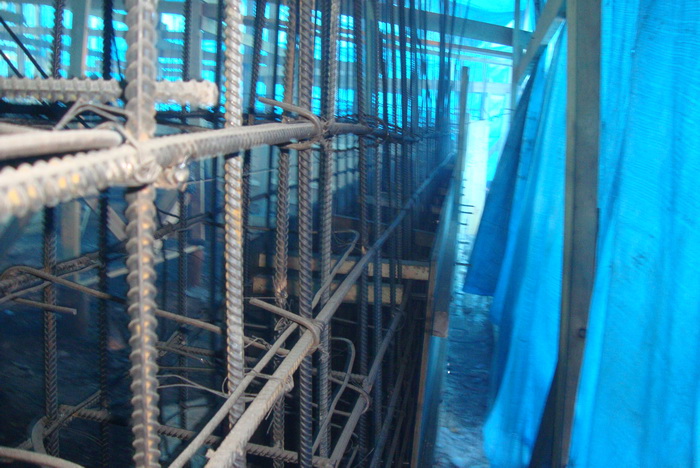
Reinforcement technology
Steel rods with a diameter of 8 to 16 mm are used as reinforcement for a monolithic slab. And the larger the reinforcement section should be, the greater the estimated load on the foundation. In addition, the pitch of the steel rods in the reinforcing mesh depends on the same parameter. As a rule, it is done at a distance of 30-40 cm, but if the load is high, then the distance between the rods can be reduced.
- Two horizontally arranged meshes are constructed from the rods by knitting.
Important: you can also use welding technology to create a reinforcing frame. But it should be remembered that welding violates the strength characteristics of steel.
- The finished lower mesh should be located at a distance of at least 5 cm from the sand and gravel cushion. In no case should the reinforcement be touched by bulk reinforcement. Stands or any blocks can be used as supports.
- The upper mesh is also connected to the longitudinal rods by knitting. The diameter of the longitudinal rods can be 6-8 mm.
- After the reinforcement is fully assembled, you can start pouring concrete in compliance with the level. For high-quality shrinkage of the solution and the removal of all air bubbles, you need to use a deep vibrator.
- After the mortar has dried, it is necessary to additionally waterproof the upper part of the slab.
Important: the solution dries for about a month. But for this time it is necessary to cover the slab with roofing material to avoid its premature drying. And for the best result, you need to periodically moisten the poured monolithic pillow.
The foundation erected in this way is a reliable and solid foundation for building.
After the type of foundation for the house has been selected, the place and depth of its foundation have been determined, all the earthworks have been carried out, you can proceed to the last most important stage in laying the foundation - pouring the foundation slab.
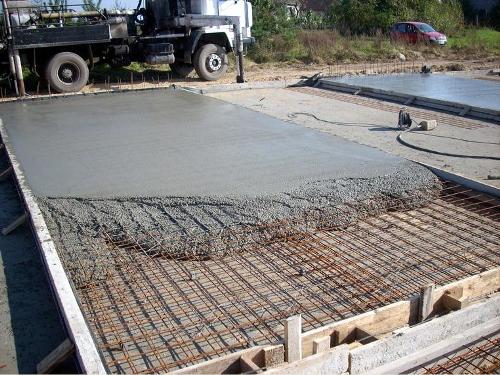
Pouring a slab under the foundation using a ready-made mixture in mixers
The fastest filling option, which, among other things, provides very good quality concrete - order delivery of concrete from a local construction company. Delivery is carried out in mixers. Usually, about 6-8 cubic meters of ready-mixed concrete can be delivered at a time. In this case, under the house is possible within a few hours. It will take about 4-5 people to work. From the mixer, concrete is fed into a chute, which has a length of about 1.2-1.5 m. If the mixture is supplied to one place, it will then be very difficult to rake it all over the formwork. Secondly, the concrete may begin to stratify: the more liquid mixture will begin to pass into the farthest sections of the formwork, and the more stony, dense part will settle in the place of pouring.
Therefore, it is necessary to send the mixture to different places of the formwork, so that it is easier to distribute it over the entire surface. For this, it must be possible to drive the mixer from all sides of the foundation being created. If this is not possible, then a long chute is made in advance to supply the concrete mixture from the mixer to different points of the foundation. You can knock it off from the boards. Linoleum or plastic wrap is laid inside the gutter. By alternately rearranging this gutter in different corners of the foundation, it is possible to ensure uniform filling of the formwork. This option for pouring a slab is the most acceptable for most independent builders and has an average cost: not too large and not too small.
Back to the table of contents
Pouring the foundation under the house using a concrete pump
Calling a concrete pump is the most expensive pouring option. The complete set of the concrete pump includes a special sliding boom with a concrete pipeline, with the help of which the concrete mixture is delivered at a distance of 30 to 50 m. Thanks to this, with the help of a concrete pump it is possible from a long distance, even when access to it is impossible for any reason. Concrete pumps are usually used during the construction of large reinforced concrete buildings and structures, but in the construction of summer cottages, they are usually not used due to their high cost.
Back to the table of contents
Self-pouring of the foundation slab under the house
The most budgetary option is to prepare concrete mix with your own hands right on the construction site. To do this, you can use ready-made concrete mixers, with which it is much easier to mix the concrete mixture. Concrete mixers are powered by electricity and have a power of 200 W or more. During one batch, you can make from 50 to 200 liters of concrete mix. Using this device will significantly speed up the mixing process of all components and improve quality characteristics mixtures. You can do without a concrete mixer and make it into concrete in a barrel or tub. In this case, the kneading is done manually using a shovel.
Using even the smallest concrete mixer with a working volume of 50 liters for pouring 1 m² of concrete takes about 20 working cycles. The mixing time for the foundation mixture is 3-5 minutes. It will also take time to deliver sand, crushed stone, cement and water to the concrete mixer, and then carry the prepared concrete mixture for pouring to the foundation. One cycle will take about 10-15 minutes, that is, you can pour one cube of concrete in 5 hours. If the work is coordinated and a sufficient number of people are involved, then everything can be dealt with faster: someone will bring materials, someone will make a mixture, someone will pour it into the formwork and compact it.
Building materials and a concrete mixer should be as close as possible to the poured foundation, so that there is no need to carry the mixture far away and waste time and effort. For convenience, various shovels and buckets for wet and dry materials are used. Otherwise, dry sand and cement will start to remain in the buckets and stick to the wet tool.
Be that as it may, manually pouring the foundation immediately in one day will not work, especially with large volumes. The fill will have to be done in parts. In this case, there are two options:
- If the filling needs to be interrupted for a short period of time (up to 12 hours), then there is nothing to worry about. Part of the foundation is poured - a layer of a certain thickness throughout the formwork, then a pause is made, while the concrete should be covered with a film or roofing material. The next day, concrete milk is washed off from the surface of the concrete (if it appears on the surface) and the foundation is poured. This connection of layers is called a hot seam (a pouring method in which the concrete layers do not have time to harden).
- If the pause between fillings is more than a day, then it is necessary to make a cold seam: put a new layer on the previous layer only after it has hardened. It is by no means possible to lay a new layer on slightly hardened concrete, because on the one hand it has hardened, and on the other, it only gains strength and may not withstand the pressure of the new layer. As a result, when pouring a new layer, the crust on the old one collapses and a very fragile crumbling area appears at the seam site. From this it is worth concluding that if the pouring cannot be continued as soon as possible, then it is better to let the first layer of concrete dry completely and gain strength.
Back to the table of contents
How to properly divide the foundation when pouring in parts?
You can fill the entire foundation, but only half the height. It is possible to mount vertical partitions and fill the foundation by half, but to the full height of the formwork. Some experts believe that it is better to make an inclined seam, that is, put the partition at an angle. There is no definite answer to this question in official documents. This is most likely due to the fact that the pouring of the foundation in parts by professional builders is not considered correct. However, this does not mean at all that if you are building a low-rise house yourself, you cannot do it. After all, the requirements for the strength of the foundation being created in this case are not the same as in the construction of a high-rise building.
It is not necessary to make a horizontal seam in the place where the horizontal bar of the reinforcing cage passes. It will be better if the reinforcement is located in one layer, and not at the joint. The layers should not be made too thin: when pouring the foundation in small portions, it is better to make vertical seams, rather than horizontal ones.
Back to the table of contents
Features of the technology of pouring a slab under the foundation
The parameters of the monolithic slab and its thickness are determined in the project of the future construction. If the structure is light enough (for example when building a garage), the minimum slab thickness will be about 100 mm. When building a country one-story house, you will need to create a slab with a thickness of about 200-250 mm. Too much increase in the thickness of a monolithic slab is impractical, as the load on unstable soil will increase and the main advantages of creating this type of foundation will disappear.
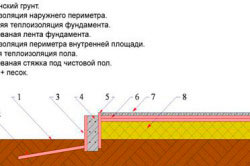
As with the creation of other types of monolithic foundation, when pouring the slab, it is necessary to carry out a set of waterproofing works. You need to protect the slab from moisture on all fronts:
- Waterproofing in the lower part of the structure is made using roll materials even during. Preference should be given to bitumen-polymer materials that are overlapped after the sand cushion has been prepared. The joints between the sheets are sealed by fusing the edge of the waterproofing material using a gas burner. You should also pre-leave a stock of material to protect the ends of the plate.
- Waterproofing of the side parts is carried out by means of waterproofing materials of the sole.
- Waterproofing of the upper surface of the slab is carried out using roll, coating and sprayed building materials.
In order to reduce heat loss, the slab base must be insulated using various materials. Most often, insulation under the foundation is used, which involves placing the slab on a layer of thermal insulation. It will be even more effective to use thermal insulation when installing floors - directly under the screed. As thermal insulation material most often they use expanded polystyrene or foam.
For the manufacture of formwork, boards with a thickness of about 25 mm are used. Shields are knocked down from them and installed around the entire perimeter of the future slab, fixing the structure with pegs and struts.
To create a reinforcing cage, you need to use steel ribbed rods with a diameter of about 12 mm. The diameter of the rod is selected based on the loads on the foundation being created and on the nature of the soil. The reinforcement is knitted by welding or wire. When choosing concrete, it is necessary to give preference to mixtures with a grade not lower than M-300, which have a strength class of 22.5.

Before starting the construction of his own home, a person needs to carefully prepare and tune in to the upcoming work. One of the first and most important stages of construction is the arrangement of the foundation. In private housing construction, a design such as monolithic slab... This type of foundation has many advantages and a number of features that any developer should know.
The type of foundation under consideration is built on a base in the form of a sand cushion. The pouring technology involves the mandatory implementation of reinforcement. This design is designed for very high loads, therefore it is used primarily in the construction of large houses with more than one floor.
However, the size and weight of the building are far from the only determining factors. For example, in areas that are characterized by uneven seasonal ground movements, a monolithic fill on sand pillow is the best option.
Also, such a foundation is perfect for regions with a high groundwater level, being most relevant for buildings with basements. The floating monolithic foundation has a relatively large area, which helps to reduce the total load on the soil when compared with other types of structures.
Foundation pouring mixture You can make it yourself or order it from a specialized company. If you have money, but there is no time, desire or experience in making concrete, you can simply buy a ready-made solution and save yourself the trouble.

Work on the construction of a monolithic foundation slab begins with the assembly of the formwork... For the manufacture of this structure, wooden inventory boards are suitable. The functions of the formwork can be performed simply by the walls of the pit, but in such a situation they will need to be insulated with roofing material or polyethylene. Otherwise, the earth will absorb the cement "milk", which will negatively affect the strength characteristics of the structure.
Monolithic slab foundation is the most reliable among other types of foundations used. Such a foundation is not afraid of the effects of moisture, it can withstand any loads, which makes it possible to build full-fledged two- or even three-story mansions.
Before starting work, you should prepare everything you need to complete it.
Tools and material for the device of a monolithic slab foundation
1. Concrete mixer or container of suitable volume.
2. A wheelbarrow for transporting materials and ready-made mortar.
3. Several shovels and buckets.
4. Building level.

5. Measuring tape.
6. Welding machine.
7. Joints, rammers, picks.
8. Trowel.
9. Square.
10. Metal rods for creating the reinforcement cage and clamps for these rods.

11. Ready-made concrete or ingredients for its preparation.
12. Materials for waterproofing.
The formwork is arranged around the perimeter of the future building. The main function of this element is to give the foundation the desired shape until the poured concrete gains the required strength and cannot maintain its shape on its own. The formwork can be assembled from edged boards, but they must be combined in such a way that there are no gaps at the joints. Whenever possible, inventory panels should be used to assemble the formwork.Such a step will reduce the time and effort required at this stage of work.

It is better that the elements for the assembly of the formwork are made of wood conifers... Larch is also suitable for making spacers and all kinds of fasteners. The formwork boards should be no more than 15 cm wide. Make sure that all boards used are of the same thickness as possible. Before assembling the formwork, the boards should be thoroughly moistened, or even better, use raw wood. The problem is that the dry material will subsequently absorb moisture from the laid concrete, and this will not have the best effect on the strength of the finished structure. The front side of the formwork system is finished with metal or plywood sheets.
It is important to first take care of reducing the adhesion force of the concrete with the formwork material, so that in the future the boards or shields can be removed with the least effort. It is enough to simply cover the front of the formwork with oil, liquid clay mortar, etc. Additionally, such a coating will help to obtain a cleaner front surface of the monolithic foundation.
Determine the distance between the installed shields with a reference to the width of the future monolithic base. From the outside of the formwork panels, stakes are driven into the ground, thanks to which the fixing of the structural elements in a given position will be ensured. Additionally, the stakes must be attached to the shields with nails. To ensure that the adjacent formwork panels do not disperse when pouring concrete, wooden planks must be nailed on top of the panels.
Be sure to make sure that no fasteners are located where concrete mix will be poured in the future. Otherwise, it will no longer be possible to get these fasteners from the poured plate.
The formwork for the foundation must be installed as evenly as possible, because the evenness of the finished foundation directly depends on this. Particularly important is the high installation accuracy at the base / plinth level, i.e. that part of the base that is above the ground. After removing the formwork, professionals recommend wiping the base with a thin layer of cement mortar. Other cladding is made at the request of the owner, you can perfectly do without it.
To increase the strength of the structure, a reinforcing belt is being installed... Without reinforcement, the slab can normally withstand compressive loads, but it will be powerless against tensile and bending loads. Liquidate this drawback competent reinforcement helps. It is performed using special welded structures or individual metal rods.
For the reinforcement of monolithic foundations, steel reinforcement is used.
It is important that the rods are free of grease and corrosion damage. Such things will contribute to the deterioration of the quality of adhesion of reinforcement to concrete, due to which the rigidity of the structure and its strength will noticeably decrease.
The frame is assembled from hot rolled or round reinforcing steel. Bars should be with a periodic profile. In exceptional cases, the frame is assembled from square steel.
Depending on its purpose, the reinforcement as part of the reinforcing structure can be working and distribution:
- working rods are designed to accept external and almost all internal loads caused by the weight of the building;
- the functions of the distribution armature are clear from its name - it is responsible for the distribution of incoming loads between the working axes.
That is, the armopoyas is a full-fledged complex, each element of which works in conjunction with others.
Wire stranding can be used to connect the reinforcement, but professionals advise using welded joints in most situations.
Before starting the arrangement of the frame, the reinforcement is straightened, sorted and cut. On average, as practice shows, about 100 kg of reinforcing material is consumed per 1 m3 of concrete mixture. The assembly of the frame is carried out directly at the construction site.
When installing the formwork, be sure to keep the steel rods in place. The maximum allowable displacement is 20% of the diameter of a single bar. Check the formwork after installing the reinforcement and immediately repair any defects that appear.
Construction Concreting Guide
It is strongly not recommended to do concreting at low air temperatures. When if the base is poured in frosty weather, the concrete mixture must be insulated, because when freezing, the material loses its strength and can simply crumble even under insignificant loads... In the heat, the formwork for the foundation should be moistened before starting concreting so that in the future the boards do not absorb moisture from the poured mixture.
The concrete is poured in layers. Each of these layers is compacted without fail. It is best to use a special vibrator for this job. If it is absent, you can pierce the mixture with improvised tools. You can understand that the mixture is sufficiently compacted by the cement milk that has appeared on the surface of the layer. The mix can be applied by a paver or manually.

Concreting must be done continuously, because only if this condition is met, it is possible to achieve high strength and solidity of the structure as a whole. If you cannot complete the work in 1 day, you need to make working seams. Such a seam looks like a flat joint and is created between the previously poured and new concrete layers. Work seams in foundations of this kind can have an exclusively vertical or horizontal position.
It is possible to resume concreting work only if the strength of the poured mixture is no more than 1 MPa. This moment is easily checked with the vibrator used for compaction. If the previous pouring layer liquefies during processing, concreting can be resumed. Beforehand, it is imperative to rinse the seams and clean off the cement film with a metal brush.

It should not be allowed that in concrete pouring got the soil. This leads to a significant decrease in the strength of the foundation system and contributes to the appearance of cracks.
Maintenance of the foundation after completion of the pouring
After pouring, concrete requires some maintenance. Especially great attention is required for about a week and a half after pouring. First of all, you should try to maintain optimal values \u200b\u200bof humidity and temperature. It is best if the concrete hardens at temperatures in the range of + 18- + 25 degrees. Do not allow any mechanical stress, shock or any other impacts that could lead to the destruction of the integrity of the structure.
The freshly poured foundation must be protected from the effects of cold, wind loads, direct sunlight, because all this will contribute to the escape of moisture from the concrete composition, which will inevitably lead to the formation of cracks. In the heat, the stove should be covered with some moisture-absorbing material, for example, with burlap or some kind of dense cloth, and periodically watered with cold water.
Determine the frequency of wetting on an individual basis, the main thing is that the surface of the foundation is always moist. If it is frosty outside, the formwork must be additionally insulated by covering all open surfaces with mineral wool, sawdust or other suitable heat-insulating materials.
If the construction is carried out in frosty weather, the laid concrete must be additionally heated. Usually, for this, the structure is blown with warm air or steam. If possible, it is better to add cements of fast-hardening grades and with a high heat release rate to the mixture. The most commonly used method is electrical foundation heating.

When to dismantle the formwork?
Boards can be removed approximately one and a half weeks after pouring the slab. You can start installing floors, erecting masonry and other similar work only after the structure has gained the required strength. It usually takes a month, but it is better to wait one and a half. If the device of the slab was carried out in full compliance with the technology, further shrinkage will be as uniform as possible and no distortions and other defects will appear.
The mentioned 10 days is the minimum period, but it is also not necessary to delay the dismantling of the formwork too much. The longer it stays in its place, the stronger the adhesion of the boards or boards to the concrete will be, and the more difficult it will be to get rid of the formwork in the future without damaging the top layer of the monolithic base.
In the process of dismantling the formwork, be extremely careful. The corners of the structure must not be allowed to crumble (and by this time, as a rule, they have not yet had time to gain the required strength). Any defects that appeared after dismantling the formwork are recommended to be immediately cleaned with an iron brush, thoroughly rinsed with clean water under strong pressure and rubbed with a "light" cement mortar prepared from 1 part of cement and 2 times the volume of sand.
If large "shells" are found, clean them to full depth until you pass the layer of "weak" concrete. After this procedure, the surface must be brushed again with an iron brush and rinsed with a strong pressure of water. It is recommended to use a hard concrete mix for the treatment of large “shells”.
Before starting work on concreting, think in advance about the placement of various technological cavities through which underground utilities like water pipes, cables, etc. Such holes are made very simply. You take pipes of the required diameter and insert them into the right places of the formwork.
In the course of pouring the foundation, the pipes must be covered with a rag or other material with similar characteristics. After all the communication elements are equipped, the existing gaps and any kind of holes must be sealed with a special silicone compound to prevent moisture from entering the system.
Thus, there is nothing super complicated in the independent construction of a monolithic slab foundation. It is only necessary to understand the instructions in detail and follow the instructions received at each stage of the foundation construction. Happy work!
Video - Do-it-yourself monolithic slab foundation


