If you look from above at a typical cottage village, you will notice a clear predominance of complex types of roofs - multi-level, cascading, hip. Meanwhile, in developed countries with a similar climate, preference has long been given to simple and solid roofs with one slope - abroad they can be found both in budget buildings and in prestigious housing. What is the advantage of such a design, and how can you build, guided by drawings and photos, pitched roof with your own hands?
The low reputation of pitched roofs in Russia and the CIS countries (it is still believed here that such solutions are suitable only for outbuildings) is actually not justified. Due to their constructive simplicity, it is possible, significantly saving on installation costs, to choose a more expensive and high-quality coating. However, along with the advantages, there are also disadvantages, which are all the more important, the more durable the building is.
Shed roof structures are ideal for outbuildings
Elements of a single-slope rafter system
A pitched roof is a plane inclined to one side, which can be covered with almost any roofing material (corrugated board, slate, ondulin, tiles, etc.). The required slope (11-60 degrees) is formed by the rafter system, which holds the crate, a layer of hydro and thermal insulation, as well as a protective coating.
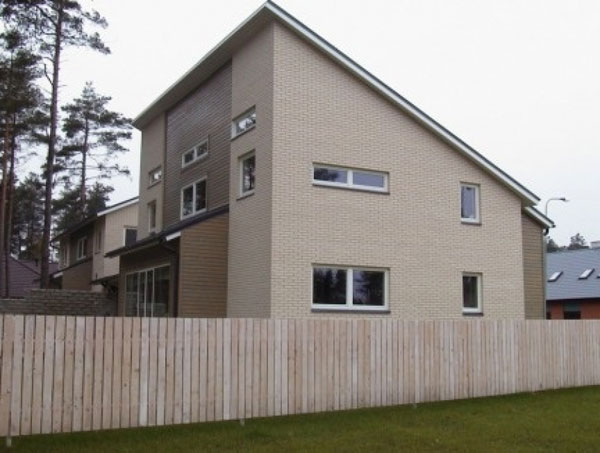
Modern cottage with a pitched roof
Elementary construction pitched roof everyone is familiar with gazebos and awnings: the rafters in it rest on the heels of wooden or brick support pillars. Another version of the support system with one slope is a row of beams installed on two walls of different heights. For mounting and fixing the rafter legs on the walls is attached support element - Mauerlat, if the walls are stone, or the upper trim, if the structure is frame.

House with complex architecture

Garage option
Features of the installation of rafters, depending on the width of the span
With a building width up to 4.5 m, it is allowed to install rafter legs with an emphasis on only two extreme points (hanging trusses), while a larger distance between the supports requires an intermediate installation of rafters on the internal load-bearing walls. When erecting more complex objects, the most rigid rafter system should be used, often consisting of two types of trusses simultaneously.
With an increase in the width of the span, the structure of the trusses has to be complicated. So, in addition to composite rafters, they can consist of several additional supports:
- one rafter leg, set on a bed (up to 6 m);
- an intermediate post and two rafter legs (up to 12 m);
- an intermediate post and three rafter legs (up to 15 m);
- two intermediate racks connected by a scrum, and two rafter legs (up to 16 m).

Shed roof scheme
In some cases, the roof slope is formed by triangular trusses. They are mounted on the ground and placed horizontally on walls of equal height. This option is technologically more complicated, its use entails a greater consumption of lumber, but it does not require the construction of walls of different heights.

Shed roof drawing
The undeniable advantages of a shed design
A clear advantage of a flat roof with a slope only in one direction is the simplicity of design and construction. Indeed, in the presence of drawings and a clear guide explaining all the stages step by step, a shed roof can be built quickly with your own hands, even if the performers lack experience. True, this applies only to low-responsibility structures, and an individual project is still needed to design a roof in private houses.

A simple drawing can be drawn up independently
From the first advantage, there are others that are equally attractive for a private developer:
- a roof that is simple in shape needs a minimum amount of building materials and additional items (valleys, ribs, skates);
- due to the equal heights, it is uniformly exposed to atmospheric precipitation and ultraviolet radiation;
- wear of all elements of a pitched roof also occurs evenly, which means that, under the same conditions, such roofs are more reliable and last longer than alternative structures;
- when the high wall is oriented towards the sunny side, the maximum amount of light is admitted into the house, which makes it possible to optimally organize the division of space into living and technical rooms;
- a house with a pitched roof is the most profitable from the point of view of energy saving, since the area of \u200b\u200bits southern wall significantly exceeds the area of \u200b\u200bthe northern one;
- a large and almost horizontal slope area can be used to install solar collectors, which also increases the energy independence of the house.

Solar panels can be attached to the ramp
Often, large cottages have combined roofs with multi-level surfaces. Despite the fact that from the outside, such structures seem complex, each part of the roof is built as a regular one-pitched roof and borrows all its advantages. It is advisable to use a single ramp roof structure to cover the veranda or garage adjacent to the main building.

Cons of a roof with a slope to one side
It must be admitted that both live and in the photo, the lean-to roof looks impersonal - it in no way complements the architecture of the building, as is possible with a more complex roof. If for outbuildings this nuance is insignificant, then when designing a private house, engineers are often forced to add a zest to the structure, significantly complicating its facade, thereby leveling the economic effect of choosing a roof of a simple form.
Skeptics can point out other disadvantages of a pitched roof:
- the impossibility of arranging the attic or attic space, difficulties in laying a sufficient layer of thermal insulation;
- increased costs for the construction of a pitched roof in the northern region (it is necessary to give the rafter system high strength or raise the slope to an angle of over 45 degrees);
- with a slight slope - the need for regular manual maintenance, for example, removing snow or leaves.

One of the disadvantages is the high cost of the facade
What to Consider to Address Weaknesses
For those who decide to cope with the design and construction on their own, the alluring simplicity of the design can be a trap if you neglect the important points:
- if strong winds of one direction prevail in a given area, the structure should be oriented with a high wall to the leeward side - this reduces the wind load;
- the more significant the average annual precipitation in the region, the steeper the roof should be inclined (in central Russia the slope should be at least 20 degrees, in the northern regions the steepness can reach 40-50 degrees);
- with an increase in the slope of the roof, the dimensions of the slope also increase, due to which the windage of the shed roof increases (vulnerability to the effects of wind can lead to deformation or complete breakdown of the roof).

The development of complex pitched roofs requires the participation of professionals
All these nuances must be taken into account in the project of the rafter structure by selecting the configuration of the rafters, their section, and the installation step. For large-span houses, this calculation is not simple, so before making a pitched roof with your own hands, seek professional help.
Preliminary design of the truss structure
A preliminary calculation of the bearing elements will allow you to get a fairly accurate idea of \u200b\u200bthe amount of building materials and lay the necessary margin of safety. At the same time, the simple configuration of the building makes it possible to calculate the angle of inclination of the rafter legs independently. Knowing its value, you can determine the parameters rafter system and the best way to attach the frame to the base.

Device roofing cake
Determination of the angle of inclination and length of the rafters
The reliability and stability of the roof, as well as its ability to perform its direct functions for hydro, heat and sound insulation, largely depend on the slope of the slope. It, in turn, is interconnected with two determining factors:
- climatic conditions of the region - the colder and more windy in your area, and the more abundant the snowfalls, the steeper the slope should be raised (for the middle lane, an angle of 20 degrees is considered optimal, for areas where winds often rage, the steepness should be minimal - within 3– 10 degrees);
- used roofing material - a flat and smooth surface practically does not retain water and snow, and vice versa, a rough roof is slowly cleared of precipitation (for roll materials such as roofing material or polymer membranes, the angle can be 5-10 degrees, for slate - 20 garus, for piece coverage - 25-30 degrees).

Formula for determining the slope angle
Formulas for Accurate Slope Calculation
You can more accurately calculate the value of the slope steepness if you have already set the height of the ridge, that is, the difference between the high and low walls of the building. Next, knowing the basic trigonometric aspect ratios in a right-angled triangle ABC will help you:

In the diagram: a - ridge height, b - span width, c - slope length, A - slope angle
![]()
Table of tangent values \u200b\u200bfor angles from 1 to 60 degrees

Sine values \u200b\u200btable
Using the number obtained as a result of dividing in the table of tangents, find the corresponding angle - this will be the desired value of the slope slope. Now, knowing the angle and having the dimensions of the two legs (the height of the ridge and the width of the span), it is easy to clarify the length of the rafter leg. To do this, you will have to do trigonometry again, remembering the Pythagorean formula or the relationship between hypotenuse and angle:

Determining the length of the rafter
Add the length of the eaves overhang to the resulting value: at least 300 mm, if the project assumes the presence of an organized drainage system, or 500 mm or more - with an unorganized drain. As you can see, with normal spatial imagination and the ability to perform simple diagrams, you have identified two important parameters of the roof structure without any software.

Installation diagram
Selecting the section of the rafters and the step between them
It is not enough to know how to build a pitched roof with your own hands in stages - it is important to prevent the occurrence of operational problems and at the same time it is advisable not to overpay for materials with an excessive margin of safety. It is quite possible to solve such a problem using the method of calculating the section of the rafter legs and the distance between them.

Snow pressure map
First of all, it is necessary to clarify the magnitude of the external load on the rafter system of the building. If we do not take into account the seismic influences unusual for most regions, the nature of the forces pressing on the rafters is determined by snow and wind loads. The sum of these components with the weight of the roofing is the value that determines the parameters of the rafter system.

Formula for calculating snow load
The force with which the snow will press on the erected roof, you can find out from the map of the distribution of snow pressure zones by multiplying the value found by a coefficient that takes into account the slope angle. Its formula looks like this:

Wind load map with design values
Due to the unevenness of the wind load, its calculation is more complicated, and it is not enough for it to know the average statistical wind pressure. Several points should be taken into account at once:
- prevailing wind directions;
- the height of the building and surrounding structures;
- the number of wind obstacles.
In the formula, these features are taken into account in the form of tabular coefficients:

Wind force calculation formula

Tables for coefficient c

Tables for determining the coefficient k
Final stage calculation - determination of the total force impact on the roof by the formula:
![]()
Determination of the external load on the rafter frame
After that, according to the table, you can find the values \u200b\u200bof the permissible length of the rafters between the supports and select the cross-section of the timber conifers a certain sort.

Selection table for rafters

Table for calculating the section of rafters
Installation of a pitched roof in two versions
To form the required roof slope, during the construction of the box, walls of different heights are initially provided. Otherwise, the truss trusses should be in the form of a triangle, which is more difficult to implement. Below are considered the processes of constructing both versions of a shed roof of a house with your own hands - videos and step-by-step instructions clearly demonstrate the difference between them.

Installing the rafter system
Installation of the supporting system on multi-level walls
The rafter system in this case is a row of boards, and the support for them is the Mauerlat, the role of which is played by a horizontally installed beam with a side of 180-200 mm. Select the method of fixing the Mauerlat bar depending on the base material:
- attach the timber to a brick or foam block wall using a wire with a diameter of 6 mm and anchor bolts previously embedded in their surface;
- nail the Mauerlat to the wooden harness installed over the frame racks with nails 150-200 mm long.

- Select the required number of softwood beams or planks with a section of 50–70x180–220 mm, logs with a diameter of 130–180 mm are also suitable.
- Try on the rafter to the Mauerlat and from both ends at 1/3 of the board width, cut out the cuts necessary to reduce the degree of freedom at the points of contact of the support bar with the rafter.
- Using the finished rafter leg as a template, make the rest of the supporting structure.
- Using a soft brush or roller, apply fire and bio-protective products to wood surfaces, allow to dry and re-treat. Pay special attention to the places of future joints.
- After the impregnation on the rafters is completely dry, you can start marking and installation.
- Break the Mauerlat bar into equal sections of 60–70 cm and mark the position of the anchor points for the rafter legs.
- Install the rafters in the marked places and secure with brackets or corners.
- From the board scraps, taking into account the width of the overhang, make a template for the filly for the side overhangs. On it, make all the cornice elements and fix them, not forgetting about the waterproofing between the concrete and wooden surfaces.

Photo of a house with a pitched roof
On the installed rafters, fill in a solid or sparse crate - the choice of design depends on the type of roofing material. Now it remains to sheathe the perimeter of the rafter system with a wind board, lay the topcoat, and the construction of a shed roof with your own hands can be considered complete.

Lattice construction and laying of slate or corrugated board
Video: Construction frame bath with a pitched roof
Alternative roof construction
If you want to erect a pitched roof on walls that are at the same level, then the algorithm of actions changes:
- Lay and fix horizontal beams on the Mauerlats or a reinforcing belt of load-bearing walls with a pitch of 70–100 cm, which will serve as the foundations of trusses and attic floors.
- Lay a plank flooring on the beams, which is temporarily necessary for movement during work.
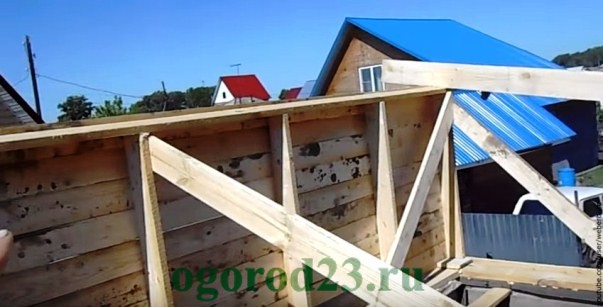
- On the high side of the future roof, install vertical supports-supports and attach them to the horizontal beams using temporary braces. Be sure to use a level when installing the supports.
- On top of the vertical struts installed and fixed with braces, mount the timber top strapping, which should be located strictly horizontally, and sew up the pediment with boards.
- With a step equal to the step of the laid horizontal beams, lay the rafters on the strapping and fix them in the upper and lower parts with staples and nails 200 mm.
- If the length of the rafters is more than 6 m, they need to be reinforced with one or more intermediate supports fixed with braces.
- Next, nail a crate of 50x50 bars and edged boards with a thickness of 30 mm to the laid rafters with nails. If the roof has a slight slope, it is advisable to protect it from moisture penetration inside using a hydro-barrier.

Rafter system on walls of the same height
Video: How to raise a roof slope on walls of equal height
For single-pitched roofs made of corrugated board with your own hands, a metal side strip should be nailed along the entire edge, while for other types of coverings, the sidewalls can be trimmed with a wind board.
Thus, the arrangement timber frame with a single slope is a great way to hone your building skills on a simple structure, especially if you want to quickly and inexpensively build a shed or overlap outbuildings.
Despite their simple, uncomplicated design, pitched roofs are in demand, rational, especially for suburban housing construction. Roofs with one slope are also widely used for arranging garages, outbuildings, and utility buildings. You will learn how to build a pitched roof with your own hands step by step below.
Multi-slope roof options are complex in design, and a single-slope roof is quite accessible to do-it-yourself construction, as it is, in fact, a rectangle that is located in one plane, has no bends. By the way, you will need much less building materials for a lean-to, than any other, it will be more resistant to seasonal manifestations (snow, wind, rain).
Construction of a shed roof garageAdvantages of a pitched roof:
- light weight;
- comparatively acceptable total cost;
- affordable, uncomplicated installation process;
- the possibility of using various building materials (roofing, rafters);
- affordable arrangement of the drainage system, chimneys.
 Coop with a walk for chickens under a pitched roof
Despite its simplicity, a pitched roof can be very creatively played in design decisions. The angle of its slope directly depends on the climatic features of the region where you live. If snowy winters are familiar to you, then the degree of inclination should be greater (so that the snow slides better), but if your house is located in a windy place, then the slope should be made smaller. For the same reasons, the slope of the pitched roof should be directed in the opposite direction from the facade, so that the precipitation “leaves” behind the house.
The roof is single-pitched, self-erected step by step, it is ventilated and non-ventilated type. The first option is used for residential buildings, the slope varies from 8 to 25 degrees. In such cases, air exchange is ensured by the insulating layer and special holes located on the sides of the roof.
The unventilated version is more often installed in garages, sheds, outbuildings to the house, the angle of inclination is mostly small - 3-6 degrees.
House with a pitched roof - the choice of roofing material
The calculation of the schematic drawing of the future house begins with the determination of the required angle of inclination and a suitable covering material for the roof. Most often, for such single-pitched structures, corrugated board, metal profile, roofing material, tile, slate, metal tile or ondulin are used. A soft tile or roofing felt covering is optimal for very small slopes - from 5 to 10 degrees. Slate with corrugated board is more suitable for "average" indicators of the angle of inclination - from 20 to 30 degrees. For metal tiles, a slope of at least 35 degrees is required.
The choice of roofing material is due to its ability to interact with precipitation and promptly remove it from the surface. For example, snow comes off much easier from slate, corrugated board, tile.
How to make a pitched roof?
To build a single-pitched roof with your own hands step by step, you will need a standard set construction toolsrequired building materials. Wood materials (lumber) must be of proper quality with a maximum moisture content of 22%. All wood materials it is recommended to pre-treat with antiseptic agents (for example, agents from the Drevoteks series).
In addition to everything, you should have in stock fasteners: crossbars, spacers, struts.
The crossbar is a horizontal piece that acts as a support for others load-bearing structures, it distributes the load of the rafters to the other beams.
Spacers - a type of supports that are located in the spans, provide greater stability of the entire structure.
The struts are beams that act as supports for the rafter system.
 Shed roof of an extension to the house
Shed roof, photo:
You must have:
- wooden beam 100-150 cm in diameter;
- laying boards (at least 5 cm thick);
- rafter nails;
- thermal insulation materials;
- waterproofing materials;
- construction tape;
- tools (ax, saw, hammer, construction knife, plumb line, screwdriver, tape measure, construction stapler, level).
The shed roof rafter system will entirely depend on the size of the future house and building materialfrom which the walls were erected. The rafters are always installed on the Mauerlat, if the building is small and the span does not exceed 4.5 meters, then the scheme of the shed roof rafter system will be extremely simple. It will consist of a main Mauerlat bar and a rafter support. If large dimensions of the structure are assumed, and the span length is more than 6 meters, then the installation of reinforcing rafter legs with your own hands is simply necessary.
 Scheme of the rafter system of a shed roof
The rafters must be installed in accordance with building rules so that after several years of operation the consequences do not appear. Do not forget about safety rules - install reliable, sturdy temporary boards on the rafters on which you will move during the construction process.
 Installations of rafters of a pitched roof
The do-it-yourself workflow includes the following steps:
- Laying transverse rafters - they are attached to the Mauerlat (this is the basis - what the entire rafter system goes for), the distance between the rafters is about 60-80 cm. Here you need large nails (or anchors).
- A crate is attached to the rafters (it is made of wooden slats 50 by 50 cm), it provides rigidity, the roofing material is laid directly on it. The lathing is placed at right angles.
- With the help of a construction stapler, a waterproofing material is attached to the crate (ordinary polyethylene film is suitable for this purpose). Fastening is done without stretching, but with an overlap from bottom to top.
- The turn of thermal insulation follows (for example: mineral wool, fiberglass, balsat mats).
- Laying of roofing material according to its individual characteristics.
Do-it-yourself shed roof
Let's consider the whole construction process step by step:

Well-laid, do-it-yourself rafters do not bend under a weight of 70-100 kg, if this fact was discovered during verification, then it is necessary to reinforce the frame.
The technology for stacking the layers of the "pie" may differ due to certain circumstances, have some additions. Sometimes, for greater reliability, the waterproofing layer is re-laid on top of the insulation. It will not be worse from this, but in all cases, special attention should be paid to fastening.
It is best to nail the film to wooden structural elements using nails with a flat head or a construction stapler, the step frequency should be 15-20 cm.
One of the most important points is to secure the edges. waterproofing material... It is brought in under the overhang of the roof, the residual segment should be at least 20 cm, after which it is nailed from below or, again, passed with a stapler.
It is best to take a wooden lath and knock it down with appropriate nails (with a step of 10-15 cm) - this is the so-called "folk" method of arranging a pitched roof. Thus, you will be sure that the air currents will not penetrate under the waterproofing film, and will not cause large-scale damage when strong winds attack.
 Errors in fixing the edges of a garage shed roof
In the photo above, the edges (overhang) of the roof were not securely fixed. In a strong wind, the sheet of the metal profile together with waterproofing filmlike a light rag was easily thrown aside.
Shed roof - extension to the house
 Garage, as an annex, under a pitched roof
For garages, sheds, baths, gazebos, this type of roof is most convenient. The pitched roof design offers a number of advantages for so-called auxiliary buildings.
 Fastening the shed roof truss frame to the wall of the house
If we consider the extension step by step, it becomes clear that its roof is adjacent to the wall of a residential building. Thus, its rafter system is equipped separately from the house, the lower ends of the rafters are located on the front wall of the extension, but the upper ends are attached to the wall of the building. It is very important here to ensure a competent connection of the rafter frame of the extension and the main wall of the house. It is also undesirable to use too rigid fasteners, because the shrinkage rate of the house and the attached building may be different. Due to this difference, wall cracks can then form.
In this case, it will be most convenient to lay the beams on a timber frame, which is adjacent to the wall of the house (attached to the wall), and fill the place (seam) between the timber and the wall with polyurethane sealant. It is necessary to lay the roofing material with your own hands on the roof of the extension with an overlap, and also start at the junction under the covering of the house. This is necessary so that later atmospheric precipitation does not seep through the junction. Typically, a similar roofing material is used on the roof of the house and extension - for aesthetic reasons.
If you decide to build a shed with a pitched roof, then arranging the roofing system with your own hands will not differ significantly from the step-by-step construction method described above.
It so happens that sheds are erected from a bar, in such cases the top of the log house acts as a Mauerlat. Otherwise, there are no significant differences in the rafter system of pitched roofs of different buildings.
A single-pitched garage roof is made according to a similar method.  If the walls of the garage are built of bricks, then the edges of the beams, rafter boards are introduced into the niches equipped for this. They are made in advance in the walls and negotiated at the stages of building design. It is recommended to wrap the wooden fragments with a waterproofing coating before burying them into these niches. In this case, the rafter interval is 60-70 cm. Facade wall garage - a high wall, from which there is a slope down to the back of the building, the entrance gate is located in it. The roof should protrude 30-40 cm from the wall and form a small overhang.
Taking into account the above information, it becomes clear that such a roof option is practical, functional, and structurally simple. A pitched roof, step-by-step equipped with your own hands, can withstand powerful wind and snow loads. Such a roof will be warm, due to the small area for air penetration. If you did everything correctly, then it will faithfully serve you for more than a dozen years.
A strong and outwardly original single-pitched roof with your own hands is easier to build than other roofing structures. Usually it is erected over farm buildings or over the wings attached to the main residential building.
1 Do-it-yourself shed roof - we will weigh the pros and cons
The construction of roofs with one slope is justified in several cases: with a shortage of rafters and others roofing materials; with a limited repair budget; in the presence of constant winds of a certain direction. If two or three of the above reasons are characteristic of construction, then an asymmetric roof from one slope becomes the best choice... Its repair advantages are as follows:
- The shed roof is reliable and simple - both at the design stage and at the stage of project implementation. You can not only build it yourself, but also calculate the bearing load and the required amount supplieswithout resorting to the services of professional designers;
- Cheapness roofing works on roofs with one slope, it reaches 35% compared to the more usual two- or four-slope structures. The savings on wooden rafters are especially significant, hydro and sound insulation of the roof of a single-pitched house will also cost less, and without compromising reliability;
- The design features of a shed roof make it easier to repair it, especially if it concerns the attic space;
- A roof with one slope is the best repair solution in case of prolonged winds of a similar direction. However, this advantage is realized only with the correct orientation of the roof relative to the wind.;
- The speed of construction, other types of roofs are built much longer.
The disadvantages of a pitched roof include inefficient use of the attic floor - you cannot equip a full-fledged residential attic in it. The appearance of a building with different heights also looks peculiar and does not always coincide with the aesthetic hopes of most residents. However, now there are many original projects residential buildings with roofs from one slope - their preliminary study can shake the traditional belief in the need for a gable roof.
2 How to make a pitched roof - we do the calculation with our own hands
Before you build a pitched roof with your own hands, you need to decide on the roofing material. The slope angle and the need for additional internal supports directly depend on the type of roof:
- A classic and cheap roofing material implies a minimum slope (no more than 10˚). Such a roof will require significant internal reinforcement, otherwise the very first heavy snowfall will be the last for it ...
- For ordinary slate, a slope of 20-25˚ is enough. It should be taken into account that it must be durable. And the installation of fragile and heavy slate sheets itself is very difficult;
- Roof tiles, metal tiles and profiled metal should be laid with a slope of 25-35˚. Durable, weather resistant and lightweight square meter roofs are the obvious benefits of these roofing materials. In addition, it is much easier to mount metal tiles and decking on the roof than roofing felt or slate.
A prerequisite for the quality of a roof with one slope is its correct orientation relative to the prevailing winds. The wind should blow on such a roof from the bottom up, as if trying to "climb" the roof slide - then its pressure on the entire structure will be minimal.
It turns out that a do-it-yourself shed roof sets the tone for the entire construction of a house (or an auxiliary building). The low wall is laid from the windward side, the elevation of the high wall depends on the type of roofing material, the end walls are laid out with a slope from the low wall to the upper one.
The site masters have prepared a special calculator for you. You can easily calculate the required amount of roofing.
3 How to build a pitched roof over spans of various sizes
The higher the slope angle of our roof, the greater the permissible rafter span without additional supports. Popular roofing materials such as metal or corrugated board must be installed on pitched roofs as follows:
- With a distance between the walls up to 4.5 meters - on the rafters without reinforcement;
- With a distance between the walls from 4.5 to 6 meters - with the strengthening of the rafters with triangular struts;
- With a distance between the walls from 6 to 12 meters - with an intermediate capital support.
Spans over 12 meters in size with an inclined roof are covered in exceptional cases, because they require a significant rise of one wall above the other.
Fastening the Mauerlat bar to load-bearing walls performed in two stages. First, it is "baited" on a few anchor bolts, then the horizontal is checked again - and only then it is rigidly tightened onto the rest of the anchor. The step between the fastening bolts corresponds to the inter-rafter distance, it is 100-150 cm.
Step 2: getting ready to lay the rafters
As rafters, a rectangular board is used, with dimensions from 50x100 mm, necessarily treated with antiseptic compounds. The length of the rafters should exceed the roof span by 30-50 cm. The distance between the rafters depends on the severity of the roof and its angle of inclination. For sheet roofing materials, you can maintain a size of 150 cm, for slate or natural tiles, you will have to make it narrower - from 100 to 120 cm.
For proper strength, the rafter boards are laid with their end up and cut into the Mauerlat beam. Under the inset, grooves of the same size are cut, slightly exceeding the width of the rafters. A good solution would be to mark the location and size of the cutouts along the entire length of the bar. The slope of the cutouts is exactly the same as the slope of the pitched roof. The wood between the horizontal cuts is cut with a wide chisel.
Step 3: installing the rafters
Laying the rafters into the grooves is a crucial stage in roofing work. It is imperative to maintain a constant slope of each rafter support. Therefore, first, we accurately install the two outer rafter boards, focusing on the laid out walls. Then an auxiliary line is pulled between them. With the help of a fishing line, it is easy to navigate how accurately the rafters placed in the grooves form a single plane. Each board is nailed to the Mauerlat bar with long nails (120 mm or more) in several places.
Step 4: additional hardware and lathing
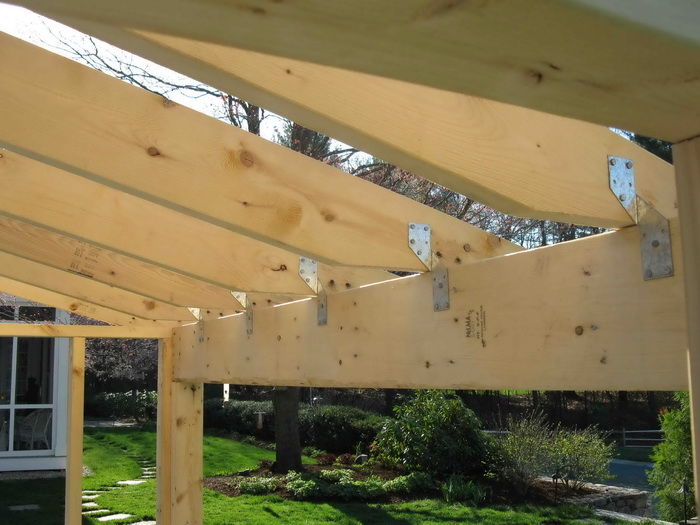
If the span between the walls exceeds 4.5 meters, the rafters are additionally reinforced with triangular supports along the perimeter of the roof or with separate supports in the center attic space... It is very easy to check the quality of such reinforcement - correctly laid rafters should not bend under a load of 70-80 kg (average male weight). The next stages of the roofing arrangement are related to the filling of the sheathing on the rafter structure, waterproofing and thermal insulation of the roof and the installation of roofing materials on it - which is described in detail in other articles of our website.
Alexey Shamborsky, 05/25/2016
Easy to build and cheap in cost, a pitched roof is suitable for a bathhouse, a private house, a gazebo or outbuildings. Simplicity of construction and not very many materials for construction are its main advantages. Do-it-yourself installation of a shed roof can be done by any novice builder. Special qualifications and the use of heavy construction equipment are not required.
Preparatory activities
First, prepare materials with tools:
- boards with a section of 50x150 mm and wooden bars 100x150 mm;
- nails for the manufacture of rafter systems and fasteners for the device of a pitched roof;
- impregnation for wood;
- covering material;
- insulation, polyethylene film for waterproofing and foil vapor barrier. Good insulation - mineral wool 150 mm thick;
- hammer, ax, hacksaw;
- tape measure, level and construction stapler;
- knife and carpenter's pencil.

Choose boards and beams without defects. Treat everything before work wooden parts special impregnation. Further you will get acquainted with step by step instructions direct installation of the roof.
Design and construction of pitched roofs

The first step is to draw up a design project and draw drawings and a diagram. This will help you choose the right angle of inclination of the ramp and perform the necessary calculations. The angle of inclination will depend on the snow and wind load in each specific region. But this roof option is good because it is possible to erect it with an angle of inclination from 3 to 45 degrees. Roofing material also plays an important role in the choice of the angle of inclination. For example, if you sheathe with metal tiles, then the slope will be 14 degrees.
Roof elements:
- rafter system;
- lathing;
- waterproofing and vapor barrier;
- thermal insulation;
- roofing material

You can buy tiles, slate, metal or ondulin. The cheapest is slate.
If a shed roof is being erected on houses in regions with strong winds with your own hands, then careful insulation of the roof and those walls that are in the wind will be required.
Construction stages

1. Installation of the truss system. The main and most serious stage in the construction of a shed roof with your own hands is the installation of the rafter system. Start its assembly by installing the Mauerlat. For these types of roofs, only two 100x100 mm beams can be installed, which are located on opposite sides of the span. The beam should be even and long, set it at a level. It is attached to the load-bearing walls anchor bolts and tightly tightened with anchors.

Next comes the installation of the roof rafters. You don't need to make them very massive. Attach the rafters to the Mauerlat with a corner, sometimes nails are used. Place the rafters in the grooves. Install the two outer boards first, pull a rope between them for accuracy. Nail the planks to the Mauerlat bar. It is advisable to familiarize yourself with the photos and videos presented in our article before work. A crate is also stuffed onto the rafter structure. For it, use beams 50x50 mm, the pitch of the lathing will depend on the roof covering. For a roll coating, a continuous structure is made.


2. Hydro and thermal insulation. If you want to know how to correctly make a pitched roof, then the next stage of work includes the arrangement of hydro and thermal insulation. Lay the plastic wrap horizontally to the rafters on the bars. On top of them, nail the horizontal crate.


Roofs on rafters are insulated with a material of low density, it should not create a large load on the roof. Mineral wool slabs are fixed tightly between the rafter legs.

3. Laying of roofing material. Installation of the cover is carried out from the leeward side. The upper layers are overlapped on the lower ones. The selected roof covering is installed using the appropriate technology. At the end, wind and eaves planks and gutters are fixed, then wall and gable cladding is performed.

We hope that you have learned useful knowledge from our article and now have an idea of \u200b\u200bhow to build a pitched roof. If you do the work carefully and adhere to all the recommended technologies, your house will have a solid roof that will last for more than a decade.
DIY video of the construction of a shed roof
The advantages of a pitched roof include:
- Simplicity of design and low weight;
- Profitability, a small amount of building materials for the roof;
- The ability to erect a roof with a slope angle from 3 to 45 degrees;
- High ability to withstand snow and wind loads depending on the slope angle;
- Most roofing materials are suitable for a pitched roof, which allows you to implement any design solutions;
- On a pitched roof, you can arrange a platform for relaxing or sunbathing.
A pitched roof also has disadvantages:
- It is impossible to arrange a full-fledged attic or attic under a pitched roof;
- In regions with strong winds, full-fledged insulation of the shed roof and leeward walls is required;
With a large snow load on a pitched roof with a slight slope, it is necessary to remove the snow in a timely manner, however, this drawback is easily solved the right choice roofing.
Shed roof structure
A pitched roof usually consists of a rafter system, lathing, insulation, roofing and external cladding of gables and walls. Depending on the type of building, the shed roof rafter system can be of three types:

In addition, pitched roofs can be divided into ventilated and non-ventilated. Unventilated roofs usually have an angle of no more than 5 degrees and require high-quality insulation, hydro and vapor barrier. Ventilated roofs can have any angle of inclination, their feature is the presence of free space between the roof and the ceiling and ventilation holes on both sides of the roof or on the gables. The air gap allows to improve the conditions for the removal of water vapor from the insulation, to extend the service life of the structure.
The slope of a pitched roof is directly related to the roofing used. For soft roof or roll materials use a slope angle of up to 10 degrees, with an angle of inclination from 10 to 20 degrees, corrugated board with a longitudinal profile and a wave height of 30 mm is usually used, slate and ondulin can be laid with a roof slope of 20 degrees, and metal tiles - from 25 degrees. When calculating the roof, it is necessary to take into account this dependence and make a choice in accordance with the purpose of the roof and the selected coating.
Shed roof technology

The construction of a pitched roof, with all its advantages, is not always possible. With a large amount of precipitation, accompanied by wind, as well as a large snow load, it is better to choose another type of roof, gable or hip.
Video - fastening the rafter system for a pitched roof


