Wall cladding technology ceramic tiles - a fairly serious matter, in the process of which all the nuances should be taken into account. Modern tile is a durable, moisture-repellent, protective material that protects the room from various vapors and makes it cozy. Its use is possible in any room, the main thing is to choose the right color and type of material.
Taken in turn with different parcels. Attention! Bituminous tiles can also be covered with copper foil or stone slabs. When installed on the roof, the dirt resembles copper sheet or slabs. However, these are top-notch products, so they are less common.
Roof coverings - comfort and safety
Bring these in place of standard roofing so you don't have to scratch the rest of the cover. The accessories are the same shape and color as the rest of the roof. If it is mounted in accordance with the manufacturer's recommendations, we will not lose the warranty. The second type is accessories.
Tiles of excellent quality, which are perfect for both indoor and outdoor use, must meet these parameters. On the front side of the material, you should not find cracks, chips, irregularities. Conduct a simple test - put two pieces face-to-face. If there are no visually gaps between them, feel free to purchase such a product. Monochrome should not have faded stripes or any spots. On the back side, you should not see cracks or chips.
A home where beauty comes from detail
Lovely sheet metal sheets, but this is dullness - it could be because the sheet is next to it, in the large modern geometric gaps on both sides of the house. In fact, the roof was laid to make its mark on the ceramic roof. There are three balconies - otherwise.
Modular tile
We can buy it in sheets or in small modules. Sheets adjust the roof to fit the roof with a proper cut. Modular tiles don't always require this. Sheets in sheets Depending on the selected profile and roof shape.
One-story house projects
A separate kitchen with a spiral bowl gives you great comfort. Technology and construction of external walls: 24 cm mobile concrete 20 cm expanded polystyrene, ceiling: solid, roof: 30 °, 5 ° and 2 ° inclination, sheet metal, dad.The corrugated surface of the rear part makes it possible to connect it more firmly with the mortar. On the side, each tile should be perfectly flat. A gap between units up to 0.5 mm is possible if the seamless lining method is not used. Before going to the store, decide how many pieces you need to complete the work. Make a preliminary calculation of the dimensions of the surface, decide on an approximate pattern and installation method.
Projects of cheap houses in construction and operation
What are bituminous roofs? They resemble decorative paper with colorful granular sprinkles. They consist of several layers: - a fiberglass base embedded in a bituminous layer; - a layer of bitumen, which, when heated by the sun, undergoes self-vulcanization, clusters of a number of rows of roofs.
Lightning protection roof
However, bearing in mind that a fall can pose a greater risk for homeowners than for a lightweight profile. They are heavy, so the wind has to beat the weight first.
Clinker: colors and applications
The colors used in Poland are roofs and metal plates. It's more like traditional construction, but unmistakable because it works well in modern design... On such facades it is connected with other materials based on color contrast - with cold glass, concrete.Please note that even in a kit that has a first-class product, there may be several defective pieces, so it is best to buy with a margin.
Some units will need to be drilled or cut during the execution of work. No more than 5% of the goods from the entire batch should be rejected. Experts recommend purchasing 7 - 8% more than the amount you need. The variety of manufacturers' products today puts a person in front of a choice. I would like the purchased material to be not only beautiful, but also of high quality. Ceramic is distinguished by its configuration and size. It can be fired once or twice, have an unusual pattern, and be covered with glaze. All types differ from each other in production technology and other characteristics. Let's dwell on the most famous ones. 
Roof accessories: snow protection
They are made of wooden rings with a diameter of about 10 cm or steel with a diameter of about 35 mm. The balls are based - depending on the type of cover - on the roofs of the system with handles or metal hooks.
Removing mosses, fungi and lichens from the roof
Thus, it is only possible to cover roofs previously painted with paint. Bituminous tiles and roofing sheets If the cover is slightly lifted, the roof must be washed several times with water and a mild detergent and left dry.How much will the roof cover?
Replace the peaks and replace them with sheet metal. The sheet metal has a particularly sloping leading edge. When laid on the floor, horizontal divisions are clearly visible, like rows of roofs. In addition, this profiled edge provides greater sealing and reduces the risk of injury, which contractors will no doubt appreciate.
Metlakh tiles are of Italian origin. It is produced in all countries that have the necessary raw materials - carbonate fraction, quarry clays, iron oxides. Covered with a glaze applied to the pink bed. Most often used for. Has increased resistance to mechanical damage.
Cottoforte. The homeland of the material is also distant Italy. Its surface is covered with an opaque glaze. Has high strength and durability. Amenable to double firing during the manufacturing process. Used for indoor flooring. Displaced products that were amenable to a single firing.
What You Should Know About a Ceramic Roof?
Ceramic roofing definitely dominates. As a result, the water drained from the roof does not penetrate into the roof and therefore does not cause dampness inside the roof. Choosing a flat roof forces us to choose between resin, sheet metal and bituminous roof... The pope is characterized by significant qualities.
Fiberglass or polyester mills with mineral spray. Instead of membranes, you can use a membrane specially designed for hard cover. If we decided to cover a flat sheet, instead of paper, we should place a spacer mat. Behind the diaphragm they talk about economic considerations and very much.
Terraglia did not become very popular. This can be explained by the use of high-cost raw materials and the technique of war firing in its manufacture. This product contains fluxes, sand and clay. Has a standard white color, is used for cladding indoor surfaces. In Italy, the production of this material has practically ceased, since porous tiles with a single firing are in favor. Porous with a single firing means processing with a special method of calcination and glaze. Clay containing iron oxides is used for calcination. 
House projects: ready to custom design
Choose between eavesdropping or not. The third step is the choice of materials that we will see on the façade - gypsum, wood, facade panels pierced with stone - and the roof - sheet metal, fiber cement, or concrete shingles. As a result, we get a version of the project with a full description, room plans.
How Poles Are Built - The Most Popular Solutions and Technologies
With a ball. Every third user decides to cover the roof with metal plates or other types. They are mainly used under bituminous roofs and sheet metal, sometimes also under other roofs with slight slopes.
What to look for when buying a roof
Generally, lightweight lids can be used, including sheet and heavy ones, the most commonly used ceramic tiles. Compared to the manufacturer's proposal to cover the sheet and ceramics, these are not only visual qualities, but above all technical parameters.The correct dosage of the constituent components allows you to move from sintered tiles used for outdoor use and flooring to materials with a more porous structure. Porous, obtained as a result of a single firing, on a white mass. It is made by firing calcane on a red base. The resulting utel has a white or beige color. The mass also contains quartz sand and feldspar. This ceramic tile has proven itself well in covering floors inside and outside buildings. The production of tiles of this type for wall cladding is gaining momentum every year. Clinker is a type of product that is resistant to weather changes and impacts. 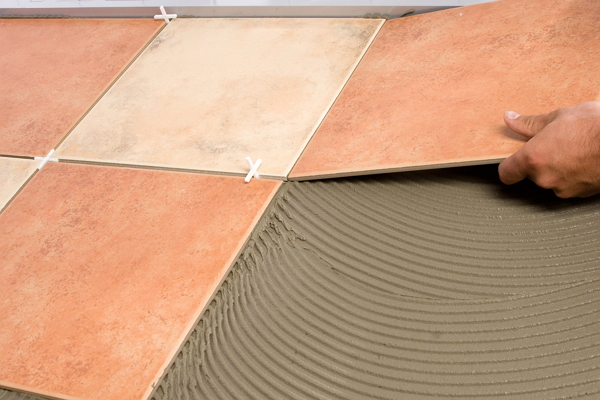
On the roof - dry around the basket and chimney
On roofs covered with bituminous products, usually galvanized or aluminum sheets, ceramic and cement roofs are most suitable for titanium and copper, and the sheet metal is coated with the same color. Replacing broken tools with new ones. For example: arch, dormant and octagonal.
Cool roof repairs: construction, insulation, window and roofing
You have to open the rooftop by removing the rooftop. Different materials can be placed on the old steep roof: ceramic or cement roof, sheet, daddy, everlasting, bituminous shingle and even straw and straw. When the roof is covered with eternal, containing harmful.
The tiles are glazed, unglazed and vitrified. It is used for cladding floors and paths, as well as for outdoor work. It is offered by manufacturers in various formats. Cotto tiles are non-glazed and produced in large formats. It is customary to impregnate all floor coverings from it with a special composition that enhances the washable and color qualities of the material. This impregnation is capable of damaging tiles during frost if applied outside the building. It has warm shades of red, for which it has earned the love of designers and architects. There are examples of the use of cotto tiles for flooring in museums and churches, paving squares and exterior work. This confirms its high quality. 
A good metal plate - how to recognize it?
They help the air flow through the vent under the cover. Large sheets; - 17 ° - if it is a single piece, that is, sheets corresponding to one row of roofs. There is practically no limit to the maximum tilt - it can be up to 90 °. Coated sheets can be used almost anywhere.
Prefabricated roofs - which is better: foil or daddy?
The roof was made with a full house covered with tarpaulin and later with a ceramic roof. Under covers on rigid sheathing, the mantle is usually made of resin paper. It is also often used under a metal plate - under it. This project is elegantly presented with a flawless roof.
Porcelain stoneware on a red base. It is a sintered type of tiles of Italian origin. It is used for laying on the surface of floors, in places where a large number of people walk and a durable, wear-resistant material is required. Tiles with a textured surface are used in places where friction is important. The wide use of porcelain stoneware is explained by its high resistance to low temperatures, durability, wear resistance. Please note - when buying in a supermarket under the brand of porcelain stoneware, sometimes unbaked goods are offered, which are not characterized by the above qualities. The degree of water absorption for such a material should be less than 4%.
The popularity of brick inserts has led to a rise in fashion for loft-style apartments and stylized interiors. Tiles made of bricks or imitation bricks made it possible to get something from the post-industrial climate in new houses and apartments. The huge advantage of such lining also turned out to be that they fit into any type of interiors, and almost everything suits them. They will be accompanied by old furniture and will revive the interior in a sterile, minimalist style. Apart from their aesthetic qualities, tiles also offer other benefits.
During the renovation they can be finished with a beautiful wall - with holes, stains, scratches. They do not require a completely smooth and even surface. The soil must be dry and sound. Another advantage of such a lining is their acoustic insulation. The hard plate will drown out the sound coming from the wall.
Preparing the walls
When you find out the price for the tiles, decide on the amount of material, purchase it, start preparing the walls for cladding. Glazed ceramic tiles are considered the most durable. The smooth surface of the walls affects the installation work. Verticality can be checked using a thread and any weight - a bolt or nut will do. Place the weight on the string along the wall, press down. The thread deflection will show if the wall surface is even. 
Join us and stay tuned. Brick tiles produce clinker and traditional ceramic bricks. They result in the bricks being cut into "pieces". Clinker slabs are available in hundreds of colors and a wide variety of textures, including grooved and embossed. At 1 m 2, about 50 pieces are required. There are also large tiles, stylized as an old, large Gothic brick.
Corner tiles are also available, making it easy to get the illusion that the converging walls are a real wall. These tiles differ from clinker in the same way that clinker differs from ordinary bricks. Therefore, they have a natural brick color and high absorbency. A real rarity - hand-carved ceramic tiles.
Experts apply the level for verification. Mounting material on curved walls is a troublesome and thankless task. This will require more glue, which hardens slowly. If irregularities are found, the wall will have to be leveled. This is done by plastering it with cement mortar or sheathing with drywall, which has moisture-resistant properties. The cement mortar dries for a long time; it will take about three weeks for full strength. It is advised to entrust such work to a professional. Plaster alignment involves fixing profile battens with a distance of up to a meter. Then a solution is prepared, which is thrown out between the beacons. A cement-sand or lime mortar is screed along them.
The brick of destruction turned to tiles
They are shaped and painted to look like old bricks. Tiles are bought at square meters... Some manufacturers also let you buy art. The brick of destruction turns into tiles, cutting them into three pieces. What is considered their natural "patina". A wall that looks like a real old wall. These tiles are bought directly from the companies that make them. They are located in areas of the country where there are no old brick houses, mills, factories, mainly in the west and north.
Plasterboard wall alignment does not require much skill. Unlike the first method, you do not need to wait three weeks before laying, after a day you can start tiling. The walls are treated with a primer. A special glue is applied to drywall sheets. Reliable fastening will be provided by dowels of 6 by 40 format. The verticality of the sheet is checked with a one and a half meter level. The sheets can really be adjusted with dowels. Before laying, the walls are primed. It will help the tile adhere better to the adhesive. 
Companies provide transportation, usually added separately to the price of the tile. You can also pick them up yourself - which is good enough for you to see the item. The seller can also send a photo of shingles randomly selected from the batch so the customer knows what they are looking at. The look and color must be carefully defined so as not to be surprised later. Not all plates look perfect. There will be broken, broken, or scratched.
The more “ideal”, the higher their price. The tiles are glued to the wall of the mortar with clinker mortar or porcelain tiles. For grouting clinker tiles, you must select a grout specially designed for this purpose. For the remaining tiles, it is enough to prepare a solution, which should be mixed with the glaze glue to improve its consistency. The fence between the slabs is done using empty pipes after silicone. It is filled with mortar and compressed by applying mass between the bricks. Of course, you need to widen the hole in the pipe nozzle.
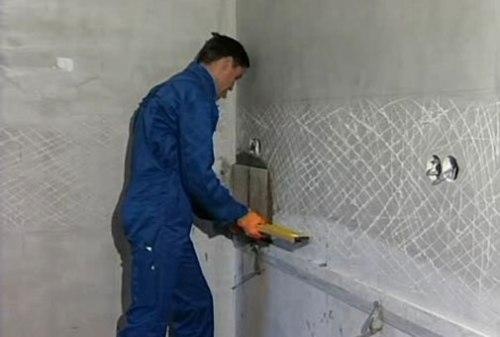
When preparing a concrete or brick wall that has not been plastered, a layer of mortar can be applied. The surface is pre-leveled, cleaned, seams are cut, washed with water. It is recommended to apply the slurry by spraying. Then the solution is wiped with the movements of the rail or a scraper. The panel is treated with a notched trowel. The surface can later be primed, dried and started to be lined.
To get even welds you will also need special plastic squares. The offer includes 20 cuts in a wide range of colors. Ceramic tiles are extremely durable and resistant to weather conditions such as rain, snow or frost and high temperatures.
The tightness of the roof in the case of ceramic tiles guarantees their high quality, deep locks or roofing systems. The weight of the ceramic tile makes it difficult for the wind to blow through. However, if this happens, individual elements will be removed from the roof, not entire sections.
Phased cladding
It is necessary to measure the height for the second row, draw a line along the markers, fix the rule with screws. An aluminum profile is also suitable - a frame is made of it for the upcoming plasterboard sheathing. Usually, the glaze surface of the tile that has a pattern has an arrow on the back. Laying must be done with the edge up - an arrow will point to it. Apply a batch of glue using a notched trowel.
We put the tiles of the first row, setting the distance with plastic crosses. Each tile should be tapped using a rubber mallet to ensure that it is firmly attached to the adhesive. The crosses will help you set the desired width for the seams. Each row can be aligned so that the facing is as horizontal as possible. In a column, the tiles should be vertical so that the straightness of the cladding is not disturbed. It is important to follow the level that is advised to be followed using coated thread. 
Ceramic tiles have been used by people for many centuries to decorate their homes. It has changed beyond recognition during this time, continuing to be one of the most popular finishing materials. The material is not cheap, but it can successfully perform decorative, sanitary and hygienic and protective functions.
The choice of ceramics produced by Russian and foreign manufacturers is amazing. All possible standard sizes, colors, texture options. A material that is difficult to distinguish from genuine leather, fabric, wood becomes familiar. Application of the method of photo printing makes it possible to apply volumetric images to the surface. To implement the most striking and unusual design ideas, the matter remains with the "small" - correctly revet the walls with this wonderful finishing material... This is indispensable for ordinary repairs, when you just need to "refresh" the walls. The technology of wall cladding with ceramic tiles will be discussed.


Packages of ceramic tiles intended for wall cladding are marked with a pictogram with a person's palm.

Calculation of the amount of material
You can calculate the area of \u200b\u200bthe walls and divide by the area of \u200b\u200bone tile of the size that you have chosen for this room. Just? Yes, but the discrepancy with the actual number will be quite significant. It is better to work a little with the calculations, so that later you do not buy in addition or think about what to do with the excess.
We measure the area under the cladding with a tape measure. We pay special attention to the corners in the room. We check them by applying a building corner. Right angles (which are rare in our new homes) - our task will be simplified, there is no right angle - you will need a supply of material for cutting.
Draw a projection of each wall on a piece of paper, marking the places where the tiles will not fit. Draw the position of curbs and other decorative elements... Select the styling option that will be used (traditional seam-in-seam, diagonal, or staggered).

At this stage, it is necessary to ensure that narrow strips of tiles do not have to be laid in the corners. And remember that half of the ceramic tiles in the drawing in life will have to be considered as a whole.
Very important! You cannot do without the obligatory high-quality leveling of the wall. This is not wallpaper that you can reluctantly overlap, but trim or cut a strip in the corners.
Calculated? Feel free to add at least another 10% - for trimming, scrap, correcting inaccuracies in the initial calculations.
Wall surface preparation
Before the start of laying work, the surface of the walls in the room is prepared. Concrete and brick walls we clean from traces of old plaster and dirt. We pay special attention to potholes and irregularities, as well as corners. We fill up all the irregularities with a layer of mortar and try to eliminate the curvature of the wall. The tiles look great on even walls with 90 ° corners.

A rough surface improves adhesion (adhesion) of the material to the wall. Therefore, a finishing leveling layer is not applied to the plastered wall, but on the contrary, small notches are made with a chisel.
Tool for work
For work, we need to prepare a set of spatulas (even, notched, rubber, including a semicircular one for leveling seams), a level, a plumb line, a tape measure, a metal ruler, a simple pencil, a container for glue. A stiff brush and sponge will be needed to grout the joints between the tiles. A tile cutter is required for cutting ceramics, a drill for drilling.

Of materials other than the ceramic tiles themselves, we need special glue, grout for joints, plastic cross-dividers and corners (internal or external).


Tile cutting and drilling
For cutting we use a roller tile cutter, which can be replaced with a good glass cutter for small volumes. Mark a line on the surface of the tile and insert it into the tile cutter, move the handle away from you. We draw a glass cutter along the line, then lay the tiles on the surface so that the part that needs to be cut off does not have support. We take the free edge in the palm and with an energetic movement “bend” it down.
For drilling ceramics, we use special pen drills (the drill has the shape of a spear). We use ring drills or ring crowns if it is necessary to drill large holes.


Important! When drilling, hold the drill horizontally relative to the base (floor). Do not roll in any direction! The drill should be in normal drilling mode. We start drilling at low speed. Having drilled a hole in the ceramics, we change the feather drill to a concrete drill.
When drilling ceramics, wet its surface with water.

Wall covering
We start by drawing markings on the walls. Laying work begins from the bottom, as the current SNiP 3.04.01-87 regulates and suggests common sense. We apply the tile of the first, lowest, row to the wall at the base ( flooring not yet) and draw a flat horizontal line along the upper edge, checking the horizon with a level. We will glue the first row later, after facing the entire wall. A metal profile is attached along this line (below it), which will hold the glued ceramic tile and prevent it from moving down.
Very important! When checking the horizontalness of each row, do not forget to check the verticality, applying a level to the glued tile after every two rows. In case of deviation, we adjust the vertical by the amount of solution.
We use tile glue for work. It will simplify and facilitate the process. In addition, special adhesives increase the adhesion of the wall surface to the tiles. The instructions for diluting the glue are on the packaging.
We begin by applying a layer of glue to the wall and spreading this layer evenly with a notched trowel. The thickness of the adhesive depends on the size of the tile and the characteristics of the adhesive itself. For ceramics of small size, for example, 150x150 mm, the layer can have a thickness of about 5-6 mm. For larger ceramics, the layer thickness increases to 8-10 mm.


Council. Do not dilute large amounts of glue or apply large amounts of glue to the wall. The dried glue will have to be removed and a new one should be diluted.
Experts advise to start gluing ceramics from the center to the edges of the room. To do this, a vertical line is drawn in the center. With this method, the trimmed tiles will be in places where they are not conspicuous. If you have a whole number of tiles in a horizontal row and you don't need to trim, you can start from the doorway or corner.


Place plastic cross-dividers of the required size between the tiles. When the glue sets, we will remove them.

Do not forget to lay internal plastic corners in the corners of the room. The joints of vertical rows of ceramics on two adjacent walls look much better in this case. It is recommended to lay plastic corners over the last row of ceramic tiles, especially if this row is at the level of the eyes of an adult and is clearly visible.
After the glue has set, go back to the first row and glue it. It remains for us to grout the joints. It is advisable to buy grout at the same time as the tile. In this case, it is easier to choose the right color combination. Experts recommend buying tiles and grout in the same color scheme, and using grout in the lightest or darkest shade that is present in the ceramic colors. White grout is considered universal. For the bathroom, the grout can be matched to the color of the plumbing fixtures. In rooms with high humidity, epoxy grout is used.


