Modern technologies do not stand still and are actively developing. Various new ones appear, which quickly begin to enjoy popularity and demand.
These include polycarbonate, which is now actively used not only in construction, but also in mechanical engineering and the advertising field.
Thanks to its many useful properties, among which we can note the low weight, flexibility, strength, a large number.
All this makes it in demand and popular. This material is divided into monolithic and cellular. Depending on its type, a decision is made how to fix the polycarbonate.
For these purposes, various fixation elements can be used, which have both their positive aspects and disadvantages. Each of them can be applied depending on which type is used. In addition, much depends on the purpose for which it serves.
This material, which is a sheet of polymer material, has won the greatest popularity in construction.
There are many reasons for this.
It can be used not only for the construction of any small, private structures, but with all kinds of industrial buildings or large public facilities.
As mentioned above, there are two types of this material - monolithic and cellular.
They have not only significant differences between themselves, but also different ways fastening.
The monolithic appearance of this material resembles glass, but it has less weight, greater strength and excellent shock resistance. This makes it very popular, primarily because of its durability.
It can be used in schools, hospitals. It is very often used for the manufacture of shop windows.
Cellular polycarbonate is actively used for the construction of various ancillary or utility structures in summer cottages and household plots. It is perfect for sheds, greenhouses, greenhouses.
There are two most common ways of fixing polycarbonate - "dry" and "wet". It can also be connected, and then fixed in a special frame, or mounted using all kinds of carved holders.
Let's take a look at the most popular dry and wet fixing methods.
The first option differs in fixation only with the help of various mechanical devices. Very often these are various profiles, complete with rubber gaskets and curly seals. In addition, polycarbonate can be fastened with nuts, self-tapping screws, bolts. It is this method of fixing that is the most accurate.
As an example, consider using self-tapping screws. It is done as follows:
- A hole of the required diameter is drilled in the sheet
- The distance between the attachment points is measured, which should not exceed 0.4 meters
- Self-tapping screws are screwed in qualitatively and strongly, which should be at least 4 centimeters from the edges of the sheet
- If the profiles are one-piece, thermal washers should be used additionally, and if the profiles are split, the method of joining two components is used
- If the sheet is notable for its solid dimensions, the hole for the self-tapping screw should be oval, not round
Fastening to metal
Very often you can hear the question - how to properly attach polycarbonate to metal?
He torments many people who need to perform this procedure.
Let's take a closer look at this mounting method, because it is quite common.
As mentioned earlier, polycarbonate is divided into monolithic and cellular.
Now let's look at how to properly attach this material to metal:
- Use rubber or silicone gaskets during this procedure.
- Handle polycarbonate with care and attention. You cannot remove the original packaging from it, you need to place it so that the grooves are directed downward.
- It is required to prepare the entire necessary tool for drilling and cutting. In addition, you must remember to process the surface itself.
- For cutting polycarbonate, it is recommended to use a special circular one, since a stationery knife and other similar devices are not suitable for this purpose.
- Drills should be selected in advance of the required diameter.
- All measurements must be taken carefully before making holes.
- At the joints, polycarbonate can be connected using special compounds, but it is best to use aluminum profiles for these purposes, which, in addition, need to be sealed with a sealant.
For fastening, it is advisable to use special washers made of thermal insulation material. They are needed not only for fixation, but also look great as an element, creating an attractive appearance.
As we can see, fastening polycarbonate to metal is a rather laborious and responsible process, which is carefully approached. You will definitely need the necessary tools and materials.
In addition, the surface must be properly prepared in advance, otherwise the mount will be unreliable and will not last you long.
Mount to tree

Quite often, polycarbonate is attached to.
This is primarily due to the low cost of this material, compared to metal.
In addition, no special tools are required for fastening.
For example, metal cutting devices or welding machines.
An important factor in using wood is that there is no need to fill the foundation for such a structure.
After all, the weight of such a building is not too great. Most often, sheds, gazebos, greenhouses, which are covered with polycarbonate, are constructed from wood.
These constructions are very popular in and home gardens. Let's look at how to attach polycarbonate to wood in more detail.
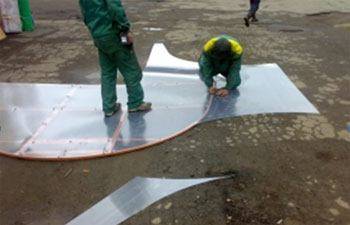
Remember, attention should be paid not only to fixing and cutting, but also to the correct transportation of polycarbonate. Please note that after delivering the material, it should be folded into a clean and dry room. In addition, the factory film must not be removed until it is attached.
Engaged in joining polycarbonate sheets, it should already be on the structure, immediately before fixing. For this purpose, special profiles are used.
Special flexible belts can also be used. But it's best to use both of these methods. First, cover the edge of the sheet with tape, and after that, additionally connect it with a profile.
Do not forget that for a secure and tighter fit you will need silicone or rubber gaskets. They are needed to avoid direct negative contact between polycarbonate and.
Please note that if you are laying this material on the roof of a structure, then you should not walk on it, as this will most likely cause it to deform.
The most popular and reliable method of fastening is the use of bolts or self-tapping screws complete with washers made of thermal insulation material. Remember that the holes must be drilled in advance, before you put the polycarbonate on wooden frame.
It is recommended to do this on a level, firm and clean surface. But the holes in the wooden frame should be made after the polycarbonate is laid. Note that you will need to leave a small gap of approximately 3 mm.
It must be remembered that the wood from which the frame is made must be durable. It should not be wet or loose.
It is advisable to pre-coat it with varnish and apply a special antiseptic impregnation to it. Thus, you can achieve greater longevity of the structure.
Based on the above, we can conclude that the best way to attach polycarbonate to a tree is to fix it with self-tapping screws and additional elements... This is the most reliable and ensures the strength and durability of the structure.
Experience with the use of polycarbonate shows that it is a material that can be used for various purposes. Due to its many useful properties, it is more and more firmly included in human life and is becoming more and more popular.
It is irreplaceable for use as a covering for greenhouses and gazebos, and is widely used for advertising purposes. The main thing, working with it, is to fix it correctly and efficiently, and then an excellent result will be guaranteed.
About the installation and fastening of polycarbonate to the greenhouse is presented in the video:
Found a mistake? Highlight it and press Ctrl + Enterto tell us.
Sheet polycarbonate is one of the most convenient materials used for the construction of greenhouses, sheds, canopies and other various extensions to the house. It owes its popularity to a whole range of beneficial properties: durability, strength, heat resistance, as well as the ability to transmit light and retain heat.
For polycarbonate structures to be truly durable, it is important to know how to properly cut and drill sheets, as well as how to fix polycarbonate to a canopy. This is not a difficult job, but you need to know a few technical details.
Types and features of polycarbonate
Polycarbonate comes in two varieties:
- Monolithic. It is actually organic glass with increased strength. It can be used for greenhouses and greenhouses, but it is not the only application.
- Cellular. These are special sheets with internal cavities that significantly increase the thermal insulation properties.
This material, unlike ordinary glass, does not break, it is very difficult to damage it. It can be of any color, therefore it has beneficial decorative qualities.
This allows it to be used in the production of arches, canopies and canopies, since it effectively blocks solar heat at a sufficiently high translucency. Such a canopy will not shade the area too much, while it will become a reliable shelter from rain and sun.
Knowing how to properly cover the canopy with polycarbonate, you can create a pleasant recreation area on the site, build a shelter for plants or equip a place for guest parking. Every year this material is becoming more and more in demand in suburban construction.
Basic rules for working with polycarbonate
This polymer material is quite easy to use if you know and follow the main rules for working with it. It is necessary to observe safety precautions when cutting and know how to properly lay polycarbonate on a canopy. In work, the following basic rules must be observed:
Compliance with the basic rules and requirements allows you to simplify the work with polycarbonate and get the best result. This is not too capricious material, and you can learn to handle it correctly very quickly. Beautiful and even sheets can be used as decoration for outbuildings, they will become a harmonious part of the interior decoration of the site.
Rules for fixing polycarbonate sheets
How to cover a canopy with polycarbonate? The frame for fixing polycarbonate can be made of metal or wood. Greenhouses, large sheds and canopies to the house most often have a metal base, steel tubes require mandatory anti-corrosion treatment.
A timber frame made of lumber or plywood can be used for small structures that will not be subject to significant stress. The elements of the metal frame are connected by welding; self-tapping screws are used for the wooden one.
How to properly screw polycarbonate onto a canopy? Fastening of sheets can be carried out in two main ways:
A special end profile must be installed on the edges of the sheets: it is designed not only to protect the sheet from moisture, dust, insects and various debris from getting inside, but also to give the structure an aesthetic complete look.
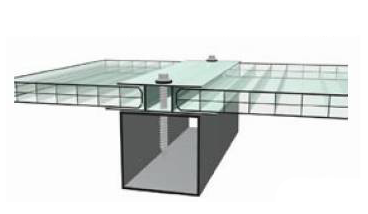
Fixing rules using an H-shaped profile
This type of fastening is used for large structures, for example, it can be used to erect a carport for parking a car. The H-shaped profile ensures the most tight connection of the sheets: it closes and seals the gaps between the sheets, and thanks to the pitched or arched structure, rainwater and snow will go away along the sides of the canopy, which will protect it from overload.
The H-shaped profile is available in several varieties:
Fastening with profiles is considered a "dry" method that can be used at any time of the year. Polycarbonate does not lose its properties at low temperatures, and work on installing canopies can be carried out in spring and autumn.
However, there is also a “wet” installation method: elements of canopies and other structures can be attached using a special polymer putty, after which all joints must be treated with a sealant. This method makes it possible to save on the purchase of profiles and at the same time get a fairly strong structure.
Making a polycarbonate canopy attached to the house
A polycarbonate canopy is a profitable solution for any building: it can become an analogue of a mini-veranda, convenient for placing plants, benches, sun loungers, such an extension requires a minimum of work on arranging the foundation, and it can be built with minimal costs. Before starting construction, you will need to correctly calculate the dimensions and think over the placement of the frame. If the house is built of wood, a lightweight canopy based on a wooden frame will be the most appropriate solution.
How to properly cover the canopy with polycarbonate, the following step-by-step instructions can show:
- The first step is calculation and design. Support pillars are located at a distance of 1.5 meters from each other, for a strong canopy, you can choose polycarbonate sheets 6-10 mm thick.
- Foundation construction. For it, you need to prepare pits 60 cm deep, which are filled with concrete. After the mortar has dried, metal angle brackets are attached to it, and the pillars are installed using a bolted connection.
- The transverse beams of the attached canopy can be installed on special metal brackets, or you can place a transverse beam on the wall, on which the frame attached by the corners will rest.
- When the base is ready, polycarbonate can be attached to it. For a wooden frame, the easiest way is to use self-tapping screws with thermal washers: fasteners are usually purchased separately, and you need to calculate correctly required amount fasteners. An H-shaped profile can be installed at the joints, and if this is not possible, the joints are connected using an aluminum tape that prevents moisture from entering.
The frame consists of bent and cross beams: bent arched frame elements can be made of plywood, and a strong beam is used for the cross members. It must be remembered that all elements of the frame must be pre-treated with antiseptics to protect against rotting and pests.
It is problematic to independently calculate the load on the frame, so you can either find ready-made drawings or order a calculation from professionals. Engineering mistakes are very expensive, so it's best to take care of a professional design. Then the canopy will be durable and safe, and it can be used both for a children's playground and for parking a car.
Advantages of a polycarbonate canopy
Polycarbonate canopy is not too expensive solution: the sheets themselves are relatively cheap, wooden or metal carcass you can also purchase at minimal cost or make all the elements yourself from materials left over after repairing a house or summer cottage. Fasteners can also be purchased without problems, and as a result you can equip your home with a convenient and practical extension.
The area under the canopy can be designed in different ways. The simplest solution is to remove the top layer of soil and anger the space with concrete. Once dry, you will have a solid and level area that can be used to park your car.
Another common solution is paving slabs: an intricate pattern can be laid out on the site, and an arched or pitched canopy will reliably protect the tiled carpet from precipitation. To make it as durable as possible, a curb garden stone will need to be laid along the edges of the site.
Despite all the difficulties, a polycarbonate canopy remains the most common solution for giving or country house... Almost every homeowner can build it with his own hands.
JavaScript required or player update required!
Increasingly, glass structures during construction are being replaced by structures made of polymeric translucent materials. This is facilitated by a number of properties that they are characterized by: low weight, high strength, affordable cost, and the like.
Polycarbonate - cellular and monolithic
The material is based on carbonic acid polyesters and is widely used in industry. It belongs to the category of thermoplastic plastics - this means that products made from it are characterized by some thermal expansion. Highest value - this parameter has for construction.
Polycarbonate has very high consumer properties.
- Strength - sheet products made of it are 20 times stronger than silicate glass. This allows the material to be used for glazing large, including industrial, facilities, as well as to erect independent structures with and without a frame.
- Density - ranges from 0.58 to 1.3 kg / sq. m.
- Fire safety - polycarbonate, in contrast to the acrylic analogue, belongs to the group of non-combustible substances.
- Thermal insulation - polycarbonate, especially cellular polycarbonate, is characterized by high thermal insulation properties. The lightweight frame construction of the greenhouse does not need special insulation. The photo shows an example.
- Light transmittance - fluctuates in the range of 7586%, which allows you to organize a high level of illumination in a greenhouse or any other structure.
The material is available in two forms.
- Monolithic - in the form of a one-piece panel without cavities. It has the highest impact strength and toughness and is used for the construction of load-bearing floors.

- Cellular - characterized by excellent thermal insulation properties, due to the structure - the presence of cavities between the stiffeners. Panels can be composed of two, four or five sheets. Polycarbon is in itself a good heat insulator, and the air gap formed in the honeycomb enhances this property.
The widespread use of both monolithic and honeycomb products in construction is ensured by both the quality of the material and the ease of installation.
Fastening polycarbonate to wood
A distinctive feature of the polymer is thermal expansion, that is, the ability to change volume under the influence of temperature. On average, the indicator reaches 2.5 mm / m, which should be taken into account when fixing the panels.

Obviously, this feature requires a non-rigid attachment. To do this, it is recommended to drill holes for fasteners in advance, when it comes to point fixation, and apply additional techniques during installation.
- Installation of a monolithic product on a tree is carried out "wet" and "dry". "Wet" involves the use of polymer putty. The latter is applied along the perimeter of the frame or a fragment of the sheathing, then the panel is laid on top, pressed down, and excess grease is removed. The next panel is located next to each other so that there is a gap of 2 mm between them - an overly tight connection will cause deformation. The joints are treated with silicone sealant. To increase the aesthetics of the junction, you can use wooden or plastic strips.
- The dry method uses an aluminum profile with a seal.
Drill holes for bolts in the honeycomb panel before installation on wood. Moreover, its diameter should be slightly larger than the diameter of the leg, since the material should be fixed loosely. The holes are made no closer than 4 cm from the edge of the panel and always in the cavity between the ribs. The panel is placed on a wooden batten and bolted. There is a washer under the head of the bolt. When fastening to a wooden beam, it is allowed to use a regular washer and stainless steel screws.

The video shows the installation process of polycarbonate panels in more detail.
Mounting on a metal frame
The above "wet" method is perfect for bonding material to metal. Either polymer putty or rubber gaskets are used.
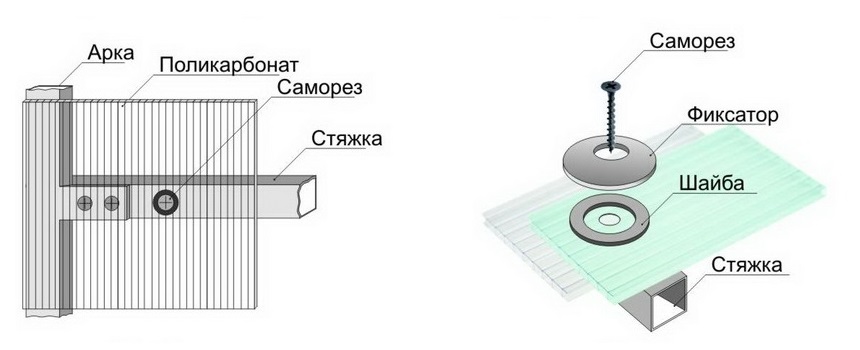
In order to fix the cellular panels to metal, special fasteners are required - a thermal washer. The latter consists of the washer itself, a silicone gasket, a leg, the length of which is equal to the sum of the thickness of the gasket and the honeycomb panel, and the cap. When fixing, a self-tapping screw is inserted into the hole of the thermal washer and twisted. The leg of the washer rests against the frame beam and prevents the self-tapping screw from sitting too tightly. At the same time, the gaps required when the volume of the sheet increases under the influence of temperature. Above the screw is covered with a cap.
Thermal washers are available in both transparent and colored.
Installation of polycarbonate plates using a profile
This method is equally effective for monolithic and honeycomb products. For its implementation, a connecting profile and the actual fasteners are required.
- One-piece profile - selected in accordance with the sheet thickness. The complete set may include rubber seals - for monolithic products it is preferable to choose this option. The panels are fixed in the grooves of the profile and placed on the crate. The connecting profile should be fastened to the longitudinal beams with self-tapping screws with a thermal washer.

- Detachable - consists of two parts - a base and a snap-on cover. In this case, the base is first fixed to the beam with self-tapping screws, then polymer panels are laid - with a gap of 3-5 mm. The cover is placed on top of the profile and snapped in length.
Installation of polycarbonate panels on forged gates
Structurally, the installation of sheets, both monolithic and honeycomb, on forged gates is no different from installation on metal. The point is this: the product that bears this name is actually a transparent gate with forging elements. This means that polycarbonate should be installed on a metal frame on one side, while forging elements will be located on the other.
Depending on the design of the forged gate, it may be necessary to pre-cut the sheet, if, for example, partial overlap of the gate area is expected, or when the ceiling element has a curved shape.

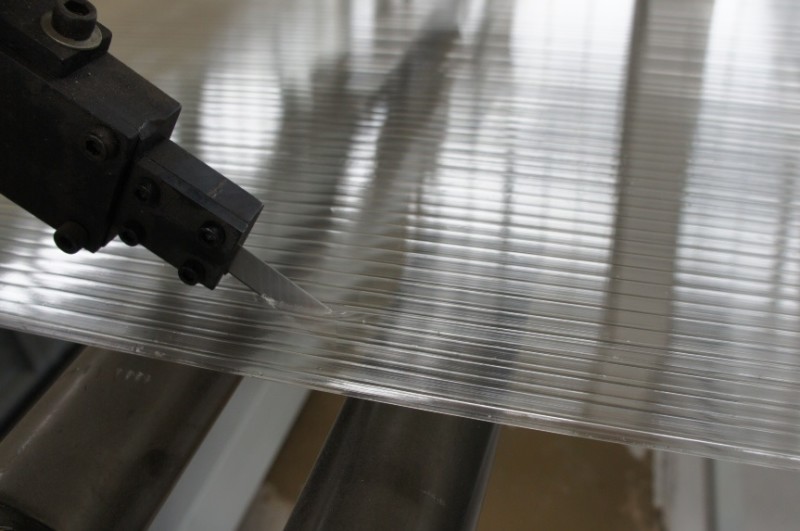
Cutting polycarbonate with a circular saw at a high enough speed so as not to damage the panel.
Fixation of monolithic products on forged ones is made with polymer putty, and cellular ones - with self-tapping screws with thermo washers. The use of profiles in this case is undesirable. In the photo there is a gate made of polycarbonate with forging elements.
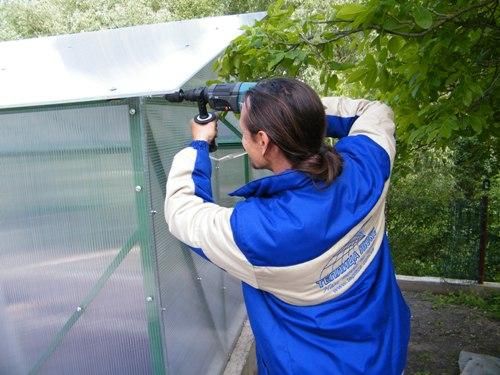
Installation on the greenhouse frame
For greenhouses and greenhouses, both wooden and metal crate are used. Both options have their pros and cons, but, as a rule, greenhouses designed for use only in the spring-summer period have a wooden frame, and those that operate year-round have a metal frame, as they can withstand a higher load. Cellular panels are more often used, since they are characterized by lighter weight and better thermal insulation performance.

The panels are fixed based on the material of the greenhouse frame.
- Wooden - fixation is made on stainless steel screws with ordinary washers. The step is 30-40 mm. At the same time, it is necessary to pay attention to the fact that at the junction of the panels between themselves there is a technical gap of 3 mm. Installation is also possible using a connecting profile. If we are not talking about a very large object, then the choice is made on the basis of financial capabilities.
Correctly performed fastening of polycarbonate to a tree is an indispensable condition for the construction of a wide variety of fast prefabricated structures, starting with light sheds and ending with summer cottages.
It would seem that it could be easier - leaned the sheet against the frame and fixed it with self-tapping screws! But in fact, everything is somewhat more complicated, since improper installation can lead to a reduction in the operational resource of the entire structure and to damage to polycarbonate.
In this article, we will talk about how to attach polycarbonate to a wooden frame and what improper conduction can result in installation works.
The topic of the article is relevant today as never before, since it is this sheet material that is the most affordable and easy-to-use solution for arranging light quick-assembly structures. But, despite the wide selection of these materials on sale, not everyone knows how to install them.
Features of the operation of sheet polycarbonate on lumber frames
The main feature of monolithic or cellular polycarbonate, which must be taken into account before starting installation work, is deformation during heating and cooling ().
In fact, when heated, most of the various substances expand, regardless of their consistency and configuration. But temperature changes have a particular effect on polymer sheet materials.
Therefore, starting the installation, it is necessary to prepare those fasteners that will allow you to withstand the expansion gap between the sheet material and the frame surface. As a result, during the operation of the structure, the polymer coating, heating up from the sun, will not crack and will not go in waves.
As already mentioned, polycarbonate can be monolithic or cellular. Both the one and the other modification of polymeric materials are elastic, but they tend to crack when heated. In addition to the expansion gap, to prevent cracking, it is necessary to correctly orient the sheets relative to the frame and cut them correctly.
So, after we found out what you need to know when installing polycarbonate on a wooden frame, we will decide what tools we need.
Selection of tools and related tools for installation work
The following tools and devices will allow us to perform the installation correctly:
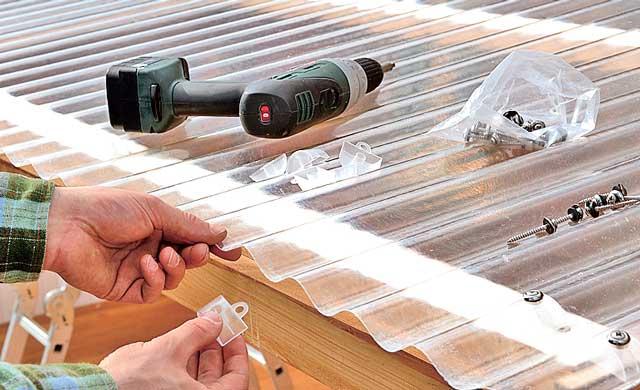
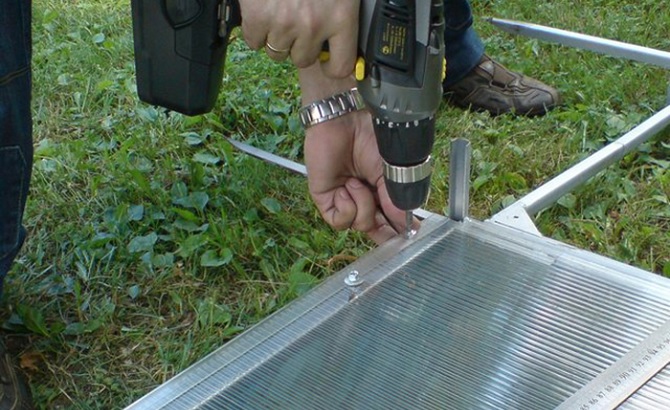
- screwdriver with drill function and drill with a diameter of 1 mm;
- self-tapping screws for mounting sheet material;
- ordinary washers or special thermal washers (the price of which is slightly higher) to perform an expansion gap;
- connecting profile with which you can connect adjacent polycarbonate sheets.
Features of orientation and cutting
In order for the installation of cellular polycarbonate on a wooden frame to be successful, you need to be able to correctly orient and cut the sheet.
- Correct orientation is more related to honeycomb modification, since these products have special stiffeners... As a result, cellular polycarbonate can be bent, while the monolithic counterpart is installed unbent.
Orientation honeycomb sheets performed in the direction of the stiffeners. Placing the sheet against the direction of the stiffeners can cause the material to crack.
In addition, if condensation accumulates in the honeycomb cavity, moisture removal, with proper orientation, will occur by itself. If the sheet is curved across the stiffening ribs, the water will stagnate, which over time will lead to darkening of the initially transparent sheets.
- Correct cutting is also very important, as it allows you to shape the sheet material to the desired shape without deforming the edge.
It is best to use circular saws with fine-toothed circles for cutting. The circular saw at high cutting speed provides a smooth cut that does not require additional processing. If a special circular saw is not available, you can use a grinder with a disc for cutting wood.
Installation work
After we have figured out how to cut and orient sheets of polymer material, we will decide how to attach cellular polycarbonate to wood.
The installation instructions are simple and you will probably cope with the task on your own without involving qualified specialists.
- At the first stage, we assemble a lumber frame. The assembly of the frame directly depends on what is planned to be built, whether it be a fence, a gazebo or just a summer cottage.
At this stage, it is important to select and arrange the lumber so that their edge, to which the polymer sheet will adhere, is as even as possible and does not have significant bends.
- At the next stage, we remove the dimensions from the frame and transfer them to the sheet to be cut.
- After the dimensions are indicated on the sheet material, we proceed to cutting. When cutting polycarbonate, we must use personal safety equipment (goggles and gloves).
Important: If a fence is to be built, we cut the sheet so that the stiffeners are located vertically.
Important: We screw the self-tapping screws so that a gap of 1 mm remains between the washer and the surface of the sheet. This will just be the expansion gap, which will prevent cracking and damage to the material when heated.
- At the final stage, polycarbonate panels are sealed (relevant only for quick-assembly roofs).
The ends of adjacent sheets are sealed with a special self-adhesive tape with an aluminum surface. The transverse ends of the sheet cannot be insulated with tape, since condensation must flow out through the holes.
Conclusion
Now that we know how to attach polycarbonate to wood, you can purchase necessary materials and apply them as planking.
As already mentioned, the installation instructions are not particularly difficult. But in order to cope with the task it was easier, we recommend watching the video in this article.
Transparency of glass and strength of metal, lightness and flexibility, resistance to temperature extremes (- 45 - + 120 g.), Environmental safety, durability (up to 20 years) - these are the qualities of polycarbonate that make this material so popular.
The range of its application is wide: flat, arched and domed roofs, awnings, canopies, acoustic barriers, stair railings, advertising structures, greenhouses, fences, etc.
Panels orientation
The stiffeners are oriented along the length of the panel.
Maximum structural strength is achieved when the hollow channels are located:
- when the panel is installed vertically - vertically;
- in curved structures - parallel to the bending line;
- in inclined - in the direction of the slope.
For external structures, polycarbonate is used, on the outside of which substances are applied that protect it from ultraviolet radiation. The corresponding information is printed on the protective film. To position the panels correctly, installation is carried out without removing the top film.
Tilt angle
On flat roofs, the angle of inclination should be at least 5 degrees or 90 mm in the direction of the water flow. For a length of more than 6 meters, the slope should be increased.
Bending radius for arched structures
Theoretically, it cannot exceed 150 thicknesses of the used panel.
In practice, it is advisable to refer to the manufacturer's instructions or the marking on the protective film.
Cutting polycarbonate
Ensure that there is no vibration when cutting.
After cutting, it is imperative to remove the chips.
Drilling holes
The place of drilling is between the stiffeners. The distance from the edge is at least two drill diameters.
Drill:
- Sharpening angle - 30 degrees;
- Drilling angle - 90 degrees;
- Drilling speed- up to 40 meters per minute.
- Feed rate - up to 0.5 mm / rev.
- Hole diameter make 3 mm larger than the diameter of the fastener.
- During drilling periodically remove chips and cool the drill.
Panel end sealing
Before sealing remove temporary tape, which protects the ends for storage and transportation.
Upper ends they are sealed with continuous adhesive aluminum tape, and the lower ones are perforated. If the end does not go into grooves or other profiles, it is closed over the tape with an end profile. Holes are drilled in the lower profile in 30 cm increments to drain the condensate.
In arched structures, both ends are sealed like the bottom.
Fastening cellular polycarbonate to metal
Self-tapping screws with a drill are used stainless steel or with galvanized tip. It is imperative to use rubber washers for sealing or thermal washers.
Fastening is done in steps of 400 - 600 mm.
The self-tapping screw is twisted strictly perpendicular to the plane. In this case, it is important to prevent deformation by excessive pressure.
Fastening solid polycarbonate
"Frame" mount
A frame made of metal, plastic or wood must have grooves 25 mm deep.
The larger the length, the larger the inner frame size:
Fastening in the frame is carried out in two ways:
- "Wet" - with the help of polymer putty and silicone sealants, with which the edges of elements and seals (profiles or gaskets) are processed. Suitable for frames made of wood and metal.
- "Dry" - using self-tapping screws, press washers, screws, bolts and nuts. It is imperative to use a sealant - a plastic profile or a rubber gasket that does not contain plasticizers. Do not glue the seal to polycarbonate.
The step of fastening is 50 cm. The distance from the edge is at least 2 cm.
Fastening to supports or battens
With a large area carried out with the same fasteners.
For small structures it is possible to use polyamide glue and even double-sided tape. For outdoor use, weather-resistant silicone glue is used.
On demand with increased transparency, it is better to use polyurethane-based glue. Before gluing, the surfaces are degreased with isopropyl alcohol.
Types of polycarbonate fastening
Point
Fasteners are made thermal washers directly to the frame, which is made taking into account wind and snow loads. Length and width are not limited in this case.
Fixing step - 300 - 400 mm.
The disadvantage is violation of the aesthetic appearance from the inside of the room, since the connecting profiles do not always coincide with the frame.
Profile
Attached to a metal frame aluminum or polycarbonate connecting profiles, and the blanks are already embedded in them.
The length is not limited, and the width is 0.7 or 1.05 meters (the result of waste-free cutting in 2 or 3 parts in length).
Disadvantage: when the design loads are exceeded, the panel, fixed only along the perimeter, can come out of the grooves.
Mixed
This is a combination of the first two types to compensate for their shortcomings.
Polycarbonate fixing accessories
- Profiles: end, connecting, corner, wall, ridge.
- Thermal washers, mini washers.
- Plugs.
- End adhesive tapes (continuous and perforated).
- EPDM gasket for profiles.
Profiles
- End - for framing the edges. A short shelf is placed outside.
- Connecting (detachable universal and solid H-shaped) - allow you to connect the edges of the sheets. Only split profiles can be attached to the frame.
- Corner - mate elements at an angle of 90 degrees.
- Wall mounted - provide an airtight abutment to the wall, at the same time performing the functions of an end profile.
- Skating - are used to decorate the ridge of the roof and to mate elements at an angle of more than 90 degrees.
Thermal washers
By design:
By material:
- Stainless steel.
They are used for large areas of coverage, in areas with strong winds. The most durable and durable in terms of service life. - Made of polycarbonate.
The design ensures tightness of the connection without damaging the surface. Durability - up to 20 years. Thermally stable. They can be monolithic or collapsible. They have a wide range of colors. - Made of polypropylene.
The most economical in terms of cost. The service life is up to 4 years. Applicable only in indoor areas or in the shade.
Mini washers
They are used in interior design where thin polycarbonate is used.
Plugs
They cover the ends of the profiles, preventing dust, moisture, insects from entering them. Provides an aesthetic appearance.
Thermal resizing of polycarbonate
Payment The linear change can be calculated by multiplying the length or width in meters by the number of degrees and by the coefficient of linear thermal expansion (0.065).
Colored sheets heat up 10 to 15 degrees more.
For example: a transparent sheet 1 meter long with a temperature difference of -30 to + 30 degrees will change its size by 3.9 mm, and a colored sheet by 4.88 mm.
Therefore, you should definitely:
- leave gaps when attaching and connecting panels;
- drill holes 2-3 mm larger than the diameter of the fasteners;
- use thermal washers;
- use special connecting, ridge, corner profiles.
General installation rules
Storage before installation
Protective coatings
Are not deleted during transportation, storage, sawing, drilling and installation. They are removed immediately after completion of work.
Immediately after cutting the film is removed from the edges, the chips are removed and the sealing is carried out.
Materials that do not destroy polycarbonate
- polyethylene;
- polypropylene;
- polychloroprene;
- teflon;
- neoprene;
- silicone.
Materials not compatible with polycarbonate
- polyvinyl chloride;
- polyvinyl nitrile;
- polyurethane;
- acrylic sealants;
- amine or benzamide based sealants.
Frame
When developing a frame project, take into account:
- wind and snow load;
- thermal deformation of panels;
- direction rainwater runoff;
- admissible bending radii;
- size used sheets taking into account economical cutting;
- the edges of the sheet along the long it is better for the side to rely on supporting supports;
- installation step longitudinal supports - 700 mm, 1050 mm plus thermal gap between panels;
- bearing thickness beams must be at least 30 mm for attaching the connecting profiles;
- before installation the frame is painted white or very light color... It is advisable not to allow direct contact of polycarbonate with metal, using rubber gaskets with a diameter of 30 mm and a thickness of 3 mm.
The approximate pitch of the lathing for a flat structure (without taking into account the angle of inclination and climate features):
The approximate pitch of the lathing for an arched structure (excluding geographic location):
Temperature accounting for installation work
In temperature in the range from +10 to +20 degrees, polycarbonate does not undergo thermal expansion. This is the best mode for editing.
In hot weather, the gaps between panels and connecting profiles are reduced to a minimum, in cool weather, they are increased to a maximum.
Moving on the mounted surface
Supports with a length of at least 3 meters, a width of 40 cm, covered with a soft cloth are used.
Cleaning polycarbonate after installation
If after removing protective film from cellular or molded polycarbonate, it is necessary to clean, use a mild neutral detergent, warm water and cotton fabric. Rinse with cold water and remove water droplets with a dry soft cloth.
For large areas processing is applied by machine washing. Stubborn dirt is removed with isopropyl alcohol.


