This article will be useful to those who are going to buy new apartment and faced a new trend in heating. Very often in new buildings, they began to leave the traditional risers supplying the coolant (hot water) to the batteries, and use a gasket plastic pipes right in the floor. Many are scared off by this decision, since it is not known how durable and practical it is. After all, there is no direct access to the pipes, check their condition and notice the leak in time - too. An article about the advantages and disadvantages of such a solution.
I'll start right away with the fact that the rejection of risers and routing of pipes to radiators on the floor is absolutely justified and has a number of advantages. You should not be afraid of such heating systems. Firstly, such a solution allows you to install a heat meter for heating and pay for heating not according to the standard, but according to the actual consumption. For example, when it gets hot in the apartment or when you are away for a couple of weeks, you can turn off the heating and not pay for it. For example, I have had months in the winter when in January or December there was a sum of one hundred rubles in a ticket for heating. With a conventional heating system through risers, it is technically impossible to install a heat meter. The fact is that in the case of floor wiring, there is only one central riser, which is located at the entrance, and from it the heating radiates through the apartments. That is, the heating is door-to-door. A heat meter is installed on the outlet from the riser. In the case when each battery has its own riser, it is impossible to install a heat meter, since there are several risers in the apartment and, more importantly, the coolant goes flowing from floor to floor, which makes it impossible to calculate the amount of coolant spent on heating specific apartment. This implies another significant plus of the heating pipes in the floor - if necessary, you or your neighbors from above (below) can turn off the heating of only your apartment in the event of an accident or repair, without prejudice to others. While in the standard version you will have to cover the entire riser from the first to the last floor. Moreover, in order to close the riser, you will have to notify the management company (ZhEK), while with apartment heating, this is not necessary - just go to the staircase of your floor and turn off the tap.
Another significant advantage of the system is its maintainability. The service life of heat-resistant plastic pipes is twice that of conventional standard pipes in risers. In the event that it is necessary to replace the pipe, the floors will not have to be opened. It is precisely this moment that frightens off many. A stereotype works: if the pipe is in the floor, then sooner or later this floor will have to be broken to replace the damaged section of the pipe. Not at all. All pipes running in the floor are laid in a special corrugation (SNiP requirement), so that the damaged pipe is replaced without opening the floor.
Also, the advantages of such a heating system include the fact that the pipes running through the floor heat the floor. In addition to hot radiators, we get warm floors. Warm-up is especially felt if the floor covering was used floor tiles (for example, in the kitchen). Floor heating is, of course, uneven - only where the pipes pass. But you won't have to pay extra for these "warm floors".
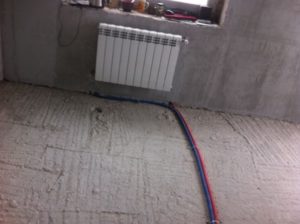
Well, the last, probably the most obvious, advantage will be that there are no risers in the apartment that must be hidden or put up with the fact that they will spoil the appearance of the room. Indeed, in the case of the floor wiring of the pipes supplying and discharging the coolant, we only have the radiator in the room, the pipes from which go to the floor.
The only drawback of the system is the possibility of its damage in the course of some renovation works... Drill the floor with sufficient care. Of course, when installing flooring, be it laminate, tile or carpet, this is not required. But there is work related to the device of sliding wardrobes, door sill devices, when it becomes necessary to drill the floor. But, firstly, the pipes lie at a certain depth (at least 4-5 cm), and secondly, in the management company you can ask to give you a pipe layout diagram in the floor in order to know exactly where these pipes pass (such schemes should be there) ... And thirdly, in the worst case, if you nevertheless damaged the pipe, its replacement will take place without opening the floor.
Also, many are afraid that a pipe laid under the floor may spontaneously leak. This is practically impossible, since before pouring the floor into the pipes, water is supplied under a pressure of 12 atmospheres (the operating pressure during the heating season does not exceed 6 atmospheres). And only after checking the pipes for leaks, the workers begin to fill the floor. Another thing is how well the organization complied with the work technology. In any case, the organization that carried out the work is responsible and carry out the repair, if anything, will be at its own expense.
In my opinion, the advantages of a floor heating system for apartments still far outweigh one single disadvantage, which I described just above. But the final choice is yours. I hope this article was helpful to you. When copying an article or its parts, a link to the original source and the author is required.
Often the concept of "heating" is associated with cast iron radiators, which used to be in every apartment. Such radiators long time warmed up, but kept warm in the house for a long time, and functioned, in general, it was not bad, the only negative by and large is the unprepossessing appearance.
With the advent of new materials and technologies, everything has changed. Nowadays, the underfloor heating system has become a worthy replacement for old heating radiators, for which the heating line is mounted in the floor. Today, all new buildings are equipped with such structures in the floor.
Having made the decision to lay the heating pipes in the floor under the screed, it is necessary to decide what type of pipes will work reliably for a long period. This decision at first glance seems quite simple, but practice shows that it depends on many factors.
 Why laying heating pipes in a screed is called the right choice? After all, there is an easier way out - it is replacing the batteries. Yes, this is easier to do, but it does not mean more efficient than this arrangement, because the laws of physics have not yet been canceled.
According to the principle of operation, heating systems are completely different. Traditional radiators give off heat. It then passes along the walls into the ceiling area. It turns out that it is the ceiling zone that first warms up.
After that, the air moves to the lower region, but it gets here already cold. Thus, the following situation is obtained - in the area of \u200b\u200bthe ceiling it is warmer, and below the temperature is much lower. The same is true with the convection principle.

And laying floor heating changes everything. The maximum heat is located at the bottom, and then, cooling down, goes to the upper part. This principle of heat distribution greatly improves the comfort of the home. Accordingly, such a system seems to be the most effective.
Floor heating: advantages and disadvantages
Before hiding the heating pipes in a concrete screed, it is necessary to study in detail all the pros and cons that it demonstrates this system heating. They should not be ignored, because this will guarantee that finances will be invested wisely.
Consider the benefits of a floor heating system.
- Long period of use.
- Uniform heating level.
- System in concrete pouring the floor is distinguished by cheaper content compared to the classic options.
- Easy maintenance.
- No moisture.
- Economical use of space.
- Complete safety (installation of the system in a concrete screed avoids child injuries and burns from hot pipes).
- The required humidity rate is constantly maintained in the air.
There are not many disadvantages of the network under the screed, but you need to familiarize yourself with them.
- First of all, when laying the heating line under the screed, the height of the room is reduced.
- Repairing pipes is not as easy to carry out as in classic cases, because it is not easy to find a leak in a hidden line.
- Installation in specific places will not work. These include a flight of stairs, etc.
IMPORTANT! These buildings in mansions are carried out without restrictions, and the apartment will require a different approach. IN apartment buildings you need to make sure that the central network can handle the high hydraulic load.
The disadvantages must be carefully studied, and one must be prepared for the fact that sooner or later the heating in the screed may leak. Do not forget that it is not easy to detect a leak on a pipe in such structures.
And once the leak has been identified, the repair will not be easy. Therefore, it is important to approach work with full responsibility.
What types of materials can be used and what not
Before making a screed, you need to find out which heating pipes from which materials will be most suitable for installation in the floor. There are many options - you can choose copper products, you can stay at such an inexpensive and practical material like plastic, which, if properly installed, will work "one hundred percent".
It is also worth paying attention to metal-plastic products. Which one is better to choose from? In order to answer the question posed, we will consider pipes from the listed materials in more detail.
Pipe products for laying in the floor must have the following properties.
- High strength index.
- Resistant to corrosive formations.
- Impermeable to oxygen, which causes corrosion of steel parts of the heating network.
- Good heat dissipation.
- Small coefficient of expansion.
- Environmental friendliness.
The listed requirements for laying in a floor under a screed are fully met by an assortment of the following materials - polyethylene, polypropylene and metal-plastic.
Polyethylene pipes and other types of pipes that are used in a screed have pluses and minuses, therefore, before you hide them and make a screed, you need to study each material thoroughly.
 Polypropylene pipes for laying in a screed compares favorably with low cost. However, these products are not widely used. The reason is that polypropylene pipes hidden in a screed have a number of significant disadvantages.
So, the polypropylene (PP) assortment is distinguished by an eight-diameter bend radius. When laying a polypropylene floor heating system, this affects the distance between adjacent branches of the line.
If the diameter of the polypropylene line is 15 mm, then the branches are separated from each other by 120 cm, which will have a bad effect on heating the room. It is also possible to mount a polypropylene water-heated floor only at a temperature of at least fifteen degrees. Polypropylene products are inexpensive and differ large quantity positive characteristics.
Polyethylene pipe-rolling materials only crosslinked ones are suitable for this task. Cross-linked polypropylene is durable, reliable and impact resistant high temperature... But, in cement floor these pipes do not hold their shape well. Therefore, a large number of fasteners must be used to fix such pipes.
Experts speak well of metal-plastic products. The metal-plastic pipe used in the screed lasts quite a long time.
Metal-plastic products appeared on the market not so long ago, but quickly took the leading position. The special three-layer construction of these pipe-rolling materials allows them to serve up to 30 years.
The disadvantages that metal-plastic pipelines have include relative complexity installation works at home. not difficult if you have some experience of such work.
Therefore, it is important to know the sense of proportion when clamping. At home, laser or ultrasonic welding is not used for this product range.
If it is bad to clamp the joint, then you should expect leaks. And, if you "pinch", then the fitting will fail, and it will have to be replaced.
But the pipe rolling copper enlisted in a number of impeccable leaders. It is far superior to polyethylene counterparts. Cross-linked polypropylene and metal-plastic are also inferior to copper. In this case, there is only a huge list of positive characteristics.
Watch the video
And copper products have one drawback. That's too much high price, which becomes the reason that not everyone can afford to use a structure made of this material for laying under a screed.
Speaking about the "warm floor" system, you need to remember such a material as metal. Metal pipe products in a screed, experts call an unreasonably risky undertaking. Heating water is often saturated chemicalsand metal can just not resist before this aggressive influence.
Ultimately, corrosion appears in the metal structure, and hence further leakage. Hard water also affects metal.
Therefore, plastic and copper products are a more practical solution for floor installation. Therefore, metal pipe-rolling materials are not recommended for this work.
Room preparation
Before sealing the heating pipes in the floor screed, it is necessary to remove all the connection points of the remaining communications, and install windows and doors. It is recommended to remove pieces of furniture from the room, and dismantle the old heating system, if this work not be held in new buildings.
Irregularities on the surface are allowed within a radius of one centimeter. If their dimensions exceed these figures, then the base for heating should be leveled.
Final stage preparatory work Is cleaning. It must be done before you close up the structure with a concrete screed. Industrial vacuum cleaners are perfect for this task.
Laying "warm floor" in the screed
This option is used in an apartment and in a private house. It is even used for wood flooring, or under surfaces such as laminate.
 Pouring is performed on a rough or wooden floor. They act in these situations according to the same principle.
- Spread the waterproofing.
- Laying insulation.
- Reinforced mesh is laid.
- Wiring and fastening of the pipeline is in progress.
- Glue the damper tape.
- The entire structure on the floor is filled with mortar.
We carry out waterproofing
It protects against moisture ingress and to prevent wet mortar from contacting the floor. After that, it is necessary to insulate the work surface. The best option for this task is foam. Also, high marks from specialists received a material derived from foam plastic - penoflex.
A steel mesh is applied to the insulating material. It is needed to evenly distribute the load over the frozen fill. Without such reinforcement, the screed may crack.

Piping in such networks is performed in two ways.
- A snail.
- Snake.
The first scheme is the laying in a circle from the walls to the center of the room. Such actions do not use sharp turns of the circulation direction.

The snake is directed from any wall, and then directed to the other, located on the opposite side. With this design, on all pieces, the direction of movement of the liquid is changed by 180 degrees. In everyday life, the first styling option is most often used.

The contour should be reinforced on the surface. With these actions, it should be borne in mind that it increases the dimensions in length. Therefore, the fasteners cannot differ in rigidity, and the pipeline must be able to slide. For such a task, plastic clips attached to the floor are effectively used. You can also use simple clamps.
It is very important not to forget to use a damper tape. It is a strip of polymeric foam. It needs to be glued around the perimeter of the room on the wall. And the bottom edge of the tape should run across the floor. This measure will help to neutralize the increase in fill, and will not allow the solution to stick to the walls.
Many are interested in how many centimeters the screed must cover the pipe structure. Masters say that it cannot be less than three centimeters. Its optimal size is 7 cm.
Watch the video
When laying heating pipes, it is very important to maintain the same pitch between turns or zigzags. So, for example, for a room of 20 sq. m, this distance is twenty centimeters. In a room with a large area, it is recommended to install several spirals or snakes for heating.
Floor heating pipes can be hidden under wet or dry filling. The first method is more common. Because with "dry" filling with voids, a lower density level is obtained, and because of this, heat transfer is inhibited.
It is not difficult to build such a heating structure with your own hands. The main thing is to have patience and some knowledge. If you add a little more effort to this, then the excellent result of the heating in the floor can please more than one decade.
(2
estimates, average: 5,00
out of 5)
The discussion is closed.
Pipes for heating in the floor (in the interfloor or basement ceiling) are installed either during hidden laying heating system, or during installation of the "warm floor" structure. It should be noted that in these cases fundamentally different types of pipes are used and various technologies for assembling the pipeline are used.
Therefore, in this article we will describe the installation of heating pipes in the floor, highlighting all the details of the technological process. In addition, we will say a few words about the "warm floor" technology itself.
Underfloor heating pipes: materials and requirements
Not any pipe can be installed under the floor covering, since the future system must be strong enough and withstand both internal and external pressure.
In addition, the pipe should not corrode. Otherwise, the owner of the system will have to regularly disassemble the ceiling in order to replace the rusted area. Underfloor heating pipes should not penetrate vapors, especially oxygen, since it is this that leads to the development of rust, which destroys the load-bearing structures and fasteners.
Considering these factors, it is possible to make a heating system in the floor with pipes exclusively from these materials:
- Copper pipes. This option is the most expensive, but such pipes are suitable for all the standards presented to hidden gasket heating. Copper does not corrode, is resistant to mechanical damage and does not allow oxygen to pass through.
- Polymer pipes made of vapor-tight material (polybutylene or polyethylene). These pipes are quite resistant to external and internal pressure and do not corrode at all. At the same time, polymer materials lack hardness, they are easy to cut, therefore it is recommended to install these pipes in cement screed, which acts as a protector.
- Multilayer metal-plastic pipes from composites. These pipes are hard, durable and resistant to rust. At the same time, metal-plastic will cost much less than copper. This option can be called the most optimal of those that are presented on the construction market in Russia now.
Features of fastening heating pipes under the floor
The technology of installation and fastening of the heating pipeline in the floor depends on the selected type of pipes, their wall thickness and diameter. Indeed, in the process of installing a hidden heating system, they try to avoid inserts, joints and other sections connected with fittings.
In other words, the pipeline should be laid in a screed or in a wall in one section, and it is advisable to create all bends, corners and roundings with your own hands or using pipe benders. Naturally, this pipe-laying pattern is only suitable for flexible construction materials such as XLPE, reinforced plastic and copper.
You need to know that the distribution of heating in the floor should be carried out according to a previously drawn up scheme. If you cannot work it out on your own, then you should use an alternative solution - a wiring diagram of the pipe system, outlined on a heat insulator or waterproofing substrate.
Pipes are attached to the floor using special strips, inside of which there are landing slots for the required diameter. Alternatively, you can use single clips or paper clips. The best option is to lay pipes for heating in the floor or screed, certainly in the grooves cut in the panel insulation.
As an obligatory heat-insulating material, special plates of extruded polystyrene foam are used, in which holes are pre-equipped for laying pipes of the required diameter. These boards are installed on bitumen waterproofing mastic. The pipes themselves fit into the grooves and bend if necessary.
Screed heating pipes
The location of the heating pipes inside the floor covering or screed makes it possible to abandon the use of unaesthetic heating radiators that spoil the interior of the room. In addition, the "warm floor" in terms of its efficiency and heat output is not inferior to some convectors, and everything acts as a radiator flooring.
Warm floors can be installed in any rooms, both in the kitchen, covering the screed with tiles, and in any other functional rooms, laying parquet or laminate on top of the heating system.
The process of installing a "warm floor" is carried out in accordance with the following instructions:
- Before starting the installation, you need to make the floor surface even by pouring a layer of self-leveling floor over the concrete screed, which eliminates all kinds of cracks and irregularities in the structure of the rough floor finish.
- After removing irregularities in the overlap, you can install horizontal waterproofing... Usually, it is a coating or roll waterproofing agent. It is best to use a water-based mastic, which plays the role of an adhesive for insulation.
- This is followed by the installation of heat-insulating material. Any hydrophobic material is used as it, for example, extruded polystyrene foam. This substance can withstand high floor loads and acts as a framework for the piping system. The minimum insulation thickness is one centimeter.
- Having fixed the insulation on the mastic, you can start installing the pipeline structure. It is necessary to avoid breaks, joints and mates in his body. A solid pipe from the coil is rolled out over the insulation, giving it the desired shape using a reinforcing mesh with clips. Also, bends can be formed using perforated strips or insulation with rolled channels. Optimal size pipes - 16 millimeters.
- After installing the pipes, it is recommended to pressurize them. This process is a leak test. This procedure must be performed before pouring the upper level of the screed, because the pipe may be damaged through no fault of yours, and a heavy object that has fallen on polymer pipes can cause them a serious defect.
- Having finished the process of installing the pipes, you need to take care of the reinforcing screed, which will hide the relatively soft pipes. Please note that the screed must be laid exclusively on top of the pipeline filled with coolant. Otherwise, pipes from soft materials can get defects under the weight of concrete. For filling the screed, you can use a standard cement-sand mixture or ready-made sand cement. The volume of the required solution depends on the area of \u200b\u200bthe room with a warm floor and the selected thickness of the top screed, which is usually 3-7 centimeters. You can turn on the heating system after the screed has completely hardened, this process takes about a month.

After the final screed has hardened, you can install a floor covering - parquet, tile, laminate and the like. Please note that if there are no problems with the choice of tiles for installing them above the "warm floor", then the choice of parquet or laminate can cause serious difficulties for the buyer. This is due to the fact that these materials must have a special marking, saying that it can be used for installation above a warm floor.
It is advisable to lay heating pipes under the floor in the warm season and in good weather. If the terms do not make it possible to use the classic system of "warm floors", then you can use an alternative option, the floor system, which is even easier to install.
Laying "warm floor" (water or dry)
This type of underfloor heating system has recently appeared on our market and has already received many positive reviews. A water-based "warm floor" is simply necessary in cases where the installation of a classic system is impossible for various reasons, such as the weight of the structure or installation time. One square meter an ordinary "warm floor" weighs up to 300 kilograms. Naturally, the installation of such a heavy system is unacceptable in premises of an old building or with wooden floors.
Another obvious drawback of installing a heating system in a screed is the height of the structure, which usually “steals” more than 7-10 centimeters of height from the room. The way out of this situation was floor systems. They allow you to establish water heating under the floor without large losses in the height of the room and unnecessary load on the floors. In addition, this system can be used immediately after installation, rather than waiting for a whole month until the screed is fully ready.
Of course, not everything is so smooth with water flooring systems. They are less efficient than the traditional version and cool down faster. This suggests that such a system is unlikely to be suitable for full independent maintenance of room temperature. However, for residents of southern latitudes, this option may be suitable if the house is well insulated.
If you do not live in the south, then, together with the flooring version of the "warm floor", you must use other heating systems, as a rule, they are radiators, and in some situations convectors. The fact that the decking cools down faster means that they reach their operating temperature faster and use less energy.
Floor dry "warm floors" are divided into two types: polystyrene and wood. Regardless of the material used, they include 2 components: heat-distributing metal strips and floor system blocks. because of low level thermal conductivity base material, laying pipes directly into the grooves of the blocks does not give the necessary heat transfer, therefore they are placed in aluminum plates.
Wooden flooring systems are especially popular.
Their advantage is environmental friendliness and high level availability, and it is quite easy to install such a structure yourself. On sale you can find ready-made modular dry "warm floors" made of wood. They are blocks of chipboard or OSB, in which pipe channels are laid. The width of the modules is determined by the standards - 13, 18 or 28 centimeters, and they are connected by the lock method.
Polystyrene water floors are truly weightless, standard systems have a thickness of 15 to 70 millimeters. When choosing this type of "warm" floor, you can save on thermal insulation, since polystyrene itself acts as it. Plates are laid on a clean and level base, and if necessary, a layer is first laid thermal insulation material... Plates of this system can be rotary or simple. They are installed so that pipes can be laid in this scheme.
After the installation of polystyrene or wooden modules is completed, metal heat distribution plates are laid out on them. They have grooves in which pipes are installed.
Regardless of the material chosen for the floor heating system, a damper tape must be placed around the perimeter of its installation. She will compensate thermal expansion floor and will not allow cracks to appear between the wall and the floor. If there are several circuits in one of the rooms, they must also be separated with a damper tape.
Often, hearing the word "heating", people remember the heavy, rough, cast iron batteries that were present in everyone's home during the era of the Union. The radiators were warming up for a long time, did not keep the heat in the apartment, they managed their function somehow. Now everything is different - there is an opportunity to choose among worthy alternatives. The most advanced of them is the "warm floor" system. Therefore, we are learning to install heating pipes in the floor screed.
The heat starts from the feet
System operation
Why laying heating pipes in a floor screed is a wise decision? Isn't it easier to change the batteries? Of course easier, but easier doesn't mean better. The laws of physics cannot be canceled. The principles of operation of heating networks are radically different. Familiar radiators generate heat, which rushes along the walls to the ceiling, warming it first of all. Then the air returns down, but already in a cooled state. Thus, the ceiling is warm and people are cold. The convection principle is not the best.
But pipes for heating in a screed work differently. The warmth first heats the legs, and then, cooling down, rises up. The inhabitants of the house do not freeze, and with this mechanism of heat distribution they feel better.

Weigh the pros and cons before installing
Advantages and disadvantages of technology
Before mounting polypropylene pipes in a screed, familiarize yourself with the pros and cons of this heating method, because you must be sure that you are investing resources wisely.
So, the advantages of "warm floor":
- service life (from 50 years);
- uniform heating;
- profitability (the maintenance of such heating is cheaper than the classical version);
- lack of moisture;
- ease of care;
- saving space;
- safety (children will not be injured or burned by batteries);
- maintaining normal air humidity;
- lack of environment for the appearance of bacteria;
- aesthetics.

Differences in heat transfer between the classic version and the "warm floor" system
Disadvantages are few, but you should know them:
- reducing the height of the room;
- the complexity of the repair work (finding pipes in the screed is a difficult task);
- impossibility of installation in specific places, for example, on staircases.
This is important to know! If there are no restrictions on mansions, then before changing the heating system in a multi-storey building, make sure that the central system can withstand such a hydraulic load.

Installation diagram of the "warm floor" system
System installation
Work always begins with a plan, procurement of materials, search for tools. Warm floor is no exception.
The wisdom of choosing pipes
What pipes are the most reliable for arranging heating? You are free to choose copper, but it is very expensive. Better to dwell on polymer products consisting of polyethylene and polybutylene. Such a "duet" is resistant to pressure - both external and internal: it does not cause trouble if everything is correctly assembled. Polypropylene pipes should function in the floor screed, since their only drawback is their low hardness. Composite structures made of metal-plastic are no less good.
As for the installation of metal elements, in this case the risk will be unjustified. Water from the mains is sometimes replete with "chemistry", and the material may not withstand such aggressive impact - as a result, rust will appear, and then flow. Hard water is also detrimental to metal. Therefore, polymer pipes are a wise decision, and at an affordable price.
Video tutorial on the choice of elements for the network
Room preparation
The installation of the network is carried out after the connection points of other communications have been removed, as well as after the installation of windows and doors. The room should be freed from furniture, the old heating network should be dismantled or left if you want to double-heat the room.
Permissible surface irregularities - up to 1 cm. If they are larger, the base will have to be leveled.

Task number 1 - level the floor surface
Rooms located above the cold zone (basement) must be separated with insulating panels so that you heat the house, not the cellar.
The final stage of preparation is cleaning. An industrial vacuum cleaner will perfectly cope with such a task. It remains to ask the family not to interfere and proceed with the installation.

Intermediate stage of work
Installation of the structure
Work begins on the installation of a warm floor with thermal insulation. You have already understood that the hot air should be above, not below. For thermal insulation of the network, materials in the form of sheets or rolls can be used. The main thing is to make sure that there are no gaps between the joints of the heat insulator, if you see gaps, cover them with a special tape. Polystyrene or basalt fiber coated with reflective foil is ideal for this task.
How to lay pipes? The uniformity of heating is important, so use such options for the arrangement of elements as a snake or a spiral.
The main thing when laying the net is to adhere to the same pitch between zigzags or turns. Step size matters too. For rooms up to 20 m², a distance of 20 cm is sufficient. If you are installing the network in large rooms, it is recommended to mount several coils / snakes.
Laying is done wet or dry. If you choose the first - the more common, in which the heat transfer is maximum, then you will have to install reinforcement mesh... You are free to purchase a factory set or build a reinforcement structure on your own. The size of the cells depends on the pitch, but the side of the cell should not exceed the pitch distance. The armature is fixed with clips, but if special heat insulators with bosses are used, then fasteners are not needed.
A reinforcing mesh is also installed on top of the pipe network - for safety net, so that the elements do not deform under the weight of the screed. Next, the mesh is poured with a solution (gypsum, cement or other building mixture). The thickness of the screed varies between 3-7 cm.
This is important to know! Before pouring the screed, check the piping for leaks.
The dry method of "masking" the net is also practiced.
How to hide pipes in a dry screed? Use chipboard plates. The technology differs only in that instead of a solution, chipboard sheets are installed on top of the structure. The technique is simple, you do not have to wait for the screed to dry. However, dry styling cannot be called popular, since it has a drawback - voids inhibit the heat transfer of the network.

The shape of the structure is at your discretion
Using pipes in a floor screed for heating is not at all a luxury, right ?!
Video: how to hide a heating pipe in a screed


