Men spend most of their free time in the garage, including during the winter season. Therefore, it is necessary to carry out work related to car repair at sub-zero temperatures. In order to avoid additional expenses for electricity and heating, you can ask in advance how to arrange a warm floor in the garage.
What is the best material for thermal insulation?
Today in stores there are a huge number of different materials for insulation. His choice depends on the characteristics, as well as on the features of the structure of the garage.
The most common materials can be classified into one of two types:
- Foamed polymer materials. These include polystyrene foam, polypropylene foam and polyurethane foam. They can be purchased in blocks, slabs or panels. Such materials are among the most affordable (especially for foam), they are easy to install, they are airtight. The features of such materials include the need to equip with a ventilation system, this will avoid the accumulation of condensate;
- Materials based on mineral fibers. This type should include glass wool and mineral wool. They are usually sold in rolls, mats, or slabs.
Less common is the insulation of the floor in the garage with expanded clay, roofing felt and other materials.
The criteria for choosing a material as a heater are health safety, fire resistance, the level of resistance to stress, sound insulation, etc. When choosing a heater, these features should be taken into account. More information on the topic of thermal insulation in the garage can be found in the video.
How can you insulate the floor yourself?
If the owner decides to insulate the floor in a garage with a basement with his own hands, some features should be considered:
- The material for thermal insulation must be laid over the surface of the entire floor, and one should also not forget about the overlap on each wall. The surface of the heat-insulating layer must be flat, the formation of folds on it is highly undesirable;
- The insulation must be overlapped and secured with construction tape.
If there is a basement in the garage, it is also necessary to insulate this room. By insulating the basement, you can significantly reduce heat loss in the garage itself. This is especially true of a garage with a cellar, where it is supposed to store products in the winter.
The most common basement garage is a concrete floor. Most often it is insulated with expanded polystyrene. It is practical and affordable, has a long service life. The material is well resistant to the formation of mold, does not rot. It is also used for thermal insulation in the basement.
Consider the order in which installation and floor insulation work should be performed:
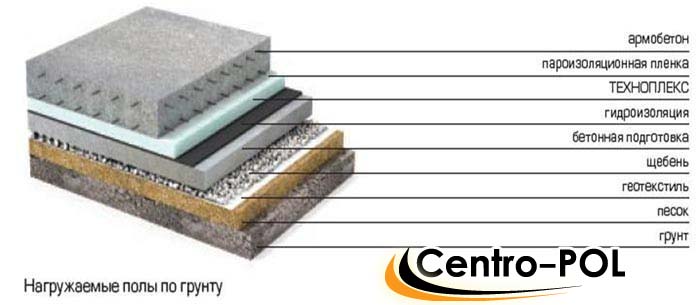
- Formation of a soil cushion. For this, the soil layer must be tamped, its thickness should be approximately 30-40 cm;
- Laying a layer of sand about 10 cm thick. It also needs to be tamped;
- Make a rough floor. This requires pouring concrete and reinforcement. After that, you need to wait for the concrete to dry. As a rule, 2-3 weeks are enough for this, depending on the weather;
- A layer of waterproofing must be laid on dried concrete. It can be plastic wrap;
- Laying thermal insulation, on top of which waterproofing should be done again;
- Pouring the final concrete screed. Its thickness should be about 5 cm.
More information can be obtained from the presented video.
The most simple and modern way floor insulation in a garage is insulation using a special heat-insulating paint. This way you can insulate an existing concrete floor. Before carrying out work, it is necessary to clean the floor from dust and dirt.
To insulate the floor in the garage with your own hands, you do not need any special knowledge and skills. Right choice material and taking into account its main properties, as well as installation features, will allow these works to be performed. And in the absence of time resources, you can use the services of specialists, which will allow you to qualitatively equip the floor in the garage in a short time.
Types of underfloor heating for the garage

To avoid freezing of car mechanisms, you can equip the floor in the garage with heating. This will allow you to forget about the problems of starting a car even in the most severe frosts. If the garage is in use all year round for repairing a car or other purposes, the installation of a warm floor is simply necessary, because with its help you can significantly save on heating the room.
Warm floor for a garage with a basement can be of two types:
- Water. This is a closed system; for its construction, metal-plastic pipes are most often used. Such a floor is walled up in a screed. In this case, a boiler is used to heat the room;
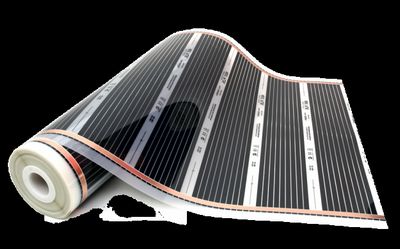
- Electric. The structure is also closed with a screed. According to the installation system, this type of floor can be cable and film. And the principle of heating is infrared or convection.
In the case of installing a cable underfloor heating, installation of heating sections, cables on a coil, heating mats is assumed. In this case, the supply and regulation of electricity is carried out by a thermostat. Film-type warm floor involves the use of a film as a heating element.
During the installation of a warm floor with your own hands, you must strictly follow the manufacturer's instructions. Consider the advantages and disadvantages of a water and electric floor heating. We suggest watching a video on this topic.
Water floor
If you need to choose which type of underfloor heating is best suited for a garage with a basement, you need to consider the advantages and disadvantages of each of them.
The advantages of a water floor include:
- the opportunity to save on electricity;
- uniform heating of the entire floor surface.
The disadvantages of this floor are:
- The complexity of installation work;
- After arranging the floor, pipe leakage is possible, which is very difficult to detect. It will be necessary to dismantle the floor;
- If the room is detached, the supply of communications is required.
To bring communications and make a water heated floor, you need to purchase a boiler and a circular pump. Also, for proper operation, you need to regularly service the system. Thus, this type of floor heating in a garage is costly. By watching the video material, you can learn more about the installation of a warm floor.
Electric underfloor heating
The design and installation of this type is simpler than with the arrangement of a water floor. At the same time, the energy consumption for floor heating increases significantly. The advantages of such designs are:
- there is no need to supply communications (except for electricity);
- the whole system consists of a heating structure (for example, a cable) and a thermostat;
- there is no need to service the system.
The disadvantages include the cost of electricity, which can be reduced by using an insulating layer.
When installing an infrared floor, experts recommend placing it locally. It is impossible to equip the entire area of \u200b\u200bthe room with an infrared film system, since a serious load will fall on its individual sections. Therefore, you can make several areas heated, for example, under the machine and on either side of it. More information on this can be found in the video.

The whole process of laying an electric underfloor heating with your own hands is the following sequence of works:
- Insulation of the garage and basement from groundwater penetration. This can be done with a concrete screed;
- Laying a layer of thermal insulation;
- Installation of electric floor heating, insulation of all contacts and installation of a temperature sensor;
- Laying waterproofing, testing the floor heating system;
- After successful testing, the screed is poured. Its thickness should be less than a conventional floor without an electrical system.
In general, it is quite simple to lay an electric warm floor, all the work can be done by hand. The presented video material clearly demonstrates how this can be done.
Warm garage it is the dream of any motorist to get into a warm car and start driving immediately on a pleasant frosty winter morning, without wasting time to warm up. In addition, parking in a warm garage has an extremely beneficial effect on the technical condition of the car. And minor repairs in the cold season ceases to be a problem.
This is why more and more car enthusiasts are thinking about heating in their garage. The best option for this is a warm floor. It evenly heats the air in the room, and the lower layers receive the maximum heating, thereby saving energy. In the garage, it is often necessary to look under the car, if you lie down on the warm floor for this, then your back will be grateful to you.
Garage heating features
Typically, the garage does not need to be heated to the temperature of the living space. To store a car, 15 degrees is quite enough, and a person at such a temperature can feel quite comfortable in suitable clothes. Heating the garage to more high temperatures will require too much energy and is not economically viable.
It is important to consider adequate thermal insulation for your garage. If the walls are thin and have cracks, then such a garage will be difficult to heat even up to 15 degrees. Insulate the walls and ceiling of the garage with foam foam or any other insulation. Do not skimp on this procedure, all costs will pay off very quickly due to energy savings.
The garage floor is subject to increased stress compared to the living space. This is the impact of the wheels of the car and accidental drops of tools or spare parts. There must be a sufficiently thick screed layer above the heating elements, usually 40-80 mm. For this reason, it is not advisable to use an infrared heating film, with such a thickness of the screed, the heating from it will be too weak.
In the vast majority of cases, garages use an electric underfloor heating based on a heating wire or a water underfloor heating. Each of these types of heating has its pros and cons, let's consider them in more detail.
Electric underfloor heating in the garage
In this type of underfloor heating, heating occurs due to heat release in a flexible conductor under the influence of an electric current flowing through it. The conductor heats up the screed tightly adjacent to it, from which, in turn, the air in the room is heated.
Electric underfloor heating is very easy to install and at the same time reliable, but it is also the most expensive way of heating. If the winter is harsh enough, the electricity bill will surprise you.
To reduce costs, you need to pay special attention to the thermal insulation of the garage, use an insulation layer not thinner than 60 mm for the walls and ceiling. Do not forget about the thermal insulation of the floor, this issue will be discussed in detail below.
Heat consumption of various buildings
At the design stage of an electric underfloor heating, it is necessary to find out whether it will withstand electrical network garage connection of such a load. Based on the calculation of 120-140 W / m2, multiply this value by the area of \u200b\u200byour garage and make sure that the network will withstand long-term operation with such a load.
| Name | Power, W | Heating area | price, rub. |
|---|---|---|---|
| Thermo 8 m | 165 watts | up to 1.5 m2 | 3494 |
| Thermo 12 m | 250 watts | 1.5-2.5 m2 | 4494 |
| Thermo 18 m | 350 watts | 2.5-3.5 m2 | 5662 |
| Thermo 22 m | 420 watts | 3.5-4.2 m2 | 6164 |
| Thermo 25 m | 500 watts | 4.2-5 m2 | 6751 |
| Thermo 30 m | 600 watts | 5-6 m2 | 7438 |
| Thermo 35 m | 710 Wt | 6-7 m2 | 8538 |
| Thermo 40 m | 800 watts | 7-8 m2 | 9706 |
| Thermo 44 m | 900 watts | 8-9 m2 | 10599 |
| Thermo 50 m | 1020 Wt | 9-10 m2 | 12170 |
| Thermo 62 m | 1250 Wt | 10-12.5 m2 | 13750 |
| Thermo 73 m | 1500 watts | 12.5-15 m2 | 15949 |
| Thermo 87 m | 1800 watts | 15-18 m2 | 18825 |
| Thermo 108 m | 2250 Wt | 18-22.5 m2 | 21574 |
Preparing the base for electric underfloor heating in the garage
In most cases, there is soil under the garage, which means that you need to take care of reliable thermal insulation of the floor. This is necessary in order to exclude heat losses due to heating of the soil, which, with improper thermal insulation, can reach 30%.
A layer of rough concrete screed is poured over the ground. The roughing screed must be sufficiently flat and not have sharp changes in height. After the screed hardens, you can start laying the thermal insulation.
Thermal insulation of electric underfloor heating in the garage
It is best to choose polystyrene foam or polystyrene as an insulating material, the thickness of the thermal insulation should be 30-80 mm, depending on the severity of winters in your area. If the temperature in your area rarely drops below -15 degrees, then it is enough to install 30 mm of insulation. If you live in a region with severe winters, then the thickness of the insulation should be at least 80 mm.
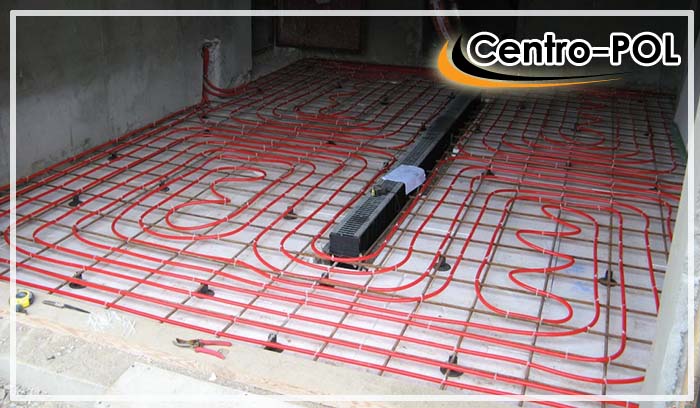
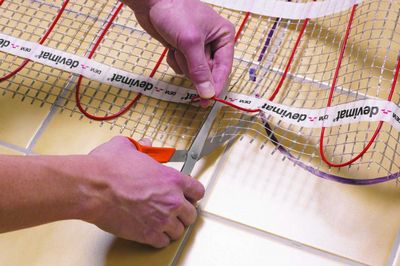
If you use a heating wire as a heater, then a special mounting tape is laid on top of the thermal insulation with a pitch of 50 cm. It is needed to fix the turns of the wire. The tape is attached to the rough screed with dowels. If you are using heating mats, skip this step and proceed with installation immediately.
Installation of heating elements for electric floor heating
If you are installing a warm floor based on a heating wire, then lay the wire on the floor in turns with a pitch of 30 cm and fix it with special antennae on the mounting tape. The turns of the wire should be parallel to each other and avoid sharp bends and excessive strains.
Please note that the surface under which the heating wire is located must be open and give off heat to the air. If you plan to install a workbench or a rack for storing tools in the garage, then decide in advance on the installation site and do not lay the wire there.
Avoid stepping on the wire during installation and do not damage the insulation. The wire under the screed must be solid, it is not allowed to twist or solder different pieces of wire and pour them into the screed, this will seriously reduce the service life and reliability of the warm floor. If you damaged the wire during installation, then replace the entire circuit.
A more convenient option would be to use heating mats. These are already formed turns of wire, fixed on a reinforcing mesh. All you need to do is place the mats on the floor and you can start connecting.
After the wire or mats are laid out, you need to install the thermal sensor. To do this, a small recess is made in the thermal insulation at a distance of about 50 cm from the wall on which the thermostat will be installed, a corrugated pipe with a diameter of 20 mm is laid in it. A temperature sensor is placed in this pipe. The pipe is necessary so that the sensor can be replaced after the screed is poured.
Electric floor heating connection
To connect an electric underfloor heating, you must use a copper wire of a suitable cross-section for the final load.
A thermostat is installed on one of the walls, to which heating elements and a temperature sensor are connected, the connection is made according to the scheme given in the instructions for the regulator.
Attention! It is forbidden to test the electric underfloor heating by applying voltage. In order to check the integrity of the insulation and the correctness of the connection, it is necessary to measure the resistance of the heating wire before connecting to the thermostat and check with the value given by the manufacturer. The difference in resistance values \u200b\u200bshould not exceed 10%.
The inclusion of an electric underfloor heating system in the network is permissible only through its own differential current switch. Leakage current setting should be no more than 30 mA.
It is forbidden to apply voltage to the electric underfloor heating until the screed is completely solidified.
Pouring screed over an electric underfloor heating in a garage
The best option is to use a special screed for warm floors, as it has the best thermal conductivity coefficient. You can also use a regular concrete screed or self-leveling floor. The thickness of the tie above the level of the wire should be 30-50 mm, depending on the weight of your car and whether any work will be carried out in the garage. If a layer of insulating material with a thickness of more than 5 cm has been laid on the floor of the garage, then the minimum thickness of the screed will be 50 mm. Evaluate the possible intensity of the impact on the coating and select a suitable screed thickness.
It is forbidden to turn on the warm floor until the screed has completely solidified, usually this period is 28 days.
The concrete screed can be left as it is or the floor can be tiled, this will not affect the heating properties of the warm floor.
This is a more economical way of heating, but it requires the installation of a boiler or a tie-in into the existing heating circuit of a private house. This greatly complicates the installation of the entire system, and also requires large financial costs at the initial stage.
Nevertheless, if you are making a water-heated floor in the garage of a private house that already has a heating system, then a water-heated floor will be an excellent option, since it does not require as much electricity as an electric floor heating.
Installing a separate boiler for heating the garage is not profitable from an economic point of view, but sometimes it is still used when the use of other options is impossible.
At the design stage, you must think over the scheme for including a warm floor into the general heating system of the house and choose a place for installing a distribution unit. After that, you need to estimate the required pipe length based on the area of \u200b\u200bthe garage, and also choose a circulating pump of sufficient power.
If you crash into a radiator heating system, then the temperature of the coolant in it is too high. To reduce the temperature, you will need to install a mixing unit, in which the heated heat carrier will be mixed with the cooled one that has passed through the circulation circuit. If you use a separate boiler for underfloor heating, then the temperature is regulated directly on the boiler.
A mixing unit, a circulation pump and a manifold group form a distribution unit, which is usually housed in a control cabinet. On sale you can find ready-made distribution cabinets of different capacities, they are assembled and tested at the factory. You just need to choose the place of installation of the cabinet, connect it to the common heating pipe, and connect the warm floor to the collector groups of the cabinet.
Preparing the substrate for a water-heated floor in the garage
The preparation of the base is no different from the preparation of the base for an electric underfloor heating, with the exception that the base for a water underfloor heating should not have a height difference of more than half the pipe diameter. Otherwise, air locks may form in the pipe, which will impede the circulation of the coolant.
Another difference is that there is a special thermal insulation for the installation of a water-heated floor, which greatly facilitates the laying of pipes. On the upper layer of thermal insulation, small protrusions are arranged in a checkerboard pattern, between which pipes of the warm floor are laid. This method of installation is convenient, but more expensive.
Water underfloor heating test
The system is filled with coolant and the pump is set to a pressure 1.5-2 times higher than the operating pressure, usually this value is about 5 bar. The pressure should be stable, no trace of coolant should appear on the floor, leave the system for at least a day. After a day, the pressure in the system should not be lower than the working one.
Set the boiler or mixing set to the maximum permissible temperature and make sure that all circulation circuits are heated. Leave the system for another day. If after a day the pressure has not dropped and the system has not cooled down, then you can start pouring the screed.
Pouring a screed for a water-heated floor in a garage
When pouring the screed, the system must be filled under operating pressure. It is strictly forbidden to fill the screed with a heated coolant. The pipe temperature must be equal to the room temperature.
Please note that most screeds are not suitable for pouring at low temperatures. The minimum temperature at which the screed can be used is indicated on the packaging. Do not try to raise the room temperature by turning on the underfloor heating.
The screed layer for a water-heated floor must have the same thickness as for an electric floor. You can turn on the heating not earlier than the complete solidification of the screed.
Video - Warm floor in the garage
Video - DIY electric underfloor heating in the garage
Many, after reading the title of this article, will say that why is it needed in the garage and, in general, it is better for this money to buy a tool or process the facade. To each his own, and if, for example, a garage is built together with the house, that is, they have one common wall, and besides, you plan to work there often, then the meaning of laying such a covering takes on a different meaning.
First of all, underfloor heating is an additional source of heat that will allow you to maintain the room temperature at the desired level. Secondly, it will create the most comfortable conditions for storing the car. This minimizes the appearance of rust and other effects from exposure of the body metal to the environment.
To insulate a garage, two types of systems are mainly used:
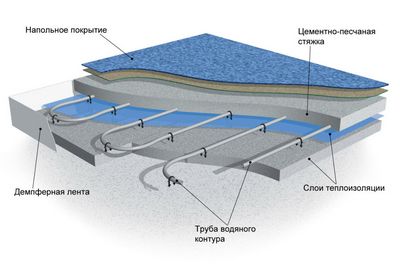
1.) Water floor. It is a wiring of pipes filled with water. The source of heating water is usually a boiler; it can be either solid fuel, gas or electricity.
2.) Electric floor heating. Here the approach to building the system is slightly different. Instead of pipes, an electric cable and a special cloth are used, which, after connecting to the outlet, heat up and create a temperature level set on the sensor.
Let's look at the installation process for each of these types of underfloor heating.
Laying water underfloor heating in the garage
 Let's first discuss all the pros and cons of this solution. Of pluses the following can be distinguished:
Simple styling system. Even a beginner can figure it out. The principle of operation is based on the example of apartment radiators.
You can save on electricity. If the boiler is used, for example, on solid fuels.
This type of coating provides uniform heating of the entire floor surface in the garage.
Of cons:
- In severe frosts, if you do not warm up the boiler, the water in the pipes may freeze and the pipe may burst. In this case, it will be necessary to dismantle the structure, since it will be very difficult to find a breakdown.
- An additional waste can be made to purchase a water pump for pumping water in the system.
Installation technology
1.) Remove the old coating, if any, and level the entire surface with a crushed stone and sand pillow, and fill in a thin screed on top.
2.) The second step is to paint the insulation. For this, mainly two types of material are used: polystyrene or penoplex. The thickness of the sheets must be at least 3 cm. You can also purchase a special type of roofing mats (insulation), which are specially designed for laying warm floors.
3.) At the edges of the floor we install a damper tape, which is used in order to compensate for the expansion of the screed under the influence of temperature.
4.) We lay a protective polyethylene film, after which we lay out a reinforcing mesh over the entire surface, it is to it that the pipes will be attached using plastic clamps. A plastic corrugation is used to protect the connecting seams.
5.) In fact, the "pillow" of the warm water floor in the garage is ready. It's time to start testing. We start the pump and water. It is necessary to raise the pressure in the pipes to 3 - 4 bar. We leave for a day. If the next day you are convinced that nothing is flowing, then you can start pouring.
6.) The screed must be made thick, as pressure from the weight of the machine will be applied to the surface. The minimum value is 5 cm. But it is desirable to fill from 10 and above.
7.) Leave the poured surface to dry. Experts advise to give it about 2-3 weeks. After everything dries up, we connect the warm floor. Raising the temperature should be done progressively upward.
We test and enjoy the warmth.
Electric underfloor heating in the garage
 The second most commonly used option. Let's also highlight the main pros and cons of this technology. TO pluses can be attributed:
High degree of security. Usually, various sensors are connected to such systems that monitor the temperature. As a last resort, the system shuts down.
No need to buy boilers, run water, and so on. Simply put - ease of use.
Sufficiently long service life of the system\u003e 50 years.
Minuses:
- The main disadvantage is, of course, the huge consumption of electricity. With the rising prices for communal apartments, this is not at all a promising direction.
- The need for complete insulation of the garage. This will allow you to somehow minimize the cost of electricity.
- If the humidity in the garage is high, this method is not suitable at all.
Installation of such a floor
The technology itself is somewhat similar to the previous one, but there are some points that we will consider.
1.) We clean up the old flooring, and we make a concrete screed. It should not be too thin to groundwater couldn't get there.
2.) We lay the heat-reflecting coating. Buy a coating specially prepared for this task, do not use " folk methods»Using foil, it is not advisable to lay it there.
3.) Install the wires and infrared coating, after which we cover it with polyethylene. We place all connections in a corrugation.
4.) We test the system for performance. Fill the screed up to 10cm. That's all.
Below is a video example of laying a warm floor in a garage.
Underfloor heating in a garage is no less important than in an apartment. It will ensure the creation of a microclimate in the room and will be a guarantee that the car will not let you down even in the most extreme situations. But only a properly selected heating system is able to warm up the room and maintain a constant temperature regime.
Types and features of a warm floor
The idea of \u200b\u200bunderfloor heating is not new. They tried to use it back in the days of the Soviet Union. A water floor was invented. But due to the fact that in the planning of those years heating system in houses it was located in interfloor ceilings, it became a senseless invention. And only relatively recently did the builders remember about it, and found application for it. For residents of the first floors and for owners of suburban real estate, such a heating system has become a real boon. In addition, it is readily used for heating bathrooms and garages.
Modern builders offer such types of underfloor heating: electric and water. The electric floor is divided according to the installation system into cable and film. According to the principle of heating, infrared and convection devices are distinguished.
The cable floor consists of heating sections, cables on a reel and heating mats. Electricity is supplied and regulated to this structure using a thermostat.
In the film floor, the role of the heating element is played by the film. This type is also divided according to the heating principle into:
- carbon - the rubber element is placed between the layers of Mylar thermal film
- bimetallic - a film of layers of copper and aluminum, stitched with a current-carrying bus and a wire through which electricity is supplied.
The water floor is made up of pipes running under the floor covering. Basically, it is a traditional hot water heating system. And although the heating efficiency is quite high, it is a rather expensive method. To equip such a floor in a separate room, a supply of communications is required.
Which heating system to choose for a garage
Underfloor heating in the garage must meet the following requirements:
- ensure uniform heating of the room from bottom to top
- automatically stop heating if necessary
- be easy to install and operate
- do not take up useful space
- comply with safety rules.
A water floor, for all its reliability, is a rather expensive option. Especially for a detached garage. In addition to the supply of communications, you will need to purchase optional equipment (boiler, circular pump). And for it to work properly, it needs regular maintenance. In addition, all of these units take up garage space that could be used more efficiently.
But the electrical system is the best option for heating a room. It does not need piping. The whole structure is located directly in the screed. The only element that regulates the operation of the heating system is the thermostat. But it is no larger than a conventional switch and does not take up much space. The warm floor does not need special maintenance. Installation is so simple that you can do it yourself. The only negative is the rather high cost of electricity. But if the room itself is well insulated, then electricity consumption can be reduced.
What you need to know when installing an electric underfloor heating
When installing electric floor heating with your own hands, you need to decide what function it will perform. In a garage, this system is usually the only source of heating. So, when choosing the required set, focus on the area for the main heating, indicated in the price list. In addition, take into account the ratio of the total area of \u200b\u200bthe room to the heated one and the power of the floor per one square meter... For cable system making the necessary calculation is not difficult.
Let's say we are assembling a warm floor with our own hands in a garage with an area of \u200b\u200b30 square meters with an insulated ceiling and a concrete base filled with a screed. We clean the base from construction debris and put expanded polystyrene and reinforced mesh on it. We nail it on top with dowels mounting tape, and then attach the cable to its clips. We install the shield and connect the equipment (25 amp automatic machine, 24 amp contacts and a thermostat). When choosing a place to install a thermostat with an air sensor, you need to make sure that it does not get into the area of \u200b\u200bdrafts and direct sunlight. Do not place it on walls that face the street. The installation is completed with a screed with a thickness of at least 5 cm and a coating of non-combustible material with good thermal conductivity.
Another type of underfloor heating is the "thermal mats" system. In fact, this is the same cable laid on a heat-resistant film. Its installation is much easier than installing a cable floor: on a rough concrete base the thermal mat is laid. The cable is connected to the thermostat, and then the whole structure is glued to the floor using adhesive tape. On top of it, a thick layer of tile adhesive is applied and after it dries, the tile itself is laid. Everything, the garage will be heated.
To make a high-quality warm floor in the garage with your own hands, you must follow the manufacturer's instructions. And when operating it, you must adhere to safety rules:
- do not expose the cable to deformation or mechanical stress
- do not make changes to the design of the thermostat
- do not carry out work when the power supply is on
- do not work with the cable at temperatures below 0
- ground heating cable
- do not screw in screws, do not drill holes in the confining area of \u200b\u200bthe heating section.
What kind of warm floor to make in the garage: water or electric?
For most fellow citizens, a warm floor in the garage is an unnecessary luxury, when it is difficult to provide a comfortable temperature directly in the apartment itself. However, those who love and appreciate their iron horse know that a warm floor for his friend is a necessity that will allow the car to long time stay in excellent condition and function properly.
Underfloor heating for the garage
A warm garage is everyone's dream
Features of installing a warm floor will depend on the type of floor chosen.
There are two types of underfloor heating that are installed in the floor covering:
- Water heated floor. In this case, the system is a closed system of metal-plastic pipes, which are walled up in a screed. The boiler acts as a heat source.
- Electric heated floor. To create it, special cables are used, they are also walled up in a screed.
Insulation of the floor in the garage
 If you want the temperature in the garage to be maintained at an acceptable temperature for car operation all year round, it must be insulated from all sides, including the bottom.
Heat insulators for floors, in addition to a low coefficient of thermal conductivity, must be resistant to heavy loads and maintain their structure no matter what. Every year, manufacturers are increasing the range of materials. Each has its own advantages and disadvantages and you have to think about how to insulate the floor in the garage.
Heat insulators are:
- Mineral. it basalt wool, expanded clay, as well as cement mortars with modifying additives.
- Silicate. This is primarily glass wool, as well as liquid glass.
- Polymeric. These include foams and their derivatives, liquid penoisols or rolled penofol. This can also include heat-insulating paints.
- Wood-shaving waste and products from them. Oddly enough, the usual chipboard and plywood boards can also be considered insulation because of their loose structure, penetrated by air bubbles.
Of course, each material requires its own installation technology.
How to insulate a concrete floor in a garage
The sub-floor is traditionally made in the form of a reinforced concrete slab. Insulation for it must have good compressive strength. Expanded polystyrene is best suited for this. The thickness of the insulating layer is required at least 10 cm. It is laid on the surface of the subfloor for waterproofing. A vapor barrier is placed on top of the styrene foam and a topcoat is made.
Penofol also behaves well. The main element in it is polyethylene foam. And the reflective aluminum foil coating traps about 95% of the radiant energy. The same layer solves the problem of moisture protection. But the membrane layer is still necessary to prevent contact with liquid concrete when pouring the screed.
A wonderful material for insulating a floor in a garage is heat-insulating paint. It is used in conjunction with penoizol. First, all cracks and irregularities are filled with foam, and then a paint-insulation is applied over the final screed several times.
How to insulate a wooden floor
The easiest way to insulate a plank floor in a private garage is by logs. Shields or boards are placed on them, and a heat insulator is attached on top. Moreover, it must be protected by a waterproof membrane on both sides. It is not necessary to use high-tech canvases, you can take simple polyethylene 200 microns thick.
Thermal insulation material you can also place it in the gaps between the lags, and build a supporting frame from below. With this arrangement, mechanical loads do not act on the insulation and soft substances such as mineral wool, foam or glass wool can be used.
The space between the support bars can also be filled with penoizol. It also acts as a waterproofing agent at the same time, so additional membranes are not needed here.
Another option is to fill the empty volume between the lags with loose substances: sawdust and insulation based on them, expanded clay or ecowool. The layer of filling is at least 25-30 cm.Although sawdust and everything associated with them are not the best choice for the garage due to the risk of fire.
Chipboard boards are mounted on the subfloor on top of a plastic film and thereby protect the garage from heat loss. But on top you will have to lay a finishing moisture-resistant coating, since chipboards do not tolerate dampness.
How to make a warm floor in a garage
 It is important not only to protect the entire room from heat leaks, but also to heat it. So that radiators and pipes on the walls do not reduce the usable area, some car owners prefer to install a warm floor in the garage with their own hands.
The principles for preparing the base and laying the heating cable are the same for all rooms, but when installing in a garage, several points must be taken into account:
- The wires are spread on a layer of thermal insulation. If this material is not hard enough, foil or fine mesh is attached over it so that the heating elements do not press into the insulation and do not overheat
- The warm floor is poured from above cement mixture with the addition of plasticizers. The layer should be at least 4 cm thick and as dense as possible so that no voids remain around the cable. Any suitable topcoat can be placed on the screed
- A volume of warm, high humidity air is created between the heated floor and the underside of the vehicle. This can accelerate corrosion of metal parts. The problem is solved by changing the ventilation scheme of the garage.
The large heating surface and upward movement of heated air give you cost savings and comfort, even if you spend a whole frosty day in the box.
Sources: http://gurupola.ru/teplye-poly/teplyj-pol-v-garazhe-montazh.html, http://www.pol-comfort.ru/ust/13-teplyj-pol-v-garazhe. html, http://svoygarazh.com/uteplenie-pola-v-garazhe
Many people consider the warm floor in the garage as an expensive whim or, on the contrary, an unnecessary and unnecessary attribute. And all of these statements are true. Warm floor is not a cheap pleasure. For some, it is expensive even for a residential building. And such a floor needs to be laid only when the garage is really used constantly.
Some owners of iron horses do not spare money for their good heating. Keeping the car warm and dry is a guarantee of an excellent appearance and technical condition. Since many parts in the construction of a car are affected by low temperatures and humidity. Also, the constant warming up of the engine in winter leaves a not very good mark. Or if you spend a lot of time in such a room for repairs and other things, heating will not interfere in any way.
Coating in garages is: earthen, wooden, concrete, flooded and from ceramic tiles... Due to the fact that the warm floor must withstand a rather large weight, be resistant to mechanical and chemical influences and moisture. Considering these factors, concrete is ideal.
There are two types of coverage:
- water;
- electric.
How to make a warm floor in a garage with your own hands? Let's consider further.
Let's analyze the process of pouring this type and talk about its features. So, the warm water floor in the garage evenly heats the surface around the entire perimeter and is more economical in terms of electricity. But it has a rather laborious installation process, since when using it, it becomes necessary to use a water pump. In addition, in the event of a leak, it will be difficult to find it and ultimately it will be necessary to dismantle the floor covering, and after fixing the problem, lay a new one.
The algorithm for making a water-heated floor in a garage is as follows:
- If there is an old coating, it must be removed. Level the subfloor surface with additional screed.
- After that, thermal insulation with a thickness of about three centimeters (penoplex, polystyrene) is laid on top. Next comes a ball of insulation. Or, special mats are used for the installation of a water-heated floor.
- A damper tape is glued to the wall along the perimeter, which will compensate for the expansion of the screed when it heats up.
- A plastic wrap is laid on the floor, and on top of a mesh of thin reinforcement to which a heating pipe is attached and fixed with plastic clamps.
- After laying the pipe, it is necessary to carry out a trial run of the system for a period of a day to identify installation defects, malfunctions and leaks.
- After careful checking, the surface is poured with concrete to a thickness of at least three centimeters. And level the screed. Then it should dry completely, which can take about a month in general.
- Then the heating can be turned on. Only this should be done slowly, increasing the temperature.
Everything, the floor is ready to use. Now you can safely put the car down without worrying that it will subsequently break down due to the constant exposure to cold. In addition, it is pleasant to be always in a warm and comfortable room when, for example, a car is being repaired.
Electric underfloor heating
An electric underfloor heating differs from the above-described option in that it has a longer service life and requires a minimum of devices and mechanisms for its installation. However, it also has a significant drawback - it is a large current consumption.
The solution to this problem, that is, to save electricity, can be the insulation of the entire building, but this will also cost a pretty penny.
You can make such a floor yourself using the following instructions:
- Initially, the old screed is removed and a new one is put in. It must isolate the upper layers from groundwater.
- Thermal insulation is laid without foil, and an infrared film (the main heating element) or a system of heat-reflecting cables is laid on top.
- This is followed by the process of reliably isolating the contacts and installing the temperature sensor.
- A plastic wrap is laid on top.
- A trial run of the system is carried out.
- At the end, the entire screed is poured with concrete to a small thickness (except for the place where the car will pass), and let it dry completely.
- Instead of a thin screed, the surface is laid out with plywood or any other flooring materials (excluding the area for the car, there must be a thick concrete screed that can support its weight).
It is highly discouraged to lay a warm floor under the board, because, as already mentioned, the covering in the garage must withstand a lot of weight and be resistant to all kinds of influences. And the tree cannot boast of this. In addition, the process of laying and leveling a wooden floor is quite laborious.


