At the time of preparation for repairs in the house and apartment, a whole "swarm" of ideas "buzzes" in my head, how to do better, what new things to bring into everyday life. Today it is fashionable, practical, convenient and, most importantly, the use of warm floor technology in everyday life has become available. Ceramic tiles conduct and absorb heat efficiently. As a result, being on a floor with such a covering, a person feels cold under his feet. To get rid of this will help the installation of a warm floor under the tiles, which is usually performed on the "territory" of the kitchen, bathroom, hallway. There are also known cases of using a water-heated floor under the tiles instead of heating radiators in the sales areas of the store.
General preparatory work
The following disadvantages should also be mentioned. With storage, heat dissipation and demand cannot be adapted to each other. High temperatures sex can cause discomfort or even health problems. Once installed, the heating may not adapt well to other uses of the space. Heating with electricity is expensive and must be registered with a power supply of more than 2 kilowatts. The relatively low heating capacity is sufficient only in low temperature buildings as the only room heating system. At first glance, dry flooring is the ideal way to install a clean, level floor in an old building effortlessly.
Terms of work! If you have sufficient funds in your budget, you can hire specialists who will carry out floor insulation work efficiently, quickly and reliably. The main thing is that specialists are really professional practitioners. But if the crisis has temporarily touched your "wallet", and warmth under your feet is still desirable, use your own strength and our article.
However, the waterless version of flooring is not suitable for every home, especially for underfloor heating there are limitations. Dry floors are made up of prefabricated gypsum boards that are applied to a bed or existing floorboard. A huge advantage: Unlike in-line screeds, which are mixed with water on site, there is no lengthy drying phase. In addition, there is already a small amount of technical skill for screed installation in self-government areas. However, this simplicity has clear limits that mostly revolve around underfloor heating.
At the current stage of development of heating building technologies we can distinguish the following types of underfloor heating:
- electric floor heating;
- with heating cable;
- single core;
- two-core;
- with infrared heater;
- film;
- rod (carbon);
- with heating cable;
- water heated floor.
General preparatory work
For the installation of any type of warm floor, it is necessary to carry out the following types of preparatory work:
Drywall and wet systems
With conventional underfloor heating systems with underfloor pipes filled with water, dry floors reach their limit. Reason: The underfloor heating design creates an air layer between the pipes and the dry floor. However, air is a poor heat conductor, so the heat of the underfloor heating system in this case must pass upward using heat-conducting plates. However, this system has a much lower efficiency than when the pipes are surrounded by floats on all sides. If the floor is covered additional layer flooring such as laminate or even boards, thermal power systems can be significantly reduced, and then it not only takes a very long time to heat the room, but it also requires much more energy.
- A concrete leveling screed or just an even concrete base floor. In some cases, during cosmetic repairs, it is possible to install a warm floor on the old floor, which is used for the installation of all subsequent "layers". It should be borne in mind that the effective room height is reduced.
- It is necessary to decide on the place of installation of the heat collector (for water heating), to "grind" all the necessary channels for pipes and electric wires, a socket for the thermostat. In general, perform all work that is characterized by large quantity "Garbage".
- Then remove all debris and dust with a brush and vacuum cleaner.
Installation of electric underfloor heating with electric cable
A warm electric floor consists of a heater - cable and a thermostat. The cable, as already mentioned above, can be single-core and two-core. A two-core cable is considered a more reliable option and, accordingly, it is more expensive.
Drying floor and electric underfloor heating
A combination of dry flooring and electric underfloor heating works much better. Here, both systems can take full advantage of their benefits: both can be easily integrated into existing buildings. In addition, the underfloor heating system has a significantly lower construction height, which makes the system especially suitable for lower rooms. There are also various models in which the heating cable ducts are already inserted into the bottom of the screed. Some manufacturers also supply variants in which floor heating is already integrated.
The required length of the heating cable is calculated based on the floor area of \u200b\u200bthe room.
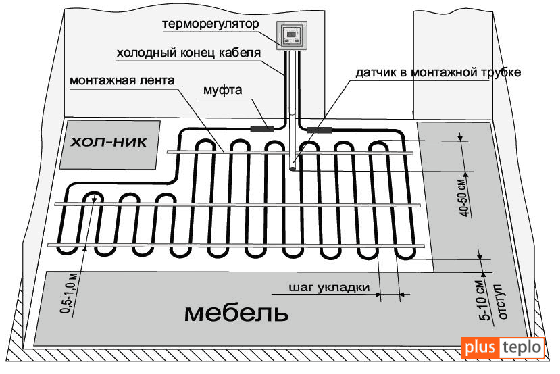
Caution! Under stationary furniture (sofa, bed, wardrobe), permanently low-standing objects and plumbing fixtures, it is UNUSUAL and DANGEROUS to lay the heating cable! It can fail from local overheating.
Since screed panels usually only need to be capped and glued, an entire floor and underfloor heating can be installed at a cost comparable to installing laminate flooring. Due to the fact that the heating is installed directly under or even in the drywall elements, it also provides a higher level of performance: no insulating air layer separates the screed from the floor heating. This is also due to the nature of electric underfloor heating, which reacts much faster than a wet system: if such a combination is installed in a bath, it only takes a few minutes for the tiles to warm up.

Attention! The cable of the selected length (especially two-core) must not be cut - it fits completely and completely!

Presumably you have already prepared a place for the thermostat !? If not, then this should be done immediately prior to any finishing work on the formation of the "pie" of the floor. A piece of corrugation is laid from the cable installation site to the floor surface. The length of its horizontal part should be within 0.5-0.8 m. The lower edge is "muffled" with a cap or tightly wrapped with electrical tape. This is a sleeve for installing and, if necessary, prompt replacement of the temperature sensor.
Installation of mats and installation of the control system
And at the end of the shower, the whole room heats up. The only real drawback: due to its energy consumption, electric underfloor heating is only conventionally used as a permanent heating system, but rather as an energy-saving and fast-reacting additive in rarely used rooms, so that the actual heating does not need to be turned on in the first place.
Generally, dry screeds are suitable for all buildings where a dry dryer cannot be used for drying due to time and cost reasons. Especially in the case of old buildings, the new floor can be integrated in an extremely short period of time: in principle, only the bed has to be applied and leveled, and then it can be immediately covered with dry tie-down elements. This simple principle makes it ideal for homeowners to retrofit underfloor heating systems.

A warm electric floor may “require” its own wiring line designed for its capacity.
Choice of wiring depending on power consumption
| Wiring type | ||||||||||||
| Copper, laid open | Aluminum, laid open | Copper, laid in a pipe | Aluminum, laid in a pipe | Cable section, mm2 |
||||||||
| Current, A | Power, KW | Current, A | Power, KW | Current, A | Power, KW | Current, A | Power, KW |
|||||
| 220V | 380V | 220V | 380V | 220V | 380V | 220V | 380V | |||||
| 11 | 2,4 | - | - | - | - | - | - | - | - | - | - | 0,5 |
| 15 | 3,4 | - | - | - | - | - | - | - | - | - | - | 0,75 |
| 17 | 3,7 | 6,4 | - | - | - | 14 | 3 | 5,3 | - | - | - | 1 |
| 23 | 5 | 8,7 | - | - | - | 15 | 3,3 | 5,7 | - | - | - | 1,5 |
| 26 | 5,7 | 9,8 | 21 | 4,6 | 7,9 | 19 | 4,1 | 7,2 | 14 | 3 | 5,3 | 2 |
| 30 | 6,6 | 11 | 24 | 5,2 | 9,1 | 21 | 4,6 | 7,9 | 16 | 3,5 | 6 | 2,5 |
| 41 | 9 | 15 | 32 | 7 | 12 | 27 | 5,9 | 10 | 21 | 4,6 | 7,9 | 4 |
| 50 | 11 | 19 | 39 | 8,5 | 14 | 34 | 7,4 | 12 | 26 | 5,7 | 9,8 | 6 |
| 80 | 17 | 30 | 60 | 13 | 22 | 50 | 11 | 19 | 38 | 8,3 | 14 | 10 |
| 100 | 22 | 38 | 15 | 16 | 28 | 80 | 17 | 30 | 55 | 12 | 20 | 16 |
| 140 | 30 | 53 | 105 | 23 | 39 | 100 | 22 | 38 | 65 | 14 | 24 | 25 |
| 170 | 37 | 64 | 130 | 28 | 49 | 135 | 29 | 51 | 75 | 16 | 28 | 35 |
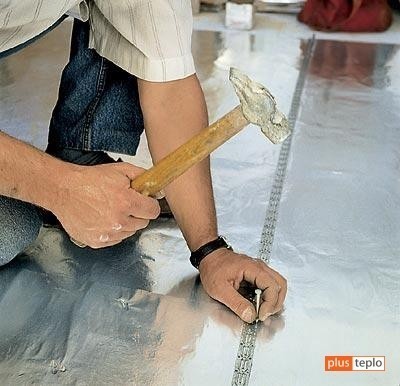
In this version of the underfloor heating, we will use foil foam as a heat insulator. Its thermal conductivity coefficient of 0.049 W / mK speaks briefly and clearly about its "outstanding" thermal insulation properties with a low weight and thickness of the material. This roll material is laid on the screed with the foil side up, and the joints are glued with mounting tape.
Dry parquet flooring with underfloor heating is an extremely useful combination when it comes to a quick and clean installation of a new floor. Thanks to their simple design, they can also be integrated into a self-governing system. However, before planning, you should add a technician and connect the heating system anyway so that it can be safely integrated into your existing home network.
Electric underfloor heating systems have the advantage that they have an extremely low overall height. In addition, the complex installation of heating lines can be omitted during electrical operation. The two-wire heating mat is equipped with a thin heating cable and is only 3.3mm thick. Then the heating system is covered either with a compensating mass or directly with tile adhesive. It includes heating mats, floor sensors and fixing material. The controller has a 2-inch touchscreen display and is capable of learning.
On top of the heat insulator, they are laid and nailed or screwed with special screws mounting tapeson which the heating cable is fixed. Before laying, it is necessary to measure its electrical resistance with a tester.

It has various timer programs and ventilation detection. These heating mats are glued to the back of the bath mirrors and prevent heat from fogging up the mirror. The heat rising from the ground heats the room evenly without losing energy. The use of an electric underfloor heating system is suitable wherever retrofitting is required. The room is pleasantly heated by the soothing radiant warmth and can be plugged into any normal power source.
Laying ceramic tiles
Electric floor heating. The electric underfloor heating system can be ideally modified and offers you a pleasant indoor climate and an invisible source of heat. Electric underfloor heating, easy to install on an existing floor. Electric underfloor heating is a complete heating system. However, only a certain part of the room can be heated, such as a playground in a children's room, where a nice foot pedal can be built.


 In some cases, a welded mesh is used, to which this cable is attached.
There is an electric underfloor heating system in the form of a swimming pool, which is installed during renovation works under floating floors, and some of the tiles are laid under the tiles in the floor tiles and in a thin layer. Heating mats are made from heat transfer fluids on a carrier mat, and heat conductors are made on a polyester film in the case of heating foils.
Distinctive parameters of the electric floor
Electric underfloor heating can be easily convected or delivered by us ready for assembly. Buy an electric underfloor heating at a reasonable price, but do not get by with a high standard of quality, you can order infrared heating and electric heating systems from us, your specialist dealer, on the Internet!

The contact wires are led out to the terminal box. The resistance of the cable is measured again and compared with the readings of the "pre-wiring" measurement.
Attention! It is strongly discouraged to turn on the heating cable to test its functionality before placing it in the concrete screed and finally drying it (30 days). This can damage the cable. The cable is checked with a tester, measuring the resistance and checking its compliance with that specified in the passport (on the sleeve) of the cable! If there is no such parameter in the passport, write down the readings of your tester.
Why electric underfloor heating?
Underfloor heating creates a pleasant floor temperature that provides excellent comfort and provides a cool season for cozy warmth and warm feet.
Full, partial or temperature heating
Another method would be partial or tempering heating. Here the room temperature is controlled by normal heating, electric underfloor heating provides the base heat. The floor temperature is measured with an external thermostat floor sensor. With this method, normal heating should heat up less because electric underfloor heating already provides the main heat.
The corrugation for the temperature sensor is fixed between the turns of the heating cable at an equal distance from them. Then a detailed diagram is made, or you can plus a photo of the location of the heating cable indicating the distance from the walls, the pitch of the turns, etc. What if you have to drill the floor! ..

Description - Electric underfloor heating
This saves additional heating costs! It is generally recommended to use partial or temperature heating in the bathroom, in case of poor insulation at home. The heating cable is attached to a flexible fiberglass textile support system, the heating mat is specially designed to be installed close to the floor directly under the floor covering. Thus, optimal, uniform heat distribution and very fast heating are possible.
In all living roomssuch as bathrooms, kitchens, living rooms, bedrooms, children's rooms, winter gardens, can be used everywhere, to be installed in flexible floor tiles or leveling compounds, because floor coverings suitable for electric underfloor heating. Due to the low installation height of about 4 mm and the short distance of the heating cable of only about 70 mm, it was possible to use it in rooms where it was impossible to climb to the floor. The heating mat is intended for permanent installation under stone floors or slabs when using other floor coverings. Not suitable for dry installation.

Walking on a cable, especially in shoes with a solid sole, is highly undesirable!
After checking the cable, a cement screed with a thickness of 40-50 mm is made. It is necessary to pour the solution evenly without the formation of voids.
Important! Emptiness in cement screed near the heating cable will prevent intensive heat removal from it, which will lead to cable burnout!
It is also possible to connect the supplied floor sensor. Which temperature sensor should be used, it is easily set via the menu. The weekly program can be set individually. Childproof button lock provides additional protection and prevents unintentional settings. All settings are still available after a power failure and do not need to be performed again.
The thermostat is easy to install and makes it easy to operate thanks to a user-friendly menu. In addition, the device is maintenance-free and quiet. Heated floors with hot water. Electric underfloor heating and underfloor heating with hot water are two options for an increasingly popular method of heating an apartment. Which floor heating is more suitable for this purpose and what you should pay attention to during installation can now be found in a short comparison.
After 5-7 it, you can start laying the final flooring - ceramic tiles.
Important! The performance test of the floor heating elements can be carried out no earlier than 35 times from the moment of pouring the concrete screed!
Underfloor heating has long been considered a particularly luxurious and exclusive alternative to classic heating systems. However, in last years underfloor heating technology has improved significantly and is much more affordable. Due to the predominant advantages of underfloor heating compared to classic heating systems, the possibility of such a heating installation should be considered, especially in new buildings. Underfloor heating can often be modified without much effort.
Different types of underfloor heating systems
Underfloor heating evenly distributes the heat in the respective room, and this warmth is felt by most as particularly pleasant. A distinction is made between electric underfloor heating systems and those that use hot water. If you want to install such a system on your four walls, you should elaborate on the two types of underfloor heating and evaluate the advantages and disadvantages.

Let's summarize! This type of underfloor heating installation under tiles requires a "high" screed, which reduces the overall height of the room. At the same time, this screed increases the inertia of the system as a whole, allowing it to accumulate heat in itself. The inconveniences associated with prolonged drying of the screed can be compensated for by performing other repair work.
Installation of electric underfloor heating with heating mats

This method of "warming" the floor avoids pouring the heating cable into the concrete screed - the heating mat is placed directly under the tile adhesive.

After a few hours, the floor is ready to “receive” the heat from the heating mat.
Such a heating mat cannot be placed under stationary objects! A heating mat is placed on the area selected for heating, cutting its base into fragments.
Attention! This does not cut the heating cable!
When laying, the heating cable must not cross and overlap. Distance from the wall - more than 50 mm and not less than 100 mm from other heating devices.

The thermostat sensor is located in the same way as in the previous method of laying the heating cable. Only because of the small thickness of the heating mat and a thin layer of backing glue, the corrugation must be “buried” into the screed, making a groove under it.

The adhesive solution is applied in a continuous thin layer of 8-10 mm and is in full contact with the tile surface.

Attention! Get rid of drafts in the room where such a warm floor is installed until the solution is completely dry.


The technology of installing a warm floor under a policy using infrared heaters differs from the previous one in that a layer of drywall or glass magnesite is placed on the heating film.
The approximate sequence of actions is as follows:
- A layer of heat-insulating heat-reflecting material is laid on a clean concrete screed.
- The heating film is being laid, electrical work is being performed. You can read more about this in the article "Warm floor under linoleum".
- Place the plastic wrap on top of the bonded, connected, tested thermal film.
- Next, sheets of drywall (glass magnesite) are laid.
- Next, the tiles are laid on the tile adhesive.

In addition to the film heater, a carbon infrared rod heat-insulated floor can be used.

These systems have a self-regulating effect. A floor with such heating elements is virtually impossible to overheat.
Water underfloor heating device under the tiles
Installation of underfloor heating under the tiles begins with the thermal insulation of the concrete screed, on which water heating pipes are laid, connected to the heating system manifold. This is, for sure, the most common and proven way to obtain a warm floor under the tiles for private houses and apartments with an individual heating system. In the central heating system, the use of underfloor heating is, to put it mildly, undesirable, since after the hot water passes through the floor pipe system, it will "go" to the neighbors much cooled. Do you want to quarrel with them?
Floor insulation starts with installation along the walls of the room thermal insulation material... Usually it is a tape or strips of a thin (1 cm) sheet heat insulator (polystyrene, expanded polystyrene, polystyrene foam), which, in addition to preventing the "leakage" of heat from the floor to the walls, also play the role of a damper compensating thermal expansion heated floor. With large floor areas, it is possible to lay such a tape between the sectors of the floor of the room.
A heat-insulating layer is laid on the concrete screed, mainly of expanded polystyrene plates. On top of the slabs reinforcing mesh, which will serve as the basis for fastening the pipes.

The scheme of laying pipes for underfloor heating can be different: a spiral snake, a double snake. This is a topic for a separate discussion. The main thing is that the selected pipe layout allows for uniform heating of the room, and is “available” (simple) for installation. The pipes are fixed with special clamps with a step of up to 1 m. Heating pipes are not laid under stationary furniture and plumbing fixtures.
Attention! You cannot fix the pipes "tightly" - it must be a "sliding" fastening. Otherwise, heat deformation of the pipes is possible. Pipes are laid with a step of 100 - 400 mm, no closer than 80 mm from the walls.

After laying, the pipes are connected to the distribution manifold. And the "pressure testing" of the system is carried out with a pressure one and a half times higher than the nominal (working).
After checking, a concrete screed is made, which should cover the heating pipes by at least 50 to a maximum of 80 mm. When the screed is dry, ceramic tiles are laid on its surface.
Positive qualities of a water-heated floor:
- Warms up the air evenly in a heated room;
- Can be an alternative to radiator heating;
Neutral negative points:
- Complex installation;
- Expensive equipment that automatically controls the heating temperature;
- Decrease in usable room height due to thick screed.
We hope that a little information about the installation of a warm floor under the tiles will help you understand and choose a worthy option for floor insulation for your home.
Underfloor heating is a quality heating solution. Therefore, today more and more often this system appears in city apartments and in private houses. But here the question arises, which one of the heated floors proposed by manufacturers is better, because they are represented by three positions: water heated floors, electric and infrared. Probably, one cannot say that some option is better, and some worse, it is just necessary to precisely select the model that will work effectively under the operating conditions. In addition, you will have to take into account the moment that a warm floor can only be installed under floor coverings with high thermal conductivity, which include ceramic tiles. Therefore, in this article only one question will be considered: how is the underfloor heating installed under the tiles.
Of course, all options will be considered in terms of the use of each model. But it is necessary to outline one point - all types of technologies for laying a warm floor under tiles have one identical stage - this is preparation. Let's start with her.
The main requirement for laying a warm floor under the tiles is a flat and solid base. Therefore, before moving on to the main installation work, that is, before you make a warm floor, you need to level the floor surface.
If it is a concrete floor, then a concrete screed or any leveling mixture (on a cement or polymer basis) must be poured over it. It is clear that the concrete screed will take longer to dry, but its price is less than that of ready-made leveling mixtures. Moreover, its thickness under a warm floor should not be less than 3 cm, which increases the consumption of the solution, while increasing financial costs.
If the floor is wooden, it is recommended to level it with wood-based panel materials, for example, plywood, OSB boards, chipboard and so on. It is better to give preference to inexpensive but durable products, for example, chipboard, the plates of which are connected with a tongue-and-groove lock, which provides a surface without gaps. At the same time, it is optimal if the slabs are laid with an offset, which will ensure an even distribution of loads on the wooden floor itself.

There is one more point related to the preparatory stage. This is the insulation of the floor surface, which will reduce heat losses. Since the installation of a warm floor under the tiles is associated with the laying of heating elements on the floor base, care must be taken to ensure that the heat emanating from the elements of the warm floor does not pass through this base. Of course, you can guarantee that the wood floor is insured against this, because wood itself is a good heat insulator. But when it comes to concrete floors, then you can't do without a separate thermal insulation layer.
Experts recommend that the insulation layer is not just made of foam or fiber material. But, so that it contains a reflective layer that will keep the infrared radiation emanating from the elements of the heating structure. Therefore, before installing the warm floor, it is necessary to lay insulation with a foil layer on one side on the floor base. Fortunately, there are a huge number of such in the modern market today building materials... But here you have to take into account the moment that this material should not be thick, because the thicker the layers to be laid, the lower the ceiling height in the premises. Of all the materials offered, Penofol insulation is suitable for this.
So, foil-clad penofol is a roll material made of polyethylene foam with a thickness of 5 mm. For example, its thermal insulation properties are equal to a rock wool slab, which is 80 mm thick. Lay the foam strips end-to-end, closing the gaps and crevices with aluminum adhesive tape.

Assembly technology
So, before putting a warm floor under the tiles, it is necessary to carry out a fairly large amount of preparatory measures. True, doing all this with your own hands is not the biggest problem. It is much more difficult to carry out the main process itself. But if you figure out everything and understand the scheme of laying a warm floor under a tile with your own hands, then you can do with small forces, without investing large funds in the services of professional specialists.
Now you need to deal with each warm floor separately. That is, you need to figure out what constitutes a warm floor under the tiles.
Electric underfloor heating
Currently, manufacturers of warm electric floors offer two types of it. This is a heating cable, as a separate element, and mats. The latter are all the same cable, only installed and fixed on a special polymer mesh. In fact, this is already ready product, which you just need to unwind, lay on the floor and make a connection to the supply current. At the same time, the distance between the sections of the cables for the mats is the same, that is, there is no need to think over the laying scheme while maintaining the required dimensions between the turns.
But there are certain requirements for electric underfloor heating regarding its installation.
- The heating element should be spaced 10 cm from the wall surfaces.
- Do not install underfloor heating (electric) under heavy furniture, household appliances and household items.
- If this design it is planned to use it as the main heating, then it is necessary to choose heating elements at the rate of 140-180 W per 1 m² of floor area. If the warm floor will be used as an additional heating system, then low-power structures with a capacity of up to 140 W / m², for example, 80 W / m², can be laid. The thing is that the main requirement for heating system - this is 1 kW of thermal power per 10 m² of surface. And this is without taking into account heat losses.

Now you can proceed to the main stage - how to properly lay the warm floor. So, in addition to the cable or mats, the electric underfloor heating also includes a thermostat, with the help of which the temperature regime is set, and a temperature sensor that will monitor the very temperature.
- First of all, the heating cable or mats are laid. The cable is mounted with a snake and attached to plywood, chipboard or concrete floor using special clamps. Some craftsmen even use construction tape, because the main thing is to fix and mount the circuit, and the fastening will be done with tile glue. The mats are evenly distributed on the floor surface, covering the entire floor. The mount is exactly the same as that of the cable.
- Then a temperature sensor is installed in a special corrugated hose. Its location is on the floor between two turns of the cable.
- The thermostat is mounted on the wall at a height of 1.5 m. It is simultaneously connected to both the temperature sensor and the heating element. Ideally, if the connecting wires are hidden in a groove on the wall.
In principle, everything is ready. But before laying tiles on a warm floor, you need to test the latter.
Attention! You cannot include it in the network, it can immediately burn out. It must be checked for resistance, which is indicated in the passport. The check is carried out with a multimeter, the readings of which during testing must coincide with the passport data. If the deviation is no more than 10%, this is normal.

The very same laying of tiles on a warm floor with your own hands is done using standard technology. That is, the marking is done first, it is better to start the cladding process from the most prominent corner of the room, farthest from the front door. The adhesive is applied to the substrate with warm floors, on which the tile itself is mounted. A gap must be maintained between the tiles with the installation of plastic crosses. And at the end, the grout must be applied to the tiles for decorating the seams.
Water heated floor
Usually, the installation of a warm floor under the tiles (meaning water) is carried out only in private houses. In apartments, this structure can be assembled, and even connected to a central heating system, but this undertaking will be very expensive. And it is not always possible to do this, and even more so with your own hands, if you are a layman in this matter. Plus, the floor of the high-rise building is a concrete slab, which will have to be not only leveled, but also well insulated, especially for apartments on the ground floor.
Therefore, the thickness of the entire multi-layer cake, together with warm floors and ceramic tiles, will be at least 10 cm. And this is the minimum indicator that will affect the decrease in the ceiling height, which is too significant for city apartments.
As for thermal insulation, much will depend on the material from which the floor itself was built. If it is plywood or chipboard, then it is recommended to use the same foamed foam foam. If it is a concrete base, then polystyrene plates can be laid on top of the concrete, in which grooves are made for laying pipes for a water-heated floor. To ensure that the infrared radiation is reflected not towards the floor, but upwards, special inserts made of aluminum alloy are installed inside the grooves. This option is called the flat method. Today it is the highest quality and fastest in the installation of underfloor heating.

By the way, if the floor is made of plywood or other wood-based panels, the flooring technology can also be used. The main thing is to choose the right adhesive composition, with which the expanded polystyrene plates will be attached to plywood or other slab materials... More recently, this insulation was attached to surfaces with special mushroom-shaped self-tapping screws made of plastic. In principle, they can be used today, but glue is better. Easier and faster.
After preparatory phase you can go directly to the pipe assembly. it plastic pipes, which are interconnected by fittings using welding technology. The assembly scheme is scattered with a snake or spiral, the ends of which are brought out to the wall, and subsequently connected to the installed collector. The latter itself is connected through pipe wiring to the heating boiler.
Before laying the screed on the underfloor heating system, check the latter. Typically, pressure testing is performed using the pressure inside the system, which should be 1.5 times the normal pressure. There are two options here:
- Pump in water using a pump.
- Pump in air with a compressor.
The heating system should be in this state for a day, during which connection defects will be revealed.
![]()
If the crimping does not reveal any flaws, you can proceed to the screed. This is the question of whether it is possible to lay tiles on pipes. Unfortunately, this layer is indispensable, because underfloor heating pipes have a minimum diameter of 20 mm. And this big size, which creates large drops in the plane, and they have to be hidden. And here are two options:
- As a screed, use usually a cement-sand mortar. Economical, but you have to wait 20-25 days for the laid layer to dry out.
- Self-leveling mixtures. Expensive, but this material dries for 10 days.
And after this stage, you can put the tiles on the floor. The technology is still the same as with electric floor heating. But before laying the tiles, it is recommended to prime the screed with a primer in order to increase the adhesion of the surface.
Conclusion on the topic
The article discussed the topic of how to properly lay a warm floor under the tiles with your own hands. Not the easiest process. Therefore, starting to understand it, it is necessary to take into account all the nuances and rules of all stages. Any wrong process will ultimately affect the quality of the end result. For example, even if the screed was poured incorrectly, or the plywood was laid incorrectly, or it was not firmly fixed. There are no trifles in this matter, everything is important and important.


