Fences are building structure, the main purpose of which is to fence a certain private or public territory. The thoroughness of the construction of fences depends on the degree of importance of the fenced area. For small private landholdings, the scale of the enclosing structure is often conditional. The priority here is to define the territory, not to protect it from violent invasion.
Therefore, most of such a fence, delimiting adjacent areas among themselves, is a light structure and only the front facade part, as a rule, is fenced off with more solid decorative fences made of wood, even with the use of decorative elements.
 Most often, to designate private land holdings, wooden fences are used, as the most available material in the Central European space.
Types of wooden fences, depending on the design solution very diverse and do not lend themselves to a clear classification. They can be conditionally divided into the following:
- Classic.
- Wicker.
- Ranch.
- Palisade.
- Log cabins.
Wooden fences can be subdivided depending on materialsthat are involved for their device:
- purely from one tree;
- wood + metal;
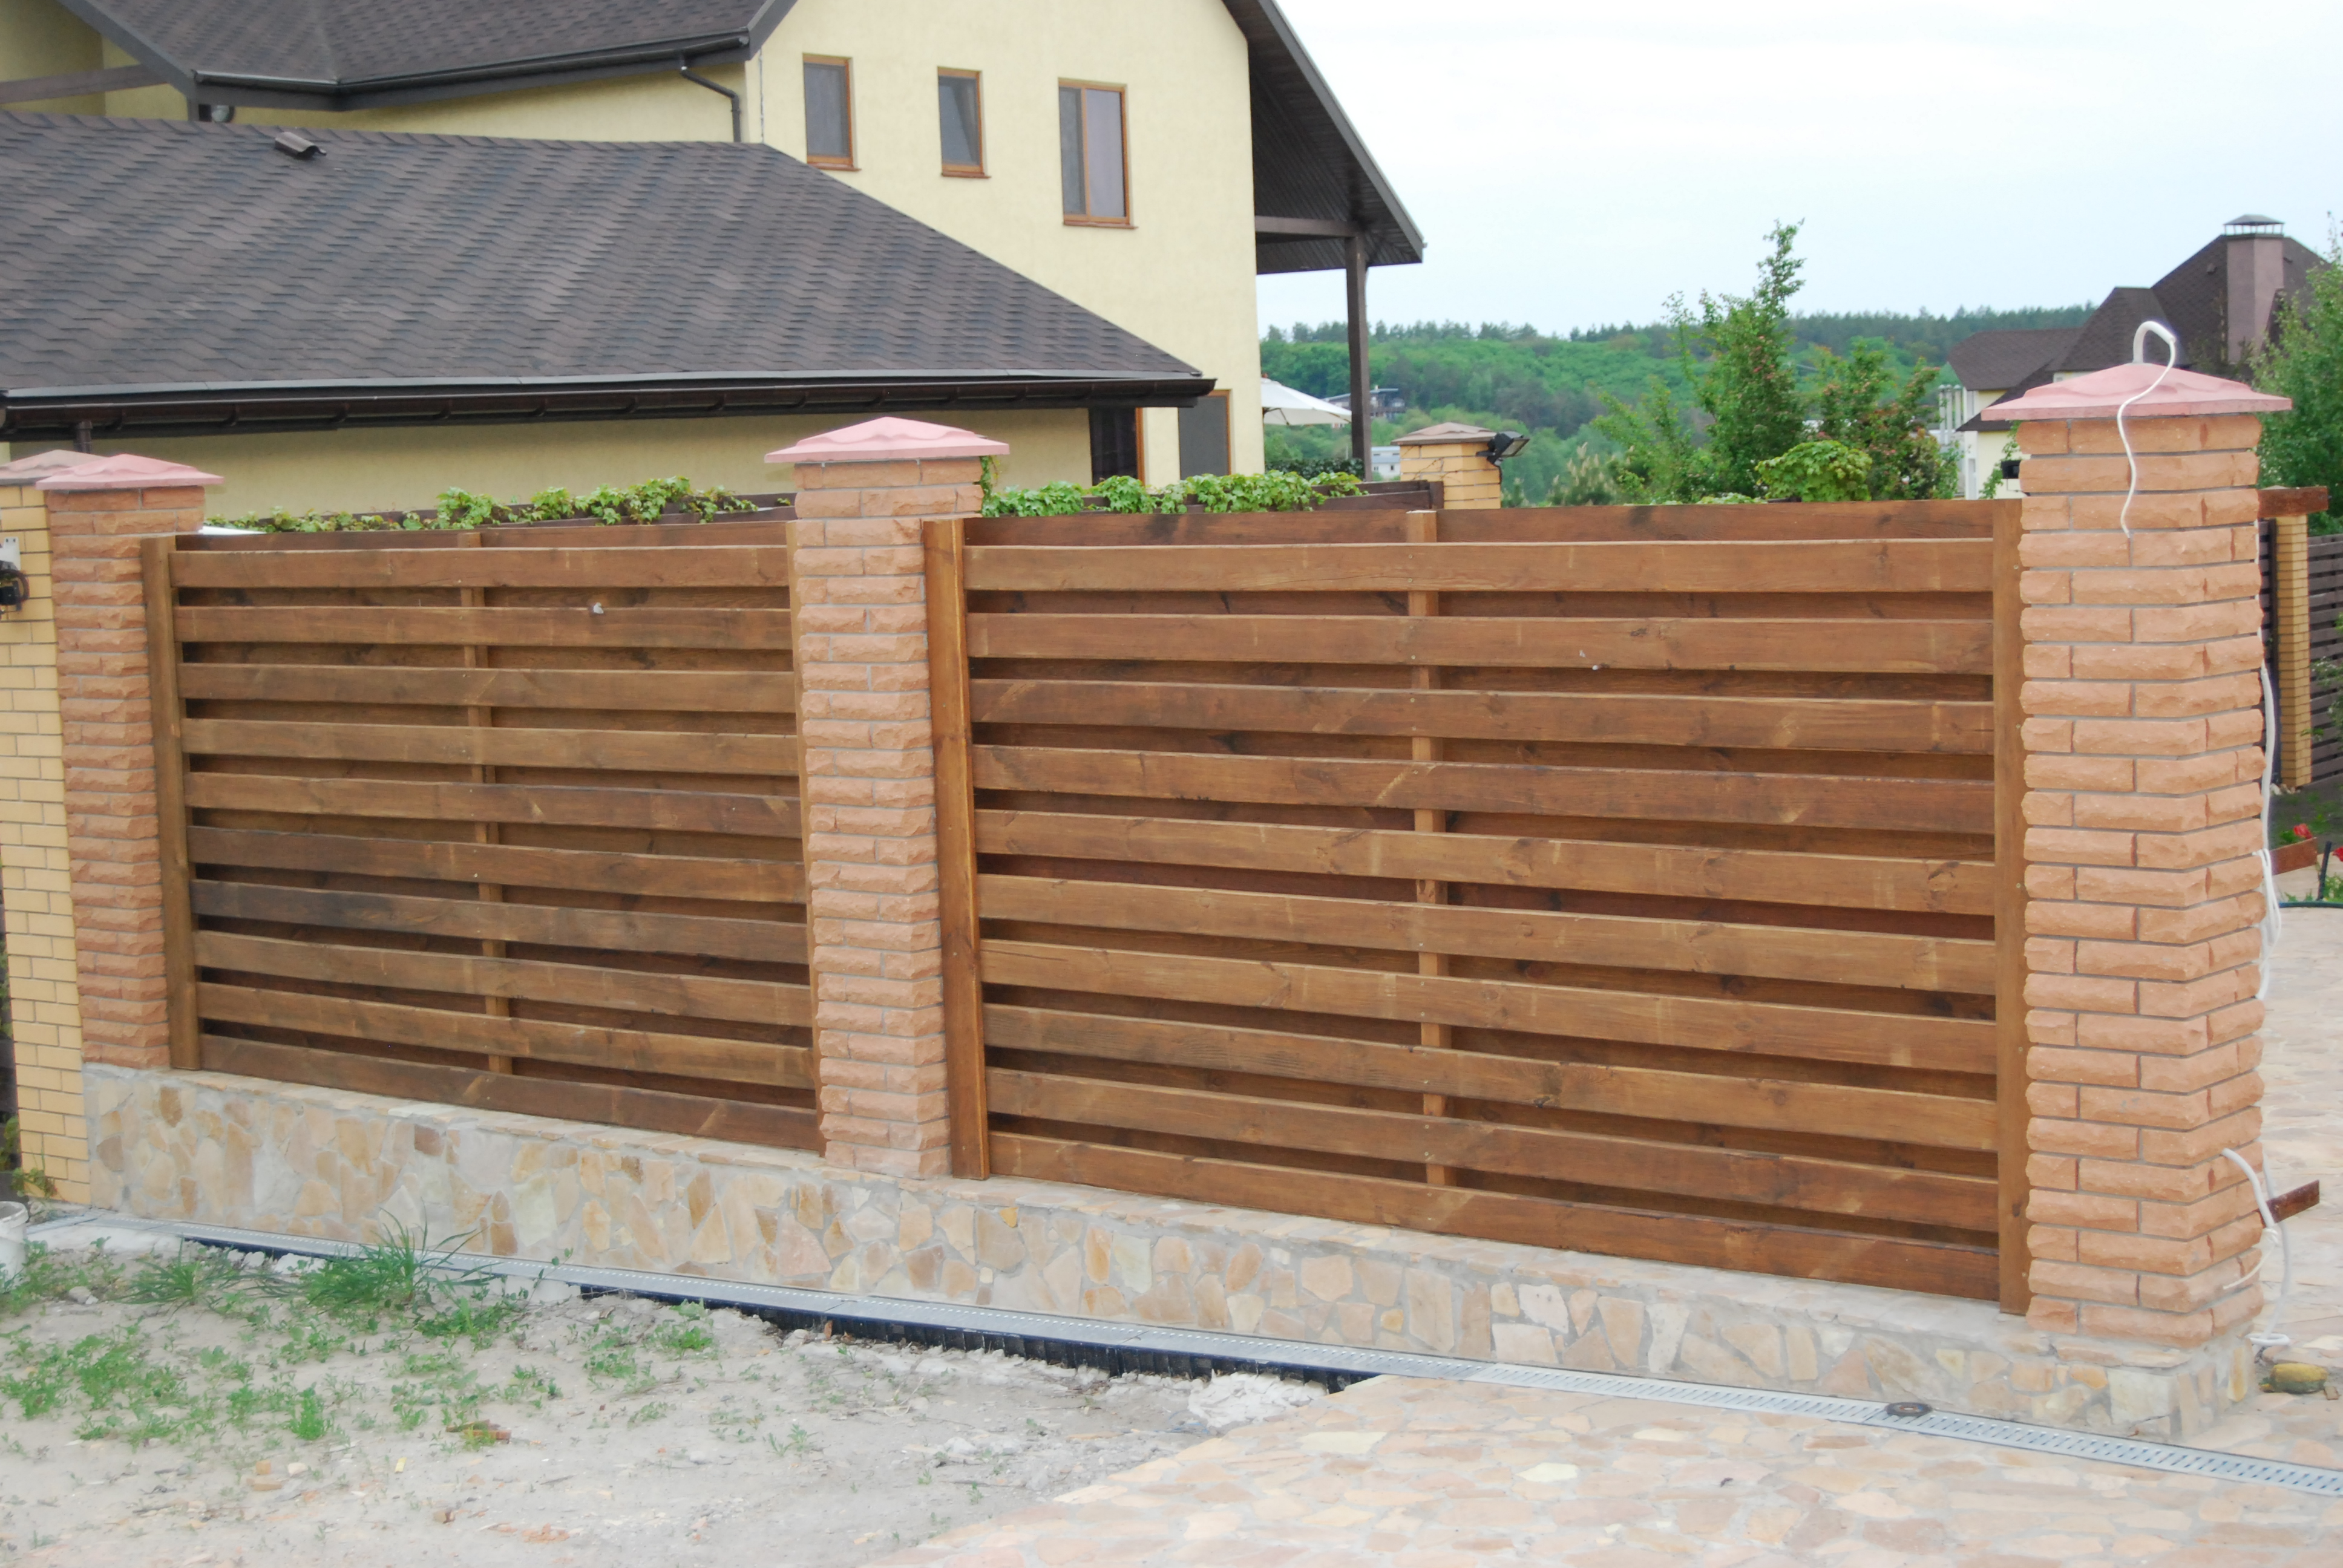
- wood + stone (brick);
- wood + metal + stone;
- wood + concrete.
Another classification means shape differences the wood materials themselves:
- Boards.
- Reiki (picket fence).
- Logs.
- Bars.
- Twigs, branches.
Fence base
 Whatever the design differences in the device wooden fences, good solid foundation below ground level is a prerequisite for their construction.
Gone are the days when wooden pillars were simply dug into the ground, exposing them to the inevitable rot and damage. After several years of operation, the rickety fences had a dull, unpresentable appearance.
To prevent this from happening even when using all the same wooden logs as pillars, there is certain device methods a solid foundation for building a fence made of wood with your own hands.
Such a basis may be metal or reinforced concrete pipes with an inner diameter of at least 100 mm. Pieces of such pipes are dug in or even concreted in the ground with a slight elevation above the ground surface, and then wooden posts are driven into them.
The ideal condition is also compliance with bookmark depth norms bases, depending on the freezing of the soil in the winter. These norms are often neglected, and they are very important especially when building heavy stone or brick fences. A shallow foundation undergoes deformation when the soil freezes, which entails a violation of the stability and integrity of the entire structure.
If the ground is rather soft, holes under the fence posts can be made using special hand drill... In hard soils, saturated with rocks, holes will have to be dug with your own hands using hand or electric slotting tools:
- Bayonet shovel.
- Pick.
- Scraper or trowel.
- Electric rotary hammer with a set of slotting lances.
The diameter of the holes in this case will be much larger, which makes it possible to better concreted the base of the fence. Support pits dig strictly along the line, which is determined using a stretched cord.
Gallery: wooden fences (25 photos)


![]()


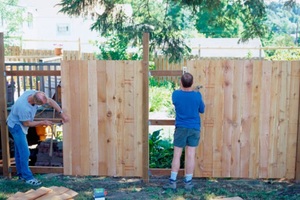
Making a wooden fence
 If the material for the construction of the above-ground part of the fence is only wood, then logs or square beams from tree trunks are used as pillars. conifers: pine, spruce.
The tree of these species tolerates open space conditions well: exposure to wet precipitation, temperature changes, heat and cold.
The posts are installed in prepared bases strictly vertical in two perpendicular planes. The lower ends of the square pillars are rounded off accordingly to be inserted into the round base.
Attached between the pillars horizontal veins, which are bars, slats or boards of sufficient thickness to make the fence a structurally strong structure. There are at least two veins for each span between the posts. One is located a short distance from the top of the pillar, the other is a vein just above the base of the vertical supports.
The veins can be attached to the posts simply with an overlap, but for greater compactness, it is worth drowning their ends in the body of the posts by making the appropriate grooves.
After fixing the veins, it follows installation of the main part of the fence, which has the main blocking function of the structure. Planks or slats are used here, which are fastened vertically across the veins with nails or screws.
If the fence does not bear an aesthetic load, then boards of the lowest quality can be used for its sheathing. slabs or obapols, which are waste of the woodworking industry.
For a more solid look, they build edged board fences, which are nailed close to each other and are framed on top with a decorative strip. You can decorate the monotonous plane of such a fence using elements from the same decorative slats.
One option is to nail them over the main boards. in the form of rhombuses, alternating them in accordance with the general ornamental pattern along the entire length of the fence.
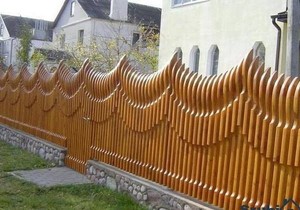
The most decorative wooden fence is obtained from a picket fence, which is a slats 20–60 mm wide. The upper ends of the rails of the picket fence can be shaped as points of various shapes.
The height of such a fence is usually less than a blank fence. As additional decorations can also be used here various geometric shapes, combined from picket rails on top of the main fence. Such artistic additions also enhance the overall structural strength of the fence.
Deaf and open fences
 Deaf fences with a height of at least 2 meters are erected if the fenced area needs to be protected from the views of strangers.
In this case, the gaps between the boards are filled with special laths or fix the boards in a checkerboard pattern so that there are no gaps initially.
As a cover strip you can use decorative picket fence... Such fences are not suitable for vegetable gardens. They will greatly shade the area adjacent to them.
For fencing spaces in need of a lot of sunlight, it is very convenient to use wooden ranch fences, the design of which, in addition to pillars, is limited by horizontal thick boards, fixed at a fairly large distance from each other.
Lightweight fences made of wood
 Fences of purely one tree are of an unusually light construction. These are lattice structures made of rails and wattle.
Lattice fences are more convenient mount from ready-made boards, which are assembled with their own hands in one place specialized for such work. And then they are fixed as a fence in the most appropriate way, depending on the design of the vertical posts.
The shield is a frame assembled from thicker beams, the space of which is sewn up thin slats in intersecting directions... Reiki can intersect both at right angles and at other angles.
Between themselves they overlapped or rallying in half a tree, which is a more time consuming process. If the slats are rather thin and flexible, then they can be recruited into the shield and in the form of a mutual weave.
On the principle of interlacing, the construction of wattle fences from rods is also based, but such fences are possible if there is an appropriate building material nearby, obtained from trees and bushes of certain species.
Fences made of wood and metal
 The combination of these materials makes the fence the most durable and convenient for further operation and repair.
It does not require a preliminary foundation device. If pillars are used metal pipes, then all of them at once concreted in prepared pits.
Both wood and metal can be used as veins. Wood veins attached to metal pillars using clamps or bolts. For the bolts in the posts, you will have to drill through holes.
Bolts can also be used to attach metal veins from the corners. The most reliable way to secure metal purlins is use of electric welding... Further, a wooden bar is inserted into the corner of the vein, to which vertical fence boards are attached with the help of nails or screws.
These boards can actually be attached directly to the metal girder, but for this, in the body of the corner, you will need to drill mounting holes individually for each board. There is another original option, if instead of a corner for the device of girders use a steel strip.
On one run, two strips are launched, fixed to the posts in parallel to one another. The distance between the strips should correspond to the thickness used for the board fence device. Subsequently, the boards are stuck inside between the strips from above. In several places, strips and boards are drilled through and bolted together.
Brick and wood fences
 When combining such materials, most often only pillars are required to be built with brick. In this case, the foundation device must be taken very seriously. The bases can be arranged pointwise separately for each pillar or in the form of a solid strip foundation
... The middle option is a one-line connection of deeper foundations under pillars with walls shallowly embedded in the ground under the main part of the fence.
When combining such materials, most often only pillars are required to be built with brick. In this case, the foundation device must be taken very seriously. The bases can be arranged pointwise separately for each pillar or in the form of a solid strip foundation
... The middle option is a one-line connection of deeper foundations under pillars with walls shallowly embedded in the ground under the main part of the fence.
To make the brick post more durable and reliable, it is advisable to use metal. A metal pipe is concreted into the base, which after bricked... In the brickwork, it is appropriate to weave metal girders welded to these vertical pipes.
If you plan to use wooden blocks as girders, then niches should be left in the brick posts for their installation. The length of the wooden girders is made in such a way that when one end of it is installed in a niche, the other end should fit freely between two brick posts.
A wooden girder is installed in this way. A little slurry is injected into both niches. The run is inserted first to failure in one niche. At this point, the liquid solution may even be squeezed out.
Then the girder slides into the opposite niche. After the solution has solidified the wooden block will be fixed and will lose the ability to randomly fall out of the place of its installation.
Fences made of concrete and wood
 In this combination building materials concrete is also used to make poles. The ideal option is to use ready-made poles from a set of so-called eurofences.
Wooden purlins in this case inserted into grooves these concrete pillars. Then the spans of the fence are sewn up with vertical boards.
Here you can even abandon the use of vertical boards, completely satisfied with a set a fence made of horizontal beams or boards, by completely filling vertical grooves in concrete with them. The bars fit with their ends in the grooves tightly to each other. Additionally, they can be tightened with nails closer to the middle of the span.
Fences made of beams
 When constructing fences made of wooden rectangular beams in their cross-section, it is realistic to hide the use of vertical posts. To do this, they should be used as steel tubes
smaller than for traditional pillars with a diameter of 50–80 mm. They are concreted into the base, like ordinary metal posts. But this must be done immediately for the entire length of one side of the fence from corner to corner.
When constructing fences made of wooden rectangular beams in their cross-section, it is realistic to hide the use of vertical posts. To do this, they should be used as steel tubes
smaller than for traditional pillars with a diameter of 50–80 mm. They are concreted into the base, like ordinary metal posts. But this must be done immediately for the entire length of one side of the fence from corner to corner.
Holes are drilled in the bars, corresponding to the diameter of the pipes of the racks in precisely measured places. Then the bars are put on metal pipes from above and laid first in one row along the entire length, and then on top of each other to the very top of the fence. Along the length, the ends of the bars can be joined anywhere, but so that the joints of each subsequent row do not coincide with the previous row.
The benefits of this method are obvious. Bars no need to cut to length, which gives huge savings in material use, reduces labor intensity of work processes and speeds up construction time.
For better light transmission of the fence, the bars can not be joined together along the length, but lay with gapsexcept for the first and last row. On the top row of beams, it is imperative to make a galvanized sheet cover to protect the tree from rain.
Wooden fences from the board by type of siding... With this method, the spans of the fence are filled with boards horizontally, but overlapping each other. In the case of wooden posts, the boards are nailed directly to the posts themselves, without any additional elements.
You will need to attach vertical guide bars to metal or brick posts, to which horizontal sheathing boards will be nailed.
Beautiful wooden fences
 The beauty of such structures as fences is achieved not only by adding decorative artistic elements, but also by the banal severity and thoroughness of all construction work.
Perfectly flat wooden fence beautiful in itself... Especially when this clarity of execution fits in with the correct height differences into the natural, not always ideal terrain, the type of fence wins twice.
How to make beautiful fence made of wood using additional overhead elements there is simply no limit to fantasy. This is a fertile field for creativity of people with skillful hands and gifted design imagination.
Let's talk about secrets ...
Have you ever experienced joint pain? And you know firsthand what it is:
- inability to move comfortably and easily;
- pain during or after exercise;
- discomfort when going up and down stairs;
- inflammation in the joints, swelling;
- unpleasant crunch, clicking not of their own free will;
- unreasonable and unbearable aching joint pain ...
We ask you to answer the question: does this suit you? How can you endure such pain? How much money have you already "poured" on ineffective treatment? It's time to end this! Do you agree? Today we publish an exclusive interview with Professor Dikul, in which the doctor revealed the secrets of getting rid of joint pain, treatment of arthritis and arthrosis.
Attention, only TODAY!
To mark the border, protect the site from uninvited guests and animals, and in order to hide your property from prying eyes.
Types of fences: corrugated board, brick, stone, concrete, picket fence, chain-link mesh.
What are the types of fences and barriers
The fence can be constructed from several materials. For example, more durable concrete is used to build support posts and a plinth, on which wood panels or cast iron gratings are then installed. Today you can find a wide variety of types of fences. They can be constructed of wood, brick, concrete and wire mesh.
Back to the table of contents
Brick fence
Important! Brick fences are reliable and durable. To give them the necessary lightness, you can complement them with arches and niches for flowerpots, which are ideal for any landscape design of the site.

The service life of a brick fence reaches 50 years. Moreover, such a fence does not need maintenance and regular painting.
For the fence, you can use ordinary red or facing bricks. The use of solid brick is undesirable, since its uneven edges will have to be plastered. In order to give strength, brickwork can be diversified with pillars, the span between which should be at least 2.5 m. Brick fence requires a strip foundation device. Alternatively, you can lay the channel between the posts.
Back to the table of contents
Concrete fence
For the construction of a permanent fence, standard reinforced concrete slabs can be used. Despite the fact that they are more durable and stronger than bricks, their price is 10% lower. Concrete has high plasticity, which allows you to get any shape out of it. Assembling a fence made of slabs is quick and easy. All you need is a crane.
Back to the table of contents
Metal fences

The construction of metal fences is carried out using welded or forged gratings of various heights. When choosing them, it is necessary to take into account that they do not discord with the pillars and the landscape of the site. Forged gratings are ideally combined with pillars and walls made of natural stone... It is logical to use metal fences in areas with large and dense plantings of bushes. According to the designers, this type of fence is the most convenient, since it does not require decoration and easily “dissolves” in the environment.
Back to the table of contents
Metal mesh fences
Such a fence is recognized as the most affordable option for arranging a site. Today you can buy a mesh of various widths and lengths, with small or large meshes. They can be black, zinc plated or vinyl coated.

Important! The most practical is the galvanized steel mesh.
As for non-galvanized mesh with cells of 10 mm, experts do not recommend using it for the manufacture of a fence, since it cannot be protected from corrosion.
The mesh is stretched over the pre-installed posts-posts, the distance between which should not exceed 3 m. For their manufacture, you can use metal and asbestos-cement posts or steel corners. In areas with weak soil, the pillars are best concreted, and the corner posts are reinforced with struts. Reinforcement of posts for wickets and gates is carried out in the same way.
Back to the table of contents
Wooden fences: variety and features of the fence
Such fences can be called classic. In Russia, they were used to fence cities, estates and fields. For their manufacture, logs, boards and rods were used. In the West it is a symbol of prestige and prosperity. In Russia, they can be either a work of art or a dull, unremarkable palisade.

Wooden types of fences differ in appearance and design. Among the most common, it is worth noting:
- fence;
- wattle;
- palisade;
- boardwalk fence;
- a fence made of wooden panels.
Before assembling the fence, all its wooden elements must be treated with a special antiseptic compound. So that snow does not accumulate at the ends of the boards, which can provoke the beginning of material decay, their ends are cut off at an oblique angle. It will not be superfluous to sharpen the upper edge of the crossbars. Wooden fences can be painted. Any paint designed for outdoor use is suitable for this.
Back to the table of contents
Fence made of corrugated board

Decking is recognized the best material for the construction of a fence. The construction of such a fence guarantees reliable protection from penetration and long service life. Unlike a wooden one, a corrugated fence does not need additional maintenance. What's more, it provides excellent sound insulation and protection from dust and wind.
Fences made of corrugated board are solid, modern lookand at the same time they do not attract undue attention to themselves. The covering of such a fence can be of any color, which allows it to be matched to any landscape design. The corrugated board is highly resistant to ultraviolet radiation, so it does not lose paint bone.
Back to the table of contents
Stages of building a fence
The construction of any fence takes place in four stages:
- site marking;
- foundation device;
- installation of pillars;
- filling of spans.

To work, you need the following tools:
- shovel;
- container for solution;
- cord;
- roulette;
- level;
- hand drill;
- self-tapping screws or galvanized nails.
We have 13 guests online
A plinth that runs along the entire fence between the posts along the surface of the ground increases the strength of the fence. It is erected during construction combined fences... If stone, brick and concrete fences reinforced with pillars, then a basement is made between them. It can be made of stones, bricks, rubble, revetted with pebbles, sandstone, shell rock and other materials. The plinth is placed on the foundation. Under it, it is necessary to make a formwork of boards, placing them on the edge on the edges of the trench in the form of a continuation of its walls.
When building a basement, you should consider drainage systems that will protect the basement and foundation from destruction.
Pillars are a key part of the fence. They give it stability, bind fences together. Pillars can be stone, wood, metal, concrete. It is faster and easier to install wooden and metal poles with a height of 2 and 3 m. Wooden poles are the most short-lived. Ready-made poles are sold ^ oke treated with a special compound.
Brick pillars erected from facing bricks. They must have a tube-like base inside. Usually a pipe with a diameter of 100-150 mm is installed. The height of the posts depends on the height of the fence. The installation of the poles should be done very accurately and carefully. This stage of work takes a long time.
Pits for pillars with a height of 1.2 m are dug to a depth of 60 cm, for pillars with a height of 2 m - 85 cm. Pits made with a drill are more accurate, and their installation takes less time and effort than if using a shovel.
It is better to install the poles on columnar foundation, even wooden. You can fix the pillars in the pit using wedges that are installed between the post and the edge of the pit. It is necessary to ensure that the pillars occupy a strictly vertical position, otherwise the fence may deform. To do this, in the pit, if you are not laying the foundation, you must put brick or rubble. To protect the lower part of the posts from moisture, the posts are installed in special fence metal crutches, which are driven into the ground or placed in a concrete foundation. From above, the pillars are covered with concrete or metal caps to protect them from atmospheric precipitation that destroys them.
The posts on which the wickets and gates are hung must also be reinforced with internal metal rods.
If you want to install reinforced concrete pillars, then you need to dig a larger hole for them.
Untreated pillars can be kept in a bath with a special antiseptic solution for several days. This will protect them from decay.
There should be no deviations in the markup.
Reinforcing bars are placed in the hollow part of the installed post and poured with concrete. Finally, the pit is also filled with concrete for greater stability. First, the first and last pillars are put up, after that the rest. The unevenness of the terrain is smoothed by pillars of different heights. The turn is performed by setting two pillars. In this case, it is better to use a template or panel to accurately determine the location of the next pillar.
Each reinforced concrete post has special grooves into which panels are inserted.
The entire fence can be mounted in two ways.
First way.
All pillars are mounted at once. In a day, when the concrete hardens, the panels are installed. This is quite difficult as the panels have to be lifted to the full height of the fence. A crane or a winch is used here.
Second way.
The first pillar is installed, placing it vertically and horizontally, and poured with concrete. Then a pit is prepared for the next post. Panels are inserted into the groove of the first pillar. Then a second pillar is installed in the pit, which
When installing a light fence made of profiled sheet around a summer cottage or estate, the owners often do not think about the fact that the lower part of the fence will be raised above the ground. Through the resulting gap, various small animals penetrate into the territory - from neighboring cats and chickens to martens and foxes living nearby. The question arises of how and how to close the gap in order to prevent the entry of animals and at the same time not to spoil the appearance of the fence. There are several ways to solve the problem.
After installing the fence from the profiled sheet, a gap usually remains
Is it possible to sew up the gap under the fence
It happens that a large opening under the fence is formed due to the sloping terrain of the site. But more often, homeowners leave it on purpose, guided by the following considerations or advice from friends:
- fencing off with a solid fence, for example, is prohibited by building codes;
- the area of \u200b\u200bthe site near the fence should be ventilated so that the heat from the metal heated by the sun does not harm the plants;
- a one-piece fence casts a shadow over the front garden, protecting it from the sun and impairing growing conditions for flowers and other green spaces.
The listed statements are not true and here's why:
- The requirements of SNiP 30-02-97 on the construction of mesh fences between neighbors are advisory in nature. If the dacha partnership has not made an official decision on this matter, then it is quite acceptable to build a solid fence from corrugated board.
- The metal sheets are not heated enough to harm the plants. But when the bottom of the fence is strongly raised, an unpleasant draft can walk in the courtyard of the house.
- The shadow cast by the fence moves with the sun. Excluding individual cases, it will not worsen the conditions for plants, and sometimes even improve, hiding them from the sun.
How to close up the gap under the fence
Depending on financial and technical capabilities, the open bottom of the fence is closed in the following ways:
- build a capital base of brick or concrete;
- to sew up the opening with the help of various materials - mesh - chain-link, flat slate, boards or corrugated board segments;
- sprinkle the gap with soil or rubble.
The last option is the least expensive, but it is used only in a situation where the clearance is low enough (up to 150 mm). It is better to use crushed stone, pouring it in the form of a roller behind the fence, having previously made a groove 10-12 cm deep. The fact is that some animals (dogs, foxes) like to break through their own passages under the fence, and compacted rubble will greatly complicate their task.
In terms of reliability and aesthetics, the best option is brickwork or a concrete monolith, although when the fence is mounted construction works not so easy. The cheapest way is sheathing suitable material, its disadvantage is its unpresentable appearance. The exception is metal siding trim, painted in the same color as the fence.
Capital base device
There are 2 methods of erecting a basement under a finished hedge from a profiled sheet:
- casting of reinforced concrete monolith in panel formwork;
- ceramic or decorative brick masonry on a concrete foundation.
The last option is the most expensive and difficult to implement. Under the brickwork, it is necessary to fill in the foundation, buried to the border of freezing or connected to the fence posts. In addition, its level must be calculated in multiples of the height of the brick (65 or 88 mm) plus a seam of 10 mm so that a whole number of rows come out. The masonry should be connected to the vertical supports using embedded parts.
The concrete base is poured on stable and dry soils in the following sequence:
- Dig a trench 30-40 cm deep and 200 mm wide between the posts. The center of the ditch and the bottom of the corrugated board must be on the same vertical.
- Make a cushion of rubble 10 cm high and compact it.
- Weld or tie the frame in place from the reinforcement to the height of the future basement. Link it to the pillars.
- On both sides of the fence, install a formwork made of wooden panels of the required height, secure it with props.
- Prepare slightly liquefied concrete M150 (the ratio of cement, sand and gravel is 1: 3.2: 5) and pour it into the formwork. After a week, the shields can be removed, and after 28 days the base can be painted or revetted in another way.
Both methods are not suitable for areas where the soil is exposed to frost swelling forces. It will be unreasonably expensive to lean a heavy base on a frost-free soil horizon. If, however, pillars extending below the freezing depth are used as such a support, then the monolith or brickwork can crack in the middle of the span.
Sheathing with mesh and other materials
 There are two ways to sew up the bottom of the fence made of a profiled sheet with a netting:
- attach the upper part of the mesh to the structure of the fence, and dig the lower part 15-20 cm into the ground;
- weld a frame from steel corners under the corrugated board, where to place the mesh.
To implement the first method, it is better to take a mesh made of steel wire covered with a layer of plastic (plasticized) of a suitable color. The order of work is as follows:
- Dig a shallow groove under the fence (up to 20 cm).
- Cut the mesh according to the following dimensions: the length is equal to the distance between the posts, and the width is equal to the height from the bottom of the groove to the top of the lower log, where the corrugated sheet is fixed.
- Loosen and unscrew the self-tapping screws holding the profiled sheet to the lower cross member.
- Bring the mesh fabric between the log and the steel sheet, resting its other end against the bottom of the groove.
- Screw all the screws into place and thus pinch the mesh between the profiled sheet and the cross member.
- Fill up the groove, preferably with crushed stone.
The same method is used if you need to close the gap with flat slate. You just have to replace the screws with longer ones, and at the end paint the slate in the color of the fence.
To close up the bottom of the fence according to the second option, you need a welding machine, a corner with a shelf width of 20-25 mm and a regular mesh - a chain-link. A frame is welded from the corners along the width of the gap, and a mesh is installed in it. Then the frame is welded to the posts and painted.
To maintain an attractive appearance of the fence, it is recommended to close the bottom with pieces of cut along the corrugated board or metal siding of the same color. To do this, you will have to weld additional logs from shaped pipes 25x40 mm, where profiled sheets should be screwed. These crossbars must be primed and painted beforehand, and self-tapping screws with painted heads must be used to install the siding.
In order to independently build a fence from boards with our own hands, we need a little. It will be necessary to purchase metal poles, which are made from a round or profiled pipe, planed boards, logs and a set of tools. Wood is one of the most convenient materials to work with, and processing is not a problem.
It is pleasant enough to realize that with a little work on your own and with a little effort, you managed to make a fence that can decorate your country cottage area... It is worth considering in more detail the process of building a fence with your own hands.
Types of wooden fences
There are several types of wood fences, each of which is suitable for construction in certain conditions and with certain requirements. Among the types of fence, it is necessary to highlight:
- Solid wood fence. In this case, the panels are attached to each other without a gap, that is, close to each other.
- Wooden picket fence. In this case, a gap is allowed between the planks of the planed board.
- Chess horizontal fence... Planks prepared in advance must be fixed to the veins in a horizontal position and in a checkerboard pattern. The front side should cover the previous one by one third.
- Chess vertical. This design, unlike the previous version, provides for vertical fastening of boards.
- Ladder. The arrangement of the boards is horizontal, however, at a slight angle and overlapping each other.
Components of a wooden fence
The main detail of each fence is its posts. It will be on them that the lags will need to be fastened, on which the elements of filling the spans will be fixed. In the presented case, fence boards act as these elements. Metal pipes with a round or rectangular cross section can be used remarkably as supports.

Wooden logs for a fence in other words are also called veins. They are horizontal beams on which fastening is carried out wooden picket fence... They are attached to the pillars with their own hands in a horizontal position using holders or standard metal corners, which are pre-welded to the supports.
For a fence whose height is in the range from one and a half to two meters, it will be necessary to make two horizontal strips. If the height of the fence exceeds this indicator, then the number of strips must be increased to three.
Consequently, the amount of lag directly depends on the height of the fence.
Fence boards
In the modern construction market, there are several types of fence boards:
- Sliced \u200b\u200bfence board. Used for almost all types of fences. It is the most popular type of material.
- Decorative fence board. In this case, the canvases are processed by the side edges and ends. In this case, the fence can be made exclusive.
- Uncut board. It is the most economical option. In most cases, it is used to decorate ethnic exteriors.
- Aged board. Over time given view boards are gaining more and more popularity. At the same time, the fence looks more spectacular and more stylish. When using the artificial aging method, the wood gets rid of soft fibers, which allows you to emphasize the natural texture of the material.
The use of antiseptic agents, fire and biological protection agents, as well as paints and varnishes is allowed. With the help of these tools, you can process wood with sufficient quality.

Do not forget that for concreting the pillars with our own hands, we will need to use cement and sand. All components are best purchased in specialized stores. Otherwise, you can stumble upon a low-quality product, due to which the fence from the boards will be fragile. You can make the solution yourself.
Installation of pillars for a wooden fence
The list of tools required for installation will depend on which pole installation option you prefer. If you will be concreting the pillars, you will need to get sand, cement, and also a device for drilling holes. In the event that you only hammer the pillars into the ground, then an ordinary sledgehammer will be enough. The method of driving pillars is suitable for areas with low-stone soil with low density. Otherwise, the application of this method will be impossible. In this case, the driving depth will be about 1.2 meters.

One of the ways to do it yourself is to fill the posts. For this, holes of the required diameter up to one and a half meters deep are pulled out, into which pillars are inserted. It is necessary to fill the pits with rubble and gradually tamp it, periodically pouring water over it. This process must be done by hand.
The fence will receive maximum stability only if the pillars are concreted. To carry out concreting, it is necessary to drill a hole in the same way as in the previous cases, install a pillar in it, and then concreted it.
Concreting is most beneficial to apply in places with weak soil, or in places with strong winds.
Plank preparation process
You can use both electric and hand tools to prepare the boards. Using hand tool the operating time will increase significantly. Boards can be prepared in batches, or work with them in stages. All blanks must be of the same size. You can cut them with a chainsaw or a hacksaw. Using a planer, remove the top layer of wood from both sides. Next, you need to sand the board using coarse, and then fine sandpaper.
After we got smooth and beautiful boards, we need to start working with a milling machine. Using a router, carefully cut out the required pattern on each of the boards. At the final stage, you need to paint the tree at your discretion.
Fence installation
We have already installed the fence posts, now you need to start assembling the canvas directly. Installation is carried out depending on whether we have ready-made canvases or individual components. Sectional installation is considered the most simple, but the beauty of the fence depends on the correct installation of the pillars.

The section is installed only after its painting and final preparation for installation. It is mounted by hand between the pillars. Fastening is carried out either on pre-installed corners or plates, or using specialized holders. In the event that the installation will be carried out using components, that is, wooden logs and boards, then they must first be treated with anti-rotting compounds.
After that, it will also not be superfluous to cover the boards with a special impregnation or paint for wood. First, wooden logs are attached to the posts, after which it is necessary to mount the picket fence directly.


