Ceramic tiles can be found in any modern home. Compared to other materials, it has almost the largest list of unique qualities. Ceramics are especially suitable for rooms with high humidity. Such a floor is of the "cold" type, which requires laying tiles on a warm electric floor, and not just on a cement screed.
Modern materials and technologies enable the owners of apartments and private houses to create water and electric heating of the floor surface. The hot water floor must be connected to the heating system. If for a private house this is feasible, then for an apartment it is problematic. Along with large-scale work, the most difficult thing is to get permission to connect.
In addition, many people prefer electric underfloor heating for the following reasons:
- no coolant leaks;
- less thickness of the screed, and in some cases - its absence;
- ease of installation of heating elements (cable, film, rods);
- no need for bulky equipment.
Note! High-quality thermal insulation and regulated electric heating of tiled floors allow you to obtain sufficient energy savings.
Choice of underfloor heating
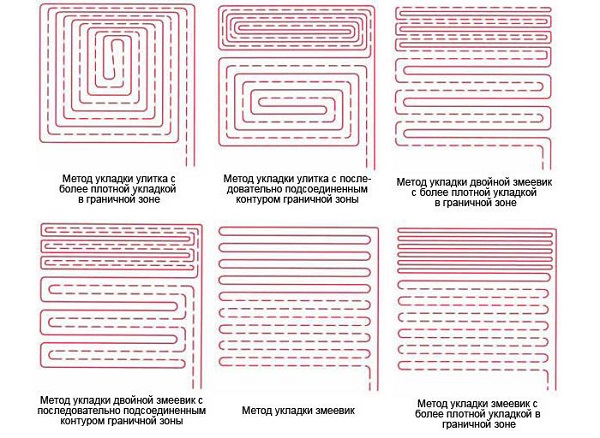
If you look at the price, preference is given to the heating cable. It must be hand-laid in a specific order. The most common way is "coil". There is also a "snail", but it is used less often.
Heating cables are classified into three types:
- Single-core. There is only one high resistance conductor under the screened insulation. When current is passed, it generates heat and heats the cement screed in which the cable is placed.
Some difficulties arise when laying indoors, as the front end must be returned to the power source in order to complete the electrical circuit. Certain skills are required here, since the room can have a complex configuration, and the cable loops should never intersect with each other. It is recommended to draw several spacer options on graph paper to scale, and then choose the most suitable one. It is advisable to make an electric underfloor heating on a single-core wire with your own hands in one of the household premises to acquire the necessary skills.
- The two-core cable has 2 insulated conductors. The function of the heat source can be performed by both or only one. Then the second cable only serves to close the circuit. The commutation of both conductors between each other is created by a coupling made at the end of the cable.
Single-core and double-core cables are evenly heated along their length by the flowing electric current. Heating is controlled by energizing and de-energizing with a relay installed in the thermostat.
- In a self-regulating cable, two conductors are parallel at a distance. A semiconductor matrix is located between them, and at the end the conductors are not connected to each other. The current does not flow along the conductors, but from one to the other through the matrix, i.e. in the transverse direction.
When the cable is cold, the conductivity is maximum and it heats up quickly. As the semiconductor heats up, the resistance of the semiconductor begins to increase, and as a result, the semiconductor is locked. In this case, the process can occur at each separate section, as a result of which the cable self-regulation is carried out. It is quite expensive, its use is justified when it is necessary to lay heating elements in places where overheating of a conventional cable is possible.
In fig. All three types of resistive cables are shown below.

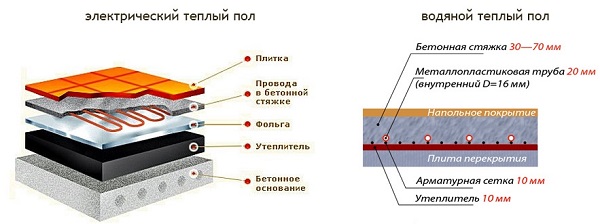
The optimum thickness of the screed filling is 50 mm, which takes up a significant part of the room space. A layer of glue and ceramic tiles are also added to it.
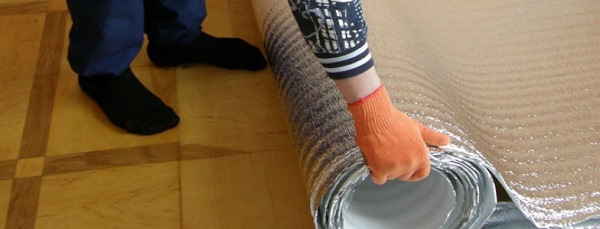
Mesh mats, consisting of a thin heating cable, already fixed at the factory on a fiberglass mesh with the desired pitch, found the greatest use for DIY installation under tiles. It is enough to roll them out over the surface of the base and thus cover the entire surface without special laying of each turn.
A noticeable advantage of mesh heating mats is the ability to lay them directly into a layer of tile adhesive. In this case, the thickness of the latter will have to be increased to 8-10 mm, but this is much less than the thickness of the cement screed. The mesh provides sufficient strength to the adhesive layer.
Mats are a little more expensive than a separate heating cable, but the price is justified by the high speed of installation. They are sold in ready-made kits and have specific power indicators indicated in the passport. The cable diameter in them is only 3-5 mm.
Note! The mats can be cut along the grid without touching the conductors and placed with the required turns, as shown in Fig. below.
You can choose a model with a self-adhesive bottom layer, which allows the heating mat to be fixed to a primed base by pressing. There are types of mats with an elastic base that allows you to stretch it and change the pitch of the buttonhole. For final fixation, self-adhesive hooks are attached to them, which are installed with a certain pitch, and a mat is pulled between them. This type is also good in that it can be pulled out in areas with a complex shape without cutting the mesh.
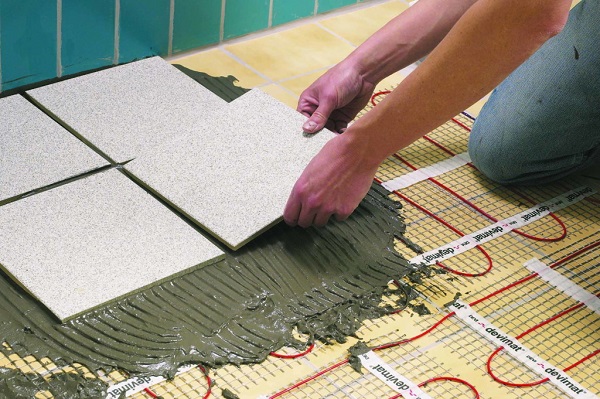
Professionals apply the adhesive directly to the mats. Then tiles are immediately glued to it. For beginners, the glue is applied in 2 steps: first, the mat is closed, and then the next layer is applied to the leveled surface, a relief is formed with a notched trowel, and the tiles are laid.
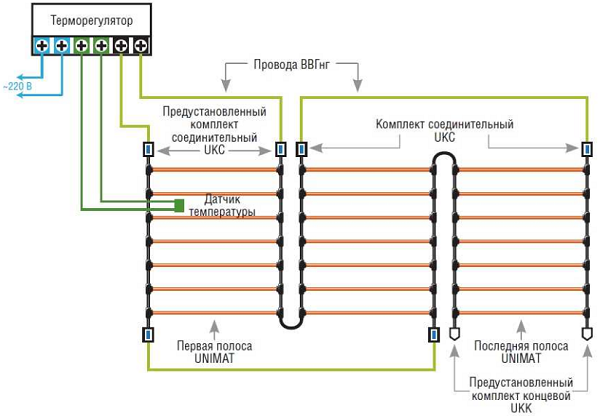
Rod infrared mats, consisting of two parallel current-carrying rails and connected to them transverse carbon rods, arranged with a step, go well with ceramic coatings. When current is passed, they generate infrared radiation, transferring heat to the ceramic tile. In fig. below is a diagram of connecting rod mats to a thermostat.
It is somewhat more difficult to change direction when rolling the mat. Here you need to bite the current-carrying bus in the middle between the rods on the side opposite to the bend. After installation, the cut sections are reconnected using clamps and patch wires. The power cable is connected in the same way. A competent electrician is needed here, since elementary experience in working with electrical appliances will clearly not be enough. Once the screed has been poured, it is no longer possible to fix the joints.
Facing work is carried out in the same way as for mesh mats with heating cables. Usually, a screed up to 25 mm thick is poured onto which the tiles are laid.
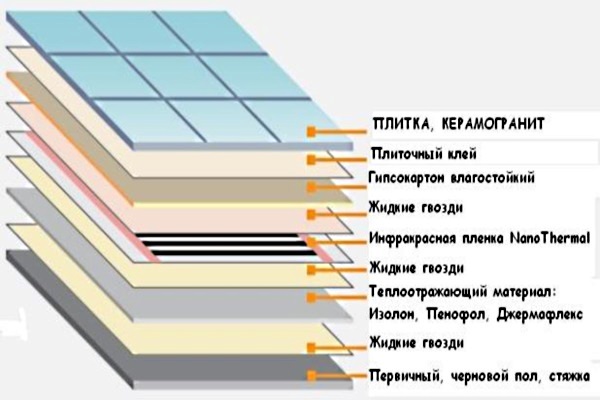
Infrared film is more suitable as a flooring option when it is covered under the topcoat. It is not recommended to use it under ceramic tiles, although with the right technology it is possible.
Important! It is advisable to install a warm floor with your own hands for the first time in a small room and choose the simplest scheme for this. After obtaining the necessary skills, work can be continued further.
Preparation for the installation of a warm floor
Despite the variety of types of under-tile electric floor systems, general requirements always remain.
Thermal insulation
The underfloor heating system is insulated for the following purposes:
- To reduce heat loss from the room through the floor. In ordinary housing, they reach 20% of the total volume. It is unreasonable to heat the ceilings, especially when there is a room below without heating. Even in the case of warm rooms on the lower floor, a thin layer of thermal insulation is required.
- Achieving a more uniform heating over the area of the room, since the heat transfer to the structures located below is reduced.
- Energy saving.
- Creation of soundproofing. Here it is possible to create a "floating floor" if a material with good soundproofing properties is chosen.
- Moisture does not penetrate into the house from below through the ceilings.
Base leveling
A level base is required for ceramic tiles. The underfloor heating surface must be flat and complete. In the presence of elevation differences, irregularities, cracks and cracks, it is necessary to repair the base and fill it with a leveling screed.
Long-term operation of the warm floor requires reinforcement of the screed. A damper tape must be installed around the perimeter to compensate for thermal deformations. The foam tape between the wall and the screed dampens expansion and closes the gaps between them.
It is most convenient to install an electric underfloor heating under a tile in an apartment where fairly even floor slabs are located. Alignment is needed in an individual house if there is soil below. First, a deepening is made in it and a layer of sand is poured. A rough screed 5-6 cm thick is poured onto it. A waterproofing film and insulation with a thickness of 5 cm or more are laid on top. Styrofoam is a budget option. The next layer of screed will lie on it, which should be leveled under the warm floor and tiles.
The screed is reinforced if a warm water floor is used. The pipes create uneven pressure, which can cause cracking of the bottom screed. Reliable reinforcement is achieved using a mesh with a diameter of 5-6 mm. For an electric underfloor heating, a mesh with a wire diameter of 2-3 mm is sufficient. The metal also serves to equalize the temperature on the surface of the screed.
Connecting to the network
Electric heating elements of the warm floor are connected to the network through a dedicated line with its own circuit breaker and RCD when the system power is 2 kW or more. Protection devices are located in the distribution board of the apartment.
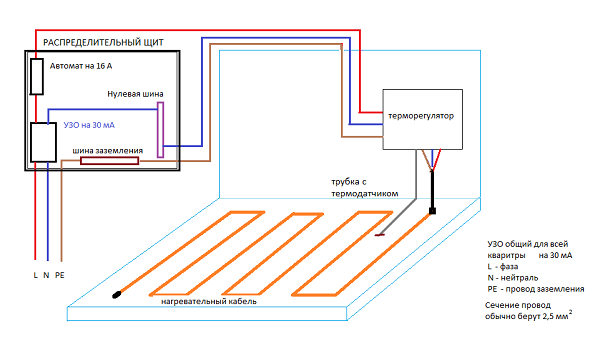
The power of the power cable through which power is supplied to the warm floor must correspond to the power consumption. Bathroom wiring is usually designed for lighting, and the wire cross-section for it does not exceed 1.5 mm 2. The underfloor heating cable consists of three cores of at least 2.5 mm 2 (red - phase, blue - neutral, brown - ground) For it, you will have to lay grooves in the walls from a thermostat located outside the bathroom.
In the diagram above, the protective shutdown is intended for the entire apartment. If you install a separate RCD for underfloor heating, it will be connected after the machine. Usually, a 100 mA fire-fighting RCD is installed on the entire apartment, and 15-30 mA each on separate lines to protect people from current leaks.
The ground loop is connected to the terminals of the equipment, to the shielding wire of the heating cable and to the reinforcing mesh of the screed (if any).
Thermostat
A thermostat with a temperature sensor can be included in the underfloor heating kit, or they can be purchased separately. In the latter case, you can choose your own regulation option. It can be cheap, with manual adjustment (fig. A below), touch control or programmable (fig. B).
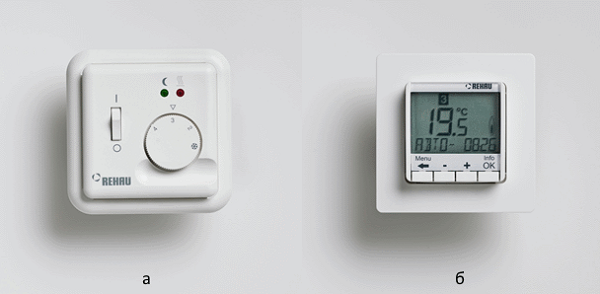
The simplest thermostat contains a toggle switch and a regulating wheel with a scale by which the temperature is set. The operating mode is maintained approximately, based on sensations or according to the indications of a room thermometer.
The electronic thermostat is also manually adjusted, but by pressing buttons or sensors on the screen. Indicators are shown on the display in digital form. The accuracy of the device is achieved higher.
The programmable device for a long time provides the setting of different operating modes. Due to this, electricity is saved when the warm floor is automatically turned off at night or in the absence of the owners. The device is used for private houses where large areas are heated. Here the savings are more noticeable, and the expensive device pays for itself faster.
The main parameter of the thermostat is the power, which does not exceed 3 kW. If it is required to increase it, contactors switching high currents are used. They should be installed in a control cabinet. The thermostat also works, but its contacts switch the power supply to the contactor coil.
It's important to know! When choosing a device, you should pay attention to the length of the cable for the temperature sensor. The thermostat for a heated bathroom floor is installed in a different room, and the sensor must be removed at a greater distance than usual. There are devices with two sensors, where the second monitors the temperature in the room.
Instruments
Installation of electric underfloor heating under ceramic tiles is carried out using the following hand tools:
- pliers;
- side cutters;
- level;
- sets of flat and Phillips screwdrivers;
- chisel;
- roulette;
- building tools for laying tiles.
As power tools you will need:
- perforator or grinder;
- drill;
- construction hair dryer.
Errors when installing a warm floor
You should focus on the area not occupied by furniture without legs and household appliances. If most of the space is occupied (more than 50%), the underfloor heating can only be used for additional heating.
- The cable is supplied with couplings, it is impractical to cut it. A reliable connection cannot be created manually and the system will quickly fail. You should immediately select the required length in terms of power.
- It is not allowed to turn on the underfloor heating system until the adhesive solution dries. Serviceability check is done by measuring its resistance before and after installation. The value should not differ significantly from that indicated in the passport.
- Heating elements must not be placed on a dirty surface. The substrate should be cleaned with an industrial vacuum cleaner and primed.
- Shoes are not recommended for walking on cables and heating mats.
- The thermal sensor is not walled up in the solution. It is placed in a corrugated sleeve so that it can be replaced if it fails. When pouring glue, do not allow it to hit the sensor.
- The floor heating installation scheme should be drawn to scale. It is best to take a photo of the heating cable after installation. In the future, this will come in handy if you need to drill the floor during repairs.
- Air pockets should not be left around the heating cable, where it can overheat and fail. This is especially important when the thickness of the warm floor is small, and all of it is placed in a thin layer of tile adhesive.
Laying tiles on a warm electric floor
The technologies for installing tiles on mesh mats and on infrared films are different.
Mesh mats
- Tile adhesive is selected taking into account the composition, properties of the tile, and room temperature. It is not allowed to use expired material, since the properties have already been lost. Some formulations require special preparation of the substrate. It is advisable to use a material that performs several functions at once, for example, use for grouting.
- Marking is made and tiles are laid out on the base in order to clearly imagine which installation scheme is best suited. In open areas, whole pieces should be located, and scraps are hidden in hidden areas.
- Work begins from the corner farthest from the entrance. The glue suspension is prepared from a dry mixture by diluting it with water. The technology for obtaining a solution is indicated on the packaging of any composition and is not as simple as it seems at first glance.
- The mortar is applied to the surface of the heating mats with a notched trowel so that it penetrates into all voids. The layer thickness should be 5 mm or more higher than the heating elements.
- Plastic crosses are laid out in the corner and the first tile is laid. It should be located strictly horizontally and evenly so that the row runs flush with the wall. Crosses are placed on each tile in all directions. After placing the second and third tiles, the evenness of their laying is checked. The rest of the solid tiles are mounted. You will need a tile cutter to stack the scrap. If you don't have one, you can use a good glass cutter.
- The next day, the joints are covered with grout.
Infrared film
The tiles are laid in two ways.
Wet way:
- Rolls of thermal film are laid out indoors and fixed in the middle of the transparent areas between the sectors.
- The corrugation with a thermal sensor inside is installed under the film in the recess of the base and secured with tape.
- A thermostat is connected to the thermal film and the sensor. Then the power is turned on and the system is checked.
- The entire floor is covered with a thermal insulating film with an overlap of 20 cm. The joints are fixed with masking tape.
- The screed has poor adhesion to the film. Therefore, a mesh for reinforcement is laid on top and attached to the base with dowels through the holes of the film at a distance from the conductive sections. Once again, a check is made for damage to the insulated conductors.
- A thin layer of cement-sand mortar is poured. It is leveled over the entire floor surface. The layer is kept for 20 days. Then the warm floor turns on and is checked for serviceability.
- The tiles are laid on the screed using conventional technology. If necessary, the tiles can be glued before the cement screed is dry.
Dry method:
- The technology repeats the previous one, including the installation of a vapor barrier film.
- Instead of a cement screed, the surface of the warm floor is covered with magnesia glass, gypsum fiber boards or drywall.
- Finally, lay the ceramic tiles on top of the glue.
Video
Underfloor heating electric ceramic tiles are laid in two main stages: first, a warm floor with all connections is placed, and then ceramic tiles are glued on top. It is important to prepare a flat base and insulation from below. Heating elements can be located in the cement screed layer or in the adhesive layer. All technological procedures are extremely important and must be performed correctly. For each type of underfloor heating, its own installation methods have been worked out.


