The dream of metropolitan residents is a beautiful house outside the city, where you can escape from the hustle and bustle of the city. But not everyone’s dreams come true; it seems that a country house is complicated, expensive, and time-consuming. In fact, building a country house with your own hands is quite simple.
Choosing a location for a future country house
Choosing a location for a future country house is not the time for hasty decisions, because there is not that much space.

Thoughtful, competent planning will help you use every piece of land as efficiently as possible. Even though this is your land, you will have to fulfill a number of requirements, maintaining a minimum distance:
- from the street - 5 m
- from the passage - 3 m
- from the neighboring plot - 3 m
We are not considering the option of a low-lying area - water will accumulate there. Optimally - the highest place on the site in its northern (northwestern) part.

Country house made of timber - a modern choice
For construction, timber from various types of wood is used: linden, larch, pine. Natural wood is the most environmentally friendly building material. Wooden houses create a unique atmosphere that has a beneficial effect on the physical health and emotional state of people. The life-giving aroma of the forest is incomparable. Houses made of timber do not need finishing: natural wood looks aesthetically pleasing and gives the room a special charm, very suitable for the country spirit.


The undeniable advantages of a house made of timber:
- at any time of the year, even in severe frosts in winter, the room easily and quickly warms up to a comfortable temperature;
- the total weight of timber houses is relatively small, so the construction of a powerful foundation is not required, which saves effort, time and money;
- wood is able to absorb excess moisture, being a natural humidity regulator, thanks to this a special microclimate is established in wooden buildings;
- quite durable: nature itself has provided for the ability of wood to withstand constant climatic changes - changing cycles of freezing and thawing, precipitation, wind, etc.


House made of stone
An inexpensive and reliable stone for a country house - foam concrete - a building material made in the form of blocks of cellular concrete. Composition: cement, sand, water and foaming agent. This is the most inexpensive way to build a country house made of stone. Foam concrete blocks are not distinguished by their aesthetic appearance, but their surface is easy to process and decorate.

Advantages of a foam concrete house:
- creates a comfortable microclimate for life all year round;
- refractory;
- high level of sound insulation;
- long service life;
- budget;
- the light weight of the material allows you to save on the construction of a massive foundation;
- high level of thermal insulation: keeps cool in summer, warm in winter.


An alternative to a house made of foam concrete is a country house made of brick or natural stone. The most durable and reliable material, which is not afraid of almost any natural phenomena and other influences of a mechanical or chemical nature. The main disadvantage is the high cost of the material itself and construction work.


Building a brick or stone house will require a lot of time. Here you cannot do without a reliable monolithic foundation. Its construction is possible only with the use of special equipment. It will take more than a month to lay the foundation and dry the concrete. Only after this can construction continue.


There is also a significant disadvantage in the operation of a stone house. Its interior takes a long time to warm up, especially if it was left unheated for some time or was heated to a minimum. Therefore, a stone country house is not the best option for those who use it extremely rarely in winter.


Many people like to get a country house in just a few days. After all, to do this, you just need to choose the building project you like, and then sign the agreement. The “designer” of your house is delivered to your site by the contractor in a semi-assembled form. The final stages of assembly are carried out as quickly as possible.


They weigh quite a bit. This means that you can use a pile type of foundation. These types of houses are very attractive and not expensive.


The disadvantage of this structure is that you can only use the country house in the warm season. And no options for insulation or heating systems will help cope with frost and retain heat.

In addition, you will not feel very good in them in the sultry heat, since the house gets very hot in the sun and it is simply unbearable to be inside. In this case, you will definitely need to install a ventilation system or air conditioning. Yes, these types of houses are inexpensive, but their operation will cost a lot! Therefore, think carefully about what type of material you should choose to make your country house practical, reliable and beautiful!


Modern houses in high-tech style
Progress does not stand still, and with the development of technology, the requirements for homes are also growing. Country houses in the high-tech style have become very popular recently. The number of variations, types of installation and facade will not leave indifferent many who want to build their own home. Modern fashion trends are gradually making their way into construction.


Projects of country houses in the high-tech style are chosen only by those people who want to be imbued with the spirit of modernity and experience technological progress for themselves. These houses combine maximum functionality and living space well. Such buildings became most popular in Europe. The EU countries were the legislators of this architectural trend.


All details comply with the principles of minimalism. It’s not for nothing that high-tech is considered technical minimalism. There are no flashy or overly bright colors in such a structure. All forms are strict, restrained and sometimes smooth. The façade immediately catches the eye. Main materials: glass, plastic, wood, metal. In percentage terms, wood predominates.


Posted in Tagged
To build a garden house with your own hands, you don’t need much, but the finished structure is a real lifesaver in an open area. Even a small and simple house is enough to hide from bad weather, store household equipment, and comfortably relax for children and adults.
Summer house options
A universal solution for any site is a one-story house with or without an attic. You can turn a summer house into a two-story one if instead of an attic, equip a comfortable attic.
For comfortable outdoor recreation, a terrace is attached to the house - open or with a canopy. In good weather, it serves as a dining room or children's play area. It all depends on the area and configuration.
Note! The terrace can be easily decorated with decorative lighting and climbing flowers.
If the garden house will be used only in the warm season, then it is not necessary to install a heating system in it. On cold evenings and nights there will be enough heater. And this will require electrical wiring.
Whatever option you choose for a garden house, you need to draw up a design before construction. It will help calculate the load on the foundation and the amount of materials needed.
What to build a garden house from
You can build a garden house with your own hands from bricks, timber, concrete blocks. Each option has advantages and disadvantages.
Lightweight 150 mm thick – at first glance economical and simple construction option. The lumber lays easily, looks beautiful, and is suitable for any finishing option. However, such a house does not retain heat well in spring and autumn, which entails considerable costs for the heating system and electricity.

Summer houses made of foam blocks can withstand heavy loads even with a wall thickness of about 30 cm retain heat well in the off-season. A special technology for laying blocks minimizes cold bridges and prevents the formation of condensation in the premises. However, specialists must build according to a carefully designed project.
Brick houses are no less reliable than block houses, but they require at least external insulation. If the thickness of the external walls is 1-1.5 bricks, this can be facade plaster, a “ventilated facade” system, or a combination of expanded polystyrene with facing bricks. The design is warm, strong, durable, but not cheap.
The technology of frame construction deserves attention. It allows you to build a light but durable garden house with the least financial and labor costs. Moreover, its design is such that repairs and additional insulation do not require much effort.
DIY frame garden house
The frame technology for constructing a summer house is simple, it involves several foundation options and wall cladding. But how to build a small garden house with your own hands if you have no experience? You can’t do this without step-by-step instructions for work and knowledge of some secrets.

Shallowly buried can withstand heavy loads. Suitable for devices on heaving, but not on peat, sapropel, clay soils. The width of the base is 10 cm greater than the thickness of the walls, the height is about 50 cm. Typically, such a foundation lies above groundwater, so in the spring it flows upward along with it, and then sinks.
Note! When installing a strip foundation, it is possible to equip a basement under the summer house, for example, for storing garden tools.
The installation of a shallow strip foundation is carried out according to the diagram.
- Mark the area using pegs and a cord stretched between them, which marks the boundary of the future pit.
- Taking into account the markings, trenches are dug for the foundation.
- A sand and gravel cushion (15+15 cm) is laid at the bottom of the trench. It is spilled with water to compact it better.
- The walls of the pit are covered with a layer of waterproofing material, for example, roofing felt.
- Formwork for pouring concrete is assembled from boards 4-5 cm thick. It should protrude 30 cm above ground level.
- Fill the trenches with concrete mixture.
- Cover the base with film and moisturize periodically so that the concrete does not crack.
For potentially large loads, the foundation is additionally reinforced. The process is quite labor-intensive, so it is worth comparing the scale of the house being built with the cost of constructing the foundation.
Shallow block base
For a small and light garden house, a shallow columnar base made of individual concrete blocks is sufficient. Will fit elements measuring 20x20x40 cm.

Holes about 50 cm deep are dug under the blocks. Layers are laid at the bottom:
- waterproofing;
- sand – 15 cm;
- crushed stone – 15 cm.
Concrete blocks are laid on top of such a “pillow” in two rows. Used for fixation cement grade M-150. The result is pillars protruding approximately 20 cm above ground level.
It is important! The second row of blocks is laid across the first.
Geoscrew foundation
Geoscrews are an analogue of screw piles, but of shorter length. They are used for light and small buildings. They are absolutely not suitable for working on floating and loose soils. The lower trim of a frame house is mounted along the heads of geoscrews.

Advantages of the technology:
- no special equipment is needed for work;
- stones and even medium-sized cobblestones in the ground are not obstacles for geoscrews;
- no preparatory work on the site is required;
- Raising the frame can be done immediately after screwing in the last geoscrew.
Geoscrews are screwed into the ground strictly vertical. To do this, using a hand drill, first make pits 35-50 cm deep. Geoscrews are inserted into them and tightened by hand. It is enough to insert a crowbar into the head and use it as a lever. Suitable for this purpose on dense soils a piece of metal pipe with handles welded to it. The design fits onto the head and also serves as a lever.
Some craftsmen purchase multipliers in stores, connect them to an electric drill using a metal pipe, and thereby increase the torque of the device. The finished structure, fixed on the head, allows reduce the time for screwing in geoscrews. Work starts from the corners. The vertical alignment of geoscrews is carried out after they are buried approximately 1/3 into the ground.
Assembling a wooden frame
The assembly of the wooden frame begins with the bottom frame. For this they use board with a section of 5x15 cm or timber - 15x15 cm. The selected lumber is laid on the foundation over a layer of waterproofing (roofing felt). In corner joints, wooden strapping elements are connected by cutting “half-wood”. The frame is fixed to the foundation using anchor bolts. The logs for the future floor are laid across, maintaining a distance of 50 cm between them.

Raise the frame, starting with the installation of beams in the corners. The intermediate posts are fastened in increments of no more than 200 cm. For this, a half-timber cut and reinforced steel corners are used. To give the structure rigidity, install in the corners temporary supports - jibs. Provide for door and window openings.
After this, the upper framing of the frame is assembled in the same way as the lower one, the transverse floor beams are attached and the rafter system is mounted.
Note! Part of the roof can be assembled in advance and then raised upward. So, when installing a hip roof, it is convenient to first assemble the ridge girder and central rafters on the ground, and then secure the diagonal rafters at the top.
Wall and roof cladding
After assembling the frame, they begin to wall and roof cladding. For the walls of an unheated small house, OSB - oriented strand boards - is most often used.
For external cladding, weather-resistant OSB-3 boards are chosen.
They are attached to the racks with wood screws, without screwing them in completely by about 1-2 mm. This is necessary so that the slabs have the opportunity expand when temperature and humidity conditions change. In this case, the joints of the slabs must land on the frame support. Subsequently, these seams are puttied. In the same way, they clad the inside of an OSB house with their own hands. The finishing material will be siding and façade plaster.
Used as roofing material tiles, corrugated sheets. The second option is preferable for a garden house, since the material is light weight and low cost. For fastening corrugated sheets use screws for metal. The most important thing in the work is to install the first sheet correctly and evenly.
It is important! If you want to insulate a building, then to protect the thermal insulation material and wood you will need hydro- and vapor barrier - polyethylene film and a vapor barrier membrane.
When building a small garden house, it is important to pursue not beauty, but for reliability, convenience and performance. What's the use of a beautiful building if it's cold even in late spring? However, to obtain a high-quality result, it is important to strictly follow construction technology.
When purchasing a plot of land, the most pressing question becomes how to build a dacha and, importantly, how to build a dacha cheaply.
There are many ways to build a country house. You can build from brick, expanded clay concrete, wood, gas silicate blocks or a combination of materials. Each material has advantages and disadvantages, so the choice depends on the purpose of the building and the functions required of it.

In order to build a cottage inexpensively with your own hands, you should pay attention to frame construction. Frame houses are built very quickly, and if you use inexpensive finishing materials, such houses are much cheaper than others.

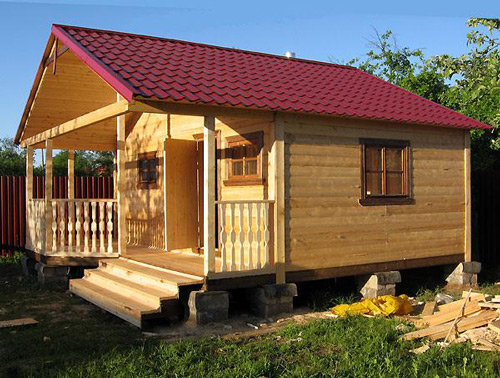
Our example shows how to properly build a summer house on a frame basis. We will build a one-story house, with a veranda and a gable roof.

Stages of construction of a dacha
1. Pouring the foundation
Any construction begins with a foundation. For our frame house we will need a columnar foundation. First, using a hand drill, we drill holes 80-100 cm deep around the perimeter and throughout the entire area of the future structure. A tube of roofing felt with a diameter of 20 cm is used as formwork. We insert roofing felt sleeves into the corner holes and fill them with concrete mixture, insert the studs.

Then we fill in all the other piles, level them, compact the earth around the pillars. We leave the concrete to “mature”.

2. Bottom frame frame
From boards with a cross section of 15x5 cm laid on the foundation, we make the bottom trim. We secure all trim boards with screws. We align the lower part of the frame and make grooves for the floor joists, having previously marked their location.

We attach the logs to the frame and foundation pillars. Be sure to do an antiseptic treatment of the boards.
3. Subfloor
We lay subfloor boards on evenly spaced joists. After fixing them, cover them with glassine paper, attach the bars and lay a layer of foam plastic.

We add bars at the joints of moisture-resistant OSB boards and put another layer of polystyrene foam. We seal the gaps and cracks with foam.

We complete the creation of the platform by laying 12 mm OSB boards and securing them with nails.

4. Walls of the house
There are several ways to build the walls of a frame house. You can initially build the entire frame from load-bearing boards, and then start covering the walls, or build each wall separately. In our case, the frame of a separate wall is first fixed, and then sheathed with slabs. Be sure to use jibs to support the structure.

In the right places we make openings for windows and doors, strengthening them with additional bars. We install interior partitions and top trim.

5. Rafter system
After the final construction of the walls, we begin to install rafters, pre-made from timber according to a template. The structure is reinforced with a horizontal lintel.

We cover the rafters with waterproofing material and make the roof sheathing and counter-lattice. Attach anti-condensation film. We cover the roof with a metal profile with a wave height of 21 mm. We cover the facades with slabs.

6. Exterior finishing
All exterior walls of the house are covered with siding over OSB boards. We install windows and doors.
A frame house is an excellent solution for a country house. This structure can be erected in a short period of time and does not require special construction skills. Today we will talk about how to build a frame house on a site, we will talk about the main stages of construction and mistakes made that are easy to avoid. The design really exists, it was made by hand.
Frame house project
Preparing a frame house project is the initial and most important stage of construction. allows the construction of buildings of different heights and purposes on the site. We decided to build a 6 by 4 light frame house on the site, consisting of one single room, with four windows and a hip roof. Insulation of the house was not provided, since it is planned to be used exclusively in the summer.
You can find it online, or you can draw the project yourself. To develop a project, special programs are mainly used, but if the house does not have complex architectural solutions, you can draw it by hand on a regular sheet of paper.
Project of a frame house on a piece of paper.
The drawing must indicate all the functional parts of the house, such as door and window openings, the roof structure, the thickness of the walls, floors, you can indicate what materials will be used in the work and calculate the approximate cost of construction in order to build a frame house inexpensively.
It is the design drawing that allows you to determine what economic costs will be needed for construction.
Frame house foundation
Once the decision has been made to build a frame house for a summer residence and a rough plan for it has been drawn up, you can begin to select a suitable site for construction. The surface should preferably be flat, then there will be no problems with installing the foundation and installing the floor.
 The logs were treated with protective impregnation.
 We decided to do without a foundation and started building the floor directly on the ground, which was leveled with gravel. This is the first and main mistake when we started building an inexpensive frame house.
 Installation of floor joists on crushed stone.
We built the floor frame from nine 150x50 mm six-meter-long boards, which allowed us to install transverse floor joists without joints along the entire length of the house. In addition, we used two more four-meter boards, which were placed on the end of the log. The distance between the floor joists was 500 mm, which is quite enough for the given thickness of the board and the thickness of the plywood for the floor.
Before thoroughly nailing the floor joists together, you need to make sure that the diagonals of this base are equal to each other. You also need to check the location of the frame house relative to the neighboring fence and. It is important to check the horizontal level of the floor joists that are located on the crushed stone, and if necessary, add it easily.
Despite the fact that a turnkey frame house is considered a fairly lightweight structure and can be built directly on the ground, the foundation of a frame house performs certain functions:
- Evenly distributes loads from the entire structure.
- Ensures the durability of the structure, protecting it from freezing and groundwater.
- Prevents warping and shrinkage during soil movement.
Strip foundation
Before building, it is better to choose a strip foundation for that type of construction. You will spend more time and effort on construction, but you will make the entire structure durable. Strip foundations will be especially in demand if construction is carried out on stable soils.
 Strip foundation on crushed stone.
When constructing a strip foundation, you can organize additional rooms in the basement. If a basement is not planned, then soil remains inside the foundation contour. Please note that the width of the strip foundation should be greater than the thickness of the walls of your frame house.
After the construction of the foundation is completed, the lower frame of the floor is installed, it is done using a beam or board placed on the end. The board is installed around the perimeter of the foundation, or along the perimeter of the future house directly on the ground (as in our case). The joints are connected using nails; the structure can be further strengthened using special metal staples. To enhance the load-bearing capacity of the floor structure, transverse joists are installed.
On a note
The floorboard must be treated with an antiseptic.
When building our house, we immediately started installing the frame, but after framing it is advisable to start installing the subfloor. If the house is planned to be used not only in the summer, insulation material is laid between the joists, then a vapor barrier film, and the last layer is plywood sheets.
Frame of a frame house
A do-it-yourself frame country house has a lightweight structure and a lightweight frame. The frame of the frame house is attached to the floor frame.
 Installation of frame house walls.
 Initially, corner posts are installed; metal brackets can be used for reliable fastening, but we did without using them. The U-shaped frame of the wall is knocked together at the bottom and must be fastened with corner jibs, and only after that it is raised and fixed on temporary supports.
 Power frame of the walls of a summer house.
 To ensure greater reliability of the structure, we attached each corner post with additional jibs at the top and bottom, so they protect the frame house in the photo from loosening. We nailed two corner posts of the frame in each corner together with 100 mm nails.
After installing the main corner posts, you can begin to secure the remaining ones, one each on a four-meter wall and two posts on a six-meter wall. The boards of the top trim along the long wall are fastened together by two beams.
Hip roof
As soon as the main supporting frame of the frame garden house has been erected, you can begin to build the roof truss system.
 Hip roof ridge with central rafters.
 We decided on the type of roof and its slope at the stage of drawing up the design of the future house. A small frame house will have a hip roof, with a minimum slope for that type of roof of 20 degrees. In a hip roof, two slopes have a trapezoidal shape, the other two have a triangular shape.
The frame summer house has a hip roof, which provides additional protection for the entire structure due to the fact that all slopes are inclined.
At the first stage of the construction of the rafter system, the installation of the mauerlat is carried out - a special wooden beam or board, which is installed along the entire perimeter of the frame walls. In this case, we did without muerlat, and distributed the load over the top strapping, which has good rigidity due to the fact that it stands on the end of the board.
 Hip roof power frame.
 At the next stage, the ridge girder is installed, the size of which must be calculated correctly, since it is this component of the roof that bears the main load. The two-meter-long ridge girder and central rafters were assembled on the ground, and only then were they lifted up and installed.
After fixing the ridge girder, they install diagonal rafters, which, like the ridge itself, are made of 150 by 50 mm boards. Diagonal rafters rest with one edge on the ridge, and the other edge on the corner where the top frame of the house meets. All fastenings are made using ordinary metal nails, which does not in any way affect the strength of the structure.
When the power frame of the hip roof is ready, you can continue to build the roof further. The intermediate rafters and outer rafters are attached, which we made from two inch pieces nailed together.
 Hip roof rafter system.
 After installing the rafter system, it is necessary to install the hip roof sheathing. We made it from an inch and began nailing it from the eaves overhang towards the ridge, with the same distance between the sheathing boards.
 Sheathing of the roof truss system.
 A one-story frame house can be covered with a roofing covering and a regular metal profile can be used. This roofing material is easy to work with; it is coated with special substances that protect against corrosion and premature destruction. Other advantages of this roofing material include light weight, affordable cost and a huge range of colors.
Before installing the material, you need to take care of additional protection of the structure. For these purposes, you can use a waterproofing material that is attached directly to the rafter system with metal brackets. But we did not use it for the reason that the frame house will not be insulated.
 Roof made of metal profiles.
 Installation of the metal profile begins from the end of the roof. The main thing is to install the first sheet correctly; the location of all subsequent ones depends on it. The first sheet of metal profile is attached to the ridge girder using self-tapping screws, all subsequent sheets are overlapped with the previous sheets and connected with self-tapping screws.
External cladding of the house
After completing the roof construction, you can begin cladding the frame. In our case, the frame of the frame house was sheathed on the outside with OSB sheets. At the same time, only two far walls were sheathed with OSB, one of them was directed towards the fence, and the other to the side. Before the OSB sheets were screwed onto the self-tapping screws, we installed additional 100 mm inch posts.
 Covering external walls with OSB sheets.
 For the summer frame house, we decided to make four large square windows of 1500 mm each, because we wanted more light. We also made the frame for the windows from an inch board; it turned out to be light, because the entire load is carried by the power frame of the garden house made from a 150 by 50 mm board.
 Frame for four windows.
 The two front sides of the frame country house were covered with a block house to add individuality to the structure. Due to the fact that the house was built only on weekends, the block house was immediately treated with a special wood impregnation to imitate mahogany.
 Covering the front wall with a block house.
 In the place where the door is mounted in the house, two racks made of 150 by 50 boards were installed to more securely fasten the door.
 Door trim and installation.
 If you plan to live in a house not only in hot weather, then it is important to insulate the interior walls with mineral wool and waterproof the interior walls after working with the block house. The waterproofing film is attached around the entire perimeter of the interior; it simply covers the opening. After attaching, the film is carefully trimmed and secured inside the window and door opening using a construction stapler.
 Frame house without inserted windows.
 After this, you can begin finishing the frame house with your own hands.
Interior lining of the house
The interior cladding of the house is done using lining. Since the frame garden house was originally planned to be used only in the summer, the walls were not insulated; the frame was simply sheathed with OSB sheets and blockhouse.
 Finishing of internal walls with clapboard.
 To improve the performance characteristics of the structure, insulation is performed. At the previous stage, we already wrote about how to properly lay waterproofing film after installing insulation. Most often, such structures use either mineral wool or ordinary polystyrene foam.
They can be built on a summer cottage; they are made from special panels, the design of which already includes both insulation and waterproofing. The lining is attached on top of the insulation.
Windows and doors
When fixing windows, be sure to leave openings that will be filled with polyurethane foam. If the profile does not have a protective transport film, it is better to paste it around the perimeter with mounting tape; this procedure will protect the structure from expansion of the mounting foam.
 Installation of single-leaf windows.
 Our inexpensive frame house used windows that open to the sides like on a balcony. If you encounter difficulties during installation, it is better to involve specialists in the work. The protection of the room from cold and moisture will depend on the correct installation of window and door profiles.
On a note
The polyurethane foam is carefully trimmed only after it has completely hardened; at the same stage, all protective films are removed.
Laminate flooring
You can begin installing the finished floor only after completing the installation of windows and doors, otherwise air from the street entering the room can cause damage to the floor covering.
 Laminate flooring in the house.
 In our frame garden house, we decided to use high-quality laminate. Laying is carried out on a subfloor made of plywood, on top of which a special sealing material is laid.
Roof insulation with foam plastic
After completing the flooring work, we started thinking about insulating the roof and further increasing sound insulation during rain. This is another serious mistake - it is advisable to complete all the finishing work, including the roof, and only then begin installing the floor covering, otherwise there is a high risk of simply ruining the floor.
 Roof insulation with foam plastic.
 We decided to insulate the frame country house with our own hands using polystyrene foam. The foam panels are attached to the rafter system from the inside of the house tightly to each other; if gaps remain, cold air will easily penetrate into the room. It is not necessary to attach a waterproofing film between the roof sheathing and the foam.
 Roof sheathing with OSB panels.
 The foam is covered with OSB panels on top, after which you can begin finishing the roof or leave everything as is.
 Almost finished finishing.
 Today we talked about how to build a frame garden house with your own hands, based on personal experience. Some mistakes were made during the construction process, but they had virtually no effect on the overall functionality of the structure.
The frame house took several years to build, because most of the time was on weekends and only on our own. With such DIY construction, you can count on low prices for frame houses. In our example, you saw that anyone can build a frame house, even without deep construction skills.
Today, more and more residents of large cities are striving to leave their city apartment and get away from the frantic rhythm. Some people simply spend the weekend outdoors and organize picnics. But most people dream of a place where they can constantly come - their own dacha. But people do not live by dreams alone, and they try to make some of their dreams come true. Those who have approached the issue of their country residence thoroughly will, in turn, be divided into two conditional groups. Representatives of the first of them are simply collecting money to buy a house. Others build a country house with their own hands.
Start of construction
Even the simplest construction project represents a whole complex of works. And many developers, given all the hassle of such events, are afraid to start it on a subconscious level. The first thing you need to do is push yourself forward. As soon as the place for the foundation is determined, the first bricks are laid, or a dump truck of crushed stone is simply brought in, the construction of the country house has begun, and now there is nowhere to go.
The second important stage that needs to be worked out properly is determining the time you will devote to construction. After all, many people are well aware of situations where a construction project, once started, waits for decades to be completed. Experienced summer residents advise starting the construction of a small country house with a fence.

You should not assume that since there is no house on the property, there is nothing to steal. Any construction requires building materials. Just imagine how disappointing it is to arrive at your dacha and discover that building materials have disappeared. Agree, this is not a pleasant situation. Therefore, before starting construction of a country house, it is worth fencing your site.
Construction requirements
To build a country house yourself, you need to know a few rules. When choosing a site, you should pay attention to environmental safety, topography, configuration, accessibility of transport routes, orientation of the land to the cardinal points, development on neighboring sites and provision of infrastructure.
If all of the above factors are present, then it is recommended to start drawing up a development plan according to which you plan to build a country house with your own hands at your own discretion. In this case, the following requirements must be observed:
- You need to retreat 3 meters from the red travel line, 5 meters from the street, and 3 meters from neighboring areas.
- The wooden house should be located at a distance of 15 meters from the neighboring wooden one. A stone country house should be located at a distance of 6 meters from a neighboring stone building, and 10 meters from a wooden house.
- If the country house is located on the southern, eastern or western side of the world, then the distance from the neighboring residential or country house should be equal to the height of your building.
If we recall briefly, the main methods of constructing a country house are as follows: construction from logs, frame-panel construction, construction from brick or other block materials, monolithic construction.
Materials for work
So, when you decide to build a country house with your own hands, think about what it will look like in the future. The appearance of any building depends largely on the material that is planned to be used in the construction of the walls. It's up to you to decide whether to choose artificial or natural materials. But remember that the building material, in addition to the design, determines the comfort, safety and durability of the building, as well as the cost-effectiveness of repair work.
Wood has a huge advantage over modern types of finishing, or rather, environmental friendliness. However, in return for the feeling of “naturalness” and fragrant smell, this material requires a lot of attention and care from the owners. A do-it-yourself wooden country house made of logs or paving stones is called a classic of the genre.

Another common option is a stone country house, which is made of traditional brick. Such buildings look more solid, reliable and original, and also have good fire safety. The advantage of bricks over a wooden frame is the ability to construct walls of any configuration with niches and projections, while the frame has a standard rectangular or square shape.
Progress does not stand still, so modern, economical and practical building materials are often used in the construction of houses. These include aerated concrete, foam concrete, aerated concrete, expanded clay concrete and polystyrene concrete. All of the listed materials are blocks and differ from each other in size, density, weight, frost resistance, vapor permeability, strength, cost of material and construction work, as well as service life.
Construction options
Making a choice of layout and method of constructing a small country house is not as simple as it seems at first glance. Having decided on the number of floors and dimensions, you can think about the construction method and layout. For the desired result, the exact sequence of work is of great importance.
First, the supports are assembled into a single structure, then they are installed in pits and concreted. Our future country house is a structure made of racks, covered on both sides with boards and has a layer of thermal insulation in the middle. For the house you will need beams, thin and thick boards, timber, planks and slats. In order for the house to be suitable for summer holidays and winter living, it should be properly insulated.

Due to their practicality, simplicity and accessibility, designs for country houses with verandas, including design documentation for two-story buildings, are most popular today. Such a small extension will not cost much, but it is quite comfortable: here you can relax on a warm summer evening and drink coffee. And the veranda is useful in terms of storage, because there are things that are undesirable to store in a residential building.
To add or not to add a veranda? This is often decided by looking at the neighbors' garden houses. In general, the veranda is a classic attribute of any country house, the owners of which love coziness, convenience and a pleasant pastime.
Foundation
Even for such a small building as a country house, you need a foundation that you can make yourself. To build a country house with your own hands, you need a flat area measuring 4 by 4 meters, from which all debris must be removed, after which the bushes should be uprooted. After this you can work on the foundation. For the foundation, it is customary to dig holes 70 centimeters deep. They should be wide - more than 30 by 30 centimeters.
In this case, it is good to use concrete blocks that are installed on a sand and gravel pad, which has a height of 20 centimeters. To build such a foundation, you need to install foundation blocks in the corners of the country house, and additionally place more blocks between the corner blocks - every 1-1.5 meters. Blocks must be level. The depth to which it is customary to go deep into the ground should reach 10-15 centimeters.
Contrary to popular belief that the foundation of a wooden structure cannot be made of wood, you can rest assured that this is not true at all. The only thing is that before laying a wooden foundation, you should make sure that the wooden parts that are buried in the ground are well treated with an antiseptic and covered with a layer of bitumen. This will be quite enough for the wooden country house to last for many years.
If the house is planned to be built on an uneven surface, then it will be necessary to create a high foundation in some places. In this situation, it is recommended to use another block, having previously strengthened it with cement or cement-based glue.
Floor insulation
The floor of the country house is insulated in the following order. Extruded polystyrene foam boards must be cut and laid between the floor joists. A vapor barrier should be laid out on top of the slabs, stapled to the beams, and the joints taped.

Then it is necessary to lay the tongue and groove boards, connecting ridges and grooves in series and securing them with self-tapping screws. Saw the last board to the required width. Remove the ridge from the first board.
Walling
For the walls of a country house, it is recommended to choose a beam that has a cross-section of 6 by 12 centimeters. This material is able to withstand the heavy weight of the future roof. In addition, with such a thickness of timber there is enough space for internal insulation (6 centimeters). Such a beam is capable of providing reliable support for double-sided sheathing, which has a thickness of 12 centimeters.
The walls of the house consist of layers such as a frame, a vapor barrier film and internal lining. The vapor barrier film must be placed on the inside of the thermal insulation to avoid the greenhouse effect. To speed up construction, you need to watch a video about a do-it-yourself country house. Wall panels with layers need to be assembled in advance - they are easier to install and level when finished.

When connecting different layers of a wall, all work must be done with an accuracy of one millimeter, because the walls in any case must stand strictly rectangular. Thanks to the large-format boards, sawn at right angles, leveling can be carried out without much difficulty. The thickness of the wall reaches 9 centimeters. Subsequently, sheathing and sheathing will be added to it.
It is more convenient to start installing a country house from the rear longitudinal wall. Screwed braces to the wall and floor will hold it vertical. It is customary to insert windows into transverse walls before installing the front longitudinal wall, which is butt-butted to the side walls. It is best to assemble walls in a horizontal position. This allows frames and OSB boards to be moved with an accuracy of one millimeter and without additional fixation and support.
Roof installation
In the photo of a do-it-yourself country house, a simple pitched roof is represented by seven rafters that rest directly on the rear and front longitudinal walls. Since the roof can later be greened, the structure should be made durable.
To avoid large deflections of the rafters, it is recommended to increase their thickness to 16 centimeters, or reduce the interval between them. If you choose the second path, then you should install regular rafters 6 by 12 centimeters with an interval of 57 centimeters.
First, calculate the distance between the rafters. To do this, you need to measure the top edge of the longitudinal walls. Then you can lay the rafters. To prevent external rafters from tipping over, secure them with steel angles. The sheathing will secure the middle rafters. Attach a vapor barrier film to the bottom by stretching it across the rafters and securing it with a stapler every 15 centimeters.

Leave generous overlaps on the walls around the perimeter. After finishing the cladding, cut the film exactly along the perimeter. Saw the OSB board to size from the bottom side. After this, you need to sheathe the ceiling and walls with the prepared parts. Lay thermal insulation between the rafters and lay tongue and groove boards, which must be screwed with two screws to each rafter.
Please pay attention to the following point: to ensure that the country house can be used all year round, insulate the roof. The insulation that will be laid between the rafters must be cut to size, which is equal to the distance between the rafters and another centimeter. This allowance allows you to “squeeze” a strip of mineral wool between the rafters.
Facade finishing
Although OSB boards are technically difficult to beat, they will look unattractive without finishing. In this case, you can sheathe the walls using tongue and groove boards. The country house will look prettier, and the presence of an air gap behind the cladding will ensure the walls are dry.
Why are tongue and groove boards considered a good solution for external cladding? The fact is that the tongue-and-groove connection can reliably protect the house from moisture and wind, which OSB boards connected end-to-end cannot do. This surface will be easier to paint. In addition, the elegant structure of the tongue and groove board will visually give the country house greater harmony.
Outside, the tongue and groove board must be placed strictly vertically, because vertical seams are considered less accessible for rainwater to enter and accumulate. If you prefer horizontal cladding, then you should make sure that the grooves of the boards are directed downwards.
There is another option for finishing a country house - painting it. For coating, it is better to purchase façade paint - its elastic structure can withstand the summer heat perfectly. To prevent tree resin from bleeding through the paint, the boards must first be primed, and then a topcoat can be applied.
Interior work
A country house is usually divided into 2 parts: 75% is occupied by living space, and the remaining square meters are area for a storage room and a bathroom. Building a country house with your own hands requires the presence of two windows: a small one in the closet and a full one in the room. Therefore, it is advisable to insulate the country house. The inside of the room needs to be insulated with mineral wool, and a vapor barrier can be laid on top so that the insulation does not get wet.
It is not necessary to vapor barrier the floor of the room; you can simply cover it with linoleum. You can use plasterboard or lining for interior wall decoration. If you plan to work with drywall, it is recommended to build a stronger foundation because the construction will be heavier.

Ceiling insulation is similar to walls. It is best to lay insulation on top, because installation from below is a very complex process. On the outside of the house, you can lay vapor-permeable waterproofing and lay lathing under the outer cladding, for which it is customary to use a 25 by 150 millimeter board, and the installation itself is done with an overlap.
Heating the house
To use a country house all year round, you need to take care of heating. In principle, for a summer cottage where you rarely live, the best option is heating with electricity or solid fuel. However, developers who plan to live there permanently can also install water heating. If you leave the house for a long time in winter, you will have to fill the heating system not with ordinary water, but with a coolant with antifreeze properties.

The simplest heating option is still the traditional Russian stove or fireplace: they are able to quickly heat the room and are undemanding in terms of fuel. Not all dacha cooperatives can boast of the presence of natural gas, so the optimal solution would be to install a gas convector.
Change house
During construction work you can live in a cabin. Although not all the time, there is often a need to spend the night somewhere! And in general, it is convenient for storing construction and garden tools and equipment. A mobile change car, which can be sold after construction is completed, copes well with such tasks.
Another option is to find half a railroad car or an old container. These improvised change houses were actively used immediately after the collapse of the USSR; many models are still in use today. The ideal solution for storing equipment and belongings is a garage! By the way, if necessary, you can spend the night in it.
And finally, I would like to remind you that you can build a country house with your own hands inexpensively! In any case, you should not rush when building a garden house. Although such a construction process does not require a serious project, it is still worth obtaining such documentation - as they say, not for show, but in order to build a comfortable and durable house.


