The most important elements of any electrical network are the wire connection points. The reliability and durability of the electrical network depends on the quality and correctness of this work. Unfortunately, such poor-quality work cannot be diagnosed; deficiencies appear when the system is loaded. In this case, a poor-quality connection begins to heat up and this often leads to a fire, which is not always possible to localize.
This review describes the main types of wire connections with photos, their classification and application.

Regulatory documents
There are many ways to connect wires. Their use or prohibition is regulated by the current rules for the construction of electrical installations (PUE), which are approved by the Ministry of Energy of the Russian Federation. They must not contradict the current document.


The regulatory framework is adjusted over time, as there is a steady increase in electricity consumption and some types of connections do not provide the reliability required in modern conditions. For example, in accordance with the current rules, twisting cannot be used without additional fixation, which was widely used previously, since there are better and no less accessible modern technologies.

In order to determine how best to connect the wires, it is necessary to study all available technologies and determine their advantages and disadvantages. First of all, they are classified according to the need for additional skills to carry out the work. They do not require their fastening using terminals, various spring clamps, bolts and PPE caps.

Each solution has its own advantages and disadvantages. First of all, they differ in ease and reliability of installation. In general terms, we can say that quickly made contacts using various terminals and clamps can weaken over time and lead to accidents. High-quality contacts made using sleeves, soldering or welding require more time and are not disassembled.

Thus, reliability is directly proportional to labor intensity. Before connecting the wires with your own hands, you should read the instructions. It is worth noting that all work requires preliminary cleaning of materials from oxide film.

Technical characteristics of various options
Let's take a closer look at electrical installation methods that require additional tools. They allow you to get reliable connections designed for high currents.

Soldering
This type of connection of electrical wires is widespread. It is most often used for copper conductors. To do this you need a soldering iron, tin and rosin. The tip is wetted with a small amount of molten solder, which is then transferred to the twist when it is heated. The remaining rosin evaporates when heated. Before soldering several wires, it makes sense to tin each of them separately.

Such solutions are very convenient to use for conductors of small diameter, both single-core and with a large number of cores. The work should be done as quickly as possible to avoid melting the plastic insulation. Aluminum can also be joined in this way, but this requires special flux and solder.


Welding
Welding can withstand high currents and has mechanical strength. This way you can connect both copper and aluminum. It is very convenient for large diameter cores. They are twisted into one bundle, and using a welding machine, a large current is passed through it, which melts the metal at the end of the twist.

In order to obtain accurate contact, you must first practice and select the operating parameters of the welding equipment. This can be done using unnecessary trimmings. It is necessary to melt the metal without damaging the insulation.

Crimping
Crimping is performed using sleeves and special tools. They come in copper and aluminum. This operation is quite simple, but requires the selection of sleeves of the required size and a special tool to compress them.

The work is done quite simply: the wires are rolled into a bundle, inserted into a sleeve and crimped in several places. It can withstand large current. The biggest difficulty is selecting sleeves of the required diameter: they should not be too large or small.

Twist
As described above, this method cannot be used without additional fixation. Since it does not allow you to create reliable contact. Twisting is used in combination with soldering, welding, crimping or the use of PPE. Before fixing, the wires are twisted.

The three methods described provide for their subsequent electrical insulation. To do this, use insulating tape for electrical installation work or heat shrink tubing. They are made of polymer material, which allows their diameter to be reduced several times when heated.


Products of various ranges are produced. First of all, we should highlight the need to use light-resistant materials outdoors. For shrinkage, it is best to use an industrial hair dryer or gently heat the polymer tube with a soldering iron.

For reliability, after installing the first tube, install a second tube of larger diameter. After shrinking, the material should reliably cover the ends of the contact.

The following solutions do not require additional equipment and make correct wire connections easy to perform with basic skill levels.

Terminal blocks
Previously, they were widely used due to their low cost and reliability. It can be used to connect wires of different sections. They can be copper or aluminum, and can consist of one or many cores. They are clamped with screws on the terminal block.

The disadvantage is that they are only connected in pairs. For a larger number of connections, special jumpers must be made. There are other options for easier connection.


Connecting insulating clamps
One of them is the use of PPE caps. This is a plastic cap with a metal spring installed inside. It is wound onto the bundle, twisting them, the plastic serves as electrical insulation. This contact is very reliable. There is a domestic development by the KZT company, which is put on directly onto the twist.


Wago Clamps
This type of connection has conquered the market with its convenience and ease of use. They connect all kinds of conductors. Clamps are available for different numbers of connections.

The disadvantage is that the design contains a spring, which can weaken over time, which can lead to an accident and fire. Therefore, you should purchase only original, branded products.


Bolt fastenings
This type of fastening is classic; it allows you to connect copper with aluminum. Consists of a bolt with a nut and three washers. You can make it yourself if there are no other connectors.

Conclusion
The choice of how best to connect the wires depends on their type, budget and time. If you follow the rules of the PUE, you can make safe and reliable contacts that will serve for many years. It should be remembered that in any case, these works must be performed as carefully and carefully as possible, without haste.

Photo of the process of connecting wires


Between themselves. I would like to say right away that you can use several methods to perform this operation. In this article I will describe a method using twisted pair. I will also provide one alternative method using a wireless network. So, next you will learn how to connect two computers to each other.
Preparation
Surely you have at least once been to an Internet cafe or a computer science classroom at school. And there you observed many separately located computers that could somehow interact with each other. For example, produce combined or correspondence. So, in most cases in such places a built-in local network is used. Interaction is achieved using a special UTP cable (or, as it is popularly called, “twisted pair”). In places like computer clubs, there is also a router. To connect two computers to each other, such a device does not need to be used. Since it is necessary to connect more than two PCs. Also, of course, it is necessary that it be installed in both computers, otherwise the wire will simply have nowhere to insert it. Below we will describe how to connect two computers to each other via a twisted pair cable.
Instructions
First of all, prepare both PCs. Turn them on and, preferably, place them next to each other first (to observe the changes). Now let's get down to the instructions themselves.

Alternative method
Previously, you learned how to use a cable. But now we live in a world of high technology. Therefore, in some cases it is not advisable to use a primitive cable. Therefore, I suggest you try a Wi-Fi wireless communication system. It allows you to achieve the same results as through a cable, only without a physical connection. In this case, you will have to incur additional costs for the purchase of a Wi-Fi router (as well as for receivers, if they are not provided in the equipment). The most difficult thing about this method is setting up the dispenser. There is no point in giving precise instructions for this process, since the setup will depend on the brand of equipment.

Conclusion
The need to connect multiple PCs may vary. For example, to join a local network in order to play games together. Or maybe you want to save on internet costs using one connection. One way or another, this can be done, and very quickly. I hope you understand how to connect two computers to each other.
Good day!
Eh, if in the 90s of the last century a computer was a luxury, now many people have not one, but several computers/laptops at home. If you connect computers to a local network (even if there are only 2 devices), you can get undeniable advantages:
- the ability to open files located on another PC, work with them, etc. Now you don’t need to run back and forth with a flash drive or disk;
- the ability to make a network printer (scanner, CD/DVD drive, etc.), and use it from all PCs on the local network;
- the ability to play online games (this is a separate and most interesting opportunity that I could talk about for a long time).
In this article, I wanted to look at the issue of building a home local network (and setting it up), which will be useful to all novice users. I’ll take the path of a step-by-step analysis, I’ll start with the issue of connecting one PC to another, then I’ll look at setting up Windows, and how, in fact, to share (make available on the local network) folders, printers, etc. So...
When creating a home local network, two options are most often used:
- connect two computers (PC to laptop, PC to PC, etc.) using a cable (often called twisted pair);
- buy special "box" called a Wi-Fi router. A PC is connected to the router using a network cable, and laptops, phones, tablets and other devices get access to the Internet via Wi-Fi (the most popular option today).
Option No. 1 - connecting 2 PCs using twisted pair
Pros: simplicity and low cost (you need 2 things: a network card and a network cable); ensuring a sufficiently high speed that not every router is capable of producing, less radio waves in the room.
Cons: extra wires create confusion and get in the way; after reinstalling Windows OS, the network needs to be configured again; In order for Internet access to be on the second PC (2), the first PC (1) must be turned on.
What is needed: each PC must have a network card and a network cable. If you plan to connect more than 2 PCs to a local network (or for one PC to be connected to the Internet and at the same time be on the local network), one of the PCs should have 2-3 or more network cards.
In general, if both PCs have network cards, and you have a network cable (also called an Ethernet cable), then connecting them using it is not difficult. I don't think there's much to consider here.
Note: Please note that usually the green (yellow) LED on network cards starts to light up when you connect a cable to it.

Another important point!
Network cables on sale are different: not only in color and length. The fact is that there are cables for connecting a computer to a computer, and there are those that are used to connect a PC to a router.
For our task needed crossed network cable (or cable crimped cross method- here who calls it what).
In a crossover cable, the yellow and green pairs are swapped at the end connectors; in the standard one (for connecting a PC to a router) - the colors of the contacts are the same.

In general, if two PCs are turned on and working, you connected them with a cable (the LEDs on the network cards blinked), the network icon next to the clock stopped displaying a red cross - this means the PC has found the network and is waiting for it to be configured. This is what we will do in the second section of this article.
Option No. 2 - connecting 2-3 or more PCs using a router
Pros: most devices: phones, tablets, laptops, etc. will have access to the Wi-Fi network; fewer wires under your feet; after reinstalling Windows, the Internet will work.
Cons: purchasing a router (after all, some models are far from cheap); "complex" device setup; radio waves from the router, lower ping and freezing (if the router cannot cope with the load).
What you need: a router (it usually comes with a network cable to connect one PC to it).
As a rule, there are no big problems with connecting the router either: the cable coming from the Internet provider is connected to a special one. router connector (it is often called “Internet”), and local PCs are connected to other connectors (“Lan ports”). Those. the router becomes an intermediary (an approximate diagram is shown in the screenshot below. By the way, in this diagram there may not be a modem on the right, it all depends on your Internet connection) .
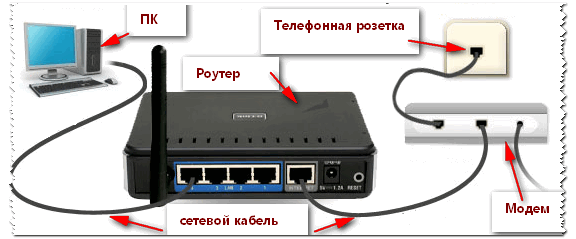
By the way, pay attention to the LEDs on the router case: when you connect an Internet cable from the provider, from the local PC, they should light up and blink. In general, setting up a Wi-Fi router is a separate big topic, and for each router, the instructions will be slightly different. Therefore, it is hardly possible to give universal recommendations in one separate article...
By the way, when connecting via a router, the local network is usually configured automatically (that is, all computers connected via a network cable should already be on the local network, there will be a couple of small touches left (more on them below)). The main task after this is to set up a Wi-Fi connection and access to the Internet. But because This article is about the local network, I’m not focusing on that...
Setting up a local network (Windows 7, 8, 10)
In this subsection of the article, I will give universal instructions, regardless of how your local network is organized: connected via a network cable, or using a router. Where the settings relate to a specific option, there will be notes.
Note: all settings are relevant for Windows 7, 8, 8.1, 10.
Computer and workgroup name
Allegory: each person has his own name, surname, patronymic, date of birth, city, etc. - no two people are exactly alike. It’s the same on the network - there shouldn’t be computers with the same name...
The first thing you need to do when setting up a local network is to check and configure workgroup name And computer name. Moreover, this needs to be done on every computer on the local network!
To find your computer name, open the Windows Control Panel at: Control Panel\System and Security\System (screen below). Next, make sure the following:
- PC name and slave the group must be in Latin;
- Each PC/laptop on the local network should have its own unique name(for example: PC1, PC2, PC3);
- Every PC/laptop should have same working group (for example: WORKGROUP).
To change the name and workgroup, click the "Change settings" button.


Changing workgroup and PC name
In general, when you bring all the names in accordance with the requirements above, you can proceed to the next stage of setup.
Enable printer and folder sharing
Relevant both for connecting via a router and directly...
This innovation appeared in Windows 7 and supposedly provides greater security for the OS (in my opinion, it only creates the need for additional configuration of the local network). The bottom line is that, by default, Windows blocks and does not allow access to open and share folders, printers, etc., until the security policy is “softened.”
To remove this lock and enable sharing, you need to:

Setting up IP addresses, DNS, masks, gateways
For a network organized using a router
In general, for PCs connected to a local network using a router, you usually don’t need to configure anything (everything works by default). If something is wrong, just in case, I recommend going in and checking the connection properties.
To do this, you first need to open "network connections" . This is done simply:
- first open the window "Run"- combination of buttons Win+R;
- then enter the command ncpa.cpl and press Enter(works in all versions of Windows 7, 8, 10).

How to open network connections // ncpa.cpl

Local Area Connection Properties

To connect PC to PC via network cable
PC 1
By PC 1 I mean a computer that has two network cards: one of them is connected to the provider’s Internet cable, and the second is connected to a local network cable going to PC 2.
Note: although, an Internet cable from a provider does not have to be present. If it is not there, select PC 1 and PC 2 - randomly...
And so, we open LAN network connection properties(how this is done - see just above in the article).
- IP address: 192.168.0.1;
- subnet mask: 255.255.255.0 (see screenshot below);
- save the settings.

IN properties of IP version 4 (TCP/IPv4) second PC, you need to set the following parameters:
- IP address: 192.168.0.2,
- subnet mask: 255.255.255.0;
- default gateway: 192.168.0.1;
- preferred DNS server: 192.168.0.1 (see screenshot below);
- save the settings.

Actually, the local network setup itself is complete. Now you can start the fun part - sharing and using shared local network resources. Actually, that's what we were going for...
Sharing Internet access on a second PC
Relevant for PCs connected directly with a LAN cable...
We need to configure PC 1 (i.e. the one to which we have the provider’s Internet cable connected).
First we open network connections : press combination Win+R, enter ncpa.cpl, Further Enter .
How to open network connections //ncpa.cpl

Next, open the tab "Access", and check the box next to the item "Allow other network users to use this computer's Internet connection" . Save your settings.

Allow other users to access the Internet
If everything was done correctly, the Internet will be on both computers.
Note: naturally, for the Internet to be on PC 2, PC 1 must be turned on! This, by the way, is one of the inconveniences of such a local network; when connected via a router, the Internet will be available no matter which PC is turned on/off.
Sharing folders/files for public access


3) Set the resolution: read or read and write.
Note:
- read enabled: users will only be able to copy your files to themselves (they will not be able to delete or change them!);
- read and write enabled: Local network users will have full control over files in folders: they can delete all files, change any of them, etc. In general, I would not recommend providing such access to important and large folders (to transfer files, it is better to create a separate folder to which you give full access).

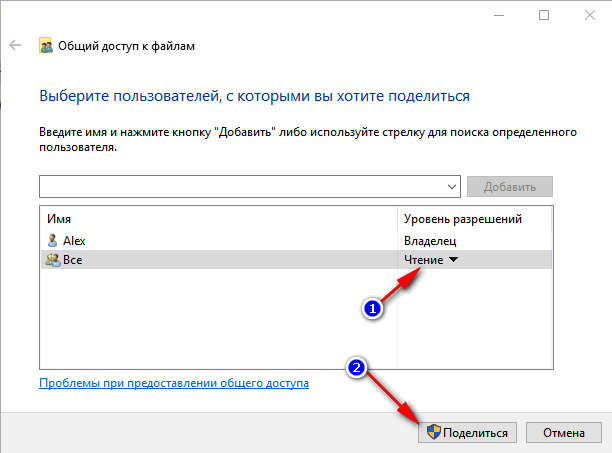
5) After a few seconds, Windows will report that the folder has been opened for public access. So everything went well.

6) To access the folder:
- open the explorer;
- then open the “Network” tab (on the left, at the bottom of the window);
- open computer name, on which the folder was shared. As you can see in the screenshot below, it is shared, you can go into it and start copying (reading) any files.

Sharing a printer (shared network printer)
1) The first thing you need to do is open the control panel: control panel/hardware and sound/devices and printers.
3) Then open the tab "Access" and check the box "Share this printer" . Save the settings (see screenshot below). Actually, the printer is now shared and can be used by other PCs/laptops/tablets and other devices on the local network.

How to share a printer
4) To connect a network printer, open conductor, select computer name , on which the printer is shared. Next you should see it: click on it right mouse button and select the option from the menu connections .

How to connect a network printer
5) Then you can open any document, press Ctrl+P (File/Print), and try to print a page.
Note: By default, Windows usually specifies a different printer (not the one you connected over the network). Don't forget to change it when printing.
Regarding the local network printer, I recommend reading my detailed article on this topic. It describes some points in more detail. Link below.
"Creating" a network printer -
This is where I end this article. Happy and quick setup everyone.
Very often, users on forums look for information about connecting two computers to a local network. A similar question is asked not only to forum participants, but also on sites where the so-called FAQ (question-answer) is implemented. Since connecting computers via a LAN cable also raises questions among blog visitors, I decided to write a detailed instruction article. It should be said that in this publication we will consider connecting two computers to a network with a LAN cable, and we will consider a wireless Wi-Fi connection in one of the following publications.
As you understand, for a local connection of two computers we need a LAN cable crimped in a cross-type manner. It is worth saying that for computers with an Ethernet Auto-MDIX interface (an interface depending on the transmission medium), the type of crimping (direct or cross) does not matter because the network port is configured automatically. This technology must be supported by two devices.
Nothing is perfect, and in practice it happens that network cards with Ethernet Auto-MDIX refuse to work correctly. To avoid such situations, I recommend that you adhere to twisted pair crimping standards and use each type of LAN crimping for its intended purpose. Before connecting two computers to a local network, be sure to make sure that you are using a working and correct type of cable. Details about where the straight and cross type are used and how to crimp a LAN cable without crimpers (crimping tool).
The length of the twisted pair cable for connecting two computers into a local network should not be more than 100 meters. Otherwise, signal attenuation will affect the quality of the network.
In addition, you can use a FireWire (IEEE 1394 or i-Link) cable to connect two computers if both devices (laptop, desktop) have appropriate ports. If there are no IEEE 1394 ports, then you can install a controller/expansion card for the PCI slot in the desktop FireWire, and install a PCMCIA card with i-Link ports in the laptop. FireWire cables are available in 4-pin and 6-pin versions. Depending on the available ports on the computers you are connecting to, use the appropriate cable.


So, you have connected two computers using one of the methods described above. If you are creating a network connection between two computers via an RJ-45 connector, the controller's Ethernet indicator light should light/blink green (usually the indicator light is located near the RJ-45 connector). If this does not happen or the indicator lights up on only one computer, then check that the cable is crimped correctly.
Also make sure that the network adapters are turned on, their drivers are installed, and the devices are working properly. But if the indicators on two computers light up or blink, then it follows that the hardware connection is established and the cable has no breaks and is working correctly.
If you use the Windows 7 (Windows XP) operating system, then as a rule, after connecting, the computers begin to “see” each other and work normally. It all depends on the preset parameters. However, if this does not happen, then you need to make some changes to the network connection parameters.
Let's look at a direct connection of two computers via a FireWire or LAN (twisted pair) cable running the Windows XP operating system, and then we'll look at how to combine two computers running Windows 7. It is advisable that the two computers being connected be in the same workgroup.
Connecting two computers to a network running Windows XP.
Go to Start, Control Panel and click on the Network Connections icon. Right-click on “Local Area Connection” and go to “Properties” in the context menu.


In the window that opens, go to “Internet Protocol (TCP/IP)” and move the switch to the “Use the following IP address” position.


Here we need to enter the network IP address for the computer. For example, like this:
- IP address: 192.168.1.1
- Subnet mask: 255.255.255.0
- Default gateway: 192.168.1.0 (enter if computers will not see each other)
That is, it is not necessary to enter “Main Gateway,” but if the computers will not see each other, then enter this parameter as well. After that, click “Ok” in all windows.


You need to do the same on another computer, but enter a different IP address. For example, like this:
- IP address: 192.168.1.2
- Subnet mask: 255.255.255.0
- Default gateway: 192.168.1.0 (must be entered if there is no connection)
Now a connection should be established between the computers (if there is no connection between the personal computers, then reboot them). To make sure the settings are correct, go to “Network Connections” and click on the “Local Area Connection” icon. The “Status” window should show “Connected”.


If “Connection is restricted,” check that the network connection parameters are filled out correctly. We've sorted out the connection in the Windows XP operating system, now let's look at how to organize a network between two computers in Windows 7.
Connecting two computers into a network running Windows 7.
Actually, in Windows 7 there are no special differences in connecting two computers to a network, but to make it clear to those who use this particular operating system, I will describe the sequence of actions specifically for them.


Go to Start, Control Panel and select Network and Internet. Next, go to “Network and Sharing Center” and click on “Change adapter settings.” Here we are. Right-click on “Local Area Connection” and go to “Properties”.


Now go to “Internet Protocol Version 4 (TCP/IPv4)” and switch the button to “Use the following IP address.” Next you need to enter your network parameters.


It makes sense to enter a default gateway if there is no connection between computers. For example, like this:
- IP address: 192.168.1.7
- Subnet mask: 255.255.255.0
- Default gateway: 192.168.1.0 (enter if there is no connection)
You can set any other parameters for the IP address, as long as they are in the range from 192.168.1.1 to 192.168.1.254.


On the second computer, you need to enter exactly the same parameters and change the last digit in the IP address. For example, like this:
- IP address: 192.168.1.8
- Subnet mask: 255.255.255.0
- Default gateway: 192.168.1.0 (please enter if there is no connection)
After you set the necessary parameters, do not forget to click the “Ok” button in all windows. If there is no connection, restart your computers. To make sure that everything is working correctly, you need to check the connection between the computers. To do this, open a command prompt on one of the two computers. Go to Start and enter cmd in the search field labeled “Search programs and files.”
For example, to check communication on a computer with IP parameters 192.168.1.7, enter the command ping 192.168.1.8 and press the Enter key.


A positive result will be the result shown in the image. If sent = 4, received = 4, lost = 0, then everything is configured correctly. The two computers are connected directly.
Now you can exchange files between computers. Bye!
2018-07-03T11:46:23+00:00
I don't quite understand your question. Why does something have to fly off? Or do you mean that you need to change your network settings? For example, to connect to the Internet.
Looking for a way to share files between two computers using a local area network cable (LAN cable)? Well, congratulations, your search finally ends on this site. I'm sure this little tutorial will help thousands of people who want to transfer files from PC to PC using an Ethernet cable. I am sure that this article will be useful for you too. So, let's begin.
Before you start, you should know that sharing or transferring files from computer to computer by connecting them using an Ethernet cable is one of the oldest methods. Wi-Fi technology has evolved significantly over the years, and as long as your two systems are on the same local network, you can simply enable sharing on one PC and use the other computer to access those files.
When is it necessary to use a LAN cable to send files from one computer to another?
Oh, this tedious thing is when you need to connect thousands of flash drives when you want to save some data, and it also takes a lot of time. If you're tired of this, then this method of connecting computers is perfect for you! This method is also useful when, for example, computers are not connected to a common Wi-Fi router or one does not have a permanent connection to such a network.
Moreover, you can also use this method when you need to transfer a lot of data like your media collection from one PC to another. Trust me, unless you have sufficient skills in setting up Wi-Fi and configuring your network to take advantage of full speed, moving several hundred gigabytes of media files over WiFi is not a good idea. I tried to do this, and it really is HELL!
Benefits of connecting two computers via LAN
The main advantage of transmission via Ethernet cable is that it is very fast, at least faster than regular WiFi transmission. If you have a lot of data to transfer, it is best to use an Ethernet cable.
Which Windows has it been tested on?
This method is tested on Win 7, 8, 10, i.e. on those, one of which is probably installed on you. So you don't have to worry about it not working.
What do you need to have?
- 2 computers with Windows OS.
- 1 LAN cable.
- A little time and patience (only if you are doing this for the first time).
Exchange data between 2 computers via LAN cable
Step 1
Connect both computers to a LAN cable.
Step 2
Okay, now you should configure the sharing settings on both computers.
Go to Control Panel from the Start menu and open it. Follow the path “Network and Internet> Network and Sharing Center> Change advanced sharing settings”:
Here, select the “enable network discovery” option under folder sharing section. Now select the “turn off password protected sharing” option. This way, you won't have to enter your password every time you try to access shared folders from another computer. However, this is also a significant security risk. So make sure to select "Enable password-protected sharing" once you're done transferring files over the Ethernet cable:


Step 3
Now we must connect both computers to the same network.

Open Control Panel > Network and Sharing Center:
You will see Local Area Network or Ethernet Connection. Click on the “Local Area Connection” link:

In the dialog box that appears, click on the “Properties” button:

Find and select “Internet Protocol Version 4 (TCP/IP V4)” from the list and click the “Properties” button:

In the properties window, select the “Use the following IP address” option. Now add the following values to the fields for the first computer and save the changes:
- IP Address: 192.168.1.1
- Subnet mask: 255.255.255.0
- Main gate: 192.168.1.2

On the second computer, do the same in the IPv4 properties window and enter the following values and save the changes:
- IP Address: 192.168.1.2
- Subnet mask: 255.255.255.0
- Main gate: 192.168.1.1

Essentially, we simply manually assign different IP addresses to two computers and make each other’s default gateways.
If everything is working correctly, you will see the names of the two computers in the Networks panel.
Step 4
This step assumes you've connected the cable correctly, enabled sharing options, and configured IP addresses, now it's time to send files from one computer to another. To do this, you first need to share the target folder on your local network.


