To date, leveling the floor with your own hands using a screed is the best solution. This is due to the fact that the process itself is quite simple, does not require special tools, knowledge and skills. And there are other ways as well.
You just need to follow the instructions that we will provide you further, we will describe in detail the process of arranging the floors in various ways.
Classification and different methods of screed
It is very simple to level the floor in an apartment with a screed, but there are several such types of floors, therefore, their classification was created:
Simple screed
Actually a simple screed, which is performed with concrete and admixtures to increase its volume, in order to save money. But such savings do not affect the strength and durability in the least.
National team
The process of creating such a coating is very different from the standard one, because many consider it a special kind, but still it remains the same screed.
Floating
It is produced according to the same principle as a standard screed, but a floating layer is poured over it, which significantly increases the strength and improves the adhesion processes.
Monolithic
It is the most durable and highest quality option. The entire mixture is poured in one layer, forming a purely cement surface without impurities and additives that weaken the material. As a result, you get an almost natural natural stone as your floor.
To make a sand and cement screed, you need to follow these step-by-step instructions:
- Cleaning and priming the surface of the base.
- Find the highest and lowest point in the room using a laser or water level. They will serve as a guide. From the highest place, make a mark on the nearest wall about 4-5 centimeters, this will be the level of the future floor.
- We mix cement with sand in a large container, in a ratio of 1 part of cement to 4 parts of sand. For this we use a special mixer or a perforator attachment.
- We install the beacons on self-tapping screws, which we screw in in half a meter increments around the entire perimeter of the room. Then we display them in such a way that each lighthouse is strictly in level relative to the starting mark and to each other.
- We fix the screws with our mixture along the entire length, and wait for them to harden.
- After that, we begin to actively knead the concrete, and pour it between the beacons.
- You can spread the mixture using the rule that we evenly distribute the concrete over the area.
- After the whole room is covered with a new surface, we wait two days for its complete hardening and you can move around without problems on the new floor.
As you can see, the process is not too complicated, but it still requires some attention from you.
Bulk mixtures
Now you will learn how to level the floor in an apartment with the help of a bulk mixture, which will set itself in the required position. First, let's analyze what a bulk mixture is - it is a substrate that is diluted with water, in the proportion that is indicated on the package, and when it spills over the area, it begins to level out itself to the ideal horizontal level.
Complete drying occurs in the same way as when screed, for confident movement on the surface, it is enough to wait about twenty hours.
The process of the self-leveling floor
Equipping the floor with such a mixture is much easier than using a screed, since you do not need to look for the maximum and minimum points, set up beacons, wait until they harden and other unnecessary actions. You just need to completely clean the surface of the entire room from dust and dirt, prime and pour the necessary amount of self-leveling mixture on the old floor.
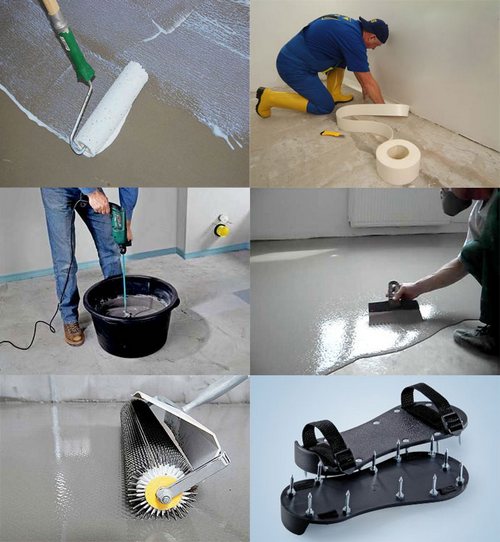 The thickness of the layer should not exceed 3.5 cm. When pouring the mortar, you need to remember that the self-leveling floor "rises" very quickly.
After that, using the same rule or a wooden mop, distribute it evenly over the area. After a few hours, the mixture should straighten out on its own and form a flat surface, after which it should completely harden in a day.
GVL or dry leveling
Gypsum fiber sheets are a modern method of leveling floors, which helps to level the floor very quickly and at the same time without a drop of water with any difference. They are great for multi-storey buildings where there is a risk of flooding the neighbors while pouring watery mixtures.
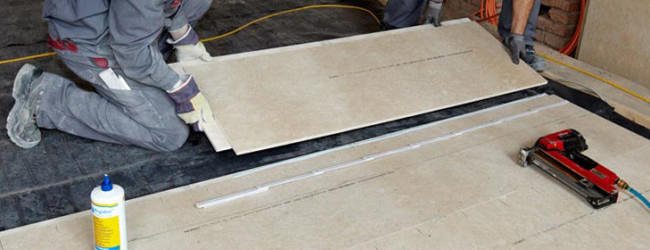 For laying on the floor, it is advisable to choose a waterproof gypsum fiber sheet (GVLV) - it is resistant to high humidity.
GVL installation process
Installation takes place in the following stages:
- Complete cleaning of the surface from the old coating.
- Primer.
- Installation of a compensating tape that compensates for the expansion and contraction of the sheets.
- Bonding sheets to tape with glue.
- Finishing seams with glue residues or any putty.
Laying plywood floor
If you prefer to use natural coatings, then plywood is exactly what you need. It is made of natural wood, which is glued into a single denser and thicker sheet with natural adhesives without admixture of toxic materials.
Plywood comes in various thicknesses and strengths, which allows you to choose it based on your needs. A floor made of such material is light, durable, and absolutely even if you do everything according to the instructions, which tells you how to level the surface and adhere to all requirements.
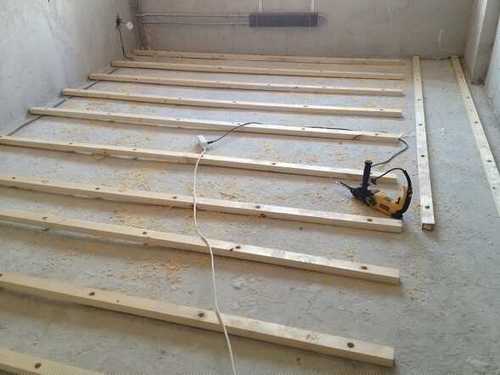 The process begins with the installation of beacons, which are used as self-tapping screws located over the entire surface at a certain height.
Installation process
Now we will tell you how to level the floor for linoleum, laminate, tiles or any other material using plywood yourself. The whole process is very simple and takes place according to the following technology:
- First, we determine the highest and lowest point in the room. To do this, you should use a laser or water level, they will help to carry out the marking as accurately and very quickly. We mark the indicated points along the entire perimeter of the room.
- Then we mark the lines where the point support elements will be installed to adjust the level of the future floor.
- With a pitch of fifty centimeters, we distribute the support pillars along the marked lines.
- After all the supports are installed, we set them according to the level, so that each is exactly relative to the first set support.
- Then we fasten the bars along the entire room to the supports.
- On top of the longitudinal bars, we screw in the transverse bars, which will serve as a support for the plywood sheets. The bars must be screwed in in increments of thirty, forty centimeters.
- On top of our frame, we install sheets of plywood and fasten them with self-tapping screws or nail them.
 To efficiently cut the plywood and at the same time save material, effort and time, lay the sheets on the floor BEFORE installing the joists
The joints between plywood sheets can be covered with glue, sealant or resin to prevent moisture from penetrating from under the floor.
Which floor is faster and more profitable
If you decide to make yourself a flat floor under the laminate, linoleum or tiles, but still wondered which one would be more profitable and faster to do, then you have come to the right place, we will help you with the solution of this issue. First, you need to separate the two concepts quickly and cheaply, they are incompatible in this matter. The first step is to disassemble the floor, which can be leveled quickly.
The screed and self-leveling floor will dry more than the drain, while the wooden floor is built in one day, after which you can immediately continue working on it. So in this matter, of course, the fastest will be the construction of a wooden floor under plywood linoleum.
If you want to save money, then leveling the floor according to the screed principle will be the best solution for you. Since sand and cement have the lowest cost compared to self-leveling compounds and wood, this floor will be the most profitable for you. So, if you want to level the floor under the linoleum and save money at the same time, then the floor screed is for you.


