Ondulin is a kind of hybrid that combines the properties of slate and roofing material. The installation of this material is less laborious: after all, its weight is 5 times less than ordinary asbestos slate. Moreover, ondulin can be fixed even on the old roof. With proper skill, it will not be difficult to cover the roof with ondulin with your own hands.
Laying ondulin
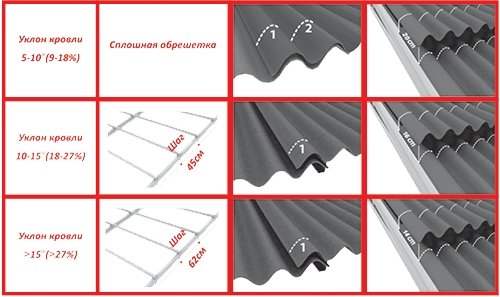
In order for the roof to be able to withstand all operational loads, the installation of this material must be carried out according to a certain technology recommended by the manufacturer:1. With a slight roof slope of 5-10 ° C, ondulin is laid on a continuous crate made of coniferous wood. If the angle of inclination is more than 15°C, it is allowed to manufacture a sparse crate with step 61 cm. The recommended beam section for it is 40x60 mm (50x50 mm bars can be used).
2. This material needs to be fastened only on a perfectly flat surface.. Roof slopes should lie in the same plane and not have kinks. If irregularities or sags are found, they should be eliminated.
3. Sheets must be perfectly level. It is not recommended to compress them too much or, conversely, stretch them - this can cause damage to the material. Dismantling the already nailed ondulin is difficult, and in case of an error, you will have to replace the damaged sheet with a new one.
Advice. For movement on the roof it is better to make roof bridges: suspended or attached ladders made of wood or metal with a strong hook with which they are hooked to the roof ridge. In order not to damage the already laid euroslate, you should not step on areas with recesses. It is better to walk in soft shoes, advancing only on his waves.
roof bridge
4. Cut this rather soft material can be used with a conventional hacksaw for wood or an electric saw. It is more convenient to mark up with a colored pencil: its traces will be clearly visible on the sheet.
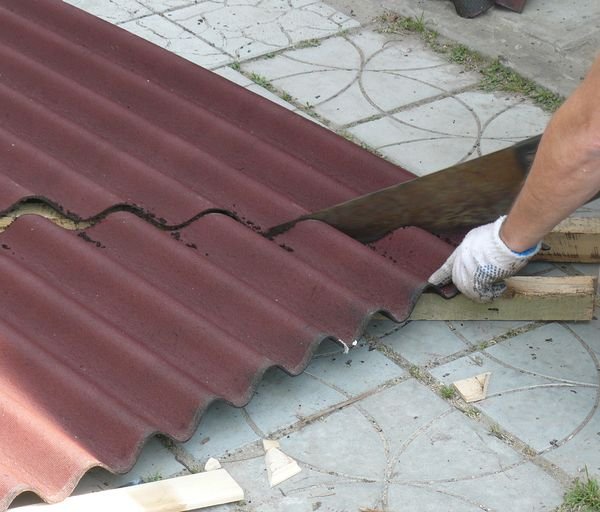
Onduline cutting
Advice. So that the wood saw does not get clogged with bitumen and does not get stuck, it should be lubricated with oil or periodically lowered into water already in the process of work.
5. To exclude thickening in places of overlaps and warping of ondulin, it is laid "out of the way" (in a checkerboard pattern) so that in the second row the sheets are shifted relative to the first row by 1/2 of the width. To do this, the second row starts with half a sheet.
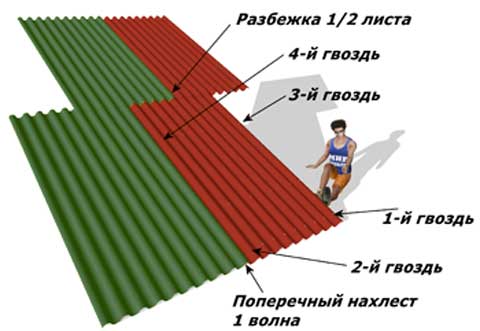
Laying "out of the way"
6. When laying, you should consider direction of prevailing winds(they should blow into the overlap areas as little as possible).
Laying is carried out taking into account the direction of the winds
7. To prevent leaks and snow ingress, ondulin should be mounted with overlap from the sides in two waves. From the ends, the sheets should overlap each other by 30 cm. When laying the Onduline Smart roof, which has special hydraulic locks, the overlap may be less.
8. With a roof slope of more than 18 °, overlap is allowed in one wave from the sides and 20 cm from the ends. If the roof has a slope of more than 27°, an overlap of up to 17 cm is allowed. With too much snow load, as well as on sloping roofs, it is better to increase the size of the overlaps.
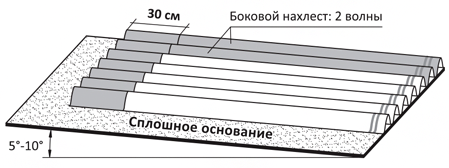
Ondulin sheets are overlapped
The size of the overlap depends on the angle of the slope
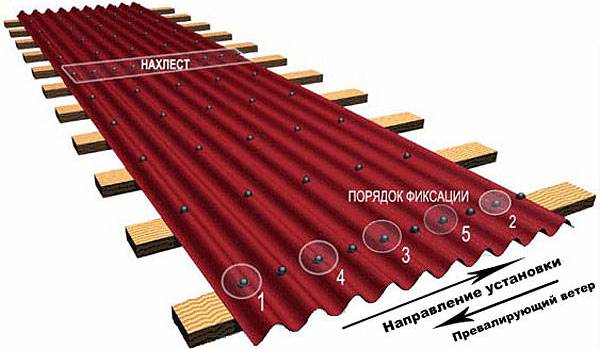
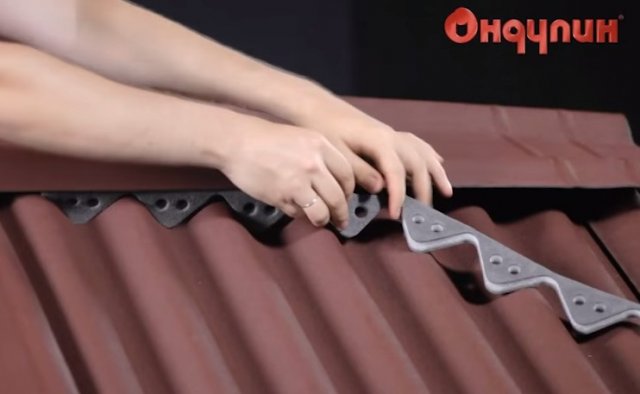
9. On each sheet of ondulin there are already ready-made mounting holes. For one sheet, 20 nails are required (these fasteners with a decorative cap come with ondulin). First, they drive in the corners, then into each wave of the bottom. Next, the sheets are attached through the wave. Nails are not driven into overlapping places: in this place, the ondulin will be fixed after the next sheet is applied. It is better not to save on nails: this can lead to the sheets being torn off by gusts of wind.
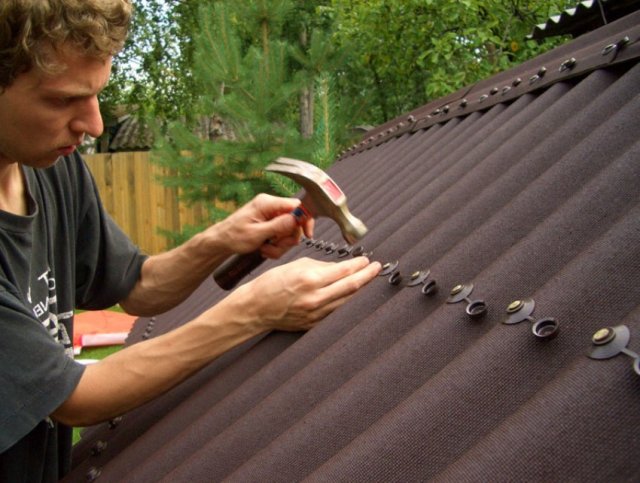
Ondulin is fastened with special nails with lockable caps
10. The nail is driven only to the top wave at an angle of 90°C. In order not to damage the soft material, you should not drive it into the sheet until it stops: the washers should fit snugly, but not push through the sheet.
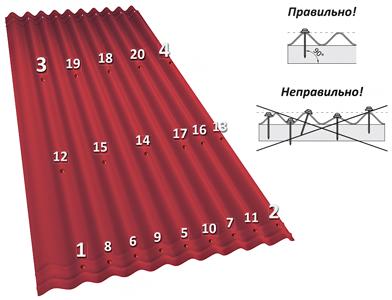
Mounting order
11. All additional elements(skates, valleys and windshields) are included in the ondulin kit and are manufactured using a single technology.
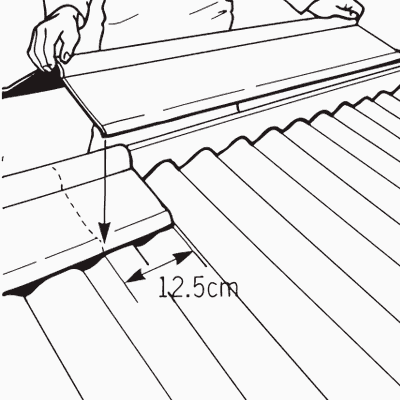
12. At the ends of the roof will be fixed ridge ondulin. With the help of the same additional element, joints can also be closed during transitions on complex roofs. They begin to fasten it from the bottom on the same side from which the laying began. A ridge ondulin is laid with an overlap of 12.5 cm. At the same time, nails are driven into the ridge in every wave.
Laying ondulin on the roof ridge
13. Skate, valley, forceps are additionally glued waterproofing self-adhesive film. It is included in the ondulin kit.
14. Tong (wind plank) fastened with one edge to the sheets, and the other - to the gable boards. For joints on slopes the use of both ridge and tong dobors is allowed.
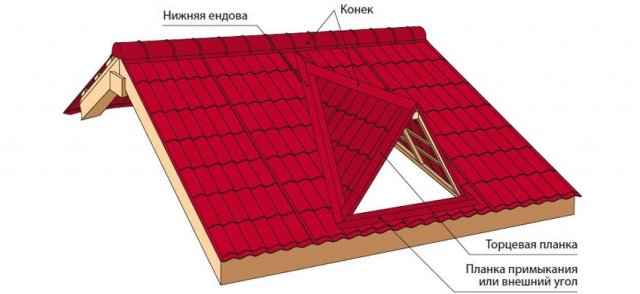
Ridge, valley and end strips are installed last
![]()
Laying the wind bar
15. Joints in the places of the chimney and ventilation must be securely covered with an apron and insulated with silicone sealant.
16. To protect against the penetration of birds into the attic, at the level of the cornice and under the ridge, eaves filler.
Laying eaves filler
17. You can mount this material and on the old roof. For this, a new crate is being prepared, which is stuffed onto the previous roofing material.
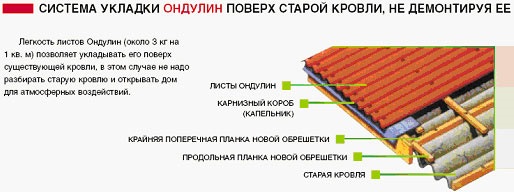
Installation of ondulin on the old coating
Important! Work with ondulin should not be carried out in extreme heat - after all, it begins to melt already at 30 ° C. In order to avoid damage, installation of this material is not allowed even at sub-zero (from -5°C) temperatures.
Advantages and disadvantages of ondulin
Unlike ordinary asbestos slate, ondulin is flexible and very plastic, so it can be mounted in any, even in the most inaccessible places of the roof. It easily fits on complex structures with many transitions and bends.The roof of this material has high heat and noise insulation. Made from eco-friendly cellulose, euroslate is absolutely safe and harmless to human health.
The weight of one sheet is only 6.5 kg. At the same time, its standard dimensions are 2 × 0.95 m, so ondulin can be easily loaded even into the trunk of a car. For ease of installation, each 10-wave sheet has a special markup for fasteners.
Outwardly very attractive, ondulin, unfortunately, is flammable, so its scope is narrowed. It must only be installed on a non-combustible substrate. Ondulin, made on the basis of bitumen, melts too much in the sun. Moreover, under the influence of ultraviolet radiation, this material burns out and fades over time. Help to overcome this deficiency roof fans: Manufacturers strongly recommend installing them on the roof. For the same purpose, special hatches. They are fixed in each wave with the same nails, and the resulting joints are waterproofed.
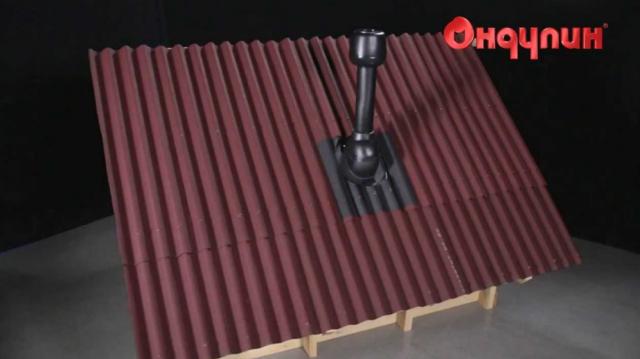
Onduline fan
![]()
Roof hatch (window)
The insufficient rigidity of ondulin also limits its scope: it can only be laid on a hard and even surface, otherwise it may warp and the roof will begin to leak. The guarantee for ondulin is 15 years, however, unfortunately, the manufacturer does not guarantee its integrity in case of violation of at least one of the above installation and operation rules.
Watch a video on how to cover the roof with ondulin with your own hands:


