Any roof serves as a protection of the building from the effects of atmospheric precipitation and a properly installed roof can serve a fairly long operational period. The most common and quite often used roofing material is slate, which has a wavy profile and is made of asbestos cement. The standard eight-wave sheet size is 1750 × 1125 millimeters, the coverage area, excluding the overlap, is about two square meters.
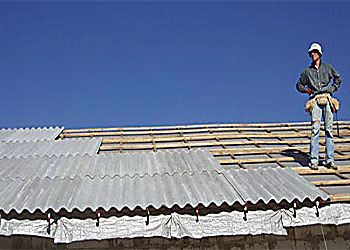
Quite often the question arises; how to properly cover the roof with slate with your own hands without involving expensive specialists. A few practical tips and a consistent progress of the work performed will help beginners in arranging the roof.
In contact with
Classmates
Types of roofs and truss frame
 Roofs with one slope are most often used for utility rooms, sheds, various outbuildings and entrance groups. Two pitched and hip roofs are mainly used to cover residential and office buildings. When mounting the frame for slate covering, it is necessary to take into account the size of the sheet in such a way that it has three support points, taking into account the overlap of 200 millimeters of sheet to sheet. The device of the crate, start from the eaves to the ridge of the roof, observing verticality and horizontality.
The timber must have low humidity, which will prevent the deformation of the frame after installation during operation. The beam for the crate should be without large knots. With a rafter spacing up to 1200mm, a 50×50mm beam is used, and with a rafter spacing up to 1500mm, it is recommended to use a beam with a size of 50×60mm. Fasteners of the beam to the rafters are made with screws 80-100mm. Using a screwdriver will greatly facilitate and speed up the assembly process. The final step will be to check the plane of the slope with a stretched twine, the permissible error should not exceed 2mm.
Roofing tool
Any master without the necessary tool is not a master. Before proceeding with roofing work, it is necessary to revise the existing tool and purchase the missing, but extremely necessary one. The minimum list of necessary tools for slate roofing:
- Axe;
- hammer;
- nail puller;
- pliers;
- chisel;
- chisel;
- Screwdriver Set;
- mallet;
- metal scissors;
- saw on wood;
- saw for metal;
- electric drill;
- drill;
- electric screwdriver;
- manual circular saw.
All tools must be in working condition, the cutting tool must be sharpened, the hammer and ax must fit tightly on the handles, which will avoid injury during work. It is necessary to strictly observe safety precautions and actively use personal protective equipment.
Installation of slate sheets: the procedure and technology of work
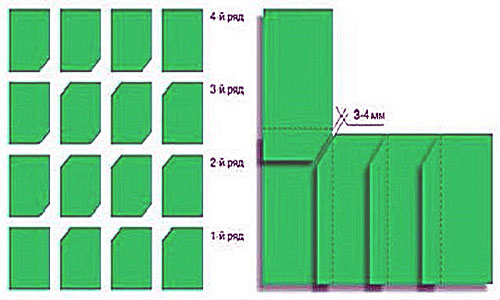
 In practice, two ways of installing sheets are used:
- Offset of the next row by several waves.
- Without shifting row with trimming the corners of the sheet.
This use makes it possible to prevent fourfold angular overlap of sheets, which contributes to the formation of cracks. Any of these methods will allow you to properly cover the roof of the house with slate. It should be noted that one wave of the sheet is below the opposite extreme wave, and it is colored with a stripe of black paint. The installation of slate sheets starts from the eaves, it is very important to correctly set the first sheet using the building level and plumb line. For marking, a twine is pulled, horizontal parallel to the eaves, which serves as a guide for the lower edges of the first row. Vertical twine is pulled from the corner of the roof to the ridge, which avoids the curvature of subsequent rows of slate. Be sure to take into account the direction of the main winds in the area. The joint of the vertical overlap should be located in the direction of the wind, which will exclude the possibility of breaking the slate sheets during strong gusts of wind. Sheets can be installed both from left to right and from right to left.
The simplest way of laying slate is the technology of ordinary displacement of sheets, which eliminates the cutting of corners. The first sheet of the second row is cut lengthwise into one or more waves, and then whole sheets are laid, the last sheet may be cut longitudinally.

Scheme of laying slate sheets with offset.
Laying slate without displacement
When laying slate without offset, the corners of adjacent sheets are trimmed to ensure a tighter fit. The first and last sheet are installed without trimming, on the rest it is necessary to carry out preparatory work. A prerequisite is that the cuts of the corners during installation must have a thermal gap of two to four millimeters and in no case come into contact with each other. For complete clarity, the scheme of laying slate with cutting corners is given:
Scheme of laying slate sheets without offset.
To cut corners, you can use an old hacksaw for wood or a hand-held electric circular saw with a blade designed for cutting stone.
In order to perform the trimming correctly, we recommend watching the video below, as a professional does it.
Fixing work
The slate is fastened to the crate with screws with a silicone gasket located on the inside of the head; it is highly undesirable to use nails, since during operation they do not hold well in the wood, loosen and rise, which leads to a violation of the fit of the sheets to the crate. Each slate sheet of the first row is fixed with two screws in the lower part and one screw in the middle part of the sheet, through holes drilled in the upper wave with a diameter greater than 1-2 mm of the screw thickness. In no case should you punch holes, as you can damage the slate or get a hole of a much larger diameter than the screw head. The upper part of the sheets of the first row will be fixed when installing the second row, while the mounting holes are drilled through two overlapped sheets, which, according to technology, should be at least 200 mm at a slope of 25 degrees and at least 150 mm at a slope of more than 30 degrees.
![]()
Options for fastening sheets of slate.
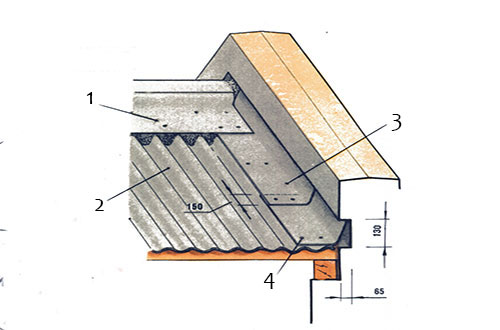
Valley device
Sometimes there are internal corners in the shape of the roof, then in this case the arrangement of the valley is required, which is made before being covered with slate. The basis is a flooring made of boards on which a waterproofing material is attached, which in turn is covered with galvanized sheet metal. When covered with slate, the sheets are adjusted in such a way that the gap between them has a minimum distance. From the outside, the joint of slate sheets is covered with a curved strip of galvanized roofing metal.
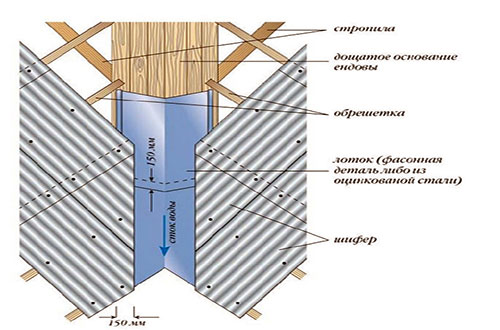
Scheme of the device of the valley under the slate.
Connection to chimneys and ventilation pipes
Depending on the location of the pipe, the slope of the slope and other nuances, there may be a sufficient number of options, so consider the main basic option. A sheet of roofing metal with a hole for a pipe is installed in such a way that the upper edge is located under the upper slate sheet, and the lower edge is released onto the underlying slate sheet. Asbestos is laid around the pipe, and on top it is covered with a second sheet with a hole for the pipe, but larger. Often, an ebb of cement mortar is additionally arranged.
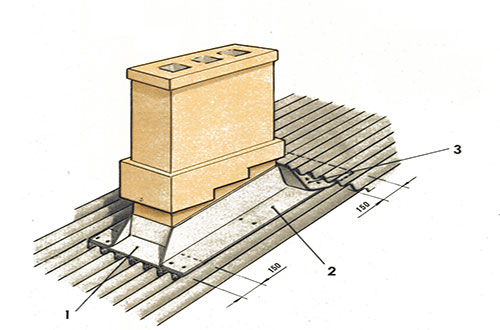
Scheme of the connection device to the chimney and ventilation pipes: 1 - front corner; 2 - side corner; 3 - annulus.
Attaching a slate roof to a wall
In some cases, it becomes necessary to install a roof when the upper edge of the slope is adjacent to the wall of the building. To prevent atmospheric precipitation from entering the gap between the wall and the slate, especially in the winter-spring period, an ebb is installed, made from a 400 mm wide roofing iron strip having a longitudinal bend corresponding to the angle of inclination of the slope. One edge of the tide is fastened with dowels to the wall, and the second one covers the slate sheets from above and is fixed through the upper wave with screws to the crate. This type of roofing is often used on entrance groups and all kinds of extensions to existing buildings, usually they have no more than two slopes.
Scheme of the junction of the slate roof to the wall: 1 - ridge; 2 - slate; 3 - corner; 4 - screw.
Installation of the skate
The final stage of roofing work, according to tradition, is the installation of a ridge. Various ready-made ridge elements for a ridge device can be easily purchased at any construction market, but if desired, you can make it yourself from a 400 mm wide strip of galvanized roofing metal using a metal corner and a mallet. Ridge elements are attached to the crate through the upper wave of slate with screws. At the end of the roofing work, it will not be superfluous to go up to the attic on a sunny day and carefully examine the work of your hands, and if cheerful sunbeams are seen in the twilight, then somewhere, something went wrong as you would like. Small gaps and through holes are easily removed with any silicone sealant.
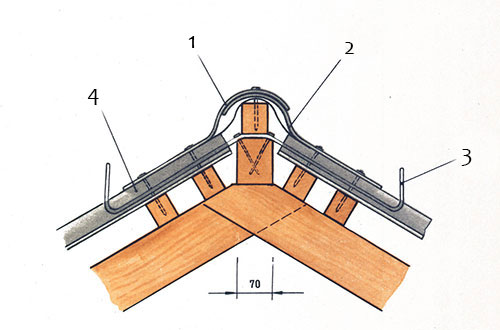
Skate device diagram: 1-2 - skate; 3 - bracket for fastening navigation bridges; 4 - sheet of slate.
Covering hip roofs with slate
The classic hip roof has four slopes, two triangular and two trapezoidal, which are larger than triangular in area. The technology of laying slate is practically no different from single-pitched and double-pitched roofs, except for the additional trimming of the extreme sheets of each slope. In order not to make a mistake with the cutting angle and not to fill your head with calculations, a template is made from three thin rails to the height of the slate sheet in the form of a right triangle in which the right angle is rigidly fixed, and the hypotenuse is attached at the installation site of the first sheet. The presence of a template will make it much faster to mark and trim the extreme sheets on two opposite slopes. It should be noted that the angle of the trapezoid is different from the angle of the triangular slope and therefore a second template will be required. Trimming of slate sheets must be done on the ground, for installation on the roof, a ready-made workpiece should be submitted.
In contact with


