Correct pouring of floors is a guarantee of their strength, reliability and durability. There is nothing difficult in arranging the floor yourself. You just need to understand the basics of technology and complete each stage taking into account the basic rules and requirements.
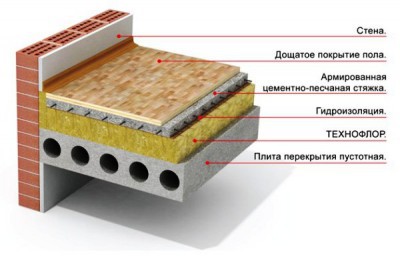
The first thing you need to know is that the construction of a concrete floor is a kind of "pie" consisting of several layers.
Before you deal directly with the arrangement of the structure, you need to know that work can be performed on far from every reason. For example, if the groundwater level is higher than 4 m, there will be a high probability of flooding the flooded floor. In the case of pouring on the ground, it should be remembered that such work cannot be performed on moving soils.
Otherwise, it is impossible to count on a long service life of the floor and the whole house. It is important that the building in which the pouring is planned is heated during the cold season, because at this time the earth, and with it the floor, freezes. This creates additional stress on the foundation of the house and leads to its deformation. And another important limitation is that the land on which the flooring is planned must be dry.
Work can be started only after the completion of the walls and roofing. This will protect the future fill from unexpected atmospheric phenomena.
Mark the level to which your floor will be poured. Usually this mark is made at the level of the lowest edge of the doorway. So the concrete floor will have the same level throughout the house.
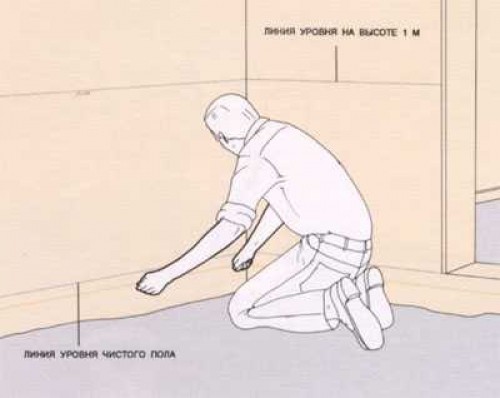
Apply the zero point as follows:
- find the very bottom of the opening;
- upward from the found place, set aside a distance of 100 cm;
- leave a mark on the surface of the wall, and then transfer it to each wall of the room;
- draw a horizontal line.

Next, you need to postpone from the drawn line 100 cm down. Do this around the perimeter of the room. Draw a new line. Thus, you will find the level of the future finished concrete floor. For added convenience, hammer nails into the floor in the corners of the room and stretch the rope. This will allow you to navigate faster and easier while working.
Remove about 35 cm of topsoil. The surface of the soil must be compacted. It is better if this is done using a special vibration technique. In its absence, you can do everything with improvised means. It is necessary to take a log, nail a flat wooden board from below, and fix the handles in convenient places. To work with such a tool, you will need an assistant. Compact the soil until there are distinct footprints on it from your footsteps.

Consider the fact that in certain situations, for example, when a house is being built on a high strip base, the distance between the "zero" point and the ground exceeds the previously mentioned 35 cm. In such situations, you need to get rid of the fertile layer of earth, replacing it with clean sand. The backfill must be rammed.
In the process of preparing for the arrangement of the floor, it is recommended to perform a clay bedding. To do this, it is enough to pour a small amount of clay on top of the soil and carefully compact it. This layer will act as additional waterproofing. The floor pouring technology involves the mandatory filling.
The bedding consists of several layers. First, about 7-10 cm of gravel is poured. The layer must be moistened with water and carefully compacted. Pre-hammer wooden or metal pegs of the required length into the ground. They will help you control the thickness of the backfill. After the crushed stone, a layer of sand is poured. It is recommended to make its thickness the same as the thickness of the first layer. Check the correct backfill with the pegs you already know. Spray a layer with water and seal thoroughly.
And at the end, another layer of gravel is poured, all of the same 10-centimeter thickness. Level the backfill thoroughly and be sure to compact it. For backfilling, crushed stone with a fraction of 4-5 cm is best suited.
At each stage of the backfill, it is necessary to control its evenness using a building level. For greater convenience, the level of each layer of backfill can be pre-marked on the walls of the foundation of the house.
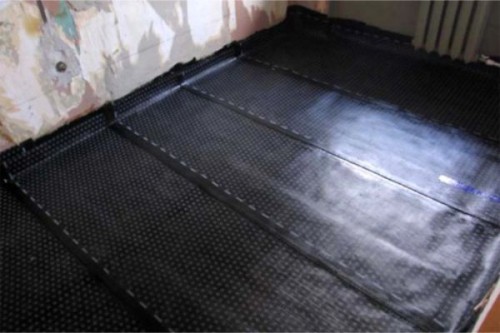
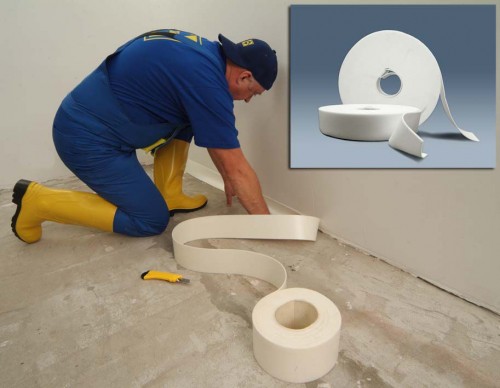
Next, a layer of waterproofing is laid on the backfill. In the absence of sharp edges of gravel, the material for moisture insulation can be laid directly on top of the backfill. You can use plastic wrap, roofing felt or more modern and expensive waterproofing materials. Spread the waterproofing over the area of the room. The edges of the film must be brought out to the previously applied "zero" level on the surface of the walls of the room and fixed there with construction tape. The film is laid with a mandatory overlap of about 15-20 cm and glued with tape.
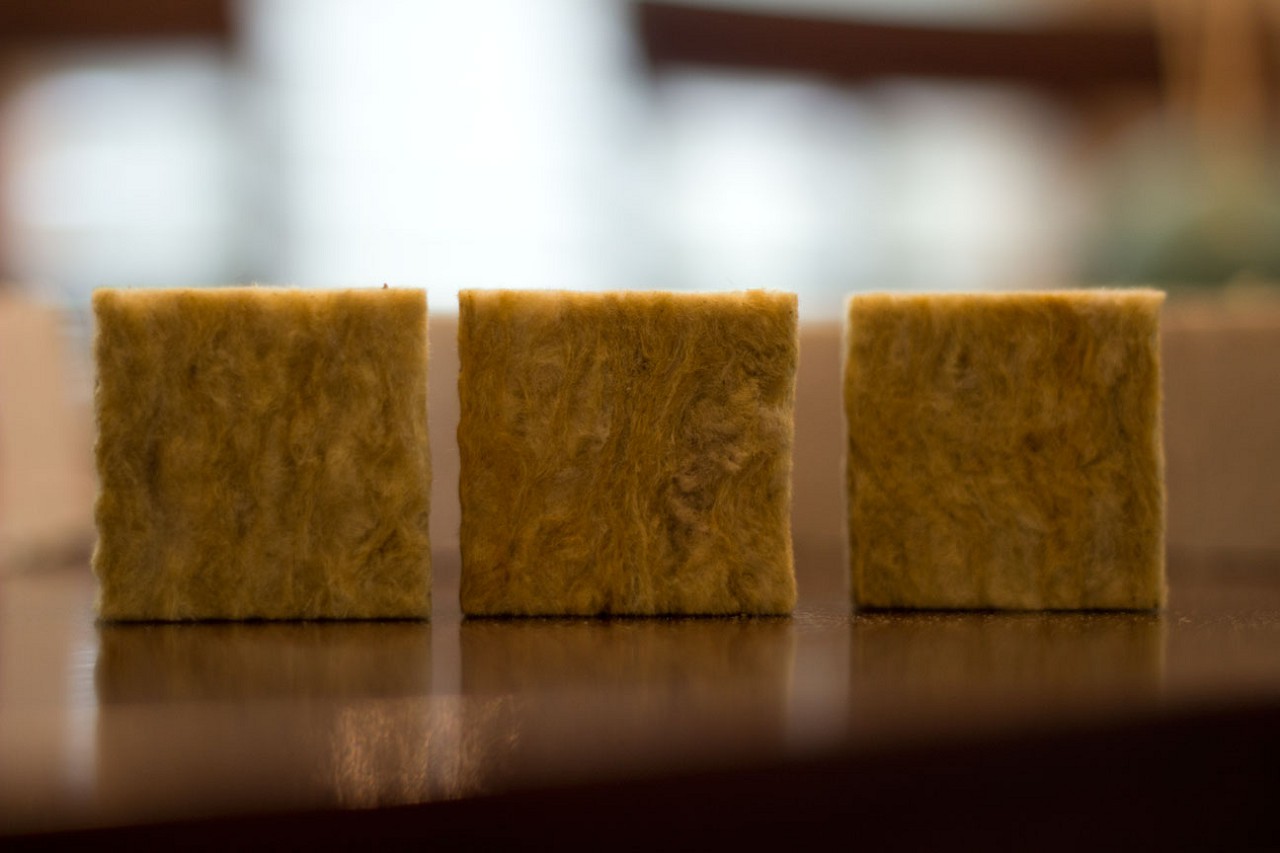
Foam plastic, mineral wool, expanded clay and many other materials are suitable for this.
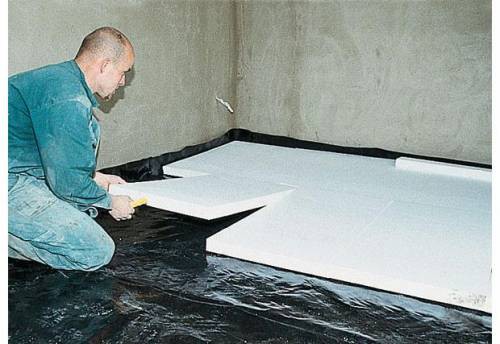
Most often, plates of extruded polystyrene foam are used for insulation. Using this material as an example, the procedure for laying thermal insulation will be considered. Mineral wool is laid in the same way. It is even easier with "free-flowing" materials.
Plates of heat-insulating material are laid out over the floor area end-to-end. Try to lay them without gaps. Be sure to glue the joints with metallized tape.
In some situations, it is not possible to carry out moisture insulation and insulation by bedding. In such situations, professionals recommend pouring a layer of liquid concrete with a thickness of no more than 3.5-4 cm over the backfill. You just have to wait until the concrete gains its initial hardness, and you can start installing waterproofing and insulation. The lean concrete will provide a strong bond between the backfill materials. Also, concrete will create a reliable base that will not damage the materials laid on top of it.
The nuances of reinforcing the floor structure
The correct filling of the floor presupposes the obligatory reinforcement. This procedure allows you to increase the strength of the structure.
The reinforcement layer consists of a reinforcement cage and / or meshes. The meshes can be made of plastic and metal. Usually, metal meshes made of wire with a diameter of 5 mm and with cells of 10x10 cm are used. In those situations when very heavy loads will be placed on future floors, a wire of a larger diameter is used - up to 18 mm. In this case, the concrete must be compacted using special vibration tools.
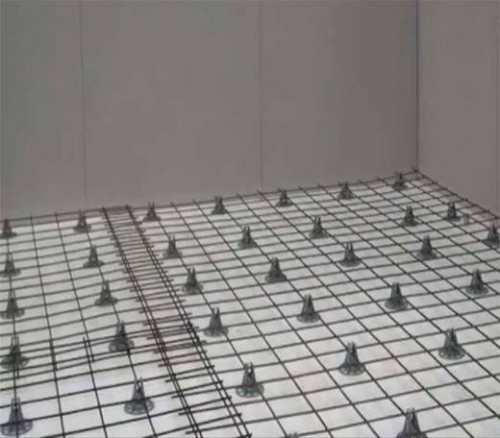
It is forbidden to place the reinforcement layer directly on the base. The frame or mesh should be raised by about 30-35% of the thickness of the future concrete layer. For this, the so-called. “Chairs” are small coasters with a height of about 3 cm, made of suitable, comfortable materials.
What you need to know about beacons?
"Lighthouses", they are guides, will allow you to fill the floor at the correct and uniform level, ie. as horizontal as possible. For the manufacture of guides, metal pipes, profiles, wooden bars with a smooth surface are suitable. Also for this purpose, you can use ready-made rails made of aluminum. Here you can decide for yourself how it will be more convenient for you.
Divide the floor area into several segments with a width of 150-200 cm. Make a number of "buns" from the solution and install guides on them. The top edges of all beacons should be at the previously designated "zero" level. Simply press the guides into the buns or add mortar to meet the above condition. Lighthouses are recommended to be lubricated. This will make them easier to obtain in the future. In the absence of special oil, the use of working off is allowed.
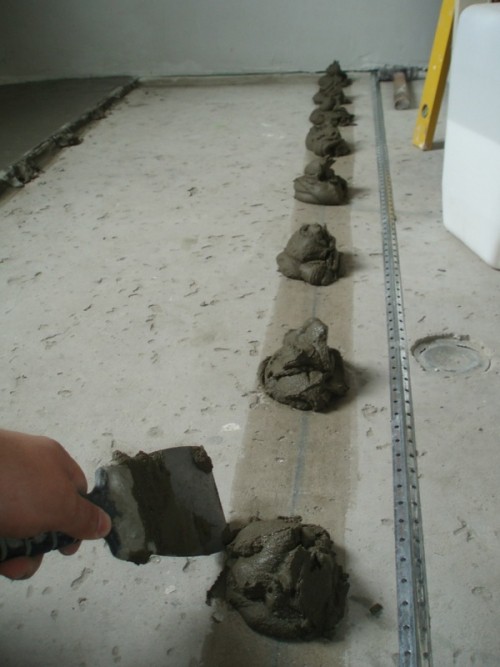
To control the horizontal alignment of the "beacons" use a level and a building level. You can start pouring the floor after a set of "buns" of sufficient hardness. Make sure that the "buns" do not squeeze when you press on the guides, and you can start filling.
You can refuse to divide the floor space into separate sections using guides if the area of the room is relatively small and concrete can be poured in one go.
Step-by-step guide to pouring a floor
To improve the thermal insulation properties of the floor, it is recommended to add perlite or expanded clay to the concrete solution. Buy, rent, or otherwise procure a concrete mixer whenever possible. Without it, it will take much longer to prepare the required amount of solution.
The following will give the weight and volume of the ingredients used. They are given as an example so that the proportions are clear. Focus on the specifics of your specific case and select the right number of components, taking into account the floor area and the required thickness of the concrete layer, which will differ for different climatic zones.
First, put a couple of buckets of perlite into the mixer and add about 10 liters of water. Stir the resulting mixture thoroughly. After adding water, a significant decrease in the volume of perlite will be noted. Add about half a bucket of cement and continue mixing. Next, you need to add half a bucket of water and mix everything thoroughly again.
After obtaining a homogeneous mixture, add a bucket of sand and about 2 liters of water to the container of the concrete mixer. Continue kneading until a free-flowing mass is obtained. Take a 10 minute break and then continue kneading until a plastic solution is obtained.
As for cement, in the case of floor pouring, it is best to use M500 grade material, you can M400.
Fill should be started from the corner opposite to the doorway. Try to work so that several marked areas are filled in 1-2 steps.
In accordance with the requirements of the technology, concrete mortar should not be in close contact with the surface of walls and various protruding structures
Fill the marked areas with mortar. Typically a 10 cm layer thickness is maintained. The mortar must be leveled with a shovel. To remove excess air and additional sealing, the mortar should be treated in a special way. It is best to do this with a deep vibrator intended for such an operation.
The tool is immersed in a layer of mortar and held there until the so-called protrudes to the surface. "Milk". Its appearance indicates that the solution is already sufficiently compacted and the vibrator can be transferred to another place.
Place the tool on the guides and pull it lightly in your direction, alternating left and right movements. This will remove excess concrete.

After you finish leveling the mortar, remove the guides, and completely fill the voids that appear with fresh mortar.
The concrete needs to be regularly moistened with clean water for several days. It should also be covered with plastic wrap. This material gains the necessary strength in 1-1.5 months.
Quite rarely, when self-pouring the floor, it is possible to immediately get a completely flat base, without sagging and other defects. If the tiles are laid, then it is not necessary to achieve perfect evenness. But if it is planned to use linoleum, parquet and other similar materials for finishing, the evenness of the base will be of paramount importance.
They are easy to use and produce mirror-like surfaces.

The solution is prepared in accordance with the instructions on the package, poured onto the floor and evenly distributed over its surface using a special brush. To remove excess air, the casting is rolled with a needle roller. On average, such mixtures dry for 1 week, see the specific time on the package. Wait until it is completely dry and you can use the floor as directed.
Happy work!


