Many people prefer to finish the floor in the bathroom, hallway or kitchen with ceramic tiles. The tile, however, is cold and uncomfortable to walk on barefoot. But for this reason, you should not refuse ceramics, there is an excellent way out - an electric warm floor under the tiles. The system not only serves for underfloor heating, but also complements the central heating system. Warm floors are indispensable in homes with small children.
Warm floors have a lot of advantages. But how to properly arrange electric heating? Is it difficult to lay the cable or mats with your own hands? This will be discussed in the article.
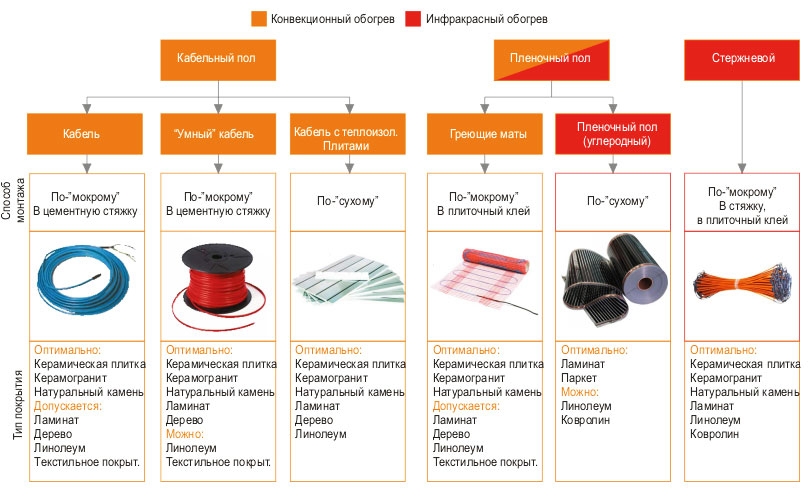 Types of electric underfloor heating systems
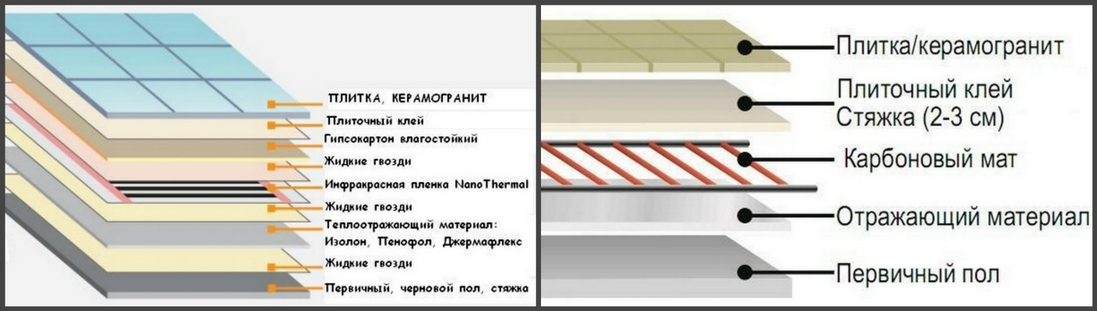
  Underfloor heating cake for tiles based on heating mats: 1 - Leveling rough screed, 2 - Heating mats, 3 - Tile adhesive, 4 - Tile or porcelain stoneware
Infrared heating is most suitable for wood surfaces (laminate, parquet). It uses special heating rods that are connected in parallel to the power wires.
Preparation for the installation of a warm floor
Installation of any type of underfloor heating begins with the preparation of the base. Both the cable and the mats are laid on a flat, clean surface. The first thing to do is to dismantle the old floor covering, remove any remaining paint, varnish, dust and dirt from it. If there are any defects, irregularities, it is necessary to perform a rough screed. Its thickness can be from 30 to 70 mm. , you decide. For example, solutions can dry for up to four weeks. If you need to make the floor in the bathroom as quickly as possible, then it is better to stop. Before pouring the floor, a damper tape is attached to the walls at the expected level of the screed.
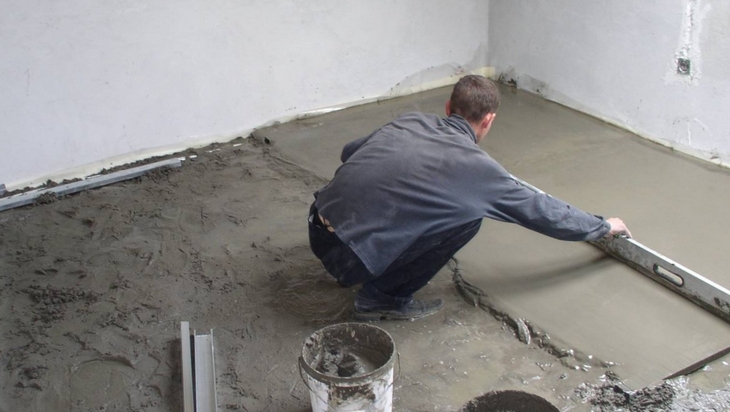 In the photo, the installation process of the leveling rough screed
 Why are there such high demands on the surface? The fact is that if the technology is violated and the heating cable rests against any unevenness on the base and bends, its breakdown may occur, which will lead to the failure of the entire underfloor heating system. Eliminating the problem, of course, will entail a lot of effort and new financial investments, since DIY repair is extremely difficult, and sometimes even impossible.
After the base is leveled, a wiring diagram for the underfloor heating system for ceramic tiles is drawn up. The diagram shows the step with which the heating cable or mats will be laid. The scheme should take into account the following points:
- The distance from the wall must be at least 10 cm;
- Where furniture or other large-sized objects will stand that will impede heat transfer, the warm floor is not mounted;
- Heating elements can be laid in any convenient direction. Only the necessary areas should be heated.
The amount of materials, cable or thermomat, is calculated based on the usable area of the bathroom and the required power. You can fasten the underfloor heating system to the screed using an assembly tape.
An important point is choosing a place in the wall where the thermostat will be installed. If necessary, a separate wiring is made for. The technology also requires a separate output from the power supply for such devices.
When all the above preparatory work is completed, you can start laying under the tiles underfloor heating.
Installation of electric underfloor heating
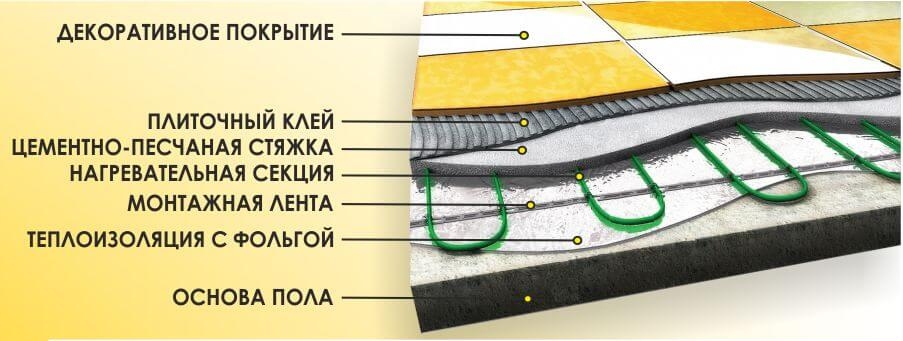 Pie cable underfloor heating under the tiles. Expanded polystyrene, penofol or other heaters can be used as thermal insulation.
 The first step in the installation phase is to insulate the surface. The efficiency and economy of the underfloor heating system depends on how well the base is insulated. Experts recommend using foil-clad penofol as insulation. The pieces are laid close to each other, and the joints are glued with foil mounting tape. To improve the thermal insulation of the room, penofol should go on the walls by several centimeters. If you are using expanded polystyrene or polypropylene, note that the room height will decrease.
After the insulation is laid and fixed, a damper tape is glued around the perimeter, which compensates for the expansion of the coating when heated.
A metal mesh is placed on top of the thermal insulation. It serves to prevent direct contact with heating elements, and also makes laying a warm floor under the tiles with your own hands easier.
 Variants of using infrared systems: film and core floor under tiles
 Then a temperature sensor and a thermostat are mounted - devices that control the operation of the "electric floor heating" system. The thermostat can be mechanical or electronic, surface-mounted or built-in. With its help, the desired temperature mode and the time for turning on and off the system are set. It is installed next to the wall sockets.
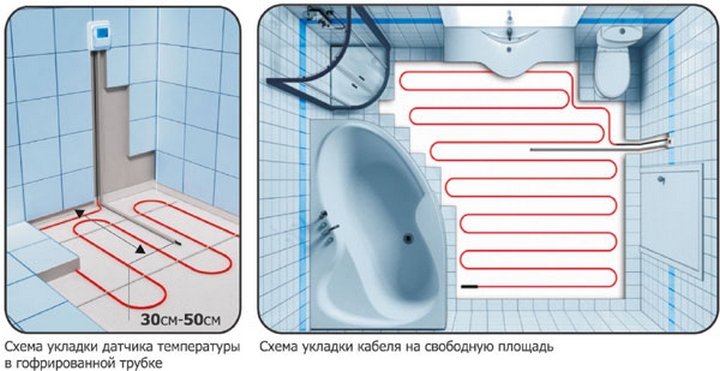
The temperature sensor is mounted directly in the floor, in the gate. It should be directed vertically to the floor. To protect the sensor from external influences, it fits into a corrugation, the end of which is wrapped with electrical tape. According to the rules, the remote part of the temperature sensor should be located at a distance of 40 cm from the wall.
- Fix the cable to the fixing grid according to the developed diagram using plastic clamps. The distance between the turns must be the same everywhere, otherwise heating will be uneven.
- Connect the thermostat to the heating element.
- Check if the system is connected correctly. To do this, you need to measure the resistance using a multimeter (tester). The value before and after installation must be the same.
- Turn on the electrical heating for a while.
- Disconnect the underfloor heating power supply.
Mats are stacked using a similar technology, more details in the video:
If you have correctly installed the electric floor with your own hands, you can proceed to the next step - laying the tiles.
Laying ceramic tiles
After the screed hardens,. This task is quite feasible with your own hands, but if you are not sure, trust the professionals.
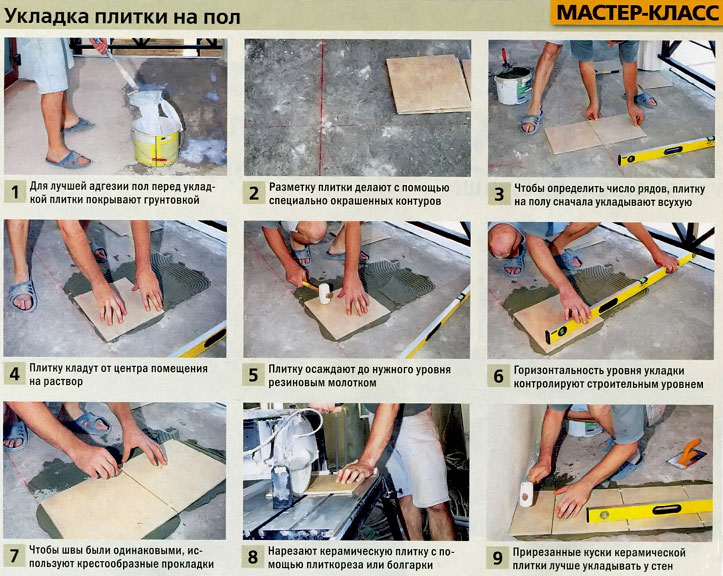
First, a tile laying scheme is selected. It is better that in the most prominent places there are whole tiles, and in inconspicuous places - cut off. The floor is marked with perpendicular lines from the center of the walls, along which you need to lay ceramics. The surface must be perfectly horizontal.
For convenience, you can put a mounting grid on the heating element. Laying begins at the farthest corner from the door. The tile adhesive is applied with a notched trowel in an even layer, the thickness of which should not be at least 5 mm. He must fill all the voids. Plastic crosses are inserted on all sides of the laid tiles. They are needed to control the distance between tiles. It is necessary to constantly check the level of the horizon. If it turns out that the tiles are at different levels, this can be adjusted by increasing or decreasing the thickness of the adhesive layer.
If necessary, the tile is cut with a tile cutter. If you do not have it at hand, it can be done with a grinder or glass cutter.
When the entire floor is filled with tiles, you need to wait a day for the glue to set. Then grout is applied to the seams. The excess is immediately removed with a damp sponge. It is recommended to wait a few days until the screed and glue are completely dry, and only then turn on the electric underfloor heating. Failure to comply with the technology can lead to ineffective system operation.
Installation of underfloor heating is not an easy task. However, with the utmost effort and knowledge, you can make your bathroom warm, cozy and comfortable. Leave comments - share your opinion, experience, criticize!


