Of course, wood is a warm material, but its weakness is in drying out, cracks from which it can see through. If the heat comes out mainly through the windows and the roof, then the floor can "supply" the dwelling with cold from the underground.
Until the walls, floor and ceiling of the house are sufficiently insulated, we cannot talk about saving on heating. Let's figure out how to properly insulate the floor in a wooden house, what technologies and materials are there.
The choice of technology will depend on the stage of construction, when you need to insulate the floor:
- in a finished room;
- at the stage of building a house.
If the finished floor needs insulation, you can choose a roll insulation, covering the board surface, you can get rid of the cracks.
It is sometimes made as a substrate under a laminate or other floor covering.
Another option is to hem the boards with insulation from the basement side, nailing them with a stapler from the bottom.
During construction, there are many more ways and options: you can backfill directly on the ground, or make a double layer of the floor, with insulation between them.
Material selection
What is the best way to insulate the floors in a wooden house? Materials for insulation can be divided according to the method of working with them:
- Bulk (these are sawdust, slag, expanded clay, foam glass).
- Bulk (mixtures of polymers).
- Rolls (penofol, flax, mineral wool, glass wool, isolon, cork).
- Tiled (polystyrene, polystyrene foam, gypsum fiber, linen in mats, basalt wool, mineral wool in blocks, foam glass).
- Spray-on (ecowool, penoizol, polyurethane foam).
Thermal insulation of the floor with ecowool
How to choose
Humidity. It is not recommended to use glass wool, gypsum fiber board and flax if there are problems with high humidity in the room, or they need to be carefully waterproofed.
Thickness. If the ceiling is low and you need to make the insulation layer as thin as possible, you should choose: a bulk option, penofol, isolon, cork, or sprayed materials.
Price. With limited funds, you can stop at styrofoam, mineral wool or sawdust.
Some disadvantages of the materials that you need to know about in advance:
- All mineral wool cakes over time and begins to conduct heat better, in addition, it is necessary to work with them protecting the nose, eyes and throat, since their particles injure the mucous membranes.
- Rodents often settle in layers of glass wool, foam and other popular insulation, nullifying the effect of them. Only ecowool, foam glass, foam concrete and expanded clay are resistant to rodents. Polyurethane foam (polyurethane foam) is also referred to as materials that are unattractive to rodents.
- Sawdust is a wonderful place to live not only for rodents, but also for insects. Over time, they dry out a lot, they can be susceptible to mold and decay. To prevent these troubles, cement, lime, boric acid, etc. are added to the sawdust.
- Sprayed materials are good for everyone, except for the high cost and difficult application technologies.
- Expanded clay protects against the cold almost two times worse than, for example, mineral wool. Accordingly, its layer should be twice as thick. The weight of the structure will be impressive, therefore, expanded clay is recommended to be used only on the ground floor on the ground.
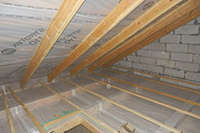
Heat is actively lost through the ceiling of the house, so high-quality thermal insulation is needed. - an overview of materials and methods of installing insulation.
How to make a muffle furnace with your own hands, see the step-by-step instructions.
During the start of the heating season, it is necessary to bleed the air from the batteries so that they are filled with water and heated at full capacity. Here you will learn how to do it correctly without the help of a specialist.
Required tool
Of course, for different materials, the set may differ, but the main tools are:
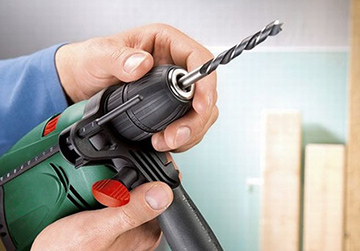
- drill and various drills;
- roulette;
- stapler;
- hacksaw;
- plane;
- screwdriver;
- jigsaw;
- level;
- mixer with which building mixtures are prepared.
You also need to stock up on fasteners, a pencil or marker and scissors.
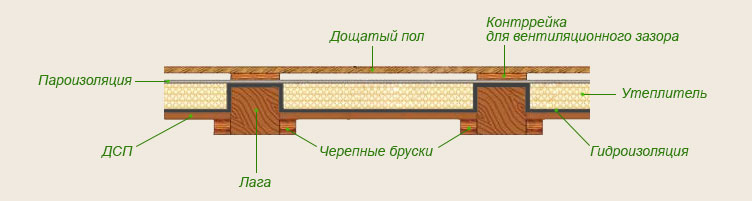
Double floor system
This is the most popular way to insulate a wooden floor. It consists of two layers of boardwalk, between which there is a steam and hydro insulation and insulation. Pies can be different, for example:
- Draft layer.
- Sand or expanded clay.
- Cardboard.
- Air gap of 3 cm.
- Finishing layer.
Another option (suitable for first floors with an underground floor, where there are no subzero temperatures):
- Draft layer.
- Waterproofing.
- Lags, between which sheets of mineral wool are inserted.
- Vapor barrier.
- Finishing layer.
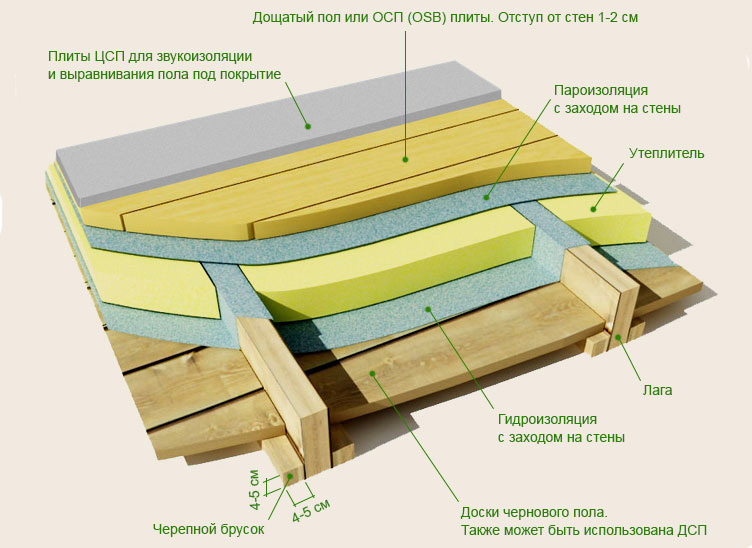
Double floor system - device
Rules for making a sub-floor layer:
- Boards thicker than 2 cm, less than 20 cm wide are selected.
- Boards of this layer must not be nailed directly to the joists.
- First, a crate is made (the thickness of the bar is 5 x 5 cm), which is attached to the bar of the floor base (with self-tapping screws).
- Then the boards of the rough layer are nailed to it with nails (they should not reach the log).
- There are no strict requirements for the quality of the boards and their surface. Even small gaps may be allowed, since the layers of insulation compensate for everything.
The subfloor is not visible to the eye, but the entire pie of building materials will be based on it, therefore it is recommended to thoroughly impregnate the tree with an antiseptic so that mold and mildew will not destroy it.
How to insulate a wooden floor with styrofoam and styrofoam?
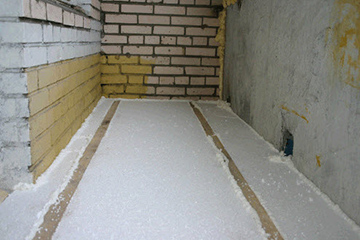 Consider how to insulate a wooden floor in a private house with polystyrene and polystyrene foam.
These are related materials, but foam is not as brittle, more compressive strength, and not as fire hazardous as foam.
No additional pressure will be created on the floors, because the materials are very light.
For insulation, plates are selected that can withstand a pressure of 35 kg / m 2.
Whatever material the choice fell on, their installation technology is similar.
When working with foam, additional waterproofing will be made (foam is about 2 times less resistant to moisture than penoplex). The latter can be mounted without it.
Sequence of work:
- The old floor is dismantled, you need to reach the rough layer. If the work is done "from scratch", then the subfloor is built.
- Lags are installed. The distance between them is according to the size of the material slabs, for example, 70 cm.
- For foam: a vapor barrier is nailed to the base with a stapler. The joints are glued with tape.
- Sheets of insulation are cut, which must be tightly laid between the logs (the penoplex is cut out strictly to size, the foam can be made 1 mm wider on each side so that it lies by surprise).
- Waterproofing layer.
- Finishing boards are being laid.
Scheme of the device of rough floors
Does the floor need to be insulated from the basement? A vapor barrier will serve as a good service if the basement is damp, if groundwater periodically rises. On the side of the house, a layer of waterproofing is needed if the humidity in the room periodically rises (bathroom, kitchen).
The thickness of the foam layer should be calculated based on the temperatures outside, the degree of basement insulation, etc., but on average it is customary to make a layer 10 cm thick.
 The house can be sheathed with siding, clapboard, stone, tiles, block house. But not everyone knows that the cladding material must be chosen depending on the material of the house itself. and an overview of work execution technologies.
You will learn how to make a check valve for ventilation with your own hands in the article. As well as information on the purpose of this device and the cost of finished structures.
Features of spray technology
Small cans contain foam that hardens in 10 seconds after spraying. The increase in volume occurs several times. The result is perfect - an even layer of insulator that does not deteriorate from age, fungus or moisture, and is not to the taste of rodents. Polyurethane foam can be applied to any surface without specially leveling them and without constructing a rough flooring.
Its weaknesses are only in flammability and high price. The cost of material per m 3 fluctuates in the region of 1.5 - 2.7 thousand rubles.
You also need to purchase or rent specials. spraying equipment.
Equipment can be:
- Professional.
- Semi-professional.
And they are also divided into devices:
- High.
- Low pressure.
Professional installations can cost from 180 thousand rubles. (Chinese), up to 300 - 600 thousand rubles. and more, for devices capable of maintaining a constantly high pressure. For work on an area less than 500 m 2, a semi-professional installation will be sufficient. Domestic apparatus Pena-20B1, for example, with a capacity of up to 150 l / min. costs 23 thousand rubles.
Two cylinders contain polyurethane foam components. Through the hoses, with the help of pumps, they are fed (exactly in the proportions that are needed) into the mixing chamber. Under the influence of compressed air, the raw materials are mixed, and the compressor squeezes the resulting mass out of the pistol. When you stop spraying, the remaining foam solidifies directly inside the gun. Therefore, there are usually several of them in a set.
A few tips and instructions for spraying:
- If floor insulation in a wooden house will be carried out over a cold basement, then PPU is an ideal material for applying it from below. Of all the insulation materials, it is easiest to work with it "over your head".
- In addition, polyurethane foam can be used to insulate suburban wooden houses, where they are not periodically heated - it will not collapse due to temperature changes.
- First, a sub-floor is constructed (in the case of floor insulation from below, this does not need to be done).
- Rafters are laid (the step between them can be any, it is worth focusing on the finishing coating).
- The room and the cylinder itself must be at room temperature.
- Before applying a layer of foam, you need to prepare the surface area - clean it from dust and moisten.
- Shake the can well before spraying.
- Gradually, the space between the rafters is filled with foam, starting from the far corner of the room, towards the door.


