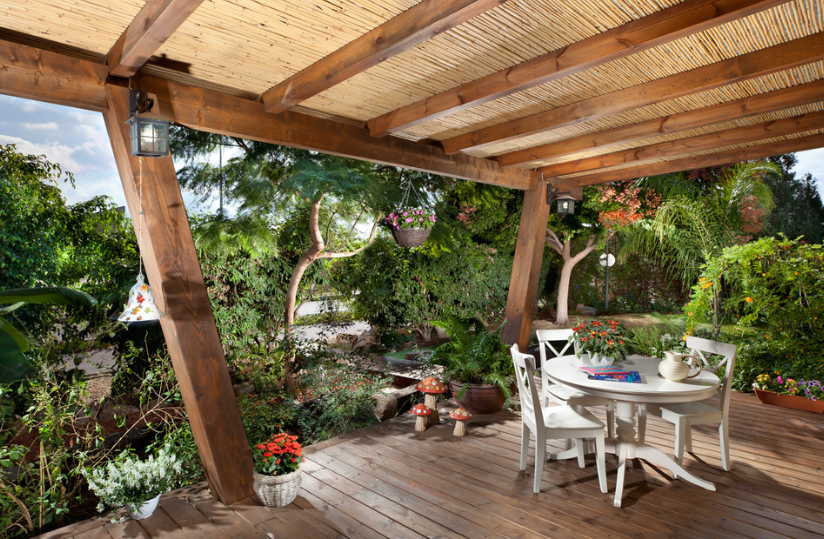
If you built a wooden house on your site, then it would be an absolutely logical decision to build a porch to a wooden house with your own hands. Despite the seeming complexity, this task is by no means so impossible, and will be within the power of almost every master with a head and hands.
In addition to the aesthetic load, what makes a good porch remarkable, first of all, this element of the facade has specific functional purposes:
- Protection of the entrance to the house from precipitation in the form of rain, snow and hail;
- Creating a canopy that creates a comfortable shade and protects the canopy from heat and heat in the warm season;
- It is possible to create a recreation area, in the case of arranging a large porch in the form of a veranda.
- Well, and most importantly, this is a flight of stairs along which we will climb to our cozy home.
Therefore, before picking up a hammer and a chisel, you need to think carefully about the above, and take into account all the nuances, making the necessary amendments to the construction plan.
Proportions and dimensions
We think that it is no secret to anyone that from time immemorial man has been constructing residential buildings, taking as a basis the dimensions of the human body and its psychological perception of the surrounding space. An exception is not the porch, which must meet certain requirements of human physiology.
All the following dimensions are generally accepted, and are used everywhere in construction. You, if necessary, are free to change the main proportions, according to your preferences and requirements, but do not forget about the reliability of the design.
Now let's take a closer look:
- To create a free approach to the door, you need to provide an open space that will allow you to open the door without interfering with the person standing in front of it;
- If you focus on building codes, then the width of the porch in front of a single-leaf door should not be less than 1m 60 cm - this value is the minimum;
- For a double-leaf version of the door leaf - the norm regulates a distance of 2 meters;
- The distance from the doorway to the first step starts at 1 meter: this value should be adjusted, looking at the width of the doorway - the wider, the greater the distance;
- To protect the steps and platform from direct sunlight and precipitation, the length of the canopy at the porch should go beyond the boundaries of these elements. Usually leave a protrusion equal to 30 centimeters.
Now, with regard to human physiology. There are also certain laws, derived in specific formulas and values:
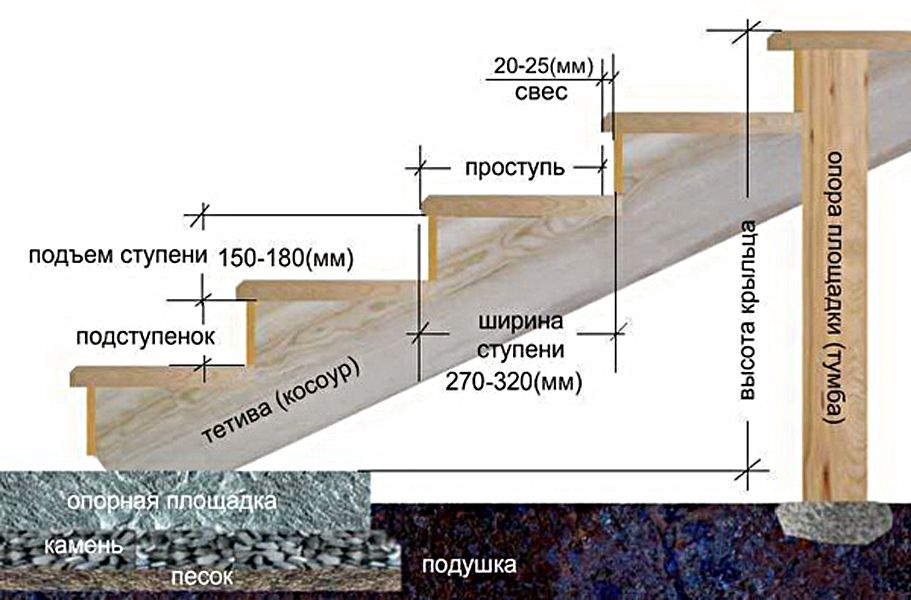
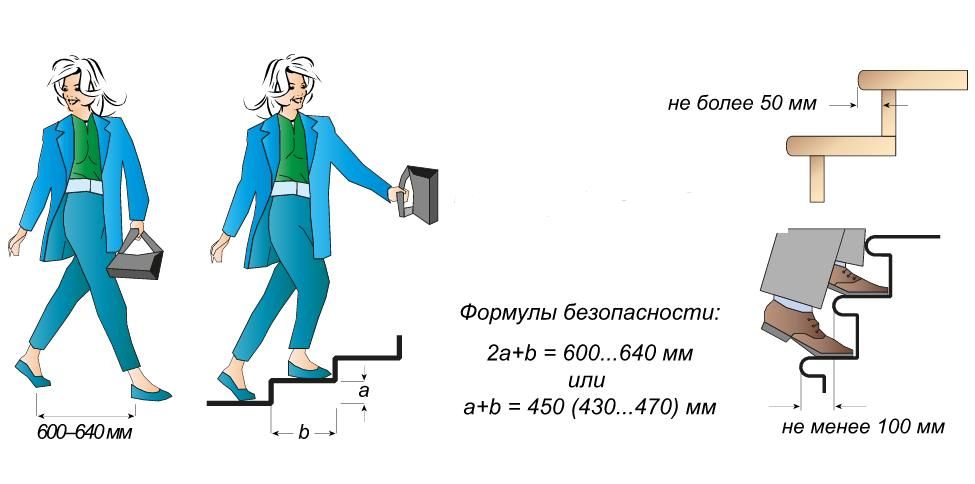
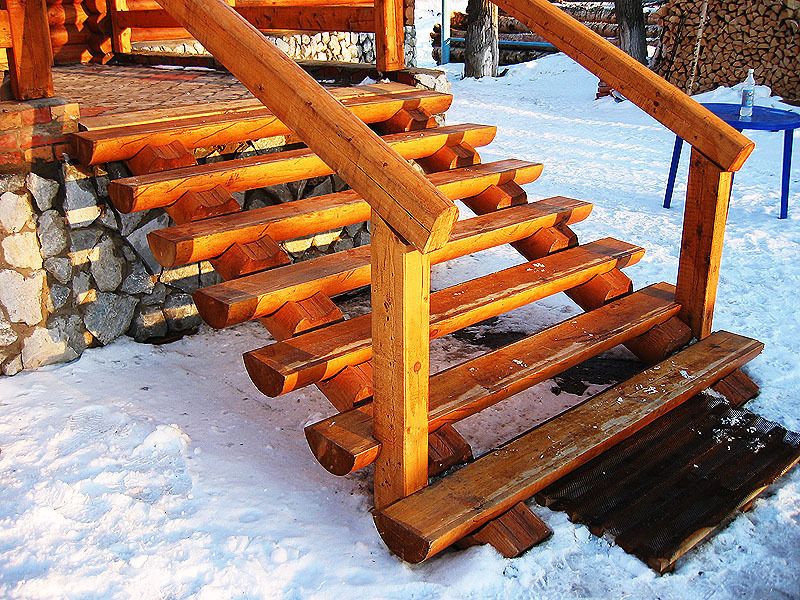
- The average step length for an adult is about 63 cm. Based on this, the optimal values of the height and depth of the steps are derived. They are 16 -19 cm and 25 - 33 cm, respectively;
- If nature has endowed you with non-standard dimensions, then when designing a porch, you can use the formula shown in the picture above. Its essence is that in the width of your step two heights and one depth of steps should proportionally fit. In this case, the height should be one and a half to two times less than the depth.
- The flight of the step cover from the riser should not be more than five centimeters, otherwise, when walking, you will constantly stumble on them, risking injury, especially in winter, when the surface of the stairs is covered with a layer of ice or frost.
Advice! Of course, the best way to protect yourself from winter is to attach an enclosed porch to a wooden house, but this is not always feasible. Therefore, take care of the anti-slip coating in advance, and clean the ice from the steps in time.
To ensure safe movement on the stairs in the winter season and not only, it is required to equip the passage with handrails. The instruction regulates that any staircase with three or more steps should have this element.
The standard height of the handrails varies from 80 to 90 centimeters.
The following requirement is mandatory in design, but is far from always feasible in practice when building a porch with your own hands - a person moves in space so that when climbing a flight of stairs, he starts and finishes it with one foot. Therefore, the correct staircase should consist of an odd number of steps (in apartment buildings with a floor height of 2.5 meters, the number of steps in the march is 9).
What else should be considered before starting the construction of the porch of a wooden house?
The level of the platform in front of the door should be 5 or even 10 centimeters below the border of the door leaf. Otherwise, you risk that as a result of seasonal soil fluctuations, the raised porch will block the door and prevent it from opening freely.
Foundation and place under it
Like any other construction, the construction of a porch begins with a foundation. You must check all dimensions and heights at the design stage - ideally, you should have a full-fledged drawing. If you do not have enough skill in carrying out such work, then we recommend that you involve a third-party specialist who will cope with such a simple task for him in a very short time.
Advice! It is better to be an inexperienced builder with the right blueprint than a jack-of-all-trades with little idea of the final result.
The designer will indicate in the drawings the complete scheme of the porch along with the foundation. He will determine the type of soil and give the necessary recommendations so that the structure is reliable and lasts as long as possible.
Among other data, the depth of soil freezing will also be indicated (this is extremely important information when building a foundation), below which you will need to dig trenches for the foundation, or drill wells. If you refused the services of a professional, then you will have to look for this data on the “network”, where the limit values \u200b\u200bare posted for each of the regions of our vast country.
The foundation for a wooden porch can be of three types:
- Wooden piles- the most common, inexpensive and simple solution for such purposes. That is what we will cover in this article.
- Metal piles- form with horizontal lintels a strong and even frame, sheathed on the outside with wood. The price of such a solution will be higher, and besides, you will need to hire a craftsman who will reliably strengthen and weld the frame into a single structure. The disadvantages include the fact that the metal has a solid weight, and for work you will need at least three people, sometimes with the involvement of lifting equipment.
It is better to use such a solution if you want to make a terrace made of synthetic composite materials, which are very demanding on the evenness of the base, and are laid on special profiles, or, conversely, the size of the porch is small and consists only of steps that will contrast with the main building facade.
- Concrete or block- these are capital foundations for a porch, which require compliance with certain standards when attaching to a wooden house. There are a great many types of concrete foundations, but the main requirement for their construction is that between it and the house, or rather its foundation, it is imperative to provide for an expansion joint.
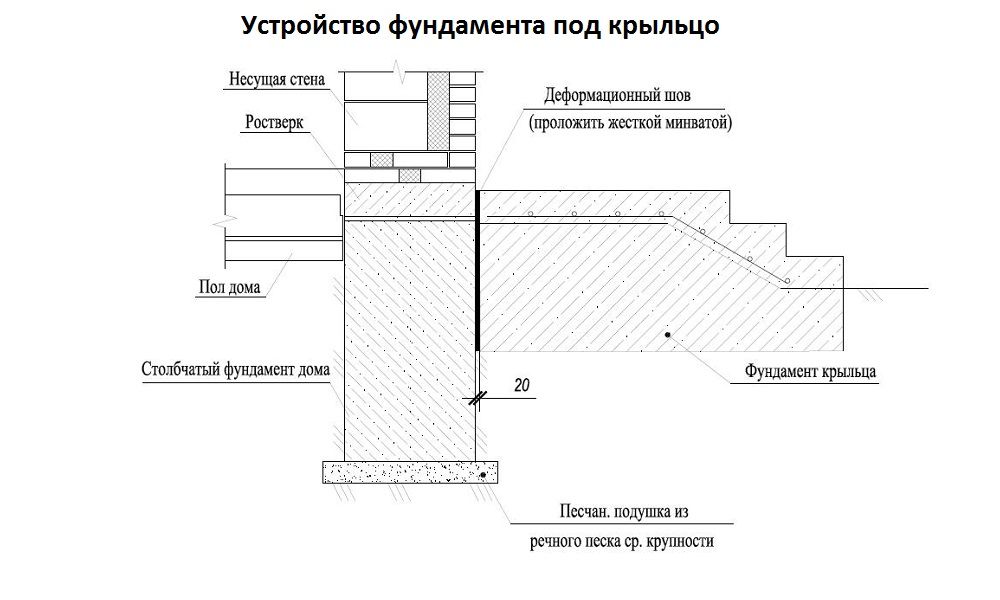
What is it for? During the time when seasonal ground movements occur, due to the difference in the loads that the structures experience, the foundations at their junctions can crack.
Expansion joints are filled with elastic materials to prevent moisture from entering it. For these purposes, rubber gaskets, or mineral wool, are excellent, which are subsequently closed with a special flashing.
This concludes our preparations and begin to disassemble the construction process
We do it ourselves
As already mentioned, we are building a porch for a wooden house only from wood, so that it most harmoniously fits into the overall picture of the facade. Further about everything in order.
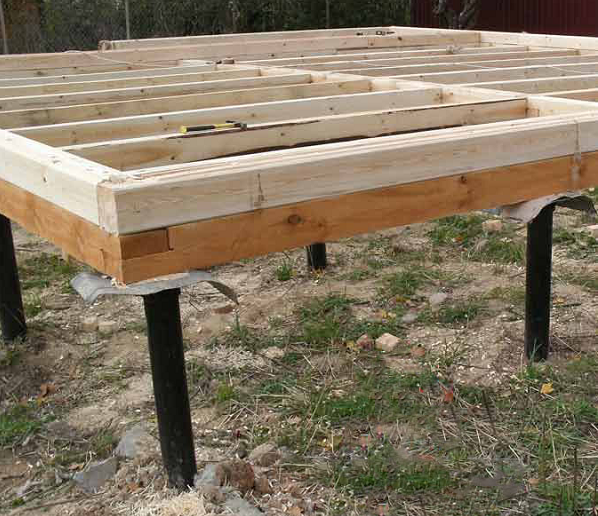
Base under the porch
Well, now let's take a closer look at the construction of a foundation from a wooden beam. And we will start by marking the site with the help of twine and tape measure.
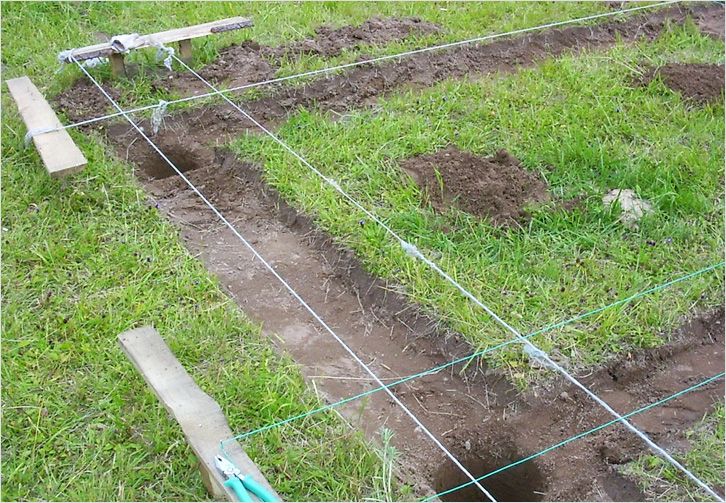
This is done approximately as shown in the photo above.
- The wall and the doorway are the main reference points from which it is required to measure all the necessary distances, not forgetting to observe right angles at the intersections of the lines.
- To do this, align the lengths of the segments with an accuracy of a millimeter. Throw both diagonals in the resulting rectangle, which should be equal to each other.
- If right angles are alien to you, and you have chosen a porch of an unusual shape, for example, pentagrams, then be guided by the geometric features of the figure that you plan to build.
- Next, we determine the location of the piles - usually these are the corners of the terrace, including those adjacent to the house, and the corners of the first step. If the porch and flight of stairs have solid dimensions, then increase the number of piles at the rate of 2 piles by 1 - 1.2 meters of free span. This value can vary greatly depending on the thickness of the bars of the lower trim of the veranda, and reach 2.4 m with a cross section of 100 * 150 mm.
- Now it is necessary to drill wells at these points, with a depth exceeding the depth of soil freezing by 15 - 30 centimeters.
- In order for moisture to better move away from wooden piles, it is necessary to make a drainage cushion from river sand of medium fraction and gravel, which are poured into the holes alternately, in small layers.
- Further, piles are installed in the holes, the recessed ends of which are pre-treated with waterproofing material (bitumen), or fired at the stake for the same purpose. This treatment will protect the tree from premature decay and damage.
- If the size of the terrace has impressive dimensions, or the piles will go up, forming the base for the porch visor, then before installing them, asbestos-cement pipes are placed in the holes, into which concrete is poured three-quarters of the depth of the well. But first they are set vertically, rammed around with rubble and soil, and a reinforcing belt is made inside.
- This design will more reliably fix the pile and protect the wood.

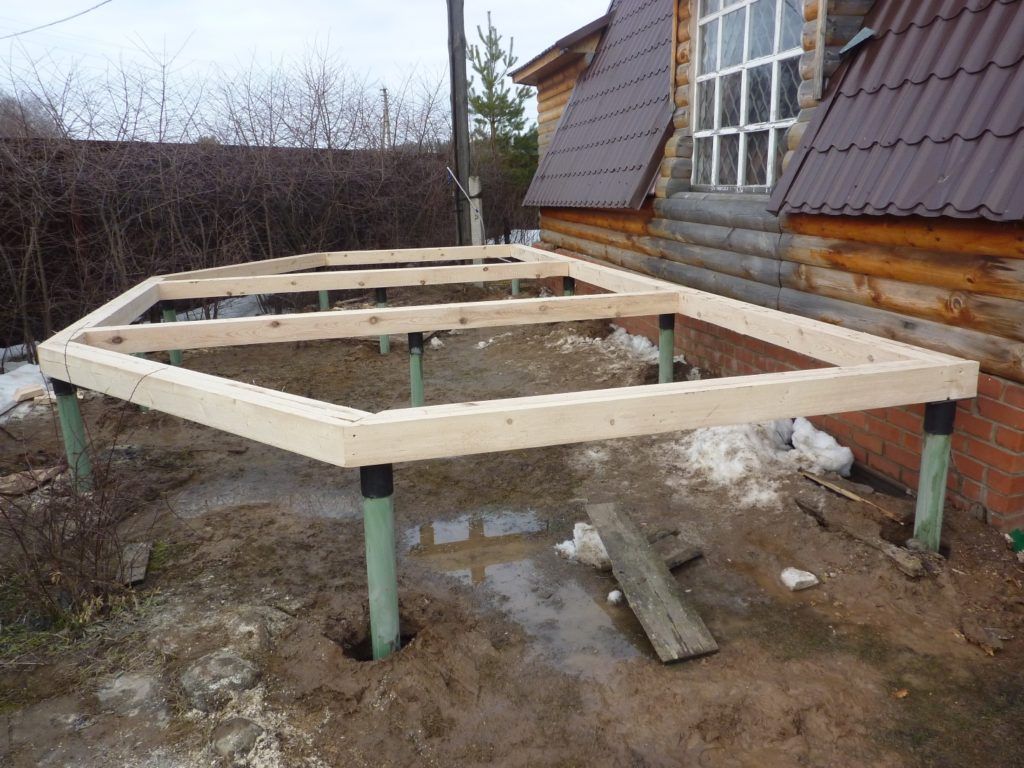
- Next, piles are installed (in pits or asbestos-cement pipes, after the concrete has hardened), which must be set strictly in a plane and vertical, and firmly fixed for a while. Use a rough crate, stretch marks and wedges for this, exposing the structure like a tent.
- After fixing, we fill the space around with concrete mixed with screenings and small gravel - such concrete will be much stronger. Don't forget that we have to make a pretty impressive layer.
- Piles adjacent to the house are attached to the wall with long self-tapping screws, anchors or nails.
All further work is carried out only after the concrete has completely cured.
Installation of stringers
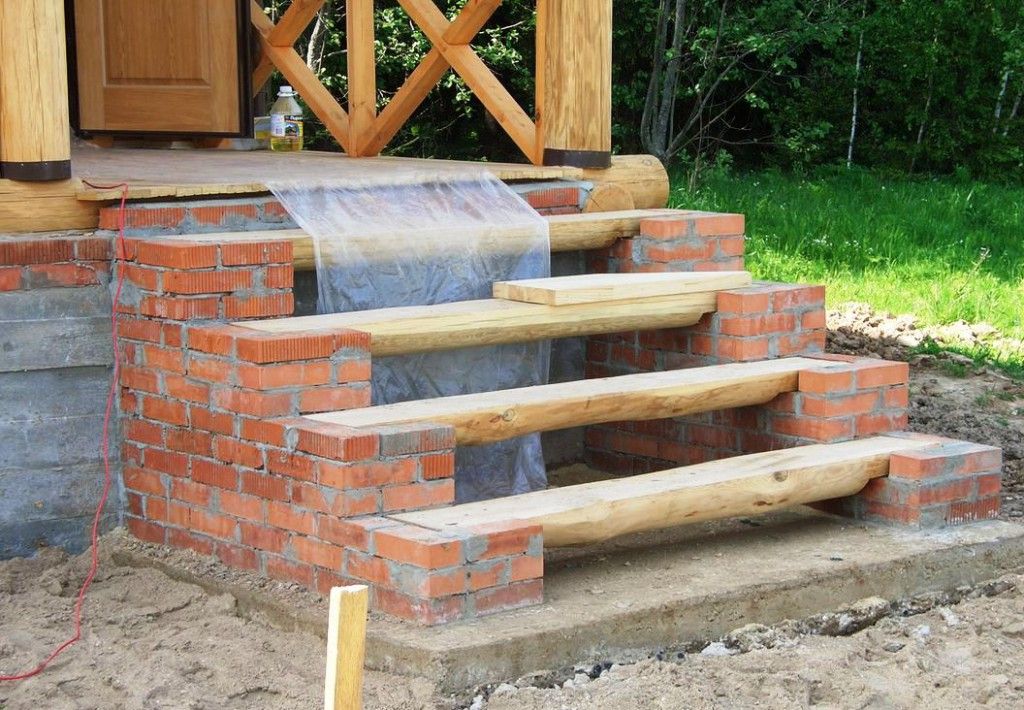
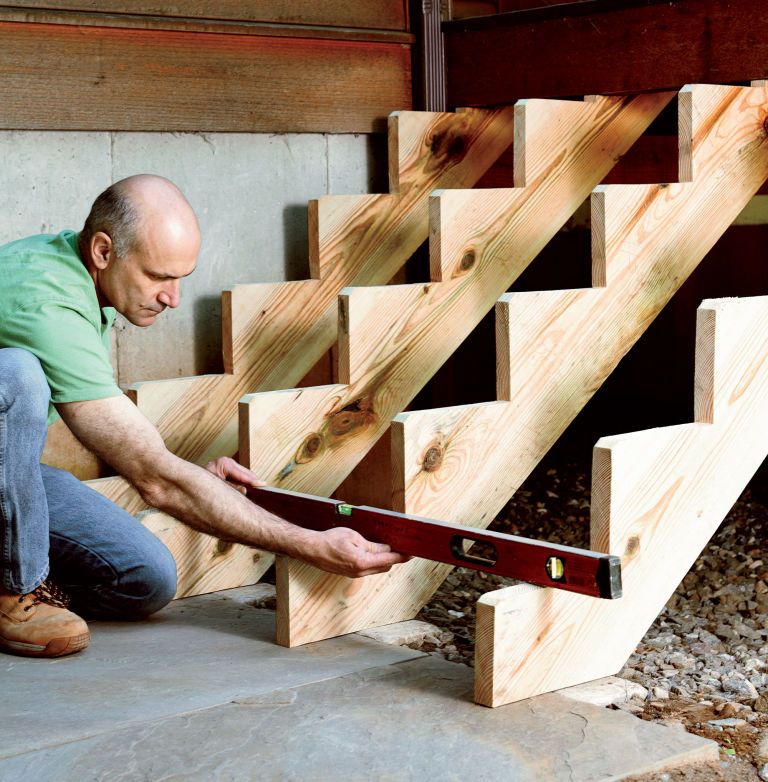
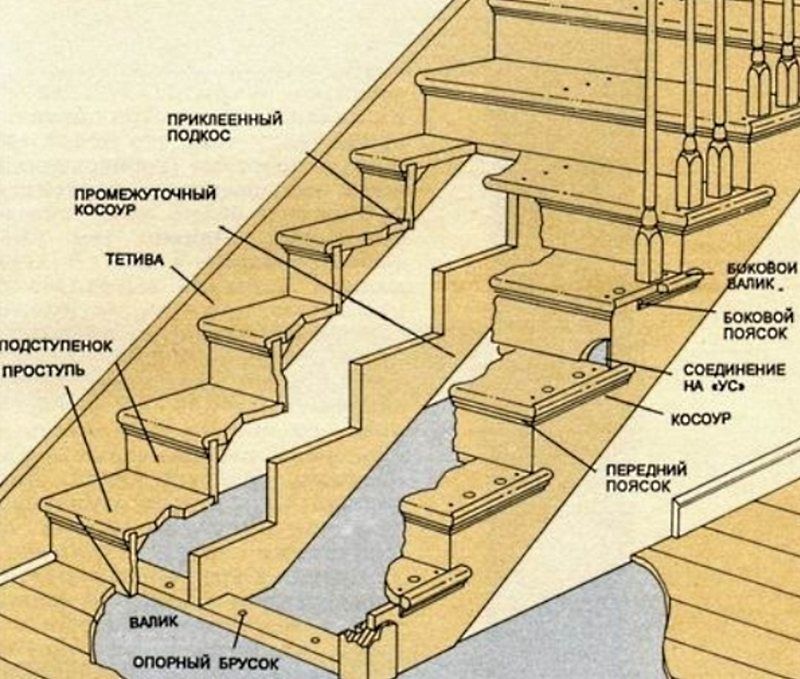
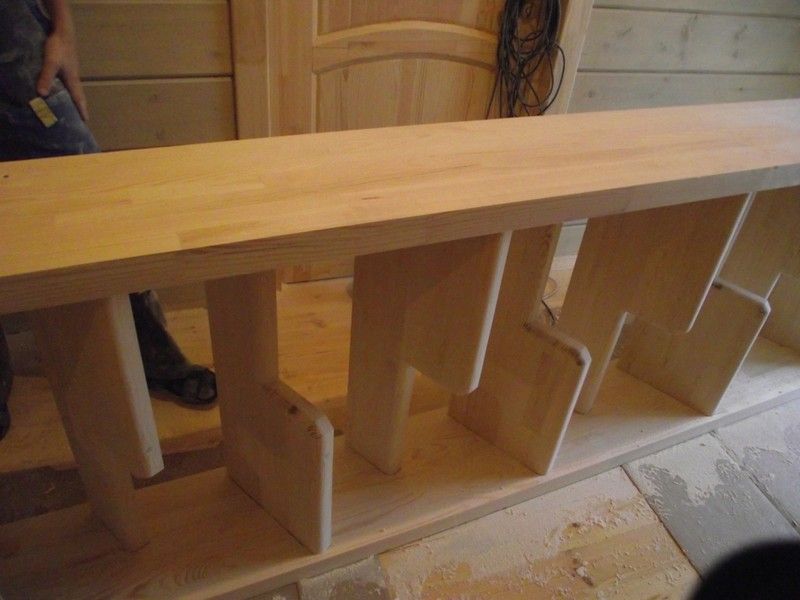
Steps on a flight of stairs can be fastened in various ways, but most often craftsmen use designs on bowstrings. The bowstring is an inclined guide support that provides reliable fixation of the steps.
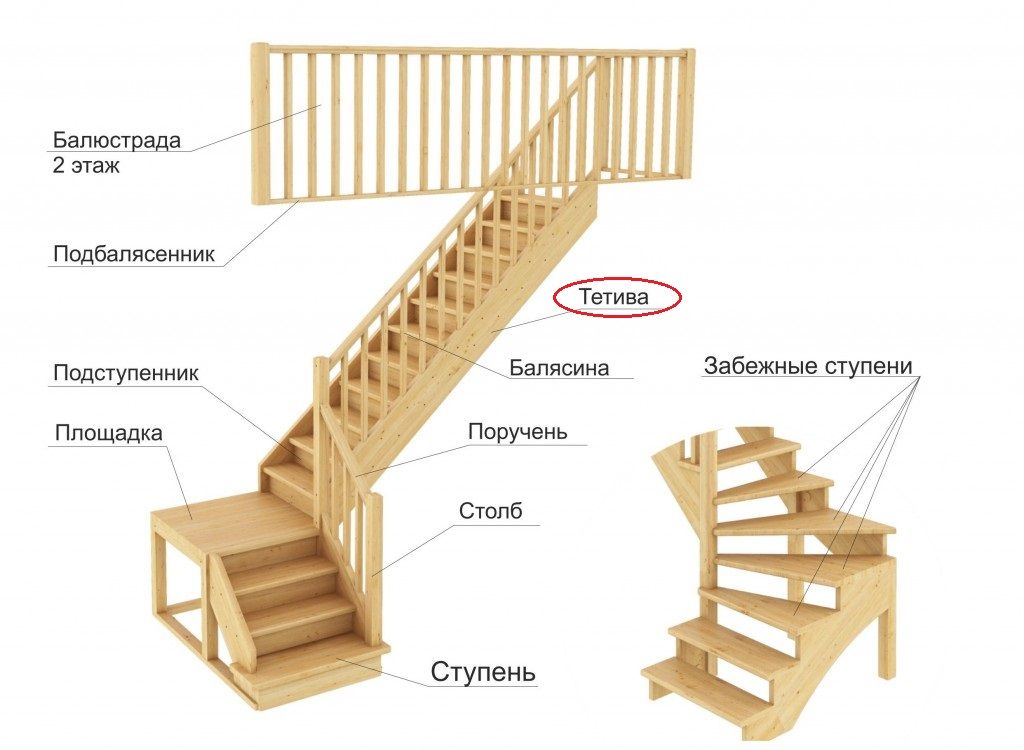
You can attach the step to the bowstring by inserting it into the groove, or by using self-tapping screws, nails, studs, dowels or special steel fasteners to fix it. But most often they use bowstrings that have cutouts for steps that fit on top. Such bowstrings are called stringers.
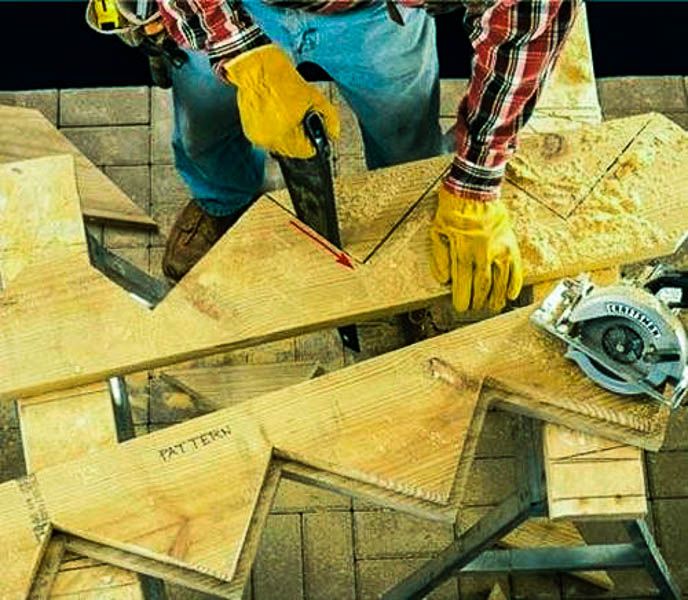
Making a kosour on your own is not such a difficult task. It is enough just to accurately mark the boards and make straight cuts along all the marks, for which a pre-prepared staircase drawing is very useful to you.
Of the tools you will need:
- A circular saw;
- Square and pencil;
- Meter;
- Wood saw.
The number of prepared stringers, first of all, determines the shape of the stairs and its width. Sometimes you can find options on one stringer, but such work is the privilege of qualified specialists. We will need at least two supports, the number of which will increase depending on the width of the passage.
Stringers can be divided into two main types, differing not only in shape, but also in the complexity of manufacturing:
- Stepped - we showed them in the photo above. They have triangular cutouts placed at the same distance from each other along the entire length of the part. This design has one drawback - the beam, after sawing cuts in its body, becomes thinner and greatly loses its strength.
- Stringers with "fillies" - have smaller slots, and are equipped with additional elements, the "fillies" themselves, and dowels for fixing them. Such a design is only possible for an experienced carpenter, so we will not advise it for beginners.
Stringers are the most time-consuming and complex parts of the porch being built. When marking and sawing boards, be especially meticulous, often double-checking and comparing the result with the parts already cut.
Advice! To make several braids of the same shape, use a stencil that you have previously cut out of plywood, thick cardboard or a piece of MDF.
- If the width of the tread in the stringer can be less than the actual step (laying with a release), then the height of the riser must exactly match the height of the cladding part of the same name.
- Do not forget to take into account that the upper step of the stringer should become a continuation of the main porch area. Take this into account when marking up this element.
- In order for the supports to be strong and not to bend under the weight of people walking on the porch, boards with an end section of at least 60 * 300 mm should be used as a material. So you guarantee yourself the quality of the future product.
- Use for these purposes boards that do not have cracks and falling knots. Beware of overdried wood, which has lost a lot of strength.
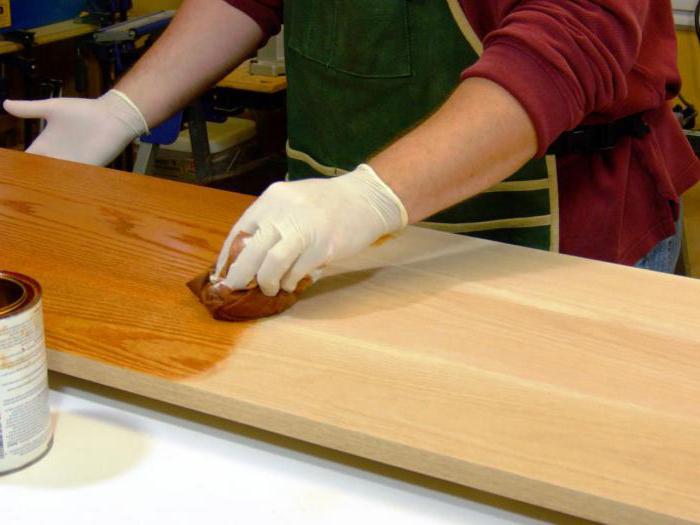
- Since our structure is external, the contact of the stairs with moisture and ultraviolet radiation is ensured. Of course, you can buy cheaper boards from softwoods (pine, spruce, etc.) and treat them with special impregnations, but it would be better to immediately take hardwoods, which are not only more resistant to the above troubles, but also have a good density that makes them resistant to mechanical stress.
The leaders among such species are oak, Siberian larch, beech or maple. The price of lumber will be higher, but such a porch will last much longer.
Before you start assembling all the elements into a single structure, you need to treat the wood with antibacterial impregnations and flame retardants - substances that protect wood from fire.
After complete drying of the impregnation, you can proceed with the installation:
- We install the bars of the lower trim on the strengthened piles - they are attached from the outside to nails or long self-tapping screws.
- Waterproofing can be laid around the pile at the attachment point.
- We cut grooves in a horizontal beam for laying the upper edge of bowstrings or stringers in them.
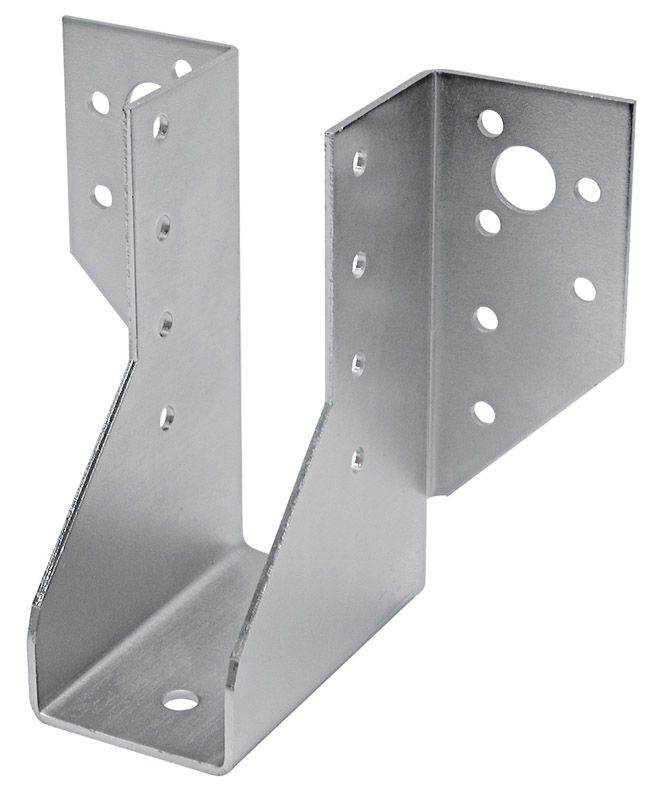
- The lower part of the kosour is laid on a horizontal support plate in the form of a bar. At the same time, washed down can be done both in the beam and in the stringer. In the first case, it is better to tie the elements with steel corners, and in the second, with studs.
- Next, we install the lags, forming the basis of the future site. They are placed flush with the bottom trim, and are fastened with special stainless steel brackets.
- The thickness of the lags should not be less than 5 centimeters, as it must withstand the weight of people walking on it without deflections.
- Lay them perpendicular to the laying direction of the decking that will cover the floor afterwards. The laying distance is 50 cm.
- Next, the deck board is laid, which is placed with a verified gap to drain water.
- Laying steps starts from the bottom - first the riser is placed, then the tread.
- Fastening is carried out with galvanized self-tapping screws with a wide hat, which needs to be drowned a little. To do this, first drill a narrow hole for the self-tapping screw, and slightly expand its edge with a wider drill, creating a recess.
- In the future, you will need to hide the holes with wood putty.
- To avoid this, you can purchase special staples and use wood glue.
This concludes our review, in which we examined the construction of a wooden porch to the house with our own hands. As you can see, the process is very exciting, and will be within the power of many of us. You can learn more about it from the video in this article, where an experienced craftsman performs a similar job.


