Having decided to build on an individual project, the private developer often finds that the porch, which is being built along with the house, accounts for a disproportionate share of the estimated costs. Designers and builders do not cheat here: the extra corners of the foundation and its protrusion under the porch require in-depth calculations and technical measures to ensure uniform shrinkage of the structure. Therefore, in many cases it turns out to be advisable to build a house without a porch, and then attach a porch to it with your own hands. Moreover, such work is feasible for a person with initial experience as an amateur builder or who does not have one at all, and a porch correctly attached to the house will not affect the strength of the building structure.
Material selection
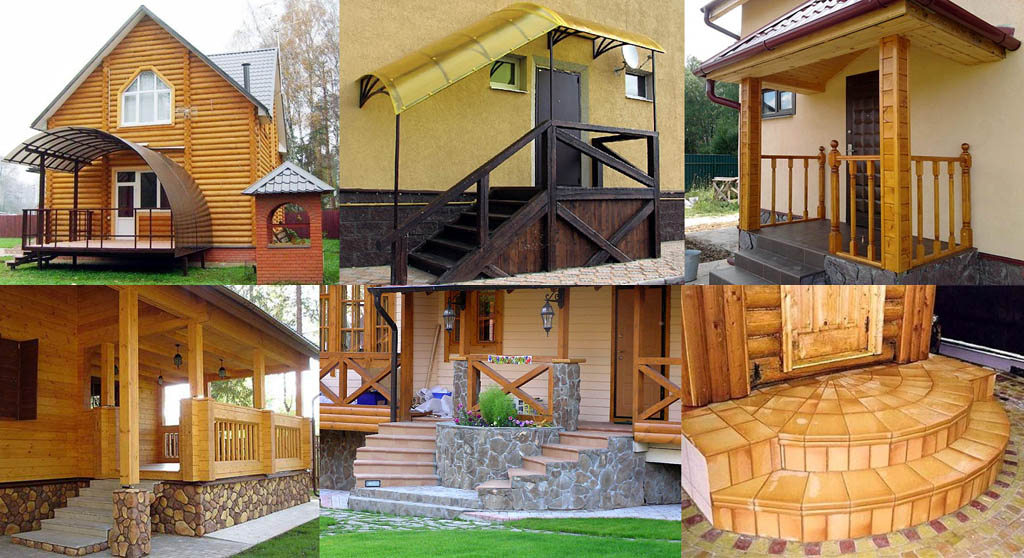
The porch to the house can be attached brick, stone, concrete, wood or steel, welded from profiles or cold forged. Brick is undesirable: natural soil chemistry, microflora and microfauna get on it with splashes during rain, which quickly destroy the material. It is for this reason that brick houses are built on a basement with a height of 400 mm or more. A completely forged or stone porch is difficult to perform and will be very expensive. It will be much easier and cheaper to build a porch of simple shapes and then revet it under a stone or the same brick or decorate it with overhead forged elements.
As for the aesthetic qualities of the remaining materials, the assertions that, they say, a concrete porch is needed for a concrete house, and a wooden porch for a wooden one, are not substantiated by anything. The houses in the photo below with a porch made of materials that seem to be incompatible with each other and with the main structural material of the building. However, it is immediately clear that they are combined. Technically, it is quite possible to attach a porch of any material to any house. What are we going to do.
Base
It is necessary to build a porch so that during seasonal ground movements and due to uneven shrinkage, the house and the porch do not affect each other. Cracks along the contours of the junction of the house with the porch are undesirable in any case, but in no case should they violate the design of both. Suddenly, the crack nevertheless went, it is necessary to be able to repair it without starting complex construction work.
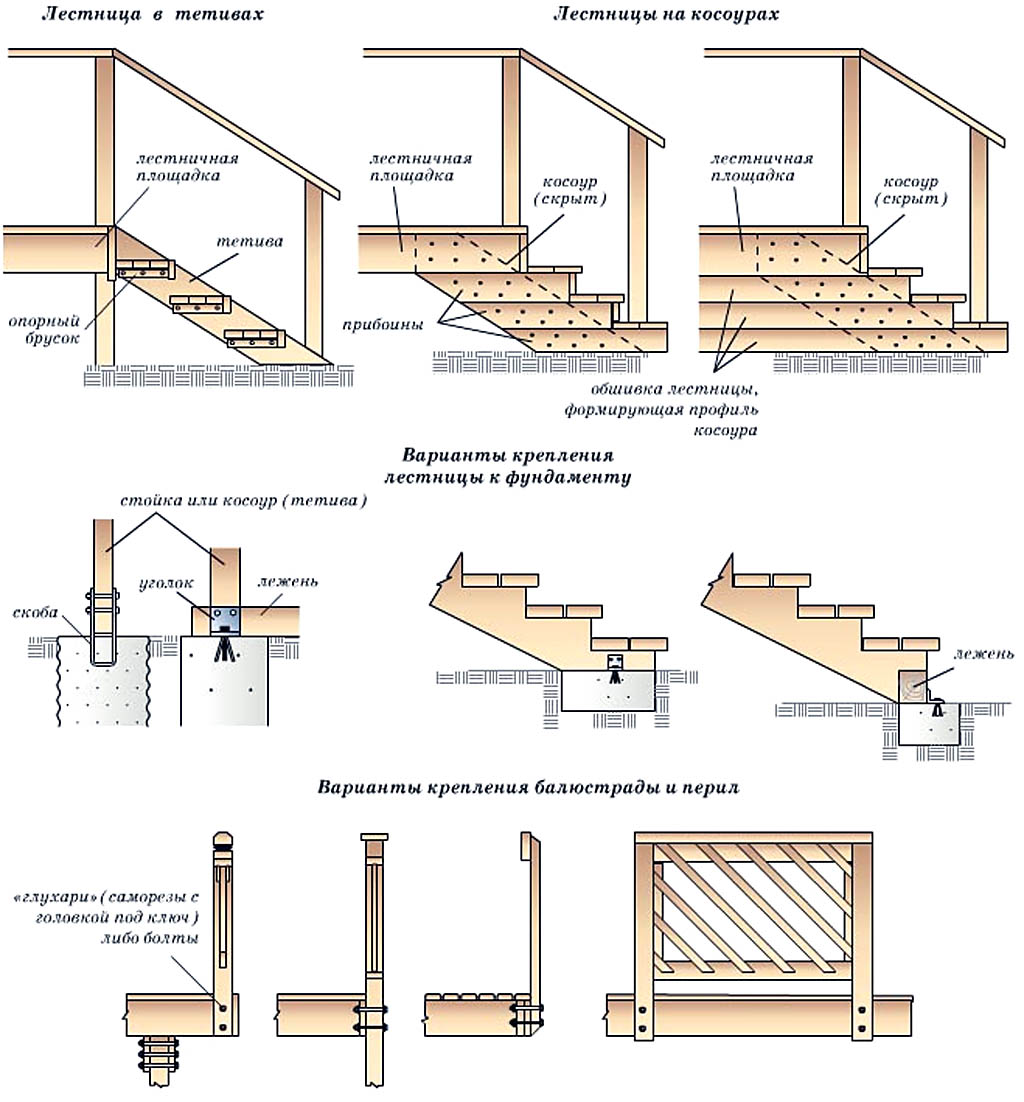
The fulfillment of these conditions ensures a properly executed base of the porch. A private house and a porch subsequently attached to it must have separate foundations; this, generally speaking, is the general principle of building extensions to a house that has already shrunk. Schemes of the bases of the porches for different occasions are given in the figure, and we will analyze the ways of pairing the porch with the main structure along the way, because for different materials of the porch, they are different.
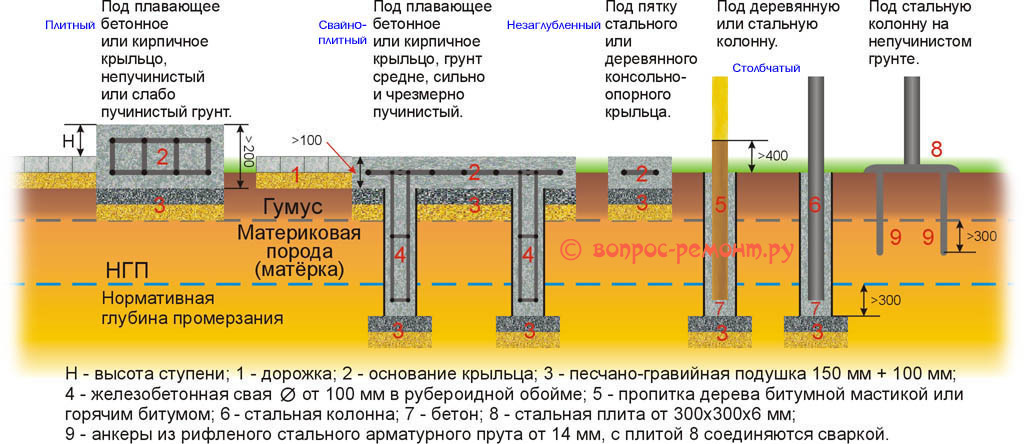
Note: if the height of the slab foundation under the porch is more than 200 mm, then its reinforcement (see below) must be made 3-level. It is highly undesirable to replace non-buried and columnar foundations with masonry from ready-made concrete blocks, with rare exceptions (see below). then, due to the low weight load, the base of the porch will turn out to be unstable.
Tree
A wooden porch looks great in any home and with any decorative design. Building a wooden porch is the easiest. The base for a wooden porch also requires the simplest to complete: a columnar or shallow foundation, see fig. The last (on the right in the figure), in general, as they say, a song is one of 2 cases when ready-made concrete blocks can be used - “bulls” 400x400x200. If the span of the stairs of the porch (see below) from the forty board is up to 900 mm, a couple of “bulls” will suffice. Span up to 1300 mm - the treads of the steps are reinforced from below with backing bars 40x40. The span is longer - additional support blocks are needed.
On the 3rd fig. Below are typical projects of wooden porches. Typical design of individual housing is carried out by studying the requests of developers, therefore, it is quite possible that you will find a porch here that is suitable for you. But most importantly - pay attention to the ways of connecting wooden parts.
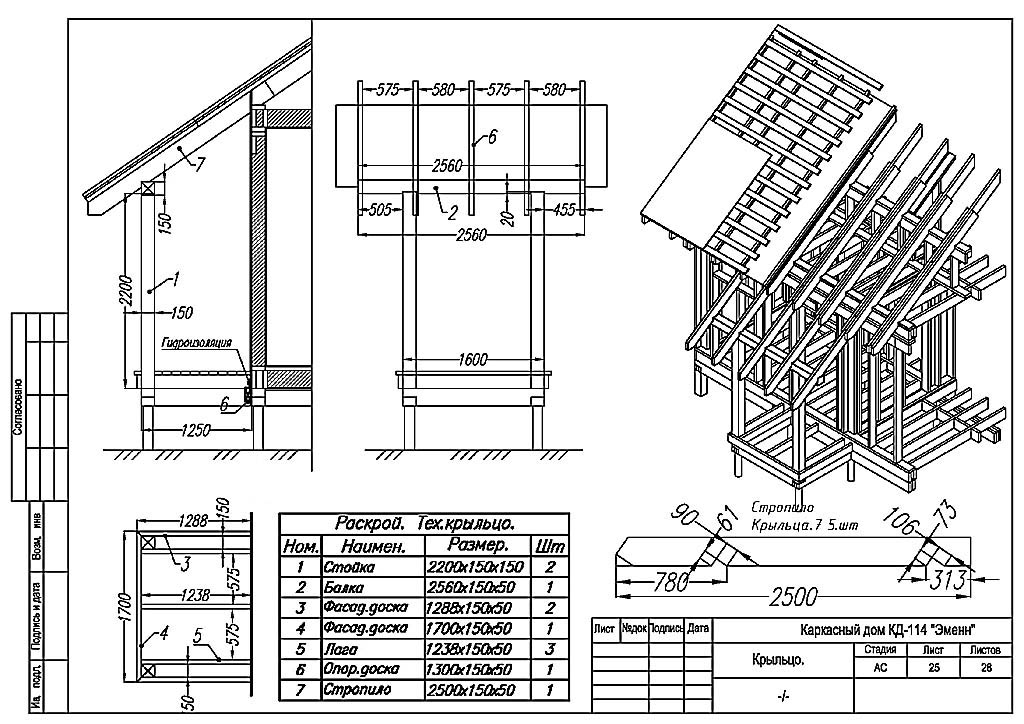
The great advantage of a wooden porch is that it is able to "play" according to the movement of the ground, while remaining tightly attached to the house. Therefore, a wooden porch does not need a particularly stable foundation. But it is also not necessary to “tighten” the frame of the wooden porch, it should walk a little as if on hinges, see fig. on right.
No special hinges are required; ordinary carpentry joints are quite elastic and pliable for this. Each porch in Fig. with the projects, it is done in such a way that it will win back the movements of the soil up to strongly heaving, without transferring excessive stresses to the structure of the frame house. And the “framework” will withstand, any other will survive.
Ladder
Stairs are the most difficult knot of any porch, and a wooden staircase is more difficult to make than others. However, heavy long-term work is not required for this, and a wooden staircase can be attached to any other porch. Therefore, it is from the stairs that you should start developing your own porch to the house.
Essential elements
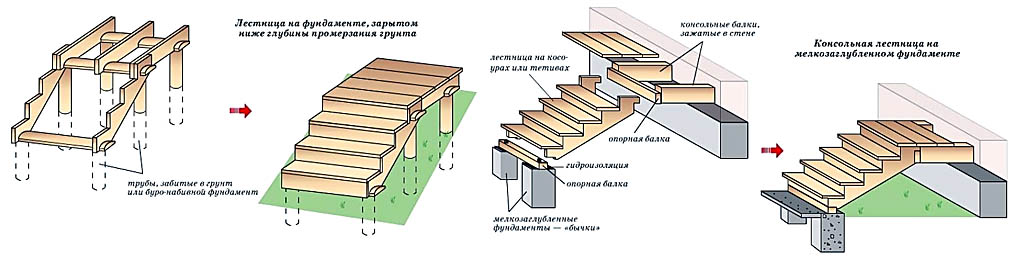
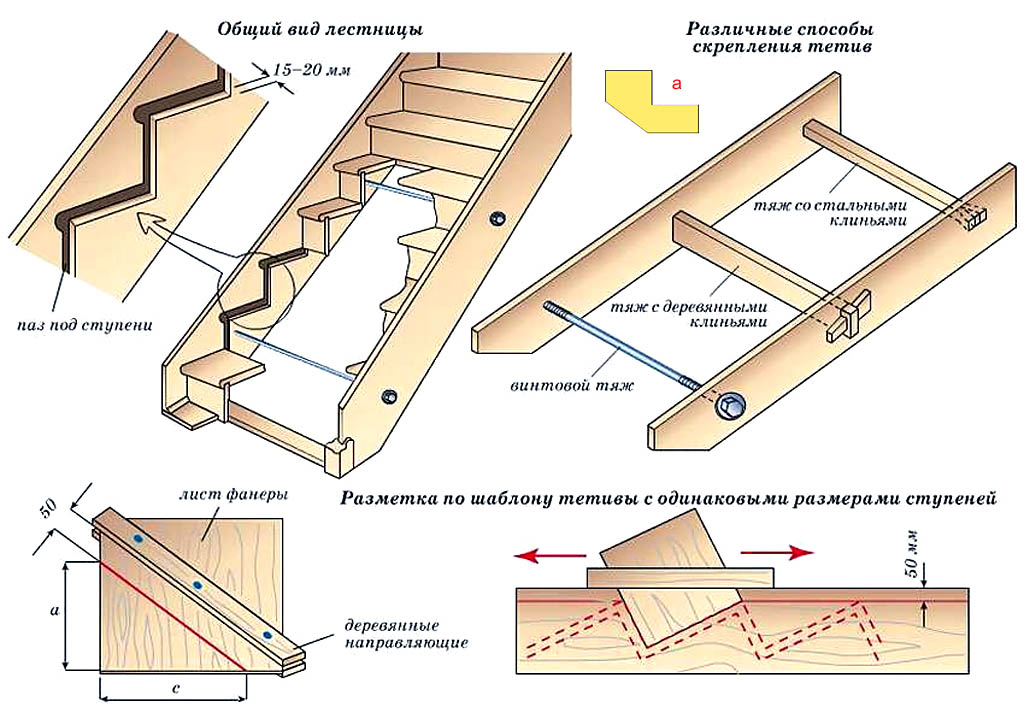
The ladder, as you know, can be made in bowstrings and on stringers (skewers), see fig. At the stairs in bowstrings, the ends of the platforms of the degrees - the risers - are closed by the beams that carry the steps, and at the stairs on the stringers, the ends of the steps are free. Wooden stairs for outdoor use are preferably made on stringers so that moisture does not stagnate in the gap between the bowstring and the step and does not cause the wood to rot.
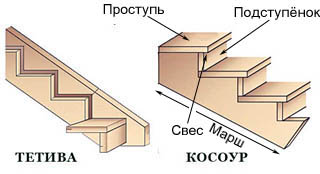
The gap between the underside of the upper step and the tread of the lower one is called the riser; it can be open and closed (deaf). The steps of one flight of stairs, assembled in bowstrings or stringers, make up the flight of stairs. The overhang of the step over the riser (step overhang) allows you to increase the width of the tread without reducing the angle of inclination of the march, and, accordingly, the departure of the stairs - the length of its projection onto the underlying surface. Giving a step overhang of more than 30-40 mm is undesirable, people will cling to it with their toes. In order for the shoes to slip less over the overhang, the deaf riser is sometimes made beveled anteriorly flush to the front edge of the tread of the upper step.
Note: general schemes for the device and fastening of wooden stairs are given on the next. Fig., and we will deal with the details further.
Calculation
The outdoor stairs may be wet, icy. On it often rise tired, chilled and wet. Therefore, the height of the steps of the outer staircase should be kept optimal - 160-175 mm, and the angle of inclination of the march should be within 30-40 degrees. For the same reasons, the width of the tread is taken more than for internal stairs - 280-320 mm. It is not necessary to give it over 350, it will be inconvenient to ascend. The span of the outer staircase, based on walking in outerwear, should, if possible, be taken no less than the inner staircase of a double passage, i.e. from 1300 mm.
Note: the slope of the march is calculated as arctg(h/w), where h is the height of the step, and w is the width of the tread without overhang.
Also, for the convenience of walking and reducing the likelihood of slipping, the stairs are designed so that a person descends from the last step with the same foot that stepped on the first. It follows that the steps of the ladder must be an odd number. According to these data, knowing the area available under the stairs from the outside, it is calculated. If the calculation does not converge in any way, it is necessary, firstly, to “play” with the size of the overhang. In addition, the stairs to the porch most often go to the platform. This allows the upper last, the so-called. frieze step, do it already. Well, and the space in front of the house to fit the removal of the stairs, most often, is also enough. Finally, you can vary the width of the platform, but if it goes out less than 750 mm, it is better to refuse the platform altogether.
Staircase on stringers
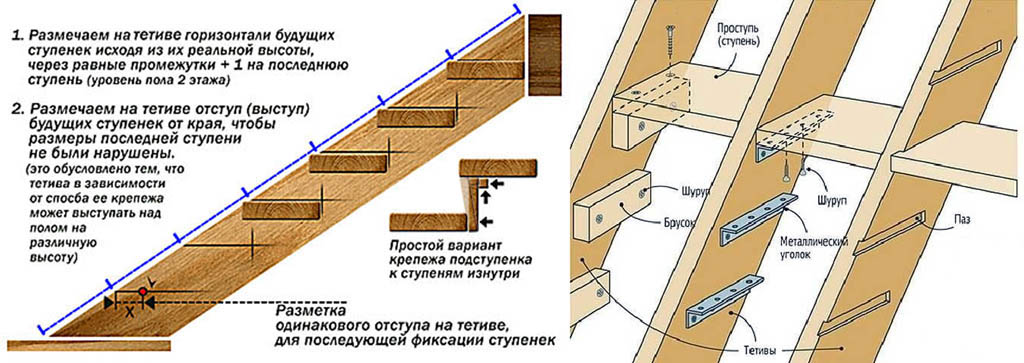
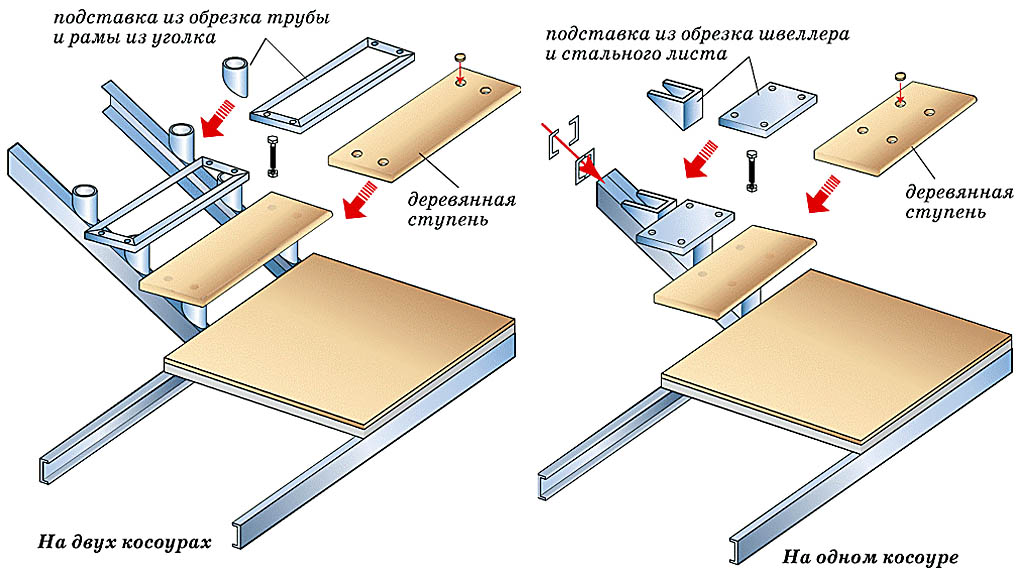
The most important node of the stairs to the porch is its connection with the building. On the left in fig. ways of pairing stairs on stringers without a platform are shown. Pairing according to pos. 1 (kosour with a gash) is preferable for a wooden house, which also “plays” well and shrinks less. The cross section of the platform beam (which in this case is attached to the lower crown of the frame or log house) here is enough 75x50 mm.
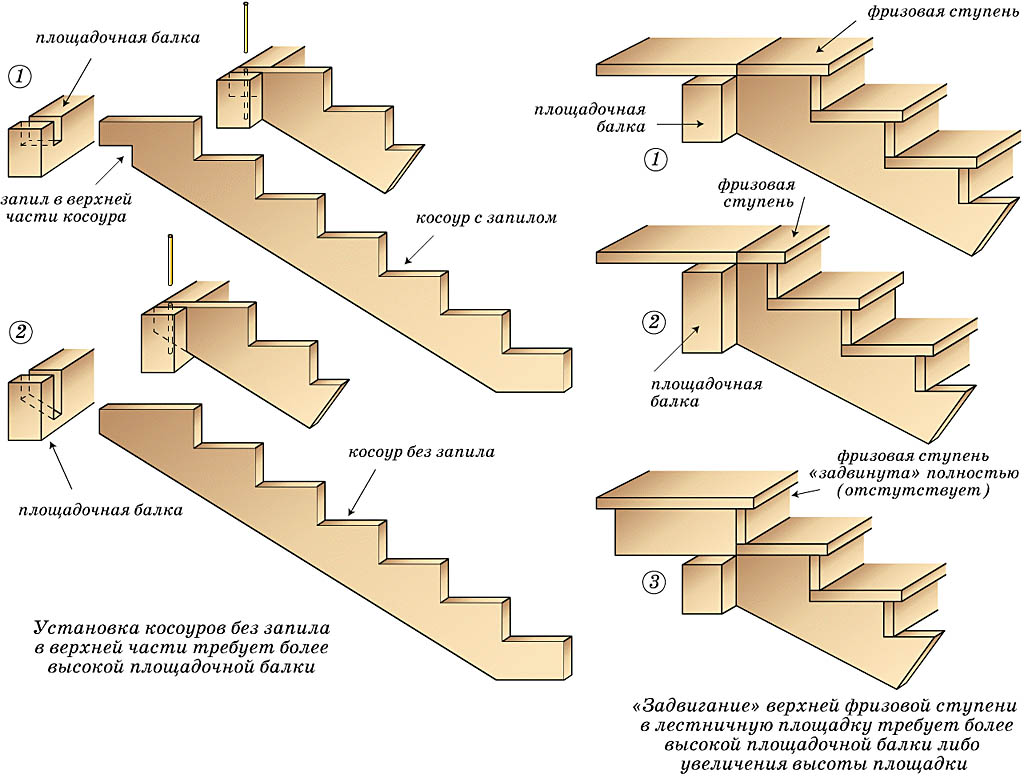
For fastening a kosour without gash (pos. 2 on the left), a platform beam of 100x50 mm in diameter is required. This method is preferred for attaching stairs to stone and concrete structures. In any case, the surface of the tread of the upper step should be located 50-60 mm below the top of the door threshold, based on further shrinkage of the house.
On the right in fig. - methods of fastening the flight of stairs to the platform, depending on the width of the frieze step. If the platform is wooden (see below), then it will be a damper between the stairs and the building; in this case, the stringer can be fixed tightly to the platform beam, for example, with steel corners and self-tapping screws. Otherwise, the kosour is attached to the beam with a tie-in without gash.
Methods for attaching steps to the stringer are shown in the following. rice. Mounting on fillies and steel holders is laborious, but the good thing is that you can put an ordinary bar 150x50 or 150x75 on the stringers. Molded lumber of greater width per cubic meter is significantly more expensive, because. great waste of wood when sawing timber.
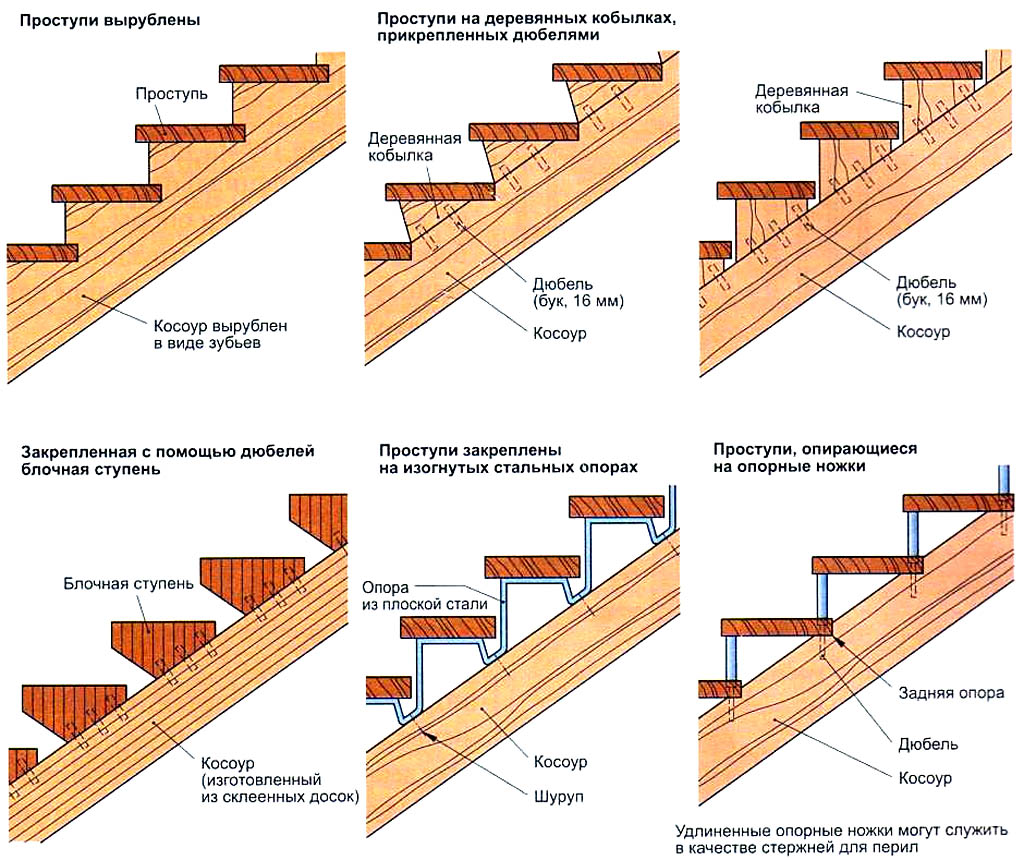
Note: dowels in this case are wooden dowels, not furniture dowels!
Area
A wooden landing is usually a frame made of timber from 150x150. Support poles, if they are wooden - from the same timber. If the width / length of the platform exceeds 1.7 m, it is necessary to install a crossbar (s) also from a bar 150x150. The strapping bars of the frame and crossbars cut into half a tree at the junctions.
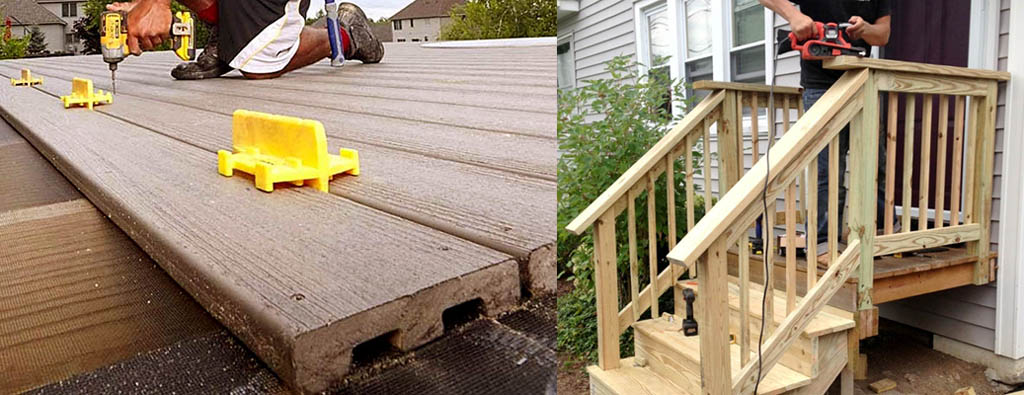
The flooring of the platform is laid on the logs 150x50. The logs are placed parallel to the short side of the site in increments of up to 750 mm (under the flooring of the forty board) and cut into the frame and crossbars also half a tree. Floor boards must not be tongue-and-groove, they will rot! The porch area is covered with boards with rounded corners with gaps of 2-3 mm for water drainage. Spacer boards for mounting outdoor wooden decking are commercially available, on the left in fig.
Note: in general, the entire porch should initially be designed so that the ends of the boards / beams are protected from direct moisture. It is better to immediately give a little surplus and cut it off than to rack your brains later on what to do with rot. An example of the correct implementation of the porch railing is on the right in fig.
Staircase in bowstrings
The staircase on the stringers does not always fit the chosen design of the porch. In this case, the ladder in bowstrings must be designed in such a way that it is as stable as possible in external influences.
The general arrangement of a wooden staircase in bowstrings is shown in fig. You can get by with pairs of narrower boards for bowstrings instead of one wide one with the help of overlays for steps - surfboards - pos. A. The ribs are cut from a board material resistant to external influences, for example. OSB. Their thickness, for steps from forty and bowstrings from "fifty kopecks" - from 18 mm.
Fastening bowstrings with screw cords is the simplest and most reliable, but, you know, the pieces of iron stick out. Sufficiently reliable and invisible fastening with strands on steel wedges, however, bowstrings with a thickness of 75 mm or more are needed for it. Mounting on steel wedges is laborious and requires considerable carpentry skills: for wedged spikes of strands with a height of 50 mm or more in bowstrings, you need to choose blind sockets of the dovetail profile. When assembling the frame of the march, the bowstrings are strongly, but evenly and accurately, tapped with a wooden sledgehammer - a snow leopard. The whiskers of the spikes of the cords are then tightly wedged in the dovetails. Bowstrings for assembly on strands with steel wedges need oak, and strands (from 60x60 mm) - from high-quality straight-grain pine. Not from larch, it is fragile!
Of great importance for the accuracy of the assembly of stairs in bowstrings is the accuracy of their marking under the steps. The main ways of installing (joining) steps in bowstrings are given in Fig.:
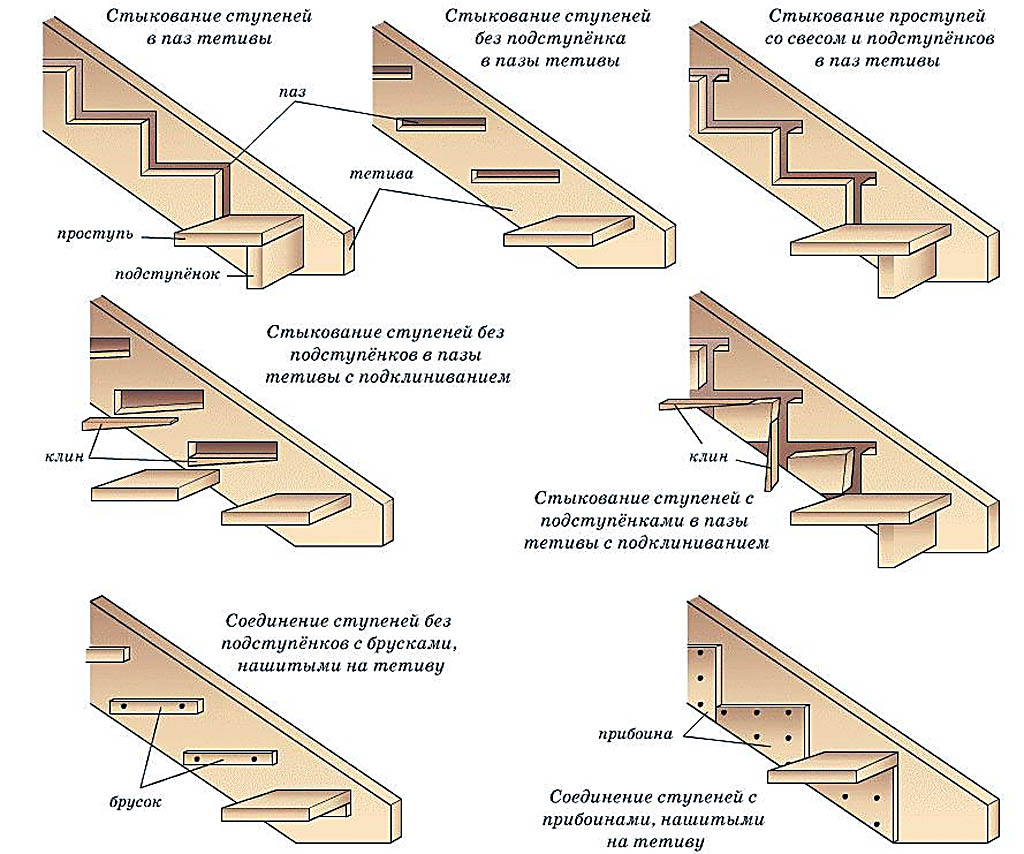
The steps of outdoor stairs in bowstrings should be placed on backing bars or surfs. This, firstly, reduces the possibility of moisture accumulation in the grooves for treads / risers. Secondly, the march frame can be assembled and, if necessary, trimmed before installing the steps. Both make the manufacture of a wooden staircase in bowstrings feasible for beginners.
The scheme for assembling the stairs in bowstrings "for dummies" is given on the next. rice. In this way, a green novice carpenter can even make beveled risers (shown in pale tone). On the right in fig. - ways of fastening steps to it. Here it should be added to the above that it is not necessary to put treads on steel corners in the outer staircase - rust will flow.
metal porch
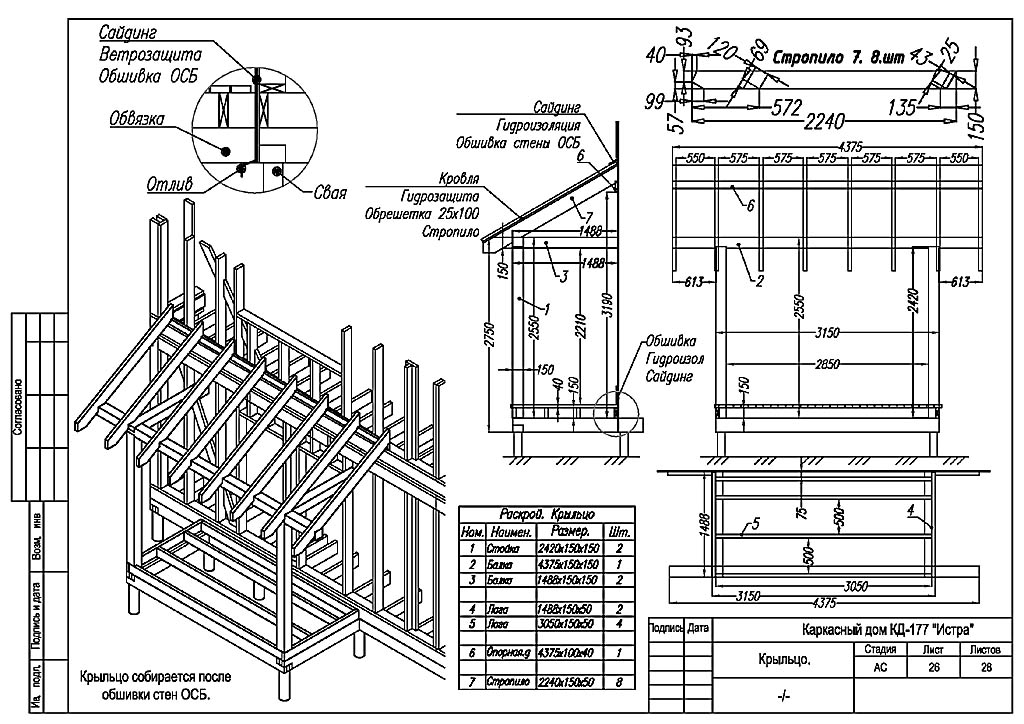
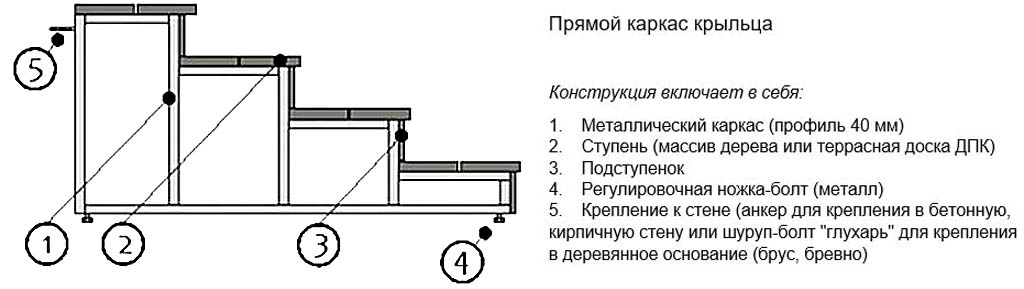
A metal porch is the second most popular after a wooden one. With their own hands, a steel porch is most often made for giving: here the appearance, as they say, does not beat very much, but the entire structure can be welded in advance in production conditions, brought and delivered ready. A steel porch without wrought iron decorations will cost less than a wooden one, not to mention a concrete one.
Due to their elasticity, metal structures are very little susceptible to damage by soil movements. But she is able to transfer great efforts to the construction of the building. Therefore, on soils of medium and stronger than average heaving, the steel porch must be made floating, like a concrete monolith (see below). The foundation under it can be laid slab lightweight, with a slab 100 mm thick flush with the ground surface and single-level reinforcement. On weak and non-rocky soils, a steel porch can be made cantilevered (see below) with supports from a pair of bullock blocks under the heel.
The steel porch is usually assembled on stringers as shown in fig. Channels for stringers and platform frame take 60 mm; corner for frames of steps - equal-shelf 40 mm. Logs under the platform flooring are made from the same corners welded into a T-shaped profile (half-tee). Steel pipes from 100 mm go to the support pillars.
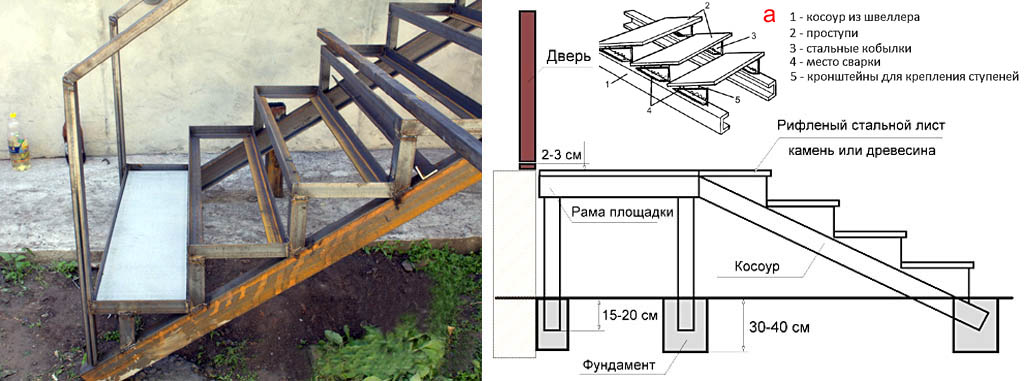
This design is optimal for production in industrial conditions, incl. piece and small-scale handicraft. The fact is that for accurate welding of step frames, volumetric conductors are needed. When welding outdoors on the weight, the steps of a novice welder will most likely come out skewed. Or, to assemble such a ladder on the spot, you need some experience, see for example. track. video.
Video: an example of assembling a metal staircase
A beginner can get out of the situation in several ways. The first one is shown in pos. and the figure above: instead of voluminous frames of steps on the plaza (a flat, durable fireproof platform), flat fillies are boiled under the steps. Tread them - either wooden hanging, or any (for example, stone) laid in flat frames from the same corner. In either case, the tread or frame for it is attached to the filly with screws, which allows you to align the steps. Bad in this method is its high labor intensity and increased consumption of material. Wooden treads will also not receive proper support, so you need to take thick ones from them.
The second method is shown on the left side of the footprint. rice. Here, the labor intensity and material consumption are less, because. supports from pipes after welding are cut into the horizon by a grinder according to the level and cord-mooring. According to this scheme, there is a temptation to reduce the volume of earthwork and concrete work by making a ladder on one stringer, on the right in Fig. However, it requires a cutting machine: the slightest distortion of the filly supports from the channel - and the steps went for a walk. You can make a cutting machine yourself by fixing the grinder on a swinging arm, the hinge of which is installed in a solid frame, but whether it is worth doing it is a master's business.
Finally, the simplest solution is a porch for OSB or plywood sheathing, and decorative trim along it, on a straight frame. Its device is clear from the next. rice. All parts of the frame are flat, cooked on the plaza. The foundation for such a porch is not needed at all, it hangs on the foundation of the building, this is the so-called. cantilever porch (see also below). It rests on the blind area of the house with adjustable screw legs, so please note: the frame is fixed to the foundation of the building only at the top, as shown in the figure! Fasteners - bolts from M8x130 with steel collet anchors. The pitch of the attachment points is up to 600 mm. Since the porch is always wider, intermediate posts are needed in the rear frame frame. Which will not interfere with other frames with a height of more than 400 mm.
concrete porch
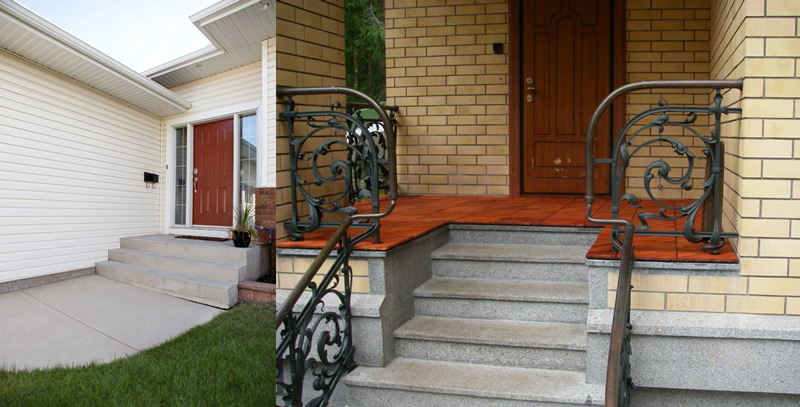
A concrete porch is actually a little better than a brick porch: laborious, and the work is hard, material-intensive. Requires a reliable stable foundation for itself, it interfaces very poorly with the building. True, it will stand on a separate foundation no less than the house itself. Aesthetically, a concrete porch justifies itself only with a house of a purely utilitarian design (on the left in the figure); technically well combined with a patio porch (terrace, veranda, on the right in the figure), but a terraced porch must be built along with the house.
Also, at the same time with the building, a cantilever (hanging) and cantilever-supporting porch is being built, pos. III and IV on the next. rice. Since we are talking about an attached porch here, we will confine ourselves to a remark about them that the cavity under the concrete porch (wing liner) must be well ventilated, otherwise it will turn into a hotbed of dampness and a nesting place for all obscene living creatures.
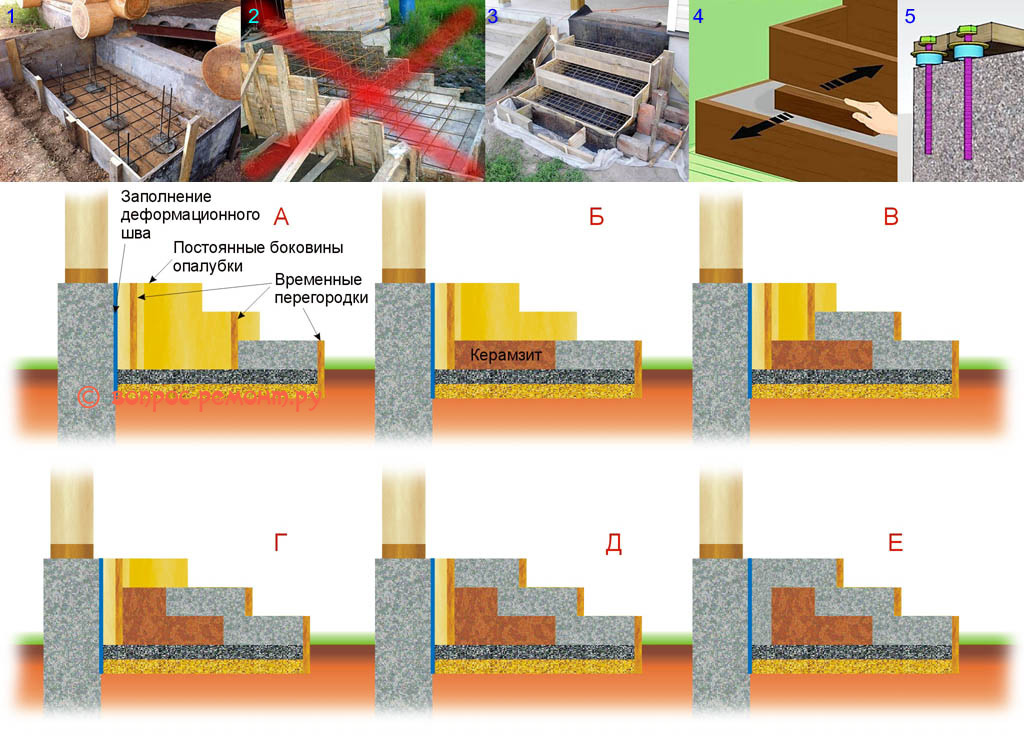
Only a floating concrete porch is attached to the existing house, pos. I and II. A more detailed diagram of its device is shown at the bottom right in Fig. Instead of rigid mineral wool, a deformation seam (width - 10-12 mm) can, and even better, be laid with basalt cardboard. A piece of mineral wool or a sheet of basalt cardboard is taken out on the sides outside the porch monolith and temporarily attached to the foundation of the building with self-tapping screws in dowels through wooden slats. It is impossible to fix the filling of the seam to the foundation of the house in the area where the porch adjoins it!
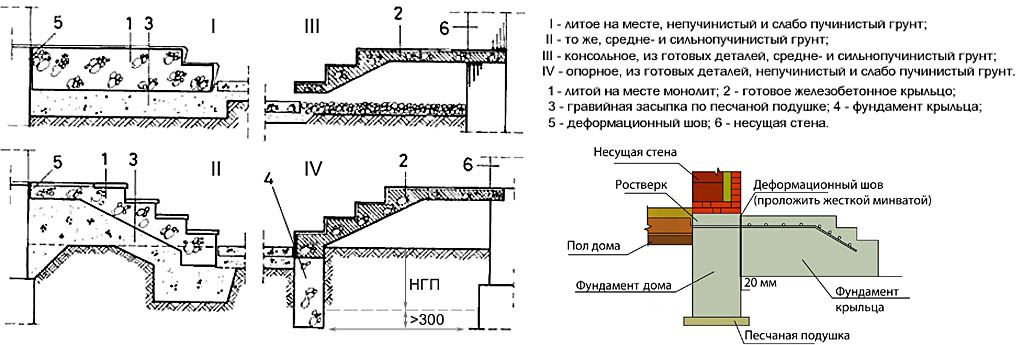
A typical, one might say, defect of a floating concrete porch is a chronically occurring crack between it and the foundation of the building. It is not dangerous, but it flaunts in plain sight, like a red nose and bags under the eyes of an alcoholic, and generally without cracks is better. Therefore, it is better to attach a concrete porch to the house on a separate foundation, slab or pile-slab, depending on local conditions (see the figure with foundation diagrams).
About the foundations for a concrete porch in RuNet, what miracles you read! It is advised, say, to do it on undercut, pressed or driven piles. And the house is nearby, close, what, is it standing on a monolithic Precambrian rock? Pile work will not affect the reliability of its foundation in any way? If the concrete porch is made on a pile-slab foundation, the following should be borne in mind:
- Piling holes are drilled manually with a garden drill.
- Piles are reinforced and poured into ruberoid clips using a standard method.
- Piles are located symmetrically along the diagonals of the foundation slab with an indent of 250-350 mm from the corners.
- If any of the sides of the projection of the porch is more than 1.8 m, the piles are laid in an envelope (item 1 in the figure below).
- The belts (levels) of the reinforcing grid of the slab are fastened with a knitting wire to the vertical branches of the reinforcement of the piles immediately after the concrete has set in them. The distance from the lower reinforcement belt to the top of the bedding is 40-80 mm.
- To speed up the work, a sand and gravel cushion under the slab can be poured through the reinforcement grid of the slab. The remnants of the backfill from the armature are swept away.
- A slab with a thickness of up to 200 mm is poured in one layer, and a larger thickness - in layers of 15 cm.
- A freshly poured layer of concrete is pierced with a sharpened steel bar approximately in the middle of each grid cell to release air.
- The next layer of concrete mortar is poured as soon as the previous one begins to set. With this method of filling, the so-called. hydraulic compaction of concrete.
Note: it is possible to reinforce the foundation of a concrete porch with both steel and fiberglass (composite) reinforcement.
The porch is poured when the concrete slab reaches approx. 15% durability. Practically - on the 2nd - 3rd day after setting the concrete of the foundation slab. There is no need to reinforce the concrete porch with multi-level powerful reinforcement (item 2 in the figure); enough for each step of one reinforcing belt made of steel mesh from 40x40x3 to 60x60x5, pos. 3.
The formwork boards must be soaked in advance with mineral oil (by mining, for example), so that they can be removed more easily later. If the concrete porch does not go under the finish, it is advisable to carefully sand the formwork from the inside, and seal the seams between the boards with wood putty. So the outer surfaces of the porch will be smooth.
Pros, working on order / for hire, pour the porch in one step, time is precious to them. Working for yourself, the porch can be poured in stages, pos. A-E in fig. In addition to saving material, the porch will turn out to be insulated and less prone to displacement by soil movements. Each successive step is poured as soon as the concrete of the previous one has set. The concreting of the steps of the porch is carried out in the next. order:
- Leveled and compacted gravel or expanded clay backfill is poured with a cement-sand 1:3 mortar of increased fluidity, with a water-cement ratio (VC) of 0.72, until all pebbles or granules are hidden. That is, the solution should be the density of liquid sour cream;
- As soon as the initial pour begins to set, pour the usual concrete mortar (cement: crushed stone: sand 1: 5: 3) of normal consistency with a layer of 4-6 cm;
- just grabbed the first layer of concrete pouring, lay the reinforcement and pour the step to the top of the formwork section. If wooden or stone treads will be installed on concrete, screw anchors are walled up for them at this step;
- The filled step is deaerated (de-aired) as described above;
- Immediately after pouring the next step, the previous one is ironed: sprinkled with dry cement M400 and carefully rubbed with a wooden block (item 4 in the figure)
Note: scheme according to pos. A-E is for a floating porch. The pouring of the porch on the foundation by this method differs only in the absence of the primary pouring of the first stage with a cement-sand mortar.
The back wall of the porch (pos. E) is poured in layers of 15 cm with de-airing and hydro-sealing. The order of its filling is the same as for the steps. Wooden or stone treads are placed on propylene spacers with steel washers, pos. 5.
Canopy and canopy
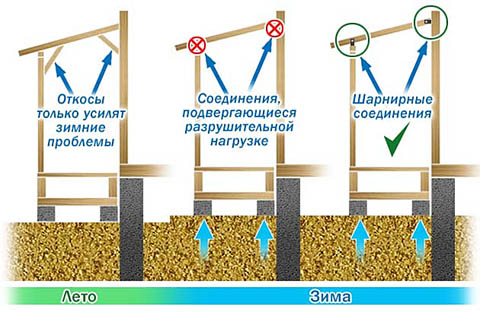
A porch with is definitely better than an open one. Not only in terms of convenience, but also the safety of the building: the front door opening is the place from where most often the violation of the building structure begins under the influence of weather conditions. The roof of an attached porch can be a canopy on columns or a hanging canopy attached to the wall of the building.
The columns of the canopy of the attached porch must be concreted separately from the foundation of the porch, and even more so from the floating porch. The removal of the bases of the columns forward and to the side from the outer corners of the porch or its foundation - from 0.5 m; better - 1 m or more. The reason is the same difference in the shrinkage of the porch and the house. If the bases of the columns are not rigidly connected to the porch, frost heave forces will press the canopy against the wall. On the contrary - to tear it off the wall.
Note: the lower parts (roots) of wooden columns must be treated with bitumen at least 400 mm above the ground. The reason is the same for which it is possible to build from bricks only on the basement. Wrapping the roots of wooden columns with roofing material, in addition to impregnation, will not hurt, but keep in mind that it will not protect the aerial part of the root of the column! In the light, roofing material is destroyed over time by solar ultraviolet (UV).
The hanging visor does not fundamentally create shrinkage matching problems. It cannot be mounted only on frame and prefabricated panel walls; in all other cases, a hanging canopy is technically preferable to a canopy on columns. Schemes of porch visors welded from a 40-mm corner frame are given at the top in the figure, and drawings of a wooden porch visor are also below. All these canopies, except for arched and gable ones, must be equipped with a drainage gutter with an outflow to the side (s). The overall width of a wooden canopy made of timber 75x75 can be increased up to 2.5 m; for this resp. increase the size marked with an asterisk.
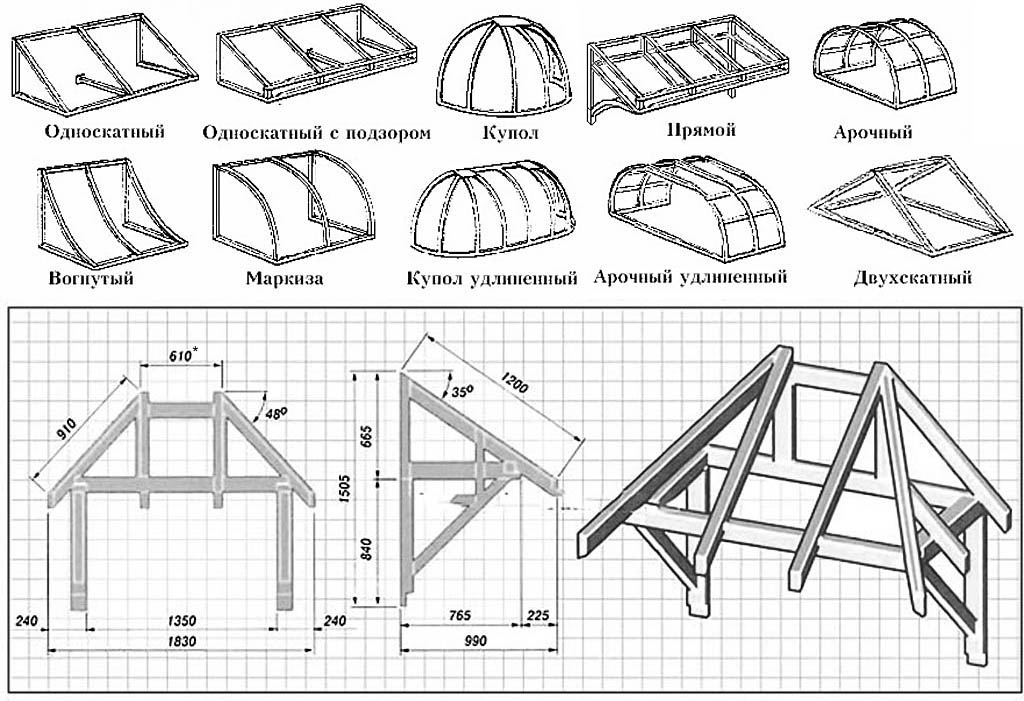
Fastening of peaks to a stone or concrete wall - with 8x130 self-tapping screws in propylene dowels or M8x100 bolts in collet anchors. To a wooden wall - self-tapping screws for wood M8x120. Canopy roof decking - any suitable (soft, steel or ceramic tiles, polycarbonate, slate, etc.); under any roof, except for polycarbonate, a crate is required. It is necessary to cover the visors with polycarbonate, observing the rules for working with this material: turn it outward with a UV-resistant side, structure channels along the slope, close the edge with a filter tape, fasten it to the frame using thermal washers, etc.
About porch glazing
The glazed porch is cool and fashionable. In many cases, it is also convenient. But - glazing without fear is only possible on a porch built together with the house on a common foundation with it. As for the porches attached to the house, no technical guarantee for the safety of their glazing for more than one season is possible in principle.
Finally: how to search for information
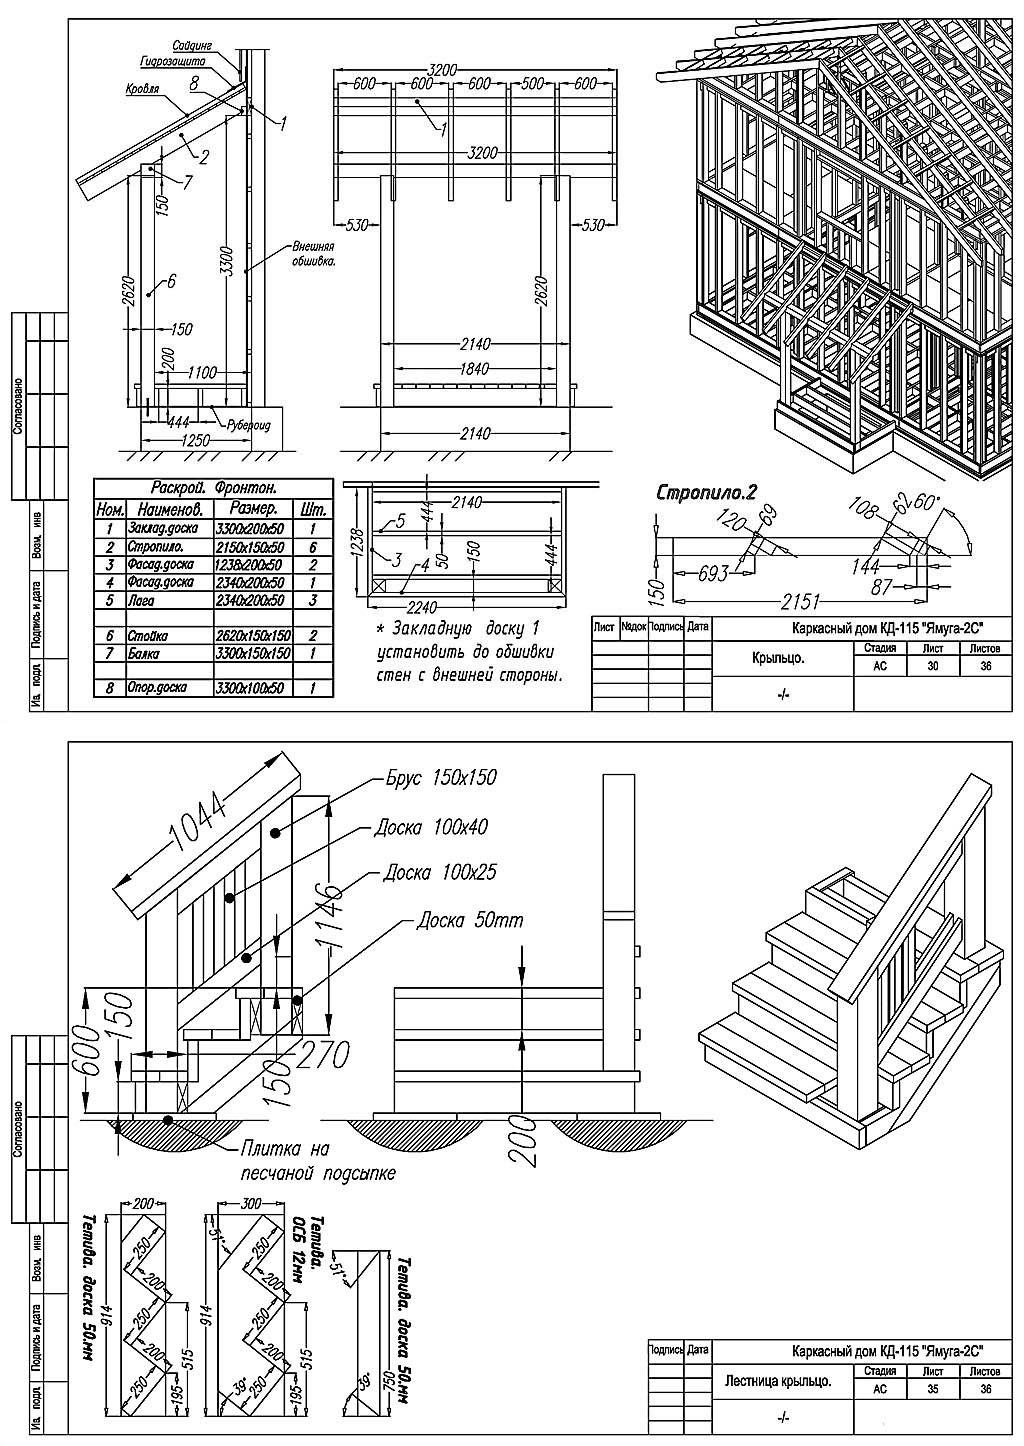
You may need exact working drawings of some of the typical porches. For example, you were self-built according to a standard project, but so far without a porch. Unfortunately, there is no possibility to include at least part of the technical documentation even for one project in a review article, but the most popular of the standard projects of individual residential buildings are available on the Internet in free distribution.
In order not to “google” in vain for a long and painful time, but to go straight to the porch, in the search bar of the browser you need to type “Typical project 18…” or “Typical design solutions 8…”. A number of preliminary results will pop up for you according to documents available for free download like “Typical project 186-214-9.87” (this is a precast concrete porch from ready-made monolithic parts) or, say, “Typical design solutions 820-1-088.88” (drawings of a metal porch ), or “Standard project 189-000-362.85” (these are drawings of a wooden porch), etc. Further - it is clear. We look at what suits - we download, we determine the materials and costs, we build.


