Recently, shingle roofing has become very popular among developers. This roofing has an attractive appearance that is not inferior in beauty to traditional tiles, a long service life and high moisture resistance. Thanks to the self-adhesive layer on the back of the shingle, do-it-yourself soft roofing can be done even without professional experience. In this article we will tell you how to properly prepare the base, assemble the crate and lay flexible tiles.
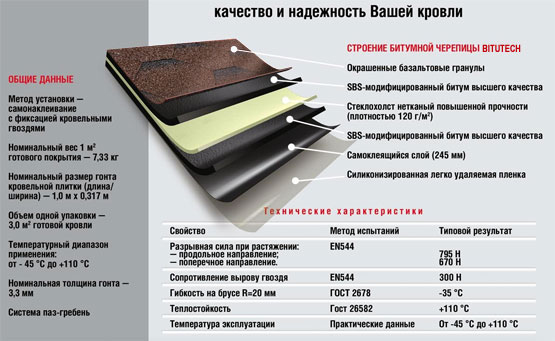
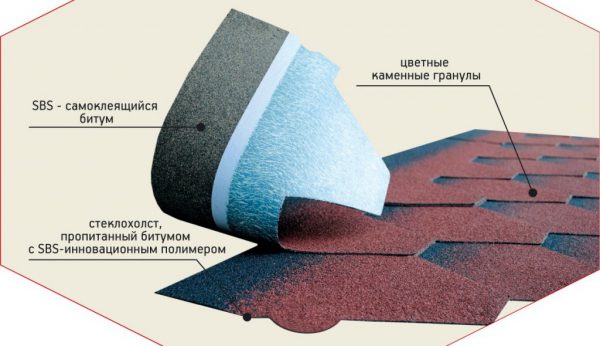
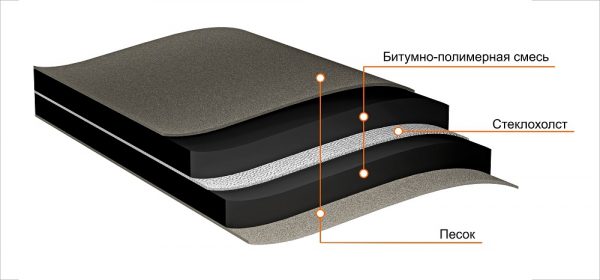
Flexible tiles are called tiles with a figured edge, made of fiberglass impregnated with modified petroleum bitumen. Laid with an overlap, such a roof imitates a rare, but aesthetic shingle covering made of wooden chocks. Fiberglass, which is part of bituminous tiles, can be plain or reinforced with polyester. The technology for the production of this material includes sprinkling the front side with armoring dressing made of stone or basalt chips, which gives color and a rough texture to the roof. The advantages of flexible tiles are:
- Durability. The service life of a soft roof based on polyester-reinforced fiberglass is more than 70 years, which fully pays for the cost of installing a roof.
- Weather resistance. The soft tile maintains influence of atmospheric moisture, ultra-violet rays and other adverse environmental factors, keeping operational qualities.
- Aesthetics. A variety of shapes and colors of the material opens up great opportunities for creating a harmonious, integral image of the house.
- Flexibility. Flexible, elastic bituminous tiles are suitable for arranging roofs of complex shape with a large number of slopes, valleys and other decorative elements.
Important! The technology of laying bituminous tiles is distinguished by its simplicity, therefore it can be easily performed even by a non-professional. Do-it-yourself soft roofing is an excellent solution for the roof of a private house, country cottage, gazebo or townhouse.
Features of working with the material
Before you cover the roof with a soft roof, you need to make sure that a reliable foundation has been prepared for work. Also, the technology of installing a soft roof involves the performance of work subject to certain weather conditions. If you do not follow the manufacturer's recommendations, you may encounter the following problems:
- If bituminous tiles are laid at an ambient temperature of less than 5-10 degrees, then the self-adhesive layer on the back of the tiles does not melt on its own. To melt the bitumen, you have to use a gas burner or a building hair dryer. However, this makes it difficult and slows down the laying of tiles.
- If you lay shingles at temperatures above 25 degrees, the self-adhesive bituminous layer melts too much and flows down the slope. In addition, high temperatures lead to deformation of the roof.
- If you install the roof in wet weather or during rain, the rafter frame and lathing acquire excess moisture, which negatively affects the life of the tile, leading to decay.
Important! The installation technology of the material recommended by the manufacturers prescribes laying at a temperature of 5-15 degrees in dry weather. Most often, such conditions develop only in the summer. However, in winter, you can assemble the truss frame for the roof and prepare the base for the roofing deck.
Lathing installation
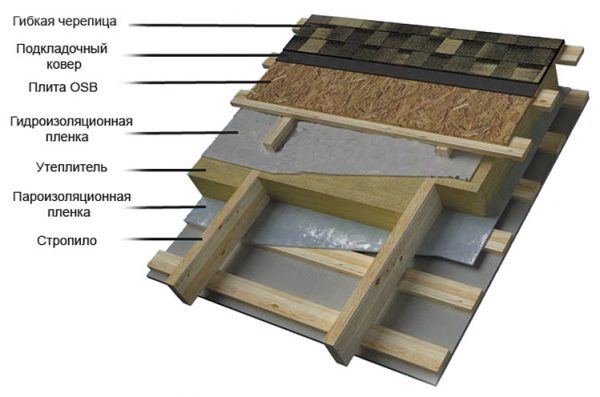
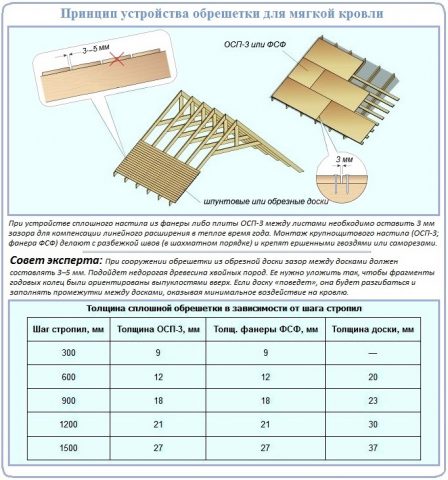
Before you make a soft roof, you need to assemble a high-quality, durable crate. The technology of laying bituminous tiles involves the use of a solid base, which gives rigidity and mechanical strength to the soft roofing. The lathing should ensure an even distribution of the weight of the roof between the rafters, so it is created from 3 layers:
- Control grid. The counter-lattice for soft tiles is made of wooden bars 3-4 cm thick. It is attached along the rafters of the frame over the waterproofing material. The task of the counter-lattice is to create a ventilation gap between the rafters and the roofing.
- Sparse crate. This base element for soft tiles is made from edged boards measuring 20x150 mm. The boards are nailed perpendicular to the counter-lattice at a distance of 30-50 cm.
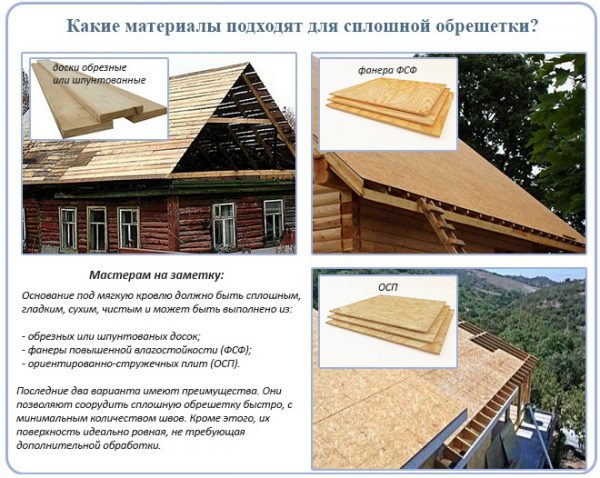
- Solid crate. It is made of moisture-resistant plywood, OSB sheets or edged boards, laid solid with a gap of 1-3 mm, which compensates for the thermal expansion of the material. To prevent damage to soft tiles, it is necessary to sand or trim the elements of the crate so that they are smooth.
Please note that for the manufacture of lathing for a soft roof, it is correct to use dried up to 20 percent softwood. To prevent premature decay of wooden elements, they are treated with antiseptic preparations. If the structure has a high risk of fire, then the crate is impregnated with fire blocking compounds.
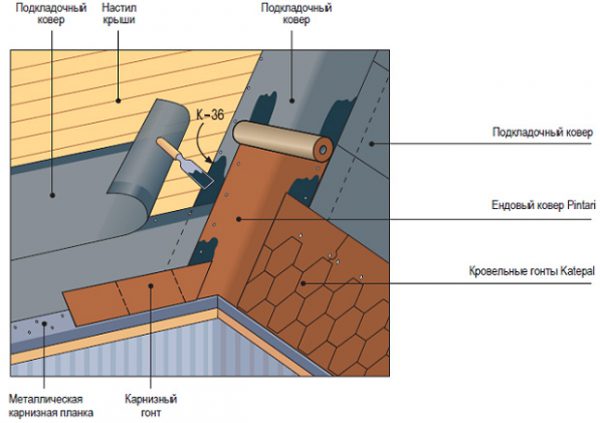
Lining carpet
Do-it-yourself soft roofing is laid on a solid crate made of chipboard or moisture-resistant plywood. A lining carpet is laid on top of the base - a lining made of moisture-resistant bituminous material resistant to mechanical damage. The lining carpet protects the roof from leaks, as well as from damage to the shingles by uneven lathing. Coating installation technology recommends:
- With a roof slope of less than 15-18 degrees, lay a lining carpet on the entire surface of the slopes with an overlap of 15-20 cm, since water can linger on it during the melting of large snow masses.
- At an angle of inclination of the slopes of more than 20 degrees, the lining carpet can only be laid in places that are particularly vulnerable to leaks, where water can accumulate or stagnate. Additional waterproofing protects the valleys, the joints of the slopes with vertical surfaces, the ridge.
- Do not use ordinary roofing material as a lining. The low price does not compensate for the poor quality, fragility and short service life of this material.
Experienced craftsmen advise using the material recommended by the manufacturer as a lining carpet, as it is guaranteed to be compatible with the selected shingles.
Laying
Do-it-yourself installation of a soft roof is carried out in dry, calm weather at a temperature of 5-15 degrees. If the material is laid on an old truss frame, then it is necessary to check the condition of the wood, and then replace the rotten or deformed elements. Installation is carried out in the following order:
- First, the slope is marked with horizontal stripes, marking the location of the rows of soft roofing with white chalk.
- It is correct to start laying the material from the bottom of the slope, using the starting strip. Fix the roofing with nails or a self-adhesive layer. If the tiles are self-adhesive, then to stick them, it is enough to remove the protective film, and then attach it tightly to the roof base.
- If nails are used to fix the coating, then they must be placed no closer than 2.5 cm from the edge, and also driven flush with the surface of the material.
- The second row begins to be laid on the left side of the slope with the help of tiles, from which 143 mm are cut off from the left edge, thus shifting the bituminous tile pattern diagonally.
- To start the third row from the tile, a fragment 286 mm long is cut off from the left edge in order to also shift the coating pattern in a diagonal direction.
- After completion, a ridge is formed using a ridge element, junctions with vertical surfaces and valleys.
Note! In order for a roof made of soft tiles to function correctly, it is necessary to equip a ventilation system to avoid the "greenhouse effect" and rotting of the truss frame of the structure.