Despite their simple, uncomplicated design, shed roofs are in demand, rational, especially for country housing construction. Roofs with one slope are also widely used for arranging garages, adjoining buildings, and outbuildings. You will learn how to build a pitched roof with your own hands step by step below.
Multi-pitched roof options are complex in design, and a single-pitched roof is quite accessible for do-it-yourself construction, since it is, in fact, a rectangle that is located in one plane and has no bends. On a shed, by the way, you will need much less building materials than any other, it will be more resistant to seasonal manifestations (snow, wind, rain).
Shed roof garage constructionBenefits of a pitched roof:
- light weight;
- relatively acceptable total cost;
- affordable, uncomplicated installation process;
- the possibility of using various building materials (roofing, rafters);
- accessible arrangement of the drainage system, chimneys.
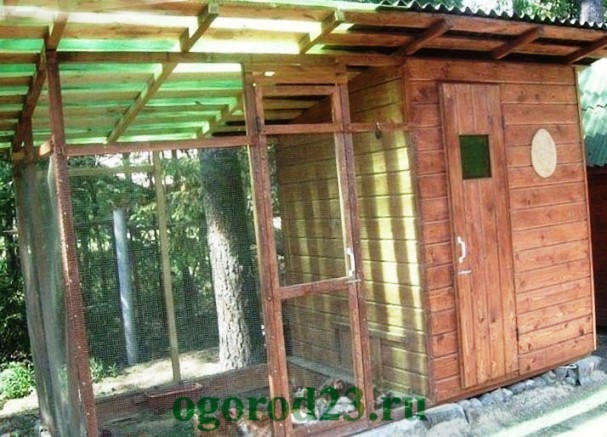 Shed roof chicken coop
Despite its simplicity, a shed roof can be very creatively played up in design solutions. The angle of its slope directly depends on the climatic features of the region where you live. If you are used to snowy winters, then the degree of inclination should be greater (so that the snow slides off better), but if your house is located in a windy place, then the slope should be made smaller. For the same reasons, the slope of a shed roof should be directed in the direction opposite to the facade, so that the precipitation "leaves" behind the house.
The roof is shed, erected by hand step by step, it can be ventilated and non-ventilated type. The first option is used for residential buildings, the slope varies from 8 to 25 degrees. In such cases, air exchange is provided by an insulating layer and special openings located on the sides of the roof.
 Outbuilding - garage and shed with a shed roof
The non-ventilated version is often installed in garages, sheds, outbuildings to the house, their slope angle is mostly small - 3-6 degrees.
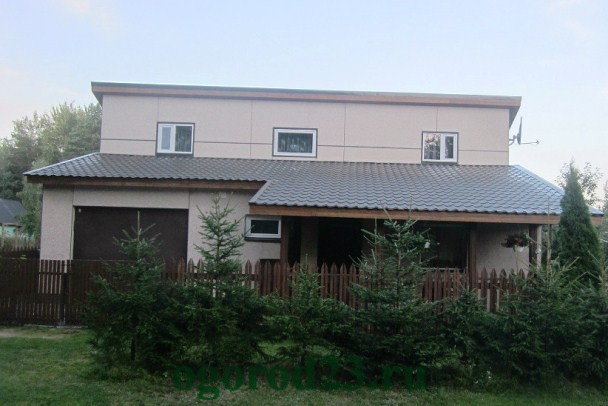
House with a shed roof - the choice of roofing material
The calculation of a schematic drawing of a future home begins with determining the required angle of inclination and a suitable covering material for the roof. Most often, for such shed structures, corrugated board, metal profile, roofing material, tile, slate, metal tile or ondulin are used. Soft tiled or ruberoid coating is best suited for very small slopes - from 5 to 10 degrees. Slate with corrugated board is more suitable for "average" indicators of the angle of inclination - from 20 to 30 degrees. For metal tiles, a slope of at least 35 degrees is required.
The choice of roofing material is determined by its ability to interact with atmospheric precipitation and remove them from the surface in a timely manner. For example, snow comes off much easier from slate, corrugated board, tiles.
How to make a shed roof?
To build a single-pitched roof step by step with your own hands, you will need a standard set of construction tools, the necessary building materials. Wood materials (lumber) must be of good quality with a maximum moisture content of 22%. All wooden materials are recommended to be pre-treated with antiseptic agents (for example, agents from the Drevoteks series).
In addition to everything, you should have fasteners in stock: crossbars, struts, struts.
The crossbar is a horizontal part that acts as a support for other supporting structures, it distributes the load of the rafters to other beams.
Spacers - a type of supports that are located in the spans, provide greater stability to the entire structure.
Struts are beams that act as supports for the truss system.
 Shed roof extension to the house
Shed roof, photo:
You must have:
- wooden beam 100-150 cm in diameter;
- laying boards (thickness at least 5 cm);
- rafter nails;
- thermal insulation materials;
- waterproofing materials;
- construction tape;
- tools (axe, saw, hammer, construction knife, plumb line, screwdriver, tape measure, construction stapler, level).
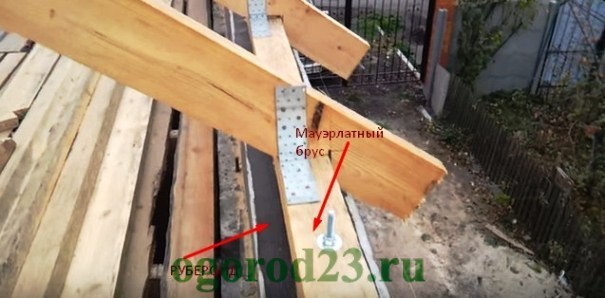
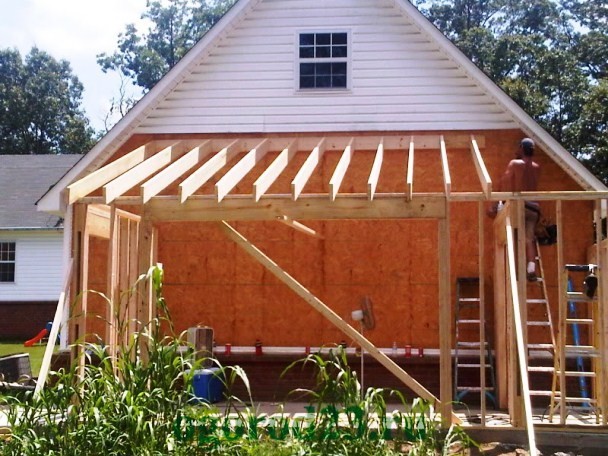
The truss system of a shed roof will depend entirely on the size of the future house and the building material from which the walls were built. The rafters are always installed on the Mauerlat, if the building is small and the span does not exceed 4.5 meters, then the scheme of the shed roof truss system will be extremely simple. It will consist of the main Mauerlat beam and truss support. If large dimensions of the building are assumed, and the span is more than 6 meters, then installing reinforcing rafter legs with your own hands is simply necessary.
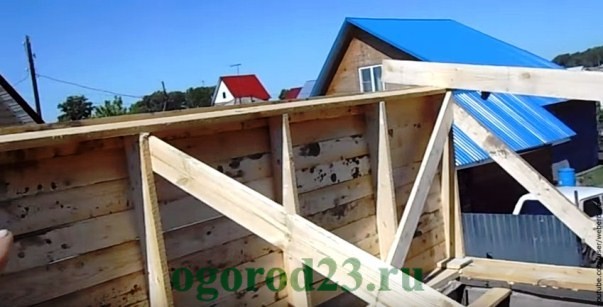
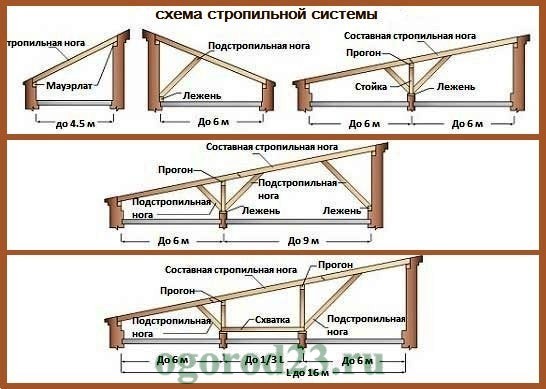 Shed roof truss system diagram
Rafters must be installed in accordance with building regulations so that after several years of operation the consequences do not appear. Do not forget about safety rules - install reliable, strong temporary boards on the rafters, on which you will move during the construction process.
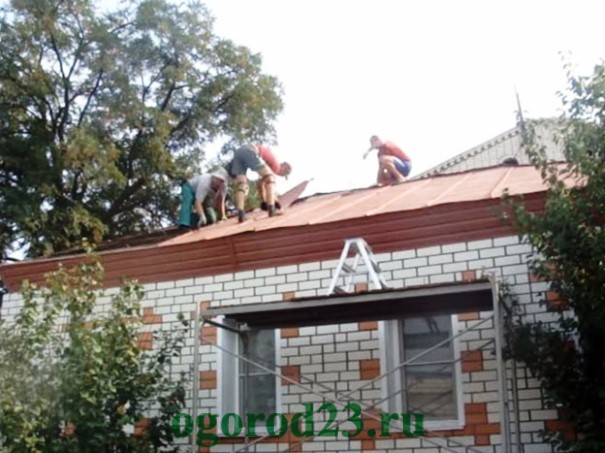
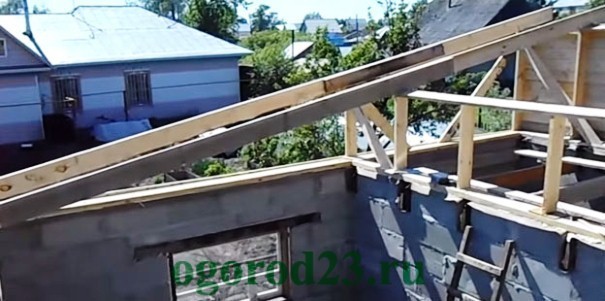 Shed roof rafter installations
The do-it-yourself workflow includes the following steps:
- Laying transverse rafters - they are attached to the Mauerlat (this is the basis - what the entire emphasis of the rafter system is on), the distance between the rafters is approximately 60-80 cm. Here you will need large nails (or anchors).
- A crate is attached to the rafters (it is made of wooden slats 50 by 50 cm), it provides rigidity, the roofing material is laid directly on it. The crate is placed at a right angle.
- Using a construction stapler, waterproofing material is attached to the crate (ordinary polyethylene film is suitable for this purpose). Fastening is carried out without tension, but with an overlap from the bottom up.
- The turn of thermal insulation follows (for example: mineral wool, fiberglass, balsam mats).
- Laying roofing material according to its individual characteristics.
Do-it-yourself pitched roof
Consider step by step the entire construction process:
Qualitatively laid, do-it-yourself rafters do not bend under a weight of 70-100 kg, if this fact was discovered during the check, then it is necessary to strengthen the frame.
The technology of laying the layers of the "pie" may vary due to certain circumstances, have some additions. Sometimes, for greater reliability, the waterproofing layer is re-placed on top of the insulation. It will not be worse from this, but in all cases special attention should be paid to fastening.
It is best to nail the film to wooden structural elements using flat-head nails or a construction stapler, the step frequency should be 15-20 cm.
One of the most important points is to secure the edges of the waterproofing material. It is brought under the roof overhang, the residual length must be at least 20 cm, after which it is nailed from below or, again, passed with a stapler.
It is best to take a wooden lath and knock it out with appropriate nails (in increments of 10-15 cm) - this is the so-called "folk" method of arranging a pitched roof. Thus, you will be sure that air currents will not penetrate under the waterproofing film, will not cause large-scale damage when strong winds invade.
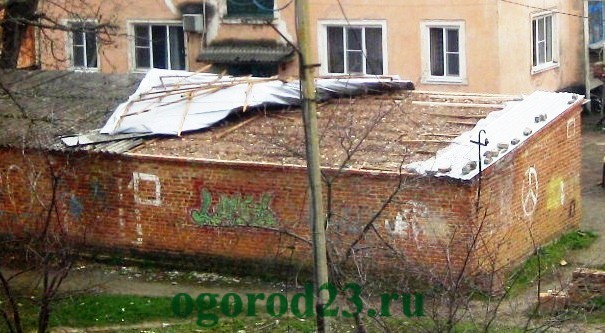 Errors fixing the edges of a pitched garage roof
In the photo above, the edges (overhang) of the roof were not securely fixed. In a strong wind, the metal profile sheet, together with the waterproofing film, was easily thrown aside like a light rag.
Shed roof - extension to the house
 Garage, as an extension, under a pitched roof
For garages, sheds, bathhouses, gazebos, this type of roof is most convenient. The shed roof construction provides a number of advantages for so-called ancillary structures.
 Fastening the truss frame of a shed roof to the wall of the house
If we consider the extension step by step, it will become clear that its roof is adjacent to the wall of a residential building. Thus, its rafter system is arranged separately from the house, the lower ends of the rafters are located on the front wall of the extension, but the upper ends are attached to the wall of the building. Here it is very important to ensure the proper connection of the truss frame of the extension and the main wall of the house. It is also undesirable to use too rigid fasteners, because the rate of shrinkage of the house and the attached building can be different. Because of this difference, cracks in the walls can then form.
In this case, it will be most convenient to lay the beams on a timber frame that is adjacent to the wall of the house (attached to the wall), and fill the place (seam) between the timber and the wall with polyurethane sealant. Do-it-yourself roofing material should be laid on the roof of the extension with an overlap, and also wound at the junction under the covering of the house. This is necessary so that later precipitation does not seep through the junction. Usually, a similar roofing material is used on the roof of the house and extension - for aesthetic reasons.
If you decide to build a barn with a shed roof, then arranging the roofing system with your own hands will not differ significantly from the phased construction method described above.
It happens that sheds are built from timber, in such cases the top of the log house acts as a Mauerlat. Otherwise, there are no significant differences in the truss system of shed roofs of different buildings.
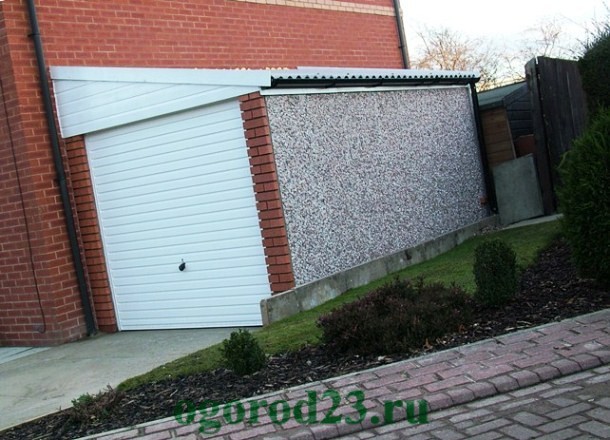
A shed roof for a garage is made using a similar method. 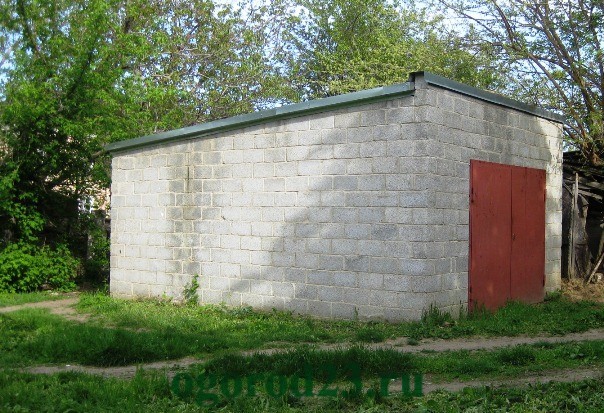 If the walls of the garage are built of brick, then the edges of the beams, rafter boards are embedded in the niches equipped for this. They are made in advance in the walls and negotiated at the design stages of the building. Wooden fragments are recommended to be wrapped with a waterproofing coating before being buried in these niches. At the same time, the interval of the rafters is 60-70 cm. The front wall of the garage is a high wall, from which the slope goes down to the back of the building, the entrance gate is located in it. The roof should protrude 30-40 cm from the wall, form a small overhang.
Taking into account the above information, it becomes clear that this version of the roof is practical, functional, structurally simple. A shed roof, equipped step by step with your own hands, can withstand powerful wind and snow loads. Such a roof will be warm, due to the small area for air penetration. If you did everything right, then it will faithfully serve you for more than a dozen years.


