A bathhouse is not as important a building as a residential building, for example, so many people decide to install it on their own. Of course, this requires some building knowledge, without which even a simple bathhouse will not be built at all or will not stand idle for a long time.
But a construction university is still not needed for such a task. The most difficult, responsible and expensive. About how to do without outside help when laying it, how to make it, fill it and will be discussed in this article.
Do-it-yourself foundation for a bathhouse: what will its walls be made of?
The load on the future foundation depends on the material of the walls. We believe that if the owner of the site decided to build on his own, then he would prefer the cheapest option. The cheapest will be a column foundation for a bath, which is not suitable only for brick and for those soils that push and overturn the pillars right in the ground - these are weak soils (peat bogs, for example) or strongly heaving (clay). Let's first figure out which foundation is suitable for a particular bath, and then there will be instructions for laying them.
For a bath from a felling, a bar
Any foundation is suitable for a bath from a log house and a bar because wood is not the heaviest material. You can put both tape, and columnar, and slab as needed.
Video
In the meantime, here is a video that fixes the stages of laying this type of foundation:
Do-it-yourself columnar foundation for a bath
IMPORTANT! This is the cheapest of the line of foundations. 1.5-2 times cheaper than tape.
Do-it-yourself columnar foundation for a bath can be of three types:
- shallow;
- bored(deeply buried);
- pile.
Let's start with the first one.
Shallow

The pillars are immersed in the ground by a third or half of the depth to which the soil freezes. This is only permissible if it is placed on soils that are not prone to heaving and inactive, for example, on sand and gravel soil.
1. Cleaning the territory and leveling the building spot. This item is the same as the tape item (see above).
IMPORTANT! Leveling is necessary so that later the bath does not warp.
2. markup. The pillars must fit at points of maximum load and evenly distributed between these points. Before starting the marking of the site, we draw something like this plan:

Then we transfer our plan to the site with the help of building threads and pegs.
3. Excavation. An individual hole is dug under each pillar. You can work not only with a shovel, but also with a manual cone-shaped drill, which gives smooth edges. The hole in the ground will be larger than the diameter of the pillar - at least 10 cm, but everything is determined by the convenience of the future laying of pillars, in particular for brick, the space expands for ease of laying. Walls should be made with slopes, expanding upwards. Consider the following typical dimensions for posts made of different materials:
- brick or stone - 50x50 cm;
- rubble stone - 60x60 cm;
- asbestos-cement pipe - 20 cm diameter;
- reinforced concrete support - 30-40 cm diameter;
- tree - 20 cm diameter.
The depth of the hole should be increased by the height of the sand and gravel cushion, which is usually 20 cm. The cushion should be spilled with water and tamped before installing the pillars.
4. Pole installation. Only one will be shown here. option with pouring reinforced concrete pillar. For other options, please visit.
So, first, in the finished hole with a pillow is placed formwork, which can be made from a board 40x150 mm, or from moisture-resistant plywood.
It is placed in the formwork frame from bars 12-14 mm in diameter. Horizontal jumpers are made in increments of 20 cm. The height of the reinforcement above the grillage is from 10 cm or more. For knitting reinforcement, use 6 mm wire.
Finally the concrete is poured. Do not fill it immediately, it is better in portions of 15-20 cm, followed by ramming of each layer.
5. Waterproofing. When the concrete hardens, it should be waterproofed with bituminous mastic and roofing material.
6. Grillage. In the event that reinforced concrete end beams are used, their joints should be additionally strengthened by welding trimmings of reinforcement.
The finished grillage also needs waterproofing.
The space between the pillars is sealed with a fence (brick or other wall).
IMPORTANT! Do not forget about the holes for ventilation and communications that are made in the intake.
Bored (deep)
The difference between this foundation and the previous one is only in how deep the well is drilled under the future pillar. When fully laid for a columnar foundation, this is the depth of soil freezing plus 40 cm. And the technological stages do not differ from those described for a shallow one.
Wells can be drilled using a hand drill, a gasoline drill, or by hiring special equipment. This is up to the owner.
IMPORTANT! This foundation does not need a sand and gravel pad.
Formwork in this case, it is better to make concrete pipes or plastic pipes, if the desired diameter is found. The well is drilled 10 cm wider than the casing.
IMPORTANT! If the drill hit a stone, you will have to move the support.
1. First, the casing pipe is inserted into the finished hole, the verticality to be checked.
2. Then reinforcement is already placed in the pipe so that there is another 5 cm to the pipe walls.
3. Poured concrete should be thinner than strip concrete and contain more cement (2 shares instead of 1).
4. After pouring, it is worth using a construction vibrator to expel air from the concrete.
5. The space between the pipe and the walls of the well is covered with earth in layers and rammed.
IMPORTANT! For greater stability of the pipe in a vertical position, it is recommended to throw a little concrete in a circle between the layers of the earth, about 10 centimeters (if there is an extra one).
6. The concrete hardens for two weeks, then the piles are leveled by the grinder (she must cut the reinforcement too)
pile
Do-it-yourself pile foundation for a bathhouse is also quite feasible, in fact, it can be considered a kind of columnar one. Only it is usually laid to a greater depth than the pillars - this is from 3 to 12 meters. The material of the piles can also be different.
- To independently lay a pile-screw foundation, you need go through the same steps, as for other species - to clear and level the territory, mark the points where the piles will be laid.
- After that, in order to facilitate the screwing of the pile into the ground, digging leader holes to a depth of 15 cm with a diameter of 2-3 cm more than the blades.
- Holes are drilled in piles for inserting rods. After the rods are inserted, they become a rotary handle, like a corkscrew.
- screw in pile should be constantly checked for verticality. The immersion depth must be below the freezing level of the soil and reach the bearing layer.
- When all the piles are screwed, a single level of them should be outlined. pruning. Cut the piles with a grinder.
- After that, to the tops of the piles are welded metal plates up to 1 cm thick, to which the grillage will be attached.
- Grillage can be welded or screwed bolts to the "hats" of the piles.
slab

1. Clearing and leveling the territory. Removal of fertile soil from the building site.
2. markup. Having outlined the dimensions of the future bath with construction thread and pegs, add 0.5-1 meter on each side - these will be the dimensions of the pit.
3. Sand and gravel pad poured on the bottom of the pit with a layer of 15 to 30 cm, leveled, spilled with water and compacted.
4. formwork. Removable formwork is done in the same way as for a strip foundation, but it can be made non-removable - from fiberglass slabs. In this case, the plates are fastened with ties and corners. Like removable formwork, this one also needs to be reinforced with struts.
IMPORTANT! Holes for communications are made at the formwork stage. If something is forgotten, concrete will have to be hammered.
5. Waterproofing. Polyethylene or geotextile is placed on the sand cushion. You can get by with ruberoid. It is important to make the joints of the waterproofing material with a good overlap and close the formwork with it too.
6. Reinforcement. Small baths can be reinforced with a mesh made of 8-10 mm rebar. The grid spacing is 10-15 cm. For heavier buildings, stronger reinforcement is needed - 12-14 mm. The same mesh is made from it. With a large thickness of the foundation, it is possible to reinforce several times.
7. fill. It's best to fill in one go. Pour slowly, evenly. Vibrator sealing is a must.
In a month and a half, the foundation will be ready for the next stages of construction. But in the first weeks it needs to be watered so that the plate does not crack when it dries.
Under the oven

The stove in the bath also needs a solid foundation, and if the foundation of the bath is not slab, then you need to think about a small foundation for the stove. However, there is a big difference whether your stove will be iron or brick. This is the difference in weight. Iron weighs a little - 300 kilograms, for example. And brick - can weigh an order of magnitude more. Therefore, there is a rule: a solid foundation is needed for furnaces whose weight exceeds 750 kg.
1350*V, where V is the volume in cubes.
Or, if it's easier, multiply the weight of one brick by their number. It is also necessary to add in excess of 40-50% to the solution, and the weight of the furnace will be obtained.
There are different options for implementing the foundation for a do-it-yourself oven. In order not to talk about this too briefly, we suggest that you familiarize yourself with.
How to pour the foundation under the bath with your own hands
Above a couple of times already talked about all the stages of work preceding, accompanying the pouring and following it. If this information was not enough, we recommend reading.
Bath without a foundation with your own hands
Yes, there are those too. Such a bath can be placed on rocky ground without any risk. In all other cases, there is some cunning in the definition of “without” - there seems to be no foundation, but to strengthen the foundation. It can be used as such:
- clay;
- sand and gravel;
- crushed stone;
- boulders.
In the first case clay fills the trenches, as for a strip foundation, becoming a support for the walls.
For rubble you need to dig a pit and drainage trenches that divert water. But in the end, a sufficiently strong and dry base is obtained, because a roofing material or other waterproofing agent is placed on top of the rubble.
Sand and gravel form the very pillow that is placed under the foundation, but here it does without the latter. It is made in the same way as from rubble.
boulders- an excellent foundation. But the pit will have to be dug. The stones are laid out along its walls and fastened with cement mortar. Small stones are piled between the walls. A grillage is made on top.
Do-it-yourself installation of a log cabin on the foundation
We consider this the logical conclusion of the topic about the foundation, but it’s better to read about it in the article about log cabins - one of the chapters is devoted to this issue.
In contact with
Russian real bath - what could be better for the body and for the soul? There is no person who would treat her indifferently. However, for each of us, this is something different, special: to relax, get together in a cheerful friendly company, warm up with a whisk, etc.
At the same time, even someone who has not previously been engaged in this kind of occupation can build it, since the procedure is very simple. There is a lot of useful information on the worldwide web, with which you can perform the task technically correctly. Let's take a look at how to make the foundation for a 3x5 bath with your own hands.
Choose a plot
Site selection plays an important role in construction. This stage must be approached responsibly, since the life of the object will largely depend on what surface it is located on. 
The area should be relatively flat. There should not be any boulders, stumps and other things there. Also, you must calculate its size in advance. As for our case, we stick to the size of 3x5. But keep in mind, the bath itself should have 3x3 meters and the dressing room should have 2x3.
Take into account possible landslides, subsidence, slope, etc. The ideal solution would be sandy soil, since it does not sag, practically does not move, so you can make a shallow foundation.
If you are going to carry out construction on clay or chernozem soil, then make the depth no higher than the level of soil freezing. It's about twenty centimeters. Do not forget to lay a sand cushion, which can protect against the movements that occur during frost heaving.
It is good if the site has a slight slope, necessary for the flow of melt and rainwater. It can be in any direction, the only exception is the north.
Preliminary work
Before starting work, it is recommended to level the site by removing the top layer of soil from it, using a long cord for this purpose. Make drawings and markup. 
Important! Do not forget that the width of the foundation should be ten centimeters more than the wall. The accuracy of the markup must be checked using a right triangle and a level.
The foundation is also important. However, given the fact that the structure is not heavy, you can do without a strip foundation, opting for small supports. In the corners it is necessary to build boxes that are needed to fill the pillars.
You can do all the work yourself or take the help of specialists. Their rates are different and depend on the level of skill of the person, his work experience and assessment of work.
Bath construction
After the cement mixture hardens, lay out the roofing material (pieces will do), thanks to them, dampness and moisture from the foundation to the walls of the building will be much less. 
Building the foundations for a 3x5 bath with our own hands, we lay out the basement row on the roofing material, using not pieces in length, but a solid beam, and in width - we use its segments of the required length. Be sure to make cuts at the ends of the material. This is necessary for overlapping.
Subsequent rows should be laid out without a dressing room. Then we cut off the necessary pieces of the bars you used and carefully fill their ends. On each row we lay the tape necessary for wall insulation. If you don't have jute, use moss.
We lay a solid beam every three or four rows to prevent the wall from pulling away. Then all the bars in the opening must be cut. The last row, as well as the first, is laid from a single beam, supports are made.
Strip foundation
If you want to play it safe and make a solid foundation, choose a tape one. It is performed for an object built from a frame, fbs blocks or bricks. It is easy to build, but a lot of material diverges here, since the filling is done around the entire perimeter. 
Making a foundation for a 3x5 bath with your own hands, make a quality foundation. This can be achieved using gravel, sand, water and cement.
It is very important to mix the components correctly, in the right proportions. At the same time, cement must be taken three times more than water, and sand is two times less than gravel.
- We make a sand cushion, using in turn a layer of sand and a layer of gravel. Each of them should have a thickness of about twenty centimeters. Do not forget to spill them with water;
- After you reach half of the trench, the pillow (sand) must be leveled and strong material should be laid well in a continuous row, for example, bricks;
- We make a removable formwork;
- We mix the concrete mixture, using a concrete mixer for this purpose;
- We install the reinforcing cage and fill the prepared solution to the intended height.
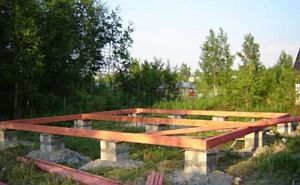
Column Foundation
In those cases, if you decide to build a bath from timber or logs, it is best to choose a columnar foundation. This option will allow you to save money during its construction, since in this case you do not have to fill the trench with gravel and sand and spend a huge amount of cement. However, a columnar foundation is not suitable for heaving soils. 
It is best to perform it from metal pipes, stone, wooden or brick pillars. Below is an instruction on how to make a foundation using asbestos-cement pipes. This is the best option for a bath.
- We make marks in the corners of the bath. You need to pay attention to those places where there will be the greatest load. In this case, the distance between the pillars should not exceed two meters;
- According to the marks, we drill one and a half meter wells. Their diameter should be about twenty-five centimeters;
- We insert pre-prepared pipes with a diameter of about twenty centimeters into the wells, it is recommended to wrap each of them with roofing material. Make sure the material is level. After that, we fill the empty space with earth;
- Pour concrete mixture inside each pipe. Leave fifteen centimeters to the top;
- We insert the reinforcing bar and fill the pipe, using concrete, to the very top.
Internal work
Before you start interior work, you need to decide exactly how you want it to look. Someone performs it in one restrained style, while someone prefers a simpler solution, trying to save a little on this. 
We collect the floor and ceiling from the board, which has a width of about forty millimeters. It should be taken into account the fact that the floors must be done regardless of the walls of the building.
Do-it-yourself foundation for a 3x5 bath (how to do it right)
In the article you will find step-by-step instructions for building a foundation for a 3x5 bath with your own hands
Do-it-yourself foundation for a bath: Step by step instructions
To build a bath is the first desire of most owners of private houses. But before construction, questions arise: what material to build, what should be the foundation, etc. If you decide to mount the foundation for a bath with your own hands, then this article will become an assistant and tell you in detail how to do it right.

Types of foundations for a bath
The bath is a lightweight construction, but there are two-story ones, you need to choose the foundation individually for each building, starting from the indicators:
- The massiveness of the bath
- Specifics of geodesy in the construction area.
- The material from which the bath will be assembled.
- Monolithic. This is mounted on floating soil with high-lying GW (groundwater).
- Columnar or pile-screw. It is used for wooden baths made of timber or logs, suitable for sandy soil.
- Tape. The most common option is used on soil with deep GW.
- Mixed type (tape + pile). They are rarely used for baths, suitable for soil with quicksand, high occurrence of GW.
Depending on the material used, the foundation at the bath may consist of:
- from brick;
- concrete;
- from blocks;
- cast or screw piles.
 The foundation for the bath is in most cases lightweight, then the installation is done by hand. Of course, there are companies involved in the construction of turnkey baths at a price of 10,000 m2, but in order to save money, it is easier to do the work yourself. How to make a foundation for a bath of various types, we will talk below.
Do-it-yourself installation of the base under the bath
Each of the listed types of foundation for a bath has its own characteristics, they need to be considered separately. The only thing that unites the work is the choice of a place for construction, the preparation of a project plan.
How to choose the right place for laying the bath
The choice of a place for the construction of a bath must be taken seriously. The structure is not built for one year, it must be located correctly. There are several types of bath location: an extension to the main house, a separate bath. If the bath is an extension to a residential building, the foundation for it is carried out similarly to the main one with binding. You should not make screw piles when the main house is on a strip foundation.
A separate bathhouse means choosing a place away from trees and other plantings. The bath will be heated, smoke, sparks are not useful for fruit trees.
 Why is a project needed?
Building a bath with your own hands requires preliminary planning. Regardless of whether the building will be registered in the future or not. The easiest way is to use a typical project, there are many of them on the net. Photos are attached to any of the typical projects. Photos are necessary to understand and present the construction in more detail.
Planning also includes an estimate, where all costs and the necessary material are calculated in order to start building a foundation for a bathhouse with your own hands.
Installation of strip foundation
 A strip foundation for building a bath with your own hands can be done in several ways. The future platform is preliminarily marked on the site, a trench is dug along it to a depth of more than 50 cm, 4–5 cm wider than the intended brick or timber masonry. It is better to start digging a trench in the summer when groundwater has the lowest level of occurrence. The course of subsequent work depends on the option chosen:
- A pillow is made of gravel and coarse sand. Each layer is rammed, should have a thickness of 15 cm. You can use a ready-made mixture of PGS, but it costs more. For better compaction, sand is recommended to be shed with water. A liquid cement mortar is made (should resemble sour cream), spilled onto a sand cushion. A brick or rubble stone is mounted on the base. This will be a strip base mounted with a brick. Between every second row lay a masonry mesh. Waterproof with roofing material (2 layers).
- Another way begins with filling the pillow from ASG to half, it is rammed in exactly the same way as in the first case. It is important that the surface of the pillow is level. The next step is to lay bricks in one row. After that, formwork is mounted from boards and timber 40x40 mm. The height of the formwork is more than 40 cm. Concrete based on moisture-resistant cement is poured into it.
- The method is used for dense soil. Formwork is installed from dense material and timber, such as slate. It is necessary to lay slate sheets with an overlap of 8-10 cm for the tightness of the formwork. Sand is poured into the formwork, which is rammed. The next layer is filled with gravel, half of the dug trench. The sealing structure is filled with water. Then the concrete begins to be poured. The concrete layer should be no more than 150 mm. It is necessary to fill with concrete before the appearance of a liquid cement solution on the surface.
 For uniform drying, the foundation is covered from above with sawdust, burlap, even PVC film is suitable. Once in essence, the structure is unwrapped and again watered. So, she must stand under isolation for three days. Then the foundation for the bath is opened, allowed to dry completely, to settle. The minimum drying time is 2-3 days. After it can be covered with waterproofing, for example, roofing material in two layers.
For work on the construction of a foundation for a tape-type bath, several factors must be taken into account:
- The height of the pour above ground level should be 20–40 cm. It depends on the level of occurrence of the GW and the material from which the walls are assembled, so for a bath from a bar, the height of the base should be greater, since the tree does not like moisture.
- Silicate brick is not suitable for building a foundation; over time, it collapses from moisture. Red ceramic is made at high temperatures and humidity is not terrible for him.
- The tape has a width of 25–50 cm and depends on the material from which the bath will be built.
- Concrete can be purchased ready-made, but it will be cheaper to make it yourself.
- sand (preferably coarse-grained, it is pre-cleaned) 5% moisture - 1150 kg;
- portland cement (moisture resistant) - 400–500 kg;
- crushed stone (small or medium) - 1800–200 kg;
- water - 170–175 l
You can also calculate the amount of concrete on the foundation of the bath yourself. For example, a strip foundation with a height of 0.3m and a length of 19m contains 0.3x0.3x19 = 1.71 m3. Similarly, any volume can be calculated. But be sure to additionally take into account that a foundation is also needed for the stove, so you need to add another reserve of 0.3 m3 to the resulting volume.
Installation of a column foundation
 The simplest type of foundation for a bath is made of timber, chopped or rounded logs. A good option for any type of soil, especially in hilly areas.
The design consists of pillars, which are located at the corners of the future bath, under all load-bearing walls. The distance between the posts is a maximum of 2 m.
It is not difficult to make a columnar foundation with your own hands, you can use:
- wooden or metal, asbestos poles;
- laid out brick columns;
- filled piles;
- screw poles.
An inexpensive option is wooden poles, but before use they must be dried and treated with tar or a deep penetration antiseptic, such as Senezh. For a columnar foundation made of wood, it is better to use larch or aspen, since these types of wood are not afraid of water and when wet, they only become stronger. Installed in pre-drilled holes, where sand or ASG is poured, fixed with concrete pouring.
 Brick columns are the most time-consuming type of do-it-yourself foundation for a bath. But with some effort, this work can be done. A diagram of this can be seen in the figure.
The location of the posts is marked, the top layer of soil is removed and a hole is dug, 10-20 cm wider than the future pillar in diameter. A sand cushion of at least 15 cm is laid. A column of bricks is mounted on top in two rows.
Do-it-yourself concrete piles are most often installed, since the work, although time-consuming, does not require special skill. Wells are drilled with a depth of at least 1.5 m and a diameter of at least 250 mm. Connected reinforcement frames are laid in the holes. They are knitted in advance from reinforced rods of 3 pieces, short connecting and knitting wire. The structure is poured with concrete. A brick column is laid out on top of the pile.
You can simplify this design by taking an asbestos pipe with a cross section of 200 mm and installing them in wells. Concrete is poured inside the pipe. The gap between the pipe wall and the well is filled with clay or gravel and rammed.
Concrete must be poured into the pipe gradually. The first time the filling is carried out by ⅓, since the pipes will then lift a little. In the second stage, another ⅓ part is poured and iron fittings are inserted inside. Only after that the rest is poured. Such a foundation dries completely in 5-7 days.
Another option for pillars is screw piles. They are sold ready-made and have blades. They are screwed into the ground with a beam. The only negative is that it is impossible to do the work with your own hands alone. You can screw to different depths, which is good for uneven surfaces.
Installation of a monolithic foundation for a bath
 The type of foundation is used for any soil, but most often if there is a swimmer. The design is expensive, but the pressure on the ground is evenly distributed and the bath will not warp over time. There is no need to install a separate pillow and foundation for the stove. The structure is either poured with concrete on a mounted reinforcement frame, or ready-made reinforced concrete slabs are used.
Do-it-yourself installation of a monolithic foundation for a bath is carried out in stages:
- A trench is dug to the width of the foundation and a depth of 80–60 cm.
- A pillow of sand and gravel 15 cm is poured at the bottom.
- Waterproofing is covered, for example, roofing material. There can be 2–3 layers, the main thing is that there are no uncovered areas, with an overlap of 10–15 cm.
- Then formwork and reinforced girdle are made, which are again poured with concrete.
- It is important to think about where the drain will be before pouring and it will be more difficult to install the pipe after hardening.
Only the owner can choose the desired foundation option. At this moment, you need to build on your strengths and material capabilities.
Do-it-yourself foundation for a bath
The foundation for a bath with your own hands, what types are there and how to build them, a step-by-step description of work with photos and videos.
Do-it-yourself strip foundation for a bath, step by step instructions
 An integral part of any building, including baths, is the foundation. The principle of pouring the base is no different from laying the foundation for a residential building. The category of the foundation for a bath is determined based on the following factors:
- Load on land. In most cases, a bathhouse is an oversized building. Naturally, the load from its structure will be less, which means that there is no need to lay too massive a foundation.
- Soil features. The soil under the building may be heaving, or slightly heaving. The groundwater level can be deep, or lie close to the ground surface. The soil is sandy, clay, black earth, and so on. Each of them contributes to a certain coefficient of shrinkage of the building. This should be taken into account when determining which foundation to fill.
Before you get acquainted with the step-by-step instructions for pouring the foundation for a bath with your own hands, you need to consider the features of the main types of foundations that are used in this case.
Foundation types
The main rule that should be taken into account when choosing a monolith for a bath is small overall dimensions, but strong enough to cope with the load from construction. The design of such a base is simple enough to do the work with your own hands. In this case, use:
Phased work
The time has come to do the work on pouring the foundation under the bath with your own hands. The step-by-step instruction contains a description of the following work:
- The choice of a place for filling.
- Site preparation.
- Digging a trench.
- Concrete works.
Before starting the preparatory work, it is necessary to have a project of the future bath in hand. This is necessary in order to determine exactly what size the foundation should be, even if all the work will be done by hand (without using the services of a construction team).
Location selection
The bath can be free-standing, or an extension to the main building. Wooden arbors should not be placed near it (a spark can cause them to ignite). The building should stand at a distance from fruit trees (smoke will harm their branches, foliage and fruits). Compliance with this rule ensures fire safety during the operation of the building.
If the design of the building allows it to be built near the house, then the foundations of both buildings should be identical. In the case of a free-standing bath, its foundation can be of any structure (tape, slab, etc.).
Site preparation
The next step is to prepare the site for excavation. If a tree grew on the site where the building will be located, be sure to remove the entire root system so that it does not grow inside the building or destroy its foundation. Useful soil can be previously removed. It can be used for bedding in flower beds, or laying out lawns. During concrete work, cement mortar can damage the fertile soil layer. Therefore, they should be carried out as close as possible to the building itself (ideally, inside the future room).
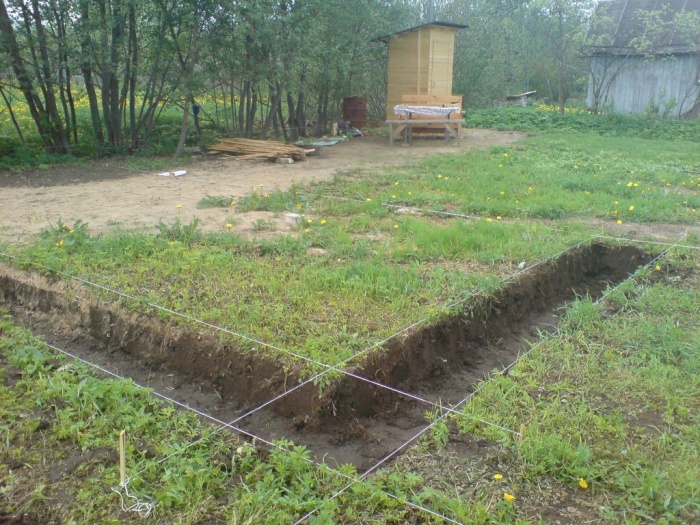
trench digging
Earthwork is a very important preparatory process before pouring the foundation with your own hands. At this stage, you need to know the depth and width of the future base. In most cases, a shallow tape monolith is sufficient.
 Foundation trench
The walls of the trench will act as formwork. Therefore, they should be as even as possible (in order to avoid overspending material). During the execution of work, the earth can be thrown inside the future building. This will make it easier to level and raise the floor level. One of the most important elements of the foundation of any building is backfill. Mostly sand is used for this.
It should be well compacted (with a vibrating plate, or with a vibrating foot). If the area has a high level of groundwater, then at this stage it is necessary to take care of waterproofing. In the old days, a layer of clay was covered under strip foundations and strongly compacted. Then a small layer of liquid clay was poured. After it stood, concrete work was carried out. This is the cheapest option for waterproofing. But today there are inexpensive materials on sale that are ideal for protecting the base of the building from groundwater.
The final stage of the preparatory work is the installation of formwork for the strip foundation, or basement. For convenience in pouring the monolith, its height should correspond to the level of the future foundation for the bath.
Concrete works
Each type of foundation requires its own procedures. Therefore, further in the step-by-step instructions for pouring the foundation of the bath with your own hands, each type of foundation will be described separately.
The grade of concrete for such work must be at least M200 (220 liters of water, 324 kilograms of cement grade 400/500, 1296 kg of sand, and 1296 kilograms of crushed stone of fraction 10 are taken per cube of the mixture). Be sure to reinforce the monolith layer so that it is stronger. For this, reinforcement with a diameter of one centimeter is sufficient.
Shallow-depth tape
The strip foundation is used on dense soil. If the ground is not prone to heaving, such a foundation will be sufficient to support the structure of the building. When choosing this method, you need to consider that its use is only permissible on relatively flat areas. The depth of the trench should be 20, 40, or 60 centimeters. You can dig it yourself without using an excavator. At the bottom of the trench, a bed of sand is made and compacted. Its thickness is 20 centimeters.
Then the frame of the reinforcement is connected. It must be placed on small stones so that after pouring it is completely in the monolith. After the waterproofing has been laid, the armored belt and formwork have been mounted, concrete can be poured. To do the work with your own hands, the solution is prepared according to the following proportion: two buckets of sand are taken per bucket of cement, and three buckets of crushed stone.
The tape version must be firmly tied with rods. At the corners, a piece of reinforcement should be bent in half, and not tied up with another rod. The strength of the monolith will depend on this.
Column Foundation
Unlike a tape monolith, this type of base is easier to do with your own hands. To do this, during the preparatory stage, a shallow trench breaks out (this will be the bottom of the basement). Further, a well is drilled to a depth of 1.3 meters. Sand (thickness 30 centimeters) is poured onto its bottom, and compacted. After that, a frame of reinforcement is connected, and placed in a well.
Do not immediately fill the entire cavity of the well, otherwise voids will form in the concrete at such a depth. To avoid such difficulties, concrete should be poured gradually, followed by compaction with a vibrating finger. This support should be left to harden for about a week. After that, the pillars can be connected to each other by installing bars, or channels. If the support is not filled evenly, you should not try to pull it out in order to subsequently install it correctly. To level the support, it is necessary to cut off the upper part of the column, bringing it under the level.
slab foundation
Such a base for a bath is used in the case of a high level of groundwater, or in the presence of floaters. During the preparatory work, the entire area where the building will stand is cleared. The soil thickness corresponding to the thickness of the monolithic slab is removed. At the bottom of the "trough" sand is poured and compacted. Then a waterproofing film is laid.
After that, the frame of the reinforcement is connected. To make it easier to do this work with your own hands, first two grids are knitted with a cell of 30-40 centimeters. The first is laid on stands (so that it does not lie on the sand) at the bottom of the pit. The second mesh is attached above it at a distance of 15 centimeters using reinforcing bars. It is necessary to fix these elements with a flexible knitting wire. Watch the video on how to make a slab foundation for a bath.
After performing such work, the entire plane is poured with concrete. The peculiarity of such a foundation is that the weight of the building is distributed over the entire plot of land. Therefore, it does not sag, even if the bath is built on unsteady soils.
Regardless of the type of foundation, be it tape, slab or any other, before pouring the monolith across the structure, you need to place a plastic pipe filled with sand. This mortgage will allow plumbing communications to be brought into the bathhouse building.
Do-it-yourself foundation for a bath, step by step instructions
How to properly fill the strip foundation for a bath with your own hands: step-by-step instructions, basic technological methods, material consumption.
How to build a foundation for a bath
The construction of the foundation of the bath is an important stage on which it depends how functional the structure will be. This is the selection and preparation of the site, formwork, concrete pouring, erection of walls and roofs.
Preparation for the construction of the bath
Until the time when the bath is usable, a lot of time will pass. The most time-consuming is the stage of building the foundation. It takes from 3 months to a year.
Main stages of construction:
- Development of a drawing of a structure and a layout plan on the site.
- Procurement of materials and preparation of tools.
- Building a foundation.
- Building walls, installing windows, doors, stoves.
- Roofing.
- Bath interior.
The foundation, as the basis of a future structure, requires a responsible approach to the choice of site, materials and the quality of construction work.
What type of foundation to choose
Depending on the type of soil on the site, they decide which foundation to build, to what depth to deepen.
The main types of foundations for a bath:
- pile - used on uneven surfaces with a large elevation difference, when there is a risk of flooding;
- tape - the most common type used on flat areas and on most types of soil;
- tiled - suitable for heaving soils, wetlands.
Information about what kind of soil is present on the site for the construction of a bath will be found out through geodetic research. Or they dig a hole with a depth below the freezing point (about 2-2.5 m) and determine the composition of the soil by layers.


What to make the foundation of the bath
Strip foundation, as the most common type of foundation, can be:
A monolithic structure based on reinforcing mesh and concrete is the most durable, withstands high loads. Block and brick gives savings of up to 20%, but is not suitable for construction on heaving soils.
On soils that are dominated by sand and clay, install a tiled foundation. This will help to avoid deformation of the walls and roof of the bath due to natural swelling of the soil.
To build a strip foundation you will need:
- concrete mixture of water, cement, river sand, crushed stone;
- granite crushed stone 10-20 mm fraction, grade not lower than 400;
- fittings;
- wire;
- formwork material - wooden boards, chipboard;
- nails;
- roofing material or PET film;
- pipes for vents and drains;
- sand and fine gravel for a pillow;
- old metal buckets, beams, pipes, stones, pieces of concrete - to save materials and strengthen the foundation.
Step-by-step instructions: strip foundation for a bath
The main stages of work in the construction of the foundation for the bath:
- Bath site preparation. Markup.
- Digging a trench. Cushion padding.
- Formwork and trench reinforcement.
- Pouring concrete.
- The final stage of work: dismantling the formwork and sprinkling the foundation with soil.
Preparation of the site for the bath
Remove from the site, which is intended for the construction of a bath, garbage, dry grass and leaves. If trees and shrubs grew here, remove the roots completely.
If the ground is uneven, holes will need to be filled or protruding parts cut off. On a site with a significant difference in heights, a pile foundation is mainly installed. With a slight difference in height, the base is made according to the level in the horizontal plane.
Fertile soil with grass and roots is removed from the foundation site. Usually, 10-15 cm of the top layer of soil is removed for this. At the same time, the earth is removed from all sides by another 0.5-1 m. So, the site will be slightly larger than the design size of the foundation.
Preparation of a trench for a bath
Mark up the future foundation. To do this, drive in metal rods at 4 corners of the future bath. Pull the nylon thread around the perimeter, bring the level horizontally, fix it. Measure the estimated width of the foundation and drive 4 more rods into the inner corners. Pull the thread, bring the level, fix. Check the correct installation of the rods and the tension of the cord: measure the diagonals. If the corners are drawn at 90 degrees, the diagonals will be the same in length.
Dig a trench, focusing on the thread. Trench depth: + 20 ... 30 cm to the depth of soil freezing (buried foundation); up to 60 cm (shallow). The bottom is leveled with a leveler.
Lay a pillow at the bottom of the finished trench. To do this, pour fine sand evenly in a layer 15-20 cm thick. Level and pour. Compact the wet sand using a vibratory rammer. This work can be done with a heavy bar with handles.

Formwork and foundation reinforcement
Before installing the formwork at the bottom of the trench, a layer of broken bricks and coarse gravel are laid on the sand. This is done so that the metal frame of the foundation does not touch the pillow. Sand is a porous building material that retains and releases moisture well. Therefore, with constant interaction, the reinforcement rots and collapses.
Prepare the formwork: make shields from unedged boards and chipboard, knock down with nails, connect with screws, tie with wire. Frame height - 45 cm above the level of the trench.
The foundation formwork is a temporary frame for liquid concrete. Therefore, fasten the shields in such a way that, without damage to the base, they can be removed after the building mixture has solidified.
For reinforcement, use metal rods and wire to tie them together. Welding in this case is not the best solution, since corrosion will primarily affect the welded surfaces.

Frame reinforcement must be uniform. A common laying option is two rods along the trench and the installation of vertical metal pins on both sides of the trench every 20-30 cm. At the intersections of the reinforcement, a wire knot is made. The metal frame is finished with two rods fixed on vertical pins at the top. To save on concrete and strengthen the foundation, any metal products are added to the frame: old buckets, agricultural tools, channels, wire remnants, scrap.
Do not use non-ferrous metals, products containing lead, radioactive substances in the foundation.
pouring concrete
To fill the foundation, a mixture of sand, cement, gravel, water is prepared. Proportions of concrete:
- 1 part sand;
- 1 part cement;
- 1.5 parts gravel;
- the mass of water is not less than 60% of the entire mixture.
- cement grade not lower than M-200 - in warm weather;
- not lower than M-400 - in the cold.
In summer, in the heat, the water is cooled so that the concrete hardens evenly. In the cold season, on the contrary, the mixture for pouring the foundation is prepared in warm water.
The concrete mixture is poured directly into the metal frame. In order to evenly distribute the liquid mass in the formwork and remove air bubbles, holes are periodically made with a shovel, crowbar, metal rods. Instead, special vibrators are often used. The less air remains inside the foundation, the stronger and more reliable the base of the bath will be.
It is not allowed to get into the concrete mixture of earth, branches, organic debris, and other chemicals.

Formwork dismantling
Concrete shrinkage occurs within 3-12 months. It depends on weather conditions, the consistency of the mixture, the brand of cement, the quality of the fill. After the preliminary hardening of the foundation, the formwork is removed (after 3-7 days).
The cavities in the trench, left over from wooden shields, are covered with rubble and soil. To drain groundwater, drainage is arranged: special perforated pipes are laid on the bottom along the perimeter of the foundation and taken to the site.

After creating a solid foundation within 7-30 days, an experienced builder will finish the bathhouse and hand it over on a turnkey basis. The erection of walls, roofs, interior decoration, installation of windows, doors, stoves - these stages take place much faster than pouring the base. However, each of them requires certain skills and the involvement of additional labor. If you can handle the foundation with your own hands alone, then at least two people will be required to lay the roof. To install a stove, ventilation, chimney, you will need an experienced stove-maker, and a good carpenter will help you finish the interior of the bath with natural wood.
Building a bath: step by step instructions - do-it-yourself foundation, video
How to build a foundation for a bath Building a foundation for a bath is an important stage, which determines how functional the structure will be. This is the selection and preparation of the site, formwork, pouring
In this article we will talk about how to make a foundation for a bath with our own hands, we will consider options for a strip and column foundation.
Before building the foundation, it is necessary to determine the type of foundation, based on the type of soil on the site. If a house was built before this, then the type of soil is already known.
- Wet or bulk soil requires a strip foundation.
- Clay soil - columnar.
- Soil with a height difference - screw.
- On swampy soils, the foundation must be chosen monolithic.
The most optimal options are strip and column foundations. The choice of them can be made at the stage of deciding which building material the bath will be built from.

For example:
- if it is supposed to build a bath from blocks or bricks, a strip foundation is required.
- if wooden timber or logs become the building material for the bath, a columnar foundation will do.
Belt construction
- tape measure, cord, wooden stakes;
- shovel, fittings in the form of metal rods and light wire for tying it;
- sand, cement and gravel for making concrete mortar.
First, you need to mark the corners of the perimeter of the future bath with stakes using a tape measure. A stretched rope will help to get an even foundation.
![]()
Along the perimeter of the future bath, you need to dig a trench with a depth below the freezing level in the area. The width of the trench must be at least 30 cm. Its outer edge must pass along the markings made using stakes and rope.
At the bottom of the trench, you need to pour 20 cm of sand and gravel mixture, spill it and compact it well.
Reinforcement is laid on top - ready-made metal gratings, the thickness of the rods in which is at least 1 cm. If the reinforcement is separate metal rods, they can be connected to each other using soft wire.

After installing or laying the reinforcement on the prepared bottom of the trench, you can start filling it with concrete mortar. It is advisable to arrange the reinforcement so that it does not touch the edges of the trench and at the same time does not rise above the soil surface.
For a bath, it is advisable to use high-grade cement and fine-grained sand - this will provide additional strength to the future building.
If the strip foundation is to rise above the ground, a formwork of wooden boards must be installed before pouring the concrete mix. After a few days, the formwork can be removed and the foundation left to dry for another week or two.
Construction of a columnar

If a columnar foundation is required, the following building materials and tools will be required:
- stakes, tape measure and twine;
- manual or electric drill;
- piles - wooden poles, asbestos-cement or metal pipes or bricks;
- cement, sand and gravel.
First, the territory is marked out: the pegs are located at the corners of the perimeter of the future structure, a rope is pulled between them.

Places for poles are marked: each hole should be located at a distance of 1-1.5 m from the previous one. This distance must be observed for both external and internal load-bearing walls.
When using wooden logs, they must first be treated with an antiseptic to prevent premature decay of the building material.
If pipes with a diameter of 20 cm - metal or asbestos-cement - act as the base of the foundation, they must be poured with concrete mortar during the arrangement of the base for the bath.

First, with the help of a manual or electric drill, holes in the ground are organized in the marked places with a depth of 1.2 to 1.5 m and a width of 25-30 cm.
A 20-30 cm layer of sand and gravel cushion is placed at the bottom of each hole, it is spilled with water and carefully compacted.
A processed wooden pole or pipe of the required height is placed on the prepared bottom.
Reinforcement is placed in the middle of the pipe or around the pole, after which the pipe is poured with concrete, and soil is compacted around it, as well as around the pole.

If the bath is made of timber, then for such a building you can choose the following types of foundation:
- tape;
- columnar;
- monolithic.
Consider the features of their construction directly for a bath from a bar.

Concrete is poured along the planned perimeter. It has the following positive characteristics:
- This type of foundation is able to withstand two floors, since its design is quite strong.
- It is very beneficial for the construction of a bath, as it has a low level of thermal conductivity.
- There is an opportunity to build an underground room or cellar.

If the bath will have a small size and moderate weight of the structure, then a columnar foundation can be made. Mostly this type of foundation is used for the following types of soils:
- clay;
- gravel;
- sand.
Some of its advantages can be highlighted:
- Relatively low cost for construction.
- If the soil in your area is sloping, then the columnar foundation will allow the construction of a bath.
- It is very easy to manufacture, so you can completely do without the help of specialists.

This type of foundation is relevant for any type of soil. Its design is a reinforced concrete monolith. Among its advantages are:
- High strength and reliability.
- You can build multiple floors.
The main disadvantage of a monolithic foundation is the high cost.

A frame bath means the use of ready-made frames for quick construction. Given these and other features of such a building, let's compare the advantages of manufacturing a strip and column foundation.

It is important to understand that the construction of a frame bath implies the arrangement of sufficiently thick foundation walls to hold the entire building. Depending on the material used, the thickness of the foundation may be different:
- Reinforced concrete - thickness from 10 cm.
- Natural stone - from 5 cm.
- Concrete - from 25 cm.
- Flagstone concrete - from 30 cm.
When building a foundation, it is imperative to deepen it to a level below the freezing of the soil up to 20 cm. On the other hand, it makes no sense to equip the foundation with a depth of more than 70 cm. From this it becomes clear that the strip foundation is divided into two categories:
- Finely recessed.
- Buried.
For the construction of a frame bath, it is enough to use a shallowly buried foundation up to 60 cm deep.
Features of the column foundation

Although the strip foundation has many advantages, it is used in most cases for buildings made of blocks or bricks. Therefore, if the bath is wooden, then you can stop on a columnar foundation. During its construction, you will need much less financial costs for the source material.
Such a foundation is especially relevant for the construction of chopped, cobbled and frame structures. Since in the interval between the pillars there is no need to build special jumpers.
However, if the soil is weakly bearing, then this type of foundation is not relevant. If you want to equip the basement, then with such a foundation it will be problematic to do so.
Foundation for the furnace

If you plan to install a brick oven in the bath, you need to organize your own foundation for it.
At the site of the future location of the stove, a hole in the ground is prepared with a depth of 50 cm. If one of the foundation pillars is provided in this area, then it is not installed to its full height, but at a depth of 50 cm from the surface it passes into a square or rectangular mini monolithic base.
The bottom is covered with a sand and gravel cushion, compacted, and reinforcement is placed on top. At the end, the hole is filled with concrete mortar.
Video
Photo


Every owner of a country house or cottage dreams of his own bath. Any construction begins with laying the foundation, because it is it that must bear the entire load from the weight of the structure. It is not difficult to make a foundation for a bath with your own hands; you can save a lot on this part of the building. After all, the construction of the foundation already costs the owner 40% of the cost of the entire bath.
How do-it-yourself foundations for a bath are being built with step-by-step instructions, photos and videos will be shown in this article.
Where to start work
Regardless of what type of foundation is chosen for the construction of the bath, the first step is to prepare the site for construction.
All stumps are uprooted from the ground, large stones are removed, and other debris is removed. It is better to mow or pull out the grass on the site so that there are no roots and stems left. Then the entire turf is removed from the site - the top layer of soil and removed to the side.

Now we need to markup. To do this, use metal rods, such as reinforcement, and a strong inelastic rope. The most important thing at this stage is to set aside a right angle. This can be done with a large construction square or improvised means.
Important! Each side of the foundation should be 5-10 cm larger than the intended perimeter of the building.
Choosing the type of foundation
You can determine which base is more suitable for a particular bath, based on several factors:
- depth of groundwater;
- type of soil on the site;
- the depth of freezing of the earth in the winter season;
- building material;
- bath area.
A phased analysis of all components will help determine the most reliable foundation for the construction of a particular bath.
Most often, they use a tape shallow foundation for a 4x6 bath. However, this is far from the only option. You can also apply:
- pile-screw - they are being built when the construction site has strong elevation changes;
- columnar - suitable for stable soils on which there are no landslides and shifts;
- pile-grillage- applicable for unstable soils prone to shifts and shedding;
- monolithic - universal, is the most reliable, but, at the same time, the most expensive in terms of cost. A solid concrete slab evenly distributes the loads from the bath, the soil does not sag, and the building does not deform or crack.

All are used for the construction of baths, but most often, nevertheless, they use columnar or tape types of foundations - they will be discussed in more detail.
How to arrange a columnar foundation for a bath
It is quite possible to make a columnar foundation for a 6x4 bath with your own hands. Such a base is especially suitable for lightweight buildings made of timber, logs, foam or aerated concrete.

Attention! The foundation of wooden logs or timber must not only be carefully waterproofed, but also treated with an antiseptic to prevent decay.
Columns can be constructed from the following materials:
- bricks;
- concrete poured into prepared formwork;
- asbestos-cement pipe;
- metal pipe;
- solid concrete slabs;
- wooden logs or beams.

Advice! Whatever material the pillars for the foundation are constructed from, they must be carefully waterproofed. For this, roofing material or bituminous mastic is used.
More often than others, pipes are used for a columnar base: metal or asbestos-cement. The description of the installation process looks like this:


Attention! The cost of a column foundation is much lower than the construction of a strip foundation. And the strength of such a foundation is quite enough for a small bathhouse made of wood or other light material.
Construction of a strip foundation
For small buildings, such as a garage, a summer kitchen, a bathhouse, you can arrange a shallow strip foundation. In order to calculate the depth of the trench for such a foundation, it is necessary to study the composition of the soil on the site.

If the soil is stable - not crumbly, moderately moist - a trench about 40 cm deep will suffice. For more unstable soils - chernozem, peat, sandy - this value should be increased to 70-80 cm.
The width of the foundation depends on the material of the walls of the bath: 25 cm will be enough for light structures, and at least 35 cm is required for stone or brick walls. The trench itself, at the same time, should be even wider - about 5 cm.
A step-by-step description of the process of laying a strip foundation for a bath looks like this:
Attention! For the construction of the foundation on the street there must be a positive temperature - optimally up to +5. If it is too cold, the concrete will harden unevenly, causing it to become brittle.
When building a concrete foundation, it is important to remember that any air bubbles in the thickness of the solution will sooner or later lead to the destruction of the material. Therefore, concrete can be poured from a height of no more than 50 cm, and after pouring, compact it with a vibrating machine or, at least, pierce the solution with a rod in several places.
The construction of a bath begins with laying the foundation. From how well it was done, the entire period of its operation depends. An important role is also played by the choice of its type. It must not only withstand the main structure of the building, but also perform the functions of hydro and thermal insulation.
In order to lay the foundation for a bathhouse with your own hands, you will need to follow the technology and perform the work in the correct sequence.
Preparatory work
Before excavation, you should choose a place for the construction of a bath. Usually, a site is selected that is remote from outbuildings, closer to the reservoir, if any, the windows are displayed on the sunny side, and the doors are located in such a part of the building that what is happening in the bath is not visible from neighboring sites. At the same time, the soil must be dense in order to reduce the cost of concrete and reinforcement. The presence of groundwater close to the surface is undesirable, and construction on a peat bog or fine sand is generally excluded.
To find out the required depth of the base, you should contact surveyors who can give a qualified assessment of the terrain and layers of the earth. But many do otherwise - they themselves dig a hole and roughly estimate its bearing capacity.
Note! Under the bath, a hole will have to be dug 2/3 of the depth of the foundation for the house, taking into account the sand and gravel cushion.
- In the selected place, the surface is cleaned of debris and vegetation.
- Then the required area is marked with pegs, and only after that the foundation pit is dug. The geometry of the pit depends entirely on the type of foundation chosen, but is performed along the perimeter of the bath.
- Mark the site starting from one of the corners of the bath. A wooden peg is driven in, and then the length of the structure is counted from it in one direction and a second peg is driven in there. Then, at a right angle to the future wall, the required width of the object is measured from the starting point. At the end, measure the distance to the fourth corner.
- A rope is pulled over the pegs around the perimeter for the convenience of earthworks.
- After that, in accordance with the construction plan, a separate hole is dug in the proposed location of the furnace for pouring the base of the furnace.

Note! Two main types of foundations are installed under the bath: tape and columnar. Both of them are able to provide a long service life for a bath, but they have a significantly different consumption of building materials. To save finances, a columnar one is erected on dense soil, and a tape one is used on loose and loose soils, as well as in the construction of heavy structures.
The columnar foundation is a separately dug-in pillars around the perimeter of the bath, and, if necessary, inside the perimeter. Pole material can be selected according to its availability and cost in a particular region of residence. The most common are wooden, brick and monolithic pillars.
Wooden poles. They are the easiest to install, their installation will take a minimum amount of time. Although it will take some time to shrink.
A tree of dense species is suitable, which does not have knots, cracks and other defects, and is fairly even along the entire length. It is desirable that the outer surface of the logs is not cut off, otherwise the post will not have natural protection from external influences, and it will deteriorate much faster.
Note! Before using logs for construction, they should be properly dried and then treated with antiseptics and a waterproofing layer.
They are installed at intervals of 1.5–2.5 meters along the perimeter, depending on the size of their section. If this distance is exceeded at the bottom of the pits, additional fastenings will have to be constructed so that the strength of the structure is not lost. The optimal diameter is 50-60 cm.
If it is necessary to strengthen the supporting structure inside the allocated area, poles are also installed at a similar interval.
Note! The depth of the pits for the pillars should exceed the freezing depth by 30–50 cm.
The disadvantages include:
- significantly shorter service life compared to other materials,
- flammability
- susceptibility to rotting with increased dampness,
- susceptibility to damage by insects and rodents (which is why the poles should be impregnated with appropriate protective mixtures, qualitatively, in compliance with the instructions for use).
Monolithic pillars. They are the most durable and strong.

They are able to withstand significant loads, but are unstable to freezing of the soil, so they must be buried in the same way as wooden ones, and a pillow of sand and gravel should be laid on the bottom, with a thickness of each layer of 20 cm. Installation of high-quality waterproofing is required on the sides. As a mold for a monolith, you can use asbestos-cement pipes with a diameter of up to 25 cm, which will solve the problem of installing formwork and will perfectly cope with the waterproofing function.
Fill method:
- A pillow of sand is poured into the drilled well, and then of gravel.
- The pipe is lowered to the very bottom, after which the concrete solution is poured, and the column rises to a certain height, as a result, the solution partially leaves the pipe, and a fixation with the ground is created.
- After the concrete has begun to set, the pipe is no longer held, the solution is added from above in the volume of the poured out and reinforcement is inserted.
- Do the same with the rest of the columns. The curing time ranges from a few weeks to a month, depending on environmental conditions.
The main disadvantages of this type are its high cost and complexity of installation for people who do not have experience in concrete work, as well as the possibility of working only at temperatures above +5°C.

Brick. To install a brick column foundation, you will need to dig a pit in order to have access to the masonry. A sand and gravel cushion is installed at the bottom under each of the pillars. A small concrete layer is poured on top of it, which is carefully leveled horizontally using a level.

The brick should be laid out immediately after the mortar has set. Red hollow and silicate bricks are not suitable for these purposes. When laying, it is necessary to observe the evenness of the rows and the verticality of the masonry. The optimal size of the pillars for the bath is one brick with dressing. For masonry, reinforced concrete blocks with dimensions of 60 × 60 cm can be used. After laying out the pillars, they are coated with waterproofing mastic on the outside. This type is economical and durable.
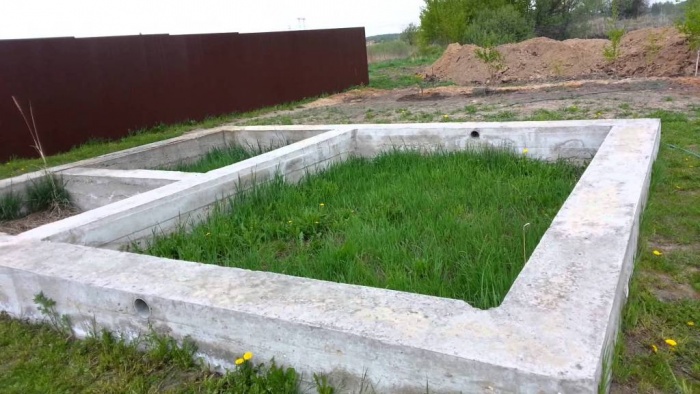
Tape
The strip foundation is capital and suitable for the construction of a bath on most soils. The work on pouring is somewhat larger than during the construction of a columnar one. Material costs will also increase. But the strength of the structure will be significantly higher, and there will be no distortion of the bath or cracks in the walls, of course, subject to the construction technology.
Note! In some cases, special additives are used in the concrete solution to increase its resistance to high moisture and sudden changes in temperature.

Brick
The first brick option is the most successful both in terms of performance and cost. To install it, as in the case of the construction of a brick columnar foundation, you will need to dig a foundation pit with a similar depth. The general order of construction is as follows:
- Along the perimeter of the bath, a sandy, and then a crushed stone pillow with a thickness of up to 20 cm is covered.
- They ram it and lay out the brickwork, as well as in the case of building walls with dressing of subsequent layers.
- The laying is performed in this way:
- a thin layer of cement mortar is applied to the surface of the brick,
- another brick is placed on top, pressed tightly, and the remaining mortar is removed,
- on loose soils, a reinforcing metal bar is laid every 2-3 layers.
Note! The thickness should be 10 cm wider than the walls being built, so they put it in two bricks. Waterproofing is laid on both sides of the wall.
From reinforced concrete blocks
Laying the foundation for a bath of reinforced concrete blocks is not rational, since the blocks are of high cost and significant weight, however, construction work can be carried out at any ambient temperature. Such a bath base is formed using special equipment, since the blocks have a significant weight.
- A trench breaks out under the blocks along the perimeter.
- A sand and gravel pillow is laid on its bottom, it is rammed.
- The blocks are carefully lowered to the bottom.
- Before installation, the blocks should be covered with waterproofing mastic.
- The seams formed between adjacent blocks are sealed with concrete mortar.
Note! Before continuing with the construction of the bath, you will have to wait a few weeks until shrinkage occurs.
Concrete
The foundation for a bathhouse made of concrete will require a significant waste of money and time. This is due to a significant increase in the complexity and number of ongoing work. With proper filling, it will last a long time. The depth of the pit should be below the freezing level of the soil.

Before pouring the concrete solution, you need to install a pillow at the bottom of the pit and prepare a formwork suitable for the thickness of the walls. The simplest formwork option will be knocking down unedged boards in an amount equal to the perimeter of the bath. However, this method has a significant drawback, which is expressed in the absorption of water by wood, resulting in a lack of moisture in concrete and loss of strength properties. If possible, it is better to build a metal formwork. It is laid along the perimeter of the bath, and then the concrete is poured.

Note! The solution should be poured in layers and evenly along the entire area in layers of 20-30 cm and leveled with a shovel to remove air spaces and ensure uniformity of the structure. On loose soils, each layer should be reinforced with a metal grating in increments of up to 10 cm and a bar thickness of up to 4 mm.

If you can rent a vibrator or have your own, then they should go through each layer to compact the solution. Each dive must be accompanied by a penetration into the previous layer and last at least several minutes. The distance between immersions should be small - up to 50 cm, while it is advisable not to touch the formwork. When all layers are filled, the surface is leveled using a level and a rule.
After a few days, the solution sets and the formwork is removed. The foundation will be ready for operation in a month. During hardening every 4 hours the surface should be moistened with water. To prevent moisture from evaporating quickly, or in the event of precipitation, the building should be covered with a film. It is also undesirable to get direct sunlight.

If work is carried out in autumn or spring, then the concrete is protected from sudden temperature changes with protective materials, covered.

In some cases, it may be necessary to build a slab foundation. Its construction is more expensive, therefore it is advisable to fill it in cases where the construction of columnar and tape types of foundation is impossible.
For oven
When building a bath with a brick oven, a separate foundation will be required, since the load per unit area will be significant. The technology of its laying is similar to the tape monolithic type. The depth must be at least 70 cm, taking into account the laying of the layers of the pillow. In terms of area, the pit should exceed the dimensions of the base of the furnace by 10 cm. This is done in order to prevent soil displacement.

Note! If you plan to install a metal furnace, then you do not need to make a separate foundation for it, since its weight is negligible for the entire structure. It will only be necessary to lay additional beams under it so that the floors do not sag.
When planning the construction of a bath, many factors and nuances should be taken into account and given due attention to them. At the heart of any bath is the foundation, and it largely depends on how long it can stand. On the other hand, there is a desire to save on building materials. Therefore, before making a base for a bath, you should evaluate the estimated weight of the structure and perform all the work in stages. A well-thought-out course of construction will guarantee that the constructed facility will last for decades at minimal cost.


