The technology of laying soft tiles is quite simple and does not cause any particular difficulties, and if you follow the instructions and also have some skills in construction, it is quite possible to install bituminous tiles with your own hands. Properly made laying of such a coating is not only an excellent protection of the home from adverse weather conditions, but also an excellent appearance of the roof itself.
Weather
According to the instructions, flexible tiles are recommended to be laid in the warm, dry season, at a temperature of at least +5ºС, but +10ºС is better. This is necessary so that, under the action of heat, the sheets of bituminous shingle better stick together with each other and with the base, forming an almost monolithic coating layer. At low temperatures, the sheets become brittle, do not bend well, so winter is not the best time to work with this type of coating, but if it is planned to lay bituminous tiles in winter and the air temperature is less than + 5ºС, then it is necessary to keep the material at room temperature for a day and use a building hair dryer to heat the tiles and bituminous mastic for better sealing of the layers. In winter, it is better to make a partial repair of the roof, rather than a full-fledged installation on the entire surface of the roof, especially if the laying of flexible tiles with your own hands is done for the first time.Roof slope
Installation of flexible tiles is advisable to carry out on roofs with a minimum slope of 12º-18º. If the slope is less or the roof is flat, then it is better to choose a different type of coating, since the inevitable stagnation of water will lead to rapid damage to the roof.The main stages of laying soft tiles
Base, ventilation
Any type of roof installation begins with the preparation of the base. A solid solid base is used as the basis for laying bitumen. It must be even and firm, since the slightest irregularities will inevitably affect the appearance of the roof. The OSB-3 plate is considered the ideal coating option. A prerequisite for the long service life of a soft roof is proper ventilation according to the “bottom-up” principle. At the bottom of the slope, ventilation holes are made through which air enters, and it is drawn out through the so-called ridge vents or aerators.
 Features of laying the lining layer
Installation of soft tiles is carried out on a special lining carpet, preferably from the same manufacturer as the tiles. If the slope of the roof is minimal, i.e. 12º-18º, then the lining carpet must be laid on the entire surface of the roof. To fix the lining layer, start from the lowest point of the roof, parallel to the cornice line. The layers are superimposed on each other: the top layer should be 20 cm on the bottom, the edges are smeared with glue and nailed with wide hats. Pay attention to the good tension of the carpet! In the case of a roof slope of more than 20º, it is possible to lay a lining only on cornice overhangs, ridges, at the junctions of slopes (valleys), around pipes, i.e. on “problem areas” where there is a high probability of leakage. In this case, the carpet can also be mounted vertically. Also, the vertical fastening of the carpet can be used for roofs with steep slopes. In any case, before installing the lining layer, it is better to coat the base with bituminous mastic. Then, when the carpet is heated with a hair dryer, the lining perfectly adheres to the base and a continuous coating is obtained. The correct base and a well-laid underlayment affect both the appearance of the roof and its protective functions. It is not recommended to use a hydrobarrier as a lining material, roofing material is not recommended.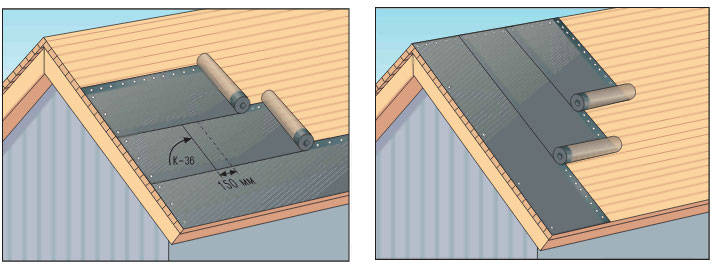
Protection of the "edges" of the roof
To drain water and protect the wooden elements of the roof along the roof overhang, metal cornice strips are installed over the lining. They should be fastened with nails in a checkerboard pattern and overlapped by 5 cm. End strips are attached in the same way. These elements reinforce the overhangs, protect the wood flooring from precipitation, increase wind resistance and give a finished look.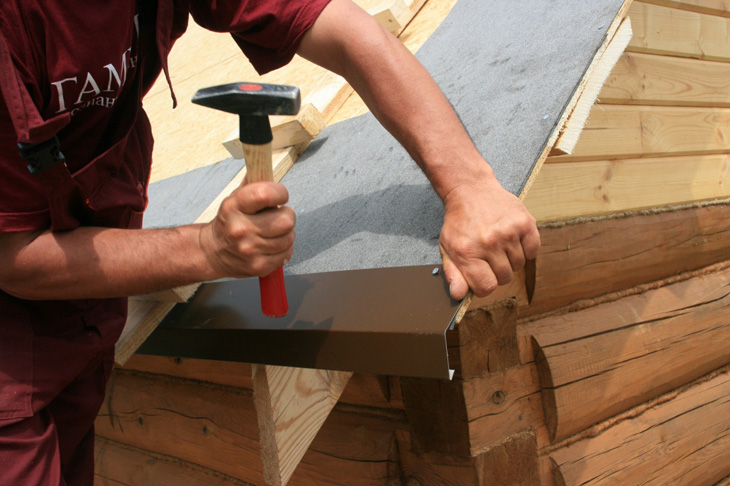
Marking for flexible tiles
If the laying of soft tiles is done for the first time, then it is better to make preliminary markings in order to avoid row distortion. A beating is done with a cord on horizontal and vertical lines with a step of 0.8 and 1 m, respectively. This markup will help align the rows horizontally and vertically, as well as correct distortions if some object is mounted in the roof: a pipe, a window. It is impossible to fasten the tiles strictly along these lines! Just follow the direction! It is necessary to mix several packs of shingles in order to make the roof covering look uniform, as there may be different shades in different batches that cannot be immediately noticed. First, 1.5-2 cm from the edge of the cornice plank, a self-adhesive cornice tile is fastened joint-to-joint, additionally it is nailed with wide-head nails. You can take an ordinary ordinary tile, and cut off the protruding parts, the so-called petals. The first row begins to be fixed from the center of the slope towards the ends of the roof in both directions. If the installation of flexible tiles is done by hand for the first time, then the sequence of actions should be followed:- Remove the film from the bottom of the sheet (after that, you can not stack the tiles on top of each other).
- Lay the shingle on the surface and secure with four nails along the “notches” at least 2 cm from the edge. If the slope of the roof is large, then you need to fix it with six nails - drive two along the edges of the sheet for additional fixation.
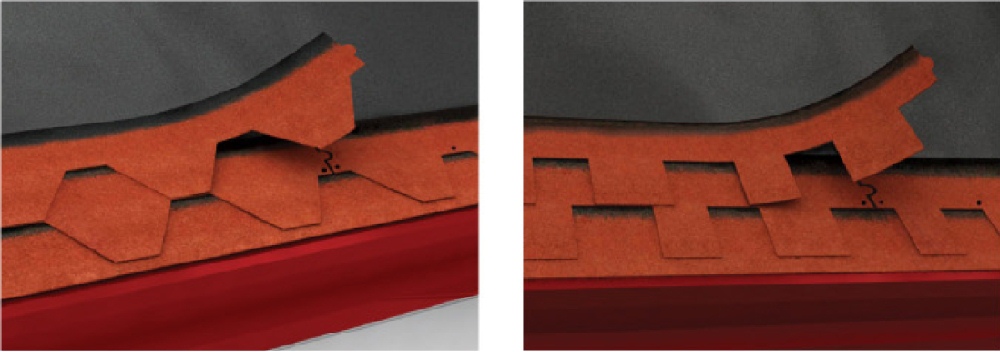
- The next row is superimposed on the previous one so that the “petals” of the top sheet are found on the recesses of the previous row and form a continuous straight line with them.
Making "problem" places
- Having reached the end plank, the soft tiles must be cut flush with the plank and glued with bituminous sealant or glue to a width of about 10 cm.
- When laying in valleys, the tile is overlapped on the adjacent slope and cut to fit one line, heated additionally with a hairdryer and glued with bituminous glue.
- A metal apron should be used around pipes, antenna outlets and in places where soft tiles adhere to vertical surfaces and be sure to additionally coat the seams with bituminous sealant.
Skate
A cornice tile, divided into three parts, is attached to the ridge of the roof. Each part is bent at the desired angle. You can start laying from any side of the ridge. The sheet is glued to the ridge with a self-adhesive side and nailed with four nails. The next (upper) tile should be overlapped by 5 cm on the lower one to cover the nails. The end sheets are glued. Everything, the roof is ready!
  But most of the questions arise precisely in the process of work, so you should familiarize yourself with the video materials on the installation of shingles.


