Slate has been used as a roofing material for a long time, and it has not lost its popularity even today, especially since everyone can handle roofing work on their own if you know how to cover the roof with slate.
The main advantages and disadvantages of slate
The advantages of this roofing material include:
- incombustibility,
- ease of installation,
- strength and cheapness
- long service life (35-40 years).
A slate roof fits any building design, looks beautiful and lasts a long time.
Flaws:
- relatively large weight: more powerful truss structures should be made,
- fragility: in case of careless transportation or careless handling, it can break.
Types and sizes of sheets of wave slate for roofing
Slate sheets produce 6, 7 and 8-wave. The standard length of the sheets is 1750 mm, the width depends on the number of waves and is shown in the figure, the thickness is from 5.8 to 7.5 mm, the wave pitch is 150 or 200 mm.
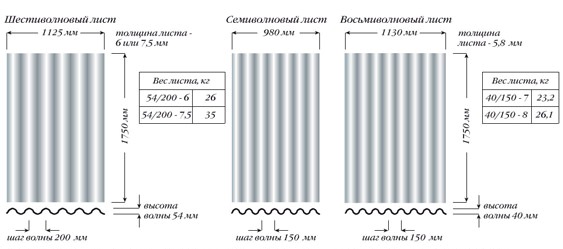
The height of the crest (wave) is 40 mm for 7 and 8 wave sheets and 54 mm for a 6 wave sheet.
Features of truss systems for slate roofs
Reinforced crate
The slate is fastened to the roof on the crate, for which a bar of 60x60 mm is used, rafter boards with a thickness of 60 mm or more. This is due to the increased load of the roofing material on the truss system. The distance between the bars of the crate is made such that the slate sheet lies on at least two of them with a margin of 15 cm on each side.
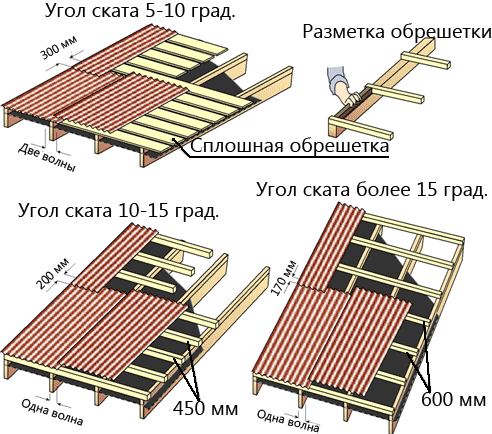
The smaller the slope angle, the stronger the crate
For slate roofs, a slope angle of at least 22 degrees is recommended. For single-pitched and double-pitched roofs, the angles of inclination may be smaller, but reinforced lathing is required. The principle of amplification for different slope angles is shown in the figure. A vapor barrier is placed under the slate, especially if roof insulation is planned.
Important! Before laying slate, all wooden structures must be treated 1-2 times with an antiseptic with fire retardant properties. This will protect them from decay, fire and extend their service life.
How to determine the amount of slate for a roof
When planning do-it-yourself work, it is important to correctly calculate the amount of slate per roof so that there is enough material and there are no extra expenses. For a person familiar with the basics of geometry, such calculations will not be difficult. For a roof with one or two slopes, you will need to measure the width and length of the house, the angle of the slope.
Easier calculation of slate according to the size of the roof , it is done like this:
- determine the size of the roof along the eaves, the resulting distance is divided by the size of the width of the sheet and add 10%, get the number of sheets in one row;
- measure the distance from the ridge to the eaves along the slope and divide it by the size of the height of the slate sheet, get the number of rows, increase the result by 13% for overlap;
- the resulting numbers of rows and sheets in one row are multiplied and the number of slate sheets per slope is obtained. If the roof is gable, the result is doubled.
For four-pitched roofs, the area of \u200b\u200bthe slopes is calculated geometrically (the area of \u200b\u200bthe triangle and the area of \u200b\u200bthe trapezoid, as shown in the figure), divided by the area of \u200b\u200bthe slate sheet and add 15%.
Important! When buying slate, you should pay attention to its integrity. Slate sheets should be lined with paper or film. Sheets should be stored on a flat horizontal surface, protected from moisture and sunlight.

Preparatory work for the installation of the roof
Before you begin work on the construction of a slate roof, prepare all the necessary tools and a flat area on which you will saw the sheets and drill holes in them. The platform should be such that the sheet can be approached from any side.
Tools and equipment
To install a slate roof, you will need: a hammer, slate nails, or self-tapping screws, a drill, a grinder or a hacksaw, a respirator, paint for coloring sections, a step ladder, a ladder, ropes, metal hooks.
How to lift slate on the roof
For those who plan to make a roof with their own hands, the question often arises of how to raise the slate to the roof. This is done with a rope and two hooks. The sheet is hooked from below with two hooks, to which a rope is tied. The rope, together with a sheet of slate, is pulled onto the roof. Sheets can be fed by hand using a stepladder if two or three people are doing the work.
Preparation of slate sheets
Before laying the slate on the roof, unpainted sheets, if necessary, can be impregnated with a water-repellent composition, painted with acrylic, water-dispersion or alkyd paint. The paint closes microcracks, makes the slate smoother, snow rolls off it easier in winter.
Slate, depending on the ambient temperature, is subject to deformation, therefore there should be a small gap between the nail and the asbestos cement. They make it by drilling holes in the slate comb 2-3 mm larger in diameter than the nail. You can also drill these holes at the place where the sheets are laid, if it is more convenient.
Laying slate on the roof, how to do it yourself
The drain is installed before the start of roofing work. Slate sheets begin to be laid from the bottom row.
How to put slate on the roof
- In order for the sheets to lie flat, a cord is pulled along the cornice at a distance of 15 cm from the edge and the sheets are leveled along the cord;
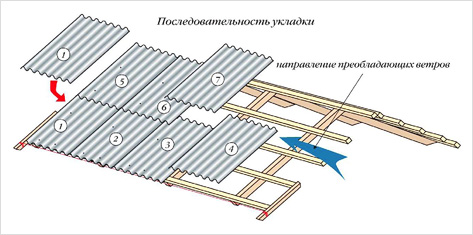
- the roofing material is laid staggered with an overlap of 1-2 waves sheet to sheet, 15-20 cm row by row (the size depends on the angle of inclination of the slope). The laying order is as follows: first, the lower 3-4 canvases, then 2-3 of the second row above them, 1-2 canvases of the third row above the second row, then one canvas is added to each row, starting from the bottom;
- overlaps of slate waves should be in the prevailing wind direction so that the wind does not blow under the slate and does not seek to lift it.
Sheets are sawn with a hacksaw or grinder. Sections are painted over with paint so that the asbestos does not crumble.
Attention! You need to drill and saw slate sheets in a respirator, especially if you use a drill and a grinder. It is recommended to pre-wet the cutting site. Asbestos cement dust is harmful to health.
How and how to fix slate on the roof
Fastening the sheets of roofing material to the crate is an important stage, on which both the strength of the roof and the integrity of the slate itself during operation depend. It should be borne in mind seasonal deformations and movements of rafter systems and slate, increased loads on the roof in winter.
Slate nails and self-tapping screws
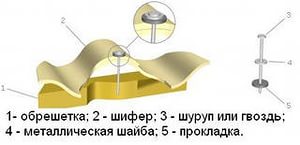
The fastening of slate on the roof to the crate is carried out with slate steel nails with a hat with a diameter of 14 mm or self-tapping screws. The nail head and slate are separated by a metal washer and a gasket made of rubber or other elastic material.
How to nail slate sheets
Slate is nailed with an ordinary hammer. The nails are inserted into a hole drilled in advance and hammered not to the stop, but so that the slate does not move. An 8-wave slate is hammered into the 2nd and 6th wave from the joint, a 7-wave slate is driven into the 2nd and 5th, respectively. Vertically, the sheet is nailed in two places to the crate. The distance from the nail to the edge of the canvas is at least 15 cm. This is how they move to the ridge.
Important! It is not recommended to bend nails from the side of the crate if they are long. It is better to cut them to the desired length.
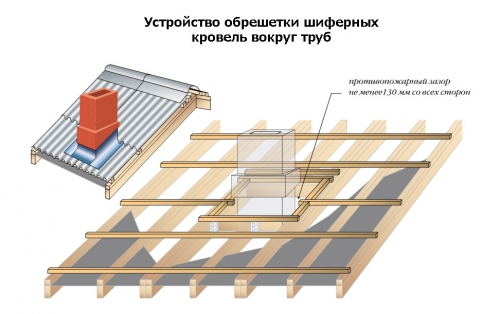
Chimney connection device
If the house has a stove, it is required to arrange a bypass for the chimney on the roof. For a chimney on a roof slope, the connection is arranged differently depending on whether there is waterproofing or not. In the presence of waterproofing, a steel sheet junction is installed under the slate and film, and in its absence, they are made in such a way that the upper edge of the steel sheet is under the slate, and the lower edge along the slope is above it. The diagram of the connection device is shown in the figure.
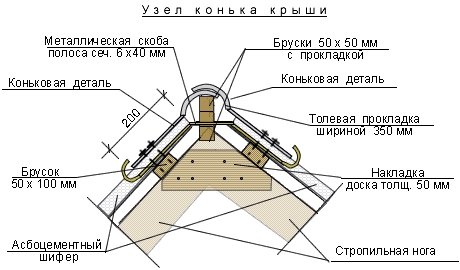
Roof ridge device
The device of the ridge is the finishing stage of the installation of the roof. The ridge protects the roof from water ingress, provides ventilation, and is a decorative element of the roof.
The slate roof ridge is made of galvanized steel or ready-made ridge elements to match the color of the sheets. A sheet of galvanized steel is cut to the desired width and bent on a bending machine or by hand so that the bend angle is slightly smaller than the angle between the sheets of slopes. The same nails are used to fasten the ridge. How to properly install the skate is shown in the figure.
How much does slate roofing cost?
Installation of a slate roof is a simple matter, it is within the power of someone who is familiar with a hammer and a hacksaw, has enough time to work. Wave slate costs 170-260 rubles. per sheet, which ranges from 90 to 135 rubles / m 2. On average, taking into account fixing materials and waterproofing, the price of a do-it-yourself roof will cost about 200 rubles / m 2.
When there is not enough time to cover the roof with slate with your own hands, you can hire a team. The cost of laying slate will be from 150 to 300 rubles / m 2. If you need to install a rafter system, heat, steam, waterproofing, lay slate, then the work will cost from 700 to 800 rubles / m 2.
Provided that the work is carried out consistently and carefully, the slate roof will serve for a long time and reliably.


