The usual and familiar traditional slate does not apply to innovative products.
However, it remains popular in our domestic market: consumers value it for its reliability and durability.
In addition, it has a very affordable price.
Not surprisingly, the method is still of interest to homeowners.
Today, many different purposes are produced.
 Slate can be painted in the desired color, selected specifically to match or contrast with the color of the facade. The material is actively used to cover outbuildings, and full-fledged residential buildings.
Slate has a fairly long service life. But in order for him to honestly serve the allotted time, he must be laid in accordance with all the rules.
And this process is not as simple as it might seem. Although it is not complicated, it requires you to know some important nuances.
Slate is not an absolutely universal roofing material suitable for all types of roofing without exception.
 Therefore, it is important to rely on some facts:
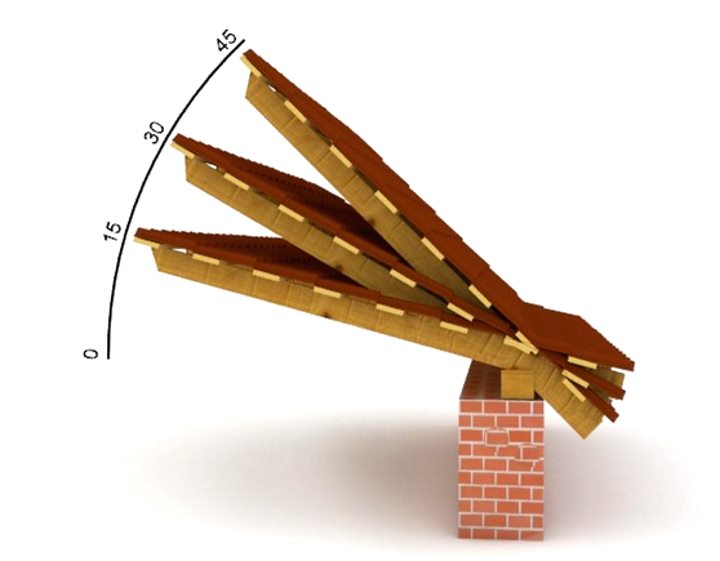
- most of all, it is suitable for gable and single-pitched roofs with a slope of 15 degrees;
- if the roof slope is supposed to be more gentle, then under the slate it will be necessary to mount a special crate, roofing felt or membrane waterproofing;
- the overlap of slate sheets on each other should also be increased.
Types and characteristics of roofing slate
The slate cloth can be cement-fibrous or asbestos-cement. According to their technical characteristics, they do not differ too much. But asbestos, which is not part of the second type, deprives it of increased strength, although the existing one is quite enough: the material can easily withstand the weight of an adult.
In addition to the composition, there is another difference - sheets can be made from non-pressed or pressed material. The quality of the latter is an order of magnitude higher:
- has an order of magnitude higher density, and, accordingly, strength;
- more resistant to aggressive weather conditions and temperature extremes.
In form, both types can be of different configurations - wavy and flat. The wavy material has its own gradation, the number of waves in the sheet depends on its size.
Advantages
Despite the familiarity of the material and the traditional nature of its use, not many people know about its outstanding properties:
- excellent fire resistance;
- amazing durability and strength in all weather conditions;
- long service life;
- excellent chemical resistance;
- quite democratic cost;
- the ability to choose a color solution;
- low thermal conductivity;
- ease of installation.
Flaws
Like any other material, this one also has not only pluses, but also some minuses:
- big mass. Maybe a special engineering approach to installation will not be required, but significant physical effort will be needed;
- although this material is durable and resistant, it is quite fragile, which must be taken into account when storing, installing and transporting it. Sheets should not be thrown to avoid cracking. They should be put in neat piles, and in a certain amount - no more than 165 in one;
- asbestos-cement slate contains a component of the same name, which can have a harmful effect on health. Therefore, for objects located in close proximity to people, it is better to prefer the cement-fiber type of material. Although it is quite successfully used for the roof of a house;
- the material is quite hygroscopic, able to accumulate moisture. Therefore, over time, moss may appear on it. Partially, this problem can be solved with the help of silicate or phosphate paints, which reduce the moisture absorption of the material.
Installation of slate on the roof
Dismantling the old slate
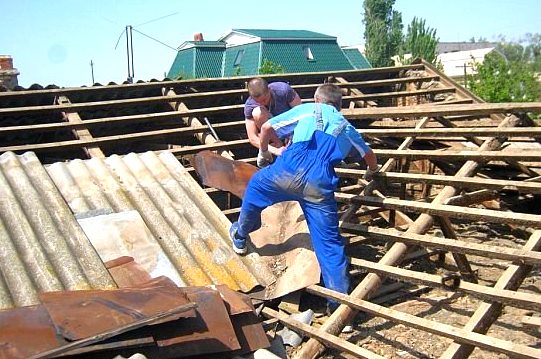 If you have to remove the old coating before starting installation work, do not be alarmed. There is nothing particularly difficult in the process. The main thing in it is a competent distribution of roles and a good, convenient tool.
Do not forget about the fragility of the material. Considering that even old sheets can be successfully used in a private household, do not drop the sheets from the roof. Remove and deflate material carefully, in the reverse order of installation.
Installation of a new slate
 The entire laying workflow can be divided into three important steps: preparatory measures, lathing and direct laying of material.
- Preparation - the choice of a specific type of coating. If material with asbestos will be used in the work, then you should take care of the safety of the people involved in the work process.
- When choosing between corrugated and flat sheets, properly evaluate their purpose and performance. For residential buildings, wavy ones are often preferred, which contribute to better water flow.
- Depending on the required density of slate, among the wavy representatives of the material, you also need to choose. It can be ordinary, reinforced, medium-wavy and unified.
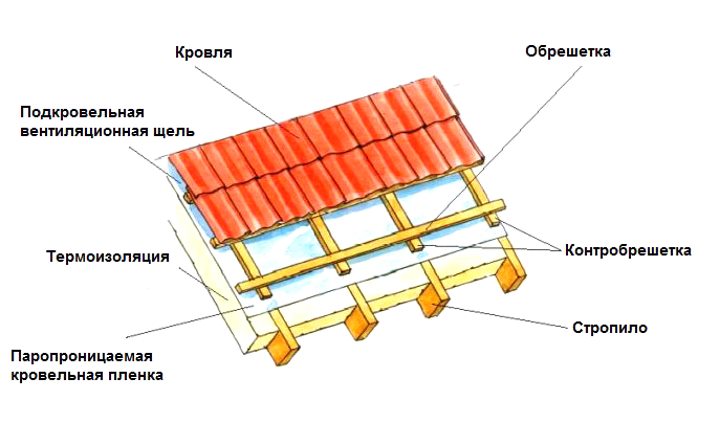
- Both the nature and working properties of the future crate depend on the specific type of slate chosen.
Preparatory activities
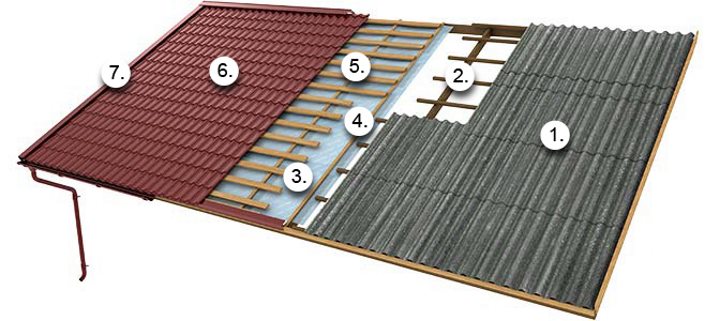
Proper installation of slate - the importance of waterproofing
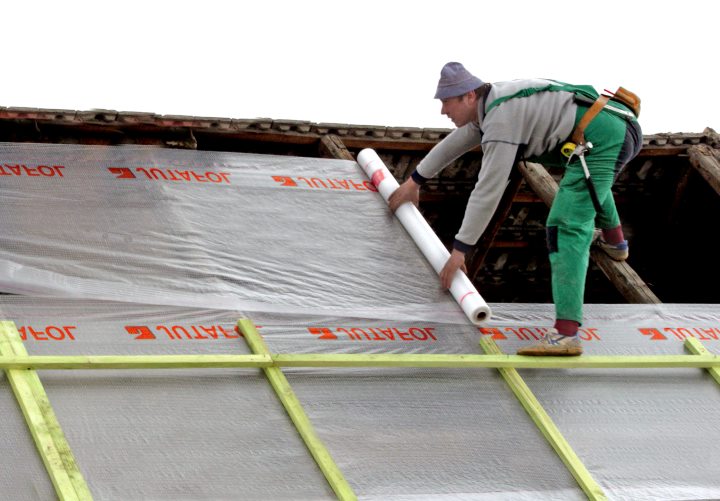 There are many different ones, but as for roofing, polypropylene film is most often the most suitable option for it. It is fastened up with a glossy side to the rafters.
The pile located on the inside will become an additional obstacle for moisture. This is especially important if there is an insulating layer under the waterproofing. It is allowed to use two layers of film.
Fixation is carried out with a construction stapler. For comfortable work, at least two pairs of working hands are needed. One master gradually rolls out and stretches the film from the roll, the second attaches it to the rafters. The joints of the film must be reinforced with construction tape or sealant. On top of the insulating layer, you can begin the installation of the battens of the crate.
Lathing in the scheme of laying slate
It is one of the most important steps. What should you pay attention to?
 If the percentage of dampness exceeds 12, then the finished crate will not be stable. Drying, the individual bars will begin to decrease in size, and the crate will begin to “float”.
For the manufacture, you can use wood of several different varieties. These are aspen, pine, spruce and fir. The bars must be treated with resin or drying oil before work, coated with one of the fire retardants. The length of the bars is calculated according to the number and size of the slate sheets: they can be either 6.5 m or 3.5 m. The ideal option is if the slate does not have to be cut along the edges of the roof, that is, the slope will definitely close with solid sheets.
The size of the bars 60 by 60 mm is considered universal for the crate. In fact, it will be most correct to select their cross section based on the thickness of the prepared slate - from 50 to 75 mm.
The distance between the individual bars is directly related to the grade of the material:
- 75-80 cm for reinforced and medium;
- 50-55 cm for ordinary;
- 60-80 cm for unified.
It is very important that this distance is the same over the entire area of the roof.
Sometimes bars are used that differ in width: there is nothing wrong with that. The widest are placed at the ridge and where there will be joints of individual sheets.
The beam closest to the ridge is placed with an edge, rising above the rest by the thickness of the slate (1-3.5 cm): for cornice beams, the indicator is from 6 to 10 mm (also with an edge).
The lathing bars are attached to the rafters from below, taking into account 30-50 cm of overhang. During the laying process, all important construction nuances are taken into account, especially for cornices and places near pipes.
Slate laying
The order of laying slate sheets
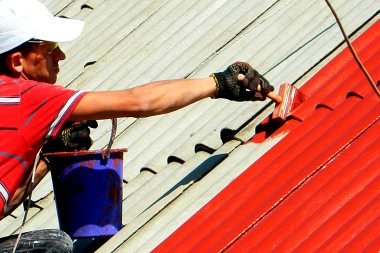
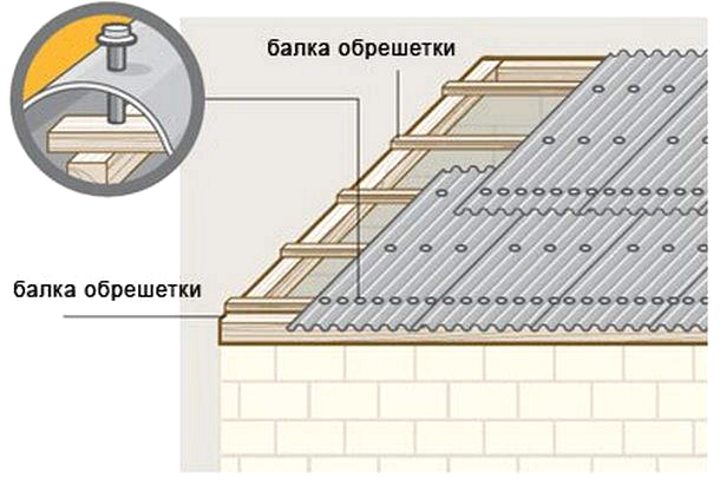 Slate sheets to the crate are fixed with special galvanized nails. To make holes, you will need a drill with a diameter larger than that of nails by 2 mm.
To protect the roof from possible leaks, nails are driven into the crest of the wave through a washer with a rubber gasket. The work is carried out carefully, do not go too deep: contact with the slate should be minimal. Otherwise, even with a small temperature difference, a crack may form on the material.
Usually, installation starts from the bottom of the more windy side of the roof.
It is very important how the first sheet of slate is laid, setting the tone for the rest: the evenness of its laying is controlled by a plumb line.
The overlap of the next rows of slate sheets depends directly on the magnitude of the slope of the roof (with indicators from 20 to 45 degrees, 10 cm of overlap will be enough).
Slate laying methods
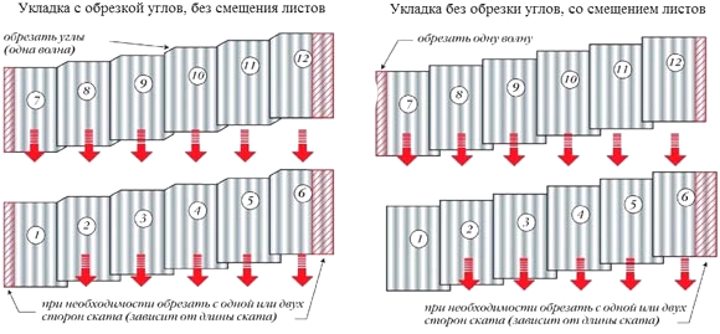 There are two ways to lay slate:
- apart - in which the sheets are laid down like brickwork;
- without displacement, with trimming of corners - in this case, each slate sheet needs to be adjusted.
The first option is easier to use, and, accordingly, is more popular.
Laying slate apart
Already at the stage of acquiring slate, it is desirable to have at least an approximate plan for laying it on the roof. This will allow you to more accurately determine the amount of material needed, which is better to buy with a small margin.
Before starting work, the material must be prepared, inspected for cracks or chips. Damaged sheets are not used. With the help of the sheets going to work are cut off. Experts advise to pre-moisten the places of future incisions.
Direct installation of slate starts from the bottom. For one of the upper corners, the sheet is attached to the crate, docked with the edge of the roof itself. After that, it is fixed in different corners with three more nails, one of which is certainly driven into the crest of the wave. The next sheet is fixed in the same way, with one or two waves of overlap.
Along the entire perimeter of the roof, the bottom row is laid in this way, each sheet with four nails. The next row, the second, begins with half of the lower slate sheet. So you should go further, with an overlap on the sheet below, and on the previous sheet of the same row. This is the "spread" effect.
So one slope is completely filled with slate. In the last row in front of the ridge, a gap is needed for ventilation. After that, they move on to the next slope. The roofing covering formed in the process of these works outwardly resembles a kind of chessboard.
Laying slate with trimming corners
We have already noted above that this method is more labor-intensive. But the roofing surface in this case is obtained without gaps, perfectly flat. Therefore, it is capable of serving for much longer than the laid "out of the box". And the material will require significantly less.
Laying slate with pruning: stages of work
Here, too, a roof laying plan is required, as in the first case. The amount of required material that needs to be purchased and its competent preparation depend on the correct calculations. We select a specific slope from which the installation will begin. There is no consensus here - someone likes the left, someone likes the right, there is no fundamental difference here. In our example, we will consider the option from right to left.
We prepare slate sheets. What corner needs to be cut? Its dimensions are 120-140 mm on the side and 103 mm on the top.
When trimming, it is important to consider the following:
- this applies to one slope - the last sheet of the top row and the first sheet of the bottom row are not cut off;
- in the very first row (bottom), the sheets are adjusted depending on the chosen direction. If the material is placed from right to left, then each sheet should be cut off the upper right corner;
- the second row is mounted as follows:
- the first sheet is mounted in the lower left corner;
- middle sheets of slate are placed in the upper right and lower left;
- the upper right corner is closed by the last sheet;
- the last row, the final one, is mounted in the same way as the middle rows, with one exception - the last sheet remains intact.


