According to the electrical standards of the last century, the construction of protective grounding in private property was considered an optional matter. The load was small, steel pipelines coped tolerably with the tasks of diverting electrical leaks. Time is running. Steel and cast iron communications replaced plastic and composites. Country property filled with numerous household appliances. Water and heat are supplied by powerful pumps, heating devices are working. It's time to protect yourself and the units from the vagaries of a useful, but wayward electric current. Let's do grounding with our own hands! The work is not difficult, the skilled owner will not have problems with the implementation.
The task and device of protective earthing
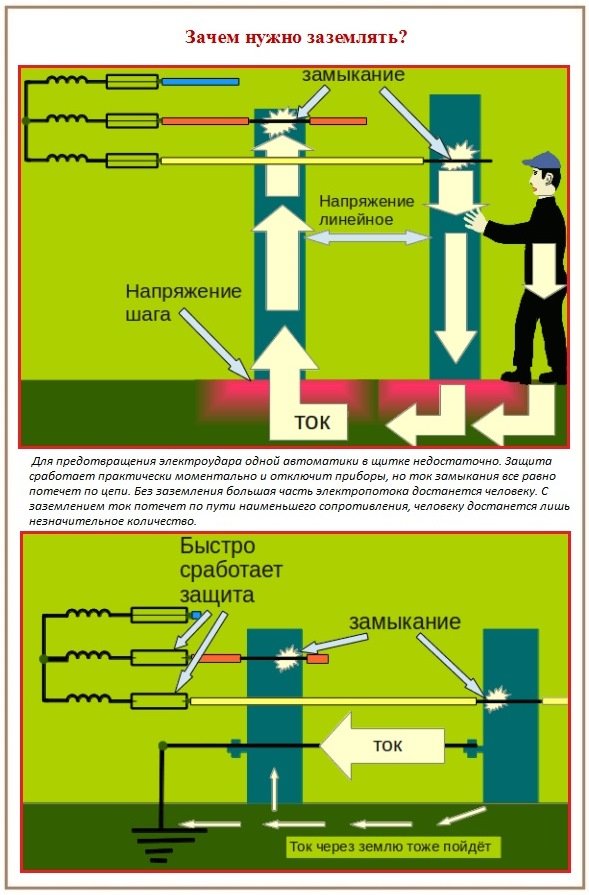
The purpose of grounding is to divert electrical current that has found a loophole in the insulation to reach the surface. This surface is metal cases and fasteners of washing machines, computers, microwave ovens, electric heating equipment. According to their functional duties, they should not conduct current, but they are always ready to substitute their metal “barrel” for leakage and short circuit current. This warm welcome is often felt by the owners of leaky or overly loaded equipment in the form of light blows, pinches and tingling.
Breakdowns on the body of household units rarely cause serious concern. Well, it shied away a little: it kind of cheered up. However, the apparent absence of serious risks is no reason to relax. The stray currents that break out contribute to headaches, discomfort and an unreasonable feeling of anxiety. In addition, ungrounded equipment makes noise, interference occurs in it, which reduces the speed and quality of receiving, processing and transmitting a signal. Such troubles will not disable the equipment instantly, but will significantly help to reduce its working life.
So, a ground loop is needed:
- to protect the owners from electromagnetic radiation, negative mood and ailments;
- to eliminate interference in the electrical network;
- to maintain the performance of the equipment.
Protective grounding will eliminate the above problems by providing the most attractive paths for the current to exit. By the principle of movement, electricity is very similar to water. It flows where there are no barriers, where there is less resistance and where it is easier for it to pass. Those. in order for people and units not to suffer, it is necessary to lay an unobstructed path “to the left” for the electric current, in the case of grounding, by definition, into the ground.
The resistance of the constructed path must be less than that of a person and equipment connected to protective grounding. That's when most of the electricity that has broken through will flow along the intended path with the smallest barriers, go beyond the building and dissipate in the ground. And the owner and equipment will get only the normative minimum.
The grounding system is a closed or linear circuit, which includes:
- two or more metal ground rods, strictly vertically immersed in the ground;
- a horizontal grounding conductor that combines the electrode rods into a common circuit;
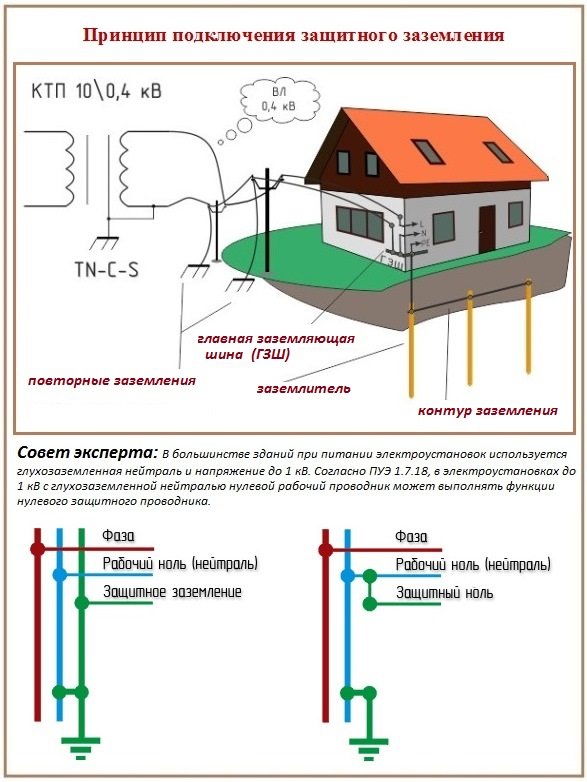
- a bus that provides entry to the house and grounding connection to protected units.
An autonomous structure may have several grounding systems, but one of them must be connected to the main grounding bus or to the main element - to the switchboard with the formation of a metal connection between the shield and the grounding conductor brought to it.
The choice of geometric shape for the earthing system
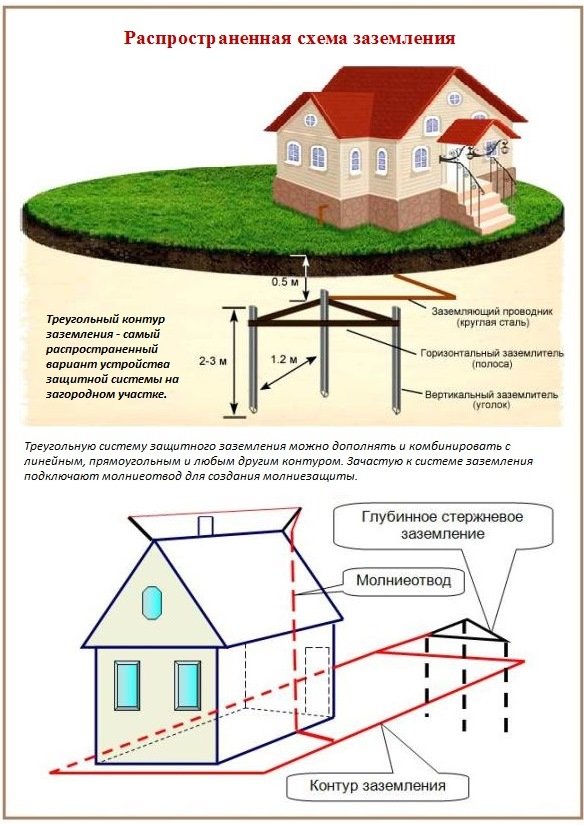
The most common configuration, according to which it is easiest to build a protective earth loop with your own hands, is an equilateral triangle. The contour triangular in plan is formed by three metal rods driven into the ground with a sledgehammer, the distance between a pair of which should be equal. In addition to triangles, grounding systems are constructed in the form of squares, straight or rounded lines, or other geometric shapes. Compliance with equal distances between ground electrodes is a mandatory condition, a clear geometry is desirable, but not essential.
Often, autonomous buildings filled with all kinds of equipment are simply surrounded by a ground loop. An excellent, effective option, if there are funds for this and enough free space on the site. More precisely, special money is not needed for an independent organization of grounding, but the choice of the shape of the contour is most often dictated by the site planned for the grounding device. However, one should not forget that when earthing switches are connected in parallel in one row, the efficiency of the system will be reduced due to the influence of the electrodes on each other. Closed loops are preferred.
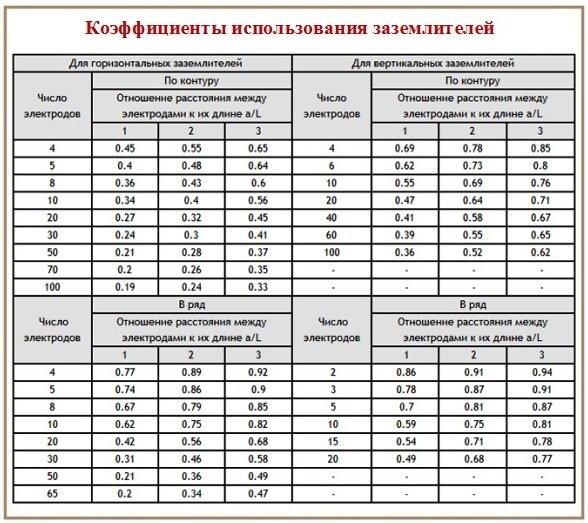
There are three or more grounding electrodes in the protective earthing complex. A working ground, created to optimize the signal supplied to the instruments, can have two ground rods. Because the ground is a non-linear conductor, there must be at least two ground electrodes. So it is necessary that a potential surface is formed in the space between them, contributing to the spreading of the current. A single rod is not enough for this.
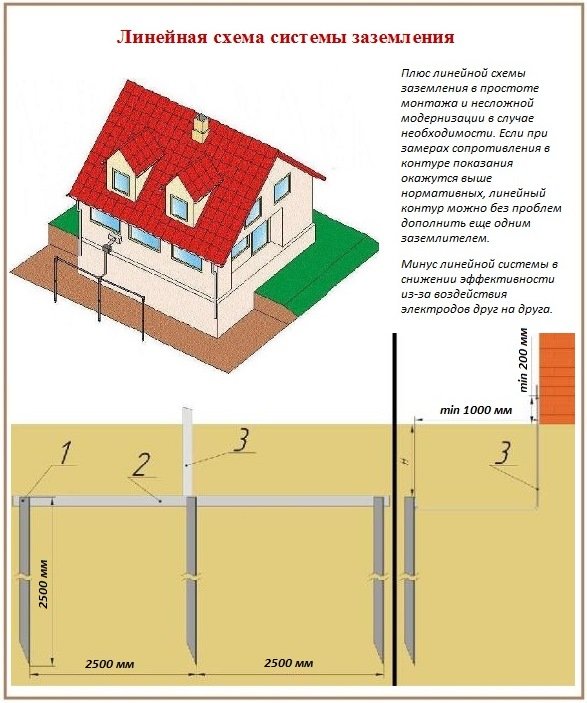
The working potential of a grounding system is affected by the distance between the vertical electrodes. The more often they are installed, the more effective the grounding. Recommended distance minimum 1.0m, maximum 2.0m. With an increase in the maximum limit between the metal rods, a gap in the potential surface is formed, it will nullify all the arrangement efforts.
The distance between the extreme grounding point and the foundation must be more than 1.0 m. The system will work flawlessly at a distance of 4-6m from home. It is pointless to arrange grounding further than 10m from the building.
Details about the components of the contour
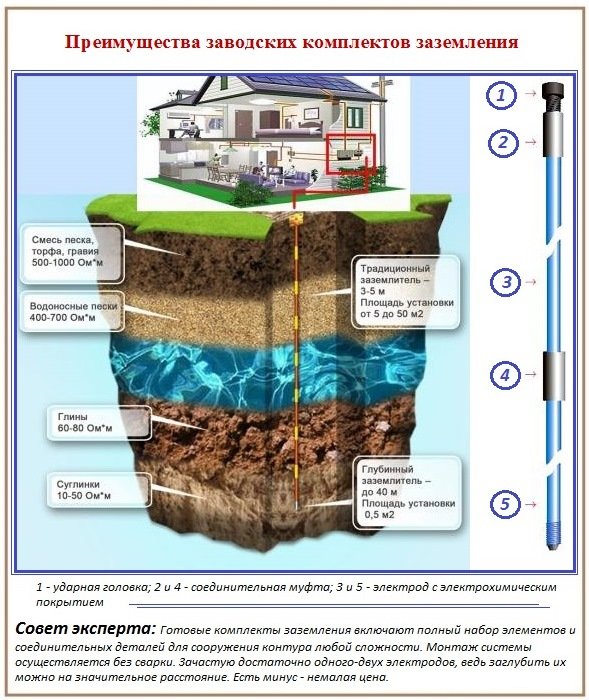
It was mentioned above that grounding consists of horizontal and vertical components. By analogy, ready-made kits are produced for the operational device of ground loops. Following the attached instructions, building grounding from factory elements is easy and pleasant, but expensive.
Vertical ground conductors
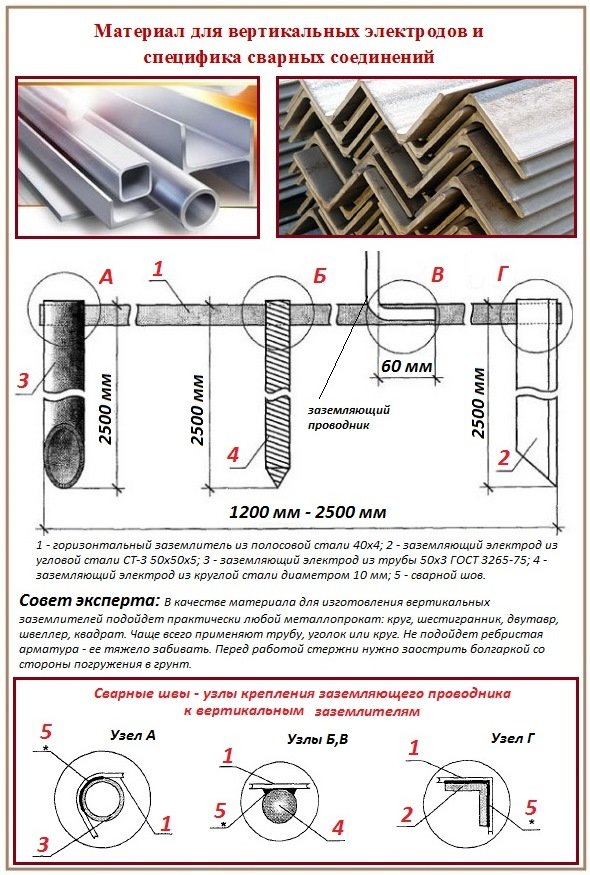
As grounding vertical rods for self-made grounding, any long products made of black rolled metal without galvanization can be used. This treatment is not necessary for parts located in the ground, it reduces the potential. Reinforcing bar with ribs is undesirable, it is difficult to drive it into the ground. A square, a strip, a channel and its I-beam counterpart will do. Rolled metal with a complex profile is applicable if it is planned to drill wells for laying vertical electrodes before installing the system.
Advice. In order for the process of driving ground electrodes into the ground not to be unnecessarily laborious, it is better to purchase rolled metal with a smooth surface. Before work, its lower edge must be sharpened with a grinder. In the process of work, the earth around the rod must be periodically “irrigated” with water. This will make it easier to score.
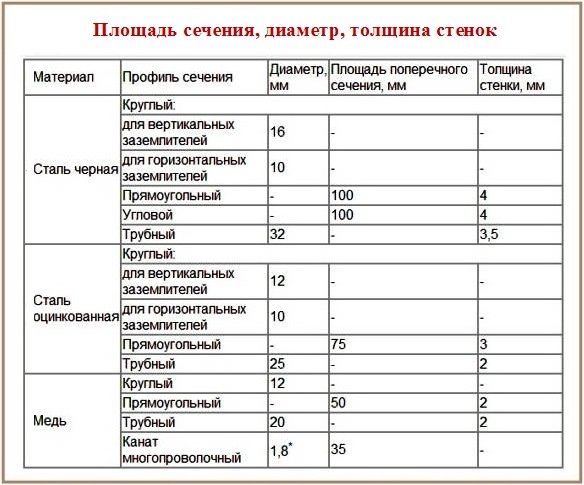
Common materials for the manufacture of vertical conductors are:
- a pipe with a wall thickness of at least 3.0 mm, the recommended diameter is 32 mm;
- corner with equal or different shelves with a preferred thickness of 5mm;
- circle with a diameter of 10mm.
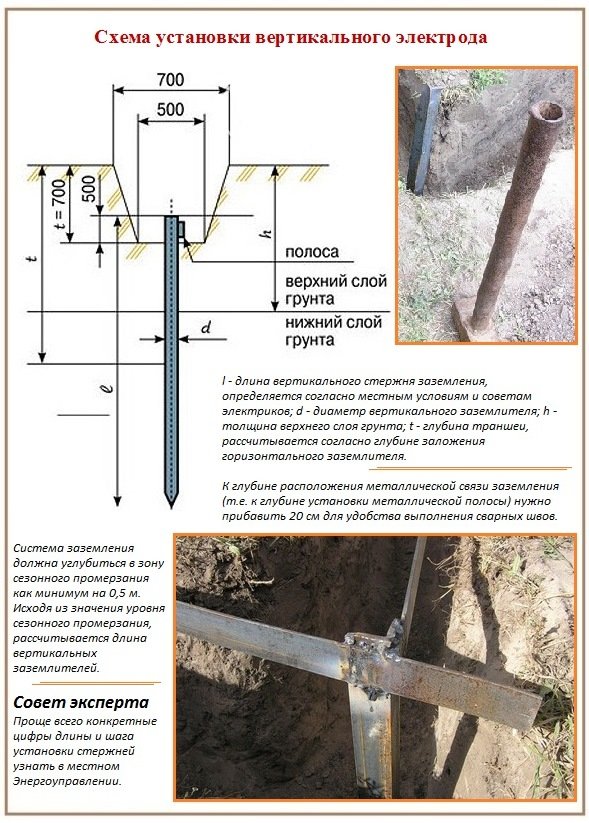
The optimal cross-sectional area of the vertical electrode is 1.6 cm². Based on this size, you should select the material. The length of the earth electrode is determined according to the local geological situation. It is necessary to go deep at least half a meter below the level of seasonal freezing.
The second condition affecting the length of metal rods is the water saturation of the host rocks. Simply put, the lower the groundwater, the longer the electrodes are needed.
In order not to suffer with geological characteristics and calculations, information about the depth of laying the grounding conductors must be obtained from the local energy department from the electricians on duty. Indicative data will help in any case, because. they have some estimated efficiency margin.
The average standard for the length of the ground electrode varies from 2 to 3 meters with half-meter variations. A favorable environment for the construction of grounding are loams, peat, water-saturated sands, sandy loam, fractured flooded clays. It is unrealistic to arrange grounding in rocks on your own, but there are ways to create electrical protection. Before the construction of the circuit, wells of the required depth are drilled. The rods are installed in them, and the free space is filled with sand or sandy loam mixed with salt or pre-filled with saline. Approximately half a pack per bucket.
With insufficient electrical conductivity of the soils on the site, it is better to use pipes as vertical ground electrodes. In the lower part of them, you need to arbitrarily drill several technological holes. Brine can be periodically poured through pipes with holes to reduce resistance. Salt, of course, will help to destroy the electrodes from corrosion, but grounding will work flawlessly for a long time. Then you just need to replace the rods.
Independent craftsmen for the manufacture of electrodes most often use black steel rolled metal. After all, economy is at the head of one's own efforts. An excellent, but expensive material for vertical electrodes is steel with an electrochemical copper coating or copper. Grounding elements embedded in the ground must not be painted, paint will worsen the electrochemical contact of the metal with soils.
Grounding metal connection - horizontal conductor
The horizontal grounding element that unites the system and brings it to the shield is most often made of a strip 40 mm wide, strip thickness 4 mm. Round steel is also used, less often a corner or corrugated reinforcement. The strip is welded to the upper edge of the vertical ground electrodes or fastened with bolts. Advantages of welding, it is more reliable. Places of welded and bolted joints are generously treated with anti-corrosion bituminous mastic or simply bitumen. It is impossible to crimp the underground grounding elements!
For the construction of a horizontal component located underground, it is undesirable to change the material so that, with inevitable moisture, a galvanic couple with its traditional corrosive consequences is not formed. An aluminum, copper or steel conductor can be connected to the horizontal grounding component brought out of the ground. Further, the entire system is connected to the busbar through a welded bolt, and from it it is fed to each of the grounded devices separately.
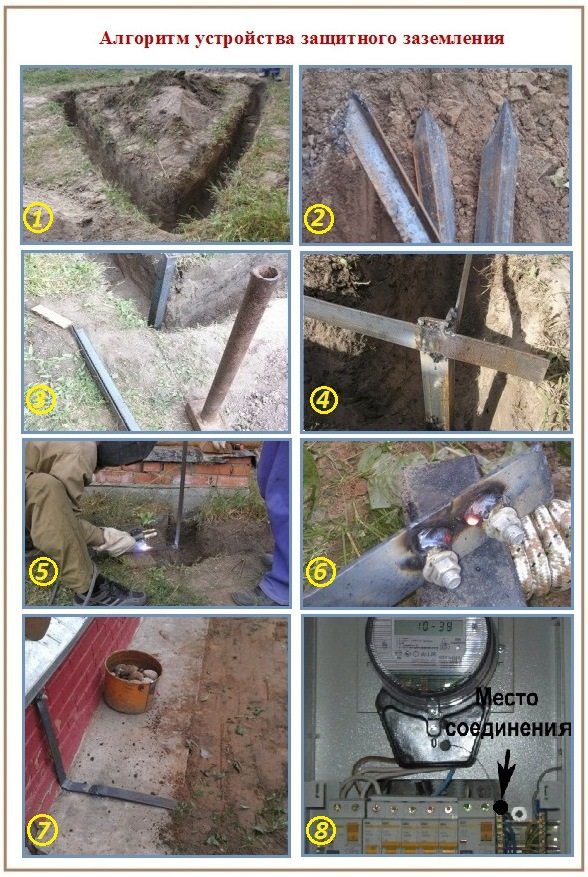
Triangular contour device algorithm
Work order:
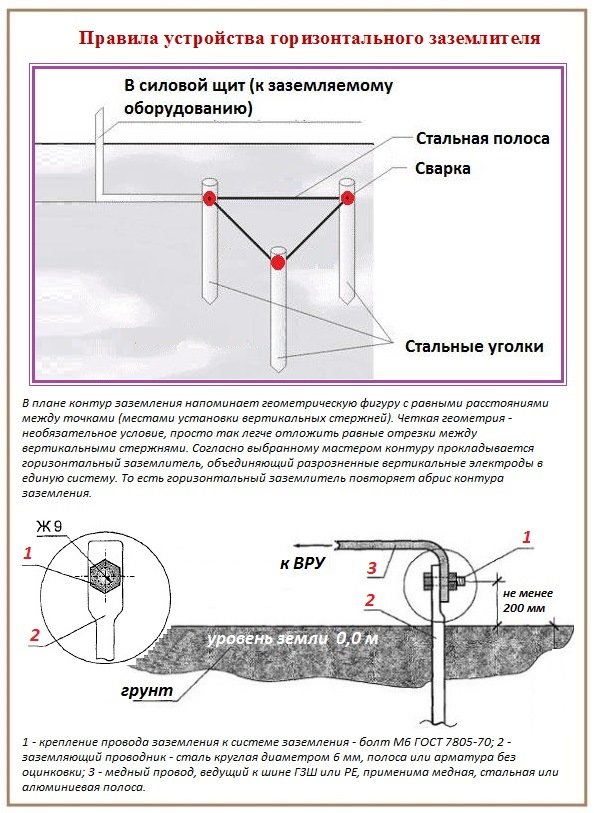
- On the site chosen for the device of the grounding system, we mark the points for laying vertical conductors. These are the vertices of a triangle with sides approximately 1.2-1.4m.
- We outlined the outline of the future trench. It will be triangular with a "sprout" for bringing ground to the entry point to the house or to the outer shield. The choice of the minimum distance from the contour to the shield will save materials. The width of the trench is arbitrary, but taking into account the need for welding work in it. Depth depends on local conditions. 20 cm must be added to the installation level of the horizontal conductor recommended by electricians. For example, if the depth of the horizontal metal connection is 0.8 m, the trench must be deepened by 1.0 m.
- We drive the pre-pointed rods into the points of their installation, periodically wetting the soil around the point of driving with water. The vertical grounding conductor must be almost completely immersed in the ground, with the exception of the extreme 20 cm.
- We weld a horizontal connecting bar to the pieces of electrodes sticking out of the ground.
- From the point closest to the grounded structure, we lead the bar along the section of the trench dug to the power cabinet. We put it on the wall.
- At a convenient point for connecting the bar connected to the cabinet, we weld a steel bolt with the thread outward. Those. a bolt head will be welded to the bar, from which it is necessary to clean off rust and galvanization, if any. To connect the ground to the shield located inside the house, you will need to drill a hole in the wall through which the ground cable will be passed.
- We attach a ground wire to the welded bolt, fasten it with a nut.
- Then we thickly process the welded seams of underground joints with bitumen, fill the outer side joints with automotive silicone sealant.
- We call an electrician with an ohmmeter and check the operation of the created grounding system. The test is carried out in dry weather so that atmospheric moisture does not make adjustments to the readings. According to the standards, the loop resistance should not exceed 4 ohms. If the device confirmed the excess of resistance, the grounding will have to be finalized: install an additional vertical grounding switch and turn the triangle into a rhombus.
- If the readings of the device satisfy the requirements of PUE-7 and confirm the formation of a circuit with a sufficiently low resistance, we bury the trench, the equipment is connected to the ground not in parallel, but separately for each technical unit.
All. The grounding construction process can be considered completed.

Our homes are overflowing with household appliances, and this already poses a certain danger to our health. Therefore, protective grounding is relevant now more than ever. Especially where there are children. You can do it yourself, like me, or you can invite a specialist, and he will do everything necessary. And you can live in peace, without fear for anyone.


